Android Development Patterns: Best Practices for Professional Developers (2016)
Chapter 4. Components
When you’re developing an Android application, having an understanding of the components that make up the application will accelerate the development as well as simplify the process. Knowing how pieces of the architecture work with each other can turn creating an impossible application into an attainable one.
In this chapter, you are introduced to the components that are used by the Android system to pass information and display data to the user. Specifically, you learn about Intents, Activities, and Fragments.
Intents
When it comes to application components, the Intent component is one that is aptly named. You use an Intent to inform the system that you want to start something. You can think of it exactly as it sounds: letting the system know what your intent is.
When using an Intent, you can send two types: an explicit Intent and an implicit Intent. These mostly differ in how you would like the Intent to be interpreted.
An explicit Intent requires that you specify the component you want by using a fully qualified class name. For example, you can use an Intent that calls com.mycompany.MyActivity. This allows specific Activities or services to be called. There are times, however, when you will want other applications to be able to listen to and process your Intent. This is when you would use an implicit Intent.
Note
To keep your application secure, always make sure you are using an explicit Intent. You should also avoid setting up Intent filters that expose your services. This is crucial because any explicit Intents will be processed regardless of any Intent filters you have in place for your application. If another developer were to decompile your code, they would see your services and may end up using them for their own nefarious purposes. To help protect you from making this mistake, Android 5.0+ throws an exception whenever there’s an attempt to usebindService() with an implicit Intent. This serves as a reminder to use an explicit Intent.
If you create an application that processes photos, shares data, or even allows a form of text messaging, you may want to allow the user to decide how this is handled. For the example of processing photos, you can use an implicit Intent to tell the Android system that you would like to use the camera on the device. This would then fire up the basic needs of previewing an image, taking it, and saving it to memory. The image would then be passed back to your application, where you would do your processing and saving. For sharing data or messages, you may want to use an implicit Intent to allow the user to choose from a list of applications they already have installed to complete the sharing process.
Allowing users to choose to use their own applications is potentially a great idea because it may save you in having to develop code that handles connecting to third-party APIs, dealing with developer agreements, and compatibility issues, but allows users to use applications that they are already familiar with and efficient at using. You need to keep in mind, however, that the user may not have any applications installed that will respond to the Intent you are attempting to use. Because it is always wise to have a contingency plan, you should always perform a check to see if the system has an application registered to read your Intent.
To build your Intent, you need to name it, instantiate it, and, then, if making it explicit, give the Intent the information required for the service or Activity to start. The following shows the creation of an explicit Intent:
Intent serviceIntent = new Intent(this, MyApplication.class);
To create an implicit Intent, you can leave out the specific call to the qualified domain class:
Intent shareIntent = new Intent();
Whenever you use an implicit Intent, check with the system to make sure there is an application that can handle your request. This can be done as follows:
if (shareIntent.resolveActivity(getPackageManager()) != null) {
startActivity(shareIntent);
}
Intent Filters
Intent filters are created by adding an <intent-filter> element to your application manifest file. You must include <action>, <data>, and <category> elements as child elements in the <intent-filter>.
The following is a sample Activity that would be included inside of your application manifest XML:
<activity android:name="SharingActivity">
<intent-filter>
<action android:name="android.intent.action.SEND"/>
<category android:name="android.intent.category.DEFAULT"/>
<data android:mimetype="text/plain"/>
</intent-filter>
</activity>
By declaring the Intent filter, you are allowing your application (and in turn your Activities or services) to be available to other applications. It is recommended that you do not use Intent filters for calls from your own application; as mentioned previously, this will expose your services and may be a security concern for your application.
Broadcast Receivers
When an Intent is created and sent, your application needs a way to retrieve it. This is done by creating a broadcast receiver. This is a two-part process: You first create a BroadcastReceiver in a class file and then register the class file inside of your manifest XML with a<receiver> that contains a child <intent-filter> element.
The following demonstrates a Java class that listens for an Intent and displays a toast message when invoked:
public class MyBroadcastReceiver extends BroadcastReceiver {
@Override
public void onReceive(Context context, Intent intent) {
Toast.makeText(context, "Broadcast Received!", Toast.LENGTH_SHORT).show();
}
}
To complete the broadcast receiver, the following demonstrates a <receiver> element that is a child element inside of the <application> element in the manifest XML that invokes the onReceive() method:
<receiver android:name=".MyBroadcastReceiver">
<intent-filter>
<action android:name="com.dutsonpa.helloandroid.MyBroadcastReceiver" />
</intent-filter>
</receiver>
Note that in the <action> element, the name is set to the value that is set when the Intent is created. If it is not added when initialized, the name can be set with the setAction() method that is used on the Intent object.
Broadcast receivers can also be created and destroyed dynamically, as needed, during your application lifecycle. This can be done by using registerReceiver() and unregisterReceiver(). By using these methods, you can make services or activities available only when you need them. Another place you may want to use them is during the onResume() and onPause() methods of your application. The following demonstrates using registerReceiver() in the onResume() method and unregisterReceiver() in the onPause()method:
@Override
protected void onResume() {
super.onResume();
registerReceiver(new MyBroadcastReceiver(),
new IntentFilter(com.dutsonpa.helloandroid.MyBroadcastReceiver));
}
@Override
protected void onPause() {
super.onPause();
unregisterReceiver(MyBroadcastReceiver);
}
Choosing between creating broadcast receivers when needed versus adding them to your manifest XML may come down to your personal preference; however, when starting out it may be more beneficial to add any broadcast receivers to your manifest first so that you have a list of the ones you are using in your application. The system Intents you plan on accessing will also be a factor when choosing to use dynamic versus static broadcast receivers.
Another component that is heavily used in the creation of Android applications is an Activity.
Activities
An Activity can be simply described as one of the screens of your application. The main screen of your application would be one Activity and an options screen would be another Activity. Each Activity is essentially a combination of a layout, widgets, and application components that run when active.
An application can consist of multiple Activities, but can only have one Activity in focus at a time. When an Activity is running and a new Activity is called, the Activity that was running is stopped and placed into the back stack. If a third Activity is called, then the second Activity is also placed into the back stack on top of the first Activity. Activities are stacked this way so that when a user presses the “back” button on their device, the application knows which Activity to display.
Creating an Activity
Creating an Activity is a two-step process: You create a subclass of Activity and then add the Activity to your application manifest. Creating a subclass is generally done by extending Activity or ActionBarActivity. This can be done as follows in your Activity class file:
public class MainActivity extends Activity {
// Overrides, variables, callbacks, and methods go here
}
If your application uses an action bar, you will want to change the class to extend ActionBarActivity, like so:
public class MainActivity extends ActionBarActivity {
// Overrides, variables, callbacks, and methods go here
}
The second step to making your Activity work in your application is to add your Activity to the application manifest. To achieve this, you need to add an <activity> element as a child to the <application> element. If you are adding a new Activity to a project that already has an Activity, you may only need to add an element that specifies the name of your new Activity. In the following example, an Activity named OptionsActivity was created and has been added to the manifest:
<application
android:allowBackup="true"
android:icon="@mipmap/ic_launcher"
android:label="@string/app_name"
android:theme="@style/AppTheme" >
<activity
android:name=".MainActivity"
android:label="@string/app_name" >
<intent-filter>
<action android:name="android.intent.action.MAIN" />
<category android:name="android.intent.category.LAUNCHER" />
</intent-filter>
</activity>
<activity android:name=".OptionsActivity"/>
</application>
The original Activity, named MainActivity, is listed first and has additional options, such as an Intent filter added to it. You can see from the example that if your Activity does not use any Intent filters, it doesn’t need to list them in the application manifest.
I briefly mentioned that Activities follow a lifecycle. This lifecycle helps keep the entire Android system running smoothly and also helps you, as a developer, to ready, write, and maintain data integrity while providing the user the experience they expect.
Activity Lifecycle
The Activity lifecycle is the process that all Activities use in order to be called, run logic, and finish in a structured and reliable manner. This helps the system maintain stability and manage system resources. Some methods, such as finish(), can be called in your Activity to force the Activity to close; however, it is recommended that you allow the Android system to manage when to finish or destroy an Activity.
Every stage of the Activity lifecycle has callback methods that do not all need to be implemented inside of your Activity logic. With that said, the onCreate() callback method is required, and the onPause() method should also be implemented so that you can save data or perform last-minute operations before the Activity is destroyed.
To help you visualize how the Activity lifecycle process works, Figure 4.1 shows the Activity lifecycle.
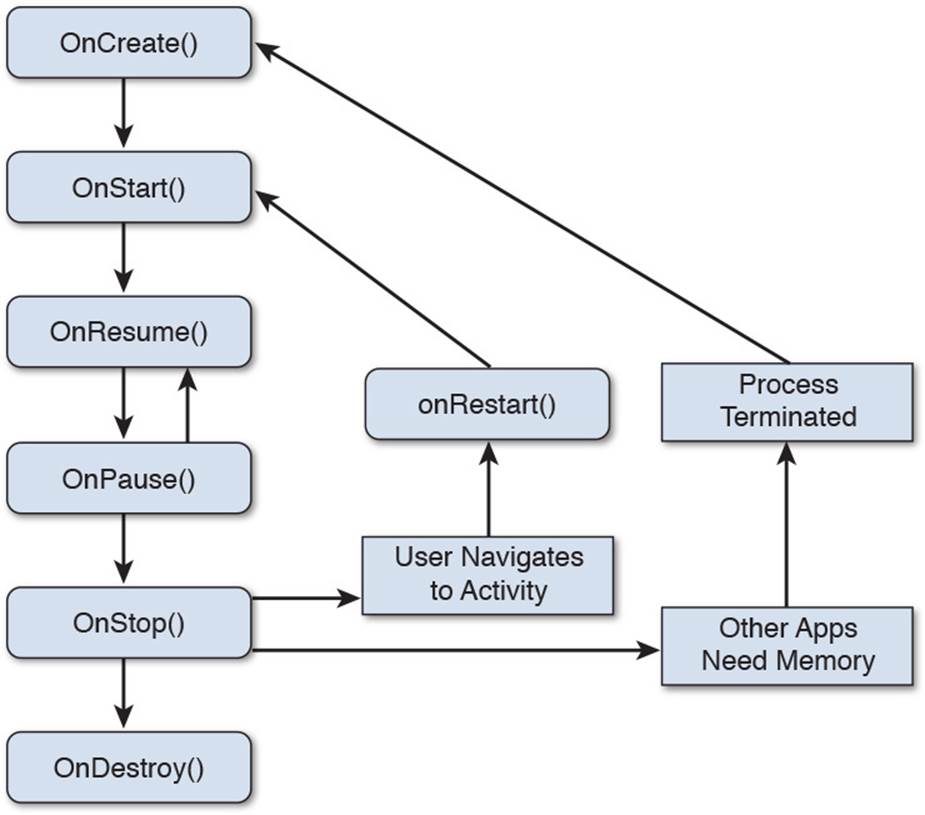
Figure 4.1 When an Activity starts, it follows the cycle demonstrated in this diagram. You can override these methods to perform logic in the various states an Activity cycles through.
Listing 4.1 shows the logic from an Activity that contains the usable Activity lifecycle callback methods along with comments on what each callback does.
Listing 4.1 Activity Callback Methods
public class MainActivity extends ActionBarActivity {
@Override
protected void onCreate(Bundle savedInstanceState) {
super.onCreate(savedInstanceState);
/* This activity is called whenever the application is started
* any variables you need as well as static assets should be
* created in this method
*/
setContentView(R.layout.activity_main);
}
@Override
protected void onStart() {
super.onStart();
// This method runs either before onStop() or onResume()
}
@Override
protected void onResume() {
super.onResume();
// This method happens right before the activity is officially running
}
@Override
protected void onPause() {
super.onPause();
/* This method runs when the application is about to be terminated for
* memory, or when the activity is changed or interrupted by another
* activity such as a phone call. This is the method to use to save
* data and changes
*/
}
@Override
protected void onStop() {
super.onStop();
// This method runs when the activity is stopped but not yet destroyed
}
@Override
protected void onDestroy() {
super.onDestroy();
// Last call before the activity and any data it has will be destroyed
}
}
It is important to note from Listing 4.1 that each callback method uses a super method to extend the implementation. Failing to use the super method results in an error and causes your application to fail when it is compiled. As documented in each method in the listing, each callback has a different purpose and allows you to perform different actions.
Tip
Although it may be tempting to do your final save or processing of data in the onDestroy() method, this is not a suitable method for doing final work. Depending on the resources needed by the system, this method may be executed and finished before your operations and will leave your application in a broken state. Stick to getting your data-saving work done in the onPause() callback.
Another component that extends the functionality of an Activity is a Fragment.
Fragments
When the first Android tablets started to appear on the market with Android 3.0 (Honeycomb), developers were given their first glance at how Fragments can be used to change the layout and structure of an application. Users were finally given devices that had displays large enough to allow more than a single-line list item or line of text to be shown. Email apps could now have a list of emails on one-third of the screen with a large preview window taking up the other two-thirds. The most amazing part was that the same application could be run on a smaller device, with the list taking up the full screen and the preview being shown when tapped.
When working with Fragments, you will get the greatest benefit by thinking of your Activities as reusable modules. This allows you to focus on creating complete Fragments that don’t require or rely on the functionality of other Fragments in order to work. This also has the added benefit of making sure that each Fragment will behave as expected on a device that only supports viewing one Fragment at a time.
Creating a Fragment
Creating a Fragment is similar to creating an Activity, although there are a couple of subtle differences. You first need to create a subclass that extends the Fragment class. Note that you do not need to create separate class files. If you have an Activity that uses a Fragment, you can place the Fragment code within the same class file You will then need to implement at least a couple of the Fragment lifecycle methods. Finally, if you want your Fragment to have a UI, you will need to return a View.
As with Activities, Fragments have a lifecycle with callback methods. The following lists the methods that can be included in your Fragment:
![]() onAttach(): The first stage of Fragment initialization.
onAttach(): The first stage of Fragment initialization.
![]() onCreate(): When the Fragment is created, the logic here will be processed.
onCreate(): When the Fragment is created, the logic here will be processed.
![]() onCreateView(): When the Activity that the Fragment has been included in returns from the Activity stack, the logic here is run as part of the resuming process.
onCreateView(): When the Activity that the Fragment has been included in returns from the Activity stack, the logic here is run as part of the resuming process.
![]() onActivityCreated(): The Activity the Fragment is in has been fully created or resumed.
onActivityCreated(): The Activity the Fragment is in has been fully created or resumed.
![]() onStart(): Called when the Fragment has been started.
onStart(): Called when the Fragment has been started.
![]() onResume(): This will run when the Fragment resumes, and is the last point for logic changed before the Fragment is considered active.
onResume(): This will run when the Fragment resumes, and is the last point for logic changed before the Fragment is considered active.
![]() onPause(): As the Fragment is placed into the back stack, the logic here is processed.
onPause(): As the Fragment is placed into the back stack, the logic here is processed.
![]() onStop(): The Fragment is going to be destroyed soon, so the logic can be run here.
onStop(): The Fragment is going to be destroyed soon, so the logic can be run here.
![]() onDestroyView(): The current view is going to either load the Fragment back to the Activity cycle through onCreateView() or be destroyed.
onDestroyView(): The current view is going to either load the Fragment back to the Activity cycle through onCreateView() or be destroyed.
![]() onDestroy(): The Fragment is going to be destroyed; this is the last chance for the logic to be run before the Fragment is destroyed and detached from the view.
onDestroy(): The Fragment is going to be destroyed; this is the last chance for the logic to be run before the Fragment is destroyed and detached from the view.
![]() onDetach(): As the Fragment is removed, this is the last method you can work with as part of the Fragment-destroy process.
onDetach(): As the Fragment is removed, this is the last method you can work with as part of the Fragment-destroy process.
Fragments also contain a lifecycle. Figure 4.2 shows how the fragment lifecycle works.
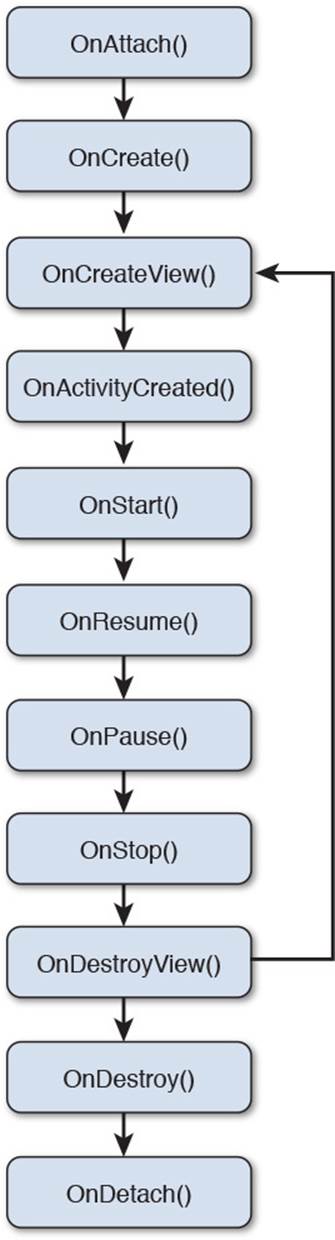
Figure 4.2 Fragments have a lifecycle as well as methods that can be overridden, similar to Activities. However, the flow differs in Fragments moving to the bottom or top of the stack.
As when working with Activities, you are not required to use all of the lifecycle callbacks, but it is encouraged that you include at least one of the create and onPause() methods. The following shows a sample Fragment class:
public class PlaceholderFragment extends Fragment {
public PlaceholderFragment() {
}
@Override
public View onCreateView(LayoutInflater inflater, ViewGroup container,
Bundle savedInstanceState) {
View rootView = inflater.inflate(R.layout.fragment_main, container, false);
return rootView;
}
@Override
public void onPause() {
super.onPause();
// logic should go here for handling the fragment data
}
}
Inside of the onCreateView() method, a LayoutInflater is used along with a ViewGroup. This is done to add the UI from the Fragment to the final layout. This happens when return rootView executes, as the layout requires a View to be returned in order to properly add the Fragment as part of the layout.
The onPause() method has been included to show the similarity between the Fragment and Activity logic. Just as you should be putting any saving logic inside of the onPause() callback method in an Activity, you should do the same with your Fragment. This way, the logic will have time and be certain to finish rather then relying on the onDestroyView() or onDestroy() callback method.
After you create your Fragment, you need to add the Fragment to the Activity layout XML file. Depending on your chosen layout and Fragment implementation, this can be as simple as adding a <fragment> element with the properties you want set inside of your layout. The following is an example of the layout XML with two Fragments:
<LinearLayout xmlns:android="http://schemas.android.com/apk/res/android"
android:orientation="horizontal"
android:layout_width="match_parent"
android:layout_height="match_parent">
<fragment android:name="com.cookbook.fragments.ItemFragment"
android:id="@+id/item_fragment"
android:layout_weight="1"
android:layout_width="0dp"
android:layout_height="match_parent" />
<fragment android:name="com.cookbook.fragments.TextFragment"
android:id="@+id/text_fragment"
android:layout_weight="2"
android:layout_width="0dp"
android:layout_height="match_parent" />
</LinearLayout>
Communicating with Fragments
Even though Fragments should be created and treated as individual modules, they will probably need to pass data to the Activity that is loading the Fragment. Fragments can access objects in the Activity by using the getActivity() method. Views can be accessed by chaining thefindViewById() method to the getActivity() method. For example, a ListView that exists in the Activity could be accessed from the Fragment with the following code inside the Fragment:
View listView = getActivity().findViewById(R.id.list);
If you need to pass data from a Fragment to an Activity, you will need to create a callback method via a public interface inside your Fragment. After you create the interface, you can extend your Activity to include it.
The following shows a sample public interface from inside of a Fragment class:
public interface OnItemSelectedListener {
public void onItemSelected(int position);
}
Now that the interface has been created, it can be added to an Activity and then accessed by instantiating it. The following shows sample code from an Activity that adds the interface and sets up an object to use it:
public class MainActivity extends FragmentActivity
implements ItemFragment.OnItemSelectedListener {
//...
ItemFragment firstFragment = new ItemFragment();
//...
@Override
public void onAttach(Activity activity) {
super.onAttach(activity);
try {
mListener = (OnItemSelectedListener) activity;
} catch (ClassCastException e) {
throw new ClassCastException(activity.toString() + " must implement OnItemSelectedListener");
}
}
}
Note that in the previous code, the ItemFragment should be called from inside of an Activity lifecycle callback method such as onCreate(). It should also be noted that the onAttach() callback method has been added. In the onAttach() method, a try/catch statement is used to help detect whether the interface has been implemented. Because this pseudo-code example is short, it would be fairly easy to spot if the interface has not been implemented. In your code, however, there may be hundreds of lines of code and you may not be sure if you have implemented the interface. The try/catch will come in handy because you will get an exception that tells you which Activity and which interface it is that was missed. If the interface was properly implemented, the mListener is defined so that it can be used to pass events from the Fragment to the Activity.
Another way to load data into either a Fragment or an Activity is to use a Loader.
Loaders
The Loader is a wonderful component that can be used on both Activities and Fragments. A Loader has the ability to asynchronously collect data and deliver it. It also has the ability to monitor for changes, which makes it great to use in Fragments because it can poll for a change.
Because many Loaders may be used, a LoaderManager is used to manage the ones in your Activity or Fragment. This is most easily accomplished by using getLoaderManager() and then using initLoader() to make sure that the Loader has been created, and if it has previously been created, to reuse it. In order to determine whether the Loader has been created, an ID is passed to the initLoader() method. The following line shows these methods in use:
getLoaderManager().initLoader(0, null, this);
Here, 0 is the ID of the loader, the null value is passed in lieu of additional arguments, and this is used because the third argument of initLoader() needs a LoaderManager.LoaderCallbacks implementation.
There may be occasions when you reuse the Loader but want to discard the data that was previously used with it. This can be accomplished by using restartLoader() in one of your state-change methods. This would appear as follows:
getLoaderManager().restartLoader(0, null, this);
Implementation of LoaderCallbacks is generally done with a Cursor. The following is an example of implementing on a Fragment class:
public class MyFragment extends Fragment
implements LoaderCallbacks<Cursor> {
// fragment class code
}
To manage connections, data, and cleanup, you need to implement three methods that are part of LoaderCallbacks: onCreateLoader(), onLoadFinished(), and onLoaderReset(). When initLoader() is called, onCreateLoader() is called automatically. Because the previous example used a CursorLoader, the following demonstrates how the onCreateLoader() is used with a CursorLoader:
public Loader<Cursor> onCreateLoader(int id, Bundle args) {
CursorLoader loader = new CursorLoader(
this.getActivity(),
CONTENT_URI,
projection,
selection,
selectionArgs,
sortOrder);
return loader;
}
In the previous example, the CursorLoader object is created, populated, and then returned. Some developers find it easier to instead create the variables separately and then return and declare the new object at the same time. This is programmer preference, and you should follow the method that fits your coding standard and style.
The onLoadFinished() method is called when a load is finished. It is guaranteed to execute and is a good place to do data management. However, you should not close the cursor here because the Loader will handle that by itself. The following is an example of swapping data without closing the cursor:
SimpleCursorAdapter myAdapter;
public void onLoadFinished(Loader<Cursor> loader, Cursor data) {
myAdapter.swapCursor(data);
}
The onLoaderReset() callback method is used when a previously created Loader is reset rather than being reused. Using this method is fairly straightforward because it relies on only having access to the adapter being used to hold data, and then calling the swapCursor()method on it and passing a null value. The following shows an example of a SimpleCursorAdapter being reset:
SimpleCursorAdapter myAdapter;
public void onLoaderReset(Loader<Cursor> loader) {
myAdapter.swapCursor(null);
}
Summary
In this chapter, you learned about Intents and how they are used to start various processes and communicate with the Android system. You learned that there are implicit and explicit forms of Intents and that each has a benefit to being used. You learned that Intent filters allow your application to answer Intent calls from other applications. This is especially helpful when allowing the user to use functionality that they may be used to using inside of another application.
You also learned about Activities and how each Activity can be thought of as a display screen inside of your application. You learned that Activities are created by using Java and by adding them to your application manifest XML. You also learned that Activities have a lifecycle that is used to manage how they are interacted with and that this lifecycle can be accessed via callback methods. These methods allow you to make sure that data integrity is maintained and that users have a seamless experience.
You then learned about Fragments and how they are used to create applications that take full advantage of available screen space by combining what would otherwise be Activities into a shared Activity. You also learned that, like Activities, Fragments follow a lifecycle with callback methods that you can use. You also learned that Fragments can communicate with each other and pass events back and forth.
Finally, you learned about Loaders and the role they play in asynchronously getting data that can be used in either Activities or Fragments. You learned how they are created, reused, and even reset.
All materials on the site are licensed Creative Commons Attribution-Sharealike 3.0 Unported CC BY-SA 3.0 & GNU Free Documentation License (GFDL)
If you are the copyright holder of any material contained on our site and intend to remove it, please contact our site administrator for approval.
© 2016-2026 All site design rights belong to S.Y.A.