Android Development Patterns: Best Practices for Professional Developers (2016)
Chapter 3. Application Structure
With the decision to change the supported development platform from the ADT bundle to Android Studio also came the decision to start using Gradle as the build system. This opened the door for many developers to start assembling Android applications in a more collaborative way and changed the file structure with which prior projects were built.
In this chapter, you learn the new file system structure as well as the types of files you can include in your project, including where XML files are located, where image assets are stored, and where the Gradle build files are stored.
When you create an application in Android Studio, you find that the project is divided into an App folder and Gradle scripts. Figure 3.1 shows this structure.
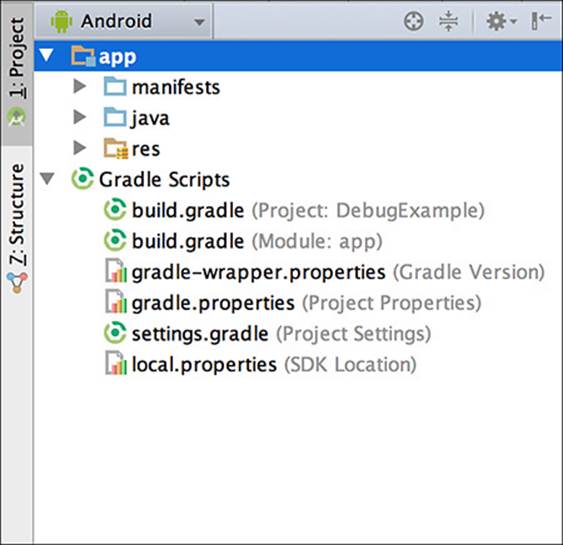
Figure 3.1 The App folder and the Grade Scripts section are visible in the Project window.
The App folder contains three subfolders that house the files and resources that make up your application. They are divided so that it should be fairly easy to determine which assets go in which folder; however, those new to application development or those looking to migrate from the older Eclipse-based development model might not be certain where files should go. To make this easier, I walk you through each folder and what it contains.
Manifests
The manifests folder lives up to its name. This is where you would put your manifest files. Depending on your target, you may have only one manifest file, or you may have several. You may have several manifest files due to application versioning, or even for supporting specific hardware.
A manifest file is generated by Android Studio when you create a project. Listing 3.1 shows a generated manifest file.
Listing 3.1 Contents of a Generated Manifest File from Android Studio
<?xml version="1.0" encoding="utf-8"?>
<manifest xmlns:android="http://schemas.android.com/apk/res/android"
package="com.dutsonpa.helloandroid" >
<application
android:allowBackup="true"
android:icon="@drawable/ic_launcher"
android:label="@string/app_name"
android:theme="@style/AppTheme" >
<activity
android:name=".MainActivity"
android:label="@string/app_name" >
<intent-filter>
<action android:name="android.intent.action.MAIN" />
<category android:name="android.intent.category.LAUNCHER" />
</intent-filter>
</activity>
</application>
</manifest>
If you have worked with an Android manifest file before, this file should look familiar. It is an XML file and as such begins with a declaration of <?xml version="1.0" encoding="utf-8"?>. This is done so that the application knows how to handle the information contained within the file. Because it has been declared as an XML file, you will find that options and settings inside this file consist of elements that may contain attributes. The next element after the declaration is a prime example.
The <manifest> element contains some attributes: the XML namespace for Android and the package name for your application. The package name is the one you created when you started the project. The <manifest> element can also contain child elements.
In Listing 3.1, there is only one child element: the <application> element. This contains more attributes that will affect how your application is displayed as well as if the user is allowed to have the application be backed up. Other child elements may include any Activities, Intents, Providers, Receivers, Services, and so on, that the application will need to use.
Your manifest may also contain other elements, such as the <uses-permission> element. This element is both the bane and balm of the application developer. By allowing your application some access to system functionality, you can create applications that appear to be pure magic, giving users access to everything they want when they want it. This unfortunately can also cause some very scary messages to be displayed to the user when they install your application. A user is much more likely to install your application if you ask for only what you absolutely need in order to accomplish a task rather than requesting the keys to the kingdom and promising that you won’t compromise the user or their personal data.
Note
You may have previously used <compatible-screens> elements to target specific screen sizes for your application. This is no longer an encouraged method of creating applications. Instead, you should use different layout resources to allow as many users as possible to enjoy and use your application.
Due to the nature of XML, the order in which you add or remove elements does not matter as much as the child-parent relationship. However, note that the official documentation lists that the following elements be ordered as shown in the following pseudo-code:
<manifest>
<uses-permission />
<permission />
<permission-tree />
<permission-group />
<instrumentation />
<uses-sdk />
<uses-configuration />
<uses-feature />
<supports-screens />
<compatible-screens />
<supports-gl-texture />
<application>
<activity>
<intent-filter>
<action />
<category />
<data />
</intent-filter>
<meta-data />
</activity>
<activity-alias>
<intent-filter></intent-filter>
<meta-data />
</activity-alias>
<service>
<intent-filter></intent-filter>
<meta-data/>
</service>
<receiver>
<intent-filter></intent-filter>
<meta-data />
</receiver>
<provider>
<grant-uri-permission />
<meta-data />
<path-permission />
</provider>
<uses-library />
</application>
</manifest>
You may be tempted to invent and add your own elements; however, you should know that the manifest is parsed for a specific set of elements and when custom elements are found it will cause an error. This is also true when using custom attributes inside of elements.
Java
The java folder is self-explanatory. This is the folder in your project where you will be storing all of the Java files you use to create and work with your application.
All of your classes will be available here, and Android Studio will even bundle together the package path so that you can work with the files without having to drill down through the folders that make up your package.
You are not limited to keeping your classes inside of the package root. Just like when working with other Java applications, you are free to create subdirectories that make sense and place your classes inside of them.
For example, if you were working with database connections and wanted all of your data classes to reside in an easy-to-use storage location, you could create a “data” folder and place your classes inside.
Depending on how you are creating your application, you may be able to import your classes for use inside of your MainActivity. If I had created a class for database work named MyDB and placed it in the “data” folder, I would use the following import to use it inside of myMainActivity:
import com.dutsonpa.HelloAndroid.data.MyDB;
When working with your own project, you need to change the domain (dutsonpa) and application name (HelloAndroid) to match.
Res (Resources)
The manifest and java folders have so far held the essential portions of the application that allow it to be installed and the logical portion of your application. The “res” folder switches things up a little bit by controlling the layout, media, and constants that will be used in your application. The folder is thus named due to it containing all of the resources that your app relies on. It contains folders that help you separate and sort the resources of your application.
When you use Android Studio to create a new application, some folders will be automatically generated for you. However, these folders are not the only ones you can use in your project. The following are the folders that can be used inside of the res folder.
Drawable
The drawable folder contains all the visual media and resources that your application will need to use. Table 3.1 shows drawable types that you can place and use inside of this folder.
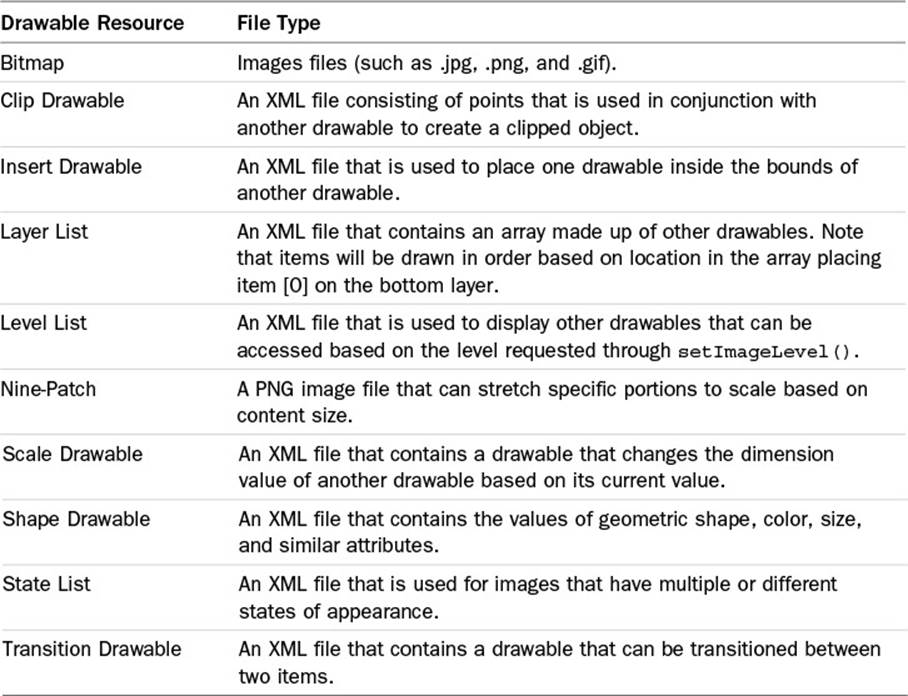
Table 3.1 Resource Files for Drawable Folder
When working with Android Studio, be aware that not all folders may be shown for your resources. On your file system, you may have separate drawable, drawable-hdpi, drawable-mdpi, and drawable-xhdpi folders, with each containing a resource that is named the same but that is to be used specifically for a different display density. In Android Studio this resource will be shown in the drawable folder as a folder that can be expanded, with the resource it will be used with in parentheses. Figure 3.2 shows how Android Studio displays resources with the same name in folders that are pixel density dependent.
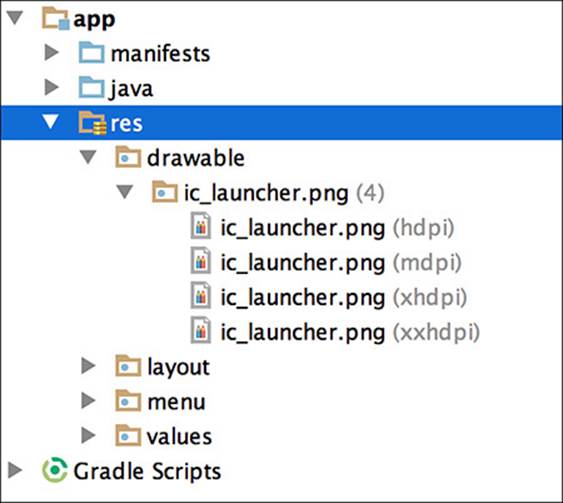
Figure 3.2 The ic_launcher.png file is several folders, but is displayed as a single resource with density-specific versions shown when the main resource is expanded.
Layout
The layout folder houses the XML files used for your layouts. The default layout file is named after your Activity, which if you created a new project in Android Studio and selected the default settings would be activity_main.xml.
This file is used to set up the layout for your Activity and is used for basic alignment of your layouts, components, widgets, and similar assets that are used for the UI of your application.
Similar to the drawables folder, you may have multiple layout folders to handle different devices. This can be helpful when working with layouts that need to be adjusted for devices with more or less screen space available. Developers who are used to working with Fragments to change the layout of the page will be pleased that they can now use a separate layout file that will automatically be used rather than having to work with a Fragment.
To use a separate layout based on screen size, you need to specify the layout based on the dp unit width or height of the device and place it as the filename. The dp unit stands for density independent pixel. This unit allows you to use relative measurements that will not be off when used on devices with different physical pixel resolutions. For example, tablets that are 7" and larger will generally have a width of 600dp units; this allows you to create a folder named layout-sw600dp and place your layout XML file there. When the application is opened, it will check to see which layout should be used and display the layout appropriate for the device.
Layouts can also be supported based on screen density based on dots-per-inch (dpi) by using folders that are named based on the density, as listed:
![]() ldpi: Used with screens that have ~120dpi.
ldpi: Used with screens that have ~120dpi.
![]() mdpi: Used with screens that have ~160dpi.
mdpi: Used with screens that have ~160dpi.
![]() hdpi: Used with screens that have ~240dpi.
hdpi: Used with screens that have ~240dpi.
![]() xhdpi: Used with screens that have 320dpi.
xhdpi: Used with screens that have 320dpi.
![]() xxhdpi: Used with screens that have ~480dpi.
xxhdpi: Used with screens that have ~480dpi.
![]() xxxhdpi: Used with screens that have ~640dpi.
xxxhdpi: Used with screens that have ~640dpi.
![]() nodpi: Resources here will be used on all densities.
nodpi: Resources here will be used on all densities.
![]() tvdpi: Used on screens sized between mdpi and hdpi, approximately 213dpi.
tvdpi: Used on screens sized between mdpi and hdpi, approximately 213dpi.
Menu
If you opted to create or add a menu to your application, the XML that defines your menu resides in this folder. You have the option of creating whatever name you would like for your menu, but if you created a new project in Android Studio and used the default options, you will find that your menu have been named menu_main.xml.
This naming convention is actually quite helpful because it identifies what the XML file is for “menu” and what activity is assigned to “main.”
Values
The values folder is used to keep track of the values you will be using in your application. To create applications with an easier maintenance cycle, it is highly recommended to no longer hard-code values into your code. Instead, place values in XML files inside of the values folder.
Here’s an example of this:
// Hard-coding a resource
<TextView
android:text="Hello Android!"
android:layout_width="wrap_content"
android:layout_height="wrap_content" />
// Using a value from /res/values/strings.xml
<TextView
android:text="@string/hello_android"
android:layout_width="wrap_content"
android:layout_height="wrap_content" />
In the previous example, the value shown in the TextView would change based on the string entered into strings.xml. The following is an example of a strings.xml file:
<?xml version="1.0" encoding="utf-8"?>
<resources>
<string name="hello_android">Hello Android!</string>
</resources>
When you create a new project with Android Studio, the following XML files will be generated automatically:
![]() dimens.xml
dimens.xml
![]() stings.xml
stings.xml
![]() styles.xml
styles.xml
By looking at these files, you’ll notice that each of them is an XML file with a parent element of <resources>. This may lead you to think that you could put all of your values in one XML file and use it inside your application. Although this is something you can do, for the sake of maintaining your application and knowing exactly where your data is, it is strongly recommended that you break your values into multiple files. The following list of files may be used in your application to help keep different values separated:
![]() arrays.xml
arrays.xml
![]() colors.xml
colors.xml
![]() dimens.xml
dimens.xml
![]() strings.xml
strings.xml
![]() styles.xml
styles.xml
Each file is clearly named so that you know exactly what you are dealing with. Also, each file is named after the element that would be placed in a parent <resource> element. For example, color values would reside in a <color> element that is a child of the <resource>element.
Other Resources
You can create other folders for other resources in your application. Table 3.2 lists each folder name as well as what should be stored in that folder.
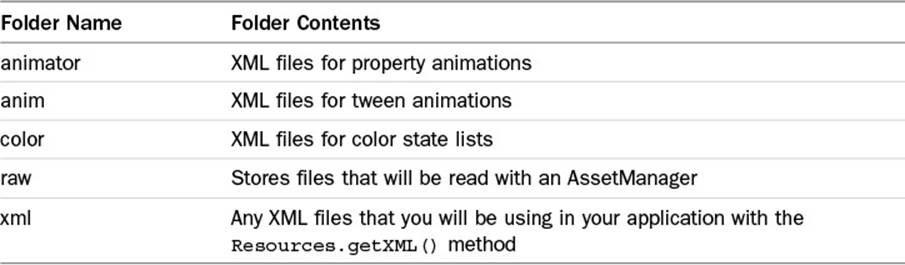
Table 3.2 Application Resource Folders
Tip
You may be wondering where to place audio files that your application uses. You can store them in /res/raw and access them with R.raw.audio_file. This eliminates the need for any other project-level folders and keeps your res folder organized.
Gradle
With Android Studio, the decision was made to leave ant for project building and move to Gradle. To help you manage your build files, Android Studio adds a section named Gradle Scripts to your project. When expanded, Gradle Scripts will show you your build configuration file, properties, and setting files.
When you are migrating a project created with Android Studio, you may find that you need to adjust some of these settings to match newer versions of Gradle or of the build tools used. You can see the current settings by viewing the build.gradle file in your app folder. Listing 3.2 shows a sample build file.
Listing 3.2 Abuild.gradleFile for an Android Application
apply plugin: 'com.android.application'
android {
compileSdkVersion 21
buildToolsVersion "21.1.2"
defaultConfig {
applicationId "com.dutsonpa.helloandroid"
minSdkVersion 15
targetSdkVersion 21
versionCode 1
versionName "1.0"
}
buildTypes {
release {
minifyEnabled false
proguardFiles getDefaultProguardFile('proguard-android.txt'),
'proguard-rules.pro'
}
}
}
dependencies {
compile fileTree(dir: 'libs', include: ['*.jar'])
compile 'com.android.support:appcompat-v7:21.0.3'
}
When you’re migrating or upgrading your application, the lines you need to pay the most attention to are the compileSdkVersion, buildToolsVersion, minSdkVersion, and targetSdkVersion. If these numbers do not match what you have installed on your system, you will see compilation errors and your application will fail to launch on an emulator or device, or even compile.
The other Gradle files should be managed by Android Studio and will be updated as need when your project is built and compiled. If you want to learn more about Gradle, visit the official website: https://gradle.org/.
Summary
In this chapter, you learned about the components that make up an Android application. You learned that with the change from Eclipse with the ADT plugin to Android Studio as the development IDE, the project structure and application assets are stored in different locations.
You learned about the application manifest and the various elements that can be included, such as the security elements that allow your application to access system resources to further extend the functionality of your application.
You also learned that you can use folders that contain assets for specific devices based on the device screen density. This allows you to create specific layouts for multiple devices without having to resort to using Fragments for layout changes.
Finally, you learned that Android Studio uses the Gradle build system and that some problems can be avoided by making sure that it has been configured for your environment.