Android Development Patterns: Best Practices for Professional Developers (2016)
Chapter 8. Application Design: Using MVC
Creating your first Android application exposes you to how an application is put together, but it does not give you an understanding of how the application is wired together. Each piece of the application works together to create an experience that transfers data between the user and the device.
This chapter introduces you to Model-View-Controller (MVC) architecture. This architecture style meshes well with Android development, and you are shown how various Android components fit this style of development. This includes working with asynchronous methods, threads, tasks, content providers, and services.
The MVC pattern has been used in software development for many years and is a clean architecture style that allows developers to separate business or application logic from display logic.
The Model manages data and really only cares about the data’s integrity. The View is what is shown to the user and serves as the interaction point at which a user can manipulate data. The Controller is the glue that holds the system together; it allows for transport and accessibility between the Model and the View. Figure 8.1 shows how this process works.
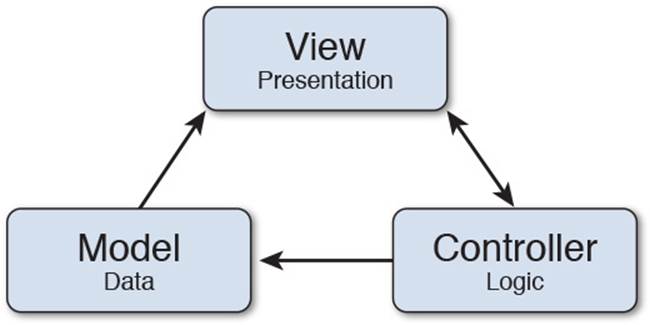
Figure 8.1 A diagram of the Model-View-Controller architecture demonstrates how the logic, data, and presentation layers work together.
Model
The primary role of a Model is to contain and manage data. In Android development, a component that acts like a Model is a content provider. A content provider not only allows you to collect and create connections to data in your application, but it allows you to create a resource that multiple applications can access.
Access to content providers from other applications requires them to have permission to access the data that will be returned. This allows users to be informed of what an application will have access to, including content providers that you have created to share data.
Some system content providers are available for use and will require you to specify permissions for access in your application. If you do not plan on sharing your content provider with any other applications, you do not need to worry about setting up extra permissions because content providers will always have read and write access from the application in which they originate.
The data that is stored in a content provider is placed in a table (similar to a rational database such as SQLite). This allows you to update, insert, and delete data in the content provider.
Running an update, insert, or delete will require you to use one of the matching methods in ContentResolver.
Here’s how to update data in a content provider:
getContentResolver().update(Uri uri, ContentValues values, String where,
String[] selectionArgs);
Note that uri is the Uniform Resource Identifier (URI), which is used to define the location of the content provider. The values are the new field values, with the key being the column name. Be aware that passing a null will erase the data in the specified column. The where value is a filter that mimics the functionality of an SQL WHERE statement. This allows you to be specific with the data that should be updated. The selectionArgs are used as the binding parameters for the selection or values. Depending on the update you are making, the value passed for selectionArgs may be null.
This method will return an int of the number of rows that were updated.
Here’s how to insert data into a content provider:
getContentResolver.insert(Uri url, ContentValues values);
The value of url should be the URL that represents the table into which you are going to insert data.
The values passed through values should be the initial values that will be used when the new row is created. The key used will be the column name, and passing a null value will create an empty row.
This method will return the URL of the newly created row.
Here’s how to delete data from a content provider:
getContentResolver.delete(Uri url, String where, String[] selectionArgs)
Similar to the other methods, the url should be the URI of the table or content provider that contains the row to be removed.
The where should contain the values that help you make a specific selection. This is used the same as a WHERE statement would work in SQL. After the method is run, it will return an int of the number of rows that were deleted.
Note
When working with content providers, you may notice that the built-in content providers contain a column name constant of _ID due to it being a requirement of Android SQLite. This is not necessarily a required column; however, if you create your own content provider and want to display the contents of it in a ListView, then you must have this column.
View
In MVC architecture, the View is exactly what it sounds like: the portion of the application that the viewer views. The View is responsible for dealing with visual display and translating user input into data that can be handled by the rest of the application.
In Android development, this boils down to Views and Activities. These were covered in detail in Chapter 5, “Views,” so refer to that chapter for a refresher. To summarize, Activities are used to manage a single set of events. This means that when an application is launched, the Activity begins a lifecycle. This lifecycle is as follows:
1. The Activity is launched.
2. The onCreate() method is run.
3. The onStart() method is run.
4. The onResume() method is run.
5. The onPause() method runs when the user leaves the Activity, and onResume() is run when the user returns to the Activity. This may include system dialogs.
6. The onStop() method is called when the Activity is no longer viewable to the user. If the user returns, the onRestart() method will run before the application is reinstituted into the lifecycle by calling onStart() again.
7. The onDestroy() method is called when the Activity has been determined by the system to be closed down and has any resources reallocated back to the system.
An Android view will contain the visible and intractable pieces that are shown to the user by displaying widgets and custom views.
Through the addition of event listeners, such as onClick(), onLongClick(), and onKey(), information is allowed to pass between the presentation (the View of MVC) to the controller, which ties the Model and View together.
Controller
As previously mentioned, the Controller is responsible for holding the system together by facilitating the exchange of data between the View and the Model.
In Android development, the Controller can be thought of as the logic that is placed inside of event handlers as well as services.
A service is a component that can perform operations that are on going or that need to run for extended periods of time. A service can continue to run even when the user switches to another application; however, unless strictly specified, it is part of the application. This means that when the application is destroyed, the service will also be terminated.
An example of service behavior is starting media, such as an audio stream, and then changing to the home screen or another application while the audio is still playing. You may also use a service to fetch news, RSS feeds, or even stock listings.
Services require registration in the application manifest XML file. This can be set as a <service> element with a name:
<manifest>
<!-- other manifest elements -->
<application>
<service android:name=".myService" />
<!-- other manifest elements -->
</application>
<!-- other manifest elements -->
</manifest>
For security reasons, note that the <service> element does not contain an Intent filter. This means that you will need to call this service explicitly.
Services have two states: started and bound. Both states are similar in starting a service, but different in how they handle data returns.
In the started state, you call the startService() method to inform the system that you need to have the service scheduled to start. The service will then be started and run to completion. When finished, the service will self-terminate. In rare circumstances, it will return information back to the application.
To start a service through the startService() method, you can implement the following:
Intent intent = newIntent(this, MyService.class);
startService(intent);
In the bound state, the service is connected to an application via the bindService() method. This allows information to be passed from service to application and back. When you set a service in this state, it will only be active as long as a component is actively connected to the service. Should the connections to it stop, so will the bound service.
To start a bound service, you can implement the following:
Intent intent = new Intent(this, MyService.class);
bindService(intent, myConnection, 0)
The three arguments passed here are the Intent service, a ServiceConnection, and flags. Depending on what you need your service to do, you may wish to pass different flag values. Here are the possible values you can use:
![]() BIND_AUTO_CREATE: Creates the service as long as the binding exists.
BIND_AUTO_CREATE: Creates the service as long as the binding exists.
![]() BIND_DEBUG_UNBIND: Saves the callstack from unbindService for viewing or printing. This does cause a memory leak, however.
BIND_DEBUG_UNBIND: Saves the callstack from unbindService for viewing or printing. This does cause a memory leak, however.
![]() BIND_NOT_FOREGROUND: Stops the service from gaining a higher priority than the application.
BIND_NOT_FOREGROUND: Stops the service from gaining a higher priority than the application.
![]() BIND_ABOVE_CLIENT: Used to inform the system that the service is more important than the application.
BIND_ABOVE_CLIENT: Used to inform the system that the service is more important than the application.
![]() BIND_ALLOW_OOM_MANAGEMENT: Allows the process used to manage the service to be treated as a normal application, allowing restarts and candidacy for termination based on the time it has been running.
BIND_ALLOW_OOM_MANAGEMENT: Allows the process used to manage the service to be treated as a normal application, allowing restarts and candidacy for termination based on the time it has been running.
![]() BIND_WAIVE_PRIORITY: Allows the system to perform schedule and memory management.
BIND_WAIVE_PRIORITY: Allows the system to perform schedule and memory management.
![]() 0: Used when you do not want to specify a value.
0: Used when you do not want to specify a value.
Should you find that you need a service that can run indefinitely and be allowed to enable application components to bind, you can use the onBind() callback method. When implementing logic that uses the onBind() method, remember that you may want or need to use theonUnbind() method.
Services also have an onCreate() method that runs when the service first starts as well as an onDestroy() method that runs upon service termination.
Note
Application performance can be severely compromised if you are performing CPU-intensive operations on the main application thread. When using a service, make sure to start a new process for the service. Failure to do so may end in an Application Not Responding (ANR) error.
Starting a service from an IntentService allows long-running services to be managed on a separate thread from the main UI thread and should be strongly considered when creating services to use with your application.
Working Asynchronously
When creating an application, there are times when you may want to perform an action without interrupting application processing. This process is known as asynchronous processing and is not limited to application development.
Web developers have struggled against loading scripts and processes for years. In HTML5, the addition of the async property to a <script> element allows scripts to be queued up and requested without stopping the rendering of the web page.
Android applications are visually run on one UI thread that is not thread-safe. This means that you must do all visual updates on the UI thread, but it also means that you cannot use operations that slow down or interrupt the UI thread, such as network or Web API operations. If you do manage to interrupt the thread, your application will stall and you may experience an ANR error due to exceptions being thrown by the system.
To get around the limitations of the UI thread, you can create worker threads. This still requires a bit of finesse because you have to be careful not to create a process that is not thread-safe. You can leverage three methods to help maintain thread-safe operations:
![]() runOnUiThread(Runnable action): Will queue the task to run on the UI thread. If the task is already on the UI thread, it will run immediately.
runOnUiThread(Runnable action): Will queue the task to run on the UI thread. If the task is already on the UI thread, it will run immediately.
![]() post(Runnable action): Adds the action to the message queue to be run on the UI thread. Returns true if the action is successfully placed into the queue.
post(Runnable action): Adds the action to the message queue to be run on the UI thread. Returns true if the action is successfully placed into the queue.
![]() postDelayed(Runnable action, long delayMillis): Adds the action to the message queue, with the condition of waiting to run until the specified time has been reached. Returns true if the action is successfully placed into queue.
postDelayed(Runnable action, long delayMillis): Adds the action to the message queue, with the condition of waiting to run until the specified time has been reached. Returns true if the action is successfully placed into queue.
The following is an example of using the post() method to perform thread-safe work:
new Thread(new Runnable() {
public void run() {
// create bitmap and retrieve from network
final Bitmap bitmap =
loadNetworkImage("http://example.com/my-image.png");
// Use .post() method on ImageView to place image
myImageView.post(new Runnable() {
public void run() {
// When queue is reached, place image
myImageView.setImageBitmap(bitmap);
}
});
}
}).start();
Depending on the work you are doing, you may also consider using AsyncTask. The AsyncTask will move processes from the main UI thread to a background process and return results without interrupting the rendering process of the application.
AsyncTask
The AsyncTask should be used with regard to the name it bears. This means you have a somewhat simple or short task that needs to be done.
Using AsyncTask requires you to set up a subclass with at least one method. Three parameterized types are used with AsyncTask: Params, Progress, and Result. Should you not want to use a particular argument, you may use Void.
The following demonstrates a skeleton AsyncTask subclass with a method to run the AsyncTask:
private class MyAsyncTask extends AsyncTask<String, Integer, String> {
@Override
protected String doInBackground(String... parameter) {
// code to run in background as an AsyncTask
}
@Override
protected void onProgressUpdate(Integer... progress){
// code to run for update of AsyncTask
}
@Override
protected void onPostExecute(String result) {
// return data from AsyncTask as well as clean up
}
}
// run the AsyncTask
public void executeAsync(View view) {
MyAsyncTask task = new MyAsyncTask();
task.execute("String value passed to AsyncTask");
}
If the AsyncTask is set to update a progress indicator, the onProgressUpdate() method could be used to pass information to update the indicator. The onPostExecute() method is used to return data to a view, widget, or other component.
Performing service-level operations with an AsyncTask opens up potential application and memory problems. One such potential problem is that an AsyncTask does not recognize configuration changes that cause Activities to be destroyed and re-created. That includes deviceorientation changes. If the AsyncTask happens to be in the middle of processing when the screen is rotated, your progress is lost and an exception will be thrown.
Getting past this issue requires keeping track of the AsyncTask instance by either implementing setRetainInstance(true) or creating a fragment with logic to check whether the AsyncTask is running when the orientation is changed.
Summary
In this chapter, you learned about Model-View-Controller architecture and how it can be applied to Android application development.
You learned that content providers are similar to Models and that information can be accessed between applications by using a content provider, but applications that do not wish to share data may still use a content provider.
You learned that Views and Activities make up the View component of MVC architecture and that activities follow a lifecycle that helps developers understand when callback methods are executed.
You learned that services can make up the Controller component of MVC architecture. Services are long-running components that do not strictly follow application lifecycles and are perfect for keeping things running even when the application is paused.
Finally, you learned about running processes asynchronously to avoid ANR errors and to speed up your application. You learned methods to pass data to the UI thread in a thread-safe manner, and you learned when you should use AsyncTask.
All materials on the site are licensed Creative Commons Attribution-Sharealike 3.0 Unported CC BY-SA 3.0 & GNU Free Documentation License (GFDL)
If you are the copyright holder of any material contained on our site and intend to remove it, please contact our site administrator for approval.
© 2016-2026 All site design rights belong to S.Y.A.