Android Programming: The Big Nerd Ranch Guide (2015)
Chapter 14. SQLite Databases
Almost every application needs a place to save data for the long term, longer than savedInstanceState will keep it around. Android provides a place to do this for you: a local filesystem on your phone or tablet’s flash memory storage.
Each application on an Android device has a directory in its sandbox. Keeping files in the sandbox protects them from being accessed by other applications or even the prying eyes of users (unless the device has been “rooted,” in which case the user can get to whatever he or she likes).
Each application’s sandbox directory is a child of the device’s /data/data directory named after the application package. For CriminalIntent, the full path to the sandbox directory is /data/data/com.bignerdranch.android.criminalintent.
However, most application data is not stored in plain old files. Here is why: say that you had a file with all of your Crimes written out. To change the title on a Crime at the beginning of the file, you would have to read in the entire file and write out a whole new version. With a lot of Crimes, that would take a long time.
This is where SQLite comes in. SQLite is an open source relational database, like MySQL or Postgresql. Unlike other databases, though, SQLite stores its data in simple files, which you can read and write using the SQLite library. Android includes this SQLite library in its standard library, along with some additional Java helper classes.
This chapter will not cover everything SQLite. For that, you will want to visit http://www.sqlite.org, which has complete documentation of SQLite itself. Here you will see how Android’s basic SQLite helper classes work. These will let you open, read, and write to SQLite databases in your application sandbox, without necessarily knowing where that is.
Defining a Schema
Before you create a database, you have to decide what will be in that database. CriminalIntent stores a single list of crimes, so you will define one table named crimes (Figure 14.1).
Figure 14.1 The crimes table

People do this kind of thing in a lot of different ways in the programming world. They are all trying to achieve the same thing: to DRY up their code. DRY means “Don’t Repeat Yourself,” and refers to a rule of thumb when writing a program: if you write something down, write it down in one authoritative place. That way, instead of repeating yourself all over the place, you are always referring to the one authoritative place for that information.
Doing this with databases can be involved. There are even complex tools called object-relational mappers (or ORMs for short) that let you use your model objects (like Crime) as your One True Definition. In this chapter, you will take the simpler route of defining a simplified database schemain Java code that says what your table is named and what its columns are.
Start by creating a class to put your schema in. You will call this class CrimeDbSchema, but in the New Class dialog, enter database.CrimeDbSchema. This will put the CrimeDbSchema.java file in its own database package, which you will use to organize all your database-related code.
Inside CrimeDbSchema, define an inner class called CrimeTable to describe your table.
Listing 14.1 Defining CrimeTable (CrimeDbSchema.java)
public class CrimeDbSchema {
public static final class CrimeTable {
public static final String NAME = "crimes";
}
}
The CrimeTable class only exists to define the String constants needed to describe the moving pieces of your table definition. The first piece of that definition is the name of the table in your database, CrimeTable.NAME.
Next, describe the columns.
Listing 14.2 Defining your table columns (CrimeDbSchema.java)
public class CrimeDbSchema {
public static final class CrimeTable {
public static final String NAME = "crimes";
public static final class Cols {
public static final String UUID = "uuid";
public static final String TITLE = "title";
public static final String DATE = "date";
public static final String SOLVED = "solved";
}
}
}
With that, you will be able to refer to the column named “title” in a Java-safe way: CrimeTable.Cols.TITLE. That makes it much safer to change your program if you ever need to change the name of that column or add additional data to the table.
Building Your Initial Database
With your schema defined, you are ready to create the database itself. Android provides some low-level methods on Context to open a database file into an instance of SQLiteDatabase: openOrCreateDatabase(…) and databaseList().
However, in practice you will always need to follow a few basic steps:
1. Check to see if the database already exists.
2. If it does not, create it and create the tables and initial data it needs.
3. If it does, open it up and see what version of your CrimeDbSchema it has. (You may want to add or remove things in future versions of CriminalIntent.)
4. If it is an old version, run code to upgrade it to a newer version.
Android provides the SQLiteOpenHelper class to handle all of this for you. Create a class called CrimeBaseHelper in your database package.
Listing 14.3 Creating CrimeBaseHelper (CrimeBaseHelper.java)
public class CrimeBaseHelper extends SQLiteOpenHelper {
private static final int VERSION = 1;
private static final String DATABASE_NAME = "crimeBase.db";
public CrimeBaseHelper(Context context) {
super(context, DATABASE_NAME, null, VERSION);
}
@Override
public void onCreate(SQLiteDatabase db) {
}
@Override
public void onUpgrade(SQLiteDatabase db, int oldVersion, int newVersion) {
}
}
A SQLiteOpenHelper is a class designed to get rid of the grunt work of opening a SQLiteDatabase. Use it inside of CrimeLab to create your crime database.
Listing 14.4 Opening a SQLiteDatabase (CrimeLab.java)
public class CrimeLab {
private static CrimeLab sCrimeLab;
private List<Crime> mCrimes;
private Context mContext;
private SQLiteDatabase mDatabase;
...
private CrimeLab(Context context) {
mContext = context.getApplicationContext();
mDatabase = new CrimeBaseHelper(mContext)
.getWritableDatabase();
mCrimes = new ArrayList<>();
}
...
(Wondering why the context is stored in an instance variable? CrimeLab will make use of it in Chapter 16.)
When you call getWritableDatabase() here, CrimeBaseHelper will do the following:
1. Open up /data/data/com.bignerdranch.android.criminalintent/databases/crimeBase.db, creating a new database file if it does not already exist.
2. If this is the first time the database has been created, call onCreate(SQLiteDatabase), then save out the latest version number.
3. If this is not the first time, check the version number in the database. If the version number in CrimeOpenHelper is higher, call onUpgrade(SQLiteDatabase, int, int).
The upshot is this: you put your code to create the initial database in onCreate(SQLiteDatabase), your code to handle any upgrades in onUpgrade(SQLiteDatabase, int, int), and it just works.
For now, CriminalIntent will only have one version, so you can ignore onUpgrade(…). You only need to create your database tables in onCreate(…). To do that, you will refer to the CrimeTable inner class of CrimeDbSchema.
The import is a two-step process. First, write the initial part of your SQL creation code, as shown here:
Listing 14.5 Writing first part of onCreate(…) (CrimeBaseHelper.java)
@Override
public void onCreate(SQLiteDatabase db) {
db.execSQL("create table " + CrimeDbSchema.CrimeTable.NAME);
}
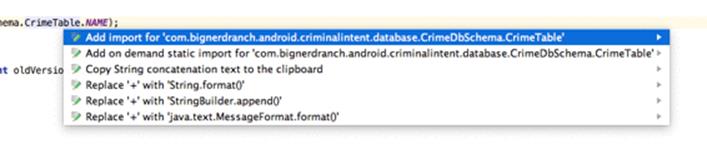
Put your cursor on the word CrimeTable and key in Option+Return (Alt+Enter). Then select the first item, Add import for 'com.bignerdranch.android.criminalintent.database.CrimeDbSchema.CrimeTable' as shown in Figure 14.2.
Figure 14.2 Adding a CrimeTable import
Android Studio will generate an import like this for you:
...
import com.bignerdranch.android.criminalintent.database.CrimeDbSchema.CrimeTable;
public class CrimeBaseHelper extends SQLiteOpenHelper {
...
That will let you refer to the String constants in CrimeDbSchema.CrimeTable by typing in CrimeTable.Cols.UUID, rather than typing out the entirety of CrimeDbSchema.CrimeTable.Cols.UUID. Use that to finish filling out your table definition code.
Listing 14.6 Creating crime table (CrimeBaseHelper.java)
@Override
public void onCreate(SQLiteDatabase db) {
db.execSQL("create table " + CrimeTable.NAME + "(" +
" _id integer primary key autoincrement, " +
CrimeTable.Cols.UUID + ", " +
CrimeTable.Cols.TITLE + ", " +
CrimeTable.Cols.DATE + ", " +
CrimeTable.Cols.SOLVED +
")"
);
}
Creating a table in SQLite requires less ceremony than in other databases: you do not have to specify the type of a column at creation time. It is a good idea to do that, but here you will save a bit of labor by doing without it.
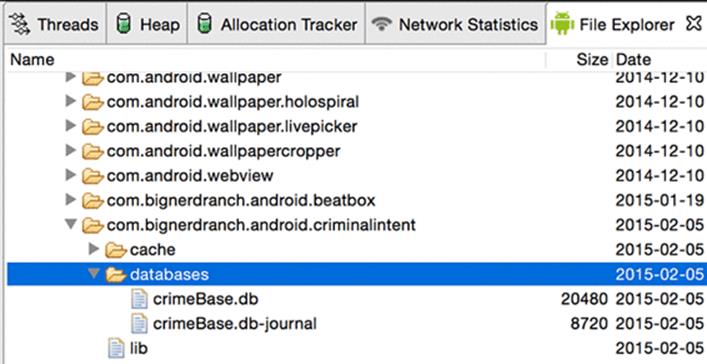
Run CriminalIntent, and your database will be created (Figure 14.3). If you are running on an emulator or a rooted device, you can look at it directly. (Not on a real device, though – it is saved in private storage, which is secret.) Just pull up Tools → Android → Android Device Monitor, and look in/data/data/com.bignerdranch.android.criminalintent/databases/.
Figure 14.3 Your database
Debugging database issues
When writing code dealing with a SQLite database, you will sometimes need to tweak the layout of the database. For example, in an upcoming chapter you will add a suspect for each crime. This will require an additional column on the crime table. The “right” way to do this is to write code in your SQLiteOpenHelper to bump the version number, and then update the tables inside onUpgrade(…).
Well, the “right” way involves a fair amount of code – code that is ridiculous to write when you are only trying to get version 1 or 2 of the database right. In practice, the best thing to do is destroy the database and start over, so that SQLiteOpenHelper.onCreate(…) is called again.
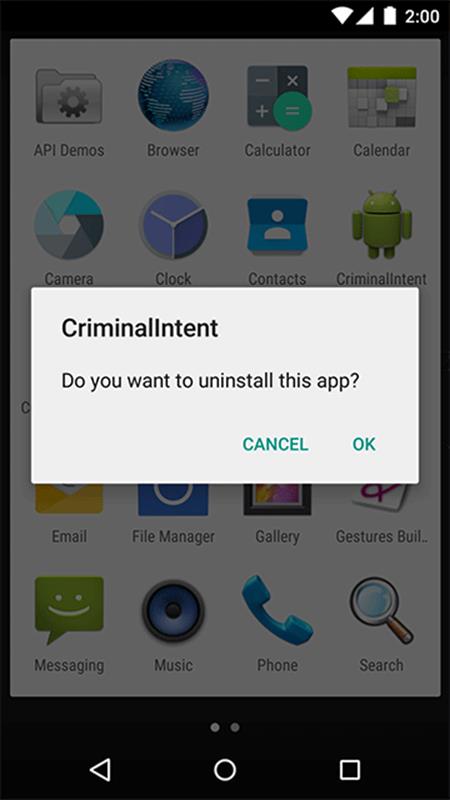
The easiest way to destroy your database is to delete the app off your device. And the easiest way to delete the app on stock Android is to go to the application browser and drag CriminalIntent’s icon up to where it says Uninstall at the top of screen. (The process may be different if your version of Android is different from stock Android.) Then you will see a screen similar to the one shown in Figure 14.4.
Figure 14.4 Deleting an app
Remember this trick if you run into any issues with your database tables in this chapter.
Gutting CrimeLab
Now that you have a database, your next step is to change a lot of code inside of CrimeLab, swapping it to use mDatabase for storage instead of mCrimes.
Start out by doing some demolition. Strip out all the code related to mCrimes in CrimeLab.
Listing 14.7 Tearing down some walls (CrimeLab.java)
public class CrimeLab {
private static CrimeLab sCrimeLab;
private List<Crime> mCrimes;
private Context mContext;
private SQLiteDatabase mDatabase;
public static CrimeLab get(Context context) {
...
}
private CrimeLab(Context context) {
mContext = context.getApplicationContext();
mDatabase = new CrimeBaseHelper(mContext)
.getWritableDatabase();
mCrimes = new ArrayList<>();
}
public void addCrime(Crime c) {
mCrimes.add(c);
}
public List<Crime> getCrimes() {
return mCrimes;
return new ArrayList<>();
}
public Crime getCrime(UUID id) {
for (Crime crime : mCrimes) {
if (crime.getId().equals(id)) {
return crime;
}
}
return null;
}
}
This will leave CriminalIntent in a state where it is not really working; you can see an empty list of crimes, but if you add a crime it will show an empty CrimePagerActivity. This is irritating, but fine for now.
Writing to the Database
The first step in using your SQLiteDatabase is to write data to it. You will need to insert new rows into the crime table as well as update rows that are already there when Crimes are changed.
Using ContentValues
Writes and updates to databases are done with the assistance of a class called ContentValues. ContentValues is a key-value store class, like Java’s HashMap or the Bundles you have been using so far. However, unlike HashMap or Bundle it is specifically designed to store the kinds of data SQLite can hold.
You will be creating ContentValues instances from Crimes a few times in CrimeLab. Add a private method to take care of shuttling a Crime into a ContentValues. (Remember to use the same two-step trick from above to add an import of CrimeTable: when you get to CrimeTable.Cols.UUID, type Option+Return (Alt+Enter) and choose Add import for 'com.bignerdranch.android.criminalintent.database.CrimeDbSchema.CrimeTable'.)
Listing 14.8 Creating a ContentValues (CrimeLab.java)
public getCrime(UUID id) {
return null;
}
private static ContentValues getContentValues(Crime crime) {
ContentValues values = new ContentValues();
values.put(CrimeTable.Cols.UUID, crime.getId().toString());
values.put(CrimeTable.Cols.TITLE, crime.getTitle());
values.put(CrimeTable.Cols.DATE, crime.getDate().getTime());
values.put(CrimeTable.Cols.SOLVED, crime.isSolved() ? 1 : 0);
return values;
}
}
For the keys, you use your column names. These are not arbitrary names; they specify the columns that you want to insert or update. If they are misspelled or typo’d compared to what is in the database, your insert or update will fail. Every column is specified here except for _id, which is automatically created for you as a unique row ID.
Inserting and updating rows
Now that you have a ContentValues, time to add rows to the database. Fill out addCrime(Crime) with a new implementation.
Listing 14.9 Inserting a row (CrimeLab.java)
public void addCrime(Crime c) {
ContentValues values = getContentValues(c);
mDatabase.insert(CrimeTable.NAME, null, values);
}
The insert(String, String, ContentValues) method has two important arguments, and one that is rarely used. The first argument is the table you want to insert into – here, CrimeTable.NAME. The last argument is the data you want to put in.
And the second argument? The second argument is called nullColumnHack. And what does it do?
Well, say that you decided to call insert(…) with an empty ContentValues. SQLite does not allow this, so your insert(…) call would fail.
If you passed in a value of uuid for nullColumnHack, though, it would ignore that empty ContentValues. Instead, it would pass in a ContentValues with uuid set to null. This would allow your insert(…) to succeed and create a new row.
Handy? Perhaps someday. Not today, though. Now you know about it, at least.
Continue applying ContentValues by writing a method to update rows in the database.
Listing 14.10 Updating a Crime (CrimeLab.java)
public Crime getCrime(UUID id) {
return null;
}
public void updateCrime(Crime crime) {
String uuidString = crime.getId().toString();
ContentValues values = getContentValues(crime);
mDatabase.update(CrimeTable.NAME, values,
CrimeTable.Cols.UUID + " = ?",
new String[] { uuidString });
}
private static ContentValues getContentValues(Crime crime) {
ContentValues values = new ContentValues();
values.put(CrimeTable.Cols.UUID, crime.getId().toString());
...
The update(String, ContentValues, String, String[]) method starts off similarly to insert(…) – you pass in the table name you want to update and the ContentValues you want to assign to each row you update. However, the last bit is different, because now you have to specify which rows get updated. You do that by building a where clause (the third argument), and then specifying values for the arguments in the where clause (the final String[] array).
You may be wondering why you are not putting uuidString directly into the where clause. That would be a bit simpler than using ? and passing it in as a String[], after all.
The answer is that in some cases your String might itself contain SQL code. If you put that String directly in your query, that code could change the meaning of your query, or even alter your database. This is called a SQL injection attack, and it is a bad thing indeed.
If you use ?, though, your code will do what you intended: treat it as a String value, not code. So it is best to be safe and use ? as a matter of habit, which will always do what you intend no matter what the String contains.
Crime instances get modified in CrimeFragment, and will need to be written out when CrimeFragment is done. So add an override to CrimeFragment.onPause() that updates CrimeLab’s copy of your Crime.
Listing 14.11 Pushing updates (CrimeFragment.java)
@Override
public void onCreate(Bundle savedInstanceState) {
super.onCreate(savedInstanceState);
UUID crimeId = (UUID) getArguments().getSerializable(ARG_CRIME_ID);
mCrime = CrimeLab.get(getActivity()).getCrime(crimeId);
}
@Override
public void onPause() {
super.onPause();
CrimeLab.get(getActivity())
.updateCrime(mCrime);
}
Sadly, you have no way of verifying that this code works. That will need to wait until you can read in the crimes you updated. To make sure that everything compiles correctly, run CriminalIntent one more time before moving on to the next section. You should see a blank list.
Reading from the Database
Reading in data from SQLite is done using the query(…) method. SQLiteDatabase.query(…) has quite a lot going on. There are a few different overloads of this method. The one you will be using looks like this:
public Cursor query(
String table,
String[] columns,
String where,
String[] whereArgs,
String groupBy,
String having,
String orderBy,
String limit)
If you have dealt with SQL before, then most of these will be familiar to you as arguments of the select statement. If you have not, then you only need to worry about the ones you will be using:
public Cursor query(
String table,
String[] columns,
String where,
String[] whereArgs,
String groupBy,
String having,
String orderBy,
String limit)
The table argument is the table to query. The columns argument names which columns you want values for and what order you want to receive them in. And then where and whereArgs do the same thing they do in update(…).
Use query(…) in a convenience method to call this on your CrimeTable.
Listing 14.12 Querying for Crimes (CrimeLab.java)
...
values.put(CrimeTable.Cols.DATE, crime.getDate().getTime());
values.put(CrimeTable.Cols.SOLVED, crime.isSolved() ? 1 : 0);
return values;
}
private Cursor queryCrimes(String whereClause, String[] whereArgs) {
Cursor cursor = mDatabase.query(
CrimeTable.NAME,
null, // Columns - null selects all columns
whereClause,
whereArgs,
null, // groupBy
null, // having
null // orderBy
);
return cursor;
}
Using a CursorWrapper
A Cursor leaves a lot to be desired as a way to look at a table. All it does is give you raw column values. Pulling data out of a Cursor looks like this:
String uuidString = cursor.getString(
cursor.getColumnIndex(CrimeTable.Cols.UUID));
String title = cursor.getString(
cursor.getColumnIndex(CrimeTable.Cols.TITLE));
long date = cursor.getLong(
cursor.getColumnIndex(CrimeTable.Cols.DATE));
int isSolved = cursor.getInt(
cursor.getColumnIndex(CrimeTable.Cols.SOLVED));
Every time you pull a Crime out of a cursor, you need to write this code one more time. (And that does not include the code to create a Crime instance with those values!)
Remember the DRY rule of thumb: Don’t Repeat Yourself. Instead of writing this code each time you need to read data from a Cursor, you can create your own Cursor subclass that takes care of this in one place. The easiest way to write a Cursor subclass is to use CursorWrapper. A CursorWrapperlets you wrap a Cursor you received from another place and add new methods on top of it.
Create a new class in the database package called CrimeCursorWrapper.
Listing 14.13 Creating CrimeCursorWrapper (CrimeCursorWrapper.java)
public class CrimeCursorWrapper extends CursorWrapper {
public CrimeCursorWrapper(Cursor cursor) {
super(cursor);
}
}
That creates a thin wrapper around a Cursor. It has all the same methods as the Cursor it wraps, and calling those methods does the exact same thing. This would be pointless, except that it makes it possible to add new methods that operate on the underlying Cursor.
Add a getCrime() method that pulls out relevant column data. (Remember to use the two-step import trick for CrimeTable here, as you did earlier.)
Listing 14.14 Adding getCrime() method (CrimeCursorWrapper.java)
public class CrimeCursorWrapper extends CursorWrapper {
public CrimeCursorWrapper(Cursor cursor) {
super(cursor);
}
public Crime getCrime() {
String uuidString = getString(getColumnIndex(CrimeTable.Cols.UUID));
String title = getString(getColumnIndex(CrimeTable.Cols.TITLE));
long date = getLong(getColumnIndex(CrimeTable.Cols.DATE));
int isSolved = getInt(getColumnIndex(CrimeTable.Cols.SOLVED));
return null;
}
}
You will need to return a Crime with an appropriate UUID from this method. Add another constructor to Crime to do this.
Listing 14.15 Adding Crime constructor (Crime.java)
public Crime() {
this(UUID.randomUUID());
mId = UUID.randomUUID();
mDate = new Date();
}
public Crime(UUID id) {
mId = id;
mDate = new Date();
}
And then finish up getCrime().
Listing 14.16 Finishing up getCrime() (CrimeCursorWrapper.java)
public Crime getCrime() {
String uuidString = getString(getColumnIndex(CrimeTable.Cols.UUID));
String title = getString(getColumnIndex(CrimeTable.Cols.TITLE));
long date = getLong(getColumnIndex(CrimeTable.Cols.DATE));
int isSolved = getInt(getColumnIndex(CrimeTable.Cols.SOLVED));
Crime crime = new Crime(UUID.fromString(uuidString));
crime.setTitle(title);
crime.setDate(new Date(date));
crime.setSolved(isSolved != 0);
return crime;
return null;
}
(Android Studio will ask you to choose between java.util.Date and java.sql.Date. Even though you are dealing with databases, java.util.Date is the right choice here.)
Converting to model objects
With CrimeCursorWrapper, vending out a List<Crime> from CrimeLab will be straightforward. You need to wrap the cursor you get back from your query in a CrimeCursorWrapper, then iterate over it calling getCrime() to pull out its Crimes.
For the first part, queryCrimes(…) to use CrimeCursorWrapper.
Listing 14.17 Vending cursor wrapper (CrimeLab.java)
private Cursor queryCrimes(String whereClause, String[] whereArgs) {
private CrimeCursorWrapper queryCrimes(String whereClause, String[] whereArgs) {
Cursor cursor = mDatabase.query(
CrimeTable.NAME,
null, // Columns - null selects all columns
whereClause,
whereArgs,
null, // groupBy
null, // having
null // orderBy
);
return cursor;
return new CrimeCursorWrapper(cursor);
}
Then get getCrimes() into shape. Add code to query for all crimes, walk the cursor, and populate a Crime list.
Listing 14.18 Returning crime list (CrimeLab.java)
public List<Crime> getCrimes() {
return new ArrayList<>();
List<Crime> crimes = new ArrayList<>();
CrimeCursorWrapper cursor = queryCrimes(null, null);
try {
cursor.moveToFirst();
while (!cursor.isAfterLast()) {
crimes.add(cursor.getCrime());
cursor.moveToNext();
}
} finally {
cursor.close();
}
return crimes;
}
Database cursors are called cursors because they always have their finger on a particular place in a query. So to pull the data out of a cursor, you move it to the first element by calling moveToFirst(), and then reading in row data. Each time you want to advance to a new row, you callmoveToNext(), until finally isAfterLast() tells you that your pointer is off the end of the dataset.
The last important thing to do is to call close() on your Cursor. This bit of housekeeping is important. If you do not do it, your Android device will spit out nasty error logs to berate you. Even worse, if you make a habit out of it, you will eventually run out of open file handles and crash your app. So: close your cursors.
CrimeLab.getCrime(UUID) will look similar to getCrimes(), except it will only need to pull the first item, if it is there.
Listing 14.19 Rewriting getCrime(UUID) (CrimeLab.java)
public Crime getCrime(UUID id) {
return null;
CrimeCursorWrapper cursor = queryCrimes(
CrimeTable.Cols.UUID + " = ?",
new String[] { id.toString() }
);
try {
if (cursor.getCount() == 0) {
return null;
}
cursor.moveToFirst();
return cursor.getCrime();
} finally {
cursor.close();
}
}
That completes a few moving pieces:
· You can insert crimes, so the code that adds Crime to CrimeLab when you press the New Crime action item now works.
· You can successfully query the database, so CrimePagerActivity can see all the Crimes in CrimeLab, too.
· CrimeLab.getCrime(UUID) works, too, so each CrimeFragment displayed in CrimePagerActivity is showing the real Crime.
Now you should be able to press New Crime and see the new Crime displayed in CrimePagerActivity. Run CriminalIntent and verify that you can do this. If you cannot, double-check your implementations from this chapter so far.
Refreshing model data
You are not quite done. Your crimes are persistently stored to the database, but the persistent data is not read back in. So if you press the Back button after editing your new Crime, it will not show up in CrimeListActivity.
This is because CrimeLab now works a little differently. Before, there was only one List<Crime>, and one object for each Crime: the one in the List<Crime>. That was because mCrimes was the only authority for which Crimes your app knew about.
Things have changed now. mCrimes is gone. So the List<Crime> returned by getCrimes() is a snapshot of the Crimes at one point in time. To refresh CrimeListActivity, you need to update that snapshot.
Most of the moving pieces to do this are already in place. CrimeListActivity already calls updateUI() to refresh other parts of its interface. All you need to do is have it refresh its view of CrimeLab, too.
First, add a setCrimes(List<Crime>) method to CrimeAdapter to swap out the crimes it displays.
Listing 14.20 Adding setCrimes(List<Crime>) (CrimeListFragment.java)
private class CrimeAdapter extends RecyclerView.Adapter<CrimeHolder> {
...
@Override
public int getItemCount() {
return mCrimes.size();
}
public void setCrimes(List<Crime> crimes) {
mCrimes = crimes;
}
}
Then call setCrimes(List<Crime>) in updateUI().
Listing 14.21 Calling setCrimes(List<>) (CrimeListFragment.java)
private void updateUI() {
CrimeLab crimeLab = CrimeLab.get(getActivity());
List<Crime> crimes = crimeLab.getCrimes();
if (mAdapter == null) {
mAdapter = new CrimeAdapter(crimes);
mCrimeRecyclerView.setAdapter(mAdapter);
} else {
mAdapter.setCrimes(crimes);
mAdapter.notifyDataSetChanged();
}
updateSubtitle();
}
Now everything should work correctly. Run CriminalIntent and verify that you can add a crime, press the Back button, and see that crime in CrimeListActivity.
This is also a good time to test that calls to updateCrime(Crime) in CrimeFragment work, too. Press a Crime and edit its title inside CrimePagerActivity. Press the Back button and make sure that the new title is reflected in the list.
For the More Curious: More Databases
For the sake of space and simplicity, we do not go into all the details you might see in a professional app’s application database here. There is a reason people resort to tools like ORMs: this stuff can get complicated.
For a more substantial application you will want to look into adding the following to your database and your description of it:
· Data types on columns. Technically, SQLite does not have typed columns, so you can get by without them. Giving SQLite hints is kinder, though.
· Indexes. Queries against columns with appropriate indexes are much faster than columns without them.
· Foreign keys. Your database here only has one table, but associated data would need foreign key constraints, too.
There are also deeper performance considerations to dive into. Your app creates a new list of all-new Crime objects every time you query the database. A high-performance app would optimize this by recycling instances of Crime or by treating them like an in-memory object store (like you did before this chapter). That ends up being quite a bit more code, so this is another problem ORMs often try to solve.
For the More Curious: The Application Context
Earlier in this chapter, you used the Application Context in the constructor of the CrimeLab.
private CrimeLab(Context context) {
mContext = context.getApplicationContext();
...
}
What makes the Application Context special? When should you use the application context over an activity as a context?
It’s important to think about the lifetime of each of these objects. If any of your activities exist, Android will have also created an Application object. Activities come and go as the user navigates through your application but the application object will still exist. It has a much longer lifetime than any one activity.
The CrimeLab is a singleton, which means that once it is created, it will not be destroyed until your entire application process is destroyed. The CrimeLab maintains a reference to its mContext object. If you store an activity as the mContext object, that activity will never be cleaned up by the garbage collector because the CrimeLab has a reference to it. Even if the user has navigated away from that activity, it will never be cleaned up.
To avoid this wasteful situation, you use the application context so that your activities can come and go and the CrimeLab can maintain a reference to a Context object. Always think about the lifetime of your activities as you keep a reference to them.
Challenge: Deleting Crimes
If you added a Delete Crime action item earlier, this challenge builds off of that by adding the ability to delete crimes from your database by calling a deleteCrime(Crime) method on CrimeLab, which will call mDatabase.delete(…) to finish the job.
And if you do not have a Delete Crime? Well, go ahead and add it! Add an action item to CrimeFragment’s toolbar that calls CrimeLab.deleteCrime(Crime) and finish()es its Activity.
All materials on the site are licensed Creative Commons Attribution-Sharealike 3.0 Unported CC BY-SA 3.0 & GNU Free Documentation License (GFDL)
If you are the copyright holder of any material contained on our site and intend to remove it, please contact our site administrator for approval.
© 2016-2026 All site design rights belong to S.Y.A.