Android Programming: The Big Nerd Ranch Guide (2015)
Chapter 26. Background Services
All the code you have written so far has been hooked up to an activity, which means that it is associated with some screen for the user to look at.
But what if you do not need a screen? What if you need to do something out of sight and out of mind, like play music or check for new blog posts on an RSS feed? For this, you need a service.
In this chapter, you will add a new feature to PhotoGallery that will allow users to poll for new search results in the background. Whenever a new search result is available, the user will receive a notification in the status bar.
Creating an IntentService
Let’s start by creating your service. In this chapter, you will use an IntentService. IntentService is not the only kind of service, but it is probably the most common. Create a subclass of IntentService called PollService. This will be the service you use to poll for search results.
Listing 26.1 Creating PollService (PollService.java)
public class PollService extends IntentService {
private static final String TAG = "PollService";
public static Intent newIntent(Context context) {
return new Intent(context, PollService.class);
}
public PollService() {
super(TAG);
}
@Override
protected void onHandleIntent(Intent intent) {
Log.i(TAG, "Received an intent: " + intent);
}
}
This is a very basic IntentService. What does it do? Well, it is sort of like an activity. It is a context (Service is a subclass of Context) and it responds to intents (as you can see in onHandleIntent(Intent)). As a matter of convention (and to be a good citizen) you added a newIntent(Context)method. Any component that wants to start this service should use newIntent(…).
A service’s intents are called commands. Each command is an instruction to the service to do something. Depending on the kind of service, that command could be serviced in a variety of ways.
An IntentService service pulls its commands off of a queue, as shown in Figure 26.1.
Figure 26.1 How IntentService services commands
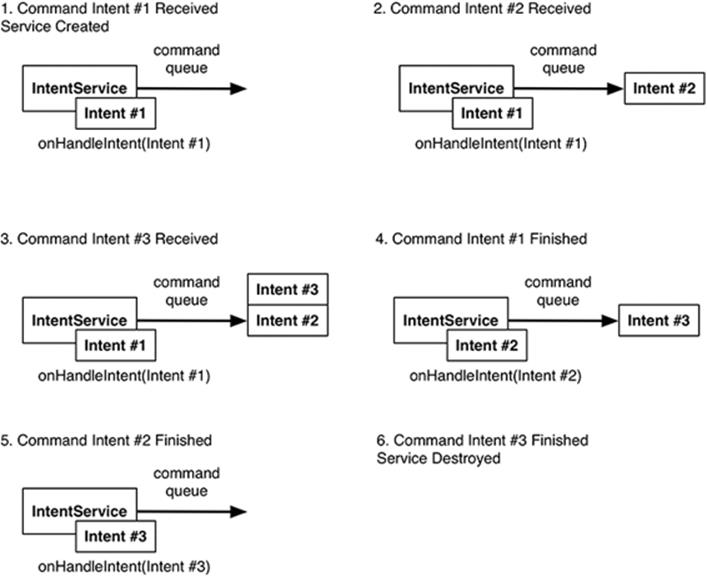
When it receives its first command, the IntentService starts up, fires up a background thread, and puts the command on a queue.
The IntentService then services each command in sequence, calling onHandleIntent(Intent) on its background thread for each command. New commands that come in go to the back of the queue. When there are no commands left in the queue, the service stops and is destroyed.
This description only applies to IntentService. Later in the chapter, we will discuss the broader world of services and how commands work.
You might infer from what you just learned about how IntentService works that services respond to intents. That is true! And because services, like activities, respond to intents, they must also be declared in your AndroidManifest.xml. Add an element for PollService to your manifest.
Listing 26.2 Adding service to manifest (AndroidManifest.xml)
<manifest xmlns:android="http://schemas.android.com/apk/res/android"
package="com.bignerdranch.android.photogallery" >
<uses-permission android:name="android.permission.INTERNET" />
<application
... >
<activity
android:name=".PhotoGalleryActivity"
android:label="@string/app_name" >
...
</activity>
<service android:name=".PollService" />
</application>
</manifest>
Then add code to start your service inside PhotoGalleryFragment.
Listing 26.3 Adding service startup code (PhotoGalleryFragment.java)
public class PhotoGalleryFragment extends Fragment {
private static final String TAG = "PhotoGalleryFragment";
...
@Override
public void onCreate(Bundle savedInstanceState) {
...
updateItems();
Intent i = PollService.newIntent(getActivity());
getActivity().startService(i);
Handler responseHandler = new Handler();
mThumbnailDownloader = new ThumbnailDownloader<>(responseHandler);
...
}
...
}
Fire this up and see what you get. You should see something like this in LogCat:
02-23 14:25:32.450 2692-2717/com.bignerdranch.android.photogallery I/PollService:
Received an intent: Intent { cmp=com.bignerdranch.android.photogallery/.PollService }
What Services are For
OK, we admit it: looking at those LogCat statements was boring. But this code is really exciting! Why? What can you do with it?
Time to go back to the Land of Make Believe, where we are no longer programmers but work in retail shoe sales with superheroes who do our bidding.
Your Flash workers can work in two kinds of places in a store: the front of the store, where they talk to customers, and the back of the store, where they do not. The back of the store may be larger or smaller, depending on the store.
So far, all of your code has run in activities. Activities are your Android app’s storefront. All this code is focused on a pleasant visual experience for your user, your customer.
Services are the back end of your Android app. Things can happen there that the user never needs to know about. Work can go on there long after the storefront has closed, when your activities are long gone.
OK, enough about stores. What can you do with a service that you cannot do with an activity? Well, for one, you can run a service while the user is occupied elsewhere.
Safe background networking
Your service is going to poll Flickr in the background. To perform networking in the background safely, some additional code is required. Android provides the ability for a user to turn off networking for backgrounded applications. If the user has a lot of power-hungry applications, this can be a big performance improvement.
This does mean, however, that if you are doing networking in the background, you need to verify with the ConnectivityManager that the network is available.
Add the code in Listing 26.4 to perform this check.
Listing 26.4 Checking for background network availability (PollService.java)
public class PollService extends IntentService {
private static final String TAG = "PollService";
...
@Override
protected void onHandleIntent(Intent intent) {
if (!isNetworkAvailableAndConnected()) {
return;
}
Log.i(TAG, "Received an intent: " + intent);
}
private boolean isNetworkAvailableAndConnected() {
ConnectivityManager cm =
(ConnectivityManager) getSystemService(CONNECTIVITY_SERVICE);
boolean isNetworkAvailable = cm.getActiveNetworkInfo() != null;
boolean isNetworkConnected = isNetworkAvailable &&
cm.getActiveNetworkInfo().isConnected();
return isNetworkConnected;
}
}
The logic for checking network availability is in isNetworkAvailableAndConnected(). Toggling the background data setting to disallow downloading data in the background disables the network entirely for use by background services. In this case, ConnectivityManager.getActiveNetworkInfo()returns null, making it appear to the background service as if there is no active network available, even if there really is.
If the network is available to your background service, it gets an instance of android.net.NetworkInfo representing the current network connection. The code then checks whether the current network is fully connected by calling NetworkInfo.isConnected().
If the app does not see a network available, or the device is not fully connected to a network, onHandleIntent(…) will return without executing the rest of the method (and in turn will not try to download data, once you have added the code to do so). This is good practice because your app cannot download any data if it is not connected to the network.
One more thing. To use getActiveNetworkInfo(), you also need to acquire the ACCESS_NETWORK_STATE permission. As you have seen, permissions are managed in your manifest.
Listing 26.5 Acquiring network state permission (AndroidManifest.xml)
<manifest xmlns:android="http://schemas.android.com/apk/res/android"
package="com.bignerdranch.android.photogallery" >
<uses-permission android:name="android.permission.INTERNET" />
<uses-permission android:name="android.permission.ACCESS_NETWORK_STATE" />
<application
... >
...
</application>
</manifest>
Looking for New Results
Your service will be polling for new results, so it will need to know what the last result fetched was. This is a perfect job for another SharedPreferences entry.
Update QueryPreferences to store the ID of the most recently fetched photo.
Listing 26.6 Adding recent ID preference constant (QueryPreferences.java)
public class QueryPreferences {
private static final String PREF_SEARCH_QUERY = "searchQuery";
private static final String PREF_LAST_RESULT_ID = "lastResultId";
public static String getStoredQuery(Context context) {
...
}
public static void setStoredQuery(Context context, String query) {
...
}
public static String getLastResultId(Context context) {
return PreferenceManager.getDefaultSharedPreferences(context)
.getString(PREF_LAST_RESULT_ID, null);
}
public static void setLastResultId(Context context, String lastResultId) {
PreferenceManager.getDefaultSharedPreferences(context)
.edit()
.putString(PREF_LAST_RESULT_ID, lastResultId)
.apply();
}
}
The next step is to fill out your service. Here is what you need to do:
1. Pull out the current query and the last result ID from the default SharedPreferences.
2. Fetch the latest result set with FlickrFetchr.
3. If there are results, grab the first one.
4. Check to see whether it is different from the last result ID.
5. Store the first result back in SharedPreferences.
Return to PollService.java and put this plan into action. Listing 26.7 shows a long swath of code, but it uses nothing you have not seen before.
Listing 26.7 Checking for new results (PollService.java)
public class PollService extends IntentService {
private static final String TAG = "PollService";
...
@Override
protected void onHandleIntent(Intent intent) {
...
Log.i(TAG, "Received an intent: " + intent);
String query = QueryPreferences.getStoredQuery(this);
String lastResultId = QueryPreferences.getLastResultId(this);
List<GalleryItem> items;
if (query == null) {
items = new FlickrFetchr().fetchRecentPhotos();
} else {
items = new FlickrFetchr().searchPhotos(query);
}
if (items.size() == 0) {
return;
}
String resultId = items.get(0).getId();
if (resultId.equals(lastResultId)) {
Log.i(TAG, "Got an old result: " + resultId);
} else {
Log.i(TAG, "Got a new result: " + resultId);
}
QueryPreferences.setLastResultId(this, resultId);
}
...
}
See each part we discussed above? Good.
Run PhotoGallery, and you should see your app getting new results initially. If you have a search query selected, you will probably see stale results when you subsequently start up the app.
Delayed Execution with AlarmManager
To actually use your service in the background, you will need some way to make things happen when none of your activities are running. Say, by making a timer that goes off every 5 minutes or so.
You could do this with a Handler by calling Handler.sendMessageDelayed(…) or Handler.postDelayed(…). But this solution will probably fail if the user navigates away from all your activities. The process will shut down, and your Handler messages will go kaput with it.
So instead of Handler, you will use AlarmManager. AlarmManager is a system service that can send Intents for you.
How do you tell AlarmManager what intents to send? You use a PendingIntent. You can use PendingIntent to package up a wish: “I want to start PollService.” You can then send that wish to other components on the system, like AlarmManager.
Write a new method called setServiceAlarm(Context, boolean) inside PollService that turns an alarm on and off for you. You will write it as a static method. That keeps your alarm code with the other code in PollService that it is related to, but allows other components to invoke it. You will usually want to turn it on and off from frontend code in a fragment or other controller.
Listing 26.8 Adding alarm method (PollService.java)
public class PollService extends IntentService {
private static final String TAG = "PollService";
private static final int POLL_INTERVAL = 1000 * 60; // 60 seconds
public static Intent newIntent(Context context) {
return new Intent(context, PollService.class);
}
public static void setServiceAlarm(Context context, boolean isOn) {
Intent i = PollService.newIntent(context);
PendingIntent pi = PendingIntent.getService(context, 0, i, 0);
AlarmManager alarmManager = (AlarmManager)
context.getSystemService(Context.ALARM_SERVICE);
if (isOn) {
alarmManager.setInexactRepeating(AlarmManager.ELAPSED_REALTIME,
SystemClock.elapsedRealtime(), POLL_INTERVAL, pi);
} else {
alarmManager.cancel(pi);
pi.cancel();
}
}
...
}
The first thing you do in your method is construct your PendingIntent that starts PollService. You do this by calling PendingIntent.getService(…). PendingIntent.getService(…) packages up an invocation of Context.startService(Intent). It takes in four parameters: a Context with which to send the intent, a request code that you can use to distinguish this PendingIntent from others, the Intent object to send, and finally a set of flags that you can use to tweak how the PendingIntent is created. (You will use one of these in a moment.)
After that, you need to either set the alarm or cancel it.
To set the alarm, you call AlarmManager.setInexactRepeating(…). This method also takes four parameters: a constant to describe the time basis for the alarm (about which more in a moment), the time at which to start the alarm, the time interval at which to repeat the alarm, and finally aPendingIntent to fire when the alarm goes off.
Because you used AlarmManager.ELAPSED_REALTIME as the time basis value, you specified the start time in terms of elapsed realtime: SystemClock.elapsedRealtime(). This triggers the alarm to go off when the specified amount of time has passed. If you had used AlarmManager.RTC, you would instead base the start time on “wall clock time” (e.g., System.currentTimeMillis()). This would trigger the alarm to go off at a fixed point in time.
Canceling the alarm is done by calling AlarmManager.cancel(PendingIntent). You will also usually want to cancel the PendingIntent. In a moment, you will see how canceling the PendingIntent also helps you track the status of the alarm.
Add some quick test code to run your alarm from within PhotoGalleryFragment.
Listing 26.9 Adding alarm startup code (PhotoGalleryFragment.java)
public class PhotoGalleryFragment extends Fragment {
private static final String TAG = "PhotoGalleryFragment";
...
@Override
public void onCreate(Bundle savedInstanceState) {
...
updateItems();
Intent i = PollService.newIntent(getActivity());
getActivity().startService(i);
PollService.setServiceAlarm(getActivity(), true);
Handler responseHandler = new Handler();
mThumbnailDownloader = new ThumbnailDownloader<>(responseHandler);
...
}
...
}
Finish typing in this code and run PhotoGallery. Then immediately hit the Back button and exit out of the app.
Notice anything in LogCat? PollService is faithfully chugging along, running again every 60 seconds. This is what AlarmManager is designed to do. Even if your process gets shut down, AlarmManager will keep on firing intents to start PollService again and again. (This behavior is, of course, extremely annoying. You may want to uninstall the app until we get it straightened out.)
(If you feel like 60 seconds is too long to wait, you can use a shorter interval. However, as of this writing, if you are running Android 5.1 the minimum interval allowed is 60 seconds. Any interval less than that minimum is rounded up to 60 seconds on Android 5.1.)
Being a good citizen: using alarms the right way
How exact do you need your repeating to be? Repeatedly executing work from your background service has the potential to eat up the user’s battery power and data service allotment. Furthermore, waking the device from sleep (spinning up the CPU when the screen was off to do work on your behalf) is a costly operation. Luckily, you can configure your alarm to have a lighter usage footprint in terms of interval timing and wake requirements.
Inexact vs. exact repeating
There are two methods available for setting repeating alarms: AlarmManager.setRepeating(…) and AlarmManager.setInexactRepeating(…).
If your interval requirements are flexible, as they are in this case, you should give the system flexibility to group your alarm with others. This is called “inexact repeating” and means your alarm will not occur at the exact interval you specify. Instead, the time between repetitions will vary. This allows the system to batch your alarm with others and minimize the amount of wake time needed.
Until API 19 (4.4 KitKat), setRepeating(…) set the alarm to repeat at exact intervals. And the setInexactRepeating(…) method set the alarm to be repeated in an inexact fashion. That is, unless you chose to specify a custom value for the interval. If you specified one of the provided interval constants (INTERVAL_FIFTEEN_MINUTES, INTERVAL_HALF_HOUR, INTERVAL_HOUR, INTERVAL_HALF_DAY, or INTERVAL_DAY), the alarm would repeat at inexact intervals, as you would expect. But if you specified a custom interval, the behavior degraded back to exact repeating.
Starting with API 19 (4.4 KitKat), the behavior of these methods changed. Both setRepeating(…) and setInexactRepeating() behave the same: they set the alarm for inexact repeating. Additionally, the restriction on using one of the predefined interval constants was removed. Using a custom interval with either of the methods still results in inexact repeating behavior.
In fact, the notion of exact repeating has been done away with in API 19 and higher. Instead you need to use one of the new methods, such as AlarmManager.setWindow(…) or AlarmManager.setExact(…), which allow you to set an exact alarm to occur only once.
So what is a well-meaning Android developer to do when an app does not need an alarm with exact repeating? If your app supports only API 19 (KitKat) and up, call setRepeating(…) with whatever time interval you see fit. If your app supports pre-KitKat devices, call setInexactRepeating(…). And, if at all possible, use one of the built-in interval constants to ensure you get inexact behavior on all devices.
Time basis options
Another important decision is which time basis value to specify. There are two main options: AlarmManager.ELAPSED_REALTIME and AlarmManager.RTC.
AlarmManager.ELAPSED_REALTIME uses the amount of time that has passed since the last boot of the device (including sleep time) as the basis for interval calculations. ELAPSED_REALTIME is the best choice for your alarm in PhotoGallery because it is based on the relative passage of time and thus does not depend on wall clock time. (Also, the documentation recommends you use ELAPSED_REALTIME instead of RTC if at all possible.)
AlarmManager.RTC uses “wall clock time” in terms of UTC. UTC should only be used for wall-clock basis alarms. However, UTC does not respect locale, whereas the user’s idea of wall-clock time includes locale. Wall-clock basis alarms should respect locale somehow. This means you must implement your own locale handling in conjunction with using the RTC time basis if you want to set a wall-clock time alarm. Otherwise, use ELAPSED_REALTIME as the time basis.
If you use one of the time basis options outlined above, your alarm will not fire if the device is in sleep mode (the screen is turned off), even if the prescribed interval has passed. If you need your alarm to occur on a more precise interval or time, you can force the alarm to wake up the device by using one of the following time basis constants: AlarmManager.ELAPSED_REALTIME_WAKEUP and AlarmManager.RTC_WAKEUP. However, you should avoid using the wakeup options unless your alarm absolutely must occur at a specific time.
PendingIntent
Let’s talk a little bit more about PendingIntent. A PendingIntent is a token object. When you get one here by calling PendingIntent.getService(…), you say to the OS, “Please remember that I want to send this intent with startService(Intent).” Later on you can call send() on your PendingIntenttoken, and the OS will send the intent you originally wrapped up in exactly the way you asked.
The really nice thing about this is that when you give that PendingIntent token to someone else and they use it, it sends that token as your application. Also, because the PendingIntent itself lives in the OS, not in the token, you maintain control of it. If you wanted to be cruel, you could give someone else a PendingIntent object and then immediately cancel it, so that send() does nothing.
If you request a PendingIntent twice with the same intent, you will get the same PendingIntent. You can use this to test whether a PendingIntent already exists or to cancel a previously issued PendingIntent.
Managing alarms with PendingIntent
You can only register one alarm for each PendingIntent. That is how setServiceAlarm(Context, boolean) works when isOn is false: it calls AlarmManager.cancel(PendingIntent) to cancel the alarm for your PendingIntent, and then cancels your PendingIntent.
Because the PendingIntent is also cleaned up when the alarm is canceled, you can check whether that PendingIntent exists or not to see whether the alarm is active or not. This is done by passing in the PendingIntent.FLAG_NO_CREATE flag to PendingIntent.getService(…). This flag says that if thePendingIntent does not already exist, return null instead of creating it.
Write a new method called isServiceAlarmOn(Context) that uses PendingIntent.FLAG_NO_CREATE to tell whether the alarm is on or not.
Listing 26.10 Adding isServiceAlarmOn() method (PollService.java)
public class PollService extends IntentService {
...
public static void setServiceAlarm(Context context, boolean isOn) {
...
}
public static boolean isServiceAlarmOn(Context context) {
Intent i = PollService.newIntent(context);
PendingIntent pi = PendingIntent
.getService(context, 0, i, PendingIntent.FLAG_NO_CREATE);
return pi != null;
}
...
}
Because this PendingIntent is only used for setting your alarm, a null PendingIntent here means that your alarm is not set.
Controlling Your Alarm
Now that you can turn your alarm on and off (as well as tell whether it is on or off), let’s add an interface to turn this thing on and off. Add another menu item to menu/fragment_photo_gallery.xml.
Listing 26.11 Adding service toggle (menu/fragment_photo_gallery.xml)
<menu xmlns:android="http://schemas.android.com/apk/res/android"
xmlns:app="http://schemas.android.com/apk/res-auto">
<item android:id="@+id/menu_item_search"
... />
<item android:id="@+id/menu_item_clear"
... />
<item android:id="@+id/menu_item_toggle_polling"
android:title="@string/start_polling"
app:showAsAction="ifRoom" />
</menu>
Then you need to add a few new strings – one to start polling and one to stop polling. (You will need a couple of other ones later, too, for a status bar notification. Go ahead and add those as well.)
Listing 26.12 Adding polling strings (res/values/strings.xml)
<resources>
...
<string name="search">Search</string>
<string name="clear_search">Clear Search</string>
<string name="start_polling">Start polling</string>
<string name="stop_polling">Stop polling</string>
<string name="new_pictures_title">New PhotoGallery Pictures</string>
<string name="new_pictures_text">You have new pictures in PhotoGallery.</string>
</resources>
Now delete your old debug code for starting the alarm and add an implementation for the menu item.
Listing 26.13 Toggle menu item implementation (PhotoGalleryFragment.java)
private static final String TAG = "PhotoGalleryFragment";
...
@Override
public void onCreate(Bundle savedInstanceState) {
super.onCreate(savedInstanceState);
...
updateItems();
PollService.setServiceAlarm(getActivity(), true);
Handler responseHandler = new Handler();
...
}
...
@Override
public boolean onOptionsItemSelected(MenuItem item) {
switch (item.getItemId()) {
case R.id.menu_item_clear:
QueryPreferences.setStoredQuery(getActivity(), null);
updateItems();
return true;
case R.id.menu_item_toggle_polling:
boolean shouldStartAlarm = !PollService.isServiceAlarmOn(getActivity());
PollService.setServiceAlarm(getActivity(), shouldStartAlarm);
return true;
default:
return super.onOptionsItemSelected(item);
}
}
...
With that, you should be able to toggle your alarm on and off. However, you will notice that the menu item for polling always says Start polling, even if the polling is currently on. You should instead toggle the menu item title as you did for Show Subtitle in the CriminalIntent app (Chapter 13).
In onCreateOptionsMenu(…), check whether the alarm is on and change the text of menu_item_toggle_polling to show the appropriate label to the user.
Listing 26.14 Toggling the menu item (PhotoGalleryFragment.java)
public class PhotoGalleryFragment extends Fragment {
private static final String TAG = "PhotoGalleryFragment";
...
@Override
public void onCreateOptionsMenu(Menu menu, MenuInflater menuInflater) {
super.onCreateOptionsMenu(menu, menuInflater);
menuInflater.inflate(R.menu.fragment_photo_gallery, menu);
MenuItem searchItem = menu.findItem(R.id.menu_item_search);
final SearchView searchView = (SearchView) searchItem.getActionView();
searchView.setOnQueryTextListener(…);
searchView.setOnSearchClickListener(…);
MenuItem toggleItem = menu.findItem(R.id.menu_item_toggle_polling);
if (PollService.isServiceAlarmOn(getActivity())) {
toggleItem.setTitle(R.string.stop_polling);
} else {
toggleItem.setTitle(R.string.start_polling);
}
}
...
}
Next, in onOptionsItemSelected(MenuItem), tell PhotoGalleryActivity to update its toolbar options menu.
Listing 26.15 Invalidating your options menu (PhotoGalleryFragment.java)
...
@Override
public boolean onOptionsItemSelected(MenuItem item) {
switch (item.getItemId()) {
case R.id.menu_item_clear:
...
case R.id.menu_item_toggle_polling:
boolean shouldStartAlarm = !PollService.isServiceAlarmOn(getActivity());
PollService.setServiceAlarm(getActivity(), shouldStartAlarm);
getActivity().invalidateOptionsMenu();
return true;
default:
return super.onOptionsItemSelected(item);
}
}
...
With that, your code to toggle the options menu contents should work great. And yet… there is something missing.
Notifications
Your service is now running and doing its thing in the background. But the user never knows a thing about it, so it is not worth much.
When your service needs to communicate something to the user, the proper tool is almost always a notification. Notifications are items that appear in the notifications drawer, which the user can access by dragging it down from the top of the screen.
To post a notification, you first need to create a Notification object. Notifications are created by using a builder object, much like AlertDialog was in Chapter 12. At a minimum, your Notification should have:
· ticker text to display in the status bar when the notification is first shown on pre-Lollipop devices (starting with Android 5.0 (Lollipop), ticker text is no longer displayed in the status bar but is still relevant for accessibility services)
· an icon to show in the status bar (the icon will appear after the ticker text goes away on pre-Lollipop devices)
· a view to show in the notification drawer to represent the notification itself
· a PendingIntent to fire when the user presses the notification in the drawer
Once you have created a Notification object, you can post it by calling notify(int, Notification) on the NotificationManager system service.
First you need to add some plumbing code, as shown in Listing 26.16. Open PhotoGalleryActivity and add a static newIntent(Context) method. This method will return an Intent instance that can be used to start PhotoGalleryActivity. (Eventually PollService will callPhotoGalleryActivity.newIntent(…), wrap the resulting intent in a PendingIntent, and set that PendingIntent on a notification.)
Listing 26.16 Add newIntent(…) to PhotoGalleryActivity (PhotoGalleryActivity.java)
public class PhotoGalleryActivity extends SingleFragmentActivity {
public static Intent newIntent(Context context) {
return new Intent(context, PhotoGalleryActivity.class);
}
@Override
protected Fragment createFragment() {
return PhotoGalleryFragment.newInstance();
}
}
Make PollService notify the user that a new result is ready by adding the code in Listing 26.17, which creates a Notification and calls NotificationManager.notify(int, Notification).
Listing 26.17 Adding a notification (PollService.java)
...
@Override
protected void onHandleIntent(Intent intent) {
...
String resultId = items.get(0).getId();
if (resultId.equals(lastResultId)) {
Log.i(TAG, "Got an old result: " + resultId);
} else {
Log.i(TAG, "Got a new result: " + resultId);
Resources resources = getResources();
Intent i = PhotoGalleryActivity.newIntent(this);
PendingIntent pi = PendingIntent.getActivity(this, 0, i, 0);
Notification notification = new NotificationCompat.Builder(this)
.setTicker(resources.getString(R.string.new_pictures_title))
.setSmallIcon(android.R.drawable.ic_menu_report_image)
.setContentTitle(resources.getString(R.string.new_pictures_title))
.setContentText(resources.getString(R.string.new_pictures_text))
.setContentIntent(pi)
.setAutoCancel(true)
.build();
NotificationManagerCompat notificationManager =
NotificationManagerCompat.from(this);
notificationManager.notify(0, notification);
}
QueryPreferences.setLastResultId(this, resultId);
}
...
Let’s go over this from top to bottom. First, you configure the ticker text and small icon by calling setTicker(CharSequence) and setSmallIcon(int). (Note that the icon resource referenced is provided as part of the Android framework, denoted by the package nameandroid.R.drawable.some_drawable_resource_name, so you do not have to pull the icon image into your resource folder.)
After that, you configure the appearance of your Notification in the drawer itself. It is possible to create a completely custom look and feel, but it is easier to use the standard look for a notification, which features an icon, a title, and a text area. It will use the value from setSmallIcon(int) for the icon. To set the title and text, you call setContentTitle(CharSequence) and setContentText(CharSequence), respectively.
Next, you must specify what happens when the user presses your Notification. Like AlarmManager, this is done using a PendingIntent. The PendingIntent you pass in to setContentIntent(PendingIntent) will be fired when the user presses your Notification in the drawer. CallingsetAutoCancel(true) tweaks that behavior a little bit. With setAutoCancel(true) set, your notification will also be deleted from the notification drawer when the user presses it.
Finally, you get an instance of NotificationManagerCompat from the current context (NotificationManagerCompat.from(this)) and call NotificationManagerCompat.notify(…) to post your notification. The integer parameter you pass to notify(…) is an identifier for your notification. It should be unique across your application. If you post a second notification with this same ID, it will replace the last notification you posted with that ID. This is how you would implement a progress bar or other dynamic visuals.
And that is it. Run your app and turn polling on. You should eventually see a notification icon appear in the status bar. In the notification tray you will see a notification indicating that new photo results are available.
After you are satisfied that everything is working correctly, change your alarm constant to be something more sensible. (Using one of AlarmManager’s predefined interval constants ensures your app will get inexact repeating alarm behavior on pre-KitKat devices.)
Listing 26.18 Changing to a sensible alarm constant (PollService.java)
public class PollService extends IntentService {
private static final String TAG = "PollService";
public static final int POLL_INTERVAL = 1000 * 60; // 60 seconds
private static final long POLL_INTERVAL = AlarmManager.INTERVAL_FIFTEEN_MINUTES;
...
}
Challenge: Notifications on Android Wear
Since you used NotificationCompat and NotificationManagerCompat, your notifications will automatically appear on an Android Wear device if the user has it paired with an Android device running your app. Users who receive the notification on a Wear device can swipe left to be presented with the option to Open the app on the connected handheld. Pressing Open on the Wear device will issue the notification’s pending intent on the connected handheld device.
To test this out, set up an Android Wear emulator and pair it with a handheld device running your app. Details about how to do this can be found on http://developer.android.com.
For the More Curious: Service Details
We recommend using IntentService for most service tasks. If the IntentService pattern does not suit your architecture for a particular app, you will need to understand more about services to implement your own. Prepare for an infobomb, though – there are a lot of details and ins and outs to using services.
What a service does (and does not) do
A service is an application component that provides lifecycle callbacks, just like an activity. Those callbacks are even performed on the main UI thread for you, just like in an activity.
A service does not run any code on a background thread out of the box. This is the #1 reason we recommend IntentService. Most nontrivial services will require a background thread of some kind, and IntentService automatically manages the boilerplate code you need to accomplish that.
Let’s see what lifecycle callbacks a service has.
A service’s lifecycle
For a service started with startService(Intent), life is fairly simple. There are three lifecycle callbacks.
· onCreate(…) – called when the service is created.
· onStartCommand(Intent, int, int) – called once each time a component starts the service with startService(Intent). The two integer parameters are a set of flags and a start ID. The flags are used to signify whether this intent delivery is an attempt to redeliver an intent or if it is an attempt to retry a delivery which never made it to (or never returned from) onStartCommand(Intent, int, int). The start ID will be different for every call to onStartCommand(Intent, int, int), so it may be used to distinguish this command from others.
· onDestroy() – called when the service no longer needs to be alive. Often this will be after the service is stopped.
The onDestroy() callback is called when the service stops. This can happen in different ways, depending on what type of service you have written. The type of service is determined by the value returned from onStartCommand(…), which may be Service.START_NOT_STICKY, START_REDELIVER_INTENT, or START_STICKY.
Non-sticky services
IntentService is a non-sticky service, so let’s start there. A non-sticky service stops when the service itself says it is done. To make your service non-sticky, return either START_NOT_STICKY or START_REDELIVER_INTENT.
You tell Android that you are done by calling either stopSelf() or stopSelf(int). The first method, stopSelf(), is unconditional. It will always stop your service, no matter how many times onStartCommand(…) has been called.
The second method, stopSelf(int), is conditional. This method takes in the start ID received in onStartCommand(…). This method will only stop your service if this was the most recent start ID received. (This is how IntentService works under the hood.)
So what is the difference between returning START_NOT_STICKY and START_REDELIVER_INTENT? The difference is in how your service behaves if the system needs to shut it down before it is done. A START_NOT_STICKY service will die and disappear into the void. START_REDELIVER_INTENT, on the other hand, will attempt to start up the service again later, when resources are less constrained.
Choosing between START_NOT_STICKY and START_REDELIVER_INTENT is a matter of deciding how important that operation is to your application. If the service is not critical, choose START_NOT_STICKY. In PhotoGallery, your service is being run repeatedly on an alarm. If one invocation falls through the cracks, it is not a big deal, so: START_NOT_STICKY. This is the default behavior for IntentService. To switch to using START_REDELIVER_INTENT, call IntentService.setIntentRedelivery(true).
Sticky services
A sticky service stays started until something outside the service tells it to stop by calling Context.stopService(Intent). To make your service sticky, return START_STICKY.
Once a sticky service is started it is “on” until a component calls Context.stopService(Intent). If the service needs to be killed for some reason, it will be restarted again with a null intent passed in to onStartCommand(…).
A sticky service may be appropriate for a long-running service, like a music player, which needs to stick around until the user tells it to stop. Even then, it is worth considering an alternative architecture using non-sticky services. Sticky service management is inconvenient, because it is difficult to tell whether the service is already started.
Bound services
In addition to all this, it is possible to bind to a service by using the bindService(Intent, ServiceConnection, int) method. This allows you to call methods on the service directly. ServiceConnection is an object that represents your service binding and receives all binding callbacks.
In a fragment, your binding code would look something like this:
private ServiceConnection mServiceConnection = new ServiceConnection() {
public void onServiceConnected(ComponentName className,
IBinder service) {
// Used to communicate with the service
MyBinder binder = (MyBinder)service;
}
public void onServiceDisconnected(ComponentName className) {
}
};
@Override
public void onCreate(Bundle savedInstanceState) {
super.onCreate(savedInstanceState);
Intent i = new Intent(getActivity(), MyService.class);
getActivity().bindService(i, mServiceConnection, 0);
}
@Override
public void onDestroy() {
super.onDestroy();
getActivity().unbindService(mServiceConnection);
}
On the service’s side, binding introduces two additional lifecycle callbacks:
· onBind(Intent) – called every time the service is bound to. Returns the IBinder object received in ServiceConnection.onServiceConnected(ComponentName, IBinder).
· onUnbind(Intent) – called when a service’s binding is terminated.
Local service binding
So what does MyBinder look like? If the service is a local service, then it may be a simple Java object that lives in your local process. Usually this is used to provide a handle to directly call methods on your service:
private class MyBinder extends IBinder {
public MyService getService() {
return MyService.this;
}
}
@Override
public void onBind(Intent intent) {
return new MyBinder();
}
This pattern looks exciting. It is the only place in Android that enables one Android component to directly talk to another. However, we do not recommend it. Since services are effectively singletons, using them this way provides no major benefits over just using a singleton instead.
Remote service binding
Binding is more useful for remote services, because they give applications in other processes the ability to invoke methods on your service. Creating a remote service binder is an advanced topic and beyond the scope of this book. Check out the AIDL guide in the Android documentation or the Messenger class for more details.
For the More Curious: JobScheduler and JobServices
In this chapter, you saw how to use AlarmManager, an IntentService, and PendingIntents to stitch together a periodically executing background task. In doing that, you had to do a few things manually:
· schedule a periodic task
· check whether that periodic task is currently running
· check whether the network is currently up
You might want to do more than that in the real world. For example, you might want to implement a backoff-and-retry policy if your request fails, or restrict network access to unmetered Internet access. What if you wanted to only check for new photos while the device was charging? These things are certainly possible, but they are not easy or obvious.
On top of that, there are some fundamental problems with how the implementation in this chapter is hooked up into the OS. For example, even if your service spins up and sees that there is nothing to do, it still has to spin up. There is no way to say, “Do not spin up my service in these circumstances.” Another problem: you have to do extra work to make sure your job stays scheduled after a reboot. (You will see how that works in the next chapter, when you receive the BOOT_COMPLETED broadcast intent.)
We have presented this way of doing things because those are the APIs that are available in older versions of Android. In Lollipop (API 21), however, a new API was introduced that is designed to do exactly what your PollService does: the JobScheduler API. JobScheduler allows you to define services to run particular jobs, and then schedule them to run only when particular conditions apply.
Here is how it works. First, you create a service to handle your job. That is going to be some kind of JobService subclass. A JobService has two methods to override: onStartJob(JobParameters) and onStopJob(JobParameters). (Do not enter this code anywhere. It is only a sample for purposes of this discussion.)
public class PollService extends JobService {
@Override
public boolean onStartJob(JobParameters params) {
return false;
}
@Override
public boolean onStopJob(JobParameters params) {
return false;
}
}
When Android is ready to run your job, your service will be started and you will receive a call to onStartJob(…) on your main thread. Returning false from this method means, “I went ahead and did everything this job needs, so it is complete.” Returning true means, “Got it. I am working on this job now, but I am not done yet.”
Unlike IntentService, JobService expects you to do your own threading, which is a minor hassle. You might do that with an AsyncTask:
private PollTask mCurrentTask;
@Override
public boolean onStartJob(JobParameters params) {
mCurrentTask = new PollTask();
mCurrentTask.execute(params);
return true;
}
private class PollTask extends AsyncTask<JobParameters,Void,Void> {
@Override
protected Void doInBackground(JobParameters... params) {
JobParameters jobParams = params[0];
// Poll Flickr for new images
jobFinished(jobParams, false);
return null;
}
}
When you are done with your job, you call jobFinished(JobParameters, boolean) to say that you are done. Passing in true for the second parameter means that you were not able to get the job done this time, and that the job should be rescheduled again for the future.
The onStopJob(JobParameters) callback is for when your job needs to be interrupted. Maybe you only want your job to run when a WiFi connection is available. If the phone moves out of WiFi range before you call jobFinished(…), you will get a call to onStopJob(…), which is your cue to drop everything immediately.
@Override
public boolean onStopJob(JobParameters params) {
if (mCurrentTask != null) {
mCurrentTask.cancel(true);
}
return true;
}
A call to onStopJob(…) is an indication that your service is about to be shut down. No waiting is allowed: you must stop your business immediately. Returning true here means that your job should be rescheduled to run again in the future. Returning false means, “Okay, I was done anyway. Do not reschedule me.”
When you register your service in the manifest, you must export it and add a permission:
<service
android:name=".PollService"
android:permission="android.permission.BIND_JOB_SERVICE"
android:exported="true"/>
Exporting it exposes it to the world at large, but adding the permission restricts it back down so that only JobScheduler can run it.
Once you have created a JobService, kicking it off is a snap. You can use JobScheduler to check on whether your job has been scheduled.
final int JOB_ID = 1;
JobScheduler scheduler = (JobScheduler)
context.getSystemService(Context.JOB_SCHEDULER_SERVICE);
boolean hasBeenScheduled = false;
for (JobInfo jobInfo : scheduler.getAllPendingJobs()) {
if (jobInfo.getId() == JOB_ID) {
hasBeenScheduled = true;
}
}
And if it has not, you can create a new JobInfo that says when you want your job to run. Hmm, when should PollService run? How about something like this:
final int JOB_ID = 1;
JobScheduler scheduler = (JobScheduler)
context.getSystemService(Context.JOB_SCHEDULER_SERVICE);
JobInfo jobInfo = new JobInfo.Builder(
JOB_ID, new ComponentName(context, PollService.class))
.setRequiredNetworkType(JobInfo.NETWORK_TYPE_UNMETERED)
.setPeriodic(1000 * 60 * 15)
.setPersisted(true)
.build();
scheduler.schedule(jobInfo);
This schedules your job to run every 15 minutes, but only on WiFi or another unmetered network. Calling setPersisted(true) also makes your job persisted: it will survive a reboot. Check out the reference documentation to see all the other ways you can configure a JobInfo.
For the More Curious: Sync Adapters
Yet another way to set up a regularly polling web service is to use a sync adapter. Sync adapters are not adapters like you have seen before. Instead, their sole purpose is to sync data with a data source (uploading, downloading, or both). Unlike JobScheduler, sync adapters have been around for a while, so you do not have to worry about which version of Android you are running on.
Like JobScheduler, sync adapters can be used as a replacement for the AlarmManager setup that you had in PhotoGallery. Syncs from multiple applications are grouped together by default, without you having to set flags a certain way. Furthermore, you do not have to worry about resetting the sync alarm across reboots because sync adapters handle this for you.
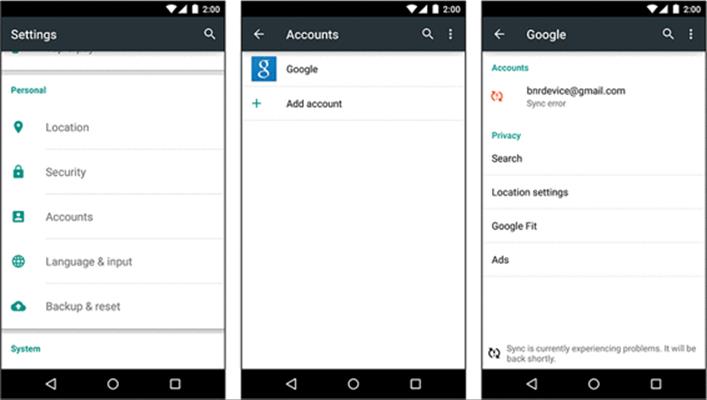
Sync adapters also integrate nicely with the OS from a user perspective. You can expose your app as a sync-able account that the user can manage through the Settings → Accounts menu. This is where users manage accounts for other apps that use sync adapters, such as Google’s suite of apps (Figure 26.2).
Figure 26.2 Accounts settings
While using a sync adapter makes correct usage of scheduling repeating network work easier, and allows you to get rid of the alarm management and pending intent code, a sync adapter does require a bunch more code. First, a sync adapter does not do any of your web requests for you, so you still have to write that code (e.g., FlickrFetchr). Second, it requires a content provider implementation to wrap the data, account, and authenticator classes to represent an account on a remote server (even if the server does not require authentication), and a sync adapter and sync service implementation. It also requires working knowledge of bound services.
So if your application already uses a ContentProvider for its data layer and requires account authentication, using a sync adapter is a good option for you to consider. It is a big advantage that sync adapters integrate with the user interface provided by the OS, too. JobScheduler does not do that, either. If none of those considerations apply, the extra code required might not be worth it.
The online developer docs provide a tutorial on using sync adapters: https://developer.android.com/training/sync-adapters/index.html. Check it out to learn more.
Challenge: Using JobService on Lollipop
For an additional challenge, create a second implementation of PollService that subclasses JobService and is run using JobScheduler. In your PollService startup code, check to see whether you are on Lollipop. If so, use JobScheduler to schedule your JobService. Otherwise, fall back on your oldAlarmManager implementation.