Android Programming: The Big Nerd Ranch Guide (2015)
Chapter 5. Your Second Activity
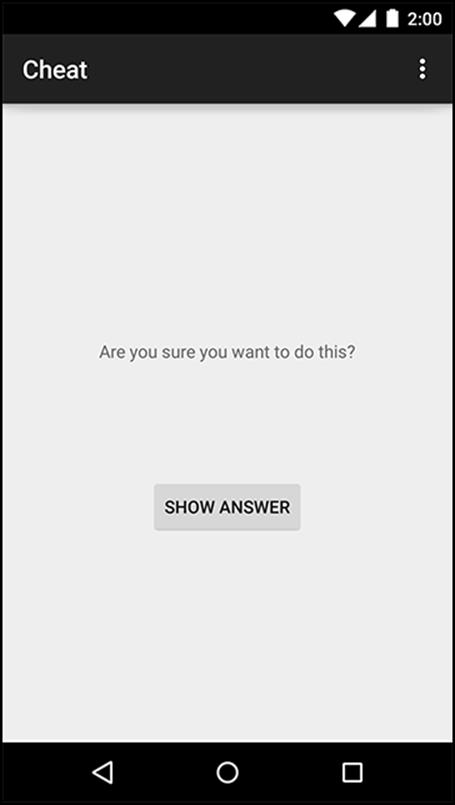
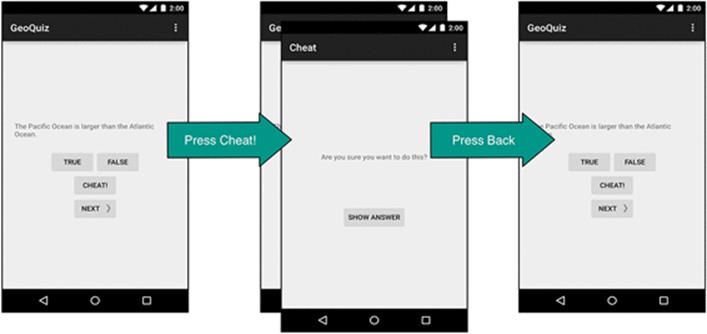
In this chapter, you will add a second activity to GeoQuiz. An activity controls a screen of information, and this activity will add a second screen that offers users a chance to see the answer to the current question. Figure 5.1 shows the new activity.
Figure 5.1 CheatActivity offers the chance to peek at the answer
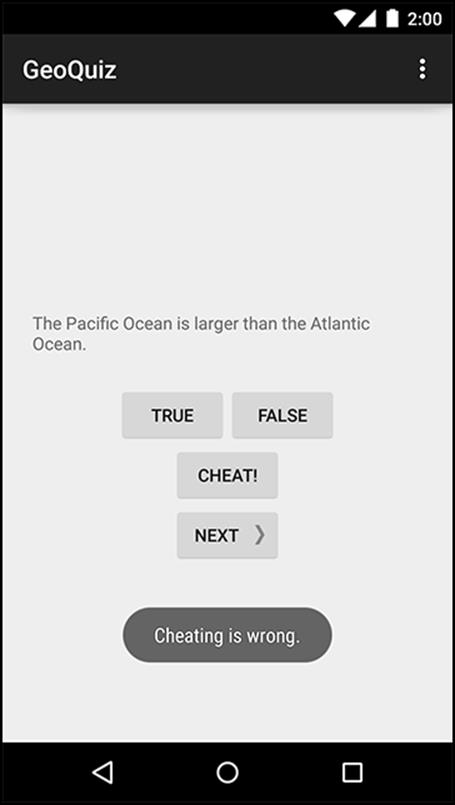
If the user chooses to view the answer and then returns to the QuizActivity and answers the question, he or she will get a new message, shown in Figure 5.2.
Figure 5.2 QuizActivity knows if you’ve been cheating
Why is this a good Android programming exercise? You will learn how to:
· Create a new activity and a new layout for it.
· Start an activity from another activity. Starting an activity means asking the OS to create an activity instance and call its onCreate(Bundle) method.
· Pass data between the parent (starting) activity and the child (started) activity.
Setting Up a Second Activity
There is a lot to do in this chapter. Fortunately, some of the grunt work can be done for you by Android Studio’s New Activity wizard.
But before you invoke the magic, open strings.xml and add all the strings you will need for this chapter.
Listing 5.1 Adding strings (strings.xml)
<?xml version="1.0" encoding="utf-8"?>
<resources>
...
<string name="question_asia">Lake Baikal is the world\'s oldest and deepest
freshwater lake.</string>
<string name="warning_text">Are you sure you want to do this?</string>
<string name="show_answer_button">Show Answer</string>
<string name="cheat_button">Cheat!</string>
<string name="judgment_toast">Cheating is wrong.</string>
</resources>
Creating a new activity
Creating an activity typically involves touching at least three files: the Java class file, an XML layout, and the application manifest. If you touch those files in the wrong ways, Android can get mad. To ensure that you do it right, you should use Android Studio’s New Activity wizard.
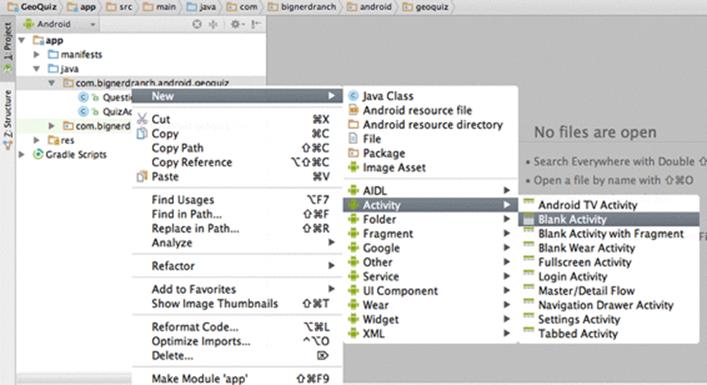
Launch the New Activity wizard by right-clicking on your com.bignerdranch.android.geoquiz package in the Project Tool Window. Choose New → Activity → Blank Activity as shown in Figure 5.3.
Figure 5.3 The New Activity Wizard menu
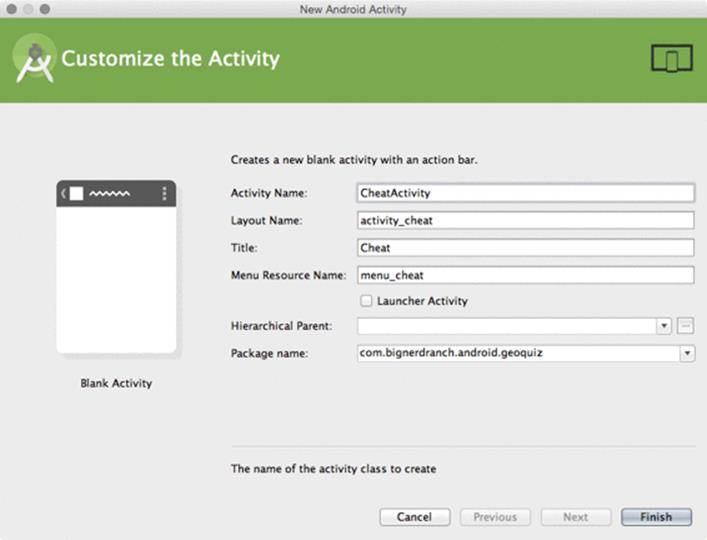
You should then see a dialog like Figure 5.4. Set Activity Name to CheatActivity. This is the name of your Activity subclass. Layout Name should be automatically set to activity_cheat. This will be the base name of the layout file the wizard creates. Title will be set to “CheatActivity” for you, but since this is a string the user will see, change it to simply “Cheat”.
The defaults for the remaining fields should be fine, but take care to ensure that the package name is what you expect. This determines where CheatActivity.java will live on the filesystem. Click the Finish button to make the magic happen.
Figure 5.4 The New Blank Activity wizard
Now it is time to make the user interface look good. The screenshot at the beginning of the chapter shows you what CheatActivity’s view should look like. Figure 5.5 shows the widget definitions.
Figure 5.5 Diagram of layout for CheatActivity
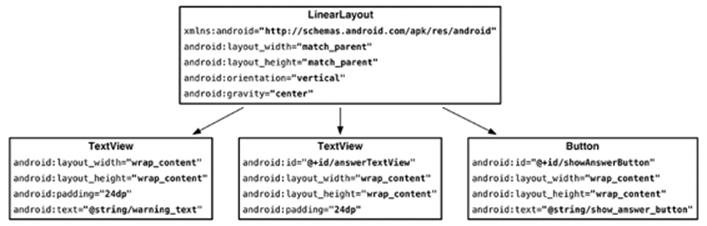
After the wizard completes its work, it should open activity_cheat.xml in the layout directory. If it did not, go ahead and open it now, and switch to the Text (XML) view.
Try creating the XML for the layout using Figure 5.5 as a guide. Replace the sample layout with a new LinearLayout and so on down the tree. After Chapter 8, we will only show layout diagrams like Figure 5.5 instead of long passages of XML, so it is a good idea to start using them now to create your layout XML. You can check your work against Listing 5.2.
Listing 5.2 Filling out the second activity’s layout (activity_cheat.xml)
<LinearLayout xmlns:android="http://schemas.android.com/apk/res/android"
xmlns:tools="http://schemas.android.com/tools"
android:layout_width="match_parent"
android:layout_height="match_parent"
android:gravity="center"
android:orientation="vertical"
tools:context="com.bignerdranch.android.geoquiz.CheatActivity">
<TextView
android:layout_width="wrap_content"
android:layout_height="wrap_content"
android:padding="24dp"
android:text="@string/warning_text"/>
<TextView
android:id="@+id/answer_text_view"
android:layout_width="wrap_content"
android:layout_height="wrap_content"
android:padding="24dp"
tools:text="Answer"/>
<Button
android:id="@+id/show_answer_button"
android:layout_width="wrap_content"
android:layout_height="wrap_content"
android:text="@string/show_answer_button"/>
</LinearLayout>
Notice the special XML namespace for tools and the tools:text attribute on the TextView widget where the answer will appear. This namespace allows you to override any attribute on a widget for the purpose of displaying it differently in the Android Studio preview. Since TextView has atext attribute, you can provide a literal dummy value for it to help you know what it will look like at runtime. The value “Answer” will never show up in the real app. Handy!
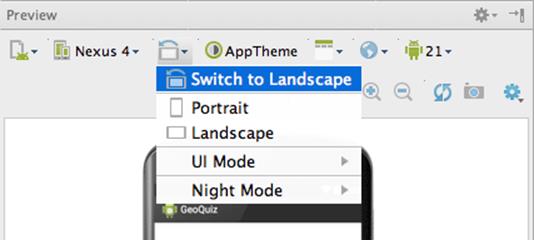
You will not be creating a landscape alternative for activity_cheat.xml, but there is a way to preview how the default layout will appear in landscape.
In the Preview tool window, find the button in the toolbar above the preview pane that looks like a device with a curved arrow. Click this button to change the orientation of the preview (Figure 5.6).
Figure 5.6 Previewing activity_cheat.xml in landscape
The default layout works well enough in both orientations, so let’s move on to fleshing out the activity subclass.
A new activity subclass
In the Project tool window, find the com.bignerdranch.android.geoquiz Java package and open the CheatActivity class, which is in the CheatActivity.java file.
This class already includes a basic implementation of onCreate(…) that passes the resource ID of the layout defined in activity_cheat.xml to setContentView(…).
CheatActivity will eventually do more in its onCreate(…) method. For now, let’s take a look at another thing the New Activity wizard did for you: declaring CheatActivity in the application’s manifest.
Declaring activities in the manifest
The manifest is an XML file containing metadata that describes your application to the Android OS. The file is always named AndroidManifest.xml, and it lives in the app/manifests directory of your project.
In the Project tool window, find and open AndroidManifest.xml. You can also use Android Studio’s Quick Open dialog by pressing Command+Shift+O (Ctrl+Shift+N) and starting to type the filename. Once it has guessed the right file, press Return (Enter) to open it.
Every activity in an application must be declared in the manifest so that the OS can access it.
When you used the New Application wizard to create QuizActivity, the wizard declared the activity for you. Likewise, the New Activity wizard declared CheatActivity by adding the XML highlighted in Listing 5.3.
Listing 5.3 Declaring CheatActivity in the manifest (AndroidManifest.xml)
<?xml version="1.0" encoding="utf-8"?>
<manifest xmlns:android="http://schemas.android.com/apk/res/android"
package="com.bignerdranch.android.geoquiz" >
<application
android:allowBackup="true"
android:icon="@mipmap/ic_launcher"
android:label="@string/app_name"
android:theme="@style/AppTheme" >
<activity
android:name=".QuizActivity"
android:label="@string/app_name" >
<intent-filter>
<action android:name="android.intent.action.MAIN" />
<category android:name="android.intent.category.LAUNCHER" />
</intent-filter>
</activity>
<activity
android:name=".CheatActivity"
android:label="@string/title_activity_cheat" >
</activity>
</application>
</manifest>
The android:name attribute is required, and the dot at the start of this attribute’s value tells the OS that this activity’s class is in the package specified in the package attribute in the manifest element at the top of the file.
You will sometimes see a fully qualified android:name attribute: android:name="com.bignerdranch.android.geoquiz.CheatActivity". The long-form notation is identical to the version in Listing 5.3.
There are many interesting things in the manifest, but for now, let’s stay focused on getting CheatActivity up and running. You will learn about the different parts of the manifest in later chapters.
Adding a Cheat! button to QuizActivity
The plan is for the user to press a button in QuizActivity to get an instance of CheatActivity on screen. So you need new buttons in layout/activity_quiz.xml and layout-land/activity_quiz.xml.
In the default layout, add the new button as a direct child of the root LinearLayout. Its definition should come right before the Next button.
Listing 5.4 Adding a Cheat! button to the default layout (layout/activity_quiz.xml)
...
</LinearLayout>
<Button
android:id="@+id/cheat_button"
android:layout_width="wrap_content"
android:layout_height="wrap_content"
android:text="@string/cheat_button"/>
<Button
android:id="@+id/next_button"
android:layout_width="wrap_content"
android:layout_height="wrap_content"
android:text="@string/next_button"
android:drawableRight="@drawable/arrow_right"
android:drawablePadding="4dp"/>
</LinearLayout>
In the landscape layout, have the new button appear at the bottom and center of the root FrameLayout.
Listing 5.5 Adding a Cheat! button to the landscape layout (layout-land/activity_quiz.xml)
...
</LinearLayout>
<Button
android:id="@+id/cheat_button"
android:layout_width="wrap_content"
android:layout_height="wrap_content"
android:layout_gravity="bottom|center"
android:text="@string/cheat_button" />
<Button
android:id="@+id/next_button"
android:layout_width="wrap_content"
android:layout_height="wrap_content"
android:layout_gravity="bottom|right"
android:text="@string/next_button"
android:drawableRight="@drawable/arrow_right"
android:drawablePadding="4dp" />
</FrameLayout>
Save your layout files and reopen QuizActivity.java. Add a variable, get a reference, and set a View.OnClickListener stub for the Cheat! button.
Listing 5.6 Wiring up the Cheat! button (QuizActivity.java)
public class QuizActivity extends AppCompatActivity {
...
private Button mNextButton;
private Button mCheatButton;
...
@Override
protected void onCreate(Bundle savedInstanceState) {
...
mCheatButton = (Button)findViewById(R.id.cheat_button);
mCheatButton.setOnClickListener(new View.OnClickListener() {
@Override
public void onClick(View v) {
// Start CheatActivity
}
});
if (savedInstanceState != null) {
mCurrentIndex = savedInstanceState.getInt(KEY_INDEX, 0);
}
updateQuestion();
}
...
}
Now you can get to the business of starting CheatActivity.
Starting an Activity
The simplest way one activity can start another is with the Activity method:
public void startActivity(Intent intent)
You might guess that startActivity(…) is a static method that you call on the Activity subclass that you want to start. But it is not. When an activity calls startActivity(…), this call is sent to the OS.
In particular, it is sent to a part of the OS called the ActivityManager. The ActivityManager then creates the Activity instance and calls its onCreate(…) method, as shown in Figure 5.7.
Figure 5.7 Starting an activity
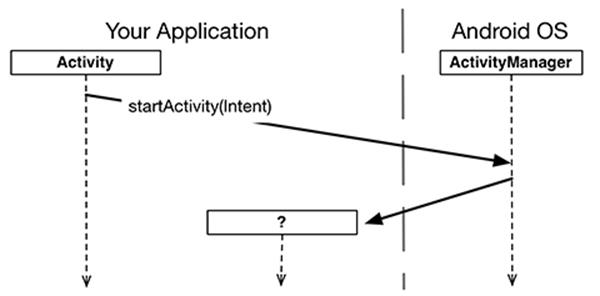
How does the ActivityManager know which Activity to start? That information is in the Intent parameter.
Communicating with intents
An intent is an object that a component can use to communicate with the OS. The only components you have seen so far are activities, but there are also services, broadcast receivers, and content providers.
Intents are multi-purpose communication tools, and the Intent class provides different constructors depending on what you are using the intent to do.
In this case, you are using an intent to tell the ActivityManager which activity to start, so you will use this constructor:
public Intent(Context packageContext, Class<?> cls)
The Class argument specifies the activity class that the ActivityManager should start. The Context argument tells the ActivityManager which application package the activity class can be found in (Figure 5.8).
Figure 5.8 The intent: telling ActivityManager what to do
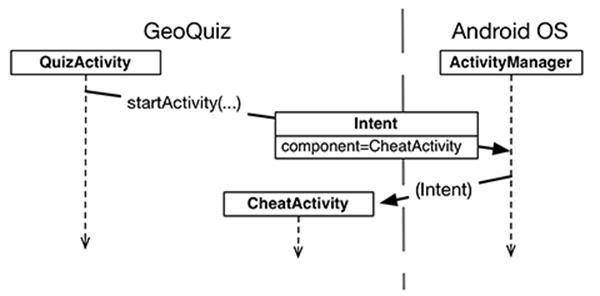
Within mCheatButton’s listener, create an Intent that includes the CheatActivity class. Then pass the intent into startActivity(Intent) (Listing 5.7).
Listing 5.7 Starting CheatActivity (QuizActivity.java)
...
mCheatButton = (Button)findViewById(R.id.cheat_button);
mCheatButton.setOnClickListener(new View.OnClickListener() {
@Override
public void onClick(View v) {
// Start CheatActivity
Intent i = new Intent(QuizActivity.this, CheatActivity.class);
startActivity(i);
}
});
...
Before starting the activity, the ActivityManager checks the package’s manifest for a declaration with the same name as the specified Class. If it finds a declaration, it starts the activity, and all is well. If it does not, you get a nasty ActivityNotFoundException, which can crash your app. This is why all of your activities must be declared in the manifest.
Run GeoQuiz. Press the Cheat! button, and an instance of your new activity will appear on screen. Now press the Back button. This will destroy the CheatActivity and return you to the QuizActivity.
Explicit and implicit intents
When you create an Intent with a Context and a Class object, you are creating an explicit intent. You use explicit intents to start activities within your application.
It may seem strange that two activities within your application must communicate via the ActivityManager, which is outside of your application. However, this pattern makes it easy for an activity in one application to work with an activity in another application.
When an activity in your application wants to start an activity in another application, you create an implicit intent. You will use implicit intents in Chapter 15.
Passing Data Between Activities
Now that you have a QuizActivity and a CheatActivity, you can think about passing data between them. Figure 5.9 shows what data you will pass between the two activities.
Figure 5.9 The conversation between QuizActivity and CheatActivity
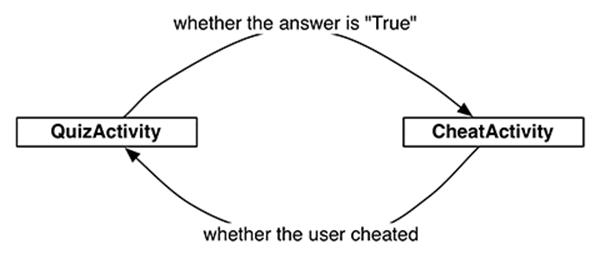
The QuizActivity will inform the CheatActivity of the answer to the current question when the CheatActivity is started.
When the user presses the Back button to return to the QuizActivity, the CheatActivity will be destroyed. In its last gasp, it will send data to the QuizActivity about whether the user cheated.
You will start with passing data from QuizActivity to CheatActivity.
Using intent extras
To inform the CheatActivity of the answer to the current question, you will pass it the value of
mQuestionBank[mCurrentIndex].isAnswerTrue()
You will send this value as an extra on the Intent that is passed into startActivity(Intent).
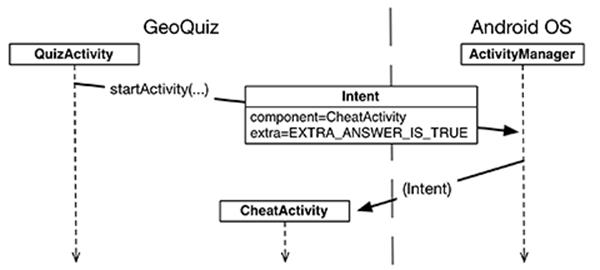
Extras are arbitrary data that the calling activity can include with an intent. You can think of them like constructor arguments, even though you cannot use a custom constructor with an activity subclass (Android creates activity instances and is responsible for their lifecycle). The OS forwards the intent to the recipient activity, which can then access the extras and retrieve the data, as shown in Figure 5.10.
Figure 5.10 Intent extras: communicating with other activities
An extra is structured as a key-value pair, like the one you used to save out the value of mCurrentIndex in QuizActivity.onSaveInstanceState(Bundle).
To add an extra to an intent, you use Intent.putExtra(…). In particular, you will be calling
public Intent putExtra(String name, boolean value)
Intent.putExtra(…) comes in many flavors, but it always has two arguments. The first argument is always a String key, and the second argument is the value, whose type will vary. It returns the Intent itself, so you can chain multiple calls if you need to.
In CheatActivity.java, add a key for the extra.
Listing 5.8 Adding extra constant (CheatActivity.java)
public class CheatActivity extends AppCompatActivity {
private static final String EXTRA_ANSWER_IS_TRUE =
"com.bignerdranch.android.geoquiz.answer_is_true";
...
An activity may be started from several different places, so you should define keys for extras on the activities that retrieve and use them. Using your package name as a qualifier for your extra, as shown in Listing 5.8, prevents name collisions with extras from other apps.
Now you could return to QuizActivity and put the extra on the intent, but there is a better approach. There is no reason for QuizActivity, or any other code in your app, to know the implementation details of what CheatActivity expects as extras on its Intent. Instead, you can encapsulate that work into a newIntent(…) method.
Create this method in CheatActivity now:
Listing 5.9 A newIntent(…) method for CheatActivity (CheatActivity.java)
public class CheatActivity extends AppCompatActivity {
private static final String EXTRA_ANSWER_IS_TRUE =
"com.bignerdranch.android.geoquiz.answer_is_true";
public static Intent newIntent(Context packageContext, boolean answerIsTrue) {
Intent i = new Intent(packageContext, CheatActivity.class);
i.putExtra(EXTRA_ANSWER_IS_TRUE, answerIsTrue);
return i;
}
...
This static method allows us to create an Intent properly configured with the extras CheatActivity will need. The answerIsTrue argument, a boolean, is put into the intent with a private name using the EXTRA_ANSWER_IS_TRUE constant. You will extract this value momentarily. Using anewIntent(…) method like this for your activity subclasses will make it easy for other code to properly configure their launching intents.
Speaking of other code, use this new method in CheatActivity’s cheat button listener now.
Listing 5.10 Launching CheatActivity with an extra (QuizActivity.java)
...
mCheatButton.setOnClickListener(new View.OnClickListener() {
@Override
public void onClick(View v) {
// Start CheatActivity
Intent i = new Intent(QuizActivity.this, CheatActivity.class);
boolean answerIsTrue = mQuestionBank[mCurrentIndex].isAnswerTrue();
Intent i = CheatActivity.newIntent(QuizActivity.this, answerIsTrue);
startActivity(i);
}
});
updateQuestion();
}
You only need one extra, but you can put multiple extras on an Intent if you need to. If you do, add more arguments to your newIntent(…) method to stay consistent with the pattern.
To retrieve the value from the extra, you will use:
public boolean getBooleanExtra(String name, boolean defaultValue)
The first argument is the name of the extra. The second argument of getBooleanExtra(…) is a default answer if the key is not found.
In CheatActivity, retrieve the value from the extra in onCreate(Bundle) and store it in a member variable.
Listing 5.11 Using an extra (CheatActivity.java)
public class CheatActivity extends AppCompatActivity {
private static final String EXTRA_ANSWER_IS_TRUE =
"com.bignerdranch.android.geoquiz.answer_is_true";
private boolean mAnswerIsTrue;
...
@Override
protected void onCreate(Bundle savedInstanceState) {
super.onCreate(savedInstanceState);
setContentView(R.layout.activity_cheat);
mAnswerIsTrue = getIntent().getBooleanExtra(EXTRA_ANSWER_IS_TRUE, false);
}
...
}
Note that Activity.getIntent() always returns the Intent that started the activity. This is what you sent when calling startActivity(Intent).
Finally, wire up the answer TextView and the Show Answer button to use the retrieved value.
Listing 5.12 Enabling cheating (CheatActivity.java)
public class CheatActivity extends AppCompatActivity {
...
private boolean mAnswerIsTrue;
private TextView mAnswerTextView;
private Button mShowAnswer;
...
@Override
protected void onCreate(Bundle savedInstanceState) {
super.onCreate(savedInstanceState);
setContentView(R.layout.activity_cheat);
mAnswerIsTrue = getIntent().getBooleanExtra(EXTRA_ANSWER_IS_TRUE, false);
mAnswerTextView = (TextView) findViewById(R.id.answer_text_view);
mShowAnswer = (Button) findViewById(R.id.show_answer_button);
mShowAnswer.setOnClickListener(new View.OnClickListener() {
@Override
public void onClick(View v) {
if (mAnswerIsTrue) {
mAnswerTextView.setText(R.string.true_button);
} else {
mAnswerTextView.setText(R.string.false_button);
}
}
});
}
}
This code is pretty straightforward. You set the TextView’s text using TextView.setText(int). TextView.setText(…) has many variations, and here you use the one that accepts the resource ID of a string resource.
Run GeoQuiz. Press Cheat! to get to CheatActivity. Then press Show Answer to reveal the answer to the current question.
Getting a result back from a child activity
At this point, the user can cheat with impunity. Let’s fix that by having the CheatActivity tell the QuizActivity whether the user chose to view the answer.
When you want to hear back from the child activity, you call the following Activity method:
public void startActivityForResult(Intent intent, int requestCode)
The first parameter is the same intent as before. The second parameter is the request code. The request code is a user-defined integer that is sent to the child activity and then received back by the parent. It is used when an activity starts more than one type of child activity and needs to know who is reporting back. QuizActivity will only ever start one type of child activity, but using a constant for the request code is a best practice that will set you up well for future changes.
In QuizActivity, modify mCheatButton’s listener to call startActivityForResult(Intent, int).
Listing 5.13 Calling startActivityForResult(…) (QuizActivity.java)
public class QuizActivity extends AppCompatActivity {
private static final String TAG = "QuizActivity";
private static final String KEY_INDEX = "index";
private static final int REQUEST_CODE_CHEAT = 0;
@Override
protected void onCreate(Bundle savedInstanceState) {
...
mCheatButton.setOnClickListener(new View.OnClickListener() {
@Override
public void onClick(View v) {
boolean answerIsTrue = mQuestionBank[mCurrentIndex].isAnswerTrue();
Intent i = CheatActivity.newIntent(QuizActivity.this, answerIsTrue);
startActivity(i);
startActivityForResult(i, REQUEST_CODE_CHEAT);
}
});
...
Setting a result
There are two methods you can call in the child activity to send data back to the parent:
public final void setResult(int resultCode)
public final void setResult(int resultCode, Intent data)
Typically, the result code is one of two predefined constants: Activity.RESULT_OK or Activity.RESULT_CANCELED. (You can use another constant, RESULT_FIRST_USER, as an offset when defining your own result codes.)
Setting result codes is useful when the parent needs to take different action depending on how the child activity finished.
For example, if a child activity had an OK button and a Cancel button, the child activity would set a different result code depending on which button was pressed. Then the parent activity would take different action depending on the result code.
Calling setResult(…) is not required of the child activity. If you do not need to distinguish between results or receive arbitrary data on an intent, then you can let the OS send a default result code. A result code is always returned to the parent if the child activity was started withstartActivityForResult(…). If setResult(…) is not called, then when the user presses the Back button the parent will receive Activity.RESULT_CANCELED.
Sending back an intent
In this implementation, you are interested in passing some specific data back to QuizActivity. So you are going to create an Intent, put an extra on it, and then call Activity.setResult(int, Intent) to get that data into QuizActivity’s hands.
In CheatActivity, add a constant for the extra’s key and a private method that does this work. Then call this method in the Show Answer button’s listener.
Listing 5.14 Setting a result (CheatActivity.java)
public class CheatActivity extends AppCompatActivity {
private static final String EXTRA_ANSWER_IS_TRUE =
"com.bignerdranch.android.geoquiz.answer_is_true";
private static final String EXTRA_ANSWER_SHOWN =
"com.bignerdranch.android.geoquiz.answer_shown";
...
@Override
protected void onCreate(Bundle savedInstanceState) {
...
mShowAnswer.setOnClickListener(new View.OnClickListener() {
@Override
public void onClick(View v) {
if (mAnswerIsTrue) {
mAnswerTextView.setText(R.string.true_button);
} else {
mAnswerTextView.setText(R.string.false_button);
}
setAnswerShownResult(true);
}
});
}
private void setAnswerShownResult(boolean isAnswerShown) {
Intent data = new Intent();
data.putExtra(EXTRA_ANSWER_SHOWN, isAnswerShown);
setResult(RESULT_OK, data);
}
}
When the user presses the Show Answer button, the CheatActivity packages up the result code and the intent in the call to setResult(int, Intent).
Then, when the user presses the Back button to return to the QuizActivity, the ActivityManager calls the following method on the parent activity:
protected void onActivityResult(int requestCode, int resultCode, Intent data)
The parameters are the original request code from QuizActivity and the result code and intent passed into setResult(…).
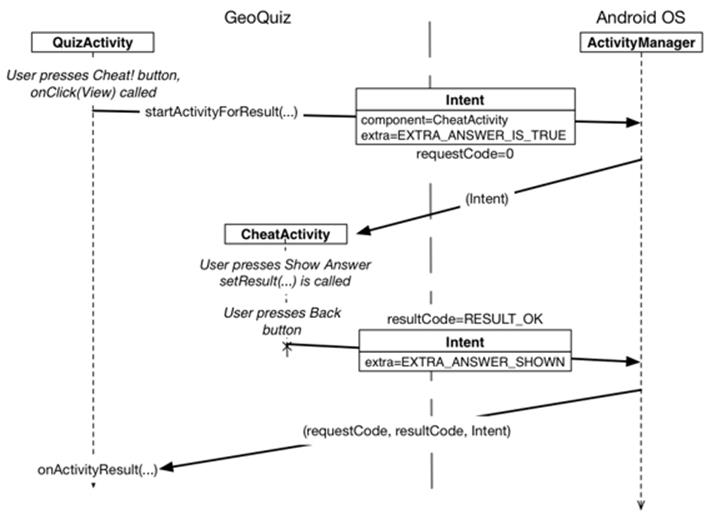
Figure 5.11 shows this sequence of interactions.
Figure 5.11 Sequence diagram for GeoQuiz
The final step is to override onActivityResult(int, int, Intent) in QuizActivity to handle the result. However, because the contents of the result Intent are also an implementation detail of CheatActivity, add another method to help decode the extra into something QuizActivity can use.
Listing 5.15 Decoding the result intent (CheatActivity.java)
public static Intent newIntent(Context packageContext, boolean answerIsTrue) {
Intent i = new Intent(packageContext, CheatActivity.class);
i.putExtra(EXTRA_ANSWER_IS_TRUE, answerIsTrue);
return i;
}
public static boolean wasAnswerShown(Intent result) {
return result.getBooleanExtra(EXTRA_ANSWER_SHOWN, false);
}
@Override
protected void onCreate(Bundle savedInstanceState) {
...
}
Handling a result
In QuizActivity.java, add a new member variable to hold the value that CheatActivity is passing back. Then override onActivityResult(…) to retrieve it, checking the request code and result code to be sure they are what you expect. This, again, is a best practice to make future maintenance easier.
Listing 5.16 Implementing onActivityResult(…) (QuizActivity.java)
public class QuizActivity extends AppCompatActivity {
...
private int mCurrentIndex = 0;
private boolean mIsCheater;
...
@Override
protected void onCreate(Bundle savedInstanceState) {
...
}
@Override
protected void onActivityResult(int requestCode, int resultCode, Intent data) {
if (resultCode != Activity.RESULT_OK) {
return;
}
if (requestCode == REQUEST_CODE_CHEAT) {
if (data == null) {
return;
}
mIsCheater = CheatActivity.wasAnswerShown(data);
}
}
...
}
Finally, modify the checkAnswer(boolean) method in QuizActivity to check whether the user cheated and to respond appropriately.
Listing 5.17 Changing toast message based on value of mIsCheater (QuizActivity.java)
private void checkAnswer(boolean userPressedTrue) {
boolean answerIsTrue = mQuestionBank[mCurrentIndex].isAnswerTrue();
int messageResId = 0;
if (mIsCheater) {
messageResId = R.string.judgment_toast;
} else {
if (userPressedTrue == answerIsTrue) {
messageResId = R.string.correct_toast;
} else {
messageResId = R.string.incorrect_toast;
}
}
Toast.makeText(this, messageResId, Toast.LENGTH_SHORT)
.show();
}
@Override
protected void onCreate(Bundle savedInstanceState) {
...
mNextButton = (Button)findViewById(R.id.next_button);
mNextButton.setOnClickListener(new View.OnClickListener() {
@Override
public void onClick(View v) {
mCurrentIndex = (mCurrentIndex + 1) % mQuestionBank.length;
mIsCheater = false;
updateQuestion();
}
});
...
}
Run GeoQuiz. Cheat and see what happens.
How Android Sees Your Activities
Let’s look at what is going on OS-wise as you move between activities. First, when you click on the GeoQuiz app in the launcher, the OS does not start the application; it starts an activity in the application. More specifically, it starts the application’s launcher activity. For GeoQuiz,QuizActivity is the launcher activity.
When the New Application wizard created the GeoQuiz application and QuizActivity, it made QuizActivity the launcher activity by default. Launcher activity status is specified in the manifest by the intent-filter element in QuizActivity’s declaration (Listing 5.18).
Listing 5.18 QuizActivity declared as launcher activity (AndroidManifest.xml)
<?xml version="1.0" encoding="utf-8"?>
<manifest xmlns:android="http://schemas.android.com/apk/res/android"
... >
...
<application
... >
<activity
android:name="com.bignerdranch.android.geoquiz.QuizActivity"
android:label="@string/app_name" >
<intent-filter>
<action android:name="android.intent.action.MAIN" />
<category android:name="android.intent.category.LAUNCHER" />
</intent-filter>
</activity>
<activity
android:name=".CheatActivity"
android:label="@string/app_name" />
</application>
</manifest>
After the instance of QuizActivity is on screen, the user can press the Cheat! button. When this happens, an instance of CheatActivity is started – on top of the QuizActivity. These activities exist in a stack (Figure 5.12).
Pressing the Back button in CheatActivity pops this instance off the stack, and the QuizActivity resumes its position at the top, as shown in Figure 5.12.
Figure 5.12 GeoQuiz’s back stack
A call to Activity.finish() in CheatActivity would also pop the CheatActivity off the stack.
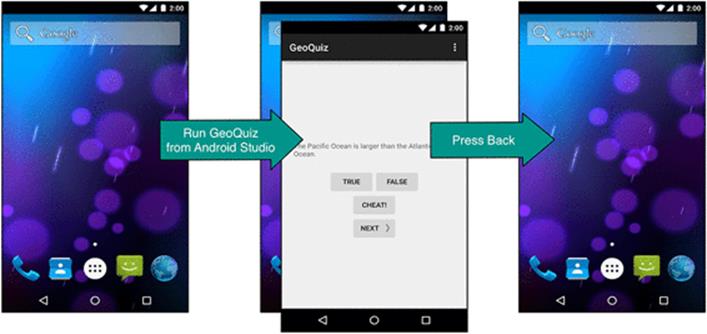
If you run GeoQuiz and press Back from the QuizActivity, the QuizActivity will be popped off the stack and you will return to the last screen you were viewing before running GeoQuiz (Figure 5.13).
Figure 5.13 Looking at Home screen
If you started GeoQuiz from the launcher application, pressing the Back button from QuizActivity will return you to the launcher (Figure 5.14).
Figure 5.14 Running GeoQuiz from launcher
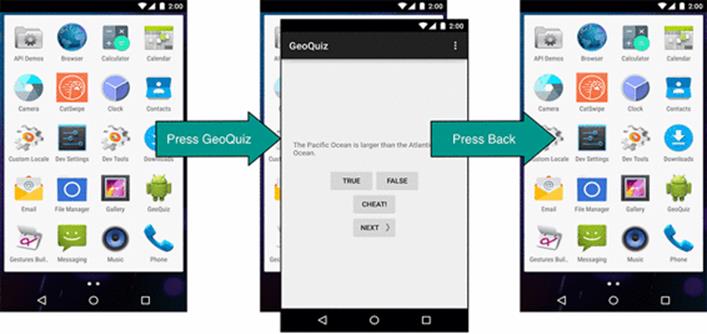
Pressing the Back button from the launcher will return you to the screen you were looking at before you opened the launcher.
What you are seeing here is that the ActivityManager maintains a back stack and that this back stack is not just for your application’s activities. Activities for all applications share the back stack, which is one reason the ActivityManager is involved in starting your activities and lives with the OS and not your application. The stack represents the use of the OS and device as a whole rather than the use of a single application.
(Wondering about the “Up” button? We will discuss how to implement and configure this button in Chapter 13.)
Challenge
Cheaters never win. Unless, of course, they persistently circumvent your anticheating measures. Which they probably will. Because they are cheaters.
GeoQuiz has a few major loopholes. For this challenge, you will busy yourself with closing them. Here are the loopholes in ascending order, from easiest to hardest to close:
· Users can rotate CheatActivity after they cheat to clear out the cheating result.
· Once they get back, users can rotate QuizActivity to clear out mIsCheater.
· Users can press Next until the question they cheated on comes back around.
Good luck!