Android Wearable Programming (2015)
Chapter 5. Working with Google Glass
This chapter will provide you with the background and understanding of how you can effectively build applications that communicate directly with Google Glass and chances are, either you are most likely a Google Glass owner or you simply don't own one currently, but are intrigued by it. Google Glass is basically a headset that has a visual display on one side, making it more like a monocle, except that it has an optics pod display. The main input controls for Glass are voice, gestures, and touch, so when you begin building applications for Google Glass, you can use one or more of these forms of input.
Another reason is that the display is much smaller than handheld devices; you have less space to work with to show information, as a result of which user interfaces tend to be plain and simple. Google Glass comes with several built-in features, some of which allow users to take a picture by issuing a voice command or pressing the onboard shutter button, or winking using your right eye. You can also record videos by holding the shutter button for three seconds and then using the touchpad to extend the video timeframe to be more than 10 seconds. You also have the ability to activate speech recognition and voice dictation, as well as performing Google searches using your voice.
In this chapter, we will also learn how we can incorporate and make use of Google Glass voice capabilities to respond to and receive voice input from the wearable. At the end of the chapter, we will look at how we can incorporate and access the Glass camera to capture and save an image, and we will cover the Google Glassware principle design guidelines.
The following topics are covered in this chapter:
· Installing the Glass Development Kit preview
· Installing the Google USB drivers for Windows
· Creating and building a Google Glass application
· Receiving voice input with Google Glass
· Accessing camera with Google Glass
· Incorporating the Google Maps API with Google Glass
· Google Glassware principle design guidelines
Installing the Glass Development Kit preview
Before we can start developing applications for the Google Glass platform, we will need to look at how to install the Google Glass Development Kit SDK:
1. Launch Android SDK Manager using SDK Manager in Android Studio.
2. Click on the SDK Platform option and select the Glass Development Kit Preview packages that are located under the Android 4.4.2 (API 19) section to install them:
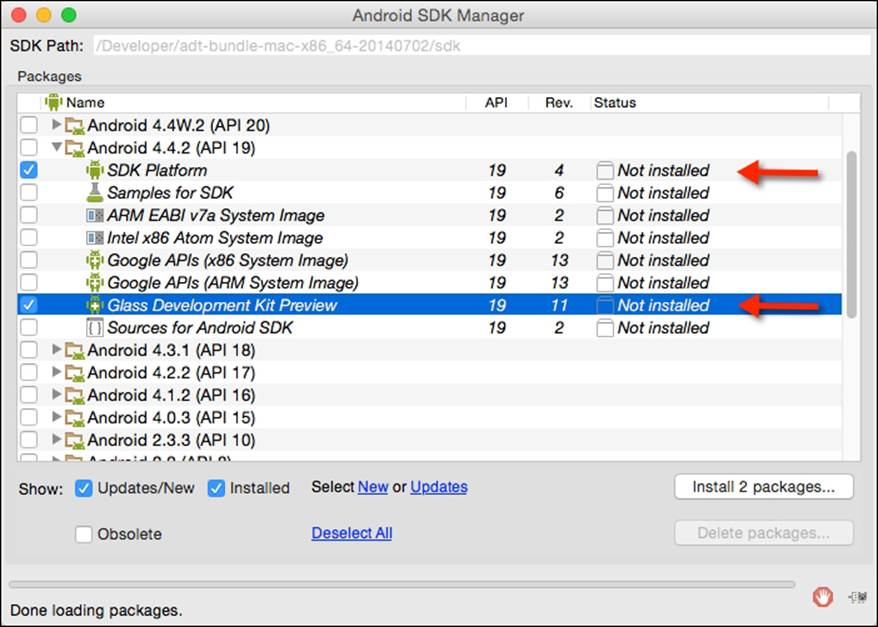
Note
The Google Glass Development Kit (GDK) is currently in preview and is only available within Android 4.4.2 (API 19) SDK.
3. Next, accept the license information for Android SDK License and Google Gdk License by selecting the Accept License option.
4. Then, click on the Install button to begin installing the packages, as shown in the following screenshot:

You will notice that the Glass Development Kit is still in developer preview and as such, at the time of writing, there is currently no emulator provided to test your apps, so you will need to have a Google Glassware device to deploy and test your apps.
Note
If you do not own a Google Glass, but hope to learn how to develop for Google Glass, you can use an Android phone or tablet to test your Google Glass applications. Most of the user interfaces you create for Google Glass can be displayed normally on an Android phone or tablet, except that the voice trigger action provided by Google Glass will not work for phone and tablet.
Alternatively, there is a Google Glassware emulator by Gerwin Sturm called the Mirror API emulator. This works as a server-side API that means it doesn't run on Glass itself, but on your server and it's your server that interacts with Glass. This can act as a good idea of what the output will be like when it is run on the real device. This can be downloaded from https://github.com/Scarygami/mirror-api.
Installing the Google USB drivers for Windows
In this section, we will look at how to install the Android device drivers for Google Glass on the Windows platform in order to perform debugging with your Google devices. Android device drivers can either be installed from the Android SDK Google USB drivers or using the software that comes from the device manufacturer.
Note
If you're developing Google Glass apps running on the Mac OS X or Linux platforms, you do not need to install a USB driver. On these platforms, you can use the Android File Transfer Manager tool.
To install the Google USB drivers, follow these simple steps:
1. Launch Android SDK Manager using SDK Manager in Android Studio.
2. Select and click on the Google USB Driver package, which is located under the Extras section, to install it:
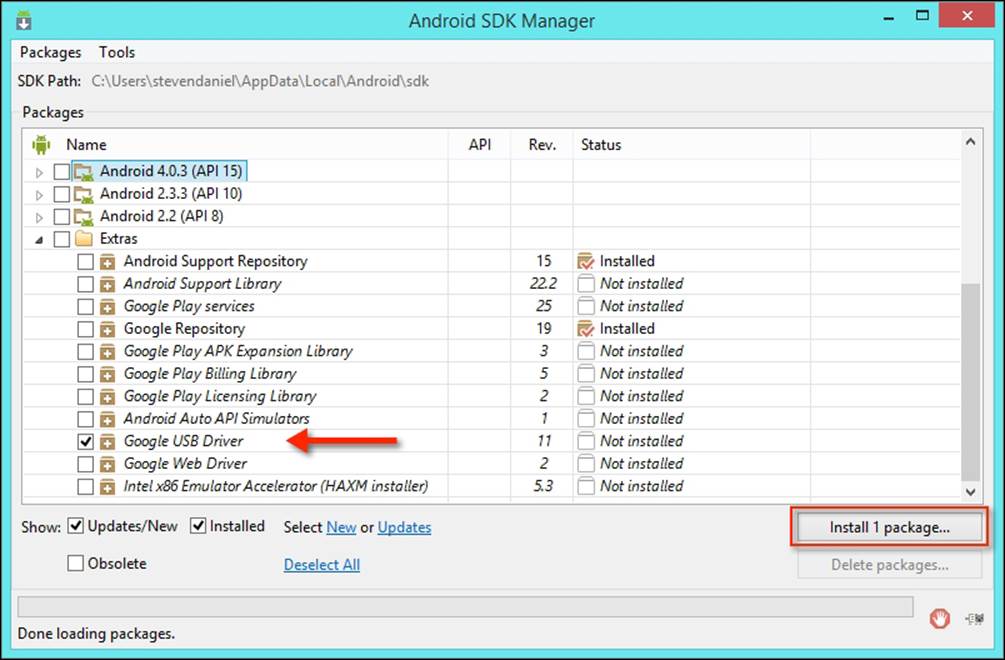
3. Next, click on the install button to begin installing Google USB Driver.
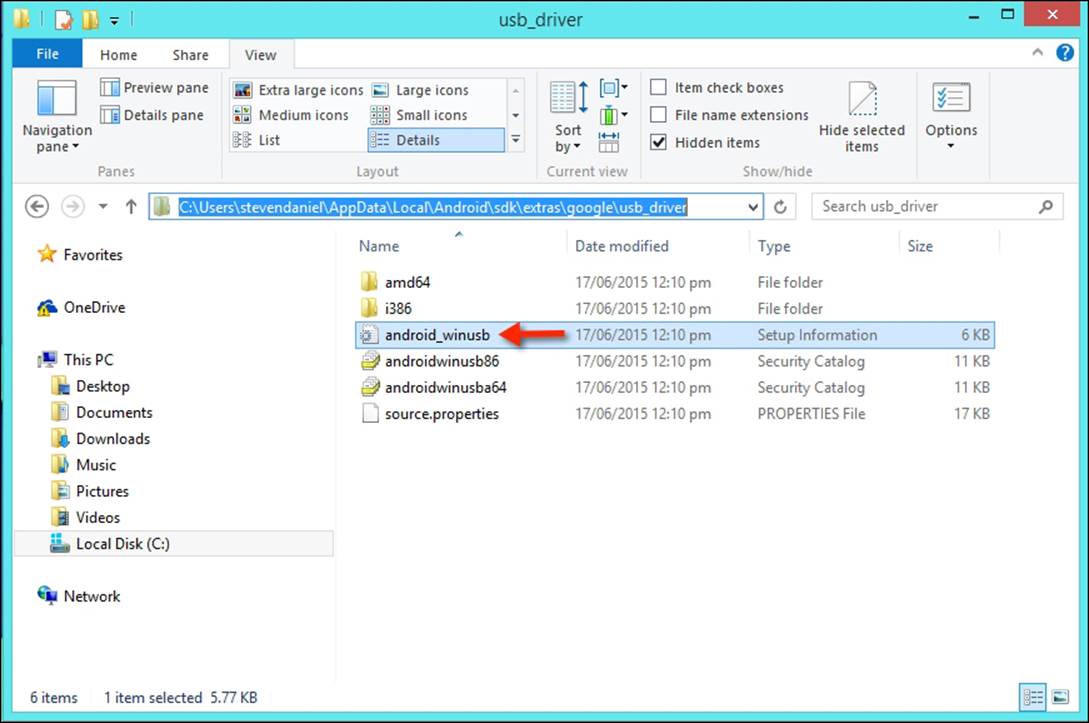
Once you have installed the Google USB drivers for Google Glass, you will need to make a modification to the android_winusb.inf file, otherwise when you want to deploy your application's APK file on the device for debugging purposes, your device won't be listed, even though you have installed the drivers correctly.
4. Open the android_winusb.inf file that is located at android_SDK_folder under \sdk\extras\google\usb_driver, as shown in the following screenshot:
5. With the android_winusb.inf file displayed, we need to add the following [Google.NTx86] and [Google.NTamd64] sections as in the following snippet:
6. [Google.NTx86]
7.
8. ;GoogleGlass
9. %SingleAdbInterface% = USB_Install, USB\VID_18D1&PID_4E11&REV_0216
10.%CompositeAdbInterface% = USB_Install, USB\VID_18D1&PID_4E11&MI_01
11.%SingleAdbInterface% = USB_Install, USB\VID_18D1&PID_4E11&REV_0216
12.%CompositeAdbInterface% = USB_Install, USB\VID_18D1&PID_4E12&MI_01
13.
14.[Google.NTamd64]
15.
16.;GoogleGlass
17.%SingleAdbInterface% = USB_Install, USB\VID_18D1&PID_4E11&REV_0216
18.%CompositeAdbInterface% = USB_Install, USB\VID_18D1&PID_4E11&MI_01
19.%SingleAdbInterface% = USB_Install, USB\VID_18D1&PID_4E11&REV_0216
%CompositeAdbInterface% = USB_Install, USB\VID_18D1&PID_4E12&MI_01
20. Then launch the Device Manager application, right-click on your Google Glass device, and click to install the drivers. When you are prompted to browse for a location, select the android_winusb.inf parent folder, and follow the instructions presented.
Note
If you experience any issues with installing the Google USB driver, it is worthwhile to check out the documentation located at http://developer.android.com/sdk/win-usb.html.
Now that we have installed our Google Glass Development Kit and Android SDK, we can now start to build our Google Glass application for this chapter.
Creating and building a Google Glass application
In this section, we will look at how to create a native Google Glass wearable application that will enable us to communicate with our wearable device, so that we can create custom voice messages as well as access the Google Glass camera to take a photo and save the image to our wearable device.
Firstly, create a new project in Android Studio by following these simple steps:
1. Launch Android Studio, and then click on the File | New Project menu option.
2. Next, enter HelloGoogleGlass for the Application name field.
3. Then, provide the name for the Company Domain field.
4. Next, choose Project location where you would like to save your application code:
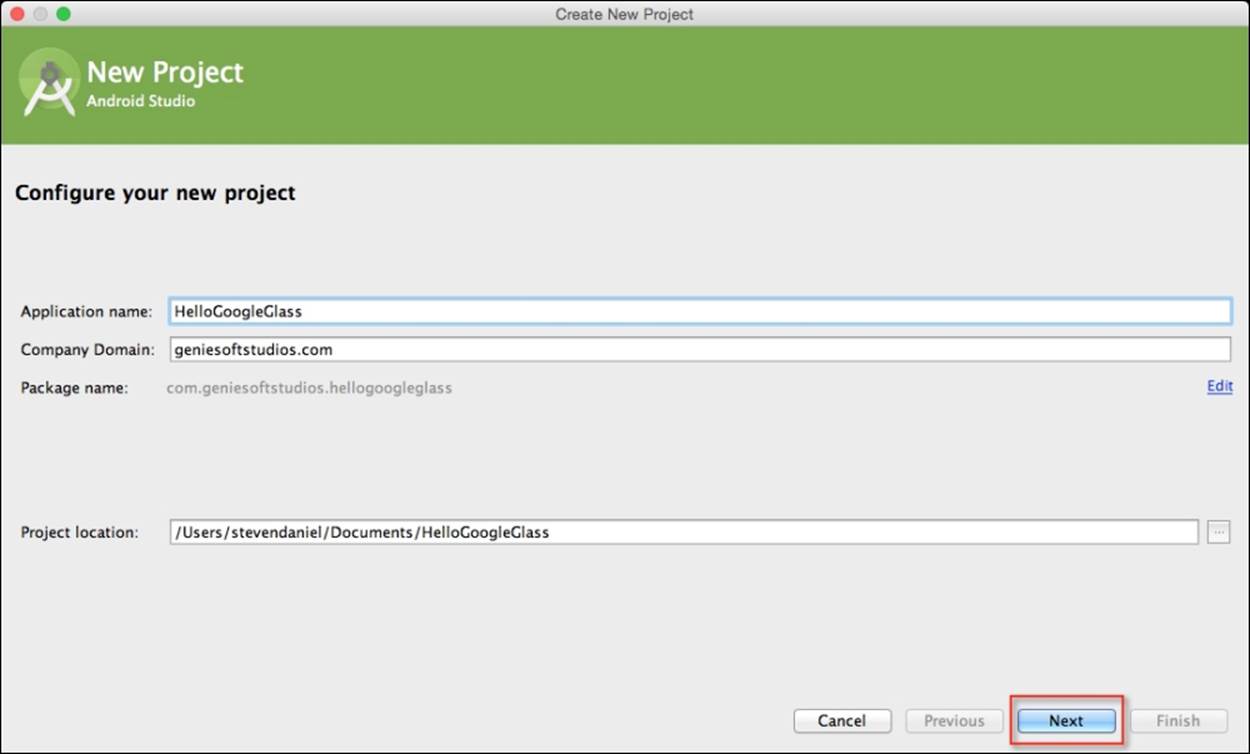
5. Finally, click on the Next button to proceed to the next step.
Next, we will need to specify the form factors for the Glass wearable device that our application will run on. On this screen, we will need to choose the minimum SDK version for the Glass wearable device.
6. Click on the Glass option and choose Glass Development Kit Preview (Google Inc.)(API 19) for the Minimum SDK option:
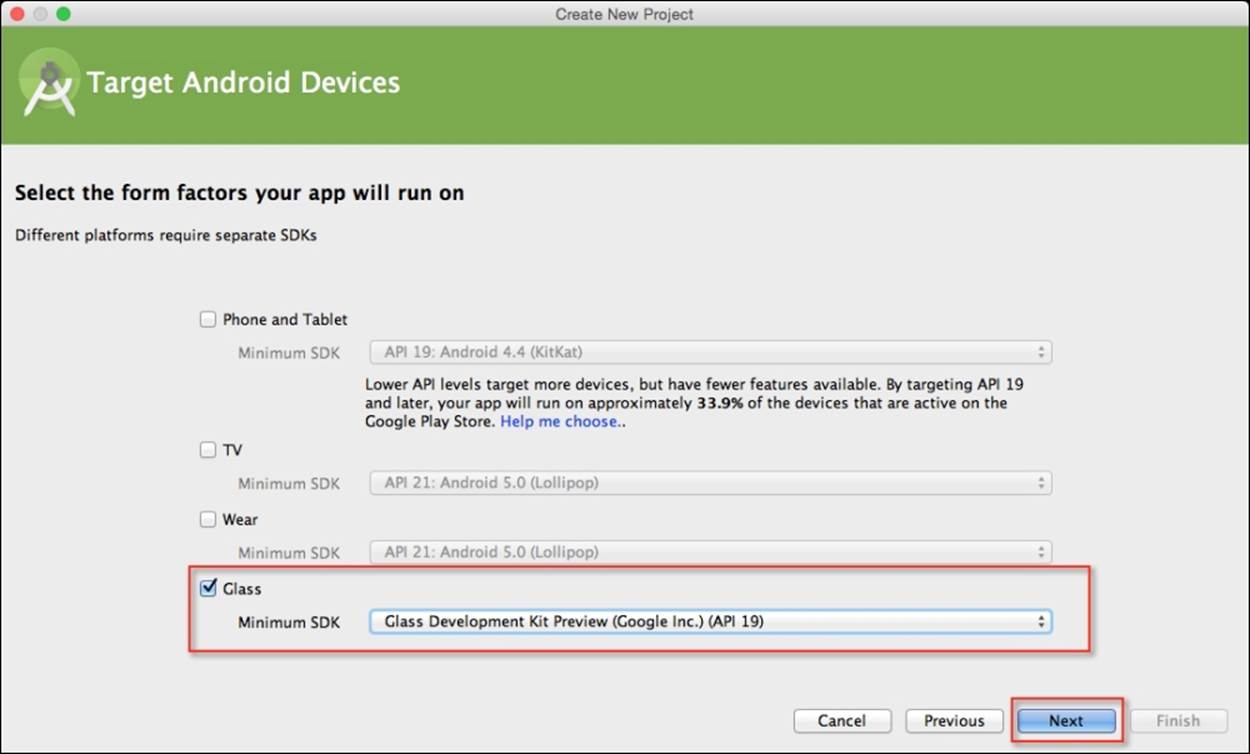
7. Click on the Next button to proceed to the next step.
8. From the Add an activity to Glass screen, choose the Immersion Activity option from the list of activities shown, and then click on the Next button to proceed to the next step:
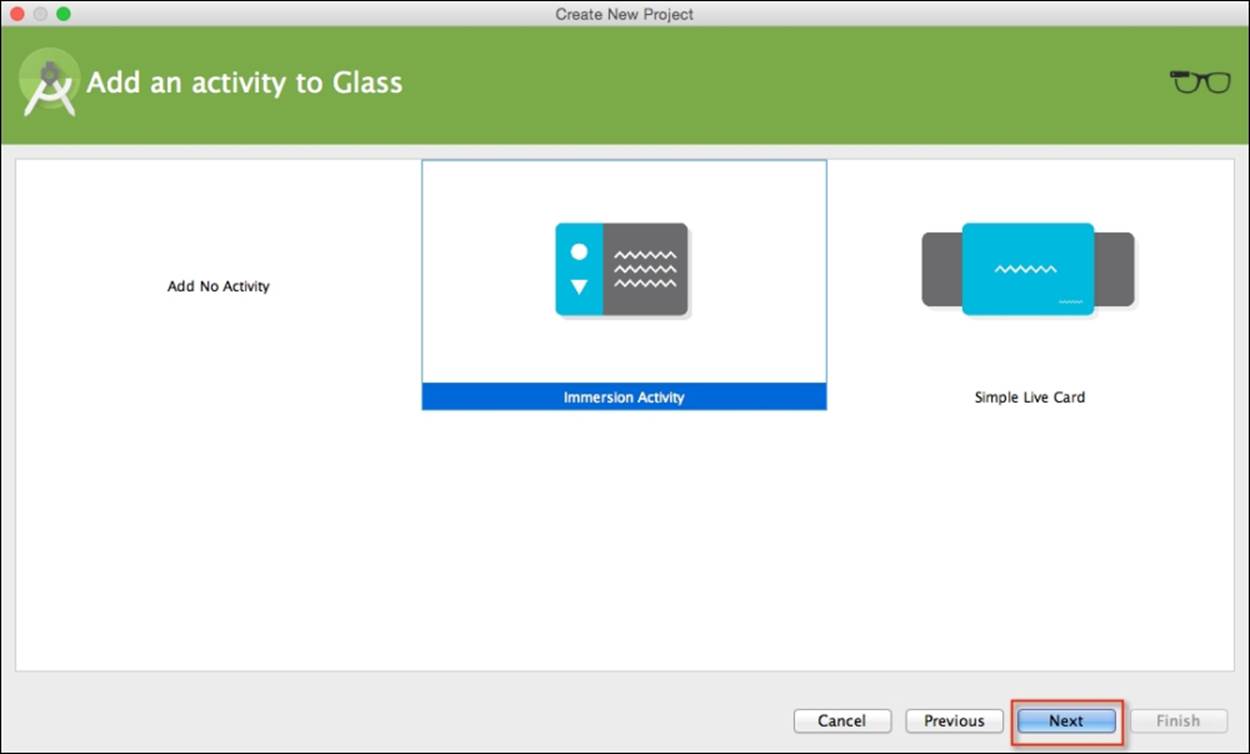
Note
An immersion activity is the same as an Android activity. The name immersion is one that takes full control of the device. For example, when the user performs a swipe down gesture within Google Glass, the immersion activity will be removed from the Glass timeline. This type of behavior is performed in a similar way to those in the apps of your phone.
Next, we need to customize the properties for Immersion Activity so that it can be used by our application. Here we will need to specify the name of our activity as well as its title.
9. From the Customize the Activity screen, enter MainActivity for Activity Name and Hello Glass Example for Activity Title as shown in the following screenshot:

10. Next, click on the Finish button and the wizard will generate your project and after a few moments, the Android Studio window will appear with your project displayed in it.
Setting the theme for the Google Glass app
The next thing that we need to do is set up our application so that it doesn't take up too much of our Glass screen with the name of our immersion activity title bar, and certainly we don't want our screen to be gray with a black font. This is quite simple to fix.
From the Project Navigator window, open styles.xml that is located in the res | values folder, and modify this file by adding the following highlighted code:
<?xml version="1.0" encoding="utf-8"?>
<resources>
<style name="AppTheme" parent="android:Theme.DeviceDefault"></style>
</resources>
As you can see, we just need to switch the theme and let the Google Glass OS take care of it for us. All we did here is modified android:Theme.Holo.Light to android:Theme.DeviceDefault and this will automatically take care of any application layout and colors for us, using the default Glass theme.
Configuring the project to run on Google Glass
Before we can actually run the application on our Google Glassware, we must first ensure that we have enabled our device for testing and we need to configure our project to handle installation of our app on our Google Glass wearable:
1. On your Glassware device, go to Settings | Device Info | Turn on debug.
2. Next, plug your Google Glass into your computer's USB port. You will hear a dinging sound coming from your Google Glass to let you know that it has connected properly.
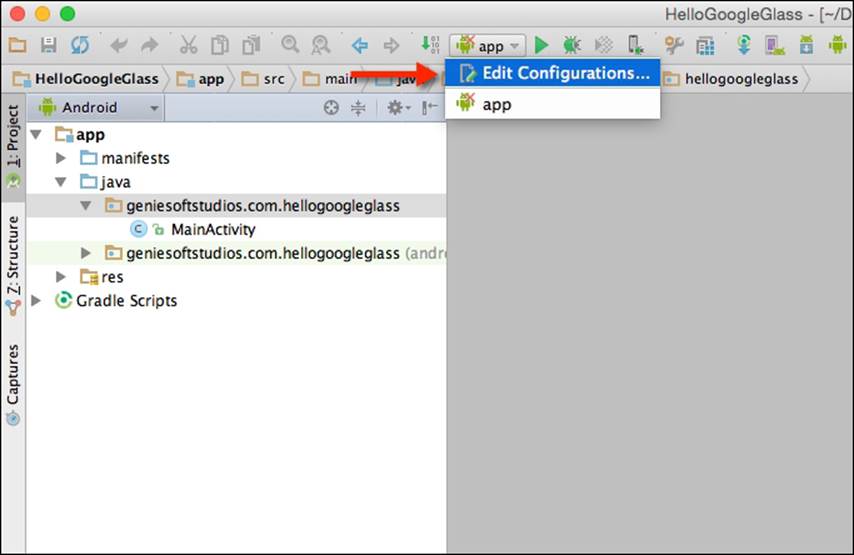
3. Now, we need to configure our app so that we can install this on our Google Glassware. Choose the app configuration from the drop-down menu, and choose the Edit Configurations… menu option as shown in the following screenshot:
4. From the Run/Debug Configurations dialog, choose Deploy default APK under the Package section.
5. Under the Activity section, choose the Launch option and click on the … button to display the Select Activity Class dialog.
6. Next, choose the MainActivity class and then click on the OK button as follows:
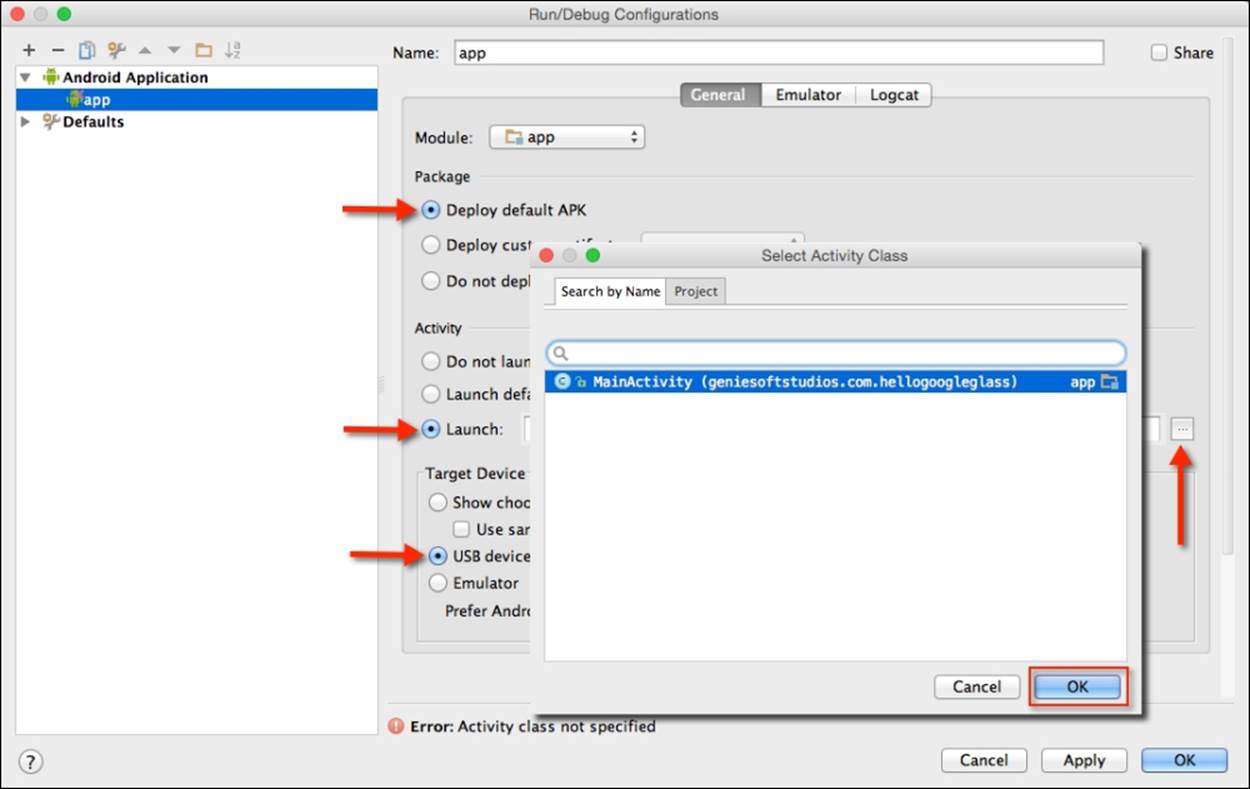
7. Under the Target Device section, choose the USB device and click on the OK button to dismiss the Run/Debug Configurations dialog as shown in this screenshot:
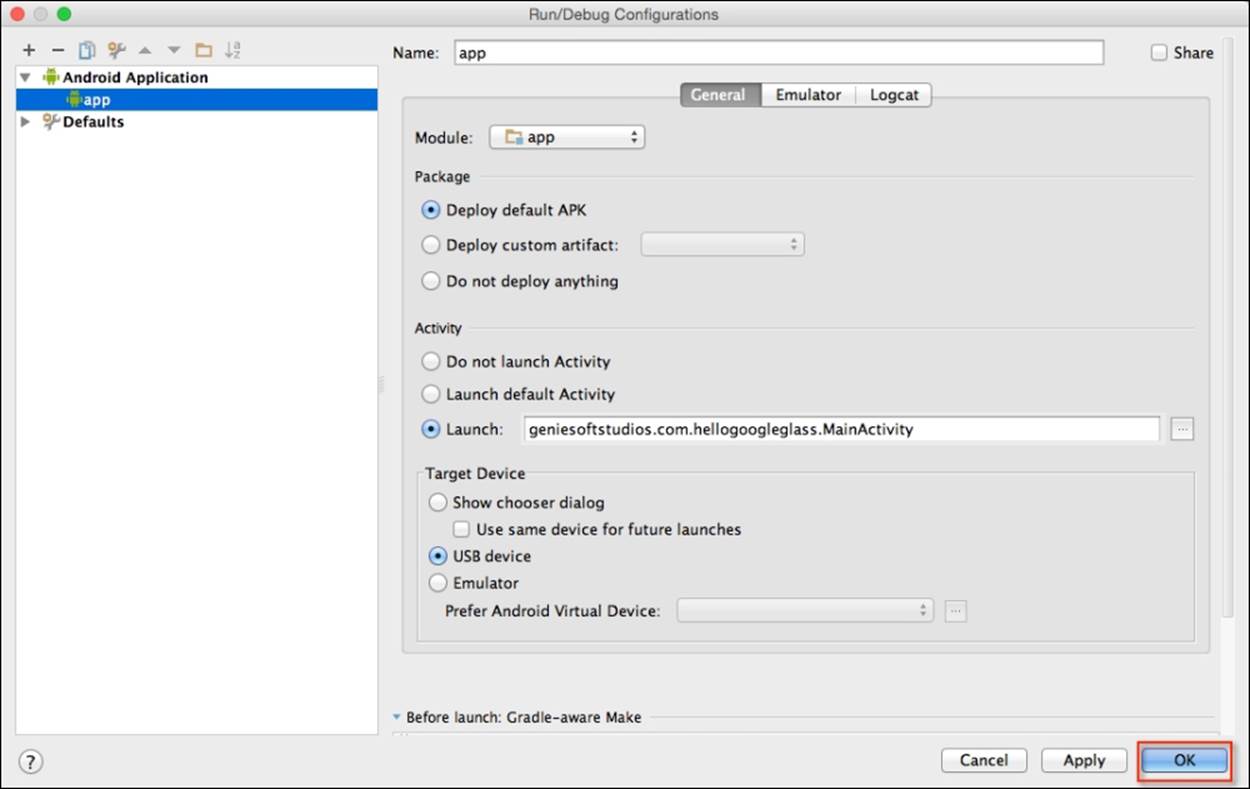
8. Upon clicking on the OK button, this will return you to the code editor window. Now that we have successfully configured our project to work with our Google Glass wearable device, we can start building additional functionality that will allow us to incorporate voice input so that it can launch our voice and camera activity classes.
Creating the custom menu resource file
In this section, we will proceed to create our custom menu resource file that will be used to store our custom voice keywords in order to launch the app handsfree:
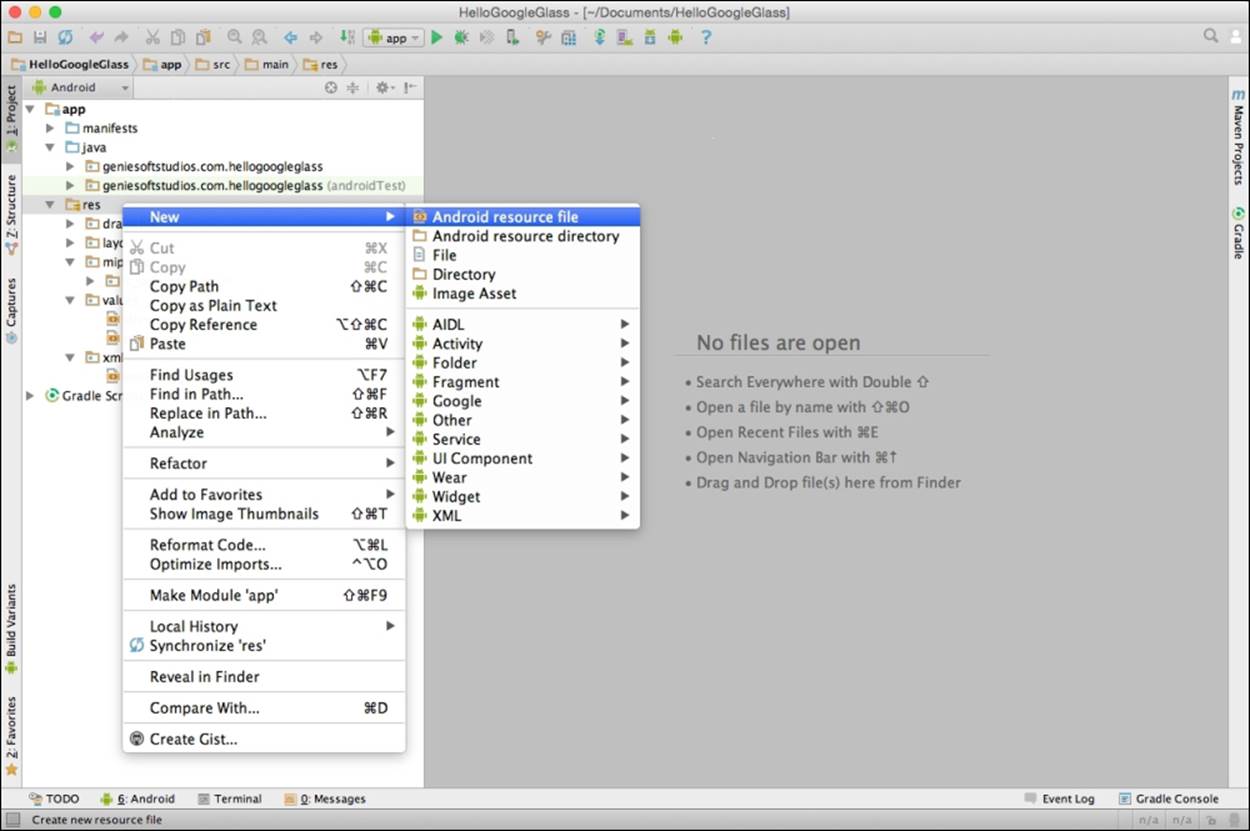
1. From the Project Navigator window, expand the app section, then select and expand the res section.
2. Next, right-click and choose the New | Android resource file menu option, as shown in the following screenshot:
Next, we need to customize the properties for our resource file so that it can be used by our application, and display the menu items for use with our Google Glass wearable. Here we will need to specify the filename for our menu file and we need to specifyResource type, which tells Android that we need this to be a menu resource file.
3. Enter activity_menu for the File name field.
4. Next, choose the Menu item from the Resource type field drop-down menu, as shown in this screenshot:
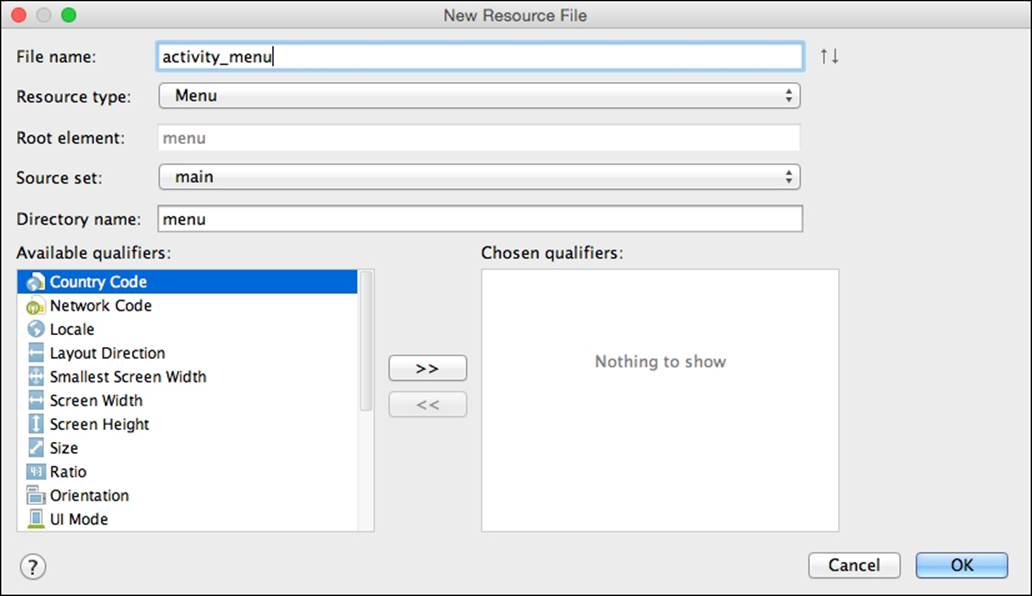
5. Next, click on the OK button to have the wizard generate the necessary files for you. Once finished, this will open the Android Studio code editor with your custom menu file displayed in it.
Our next step is to construct the menu items that will appear within our Google Glass menu when launched.
6. From the Project Navigator window, open the activity_menu.xml file that is located in the res | menu folder, and add the following code:
7. <?xml version="1.0" encoding="utf-8"?>
8. <menu xmlns:android="http://schemas.android.com/apk/res/android">
9. <item android:id="@+id/show_camera_item"android:title="@string/show_camera"></item>
10. <item android:id="@+id/show_voice_item"
11. android:title="@string/show_voice">
12. </item>
13. <item android:id="@+id/show_location_item" android:title="@string/show_location">
14. </item>
</menu>
In our next step, we need to add the associated menu item's text values that will be displayed when our menu is displayed within Google Glass when launched.
15. Again from the Project Navigator window, open the strings.xml file that is located in the res | values folder, as shown in the following screenshot:
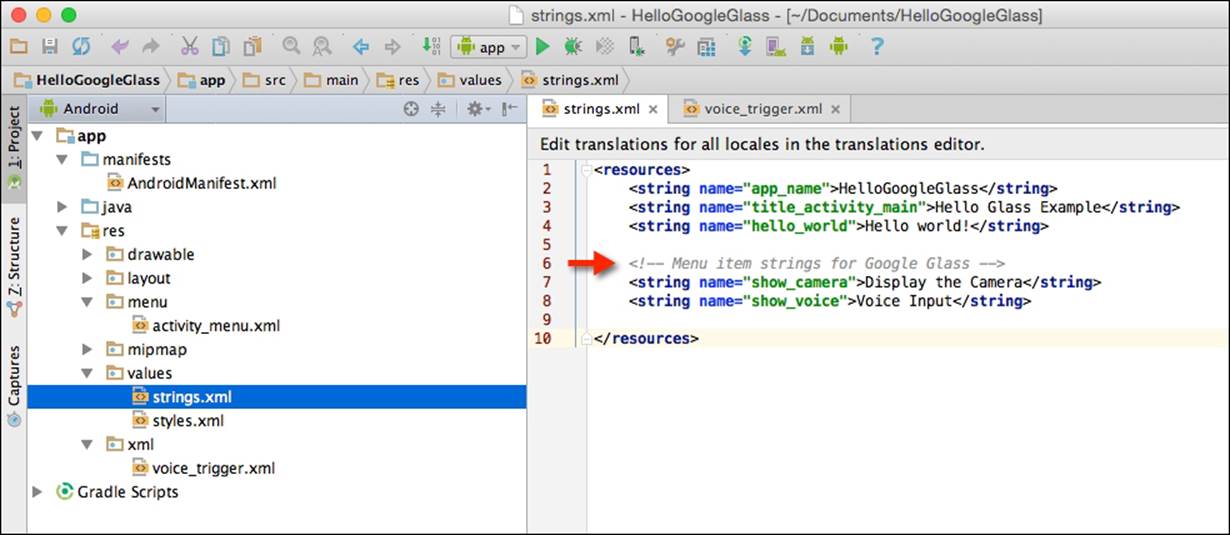
16. Next, add the following highlighted following code snippet:
17.<resources>
18.<string name="app_name">Hello Google Glass</string>
19.<string name="title_activity_main">Hello Glass
20. Example</string><string name="hello_world">Hello world!</string>
21.<!-- Menu item strings for Google Glass -->
22.<string name="show_camera">Display the Camera</string>
23.<string name="show_location">Show my location</string>
24.<string name="show_voice">Voice Input</string>
</resources>
25. Now, we will need to change the currently declared OK Glass, show me a demo command that is currently located within our voice_triggers.xml file. Here we will need to include a contextual trigger that will be required to launch our app.
26. From the Project Navigator window, open the voice_triggers.xml file, which is located in the res | values folder, and modify this file by adding the following snippet:
<trigger keyword="@string/app_name" />
This changes the starting voice trigger to the same as your application's name; for example, the trigger is now Hello Google Glass.
Note
One thing to notice here is that we have replaced the command keyword with keyword so that we can use a contextual trigger now, that is, OK Glass followed by Hello Google Glass.
Configuring the AndroidManifests file
In our next section, we will need to make some additional changes to our AndroidManifests file, which will allow our app to support custom voice controls, as Google is pretty strict about which voice commands are allowed in approved Glass apps, and all new commands must be approved prior to your app being accepted on the Google Play Store:
1. From the Project Navigator window, select the manifests folder and then double-click on the AndroidManifest.xml file to open it.
2. Next, under the manifest section of the app, we need to include all permissions that will allow our app to support custom voice commands as well store images taken using the camera.
3. Enter the following highlighted code:
4. <?xml version="1.0" encoding="utf-8"?>
5. <manifest xmlns:android="http://schemas.android.com/apk/res/android"package="geniesoftstudios.com.hellogoogleglass" >
6. <!-- Permissions to test new, unlisted voice commands-->
7. <uses-permission
8. android:name="com.google.android.glass.permission.
9. DEVELOPMENT"/>
10.<!—- Permissions to store our captured images --><uses-permission
11.android:name="android.permission.CAMERA"/>
12.<uses-permission
13.android:name="android.permission.READ_EXTERNAL_STORAGE"/>
14.<uses-permission
15.android:name="android.permission.WRITE_EXTERNAL_STORAGE"/>
16.
17.<!-- For getting the current user location -->
18.<uses-permission android:name="android.permission.ACCESS_FINE_LOCATION" />
19.<uses-permission android:name="android.permission.INTERNET" />
20.<application
21. android:allowBackup="true"
22. android:icon="@mipmap/ic_launcher"
23. android:label="@string/app_name"
24. android:theme="@style/AppTheme" >
25.<activity
26. android:name=".MainActivity"
27. android:icon="@drawable/ic_glass_logo"
28. android:label="@string/title_activity_main" >
29.<intent-filter>
30.<action android:name="com.google.android.glass.action.VOICE_TRIGGER" />
31.</intent-filter>
32.<meta-dataandroid:name="com.google.android.glass.VoiceTrigger"android:resource="@xml/voice_trigger" />
33.</activity>
34.<activity android:name=".CameraActivity"android:label="@string/app_name">
35.<intent-filter>
36.<action android:name="geniesoftstudios.com.hellogoogleglass.CAMERA_ACTIVITY" />
37.<category android:name="android.intent.category.DEFAULT" />
38.</intent-filter>
39.</activity>
40.<activity android:name=".VoiceInputActivity"android:label="@string/app_name">
41.<intent-filter>
42.<action android:name="geniesoftstudios.com.hellogoogleglass.VOICE_INPUT_ACTIVITY" />
43.<category android:name="android.intent.category.DEFAULT" />
44.</intent-filter>
45.</activity>
46.<activity android:name=".MapLocationActivity"
47. android:label="@string/app_name">
48.<intent-filter>
49.<action android:name="geniesoftstudios.com.hellogoogleglass.MAP_LOCATION_ACTIVITY" />
50.<category android:name="android.intent.category.DEFAULT" />
51.</intent-filter>
52.</activity>
53.</application>
</manifest>
In our next section, we will need to create a new layout resource file that will be used to display our camera preview when the camera activity is launched. We will be creating this file at this point and then begin adding the necessary code for our camera activity as we proceed through this chapter.
Creating the custom camera layout resource file
In this section, we will proceed to create our custom layout resource file that will be responsible for ensuring that our camera preview section displays correctly within our Google Glass wearable:
1. From the Project Navigator window, expand the app section and select and expand the res | layout section.
2. Next, right-click and choose the New | Layout resource file menu option as shown in the following screenshot:
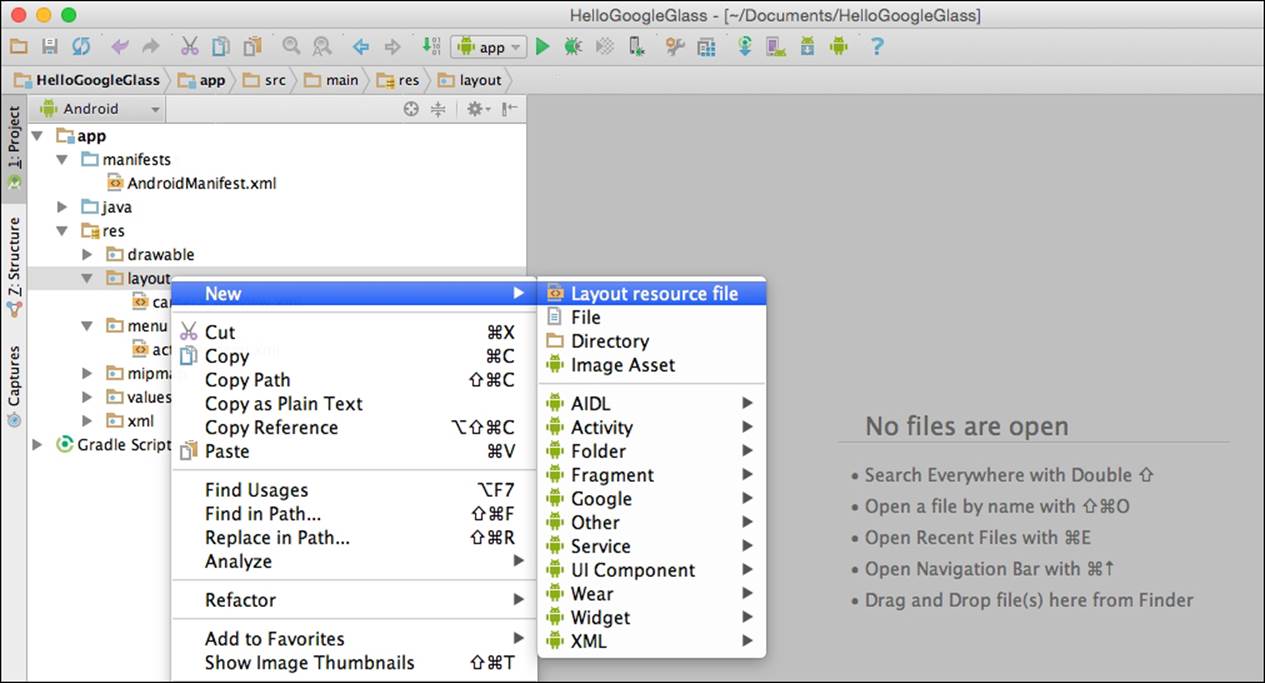
Now, we need to customize the properties for our resource file so that it can be used by our application. Here we will need to specify the filename for our resource file and we need to specify the root element name for our layout information.
3. Enter camera_preview for the File name field.
4. Next, enter LinearLayout for the Root element field as shown in this screenshot:
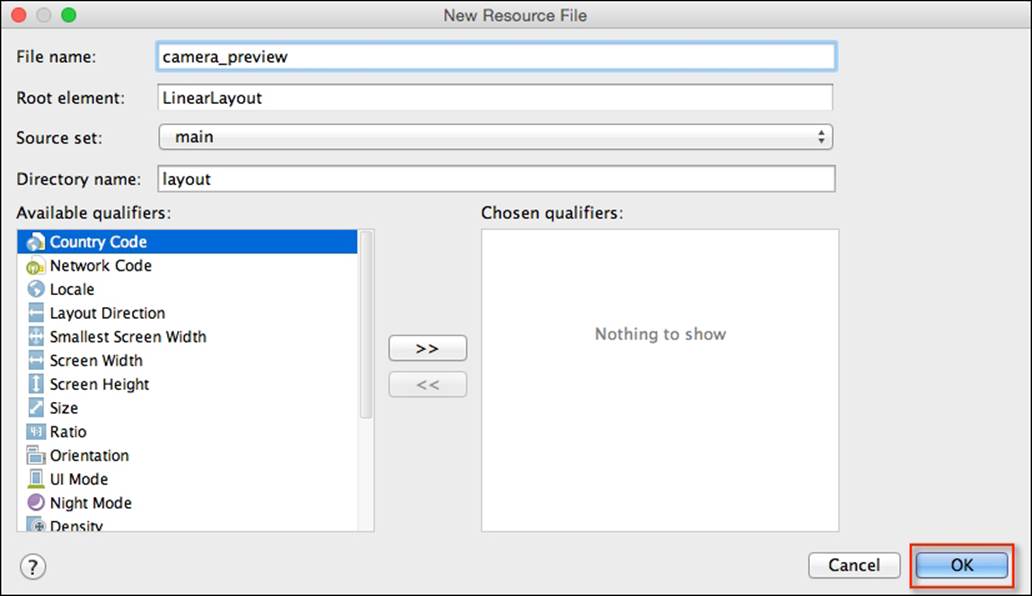
5. Now, click on the OK button to have the wizard generate the necessary files for you. Once finished, this will open the Android Studio code editor with your custom menu file displayed in it.
Our next step is to construct the layout for our custom camera preview, so that when we launch the Glass camera functionality, our camera preview will display correctly within the Glass screen.
6. From the Project Navigator window, open the camera_preview.xml file, which is located in the res | layout section, and add the following code:
7. <?xml version="1.0" encoding="utf-8"?>
8. <LinearLayout xmlns:android="http://schemas.android.com/apk/res/android" android:orientation="vertical" android:layout_width="fill_parent" android:layout_height="fill_parent">
9. <SurfaceView android:id="@+id/camerapreview" android:layout_width="fill_parent" android:layout_height="fill_parent"/>
</LinearLayout>
In our next section, we will look at how we can communicate with our Google Glass device by integrating custom voice actions and have our app launch the necessary activity based on the spoken word.
Incorporating a voice input within Google Glass
In this section, we will be looking at the steps involved in communicating with our Google Glassware wearable device to handle voice input. This process is quite simple and our next step is to write the code statements that will enable us to communicate with our Glassware wearable and display the user's spoken text:
1. From the Project Navigator window, expand the app section and select and expand the java section.
2. Next, right-click and choose the New | Java Class menu option:
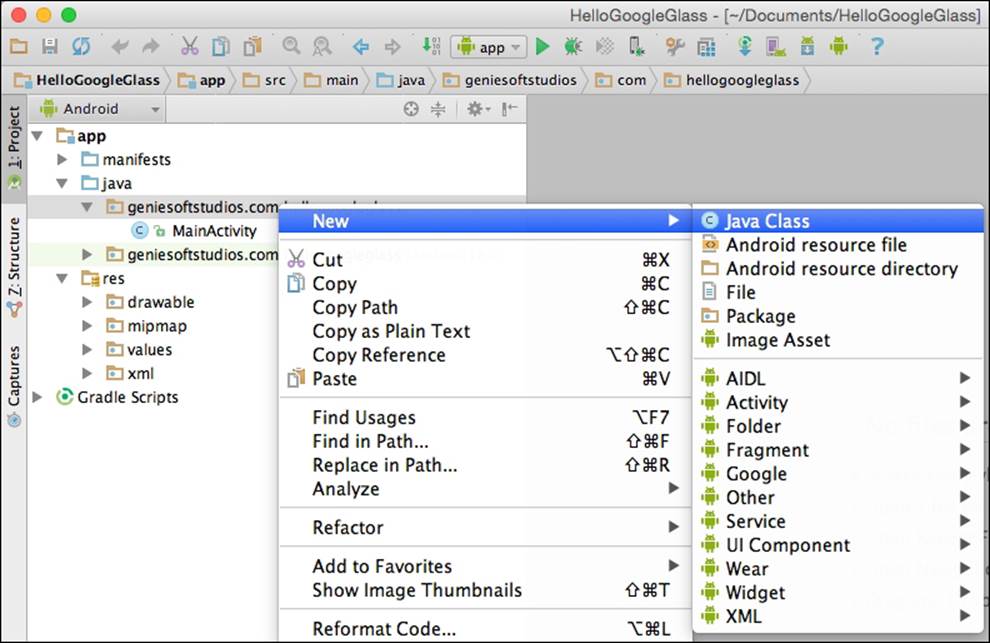
3. Then, enter VoiceInputActivity to be used as the name of our class and click on the OK button:
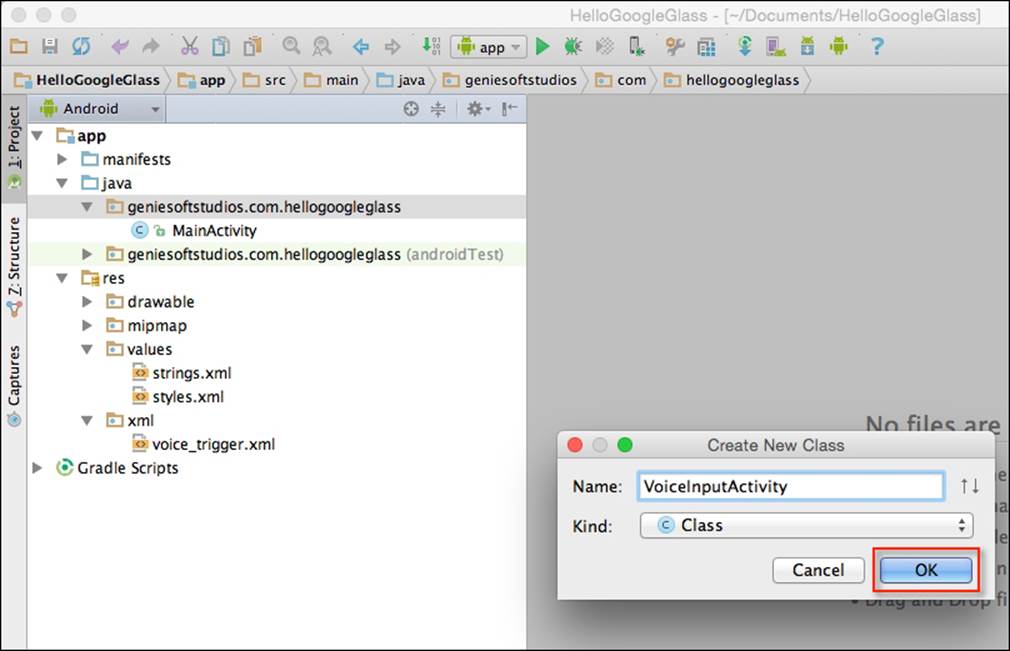
Upon clicking the OK button, the Android Studio code editor will open with our VoiceInputActivity class displayed. Our next step is to write the code that will be responsible for handling our voice, capturing our spoken voice, and displaying this within a card in the Glass user interface.
4. Open the VoiceInputActivity.java file that we just created.
5. Next, enter the following import statements::
6. import android.app.Activity;
7. import android.content.Intent;
8. import android.os.Bundle;
9. import android.speech.RecognizerIntent;
10.import android.view.View;
11.import com.google.android.glass.widget.CardBuilder;
12.import java.util.List;
import android.util.Log;
13. Now, we need to modify the VoiceInputActivity class by modifying the onCreate(Bundle savedInstanceState) method to include our receiveVoiceInput method that will start intent to ask the user for voice input when the class is instantiated, as shown in the following code:
14.public class VoiceInputActivity extends Activity {
15. private final static int SPEECH_REQUEST = 0;
16. @Override
17. protected void onCreate(Bundle savedInstanceState) {
18. super.onCreate(savedInstanceState);
receiveVoiceInput();
19. Then, we need to create a new receiveVoiceInput method that will be called once the activity is instantiated and we listen for voice commands and decide what to do, as shown in this code snippet:
20. public void receiveVoiceInput() {
21.// Start the intent to ask the user for voice input
22.Intent intent = new
23.Intent(RecognizerIntent.ACTION_RECOGNIZE_SPEECH);
24. intent.putExtra(RecognizerIntent.EXTRA_PROMPT,"Speak
25. now");
26. startActivityForResult(intent, SPEECH_REQUEST);
}
27. Next, we need to create an onActivityResult method that will be called once the voice intent has returned and no further spoken text is detected. This is shown in the following code:
28. @Override
29. protected void onActivityResult(int requestCode, int
30. resultCode, Intent data) {
31.// When the voice input intent returns and is ok
32.if (requestCode == SPEECH_REQUEST && resultCode == RESULT_OK) {
33.// Get the text spoken
34.List<String> results = data.getStringArrayListExtra(
35. RecognizerIntent.EXTRA_RESULTS);
36. String spokenText = results.get(0);
37. Log.d("VoiceInputActivity","text: " + spokenText);
38.// Add the text to the view so the user knows we
39.// retrieved it correctly
40. CardBuilder card = new CardBuilder(this,
41. CardBuilder.Layout.TEXT);
42. card.setText(spokenText);
43. View cardView = card.getView();
44. setContentView(cardView);
45. }
46. super.onActivityResult(requestCode, resultCode, data);
47. }
}
In the preceding code snippets, we started by adding our import statements that will be responsible for allowing our app to communicate with Google Glass. We added the speech.RecognizerIntent package to allow our class to receive speech input once the intent has been instantiated and then start listening for speech activity within our current class. The onActivityResult method is called when the speech recognizing intent completes and a result code of RESULT_OK or RESULT_CANCEL is returned.
In our next step, we check to see if we have received resultCode of RESULT_OK and then we get the spoken text by using its EXTRA_RESULTS from RecognizerIntent. Then we log the results to the debug window and update the Glass view to show the new data received.
Accessing camera through Google Glass
In this section, we will be looking at how we can access the Google Glassware camera, take a picture, and save it to the Glassware device:
1. From the Project Navigator window, expand the app section, then select and expand the java section.
2. Next, right-click and choose the New | Java Class menu option.
3. Then, enter CameraActivity to be used as the name for our class and click on the OK button.
Our next step is to write the code that will be responsible for handling and capturing the image from the camera, and then saving this to the device's local storage.
4. Open the CameraActivity.java file that we just created.
5. Next, enter the import statements:
6. import android.app.Activity;
7. import android.content.Context;
8. import android.graphics.Bitmap;
9. import android.graphics.BitmapFactory;
10.import android.graphics.Matrix;
11.import android.graphics.PixelFormat;
12.import android.hardware.Camera;
13.import android.media.AudioManager;
14.import com.google.android.glass.media.Sounds;
15.import android.os.Bundle;
16.import android.os.Environment;
17.import android.view.KeyEvent;
18.import android.view.SurfaceHolder;
19.import android.view.SurfaceView;
20.import android.util.Log;
21.import java.io.File;
22.import java.io.FileOutputStream;
23.import java.io.IOException;
24.import java.text.SimpleDateFormat;
import java.util.Date;
25. Here, we need to modify the CameraActivity class by modifying the onCreate(Bundle savedInstanceState) method that will initialize Camera when the class is instantiated, as shown in the following code snippet:
26.public class CameraActivity extends Activity {
27. private SurfaceHolder _surfaceHolder;
28. private Camera _camera;
29. private boolean _previewOn;
30. Context _context = this;
31. @Override
32. public void onCreate(Bundle savedInstanceState) {
33.super.onCreate(savedInstanceState);
34. setContentView(R.layout.camera_preview);
35.// Set up the camera preview UI
36.getWindow().setFormat(PixelFormat.UNKNOWN);
37. SurfaceView surfaceView = (SurfaceView)
38. findViewById(R.id.camerapreview);
39._surfaceHolder = surfaceView.getHolder();
40._surfaceHolder.addCallback(new
SurfaceHolderCallback());
41. Now, we need to create a new onKeyDown method that will be called to start the intent when the user has tapped the touchpad to take a photo as shown in this code snippet:
42. @Override
43. public boolean onKeyDown(int keyCode, KeyEvent event){
44. switch (keyCode) {
45. // Google Glass TouchPad Tap
46. case KeyEvent.KEYCODE_DPAD_CENTER:
47. case KeyEvent.KEYCODE_ENTER: {
48. Log.d("CameraActivity", "Tap.");
49.
50. AudioManager audio =
51. (AudioManager)getSystemService(
52. Context.AUDIO_SERVICE);
53. audio.playSoundEffect(Sounds.SUCCESS);
54.
55. // Take the picture
56. _camera.takePicture(null, null,
57. new SavePicture());
58. return true;
59. }
60. default: {
61. return super.onKeyDown(keyCode, event);
62. }
63. }
}
64. Next, we need to create a new getFilename method that will be called once the onPictureTaken callback method has completed, as shown in the following code:
65.// Create the image filename with the current timestamp
66.private String getFilename(boolean isThumbnail) {
67. Log.d("CameraActivity", "Saving picture...");
68. SimpleDateFormat sdf = new SimpleDateFormat("yyyyMMdd_HHmmss_SSS");
69.
70. // Build the image filename
71. StringBuilder imageFilename = new StringBuilder();
72. imageFilename.append(sdf.format(new Date()));
73. if (isThumbnail) imageFilename.append("_tn");
74. imageFilename.append(".jpg");
75.
76. // Return the full path to the image
77. return
78. Environment.getExternalStoragePublicDirectory
79. (Environment.DIRECTORY_DCIM) + File.separator + "Camera" +
80. File.separator + imageFilename;
}
81. Here, we need to create a new savePicture method that will be called once the onPictureTaken callback method has returned, as follows:
82.// Write the image to local storage
83.public void savePicture(Bitmap image, String filename) throws IOException {
84. FileOutputStream fos = null;
85. try {
86. fos = new FileOutputStream(filename);
87. image.compress(Bitmap.CompressFormat.JPEG, 100, fos);
88. Log.d("CameraActivity", "Picture saved.");
89. }
90. catch (IOException e) {
91. e.printStackTrace();
92. throw(e);
93. }
94. finally {
95. fos.close();
96. }
}
97. Now, we need to create a new surfaceChanged method that will be called once the SurfaceHolder callback method has returned as shown in this code snippet:
98.// Handling of the camera preview
99.private class SurfaceHolderCallback implements SurfaceHolder.Callback {
100. @Override
101. public void surfaceChanged(SurfaceHolder holder, int format, int width, int height) {
102. if (null != _camera) {
103. try {
104. Camera.Parameters params = _camera.getParameters();
105. params.setPreviewFpsRange(5000, 5000);
106. _camera.setParameters(params);
107. // Start the preview
108. _camera.setPreviewDisplay(_surfaceHolder);
109. _camera.startPreview();
110. _previewOn = true;
111. }
112. catch (IOException e) {
113. e.printStackTrace();
114. }
115. }
116. }
117. @Override
118. public void surfaceCreated(SurfaceHolder holder) {
119. _camera = Camera.open();
120. }
121. @Override
122. public void surfaceDestroyed(SurfaceHolder holder) {
123. if (_previewOn) {
124. // Stop the preview and release the camera
125. _camera.stopPreview();
126. _camera.release();
127. }
128. }
}
129. Next, we need to create a new method to handle the onPictureTaken callback method, as shown in the following code:
130. // Callback that is called when the picture is taken
131. class SavePicture implements Camera.PictureCallback {
132. @Override
133. public void onPictureTaken(byte[] bytes, Camera camera)
134. {
135. Log.d("CameraActivity", "Picture taken.");
136. Bitmap image = BitmapFactory.decodeByteArray(bytes, 0, bytes.length);
137. try {
138. // Save the image
139. String imageFilename = getFilename(false);
140. savePicture(image, imageFilename);
141. }
142. catch (IOException e) {
143. e.printStackTrace();
144. }
145. }
}
In the preceding code snippets, we started by adding the import statements that will be responsible for allowing our app to communicate with Google Glass. Then we proceeded to create our private variables for SurfaceHolder and Camera as these will be responsible for displaying the camera preview within the Google Glass' screen window.
Then we call the setContentView method for our activity to use our custom camera_preview layout file once the activity is created, and then start setting up the callback methods for our camera preview UI. The onKeyDown method is called once the user has successfully tapped on TouchPad within the Google Glass control options, and then a sound effect notifying success is played through Glass to notify the user that the camera successfully took the picture.
The onPictureTaken callback method is called and this sends the picture as a byte array through which we use the BitmapFactory.decodeByteArray method to convert the bytes into a bitmap image. It is worth mentioning that in terms of your code, you shouldn't attempt to access the bytes of captured data, since this may not be immediately available.
In our next step, we call the getFilename method to build the filename of the image that will be saved to external storage. This filename will contain the current date and time appended to the end of the filename. Once we have the constructed filename, we proceed to call the savePicture method and to this, we pass in the image data and filename, which then writes a compressed version of the bitmap to the specified bitmap stream and compresses for maximum quality.
Incorporating the Google Maps API with Google Glass
In this section, we will be looking at how we can use the Google Maps API to obtain users' current location and address details, and plot their position on the map as a placeholder marker:
1. From the Project Navigator window, expand the app section, select and expand the java section.
2. Next, right-click and choose the New | Java Class menu option.
3. Then, enter MapLocationActivity to be used as the name of our class and click on the OK button.
Our next step is to write the code that will be responsible for getting the current user's location and address information, and then use the Google Maps API to pass the derived latitude and longitude coordinates to create a map image in memory, which we will display to the Google Glass content view.
4. Open the MapLocationActivity.java file that we have just created.
5. Next, enter the import statements:
6. import java.io.IOException;
7. import java.io.InputStream;
8. import java.net.HttpURLConnection;
9. import java.net.URL;
10.import java.util.List;
11.import android.graphics.Bitmap;
12.import android.graphics.BitmapFactory;
13.import android.location.Address;
14.import android.location.Criteria;
15.import android.location.Geocoder;
16.import android.location.Location;
17.import android.location.LocationListener;
18.import android.location.LocationManager;
19.import android.os.AsyncTask;
20.import android.os.Bundle;
21.import android.app.Activity;
22.import android.content.Context;
23.import android.view.View;
24.import android.view.WindowManager;
25.import android.util.Log;
import com.google.android.glass.widget.CardBuilder;
26. Now, we need to modify the MapLocationActivity class by modifying the onCreate(Bundle savedInstanceState) method to start retrieving our current location when the class is instantiated, as shown in this code snippet:
27.public class MapLocationActivity extends Activity implements LocationListener{
28. public LocationManager mLocationManager;
29. private CardBuilder card;
30.
31. @Override
32. protected void onCreate(Bundle savedInstanceState) {
33. super.onCreate(savedInstanceState);
34.
35. // Add the text to the view so the user knows
36. // we retrieved it correctly.
37. card = new CardBuilder(this, CardBuilder.Layout.TEXT);
38. card.setText("Getting your location...");
39. View cardView = card.getView();
40. setContentView(cardView);
41.
42. // Request a static location from the location manager
43. mLocationManager = (LocationManager) getSystemService(Context.LOCATION_SERVICE);
44.
45. // Set up a criteria object to get the location data,
46. // using the GPS provider on the handheld device.
47. Criteria criteria = new Criteria();
48. criteria.setAccuracy(Criteria.ACCURACY_FINE);
49. criteria.setAltitudeRequired(true);
50.
51. List<String> providers = mLocationManager.getProviders(criteria, true);
52.
53. // Asks the provider to send a location update
54. // every 10 seconds.
55. for (String provider : providers) {
56. mLocationManager.requestLocationUpdates(provider,
57.10000, 10, this);
58. }
59. getWindow().addFlags(WindowManager.LayoutParams.
60. FLAG_KEEP_SCREEN_ON);
61. }
}
62. Here, we need to create an onLocationChanged method that will be called each time LocationManager determines that the user's location has changed, as shown in the following code:
63.// Method to show the current Latitude and Longitude
64.// to the user.
65.@Override
66.public void onLocationChanged(Location location) {
67. // Get the Latitude and Longitude information
68. String mLatitude = String.valueOf(location.getLatitude());
69. String mLongitude = String.valueOf(location.getLongitude());
70. // Attempt to get address information from the
71. // static location object.
72. Geocoder geocoder = new Geocoder(this);
73. try {
74. List<Address> addresses = geocoder.getFromLocation(location.getLatitude(),location.getLongitude(), 1);
75. // Check to see if we have successfully
76. // returned the address information.
77. if (addresses.size() > 0) {
78. Address mAddress = addresses.get(0);
79. String mAddressInfo = "";
80. for(int i = 0; i < mAddress.getMaxAddressLineIndex(); i++) {
81. mAddressInfo += mAddress.getAddressLine(i) + " ";
82. }
83. // Display the address information within our Card
84. card.setFootnote(mAddressInfo);
85. }
86. } catch (IOException e) {
87. Log.e("LocationActivity", "Geocoder error", e);
88. }
89.
90. // Then, call our google maps URL to return the map
91. // for the latitude and longitude coordinates
92. new LocationMapImageTask().execute(
93. "http://maps.googleapis.com/maps/api/staticmap?" + "zoom=10&size=640x360&markers=color:green|" + mLatitude + "," + mLongitude);
94.
95. View cardView = card.getView();
96. setContentView(cardView);
}
97. Next, we need to create a new doInBackground method that will be called once the LocationMapImageTask callback method has returned from downloading the image asynchronously, as shown in this code:
98.// Private class to handle loading the Map and returning
99.// back an Bitmap image object.
100. private class LocationMapImageTask extends AsyncTask<String, Void, Bitmap> {
101.
102. @Override
103. protected Bitmap doInBackground(String... stringURL) {
104. Bitmap bmp = null;
105. try {
106. URL url = new URL(stringURL[0]);
107. HttpURLConnection conn = (HttpURLConnection) url.openConnection();
108. conn.setDoInput(true);
109. conn.connect();
110. InputStream inputStream = conn.getInputStream();
111. BitmapFactory.Options options = new BitmapFactory.Options();
112. bmp = BitmapFactory.decodeStream(inputStream, null, options);
113. }
114. catch (Exception e) {
115. Log.e("LocationActivity", "LocationMapImageTask", e);
116. }
117. // Return the map as a bitmap image
118. return bmp;
119. }
120. // After we have successfully executed our
121. // doInBackground method we need to display our map image
122. // to the card.
123. @Override
124. protected void onPostExecute (Bitmap result) {
125. // Add the map image to our Google Glass card
126. card.addImage(result);
127. View cardView = card.getView();
128. setContentView(cardView);
129. super.onPostExecute(result);
130. }
}
131. Now, as shown in the following code snippet, we need to create a new method to handle the LocationListener callbacks that will be used to determine when the location provider information has been enabled, disabled, or when the status changes:
132. @Override
133. public void onProviderDisabled(String arg0) {
134. // Called when the provider is disabled by the user.
135. }
136. @Override
137. public void onProviderEnabled(String arg0) {
138. // Called when the provider is enabled by the user.
139. }
140. @Override
141. public void onStatusChanged(String arg0,int arg1,Bundle arg2){
142. // Called when the provider status changes.
}
In the preceding code snippets, we started by adding our import statements that will be responsible for allowing our app to communicate with Google Glass and obtain the user's current location information. Then we proceed to create our mLocationManager object that will be used to hold the location data and make a call to get a list of location providers. Then we call the requestLocationUpdates method to ask the provider to send a location update every ten seconds. We specify a value of ten meters for the third parameter that tellsLocationListener to update only when the location has changed and also when the number of milliseconds specified by our second parameter of 10000 has passed.
Note
For more information on the requestLocationUpdates property, as well as to know about choosing appropriate values for the second parameter that, which can help in conserving battery life, check out the documentation athttp://developer.android.com/reference/android/location/LocationManager.html.
We specify a parameter value of ACCURACY_FINE for our Criteria object, which allows the app to access precise location information from location sources such as GPS, cell towers and Wi-Fi. Next, we create an onLocationChanged method, which will be called each timeLocationManager determines that the user's location has changed. We extract the Latitude and Longitude values from our location object that is passed into this method by LocationListener and then use the Geocoder class, and the getFromLocation property that, returns an array of addresses based on the provided latitude and longitude values and display this information within the setFootnote property of our CardBuilder card object.
In our next step, we create an AsyncTask class and pass in the Google Maps URL along with the Latitude and Longitude values to the execute() method, which returns back a static map image from the doInBackground method that runs in the background and not on the main thread. Next, we use the BitmapFactory.decodeStream method, which will convert the bytes returned from the stream into a bitmap image. Once the doInBackground method has completed, the onPostExecute method runs on the main thread and is passed to thebitmap image in the result parameter, which we then add to our card using the addImage property.
Finally, we create our LocationListener methods such as onProviderDisabled, onProviderEnabled, and onStatusChanged. These methods are called when the provider service has been disabled by the user, enabled by the user, or when the status of the provider changes.
Note
For more information on the LocationListener class, refer to the document at http://developer.android.com/reference/android/location/LocationListener.html.
Modifying the Google Glass main activity UI
In our next section, we will need to modify our MainActivity.java file so that based on the custom voice command issued, it will be able to launch the required custom activity. We will need to create a menu so that our menu items will be displayed within the OK Glass menu:
1. From the Project Navigator window, expand the app section, select and expand the java section.
2. Next, double-click to open the MainActivity.java file, and add the following highlighted code:
3. import com.google.android.glass.media.Sounds;
4. import com.google.android.glass.view.WindowUtils;
5. import com.google.android.glass.widget.CardBuilder;
6. import com.google.android.glass.widget.CardScrollAdapter;
7. import com.google.android.glass.widget.CardScrollView;
8. import android.app.Activity;
9. import android.content.Context;
10.import android.content.Intent;
11.import android.media.AudioManager;
12.import android.os.Bundle;
13.import android.view.Menu;
14.import android.view.MenuItem;
15.import android.view.View;
16.import android.view.ViewGroup;
import android.widget.AdapterView;
17. Now, we need to modify the MainActivity class by modifying the onCreate(Bundle savedInstanceState) method to include a reference to our requestFeature method. This will set up our app to use custom voice commands when the class is instantiated, as shown in the following code:
18.@Override
19.protected void onCreate(Bundle bundle) {
20. super.onCreate(bundle);
21. // Set up our app to use custom voice commands
22. getWindow().requestFeature(WindowUtils.
23. FEATURE_VOICE_COMMANDS);
24. Here, we need to create an onCreatePanelMenu method that will be called when intent has started, and will set up and display our custom menu options within our Google Glass menu that we specified within our activity_menu.xml file, as shown in this code snippet:
25.// Set up our menu options so that they will appear in the Google Glass menu
26.@Override
27.public boolean onCreatePanelMenu(int featureId, Menu menu) {
28. if (featureId == WindowUtils.FEATURE_VOICE_COMMANDS) {
29. getMenuInflater().inflate(R.menu.activity_menu, menu);
30. return true;
31. }
32. return super.onCreatePanelMenu(featureId, menu);Now
}
33. Next, we need to create an onMenuItemSelected method that will be called when intent has started, and will set up and display our custom menu options within our Google Glass menu that we specified in our strings.xml file, as shown in the following code:
34.// Method to call the relevant activity based on the voice command
35.public boolean onMenuItemSelected(int featureId, MenuItem item) {
36. // Handle item selection
37. if (featureId == WindowUtils.FEATURE_VOICE_COMMANDS) {
38. if (item.getItemId() == R.id.show_camera_item) {
39. // Open new activity to do camera preview
40. Intent intent = new Intent(this, CameraActivity.class);
41. startActivity(intent);
42. return true;
43. } else if (item.getItemId() == R.id.show_voice_item) {
44. // Open new activity to do voice input
45. Intent intent = new Intent(this, VoiceInputActivity.class);
46. startActivity(intent);
47. return true;
48. } else if (item.getItemId() == R.id.show_location_item) {
49. // Open new activity to show users location on the Map
50. Intent intent = new Intent(this,
51. MapLocationActivity.class);
52. startActivity(intent);
53. return true;
54. }
55.}
56. return super.onMenuItemSelected(featureId, item);
57. }
}
In the preceding code snippets, we started by adding our import statements that will be responsible for allowing the custom voice commands that we give to Google Glass to work correctly and as expected. Firstly, we need to tell our activity that we request permission for it to use custom voice commands that are handled by getWindow().requestFeature(WindowUtils.FEATURE_VOICE_COMMANDS). Next, we create an onCreatePanelMenu method where we check whether we are listening for custom voice commands, and then we inflate our menu for our activity so that our voice command options appear within the OK Glass menu options.
After the user triggers a voice command, the onMenuItemSelected method is called and first it checks that featureId is for voice commands, which means that an item has been selected from the OK Glass menu. In our next step, when the voice commands are called, a check is performed to find out what the item is. Once this has been determined, the relevant intent is initialized and the startActivity method launches intent, displaying it on the Google Glass screen.
Note
When developing native apps on Glass, there are required patterns to use menus and stop the Glassware. Immersions requires that down swiping should exit the app and return the user to the timeline, whereas using live cards requires the presence of a dedicated stop command to terminate the app.
Launching the app within Google Glass
Next, we can finally begin to compile, build, and run our application. You must first ensure that you have connected your Google Glassware to your computer's USB port, then simply press CMD + F9, and your app will be installed on your Google Glassware wearable device.
When the app has been installed on your Android wearable device, it will be launched and from the Hello Google Glass screen you have to speak these words: OK Glass…Hello Google Glass…Voice Input…. Then your app will recognize what you are asking and display the Voice Activity screen, which will contain your spoken words displayed within an individual card notification.
An introduction to GDK and the Google Mirror API
In this section, we will be discussing the Google Mirror API and how this is designed to give developers access to Glass development without any prerequisites, as this API is included as part of the core Glass OS, and does not rely on any third party development tools. Google provides developers with its cloud-based RESTful services that enable them to build Glassware apps by interacting with web service calls that are part of the Google API platform, and is fully hosted, managed, and maintained by Google.
The Mirror API works by allowing you to build web-based services that can interact with Google Glass by providing the functionality over a cloud-based API that does not require running code on a real Google Glass device.
When working with the Mirror API, you need to keep in mind the following things about this API:
· Executes an OAuth 2.0 request to obtain an authentication token
· Executes HTTP requests
· Provides the ability to post timeline items
· Receive notifications when your users interact with a timeline item, and receive location-based updates
When using the Mirror API, you need to keep in mind that every HTTP request sent from your Glass application needs to be authorized by providing a valid token with each request. Tokens are issued by the Google API, using the standard OAuth 2.0 protocol.
Note
For more information on using OAuth 2.0 to access Google APIs, refer to https://developers.google.com/identity/protocols/OAuth2.
If you work with the GDK, you should know that this is an extension of the Android SDK, which was initially designed to develop handheld device apps. This means, your Glassware can leverage the entire Android SDK right from its activities and services to obtaining the user's location using location-based services and the camera APIs.
The GDK provides the following functionality for Glass:
· Ability to launch activities in response to voice commands
· Ability to add cards to the timeline
· Access to widgets and views designed specifically for Glass that allows you to create layouts that are consistent with the rest of the platform
Note
For more information on the GDK, go to https://developers.google.com/glass/develop/gdk/.
The Mirror API playground
The Google Glass playground lets you experiment with how the content is displayed within Glass. You can use the playground to push content to your Glass wearable device, but if you don't own the real device, you can still see how this would look like on the Glass display:
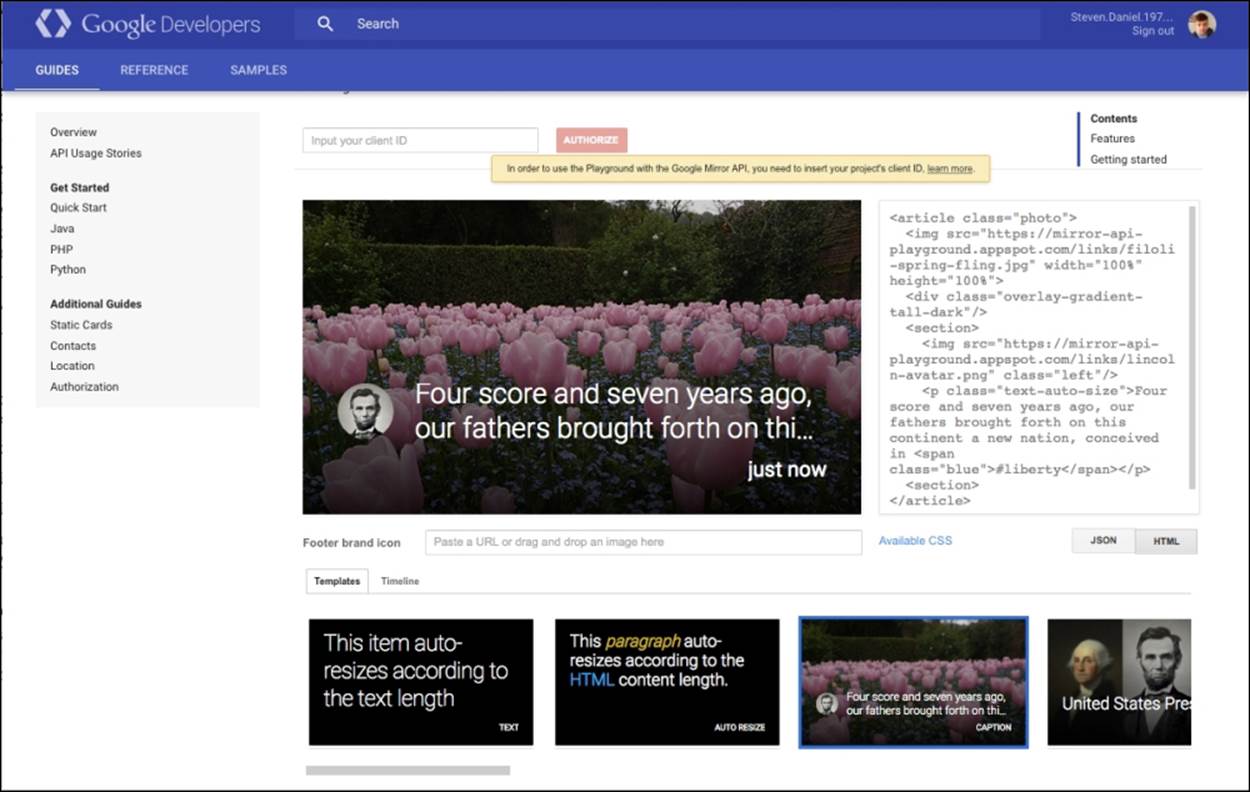
As you can see in the preceding screenshot, we can choose a sample template to use and see the associated HTML code that can be used to lay out our Glass content, so we can see how it would appear if we were running this on a real Glass wearable device.
The following code snippet shows the associated HTML code used in the preceding screenshot to display the content within our Glass display:
<article class="photo">
<img src="https://mirror-api-playground.appspot.com/links/filoli-spring-fling" width="100%" height="100%">
<div class="overlay-gradient-tall-dark"/>
<section>
<img src="https://mirror-api-playground.appspot.com/links/lincoln-avatar.png" class="left"/>
<p class="text-auto-size">Four score and seven years ago, our fathers brought forth on this continent a new nation, conceived in <span class="blue">#liberty</span></p>
<section>
</article>
Note
For more information on the Mirror API playground, please refer to the documentation at https://developers.google.com/glass/tools-downloads/playground.
The Google Glassware principle design guidelines
When designing apps for Google Glass, these need to be designed differently than how you would go about designing apps for phone or tablets, as they contain a different user experience. It is important to keep in mind and follow the Glassware principle design guidelines documentation that Google provides. This document describes the guidelines and principles that help you to design consistent user interfaces and user experiences for your Glass wearable apps, as well as ensure that your application runs efficiently within the Glassware platform.
You need to consider the screen sizes of your custom layouts, as well as the ease of use your app brings to the platform. The Glassware principle design guidelines document also explains how to ensure the consistency of your application while navigating from screen to screen, as well as the principles for designing good user interfaces are also covered. Some of the design pattern guidelines that your Glassware application needs to conform to are as follows:
· Design for Glass: When designing for Glass, users typically work with multiple devices that store and display information for a specific time period and Google Glass works best when information presented is simple, relevant, and current.
· Don't get in the way: Google Glass is designed to be there when you need it and it stays out of the way when you don't, but at the same time it must offer the same functionality that supplements the user's life without taking any of these features away.
· Keep it relevant: Information must be delivered at the right time, presented at the right place within the Google Glass user interface for each of your users, must contain information that is most relevant, and engage the users' attention and with the most satisfaction.
· Avoid the unexpected: Avoid sending content too frequently to your users, as this can have a bad experience for your customers. This is because Google Glass is so close to the users' senses that sending information too frequently and at unexpected times will frustrate your users. Always make it clear to users what is the intention of your Glassware and never pretend to be something you're not.
· Build for people: When designing your users' interfaces, make sure that you use imagery, colloquial voice interactions, and natural gestures. Ensure that you focus on a fire-and-forget usage model where users can start actions quickly and continue with what they're doing.
There is also information relating to the proper use and appearance of UI elements, such as background images and icons, as well as how to go about distributing your app to the Google Glassware platform.
Note
To obtain further information about these guidelines, it is worth checking out the Google Glassware principle guidelines documentation at https://developers.google.com/glass/design/principles.
Summary
In this chapter, we learned about Google Glass and how we can use this platform to build effective and interactive content by designing custom layouts to display content on the Google Glass screen. We learned how to install and set up the Google Glass Development Kit preview SDK, and got a brief overview about the Mirror API emulator since there is no emulator currently for Glass development. However, there is currently a Google Mirror API playground, which is a test environment to work with static timeline cards. Then we had an introduction to the two different activities that can be created for Glass, live cards, and immersions:
· Live cards are basically activities that are added to the Glass timeline and display information relating to high-frequency updates in real-time, which are constantly run in the background even when users are interacting with different cards. These activities allow users to multitask and access different kinds of information in real-time.
· Immersions, on the other hand, are fully customizable screens that run outside of the timeline experience. Using this type of activity allows you to design your own user interfaces and process user input.
Next, we learned how to customize the appearance and theme of custom menus as they appear within the OK Glass menu and how we can incorporate various voice commands within our app. We also learned about the CardScrollView class, which is a container that displays multiple cards side-by-side, whereas Card displays the content on screen. In addition, we learned how we can work with the Glass camera to take a photo and save it as an image on the Google Glass device.
In the next and final chapter, we will learn how to create and customize layouts and use layout themes for Android TV, as well as create the necessary activity fragments to display content.
Chapter 6. Designing and Customizing Interfaces for Android TV
This chapter will provide you with the background and understanding of how you can effectively design and customize user interfaces for Android TV. When Google announced the Android TV platform during their Google I/O conference back in 2014, their vision was to create a highly interactive and connected television experience that would leverage and build upon the existing functionality found in the Android platform.
Google also provided consumers with the choice of either purchasing a smart TV with the platform built in, or alternatively adding Android TV to their existing television set by purchasing a stand-alone set-top box, such as the Nexus Q.
Android TV essentially brings apps and functionality that users already enjoy working with on their smaller Android devices, but with the added ability to download Android TV apps from the Google Play Store. It also provides users with a platform that supports Google Cast that will enable them to cast content from their smartphone or tablet onto their Android TV device to make the viewing experience much more exciting and usable from a living room couch.
This chapter includes the following topics:
· Creating and building an Android TV application
· Learning how to check for the presence of an Android TV interface
· Learning how to design and customize user interfaces
· Learning how to implement search functionality within Android TV
· Introducing you to the Android TV user interface guidelines
Creating and building an Android TV application
In this section, we will take a look at how to create an Android TV application using the default Android TV template that Android Studio provides us with. As we progress through the chapter, we will learn how to customize the Android TV user interface by creating our very own custom fragment classes to display header and row content information within the Android TV user interface.
Note
In Android, a fragment is a class that represents a behavior or portion of the user interface within an activity. Fragments were introduced to help produce the user interface, so that it can adapt to the various device orientations as well as function seamlessly across phones and tablets. You can even use multiple fragments within the same activity and rearrange them when the user rotates their device.
Firstly, create a new project in Android Studio by following these simple steps:
1. Launch Android Studio, and then click on the File | New Project menu option.
2. Next, enter AndroidTVInterfaces for the Application name field.
3. Then, provide the name for the Company Domain field.
4. Now, choose the project location where you would like to save your application code:
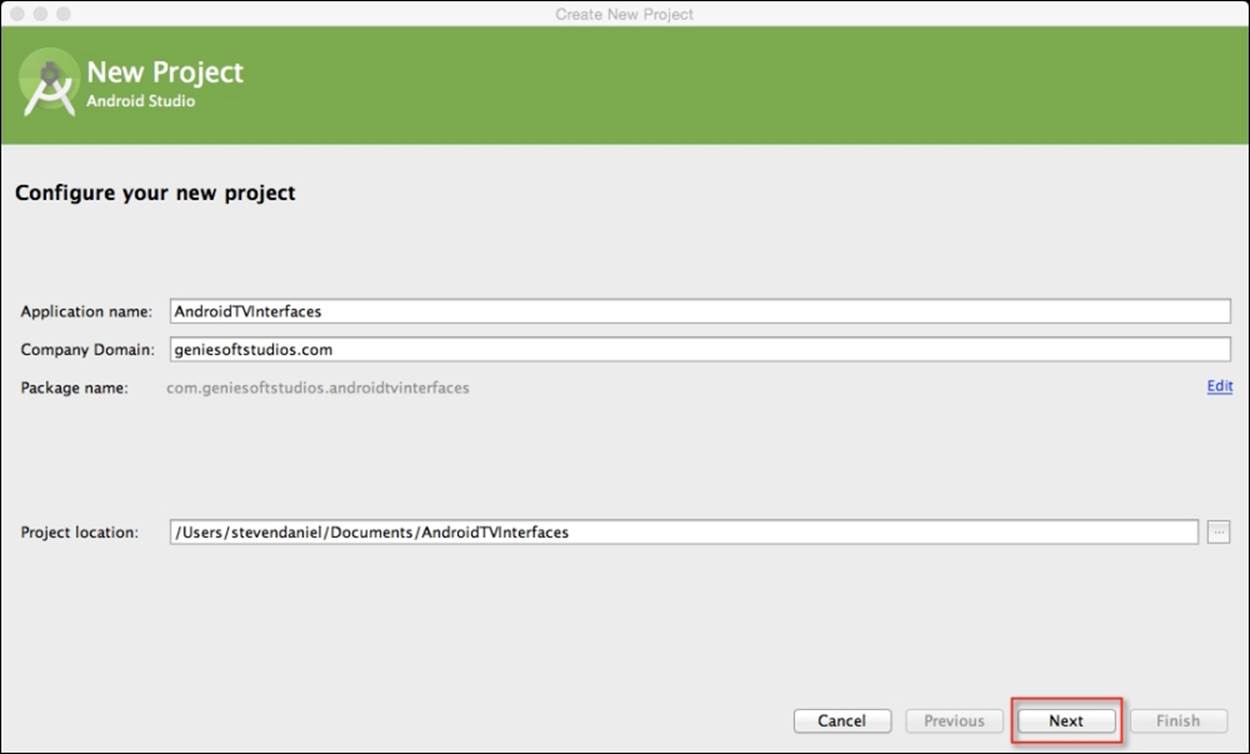
5. Click on the Next button to proceed to the next step.
Next, we will need to specify the target form factors of our Android devices that our application will run on. On this screen, we will need to choose the minimum SDK version for our TV.
6. Click on the TV option and choose the API 21: Android 5.0 (Lollipop) option for Minimum SDK:
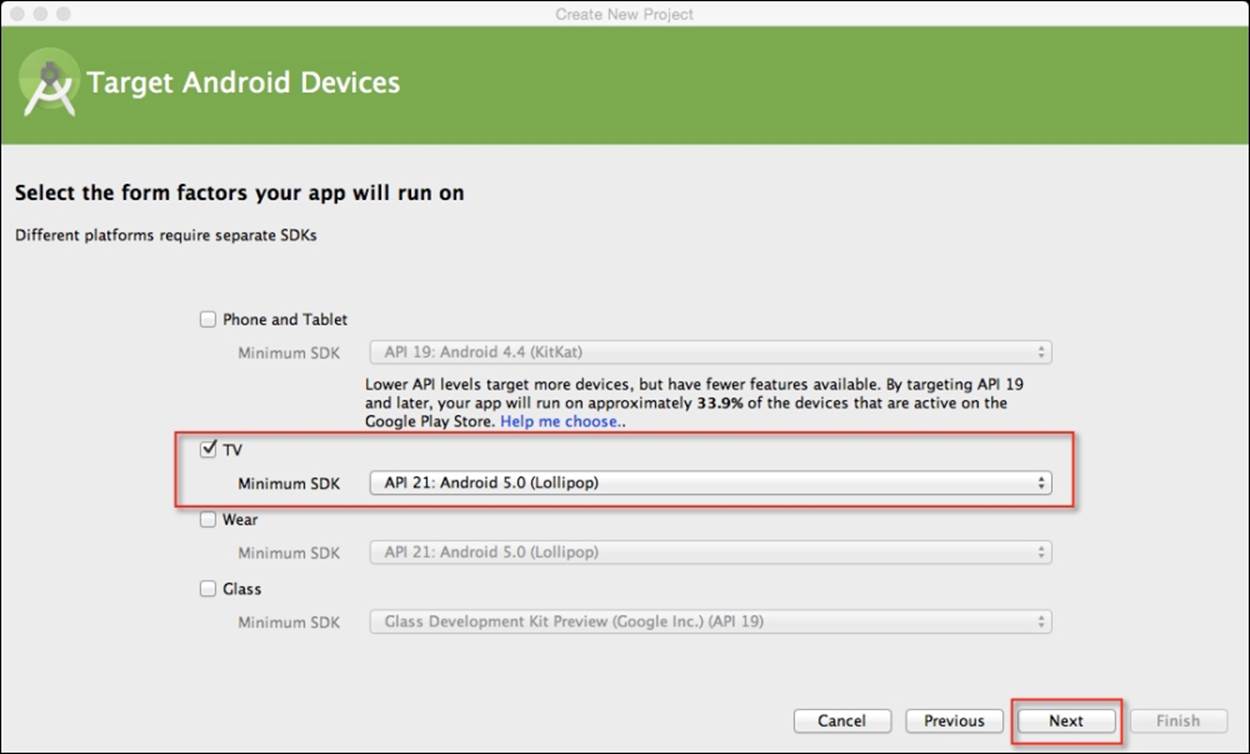
7. Click on the Next button to proceed to the next step.
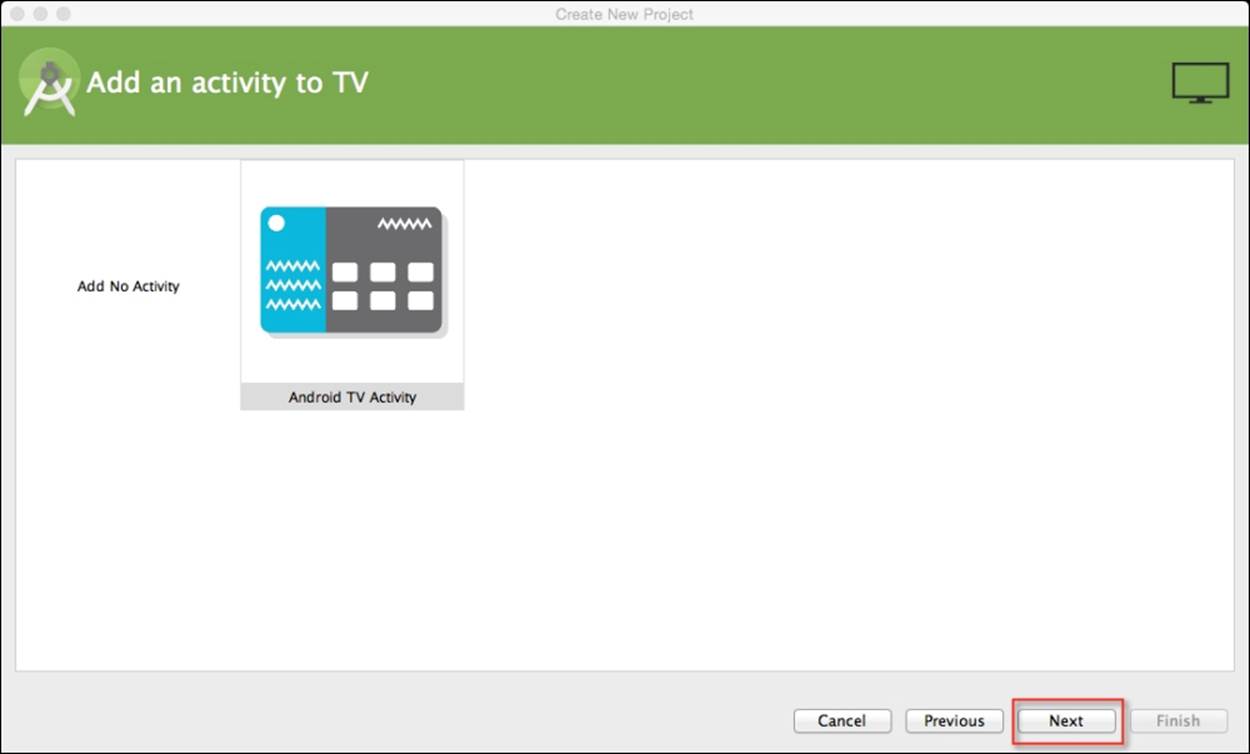
In our next step, we will need to add Android TV Activity to our application project for the TV section of our app.
8. From the Add an activity to TV screen, choose the Android TV Activity option from the list of activities shown and click on the Next button to proceed to the next step:
Next, we need to customize the properties for our Android TV activity so that it can be used by our application. Here we will need to specify the name for our activity, layout information, title, and layout fragment files.
9. From the Customize the Activity screen, enter MainActivity for Activity Name shown and click on the Next button to proceed to the next step in the wizard:
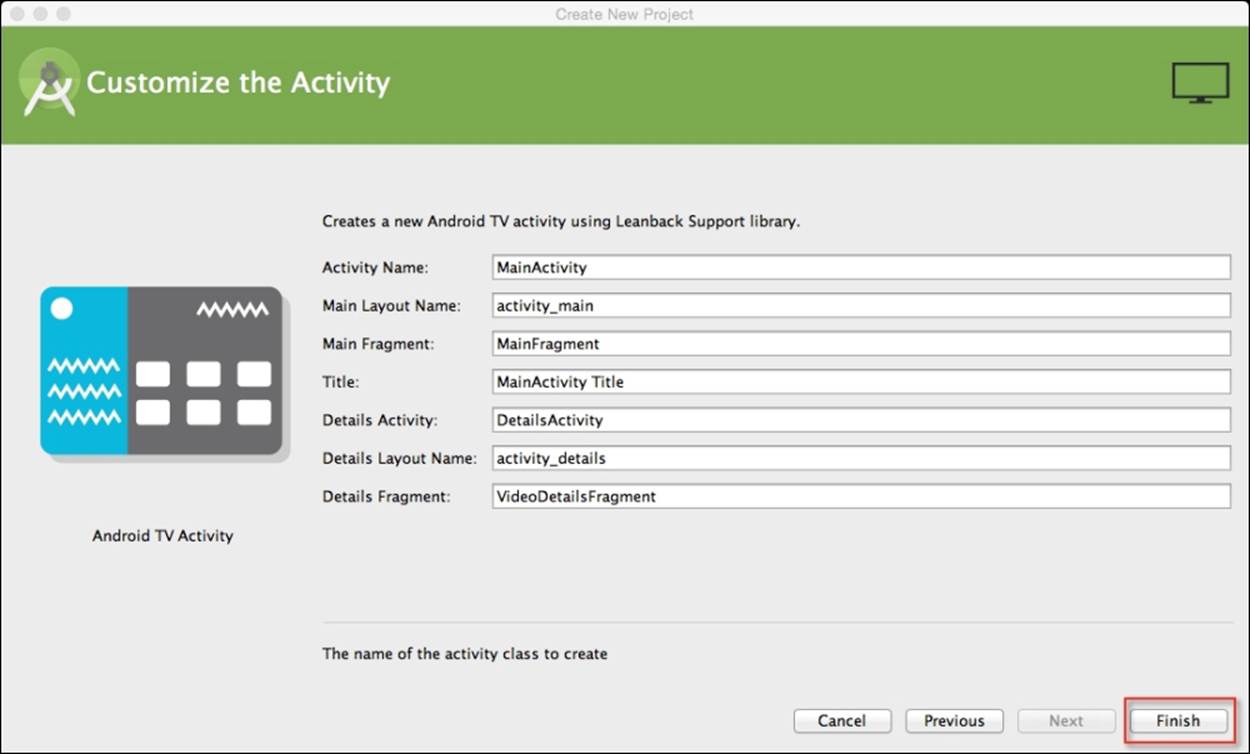
10. Finally, click on the Finish button and the wizard will generate your project and after a few moments, the Android Studio window will appear with your project displayed in it.
In our next section, we will take a look at how we can create activity and fragment classes to customize the look and feel of an Android TV user interface.
Customizing the Android TV user interface
In this section, we will begin by creating a custom header and custom row fragment for our Android TV user interface. The previously generated code that handles the displaying of header and row information currently exists within the MainFragment class.
In the sections that follow, we will be taking a look at how we can separate this information into two individual classes, which will make the code easier to maintain.
Creating the CustomHeadersFragment class
In this section, we will proceed to create our CustomHeadersFragment class that inherits from the HeadersFragment class and will be used to display our list of categories within the side panel of our Android TV user interface.
First, we need to create a new class called CustomHeadersFragment:
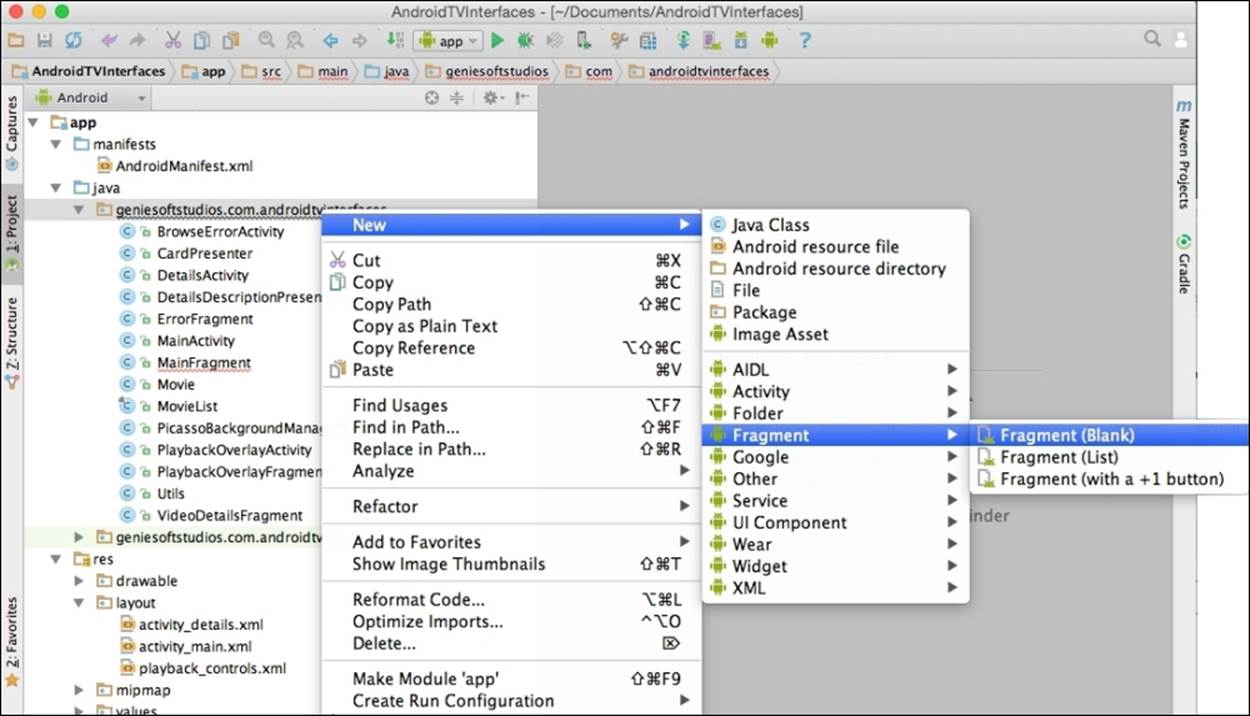
1. From the Project Navigator window, expand the app section, select and expand the java section.
2. Next, right-click and choose the New | Fragment | Fragment (Blank) menu option:
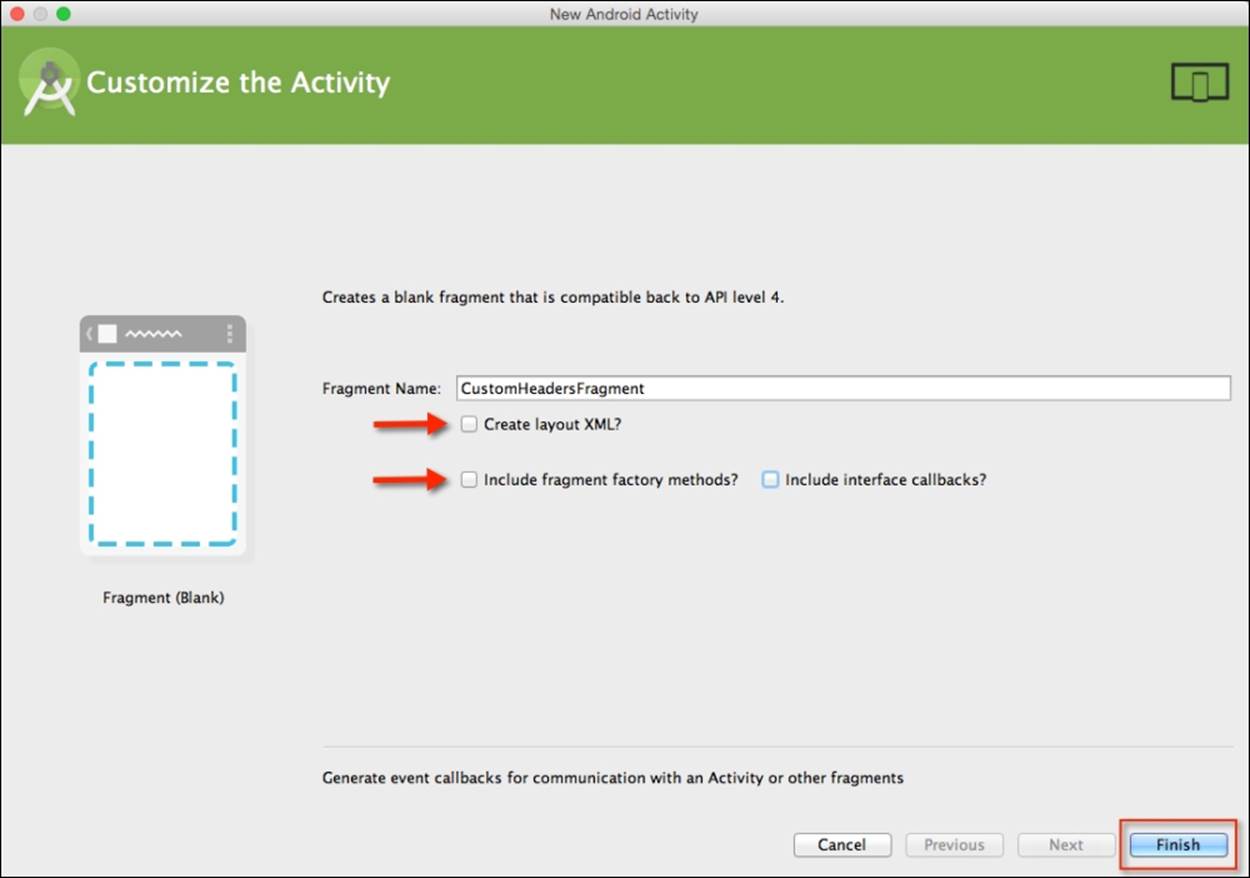
3. Then, enter CustomHeadersFragment to be used as the name for Fragment Name.
4. Next, ensure that you have not selected Create layout XML?.
5. Now, ensure that the Include fragment factory methods? and Include interface callbacks? options have not been selected.
6. Then click on the Finish button:
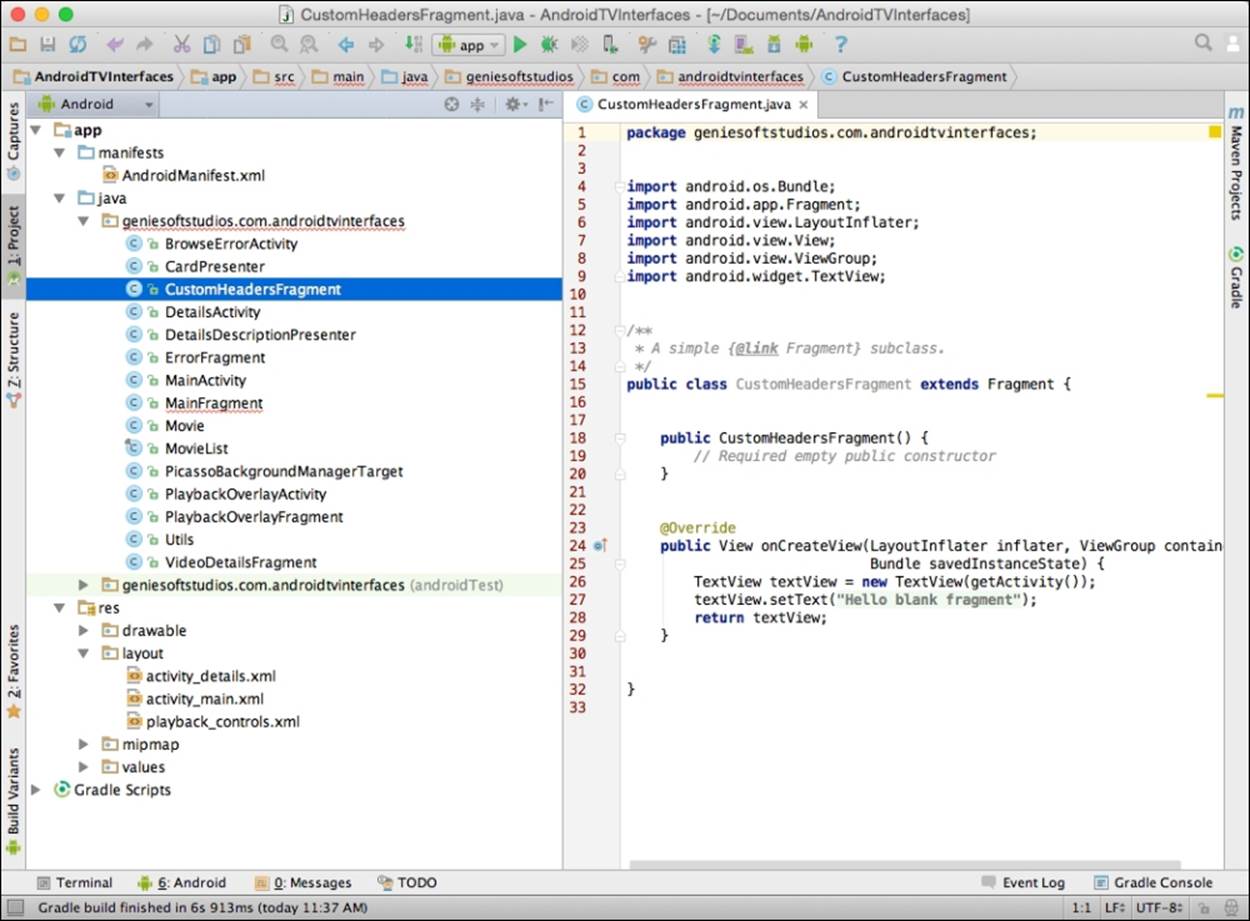
Upon clicking the Finish button, the Android Studio code editor will open as shown in the following screenshot:
Note
Over time, Google may decide to make changes to the Android Support Libraries for a Leanback support and you may notice that certain libraries and method calls don't exist, so you will need to change the code slightly to work with these libraries. Please refer to the Support Library document at https://developer.android.com/tools/support-library/index.html#revisions to help you.
Our next step is to write the code that will populate the category details within our Android TV side panel:
1. Open the CustomHeadersFragment.java file as shown in the preceding screenshot.
2. Next, enter the following import statements:
3. import android.app.Fragment;
4. import android.os.Bundle;
5. import android.support.v17.leanback.app.HeadersFragment;
6. import android.support.v17.leanback.widget.ArrayObjectAdapter;
7. import android.support.v17.leanback.widget.HeaderItem;
8. import android.support.v17.leanback.widget.ListRow;
9. import android.util.Log;
10.import android.view.View;
11.import android.widget.AdapterView;
import java.util.LinkedHashMap;
12. Now, modify the CustomHeadersFragment class by handling the onActivityCreated callback method that will be called when the fragment is instantiated, as shown in this code snippet:
13.public class CustomHeadersFragment extends HeadersFragment {
14. private static final String TAG = "CustomHeadersFragment";
15. private ArrayObjectAdapter mAdapter;
16. @Override
17. public void onActivityCreated(Bundle savedInstanceState){
18. Log.i(TAG, "onCreate");
19. super.onActivityCreated(savedInstanceState);
20.
21. setHeaderAdapter();
22. setCustomPadding();
}
23. Then, we need to create a setHeaderAdapter method that will be called to display the category names within our side panel as shown in the following code:
24.private void setHeaderAdapter() {
25. mAdapter = new ArrayObjectAdapter();
26. LinkedHashMap<Integer, CustomRowsFragment> fragments = ((MainActivity) getActivity()).getFragments();
27. int id = 0;
28. for (int i = 0; i < fragments.size(); i++) {
29. HeaderItem header = new HeaderItem(id, "Category " + i);
30. ArrayObjectAdapter innerAdapter = new
31. ArrayObjectAdapter();
32. innerAdapter.add(fragments.get(i));
33. mAdapter.add(id, new ListRow(header, innerAdapter));
34. id++;
35. }
36. setAdapter(mAdapter);
}
37. Next, we need to create a setCustomPadding new method that will be called to adjust the display when the categories are displayed within the side panel as shown in this code snippet:
38.private void setCustomPadding() {
39. getView().setPadding(0,
40. Utils.convertDpToPixel(getActivity(), 128),
41. Utils.convertDpToPixel(getActivity(), 48), 0);
}
42. Finally, we need to create an OnItemSelectedListener method that will be called when an item has been selected within the side panel window as shown in the following code:
43.private AdapterView.OnItemSelectedListener getDefaultItemSelectedListener() {
44. return new AdapterView.OnItemSelectedListener() {
45. @Override
46. public void onItemSelected(AdapterView<?>adapterView, View view, int i, long l) {
47. Object obj = ((ListRow) adapterView.getItemAtPosition(i)).getAdapter().get(0);
48. getFragmentManager().beginTransaction().replace(R.id.rows_container, (Fragment) obj).commit();
49. ((MainActivity) getActivity()).updateCurrentRowsFragment((CustomRowsFragment) obj);
50. }
51. @Override
52. public void onNothingSelected(AdapterView<?> adapterView) {
53. Log.d(TAG,"Nothing has been selected");
54. }
55. };
}
In the preceding code snippets, we started by adding our import statements that will be responsible for allowing our application to communicate with Android TV. We incorporate the Leanback support library that provides us with prebuilt components for our TV interface. We then proceed to extend our CustomHeadersFragment class using the HeadersFragment class and then add the code for our onActivityCreated (Bundle savedInstanceState) method. This will be called when the activity is instantiated and sets up asetOnItemSelectedListener listener method that will be responsible for the category after it has been selected.
In our next step, we create a setHeaderAdapter method that will be called to populate the category items in the left side panel. This method creates an ArrayObjectAdapter class that contains a list of all of our header items and will be called each time a category has been chosen and calls the CustomRowsFragmentListRow element to retrieve the associated row information for the chosen category. In our next step, we create a setCustomPadding method that will be used to adjust the padding for our fragment view, as soon as it is created.
Creating the CustomRowsFragment class
In this section, we will proceed to create our custom rows fragment class that inherits from the RowsFragment class and will be used to display our row information for the selected category that has been clicked within the side panel of our Android TV user interface.
First, we need to create our CustomRowsFragment fragment like we did in the previous section:
1. From the Project Navigator window, expand the app section, select and expand the java section.
2. Next, right-click and choose the New | Fragment | Fragment (Blank) menu option and enter CustomRowsFragment to be used as the name for Fragment Name.
3. Now, ensure that you have not selected the Create Layout XML? option.
4. Then, ensure that the Include fragment factory methods? and Include interface callbacks? options have not been selected and then click on the Finish button to open the Android Studio code editor window.
Our next step is to write the code that will be responsible for populating our row information within the Android TV interface.
5. Open the CustomRowsFragment.java file that we just created.
6. Next, enter the following import statements:
7. import android.graphics.Color;
8. import android.os.Bundle;
9. import android.support.v17.leanback.app.RowsFragment;
10.import android.support.v17.leanback.widget.ArrayObjectAdapter;
11.import android.support.v17.leanback.widget.HeaderItem;
12.import android.support.v17.leanback.widget.ListRow;
13.import android.support.v17.leanback.widget.ListRowPresenter;
14.import android.util.Log;
15.import android.util.TypedValue;
16.import android.view.LayoutInflater;
17.import android.view.View;
18.import android.view.ViewGroup;
19.import java.util.Collections;
import java.util.List;
20. Then, modify the onCreateView(LayoutInflater inflater, ViewGroupcontainer, Bundle savedInstanceState) method that will be called when the fragment is created, as shown in the following code:
21.public class CustomRowsFragment extends RowsFragment {
22. private final int NUM_ROWS = 5;
23. private final int NUM_COLS = 15;
24. private ArrayObjectAdapter rowsAdapter;
25. private CardPresenter cardPresenter;
26. private static final int HEADERS_FRAGMENT_SCALE_SIZE = 300;
27. private static final String TAG = "CustomRowsFragment";
28. @Override
29. public View onCreateView(LayoutInflater inflater, ViewGroup container, Bundle savedInstanceState) {
30. View v = super.onCreateView(inflater, container, savedInstanceState);
31. int marginOffset = (int) TypedValue.applyDimension(TypedValue.COMPLEX_UNIT_DIP, HEADERS_FRAGMENT_SCALE_SIZE, getResources().getDisplayMetrics());
32. ViewGroup.MarginLayoutParams params = (ViewGroup.MarginLayoutParams) v.getLayoutParams();
33. params.rightMargin -= marginOffset;
34. v.setLayoutParams(params);
35. v.setBackgroundColor(Color.DKGRAY);
36. return v;
}
37. Next, modify the CustomRowsFragment class by creating an onActivityCreated (Bundle savedInstanceState) method that will be called when the fragment is instantiated, as shown in the following code snippet:
38.@Override
39.public void onActivityCreated(Bundle savedInstanceState) {
40. Log.i(TAG, "onCreate");
41. super.onActivityCreated(savedInstanceState);
42. loadRows();
43. setCustomPadding();
}
44. Now, as shown in the following code, we need to create a loadRows() new method that will be called to display the associated row information for the chosen category within our side panel:
45.private void loadRows() {
46. rowsAdapter = new ArrayObjectAdapter(new ListRowPresenter());
47. cardPresenter = new CardPresenter();
48. List<Movie> list = MovieList.setupMovies();
49. int i;
50. for (i = 0; i < NUM_ROWS; i++) {
51. if (i != 0) Collections.shuffle(list);
52. ArrayObjectAdapter listRowAdapter = new ArrayObjectAdapter(cardPresenter);
53. for (int j = 0; j < NUM_COLS; j++) {
54. listRowAdapter.add(list.get(j % 5));
55. }
56. HeaderItem header = new HeaderItem(i, MovieList.MOVIE_CATEGORY[i]););
57. rowsAdapter.add(new ListRow(header, listRowAdapter));
58. }
59. setAdapter(rowsAdapter);
}
60. Then, we need to create a setCustomPadding()method that will be called to adjust the padding for each of the rows within our Android TV interface as follows:
61.private void setCustomPadding() {
62. getView().setPadding(Utils.convertDpToPixel(getActivity(), -24), Utils.convertDpToPixel(getActivity(), 128), Utils.convertDpToPixel(getActivity(), 48), 0);
}
63. Finally, we need to create a new refresh() method that will be called to adjust the padding for each of the rows within our Android TV interface when the contents have changed as shown in the following code snippet:
64.public void refresh() {
65. getView().setPadding(Utils.convertDpToPixel(getActivity(), -24), Utils.convertDpToPixel(getActivity(), 128), Utils.convertDpToPixel(getActivity(), 300), 0);
}
In the preceding code snippets, we started by adding our import statements that will be responsible for allowing our application to communicate with Android TV and, just as we did in our CustomHeadersFragment class, we incorporate the Leanback support library that provides us with prebuilt components for our TV interface.
We then proceed to extend our CustomRowsFragment class using the RowsFragment class and then add the code for our onCreateView (LayoutInflater inflater, viewGroup container, Bundle savedInstanceState) method that will be called when the view has been created. This is responsible for setting the layout information for our margins and background of our fragment. In our next step, we add the code for our onActivityCreated (Bundle savedInstanceState) method that will be called when the activity is instantiated and calls theloadRows method to populate our fragment with information for the corresponding chosen category, before calling the setCustomPadding method that will be used to adjust the padding for our fragment view as soon as it is created.
In our next step, we create a loadRows method that will be called each time the activity is created and populates our view fragment with the associated row information for the chosen category. This method sets up an ArrayObjectAdapter class that instantiates theListRowPresenter object, and then calls the set upMovies method from our MovieList class model and assigns this to a list object.
Next, we iterate through each row and column, shuffle the contents of our list object to ensure that we get different information each time our category is selected, create a listRowAdapter object that inherits from the CardPresenter class, extract the movie header information, and add the item details to rowAdapter for the chosen category. In our next step, we create a setCustomPadding method and refresh that will be used to adjust the padding for our fragment view, as soon as it is created.
Creating the CustomFrameLayout class
In this section, we will proceed to create our custom frame layout class that inherits from the FrameLayout class and will be used to ensure that the information is presented correctly within the TV interface.
First, we need to create our CustomFrameLayout class like we did in the previous section:
1. From the Project Navigator window, expand the app section, select and expand the java section.
2. Next, right-click and choose the New | Java Class menu option:
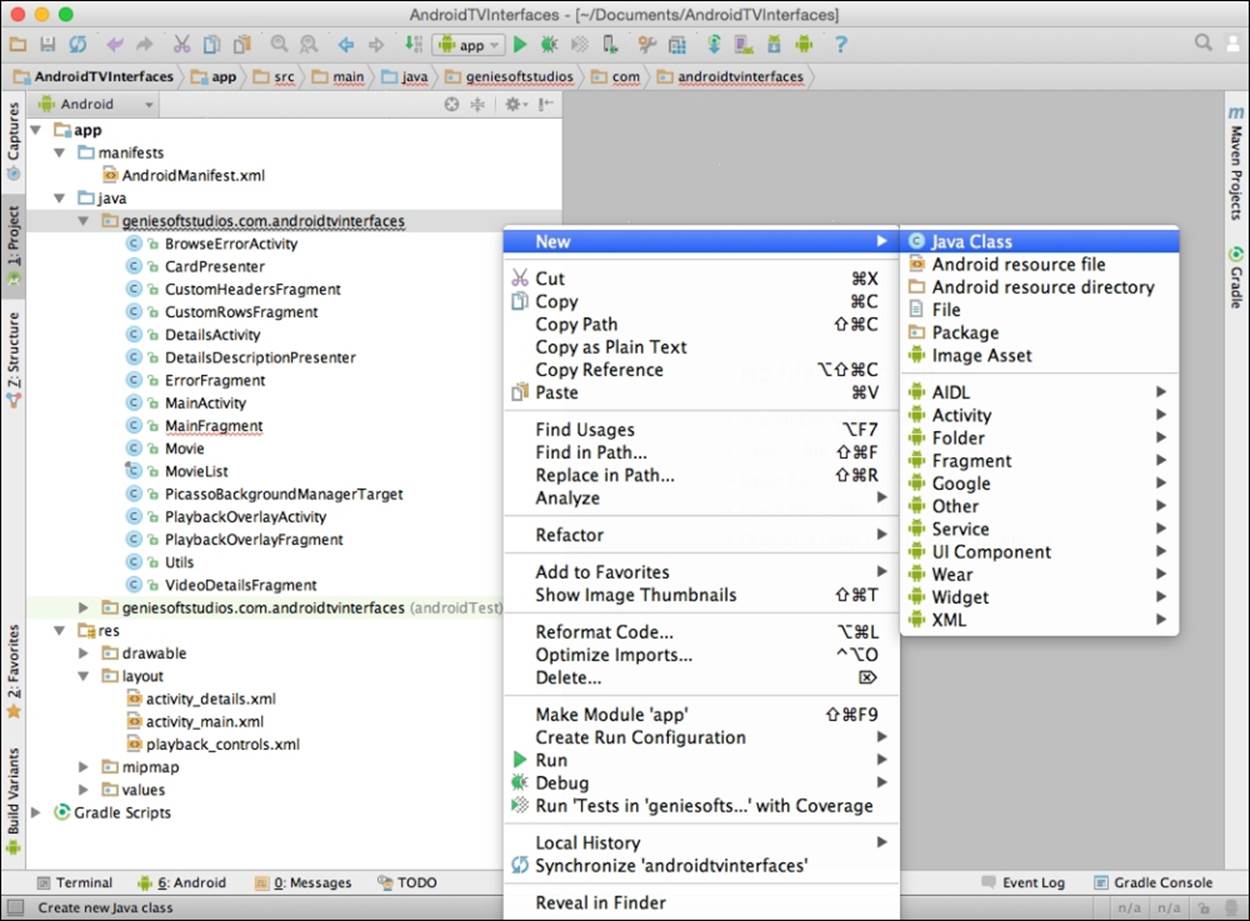
3. Then, enter CustomFrameLayout to be used as the name for our class and click on the OK button:
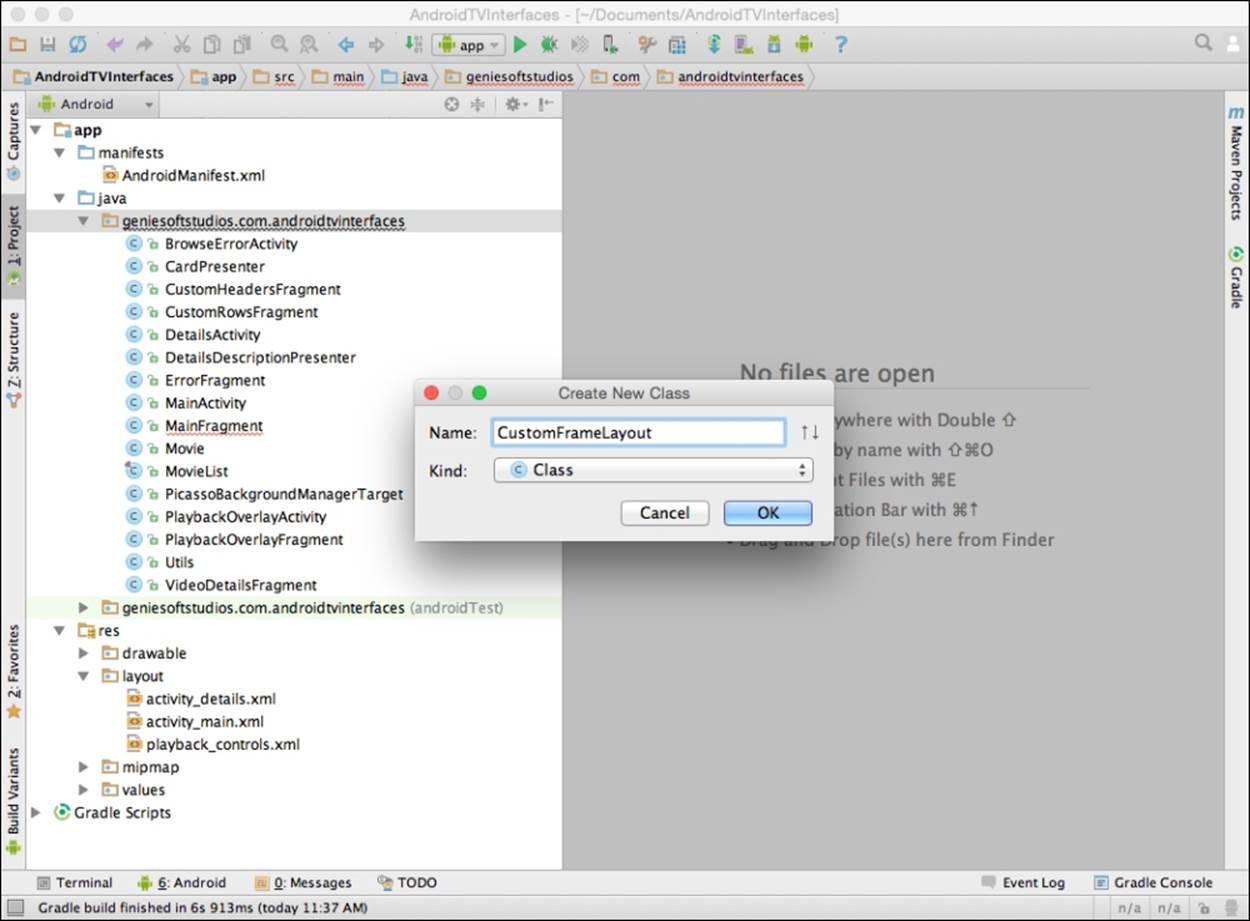
Upon clicking the OK button, the Android Studio code editor will open, as shown in the following screenshot:
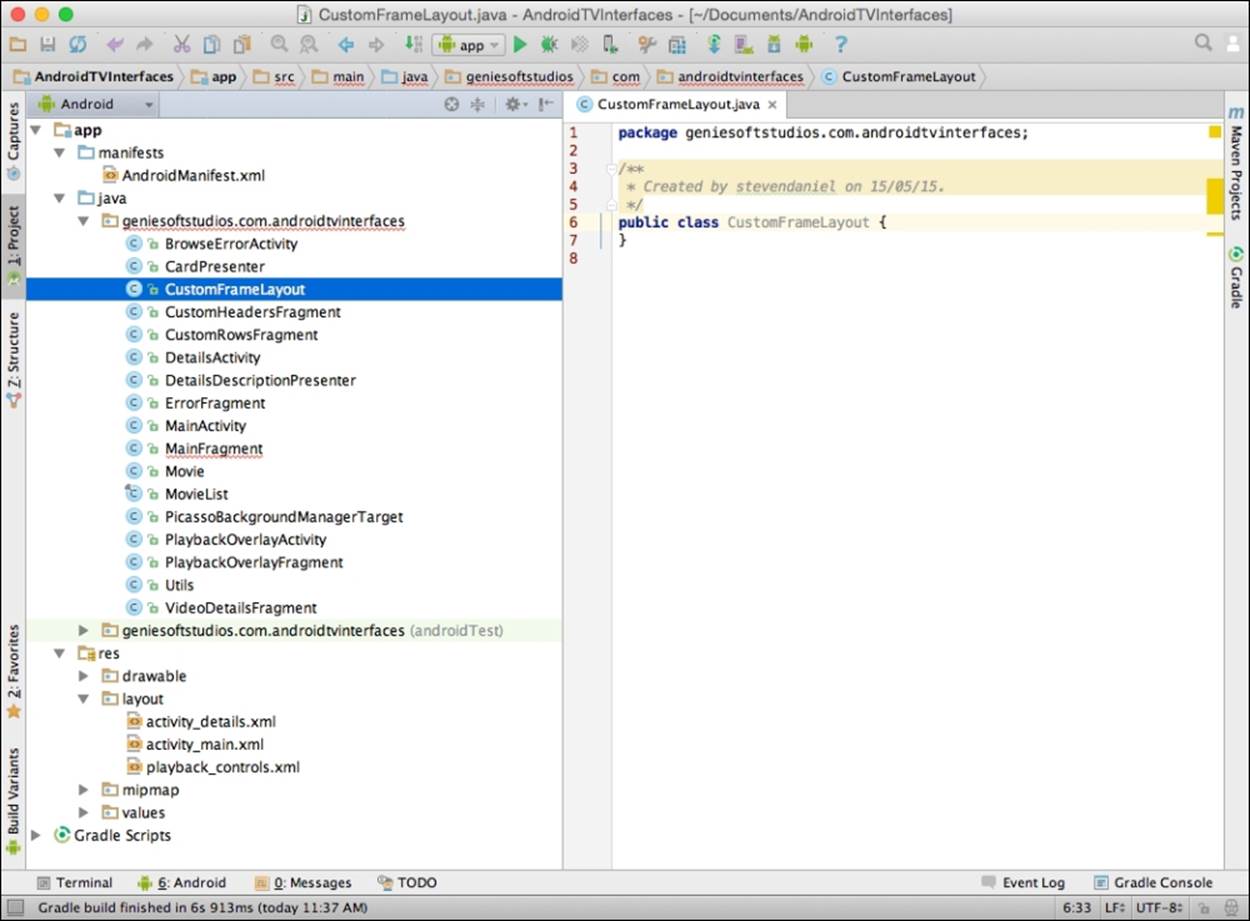
Our next step is to write the code that will be responsible for ensuring that the layout of our custom header and row information renders correctly when it is being displayed within the Android TV interface:
1. Open the CustomFrameLayout.java file that we just created.
2. Next, enter the following import statements:
3. import android.content.Context;
4. import android.util.AttributeSet;
import android.widget.FrameLayout;
5. Then, modify the CustomFrameLayout class as shown in the following code snippet:
6. public class CustomFrameLayout extends FrameLayout {
7. public CustomFrameLayout(Context context) {
8. this(context, null, 0);
9. }
10. public CustomFrameLayout(Context context, AttributeSet attrs) {
11. this(context, attrs, 0);
12. }
13. public CustomFrameLayout(Context context, AttributeSet attrs, int defStyle) {
14. super(context, attrs, defStyle);
15. }
}
In the preceding code snippets, we started by adding our import statements that will be responsible for allowing our application to communicate with Android TV. We then proceed to extend our CustomFrameLayout class using the FrameLayout class, which is used to handle the positioning of all child items within the view. Next, we create our class constructor and add the code for our CustomFrameLayout(Content context) method that will be called when the class is instantiated and called. The additional overloaded methods are required when inheriting from the FrameLayout class, and are there for handling the setting of attributes, default layout styles, and so on.
Creating the SearchActivity class
In this section, we will proceed to create our custom SearchActivity class that will enable us to search for content using Google Play Services. This class will call a custom fragment class, which we will be creating later on.
First, we need to create a new blank SearchActivity class, which is basically an application component that will provide us with a screen so that the users can interact with it:
1. From the Project Navigator window, expand the app section, select and expand the java section.
2. Next, right-click and choose the New | Activity | Blank Activity menu option as shown in the following screenshot:
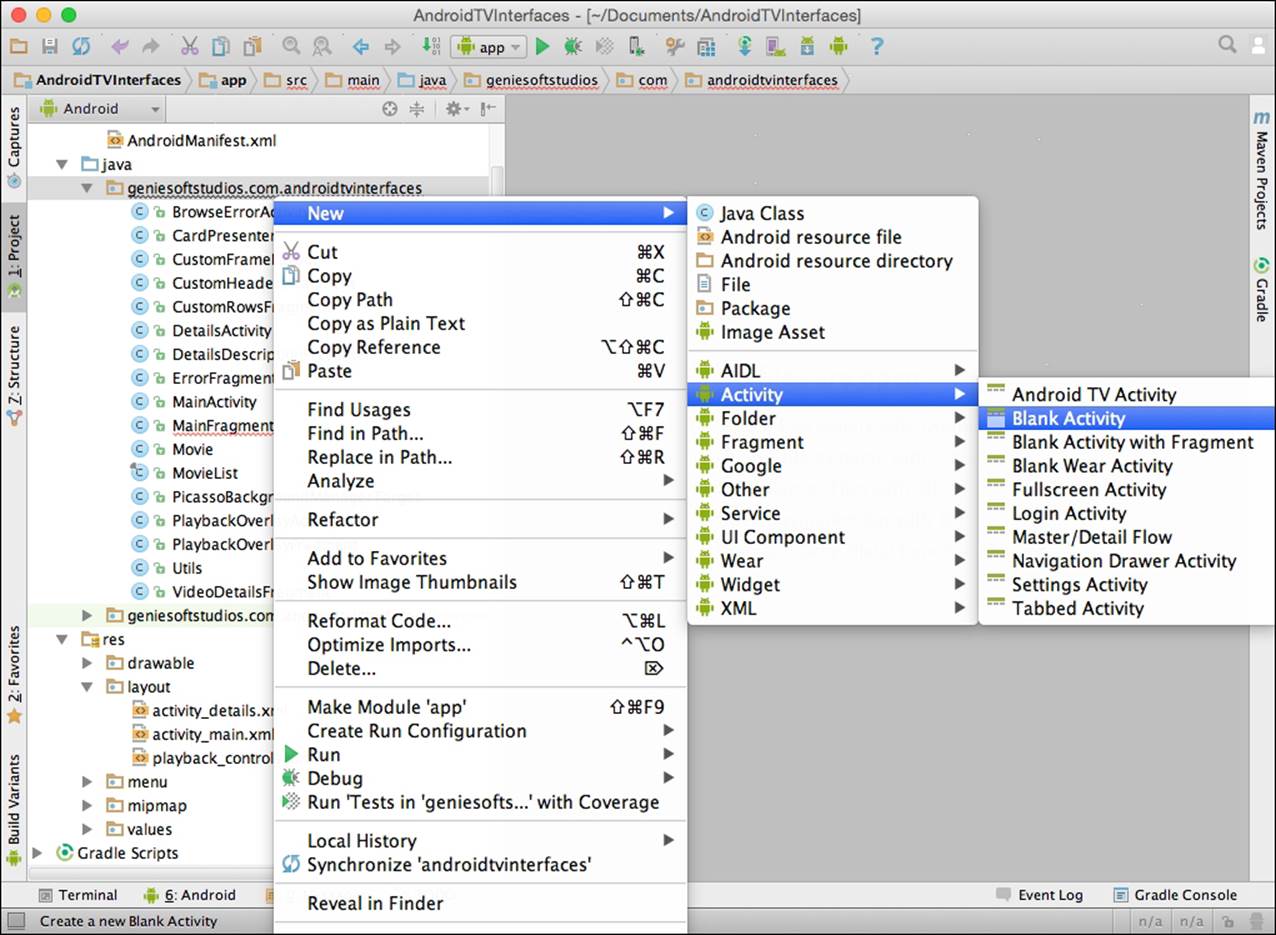
Next, we need to customize the properties for our blank activity so that it can be used by our application. Here we will need to specify the name for our activity, the layout information, and the title for our activity.
3. Enter TVSearchActivity for the Activity Name option and activity_search for Layout Name.
4. Next, enter TVSearchActivity for Title as shown in this screenshot:
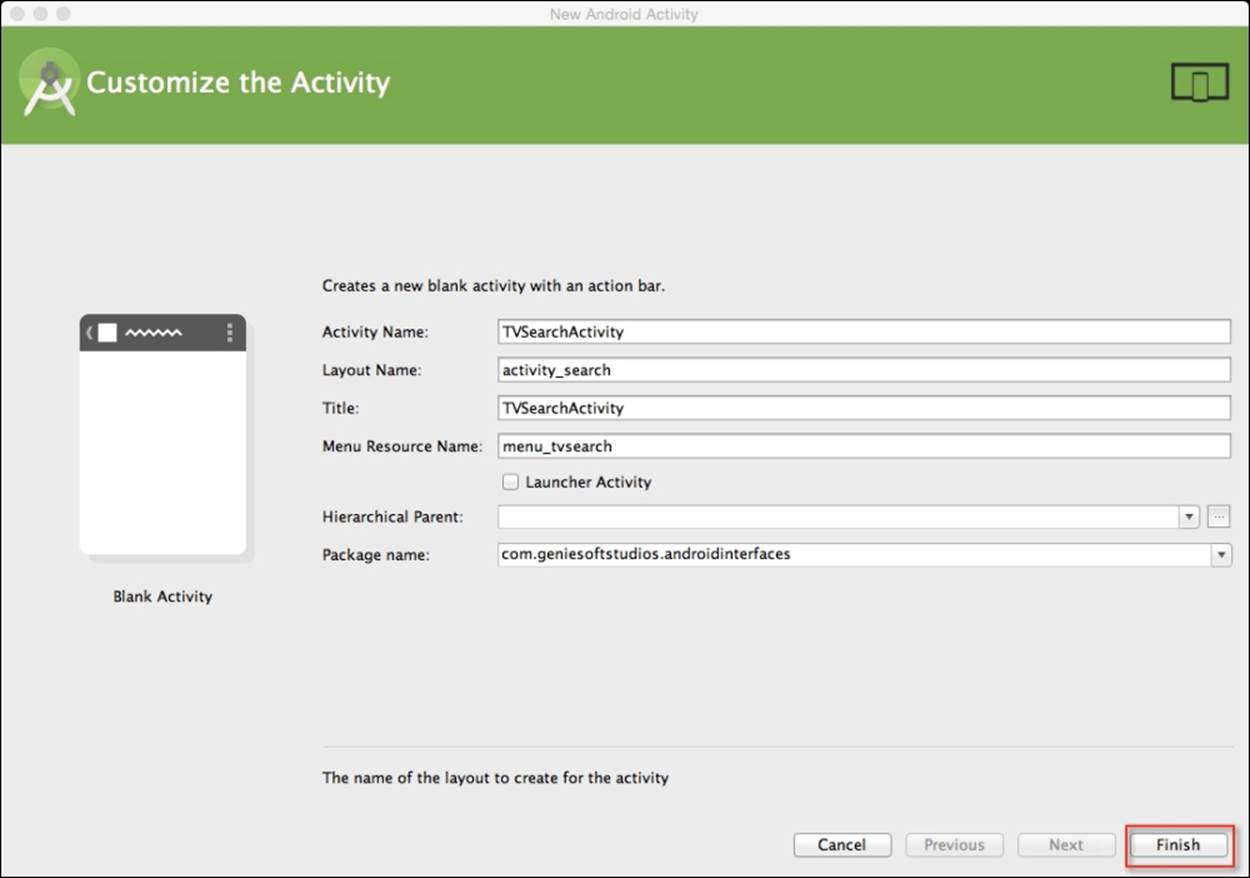
5. Then, click on the Finish button to have the wizard generate the necessary files for you. Once finished, this will open the Android Studio code editor with your code file displayed in it.
Our next step is to write the code that will be responsible for calling the layout information and our fragment file that will be used to handle our search functionality:
1. Open the TVSearchActivity.java file that we just created.
2. Next, enter in the following import statements:
3. import android.app.Activity;
import android.os.Bundle;
4. Now, modify the TVSearchActivity class as shown in the following code:
5. public class TVSearchActivity extends Activity {
6. @Override
7. protected void onCreate(Bundle savedInstanceState) {
8. super.onCreate(savedInstanceState);
9. setContentView(R.layout.activity_search);
10. }
}
In the preceding code snippets, we started by adding our import statements that will be responsible for allowing our application to communicate with an Android TV. We then proceeded to add the code for our onCreate(Bundle savedInstanceState) method that will be called when the class is instantiated and then display our search layout content within the current view.
Creating the SearchFragment class
In this section, we will proceed to create our custom search fragment class that will be inherited from the SearchFragment class. This class will be used to handle all of the search capabilities with our customized TV user interface.
First, we need to create our TVSearchFragment fragment class like we did in the previous sections:
1. From the Project Navigator window, expand the app section, then select and expand the java section.
2. Next, right-click and choose the New | Fragment | Fragment (Blank) menu option and enter TVSearchFragment to be used as the name for our fragment.
3. Next, ensure that you have not selected the Create Layout XML? option.
4. Now, ensure that the Include fragment factory methods? and Include interface callbacks? options have not been selected and then click on the Finish button to open the Android Studio code editor window.
Our next step is to write the code that will be responsible for handling all of the search capabilities within our customized Android TV interface:
1. Open the TVSearchFragment.java file that we just created.
2. Next, enter the import statements as shown in the following code:
3. import android.os.Bundle;
4. import android.os.Handler;
5. import android.support.v17.leanback.app.SearchFragment;
6. import android.support.v17.leanback.widget.ArrayObjectAdapter;
7. import android.support.v17.leanback.widget.HeaderItem;
8. import android.support.v17.leanback.widget.ListRow;
9. import android.support.v17.leanback.widget.ListRowPresenter;
10.import android.support.v17.leanback.widget.ObjectAdapter;
11.import android.support.v17.leanback.widget.OnItemClickedListener;
12.import android.support.v17.leanback.widget.Row;
13.import android.text.TextUtils;
import android.util.Log;
14. Now, modify the TVSearchFragment class as shown in this code snippet:
15.public class TVSearchFragment extends SearchFragment implements SearchFragment.SearchResultProvider {
16. private static final String TAG = "TVSearchFragment";
17. private static final int SEARCH_DELAY_MS = 300;
18. private ArrayObjectAdapter mRowsAdapter;
19. private Handler mHandler = new Handler();
20. private SearchRunnable mDelayedLoad;
21. @Override
22. public void onCreate(Bundle savedInstanceState) {
23. Log.i(TAG, "onCreate");
24. super.onCreate(savedInstanceState);
25. mRowsAdapter = new ArrayObjectAdapter(new ListRowPresenter());
26. setSearchResultProvider(this);
27. mDelayedLoad = new SearchRunnable();
}
28. Then, we need to create a getResultsAdapter() method that will be responsible for holding the number of rows that have been returned from our search query adapter. This is done as follows:
29.@Override
30.public ObjectAdapter getResultsAdapter() {
31. return mRowsAdapter;
}
32. Next, as shown in the following code, we need to create a onQueryTextChange() method that will be responsible for refreshing the TV user interface as the user types in a query search string:
33.@Override
34.public boolean onQueryTextChange(String newQuery) {
35. mRowsAdapter.clear();
36. if (!TextUtils.isEmpty(newQuery)) {
37. mDelayedLoad.setSearchQuery(newQuery);
38. mHandler.removeCallbacks(mDelayedLoad);
39. mHandler.postDelayed(mDelayedLoad, SEARCH_DELAY_MS);
40. }
41. return true;
}
42. Now, we need to create a onQueryTextSubmit() method that will be called when the user finishes entering his/her search criteria and hits the search button on the TV control pad. This method is created as follows:
43.@Override
44.public boolean onQueryTextSubmit(String query) {
45. mRowsAdapter.clear();
46. if (!TextUtils.isEmpty(query)) {
47. mDelayedLoad.setSearchQuery(query);
48. mHandler.removeCallbacks(mDelayedLoad);
49. mHandler.postDelayed(mDelayedLoad, SEARCH_DELAY_MS);
50. }
51. return true;
}
52. Next, we need to create and implement a Runnable class and include a method called setSearchQuery that starts executing the active class. This is done as follows:
53.private class SearchRunnable implements Runnable {
54. private String query;
55. public void setSearchQuery(String query) {
56. this.query = query;
57. }
58. @Override
59. public void run() {
60. mRowsAdapter.clear();
61. ArrayObjectAdapter adapter = new ArrayObjectAdapter(new CardPresenter());
62. adapter.addAll(0, MovieList.list);
63. HeaderItem header = new HeaderItem(0,getResources().getString(R.string.search_results);mRowsAdapter.add(new ListRow(header, adapter));
64. }
}
In the preceding code snippets, we started by adding our import statements that will be responsible for allowing our application to communicate with an Android TV and, just as we did in our CustomRowsFragment class, we incorporated the Leanback support library that provides us with prebuilt components for our TV interface. We then proceeded to extend our TVSearchFragment class using the SearchFragment class, add the code for our onCreate (Bundle savedInstanceState) method that will be called when the fragment has been instantiated, and then set it to handle the returned search results. This is because we have specified that we will be implementing from the SearchFragment.SearchResultProvider class.
In our next step, we proceed to call the searchRunnable method that implements the Runnable class that includes a method called run that starts executing the active class each time the fragment activity is called, and populates our view fragment with the associated row information matching the entered search criteria. This method sets up an ArrayObjectAdapter class that instantiates the CardPresenter object, adds all movies from our MovieList class model, and then displays the movie details that match the entered search criteria.
Creating the custom activity layout resource file
In this section, we will proceed to create our custom layout resource file that will be responsible for ensuring that our custom fragment classes render correctly within the TV user interface:
1. From the Project Navigator window, expand the app section, select and expand the res | layout section.
2. Next, right-click and choose the New | Layout resource file menu option as shown in the following screenshot:
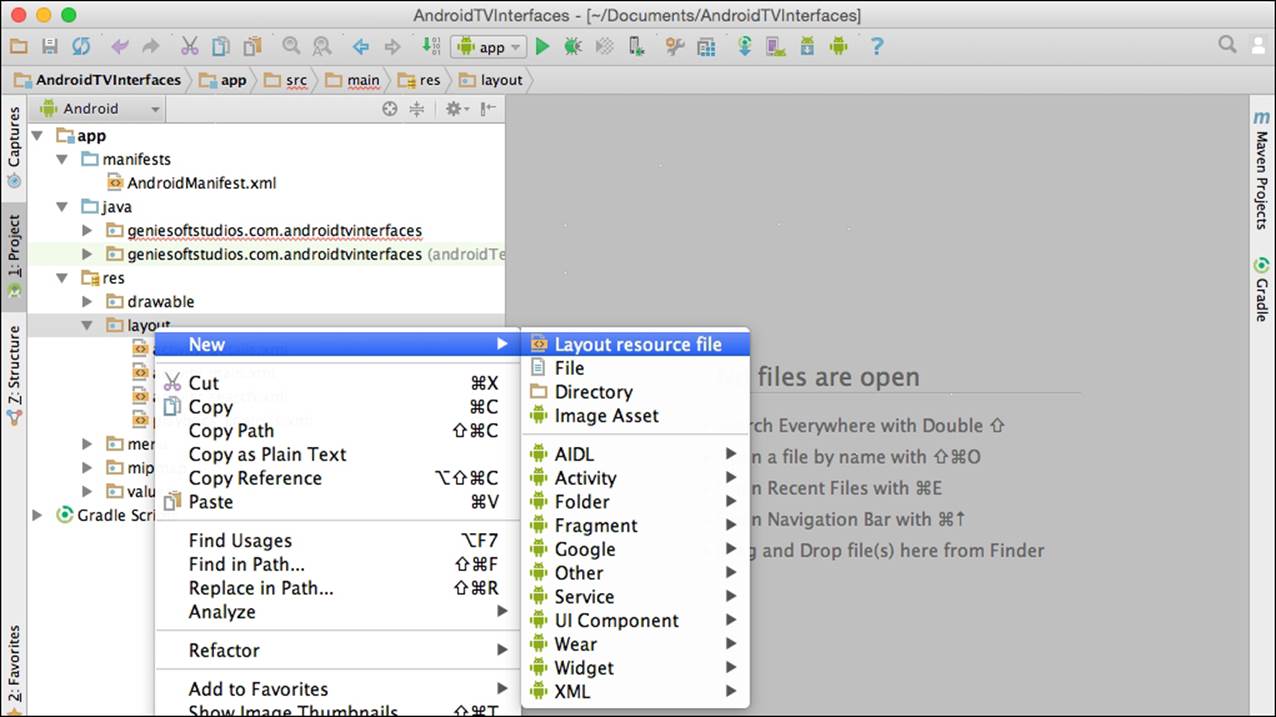
Next, we need to customize the properties of Resource File so that it can be used by our application. Here we will need to specify the filename of our layout file and the Root element name for our layout information.
3. Enter activity_custom for the File name field.
4. Next, enter packageName.CustomFrameLayout for the Root element field as shown in this screenshot:
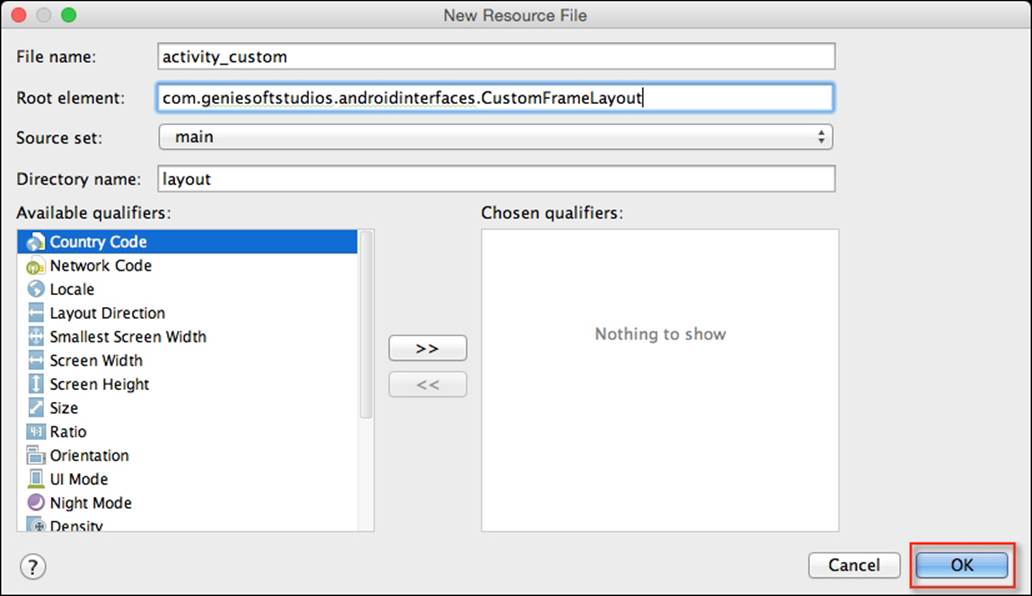
Note
You need to ensure that Root element contains the same package name as your project, otherwise you will experience build errors.
5. Next, click on the OK button to have the wizard generate the necessary files for you. Once finished, this will open the Android Studio code editor with your custom layout file displayed.
Our next step is to construct the layout for our custom headers and rows fragments, as well as correctly place the search button within our TV user interface.
6. From the Project Navigator window, open activity_custom.xml that is located in the res | layout folder and add the following code:
7. <?xml version="1.0" encoding="utf-8"?>
8. <com.geniesoftstudios.androidtvinterfaces.CustomFrameLayout xmlns:android="http://schemas.android.com/apk/res/android" android:layout_width="match_parent" android:layout_height="match_parent" android:clipChildren="false" >
9. <android.support.v17.leanback.widget.SearchOrbView android:id="@+id/custom_search_orb" android:layout_width="wrap_content" android:layout_height="wrap_content" android:layout_marginTop="27dp" android:layout_marginLeft="56dp" android:layout_gravity="top|left"/>
10.<FrameLayout android:id="@+id/header_container" android:layout_width="wrap_content" android:layout_height="match_parent" android:layout_gravity="top|left"/>
11.<FrameLayout android:id="@+id/rows_container" android:layout_width="match_parent" android:layout_height="match_parent" android:layout_gravity="top|left" android:layout_marginLeft="300dp"/>
</geniesoftstudios.com.androidtvinterfaces.CustomFrameLayout>
12. Next, from the Project Navigator window open activity_search.xml that is located in the res | layout folder, and add the following code snippet:
13.<?xml version="1.0" encoding="utf-8"?>
14.<fragment xmlns:android="http://schemas.android.com/apk/res/android"
15.xmlns:tools="http://schemas.android.com/tools"
16.android:id="@+id/search_fragment"
17.android:name="com.geniesoftstudios.androidtvinterfaces.
18.TVSearchFragment"
19.android:layout_width="match_parent"
20.android:layout_height="match_parent"
21.tools:context=".TVSearchActivity"
22.tools:deviceIds="tv"
tools:ignore="MergeRootFrame"/>
23. Then, from the Project Navigator window choose the app section, select the manifests folder, and then select the AndroidManifest.xml file.
24. Now, under the manifest section of the Android TV app, we need to include the permissions to allow our app to run within the handheld device. Enter the following permissions:
25.<uses-permission android:name="android.permission.INTERNET"></uses-permission>
26.<uses-permission android:name="android.permission.RECORD_AUDIO" />
27.<uses-feature android:name="android.hardware.touchscreen"android:required="false" />
<uses-feature android:name="android.software.leanback"android:required="true" />
28. Next, modify the <application> section of the TV app and enter the following highlighted code:
29.<application android:allowBackup="true" android:icon="@mipmap/ic_launcher" android:label="@string/app_name" android:theme="@style/Theme.Leanback" >
30.<activity android:name=".MainActivity" android:icon="@drawable/app_icon_your_company" android:label="@string/app_name" android:logo="@drawable/app_icon_your_company" android:screenOrientation="landscape" >
31.<intent-filter>
32.<action android:name="android.intent.action.MAIN"/>
33.<category android:name="android.intent.category.LEANBACK_LAUNCHER"/>
34.</intent-filter>
35.</activity>
36.<activity android:name=".DetailsActivity"/>
37.<activity android:name=".PlaybackOverlayActivity"
38.android:theme="@android:style/Theme.NoTitleBar.Fullscreen"/>
39.<activity android:name=".BrowseErrorActivity" />
40.<activity android:name=".TVSearchActivity" />
</application>
In our next section, we will need to modify the MainActivity.java file so that it will be set up to use our CustomHeadersFragment and CustomRowsFragment files, as well as call our TVSearchActivity file when the search icon has been pressed. So let's get started:
1. From the Project Navigator window, expand the app section, select and expand the java section.
2. Next, double-click to open MainActivity.java and add the following highlighted code:
3. import android.app.Activity;
4. import android.app.FragmentManager;
5. import android.app.FragmentTransaction;
6. import android.app.UiModeManager;
7. import android.content.Intent;
8. import android.content.res.Configuration;
9. import android.os.Bundle;
10.import android.support.v17.leanback.widget.SearchOrbView;
11.import android.view.View;
12.import java.util.LinkedHashMap;
13.public class MainActivity extends Activity {
14. private SearchOrbView orbView;
15. private CustomHeadersFragment headersFragment;
16. private CustomRowsFragment rowsFragment;
17. private final int CATEGORIES_NUMBER = 5;
18. private LinkedHashMap<Integer, CustomRowsFragment>
19. fragments;
20. @Override
21. protected void onCreate(Bundle savedInstanceState) {
22. super.onCreate(savedInstanceState);
23. setContentView(R.layout.activity_custom);
24. // Check if we are running on an Android TV Device
25. if (isRunningOnTVDevice()) {
26. orbView = (SearchOrbView) findViewById(R.id.custom_search_orb);
27. orbView.setOrbColor(getResources().getColor(R.color.search_opaque));orbView.bringToFront();
28. orbView.setOnOrbClickedListener(new View.OnClickListener() {
29. @Override
30. public void onClick(View view) {
31. Intent intent = new Intent(getApplicationContext(), TVSearchActivity.class);
32. startActivity(intent);
33. }
34. });
35. fragments = new LinkedHashMap<Integer, CustomRowsFragment>();
36. for (int i = 0; i < CATEGORIES_NUMBER; i++) {
37. CustomRowsFragment fragment = new CustomRowsFragment();
38. fragments.put(i, fragment);
39. }
40. headersFragment = new CustomHeadersFragment();
41. rowsFragment = fragments.get(0);
42. FragmentManager fragmentManager = getFragmentManager();
43. FragmentTransaction transaction = fragmentManager.beginTransaction();
44. transaction.replace(R.id.header_container, headersFragment, "CustomHeadersFragment").replace(R.id.rows_container, rowsFragment,
45. "CustomRowsFragment");
46. transaction.commit();
47. }
48. }
49. // Check if we are using an Android TV Device
50. private boolean isRunningOnTVDevice() {
51. UiModeManager uiModeManager = (UiModeManager) getSystemService(UI_MODE_SERVICE);
52. if (uiModeManager.getCurrentModeType() == Configuration.UI_MODE_TYPE_TELEVISION){
53. return true;
54. }
55. else {
56. return false;
57. }
58. }
59. public LinkedHashMap<Integer, CustomRowsFragment>
60. getFragments() {
61. return fragments;
62. }
63. public void updateCurrentRowsFragment(CustomRowsFragment fragment) {
64. rowsFragment = fragment;
65. }
}
In the preceding code snippets, we started by adding our import statements that will be responsible for allowing our application to communicate with Android TV and, just as we did in our CustomRowsFragment class, we incorporate the Leanback support library that provides us with prebuilt components for our TV interface. We then proceed to create our private methods for our searchOrbView, CustomHeadersFragment, and CustomRowsFragment fragment classes, and then modify the onCreate (Bundle savedInstanceState) method to call the setContentView method using our activity_custom layout file when the activity has been instantiated.
In our next step, we call the isRunningOnTVDevice method to check to see whether we are running on an Android TV device, then proceed to initialize our search icon properties, and assign an onClickListener method so that our TVSearchActivity class will be called when this button is clicked. Next, we iterate through the total number of categories that we have specified by the CATEGORIES_NUMBER variable while creating an array for each row fragment based on each category.
Then we create a fragmentManager object that will be responsible for saving our custom header and row fragment objects, and use the beginTransaction method to update the header_container and rows_container identifiers within our activity_custom layout resource file with the name of CustomHeadersFragment. We do the same for CustomRowsFragment before finally committing the transaction to tell fragmentManager that we have finished.
In our next step, we create the isRunningOnTVDevice method that will help us determine whether we are running on an Android TV device. We use the uiModeManager class and use the configuration type of UI_MODE_TYPE_TELEVISION. We then create a LinkedHashMap method that will get each fragment for our header objects and then once the fragment has been updated, it calls the updateCurrentRowsFragment method to return the total number of rows contained within each category fragment.
Next, we can finally begin to compile, build, and run our application. Simply press CMD + F9 and choose your AVD or your Android TV device from the list of available devices as shown in the following screenshot:
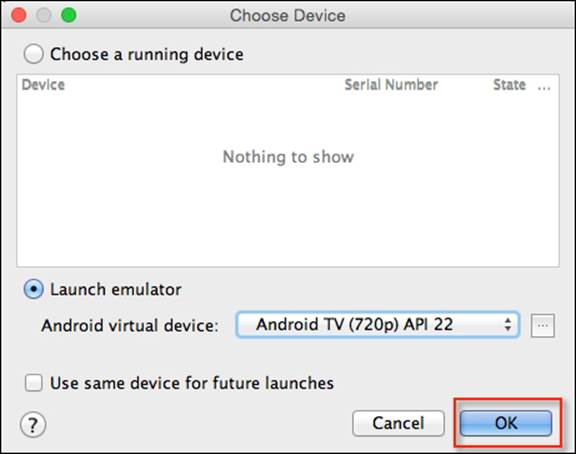
Once the Android TV app has been installed on the AVD, you should see the category information displayed within the side panel along with the associated content information displayed within the middle portion of the TV user interface. Upon clicking the search magnifying glass our custom search activity fragment will be displayed and you can begin searching, as can be seen in the following screenshot:
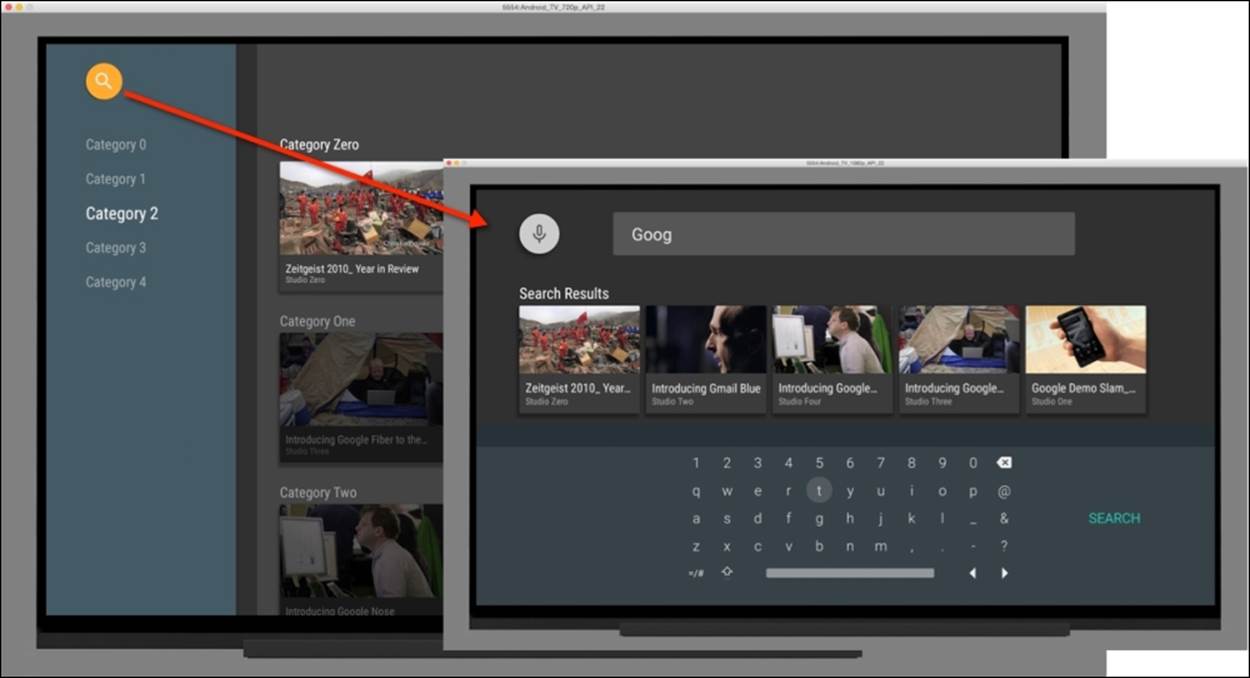
As you can see, using fragments and classes you are able to customize the Android TV user interface to provide a brilliant viewing experience based on your needs.
In our next section, we will take a look at the Android TV user interface design guidelines and also see what is the importance of designing user interfaces that are intuitive, consistent, and designed with the user in mind to provide the best viewing experience.
The Android TV user interface design guidelines
Designing apps for Android TV need to be different from how you would go about designing apps for phones or tablets, and wearables, as these contain a different user experience. It is important to keep in mind and follow the Android User Interface design principles documentation that Google provides. This document describes the guidelines and principles that help you to design consistent user interfaces and experiences for your Android TV apps, as well as ensure that your application runs efficiently on the Android TV platform, and it involves considering the screen sizes of your custom layouts as well as ease of use your app brings to the platform.
Other areas are covered to ensure the consistency of your application as you navigate from screen to screen, as well as the principles to design good user interfaces. This document also includes some design pattern guidelines that your application needs to conform to. These are as follows:
· You will need to ensure that you design your layouts for the landscape orientation as TV screens always use this viewing orientation. Try to make use of fragment classes to create your user interfaces in sections, and use the GridView class to make better use of the viewing screen space.
· Ensure that you design your artwork assets for best viewing in HD resolution set to 1920 x 1080 pixels and make use of on-screen navigational controls on the left- or right-hand side of the screen.
· TV screen layouts should be simple; it is important to avoid cluttering the user interface by adding sufficient margins and padding between layout controls.
· It is good to provide in-built search functionality within your app as this allows your users to discover new content using Google search features.
· Ensure that your app makes use of the prebuilt fragments that are contained within the v17 Leanback support library classes. These prebuilt fragments provide user interface widgets for TV apps, particularly apps that do media playback and have been specifically designed for use on TV devices with guidance from the Android user experience team.
· When adding typographical text and controls to your Android TV applications, ensure that you use the recommended minimum font size of 12 sp, and the default text size should be set to 18 sp.
There is also information relating to the proper use and appearance of UI elements, such as app and game banners, background images and icons, as well as distributing your app to the Android TV platform.
Note
To obtain further information about these guidelines, it is worthwhile checking out the Android TV design principles documentation at http://developer.android.com/design/tv/index.html.
Summary
In this chapter, we learned about Android TV and how we can use this platform to build effective and interactive content by designing and customizing our own interfaces for the Android TV platform.
We got acquainted with and learned more about the HeadersFragment and RowsFragment classes, and how we can inherit from these classes provided to us by the Android Leanback support library so that we can design our own custom classes for the Android TV platform to provide a nice and clean user experience.
Next, we learned about the FrameLayout class and how we use this to extend the capabilities of creating our own layouts so that we can present content professionally within the TV user interface. Then, we looked at how we can incorporate searching capabilities within TV user interface using the SearchFragment class that provides us with the callback methods to query search criteria and return content.
We then moved on and learned how to create a custom resource layout file that makes use of our CustomLayout class to render our custom header and row information within the Android TV user interface. Finally, we spent some time learning about the design guidelines for Android TV and the design considerations developers need to consider when designing their user interfaces.
This was the final chapter. I hope that you had a ton of fun working through this book, have learned a lot, and have got your Android wearable projects started off on the right foot. Now, you have a wealth of experience with Android Wear and know what it takes to build rich and engaging apps for the Wearable platform using a host of exciting concepts and techniques that are unique to Android's Wear platform.
If, like me, learning about all these cutting-edge technologies and concepts has got you to overflow with ideas, then I can't wait to see what you would build!
Thank you for purchasing this book and I wish you the very best of luck with your Android Wear adventures.
Note
For any development support questions, you can contact the Android Developer support resources forum at http://developer.android.com/support.html.