Google Apps Script for Beginners
Chapter 6. Standalone Web Applications / User Interfaces
It is sometimes useful to write standalone web applications that can be shared across offices or with other users; these applications would need an intuitive user interface. This chapter will teach you how to build these interfaces.
If you are a Google Docs user (and if you read this book, you certainly will be), you probably like the ability to share documents with friends or co-workers, but you would sometimes like the option to not share every part of it.
For example, it would be nice for one to be able to see data about themselves on a spreadsheet, but not all the data about everyone. As we experienced before, spreadsheets, for example, can be selectively write-protected, but there is no way to hide ranges selectively depending on the user viewing it.
We could imagine some workaround by copying part of the sheet to a new one and sharing this one, but then we'd have to take care to synchronize these sheets. When we have many people to share with, this might quickly become very complicated.
This situation is a good example for showing how designing a dedicated user interface can be an elegant solution, but we shall see that there are many others too.
UI or not UI, that's the question
Spreadsheets and text documents are by nature very powerful and well-designed interfaces; they are the result of many years of expertise from Google and other previous designs as well, but for some use cases there are just too many possibilities.
If you have already found one of your cherished and carefully prepared documents completely messed up by someone after you gave them access to it, you'll understand what I mean.
It is not always a question of malice or wickedness but, very often, a simple matter of incompetence.
Building a user interface with restricted possibilities solves that problem radically; it just requires a little more work from our side and that's what we're going to try now.
This chapter is about standalone web apps and UIs; we'll see that there are also many situations in which we don't need a user interface and others in which applications respond to parameters or even work entirely on their own without any user interaction.
Common concepts to all web apps
Any application that we use in our computer environment has a name and, for local computer programs, a container with an extension (.app, .exe, .com, and so on), but web apps don't: they generally have an address corresponding to a web page somewhere and when the page is loaded, the application starts executing.
Google web applications work this way, but remember that the code we write does not run on the user's computer but on Google's server. This workflow will have an effect on the speed of our apps: before showing a single pixel on our screen, the server has to execute most of the code and this can take a while in some cases. I have written some scripts that just don't work for some users because they have simply too much data on their drive and it's taken more than 5 minutes to prepare this data for display. I'll try to avoid such examples here so that you don't lose time on them, but we should keep this speed aspect in mind at all times and try to be as efficient as we can.
Some parts of the code we are going to use in web apps are executed differently; the code is served to our browser and executed in the browser itself, meaning that the execution speed depends only on the speeds of the browser JavaScript engine and our processor, which in both cases are far superior to what can be expected from the combination of Google server speed, transfer speed, and Internet speed we use in normal scripts.
This so-called client-side code support is a relatively new feature introduced with HtmlService (it is already present in a few methods of UiApp, but only for minor details) and opens new perspectives for a lot of applications as we'll see in the Building an amazing UIsection.
Note that a client-side JavaScript is more browser dependent than a server-side apps script and that some JavaScript methods could return different results on different browsers, particularly regarding CSS styling. See the Google recommendations on this subject at https://support.google.com/drive/answer/2375082?hl=en.
One last important aspect of code writing for standalone web apps is the entry point of the script. The execution has to start at one point: as I mentioned earlier, a normal JavaScript starts when the page loads—that's simple and logical—but the script we write for a Google web app can't work this way. The server doesn't know what we do when it receives the code; it must compile the script to serve a user interface and only then can we interact with it.
Considering all this, we have to define a starting point: a function that will be executed in the very first place and served back to our browser that is waiting for us to do something; this function has a standard name: doGet().
Every web app in Google Apps Script will begin with doGet() and generally create the UI in that doGet function (but that is not mandatory).
Building an efficient UI
Let us start with something simple that we'll examine in full detail, for example, the code we used in the previous chapter to calculate the hours since our birth date and time (again!).
The online Google's documentation also explains in detail how this works (https://developers.google.com/apps-script/guides/ui-service).
In this example, we use UiApp, which was the first user interface design service offered by Google Apps Script and is based on Google Web Toolkit (GWT), an open source project developed by Google and used in many other projects (https://developers.google.com/apps-script/reference/ui).
The documentation explains that it might be useful to read the GWT doc as well, but I'm afraid that is far beyond the scope of this book and too much information to digest for a typical user. I personally consider the UiService documentation sufficient enough to use even for complex projects.
Note that the UiService is marked as experimental, which means that Google does not guarantee its sustainability over time; but, for now they don't seem to be abandoning it.
After this preliminary information, let's have a look at how it works:
function doGet() {
The entry point of every web app is a function called doGet, as mentioned earlier in this chapter. This tells the server that it must start executing the script right there. What follows can be using UiService, or HtmlService, or even ContentService; in every case, it's all about scripts that create apps that are not bounded to any type of document and work on their own. All three services are documented in the script part of the reference documentation (https://developers.google.com/apps-script/reference/ui/,https://developers.google.com/apps-script/reference/html/, and https://developers.google.com/apps-script/reference/content/).
The following code can be used for building a UI:
var app = UiApp.createApplication().setTitle('Age In Hours');
The variable app that we create represents an instance of the UI.
This concept is important because it means that if more than one user calls that function simultaneously, there will be those many instances of this project and each of them will be completely independent. It also means that once we create that instance, we must always refer to it in any other parts of the script or any other functions in which it is used. We'll refer to it using a getActiveApplication() statement. We also gave a title to the app; this is the name that will appear at the top of the browser window. The following line of code will create a grid in our UI:
var grid = app.createGrid(3,2);
This is the first object we create in our UI; it is a grid composed of three rows and two columns. The following code shows the second most important concept of UiApp—the handler:
var handler = app.createServerHandler('myAgeInHours').addCallbackElement(grid);
A handler is a description of what should happen when the user does something. "Something" means any phenomena, such as keypress, mouseover, and hover, that are detected by the browser as events. Handlers are normally written for these events. They are nothing but functions, which are invoked whenever such an event occurs. It is one of the core concepts of how event-driven asynchronous programming is designed.
Right after this method, we find the addCallbackElement() statement that tells the handler what data must be sent to the handler function.
This data is again a JavaScript object that can be a single widget (a widget is a UI element) or as in this example, a container for many widgets. It is a good practice to choose the highest-level container as the call-back element to make things easier, but one could also add every necessary widget one by one. It's just good manners to eventually forget one!
var time = app.createListBox().setName('time').addItem('Choose the hour',-1);
for(var n=0 ; n<24 ; n++){time.addItem(n+' h',n)};
This is the first widget that will be placed in the grid: a simple listBox in which we add a few items. See the documentation (https://developers.google.com/apps-script/reference/ui/list-box) for details about how it can be used. We have added text to indicate what to do and in the following code, we add 24 hours to choose from. (Note that we add two values in each item: one is the shown value (a string) and the other is the returned value (in this case, a number).)
var date = app.createDateBox().setName('date');
var button = app.createButton('Show me...',handler);
grid.setWidget(0,0,date).setWidget(0,1,time).setWidget(1,0,button);
app.add(grid);
Then we add a few other widgets, such as dateBox to enter a date and a button to trigger the handler, and place all of them on the grid. We then add the grid to the UiApp instance; finally, we must tell the UiApp instance to return that onscreen. To do that, we use the following line of code:
return app;
}
This function is now closed with a closing brace and can be tested as it is.
This step needs a little more explanation because if you simply run that function, you won't get any error but neither will anything happen!
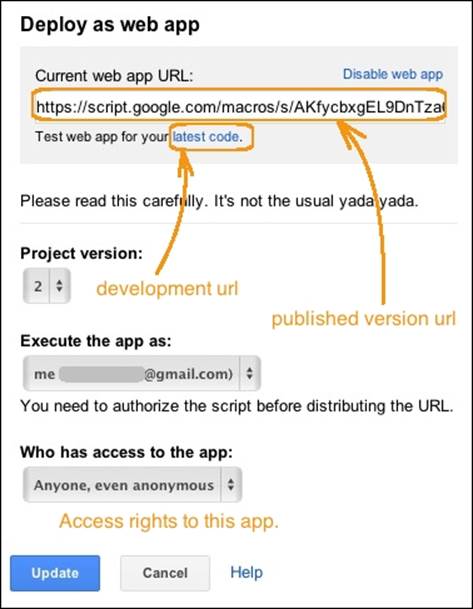
As I already mentioned in a previous chapter, web apps have to be published before they can be used, but some time ago, Google introduced a second step that allows users to have two URLs for every application.
The first URL is a development version that corresponds to the script you just saved and the second one corresponds to a specific version of the script that you can save separately.
This allows us to work on a script in the development version and when it is sufficiently stable, create a version that can be shared with anyone. Any change made to the script afterwards will not be reflected in the shared version until we update it to a new version.
Both URLs are shown in the deployment pop-up screen; the shareable one is shown as a URL, while the development URL is only available as a link, as illustrated in the following screenshot:
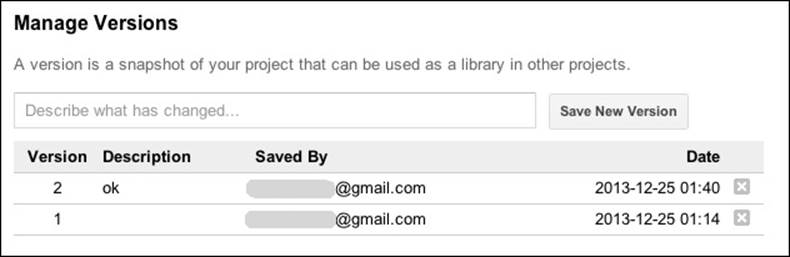
The development URL version can easily be saved from the File menu; you can create as many versions as you need as shown in the following screenshot:
Once you have saved the first version of your script, you can deploy it (menu bar | Publish | Deploy as web app ) and use the development URL to see whether or not your script works as expected.
The following screenshot shows what you should get in a new browser tab (or window):
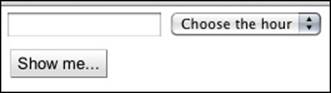
In the browser tab shown in the previous screenshot, you can select a date (or type a date) in the first box and choose an hour in the drop-down list.
You can even click on the Show me… button, but you will get an error message telling you: Error encountered: Script function not found: myAgeInHours, which is the logical action of the handler we created in the doGet function; it calls the function namedmyAgeInHours and does not find it.
So let us write the code as follows:
function myAgeInHours(e){
var app = UiApp.getActiveApplication();
As we saw earlier, there is one instance of the app variable and we have to get it to communicate with it. That's the purpose of the statement getActiveApplication().
Also note that our function has a parameter named e, which is the object that has all the information from the doGet function, that is, the content of the callBackElement parameter we added, the origin of the trigger, and a few others. The following lines of code give the returned value for date in milliseconds and the returned value in hours, combined with a condition:
var myBirthDate = e.parameter.date.getTime();// the returned value for date (in milliseconds)
var time = Number(e.parameter.time) == - 1 ? 0 : Number(e.parameter.time);// the returned value in hours combined with a condition
One of the properties of the e object is called parameter and has the keys and values that we are looking for; the values in the dateBox class and the value from the list, both are represented by their names as defined in the doGet function.
Another important point is that the name of the widget is used as a key parameter to retrieve its value. We'll see that we can also define an ID for any widget if we want to modify its value or do anything with it.
So, e.parameter.time returns the value that was selected in the listBox class named time; this value is a number, but when we get it back, it has become a string representation of the number (which, in fact, you don't see because they look exactly the same, of course); therefore, we used the Number(e.parameter.time) function to make it a number again.
Number() is a standard JavaScript function documented at https://developer.mozilla.org/en-US/docs/Web/JavaScript/Reference/Global_Objects/Number.
Following is the complete content of the event info object (e), shown in the logger using the JSON.stringify() utility function we already used:
{"parameter":{"clientY":"119","clientX":"158","eventType":"click","date":"2014-01-05T23:00:00.000Z","ctrl":"false","meta":"false","time":"10","source":"u331805504378","button":"1","alt":"false","screenY":"236","screenX":"316","y":"35","shift":"false","x":"101"}}
We can see that the object is built almost exactly the same way as it was in the form service we examined in the previous chapter: the parameter key has an object as value and this object has a number of properties among which we find our widgets' names, the source of the event, the current position of the cursor in the UI (x and y) and on the screen (screenX and screenY), and flags describing the keyboard use (Alt and Shift). If you remember how we built the form service example, you will easily understand why we use a two-level method to retrieve the values: parameter for the first level and name for the second level.
Just about every value returned by this e.parameter mechanism returns a string representation; there is one exception though: dates are returned as JavaScript date objects. No luck—we used a date in our first example!
The next part of the code, shown as follows, has nothing new compared to the former version; it comprises only a couple of math operations:
myBirthDate = parseInt(myBirthDate/3600000, 10);
var today = parseInt(new Date().getTime()/3600000, 10);
But, the end is again specific to the web app context; we are creating a new widget (a label) to show the result of our math operations as follows:
app.add(app.createLabel().setText('there are '+(today-myBirthDate-time)+' hours between now and your birth date !'));// write the result in a 'label'
return app; // this tells the script to update the Ui
}
Using the instance of the UI that we retrieved in the app variable (UiApp.getActiveApplication();), we can create a widget the same way we did in the doGet function and add it to the app variable.
Then we return the app variable to tell the script to actually show the result and update the browser.
Now we can save the script and go back to our development URL tab, eventually refreshing the browser and trying again.
When we fill both fields and click on the Show me… button, the result shows up right under the button.
This was our first example from start to end with all the details.
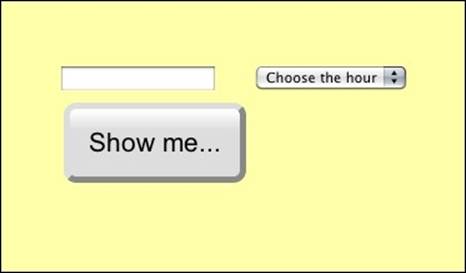
It does indeed work, but we have to admit it looks ugly!
Building a good-looking UI
UiService offers a lot of possibilities to improve the design of web apps; there's the possibility of using the numerous CSS arguments to customize elements (also visit the Wikipedia page about CSS at http://en.wikipedia.org/wiki/CSS).
The main difference is that we don't use style sheets but add a style to each widget individually in the code itself.
We have the following two methods to set a style:
· The setStyleAttribute(name,value) method accepts a single pair of parameters (https://developers.google.com/apps-script/reference/ui/button#setStyleAttribute(String,String)).
· The setStyleAttributes({objects with name/attributes parameters pairs}) method takes objects as parameters. (https://developers.google.com/apps-script/reference/ui/button#setStyleAttributes(Object)). The list of all the available attributes currently supported in UiApp is documented at https://developers.google.com/apps-script/ui_supportedStyles.
The first method in the bullet list is useful for a single parameter, but we often prefer the second one because it allows for a more compact and easy-to-read code.
Our previous code could be improved with a few CSS attributes, for example, adding a padding value could keep the widgets distant from the window's border and background could color the background of our app. The button could have a different size and rounded borders. The following is the modified code and its onscreen result:
function doGet() {
var app = UiApp.createApplication().setTitle('Age In Hours');
var grid = app.createGrid(3,2).setStyleAttributes({'padding':'50px', 'background':'#FFA'});
var handler = app.createServerHandler('myAgeInHours').addCallbackElement(grid);
var time = app.createListBox().setName('time').addItem('Choose the hour',-1);
for(var n=0 ; n<24 ; n++){time.addItem(n+' h',n)};
var date = app.createDateBox().setName('date');
var button = app.createButton('Show me...',handler).setStyleAttributes({'padding':'15px', 'border-radius':'10px', 'borderWidth':'5px', 'borderColor':'#DDD','fontSize':'16pt'});
grid.setWidget(0,0,date).setWidget(0,1,time).setWidget(1,0,button);
app.add(grid);
return app;
}
As you'll probably notice, setting the attributes for every widget in the script rapidly takes up a lot of space in the code; to avoid that, we can define style objects outside of the function as global variables (global variables in Google Apps Script can only be constants, as we have seen in Chapter 1, Enhancing Spreadsheets) and assign their properties to each widget in a more simple and compact way.
It would simply be like the following code:
var styleGrid = {'padding':'50px', 'background':'#FFA'};
var styleButton = {'padding':'15px', 'border-radius':'10px', 'borderWidth':'5px', 'borderColor':'#DDD','fontSize':'16pt'};
function doGet() {
var app = UiApp.createApplication().setTitle('Age In Hours');
var grid = app.createGrid(3,2).setStyleAttributes(styleGrid);
var handler = app.createServerHandler('myAgeInHours').addCallbackElement(grid);
var time = app.createListBox().setName('time').addItem('Choose the hour',-1);
for(var n=0 ; n<24 ; n++){time.addItem(n+' h',n)};
var date = app.createDateBox().setName('date');
var button = app.createButton('Show me...',handler).setStyleAttributes(styleButton);
grid.setWidget(0,0,date).setWidget(0,1,time).setWidget(1,0,button);
app.add(grid);
return app;
}
The previous code returns exactly the same result. Note that the script editor doesn't set colors to global variable names defined outside of any function, but accepts this method without posing any issues. When building complex UIs, this method is much simple to use and can almost be considered as an equivalent to using CSS like one does in normal HTML page design.
We can even create a new script file within the project (File | New | Script file) to hold all the style variable definitions to help keep our script tidy and clean.
Now that we have a handle on the basics of UiApps, let's try a more useful example with a slightly more complex (and hopefully better looking) UI.
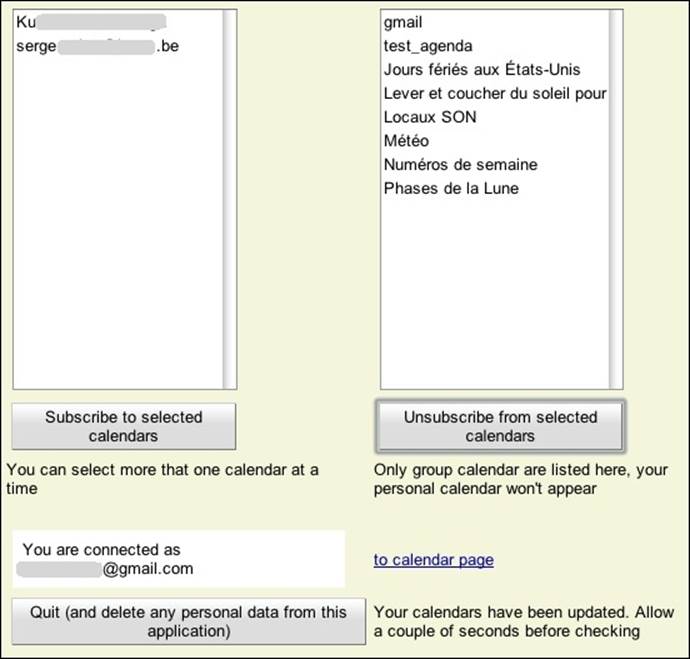
The following application was designed to allow people in the school I work for to subscribe to some of the numerous calendars we have. Actually, each class, each classroom, and each group of teachers has their own calendar; in other words, about everything has a calendar, which makes it really tedious to manually subscribe to each of them using the sharing URLs, so the following application was really welcomed when I wrote it:
The code can be divided in eight functions and, of course, the one that creates the user interface is called doGet!
//----------------------------------------------------------------
// Global variable
//----------------------------------------------------------------
var email = String(Session.getUser().getUserLoginId());
//
This web app runs as the user accessing the application, which means that we can get the e-mail address of its user and have access to their calendars. If this weren't the case, it would become completely useless. The code for the calendar example is as follows:
function doGet(){
var app = UiApp.createApplication().setHeight(400).setWidth(650).setStyleAttribute('background', 'beige').setTitle("Group calendar manager");
var panel = app.createAbsolutePanel().setStyleAttribute('padding', '25');
var Vpanel = app.createVerticalPanel();
var grid = app.createGrid(6, 2).setWidth('550').setId('grid');
var Slist= app.createListBox(true).setName("slb").setId("slb").setVisibleItemCount(16).setWidth("180").setStyleAttribute('margin-left', '5px');
var Ulist= app.createListBox(true).setName("ulb").setId("ulb").setVisibleItemCount(16).setWidth("195").setStyleAttribute('margin-left', '5px');
var subs = app.createButton("Subscribe to selected calendars").setWidth("180");
var unsubs = app.createButton("Unsubscribe from selected calendars").setWidth("195");
var quit = app.createButton("Quit (and delete any personal data from this application)");
var avert = app.createLabel("Only group calendar are listed here, your personal calendar won't appear",true).setWidth('250');
var comment = app.createLabel("You can select more that one calendar at a time",true).setWidth('250');
var wait = app.createLabel("**** PLEASE WAIT ****",true).setWidth('250').setStyleAttribute('borderWidth', '2').setStyleAttribute('background','yellow').setId('wait').setVisible(false);
var ok = app.createLabel("Your calendars have been updated. Allow a couple of seconds before checking",true).setWidth('250').setVisible(false).setId('ok');
var log = app.createLabel("You are connected as "+email,true).setWidth('250').setStyleAttribute('background','white').setStyleAttribute('padding', '8').setStyleAttribute('margin-left', '5px');
var end = app.createHTML("<BR><BR>Thanks for using this application, you may close this window<BR><BR><BR>© serge 2014").setId('end').setVisible(false);
var anchor = app.createAnchor('to calendar page', 'https://www.google.com/calendar');
grid.setWidget(0, 0, Slist)
.setWidget(0, 1, Ulist)
.setWidget(1, 0, subs)
.setWidget(1, 1, unsubs)
.setWidget(2, 1, avert)
.setWidget(2, 0, comment)
.setWidget(3, 0, wait)
.setWidget(4, 0, log)
.setWidget(5, 0, quit)
.setWidget(4, 1, anchor)
.setWidget(5, 1, ok);// place all widgets on the grid
Vpanel.add(grid).add(end);
app.add(panel.add(Vpanel));
updateLists(Slist,Ulist);// call the function to populate the lists
var handlerSub = app.createServerHandler("calsub").addCallbackElement(grid);
subs.addClickHandler(handlerSub);
var handlerUnsub = app.createServerHandler("calunsub").addCallbackElement(grid);
unsubs.addClickHandler(handlerUnsub);
var handlerQuit = app.createServerHandler("quit").addCallbackElement(grid);
quit.addClickHandler(handlerQuit);
var cliHandlerSub = app.createClientHandler()
.forTargets(wait).setVisible(true);
subs.addClickHandler(cliHandlerSub);
var cliHandlerUnsub = app.createClientHandler()
.forTargets(wait).setVisible(true);
unsubs.addClickHandler(cliHandlerUnsub);
return app;
}
There's nothing really new here, except that we used two different types of handlers: one that we tried already (ServerHandler) that tells the server which function to call and the other called clientHandler.
Let us look at it more closely and read the documentation about it (https://developers.google.com/apps-script/reference/ui/client-handler).
The following lines explain what the documentation says and verify what I explained before:
An event handler that runs in the user's browser without needing a call back to the server. These will, in general, run much faster than ServerHandlers but they are also more limited in what they can do.
They can be used on just about any widget and one of their most current use cases is to show or enable another widget (and hide or disable it of course) because they are unable to execute any functions.
In the preceding example, it shows a yellow label saying PLEASE WAIT when a time-consuming process is started.
Practically, it means that both buttons in the UI have two clickHandler interfaces: one server handler that actually calls the function and a second that shows the message. As the second one works instantly, we can wait until the handler function finishes its task and returns an instruction to hide the message. The visual effect is exactly what we expected: the message is visible during the function execution.
Keep that idea at hand as you will most probably want to use it later.
Then come the different functions to get all the calendars, store them in a spreadsheet and then a database, and update the lists; there's even a special function to quit the application with a polite message. These functions are simply commented in the following code itself to briefly explain how they work:
function updateLists(Slist,Ulist){
var app = UiApp.getActiveApplication();
var db = ScriptDb.getMyDb();// create a Db instance
var results = db.query({name: db.anyValue()}).sortBy("name", db.ASCENDING, db.LEXICAL);// get date from dB, sorted ascending
var grouplist = [];
while (results.hasNext()) {
var item = results.next();
Logger.log('item added to grouplist = '+item);
grouplist.push([item.name,item.url]);
}
var emptyU = true;
var emptyS = true;
var Ulistvalid = [];// unsubscribe list
var Slistvalid = [];// subscribe list
var userlist = [];
var Clist = CalendarApp.getAllCalendars();
for(cc=0;cc<Clist.length;++cc){
userlist.push(Clist[cc].getName());
Logger.log('Clist[cc].getName() = '+Clist[cc].getName());
if(grouplist.toString().match(Clist[cc].getName())==Clist[cc].getName()){Ulistvalid.push([Clist[cc].getName(),Clist[cc].getId()])}
}
Logger.log('Ulistvalid = '+Ulistvalid);
Logger.log('userlist = '+userlist);
for(cc=0;cc<Ulistvalid.length;++cc){
Ulist.addItem(Ulistvalid[cc][0],Ulistvalid[cc][1]);
emptyU = false;
}
for(cc=0;cc<grouplist.length;++cc){
if(userlist.indexOf(grouplist[cc][0])==-1){
Slist.addItem(grouplist[cc][0],grouplist[cc][1]);
emptyS = false;
}
}
if(emptyS){Slist.addItem('No Calendar available')};
if(emptyU){Ulist.addItem('No calendar found')};
}
In the preceding function, we compare the calendars in the database to the user's ones. If the latter don't match any item in the database, we consider them private and don't show them. The following code explains the subscribe and unsubscribe processes for the calendar example:
function calsub(e){
var app = UiApp.getActiveApplication();
if(e.parameter.slb ==''){return};// if no calendar is selected return immediately
var Slist = app.getElementById('slb');
var Ulist = app.getElementById('ulb');
var ok = app.getElementById('ok').setText("Your calendars have been updated. Allow a couple of seconds before checking");
var calsubID = e.parameter.slb.split(',');// split the string to get back an array
Logger.log('calsubID = '+calsubID);
for(nn=0;nn<calsubID.length;++nn){
try{
CalendarApp.subscribeToCalendar(calsubID[nn]);
}catch(err){
Logger.log(err)
ok.setText("Error trying to get calendar, please retry - "+err);
break;//if error exit loop
}
}
Ulist.clear();
Slist.clear();
updateLists(Slist,Ulist);// updates the lists
ok.setVisible(true);//show the confirmation or error message
app.getElementById('wait').setVisible(false);// hide the wait message
return app;//update Ui
}
function calunsub(e){
var app = UiApp.getActiveApplication();
if(e.parameter.ulb ==''){return};// if no calendar is selected return immediately
var Slist = app.getElementById('slb');
var Ulist = app.getElementById('ulb');
var ok = app.getElementById('ok').setText("Your calendars have been updated. Allow a couple of seconds before checking");
var calunsubID = e.parameter.ulb.split(',');// split the string to get back an array
for (n=0;n<calunsubID.length;++n){
Logger.log('calunsubID[n] = '+calunsubID[n]);
try{
CalendarApp.getCalendarById(calunsubID[n]).unsubscribeFromCalendar();
}catch(err){
Logger.log('ERROR message : '+err);
ok.setText("Error trying to get calendar, please retry - "+err);
break;//if error exit loop
}
}
ok.setVisible(true);//show the confirmation or error message
app.getElementById('wait').setVisible(false);// hide the wait message
Ulist.clear();
Slist.clear();
updateLists(Slist,Ulist);// update lis(removed calendars are gone)
return app;//update Ui
}
The two functions calsub(e) and calunsub(e) take care of the actual subscribe and unsubscribe process. We use a try/catch structure to prevent execution when calendarService is not available (which happens sometimes) or when we're trying to unsubscribe to a calendar we own (see the documentation at https://developers.google.com/apps-script/reference/calendar/calendar#unsubscribeFromCalendar()).
function quit(){
var app = UiApp.getActiveApplication();
var grid = app.getElementById('grid').setVisible(false);
var end = app.getElementById('end').setVisible(true);
return app
}
The preceding code shows a Goodbye message when we close the application. Since there is no real way to actually close a Google Apps Script web app, we use this workaround to reassure the user that he will not be leaving his data exposed on the Internet. The following code will help us share the calendar using a spreadsheet:
function getlistFromSS(){
var ss = SpreadsheetApp.getActiveSpreadsheet()
var sh = ss.getSheets()[0];
var last = ss.setActiveSheet(ss.getSheets()[0]).getLastRow();
var list = sh.getRange(1,1,last,2).getValues();
var key = [] ; var value = []
deleteDb_()
for(cc=0;cc<list.length;++cc){
key.push(list[cc][0]);
value.push(list[cc][1]);
}
for(cc=0;cc<key.length;++cc){
var db = ScriptDb.getMyDb()
db.save({name:key[cc], url:value[cc]})
Logger.log(key[cc]+' ---> '+value[cc])
}
}
You may now ask: why would we use a spreadsheet again? The only reason is that the calendar list has to be modified before we share this app (to remove any calendar we own and don't want to share) and a spreadsheet is the easiest way to handle that.
The web app part (the doGet function and its handlers) actually never reads that spreadsheet, so we don't have to share it with anybody. Even if someone finds a way to open this script and sees the spreadsheet ID, they won't be able to open it since it is private and I am the only person who can view and modify it. Data in ScriptDb (the database) is not protected but the data doesn't need to be hidden since the purpose of this script is to share these calendars. The following small function iterates the database and deletes every item in it:
function deleteDb_(){
var db = ScriptDb.getMyDb();
var results = db.query({name: db.anyValue()});
while (results.hasNext()) {
var item = results.next();
db.remove(item);
}
}
Note the underscore at the end of the function name; it prevents the function from appearing in the function list in the script editor. I used this feature because deleteDb_ is only called by another function in the script and never directly from the script editor menu. The following code has access to all the spreadsheets for the calendar example:
function getCallist(){
var sh = SpreadsheetApp.getActiveSheet();
var ss = SpreadsheetApp.getActiveSpreadsheet();
var last = ss.getLastRow()==0 ? 1 : ss.getLastRow();
sh.getRange(4, 1,last,2).clearContent();
var list = new Array();
list = CalendarApp.getAllCalendars()
for (n=0;n<list.length;++n){
var name = list[n].getName() ;
var id = list[n].getId() ;
sh.getRange(n+1,1).setValue(name) ;
sh.getRange(n+1,2).setValue(id) ;
}
}
The preceding function is the only function that has access to the spreadsheets; it gets all the user calendars and writes their names and IDs in two columns for visual control and editing, so you can remove the calendars you own and don't want to share.
The function is called from the script editor when we set up the application. This should seldom happen and only the script owner will be able to run it since the script file is not shared, nor is the spreadsheet. The following screenshot represents the data spreadsheet:
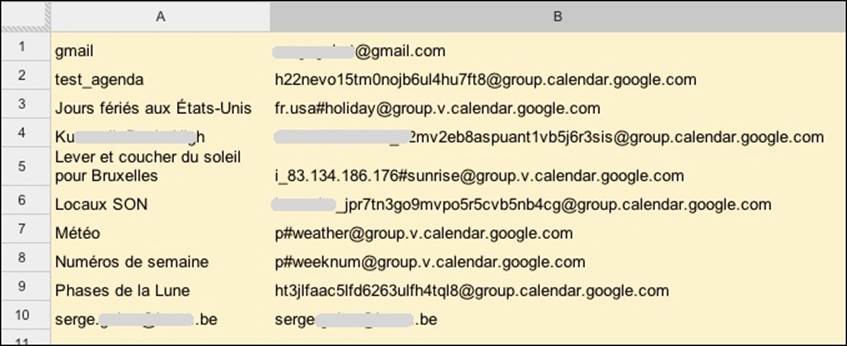
The following screenshot shows the final UI as the user will actually see it:
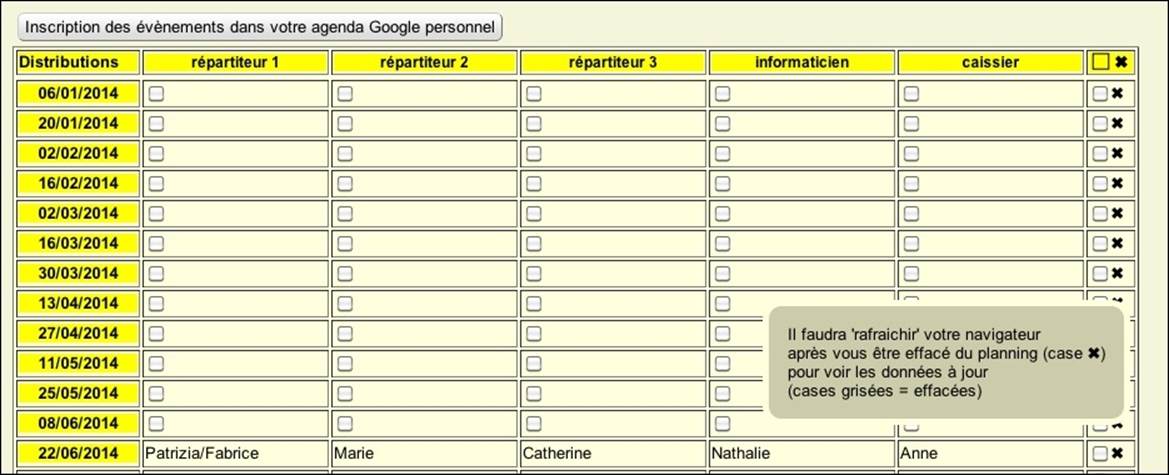
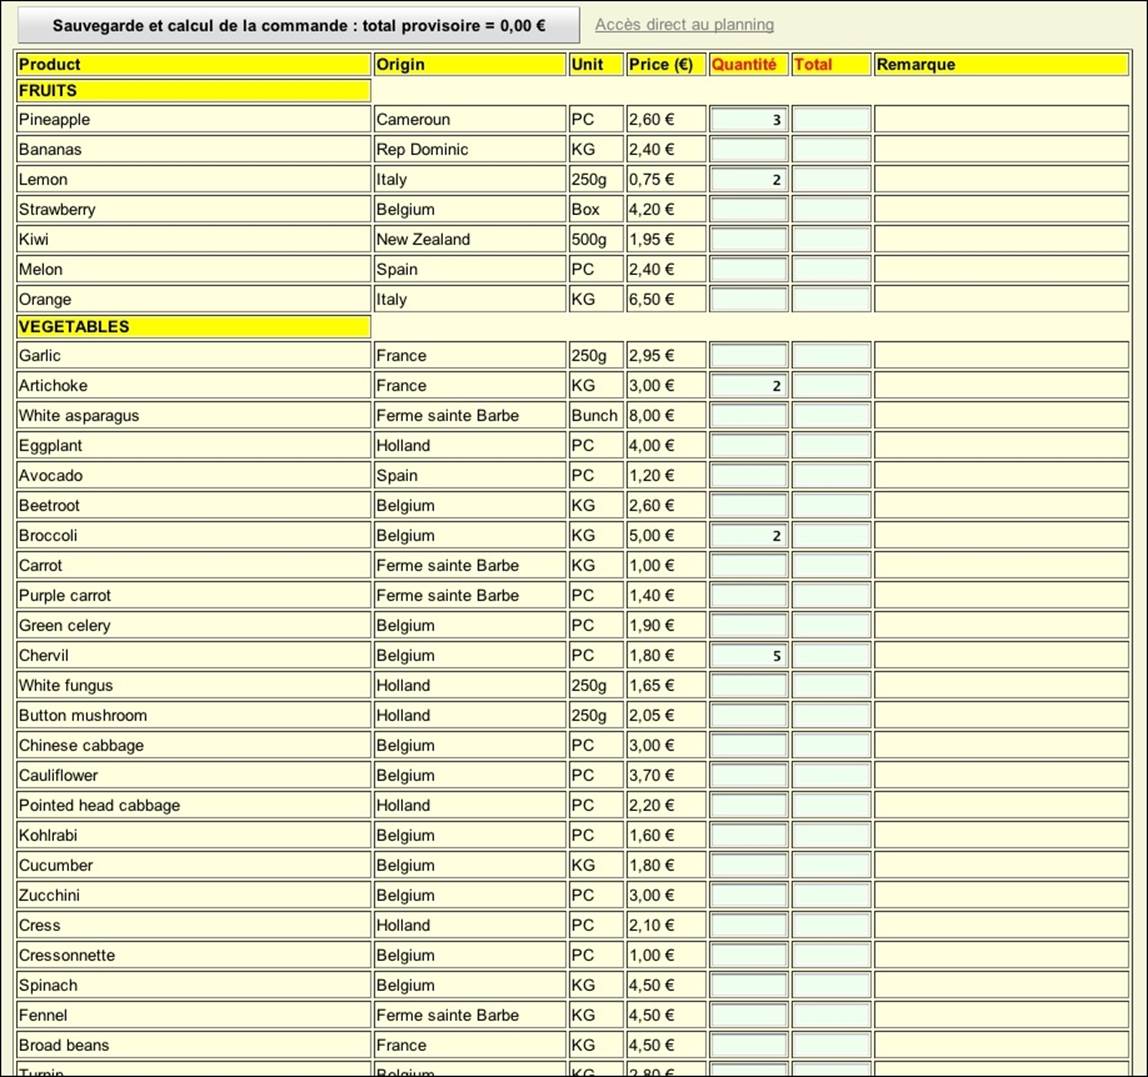
The last example shows how we can give many users access to spreadsheet data without showing the spreadsheet itself. The spreadsheet in our example was designed for an association that organizes a farm products buying group. They can send their orders every week for vegetables and other food products and they're all sent to the farmer every Thursday. The form is available Sunday through Wednesday and shows what products are available along with their prices.
The app also provides a separate link to a second UI for people to subscribe to and manage the distribution of their orders every week, with the ability to create events in their personal calendars.
The whole script is far too long to be published here, but it is available online in view mode for anyone with the link. You should make a copy of it if you intend to use it. The link is as follows:
https://docs.google.com/spreadsheet/ccc?key=0AnqSFd3iikE3dFBub2t1Ry1PaXJUMUVkSVVSempCenc&usp=sharing
A public version of the app is also available without needing users to log in (https://script.google.com/macros/s/AKfycbxr3GD8_Vz9O3Rueqms6KzxYGc0yj33tynsxLJUZStjWVuE4ZAx/exec); its functionality is reduced, so you can't obviously order anything for real, but every function works.
The following screenshot shows the planning calendar:
The following screenshot shows the actual order form:
These examples show that UiService allows for user interface building (at least IMHO) quite nicely, but we are limited to the available widgets and styles.
Another way to achieve even better results is using the HTML service.
Building an amazing UI
This section will show a single example that uses server code, JavaScript client code, and an external jQuery library.
We'll try to keep it as simple as possible, but you should know that there are probably no limits to what can be done with this toolset.
Your imagination and a few intentional limitations from Google will be the only limits. (https://developers.google.com/apps-script/guides/html/restrictions/#adding_css_dynamically and https://developers.google.com/caja/docs/about/).
I strongly recommend that before you try anything with HTML service, you take the time to read the documentation page about it (https://developers.google.com/apps-script/guides/html/best-practices) and have a look at the Caja page as well (https://developers.google.com/caja/).
Caja is a code compiler that is designed to sanitize JavaScript code, mainly to prevent from its misuse and any malware that JavaScript apps may contain.
In an introductory book such as this one, these concepts may seem a bit hard to understand. The example scripts presented are pretty basic and their purposes are clear and easy to comprehend, but you can easily imagine that a complex script can quickly become hard to read and very dangerous in terms of privacy or security.
Nevertheless, it is good to know that JavaScript is an evolved and powerful programming language that can do probably more than you imagine, both good and bad.
That's the idea behind the Caja project: make your JavaScript safe to use or embed it in your website by relying on an automatic code restriction process.
This peace of mind comes at a price: some scripts won't work and others may be too slow; but that's the choice Google made and I'm kind of happy they did.
If you find (and I would certainly understand if you did) that the Caja documentation is too complicated, don't worry too much; try your code and eventually test some parts on the Caja playground if you're unsure (http://caja.appspot.com/). Even if you don't clearly understand what's happening, you'll quickly learn enough to find your way through it.
The following code example uses the jQuery library for graphical features and shows you how to call a Google script function from a button that is defined in the HTML code itself.
It is built in four parts as follows:
· code.gs: It is a file that contains the GS code, including the doGet() function
· demoCode.html: It is the HTML code with the text and button definition
· styleCSS.html: It is the equivalent of a style sheet where all the div IDs are defined along with their formatting (color, opacity, position, and so on)
· clientJavaScript: It is the client JavaScript code
As explained in the documentation, the CSS file and client JavaScript file have to be explicitly included in the code; therefore, the line will be as follows:
function include(filename) {
return HtmlService.createHtmlOutputFromFile(filename).getContent();
}
The code will tell the server to process those files along with the rendering of the page.
The following are the four code snippets; each of them will be pasted in different script files within a single project, using the name I've written as the first comment in each part:
//code.gs
function doGet() {
return HtmlService.createTemplateFromFile('demoCode').evaluate().setSandboxMode(HtmlService.SandboxMode.NATIVE);
}
function include(filename) {
return HtmlService.createHtmlOutputFromFile(filename).getContent();
}
function sendEmail(){
Logger.log('send email');
MailApp.sendEmail(Session.getEffectiveUser().getEmail(),'A simple message','... sent from yout html WebApp !\n\nI hope you like JQuery animations.')
}
Then comes the HTML file as follows:
// html file
<?!= include('styleCSS'); ?>
<h2>Welcome to this demo,</h2>
<h1>Please use the below button to see what happens.<br><br>
<input type="button" value="Test button"
onclick="google.script.run
.withSuccessHandler(updateButton)
.withUserObject(this)
.sendEmail()" />
</h1>
<div id="tunnel"></div>
<div id="boule1"></div>
<div id="boule2"></div>
<div id="boule3"></div>
<h3>
Check your<br>email please...
</h3>
<h4>
Thanks for watching ;-)
</h4>
<?!= include('clientJavaScript'); ?>
Note that it is recommended that you place the JavaScript include at the end of the code, while the CSS, of course, comes at the beginning.
Then the CSS file that defines the graphic parameters of all the elements is as follows:
//styleCSS file<style>
#tunnel{
position:absolute;
top:250px;
background:#2bc1ce;
height:80px;
width:100%;
opacity:0;
}
#boule1{
position:absolute;
top:265px;
left:100px;
background:red;
opacity:0;
width:50px;
height:50px;
border-radius:50%
}
#boule2{
position:absolute;
top:265px;
left:200px;
background:blue;
opacity:0;
width:50px;
height:50px;
border-radius:50%
}
#boule3{
position:absolute;
top:265px;
left:300px;
background:green;
opacity:0;
width:50px;
height:50px;
border-radius:50%
}
h1{
padding-left : 20px;
font-family:Helvetica,Arial,sans-serif;
font-size:14pt;
color:#AAA;
}
h2{
padding : 20px;
font-family:Helvetica,Arial,sans-serif;
font-size:16pt;
color:#FFF;
background:#AAA;
}
h3{
position:absolute;
margin-left : 670px;
top:3000px;
font-family:Helvetica,Arial,sans-serif;
font-size:24pt;
color:white;
}
h4{
position:absolute;
margin-left : 580px;
top:400px;
font-family:Helvetica,Arial,sans-serif;
font-size:32pt;
color:blue;
opacity:0;
}
</style>
Finally, you can see the client JavaScript file that almost exclusively uses the jQuery functions in the following code:
// Client JavaScript file
<script>
function updateButton(email, button) {
button.value = 'Did you expect that ?';//update button text
button.disabled = true;// disable button
$('#tunnel').animate({'opacity':1}, 2000);
// 1rst opacity balls
setTimeout(function(){
$('#boule1').animate({'opacity':.7},500);
},200);
setTimeout(function(){
$('#boule2').animate({'opacity':.7},1000);
},1200);
setTimeout(function(){
$('#boule3').animate({'opacity':.7},1500);
},2200);
// movement balls
setTimeout(function(){
$('#boule1').animate({'left':1300}, 4000).animate({'left':100},4000).animate({'left':680},3000);
},3000);
setTimeout(function(){
$('#boule2').animate({'left':1000},4000).animate({'left':200},4000).animate({'left':780},3000);
},3500);
setTimeout(function(){
$('#boule3').animate({'left':700},4000).animate({'left':1000},4000).animate({'left':880},3000);
},4000);
// 2cnd opacity balls
setTimeout(function(){
$('#boule1').animate({'opacity':1},1000);
},4200);
setTimeout(function(){
$('#boule2').animate({'opacity':1},1000);
},4600);
setTimeout(function(){
$('#boule3').animate({'opacity':1},1000);
},5000);
// 3 balls are falling and get bigger
setTimeout(function(){
$('#boule1').animate({'top':2500, 'height':'800px', 'width':'800px'}, 4000)
},7000);
setTimeout(function(){
$('#boule2').animate({'top':2500, 'height':'800px', 'width':'800px'}, 4000)
},7300);
setTimeout(function(){
$('#boule3').animate({'top':2500, 'height':'800px', 'width':'800px'}, 4000)
},7600);
// tunnel
setTimeout(function(){
$('#tunnel').animate({'width':'340px', 'height':'200px', 'left':'630'}, 4000)
},9000);
// text
setTimeout(function(){
$('h3').animate({'top':330},3000)
},12500);
//thanks
setTimeout(function(){
$('h4').animate({'opacity':.5},3000);
},15500);
}
</script>
After you have saved these four files and then saved and deployed a version for the project in exactly the same way we did for the other examples, you will get a URL that you can test.
If you are really curious, the following link is to an online dummy test that doesn't send any e-mails, but shows the UI exactly how it will be for your version:
https://script.google.com/macros/s/AKfycbzkF79ZLdw_Dgz7n6LcW0r7Lq53tIuObifqH1903rf6kd-fPz8/exec
As you can see, the HTML service will set your creativity free of (almost) any limitations, but it is clearly a subject that could be covered in another book all by itself.
Limiting user access
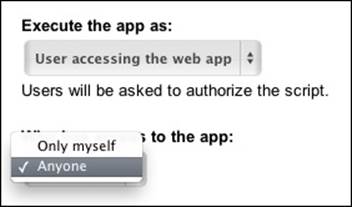
Let us return for a while to publishing web apps, which we explored at the very beginning of this chapter: we saw that we could deploy them to run as myself and used by either Anyone or only me.
That's actually the first level of access limitation, but sometimes we would like to give access to some people we know and prevent everyone else from using it; this basic limitation is definitely too basic.
There are a few ways to get the result we want; the following are two simple examples.
When we deploy an app as User accessing the web app, the user will be asked to authorize the script to get his e-mail address (or more information if the app uses other Google services) and information about who is using it.
In this case, we can easily place a condition on this e-mail address for it to be compared to the list of authorized users. The following code for this is very simple:
var email = Session.getEffectiveUser().getEmail();
var client = ['serge@gmail.com','mary@yahoo.com','william@hotmail.com','jim@gmail.com','xxx@gmail.com'];
Using the following code, we first create a list of valid e-mails in an array of strings and define a variable email, which is the e-mail address of the logged in user:
function doGet() {
var app = UiApp.createApplication().setTitle('Checking user').setStyleAttribute('background', '#DDD');
var mainPanel = app.createVerticalPanel().setStyleAttribute('padding','25');
var reject = app.createHTML("Hello,<BR><BR>You are connected with the user name <B>"+email+"</B> who is not authorized to use this app,<BR><BR>"+
"If you think this is an error please contact the owner of this app at xxx@gmail.com<BR><BR>Thank you.").setStyleAttribute('padding','25');
for(n=0;n<client.length;++n){
if(client[n].match(email)==email){
var clientOK = true ; var name = client[n][0] ;
break;
};
}
if(!clientOK){
app.add(reject);
MailApp.sendEmail('scriptowner@gmail.com', 'Someone with address ', email+' tried to connect without authorization,
think about calling him to chack what happened...');
return app;
}
// here comes the normal code
app.add(app.createLabel('Everything went right !!'));
return app;
}
Then in the app, we set up a message to reject access for unauthorized users in a very polite way and compare the client e-mail with every item on our list. If the condition is true, we go on; otherwise, we show the rejection message and send ourselves an e-mail so we know something bad just happened (this is optional, of course). This option works only if people are asked to log in. In some cases, we would like it to work for anonymous access as well and we'll show that in our second example.
We can create special URLs with parameters that include user identification; the following is an example using ContentService, which offers a good opportunity to test that service as well:
function doGet(e) {
var user = e.parameter.user;
if(user!='giovanni'){return ContentService.createTextOutput("Logging error, you are not authorized to use this app").setMimeType(ContentService.MimeType.TEXT)};
Logger.log('user = '+user )
var ss = SpreadsheetApp.openById('0AnqSFd3iikE3dFBub2t1Ry1PaXJUMUVkSVVSempCenc');
var data = ss.getSheetByName('Farmer prices').getDataRange().getValues();
var outString = '';
for(var n=0 ; n<data.length ; ++n){
if(data[n][0]==''){ continue };
var dataRow = data[n][1]+','+data[n][4]+';\n';// \n is the "new line" character
outString+=dataRow;// compose the output string
}
Logger.log('outString = '+outString);
var result = ContentService.createTextOutput(outString).setMimeType(ContentService.MimeType.CSV);// serve the string as a csv file to download
return result;
}
In the preceding code, we get the parameter that has to be added to the URL using url?user=username and use it in the script to identify the user. If the parameter is wrong (or missing), we send an error message in readable text; otherwise, we send two columns of a spreadsheet in CSV format (that's again an interesting code snippet to keep in mind).
You can test this URL with parameter at https://script.google.com/macros/s/AKfycbyPX58xpAbVH3Fa1iT10G2CY5eFGo0AHWYIbj8KH9PEShLUOaxC/exec?user=giovanni and without a parameter athttps://script.google.com/macros/s/AKfycbyPX58xpAbVH3Fa1iT10G2CY5eFGo0AHWYIbj8KH9PEShLUOaxC/exec and check the result as a downloaded .csv file.
You may feel that it's annoying to see the username in the URL and it is. So, let us use the Google URL Shortener service to make it less obvious (the URL with the parameter included):
http://goo.gl/oUK8wr
Not bad, is it? To be honest, there are a few shortcomings in using short URLs (read the Wikipedia article at http://en.wikipedia.org/wiki/URL_shortening); but in this specific use case, it is still very useful.
You can easily create one URL for every user and this will provide a very efficient data protection system.
Protecting your data (and your script)
We have seen in the previous section how to prevent an unauthorized user from accessing your web apps. However, in some cases, we would like to allow users to use the application, but not to be able to modify our script (even accidentally) or open a script-related document.
With reference to the first point, we should clarify again some aspects of file sharing and app sharing to be sure that there is no ambiguity in your understanding of the concepts:
· In standalone apps, the script doesn't need to be shared for a user to run the app (but, in spreadsheet- or document-embedded scripts, the permissions for the script are the same as those for the container).
· If an app is running on the User accessing the web app option, each file for which the script can read or write must be shared with that user too (or be public or shared with Anyone with the link).
· Note that the code itself doesn't need to be shared for an app to be shared. Don't share your code if it is not necessary.
· If the app is running with you as the user and owner of the script and files, the documents don't need to be shared.
Then the question is: how can we let an app access some data without sharing that source?
That will be the last example in this chapter and will use a special service called the UrlFetch service, documented at https://developers.google.com/apps-script/reference/url-fetch/.
The documentation states the following:
This service allows scripts to access other resources on the web by fetching URLs. A script can use the UrlFetch service to issue HTTP and HTTPS requests and receive responses. The UrlFetch service uses Google's network infrastructure for efficiency and scaling purposes.
When we read the previously quoted description, we don't immediately think of using it to fetch spreadsheets, documents, or other Google services data, although it is the only truly reliable and safe way to use data without sharing the source.
The idea is to create a second app that runs as a service and deployed as running as me (so this app can access all your sources) and make it respond to external requests coming from the shared app that the user executes.
Let us imagine a typical situation: I write a script that creates a web app to collect information that I'd like to store in a spreadsheet. The app runs as the user executing it because it needs to get some information about them, so I would normally be forced to share the spreadsheet with them, but don't want them to go to that spreadsheet and see its content for privacy reasons.
We are going to write a short code to demonstrate the principle we'll use; the code shows the spreadsheet part that acts as a basic data server. The spreadsheet is not shared.
It expects a parameter with the row number, column number, mode (read or write), and a value if the mode is write.
It returns the value from the row/column cell of the spreadsheet when in read mode and writes a value in that cell if it's in the write mode.
Note
The following code is for demonstration only; it is completely inefficient as we have one request per value and will be very slow.
I chose that workflow for two reasons: it is simple and clear and you can easily look at the spreadsheet and actually see data being updated cell by cell in real time.
function doGet(e) {
if(e.parameter.mode==null){return ContentService.createTextOutput("error, wrong request").setMimeType(ContentService.MimeType.TEXT)};
var row = Number(e.parameter.row);
var col = Number(e.parameter.col);
var mode = e.parameter.mode;
var value = e.parameter.value;
var ss = SpreadsheetApp.openById('19FdtPgo3pAciO6-gU6pZDyP7baiv4IBKvtW84xX639k');
var sh = ss.getSheets()[0];
if(mode=='read'){
var sheetValue = sh.getRange(row,col).getValue();
Logger.log('value to send = '+sheetValue);
var valToReturn = ContentService.createTextOutput(sheetValue).setMimeType(ContentService.MimeType.TEXT);
return valToReturn;
}
if(mode=='write'){
sh.getRange(row, col).setValue(value);
return ContentService.createTextOutput(value).setMimeType(ContentService.MimeType.TEXT);
}
return ContentService.createTextOutput('error').setMimeType(ContentService.MimeType.TEXT);
}
//for info: UrlFetchApp.fetch(url+'?row='+n+'&col='+m+'&mode=write&value='+textBoxValue);
This code must be deployed as a web app that runs as you and that anyone can access, even an anonymous user. When you have the public URL, copy and paste it in the following second script.
Note
Don't use the development URL (.dev) because it is only available to the script editor(s) and the app sends an anonymous request so it won't work. Don't forget to authorize the script by running the doGet() function from the editor (this will request authorization and then fail because no parameters were present, but that is normal).
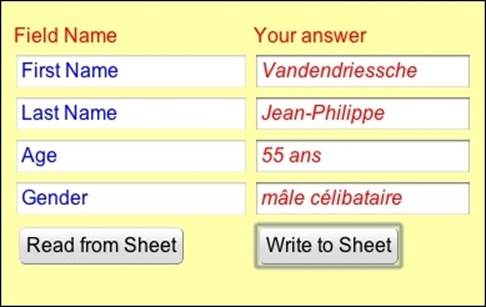
The following code shows the user UI part as a simple grid with two columns and a pair of buttons to read or write-to the spreadsheet; I added a small .gif image to show the script activity using a client handler to set it as visible, as previously explained:
var stylePanel = {'padding':'50px', 'background':'#FFA'};
var styleButton = {'padding':'5px', 'border-radius':'5px', 'borderWidth':'1px', 'borderColor':'#DDD','fontSize':'12pt'};
var styleTextItalic = {'fontSize':'12pt','fontStyle':'italic','fontFamily':'arial,sans-serif','color':'#F00'};
var styleTextNormal = {'fontSize':'12pt','fontStyle':'normal','fontFamily':'arial,sans-serif','color':'#00F'};
var styleLabel = {'fontSize':'12pt','color':'#F00'};
var url = 'https://script.google.com/macros/s/AKfycbxbtrK7BoUrGAz1wbkfEbZSE9_HYWOabw4g79yK5-zhvwU0Y5c/exec';
;
function doGet() {
var app = UiApp.createApplication().setTitle('url_fetch_demo');
var panel = app.createVerticalPanel().setStyleAttributes(stylePanel);
var headers = ['Field Name','Your answer'];
var grid = app.createGrid(7,2);
var wait = app.createImage('https://dl.dropboxusercontent.com/u/211279/loading3T.gif').setId('wait').setVisible(false);
var handlerWrite = app.createServerHandler('writeSheet').addCallbackElement(grid);
var handlerRead = app.createServerHandler('readSheet').addCallbackElement(grid);
var Chandler = app.createClientHandler().forTargets(wait).setVisible(true);
var buttonWrite = app.createButton('Write to Sheet',handlerWrite).addClickHandler(Chandler).setStyleAttributes(styleButton);
var buttonRead = app.createButton('Read from Sheet',handlerRead).addClickHandler(Chandler).setStyleAttributes(styleButton);
for(var n=1 ; n < 5 ; n++){
for(var m=0 ; m < 2 ; m++){
var textBox = app.createTextBox().setText('no value').setName('text'+n+'-'+m).setId('text'+n+'-'+m).setStyleAttributes(styleTextNormal);
if(m==0){textBox.setEnabled(false)};// left column is read only
grid.setWidget(n,m,textBox);
}
}
grid.setWidget(5,0,buttonRead).setWidget(5,1,buttonWrite).setWidget(6,1,wait)
.setWidget(0,0,app.createLabel(headers[0]).setStyleAttributes(styleLabel))
.setWidget(0,1,app.createLabel(headers[1]).setStyleAttributes(styleLabel));
app.add(panel.add(grid));
return app;
}
function writeSheet(e){
var app = UiApp.getActiveApplication();
app.getElementById('wait').setVisible(false);// hide the image when we return
for(var n=1 ; n < 5 ; n++){
var textBoxValue = e.parameter['text'+n+'-1'];
Logger.log(textBoxValue);
var textBox = app.getElementById('text'+n+'-'+1).setStyleAttributes(styleTextItalic);//update only right column
var write = UrlFetchApp.fetch(url+'?row='+n+'&col=2&mode=write&value='+textBoxValue).getContentText();
if(write!=textBoxValue){throw('comm error : response='+write)};
}
return app;
}
function readSheet(e){
var app = UiApp.getActiveApplication();
app.getElementById('wait').setVisible(false);// hide the image when we return
for(var n=1 ; n < 5 ; n++){
for(var m=0 ; m < 2 ; m++){
var textBox = app.getElementById('text'+n+'-'+m).setStyleAttributes(styleTextNormal);
var textValue = UrlFetchApp.fetch(url+'?row='+n+'&col='+(m+1)+'&mode=read').getContentText()
Logger.log(textValue);
textBox.setText(textValue);
}
}
return app;
}
An Online demo app can be found at the following URL:
https://script.google.com/macros/s/AKfycbyApSkRkea7oZ7CWGUfvBCZLFjVqHJBdxwmDKd-OiWbSzYOYntG/exec
The following screenshot shows the user interface:
The following screenshot shows the private spreadsheet:
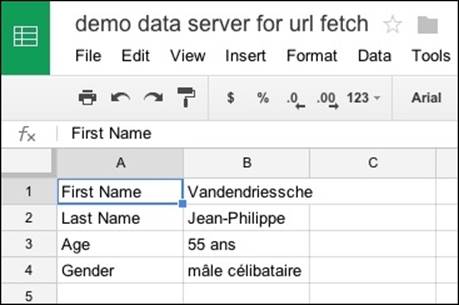
A Demo spreadsheet in the view-only mode can be found at https://docs.google.com/spreadsheets/d/19FdtPgo3pAciO6-gU6pZDyP7baiv4IBKvtW84xX639k/edit?usp=sharing.
If you intend to use such a dual-app configuration in real life, I'd suggest that you write the code differently as you probably won't spend your time looking at the spreadsheet! The idea is to reduce the number of calls from one app to another so that it would update much faster.
In the data server script, get the whole data range and run it using a JSON array of string values within that range and in the user interface, send a request/submit for the whole data array and update all the cells in one setValues() function.
The next script is the second version of this same script using batch read and write and a single urlFetch service to exchange all the data; it is definitely faster.
The code is not so different, except that I had to use special encoding to pass the JSON as a parameter because it contains invalid characters. I used base64 encoding/decoding, but there are probably other (or better) approaches.
You can try both versions with the test URLs and see the speed difference.
Please note that even though I have initially embedded this code in a spreadsheet (for my own comfort in that I won't have to look for the data spreadsheet), you could also use an independent script file instead. It is a typical example of a standalone web app without any user interface, meaning that it runs as a service on its own.
The data server code is as follows:
function doGet(e) {
if(e.parameter.mode==null){return ContentService.createTextOutput("error, wrong request").setMimeType(ContentService.MimeType.TEXT)};
var mode = e.parameter.mode;
var value = e.parameter.value;
var ss = SpreadsheetApp.openById('1yad5sZZt-X6bIftpR--OSyf3VZWf3Jxx8UJBhh7Arwg');
var sh = ss.getSheets()[0];
if(mode=='read'){
var sheetValues = sh.getDataRange().getValues();// get data from sheet
var valToReturn = ContentService.createTextOutput(JSON.stringify(sheetValues)).setMimeType(ContentService.MimeType.JSON);
return valToReturn;// send it as JSON string
}
if(mode=='write'){
var val = Utilities.base64Decode(value,Utilities.Charset.UTF_8);// decode base64 and get an array of numbers
Logger.log(val);// see it !
var stringVal = ''; // create an empty string
for(var n in val){
stringVal += String.fromCharCode(val[n]);// add each character in turn
}
var sheetValues = JSON.parse(stringVal);// convert the string into an object (2D array)
Logger.log(sheetValues);// check result
sh.getRange(1,1,sheetValues.length,sheetValues[0].length).setValues(sheetValues);// update the sheet
return ContentService.createTextOutput(JSON.stringify(sheetValues)).setMimeType(ContentService.MimeType.JSON);// send back the result as a string
}
return ContentService.createTextOutput('error').setMimeType(ContentService.MimeType.TEXT);// in case mode is not 'read' nor 'write'... should not happen !
}
The following user UI code has almost the same doGet() function, except that I added a numRow parameter to choose the number of rows in the grid, so you can create long grids. You will note that the execution time won't increase with an increase in the cell count. The comments are in the code.
var stylePanel = {'padding':'50px', 'background':'#FFA'};
var styleButton = {'padding':'5px', 'border-radius':'5px', 'borderWidth':'1px', 'borderColor':'#DDD','fontSize':'12pt'};
var styleTextItalic = {'fontSize':'12pt','fontStyle':'italic','fontFamily':'arial,sans-serif','color':'#F00'};
var styleTextNormal = {'fontSize':'12pt','fontStyle':'normal','fontFamily':'arial,sans-serif','color':'#00F'};
var styleLabel = {'fontSize':'12pt','color':'#F00'};
var url = 'https://script.google.com/macros/s/AKfycbwPioVjYMSrmhKnJOaF2GG83dnstLWI7isU9SF1vxPV8td-g9E7/exec';
var numRow = 21;// the number of rows in the grid = number of rows in the SS + 1
;
function doGet() {
var app = UiApp.createApplication().setTitle('url_fetch_demo');
var panel = app.createVerticalPanel().setStyleAttributes(stylePanel);
var headers = ['Field Name','Your answer'];// grid title
var grid = app.createGrid(numRow+2,2);// create the grid with right size
var wait = app.createImage('https://dl.dropboxusercontent.com/u/211279/loading3T.gif').setId('wait').setVisible(false);// get a spinner image in animated gif
var handlerWrite = app.createServerHandler('writeSheet').addCallbackElement(grid);// 2 handlers for the buttons
var handlerRead = app.createServerHandler('readSheet').addCallbackElement(grid);
var Chandler = app.createClientHandler().forTargets(wait).setVisible(true);// a client handler for the spinner
var buttonWrite = app.createButton('Write to Sheet',handlerWrite).addClickHandler(Chandler).setStyleAttributes(styleButton);
var buttonRead = app.createButton('Read from Sheet',handlerRead).addClickHandler(Chandler).setStyleAttributes(styleButton);
for(var n=1 ; n < numRow ; n++){
for(var m=0 ; m < 2 ; m++){ // create all the textBoxes with names & IDs
var textBox = app.createTextBox().setText('no value').setName('text'+n+'-'+m).setId('text'+n+'-'+m).setStyleAttributes(styleTextNormal);
//if(m==0){textBox.setEnabled(false)};// prevent writing to left column (optional)
grid.setWidget(n,m,textBox);// place widgets
}
}
grid.setWidget(numRow,0,buttonRead).setWidget(numRow,1,buttonWrite).setWidget(numRow+1,1,wait) // place buttons
.setWidget(0,0,app.createLabel(headers[0]).setStyleAttributes(styleLabel)) // and headers
.setWidget(0,1,app.createLabel(headers[1]).setStyleAttributes(styleLabel));
app.add(panel.add(grid));
return app; // show Ui
}
function writeSheet(e){
var app = UiApp.getActiveApplication();
app.getElementById('wait').setVisible(false);// spinner will be hidden when fct returns
var dataArrayImage = [];// an array to get typed values
for(var n=1 ; n < numRow ; n++){
var row=[];
for(var m=0 ; m < 2 ; m++){
row.push(e.parameter['text'+n+'-'+m]); // get every value in every "cell"
var textBox = app.getElementById('text'+n+'-'+m).setStyleAttributes(styleTextItalic);// update "cells" style
//textBox.setText('written value = '+e.parameter['text'+n+'-'+m]);// rewrite to the cells - not usefull but serves to check while debugging
}
dataArrayImage.push(row);// store one row(=2cells)
}
var UiValues = JSON.stringify(dataArrayImage);// stringfy the array
var newValues = url+'?mode=write&value='+Utilities.base64Encode(UiValues,Utilities.Charset.UTF_8);// add to URL & parameters+ encode in pure ASCII characters
Logger.log(newValues);// check in logger
var check = UrlFetchApp.fetch(newValues).getContent();// get back the result
Logger.log(check);// check result = newValues sent back in bytes format
return app;//update Ui
}
function readSheet(e){
var app = UiApp.getActiveApplication();
app.getElementById('wait').setVisible(false);
var returnedValue = UrlFetchApp.fetch(url+'?mode=read').getContentText();// get data from server
Logger.log(returnedValue);// check values
var sheetValues = JSON.parse(returnedValue);
for(var n=1 ; n < numRow ; n++){
for(var m=0 ; m < 2 ; m++){
var textBox = app.getElementById('text'+n+'-'+m).setStyleAttributes(styleTextNormal);
textBox.setText(sheetValues[n-1][m]);// iterate and update cells values
}
}
return app;// update Ui
}
The test URL is as follows:
https://script.google.com/macros/s/AKfycbzYzwX9lTGTvy0gVdUJlChLP5626d_loAnZNvaoisaxupGPAd4/exec
Summary
If we consider Google Apps Script as a toolbox with plenty of different tools, the tools we introduced in this chapter are probably the most powerful and useful.
There will indeed be many occasions when we may want to execute some simple (or not) tasks without using a full-featured spreadsheet: standalone web apps are the solution. Since they can easily be shared across offices or with other users, they also present us with a good way to preserve our privacy.
It might seem a bit complicated, but after a short while, we get pretty familiar with their structure and simple apps take only a few minutes to write.
Now that we understand this new possibility, why not try to integrate UIs in other documents? That will be the focus of the next chapter.
All materials on the site are licensed Creative Commons Attribution-Sharealike 3.0 Unported CC BY-SA 3.0 & GNU Free Documentation License (GFDL)
If you are the copyright holder of any material contained on our site and intend to remove it, please contact our site administrator for approval.
© 2016-2026 All site design rights belong to S.Y.A.