Android Wearables (2015)
Part II. Basic Building Blocks
Chapter 7. Pushing Data
WHAT’S IN THIS CHAPTER?
· ➤ Understanding the Data API
· ➤ Connecting to the Google Play services
· ➤ Sending images from handheld to wearable
· ➤ Using broadcasts or timers to refresh the UI
WROX.COM CODE DOWNLOADS FOR THIS CHAPTER
The code downloads for this chapter are found at www.wrox.com/go/androidwearables on the Download Code tab. The code is in the Chapter 7 download and the filenames are those noted throughout the chapter.
Chapter 6 introduced the three APIs that handle all communication between your phone and your Wear device. This chapter is devoted to the Wearable Data Layer API. This set of methods and classes is part of Google Play services.
The API consists of a set of data objects and listeners that notify your apps of different events. Table 7.1 lists the available data objects.
Table 7.1 Data Objects in the Data API
|
OBJECT |
DESCRIPTION |
|
DataItem |
Sets up shared data storage between the devices with automatic syncing. |
|
MessageApi |
Sends fire-and-forget-type commands, such as controlling and starting an intent on the wearable from the handheld or controlling a phone app from the wearable. Delivers an error when the devices are disconnected or the message if they are connected. |
|
Asset |
Sends binary blobs of data, such as images. Attached to data items, the system handles the transfer automatically. Minimizes Bluetooth bandwidth by caching large assets to avoid retransmission. |
|
WearableListenerService |
Used with services. Listens to data layer events. |
|
DataListener |
Used with foreground services. Listens to data layer events when the activity is in the foreground. |
NOTE
These APIs are specially designed for communication between handhelds and wearables. These are the APIs you should use to set up communication channels for your devices to talk to each other. Other methods, such as opening low-level sockets, should not be used at all for Wear devices.
In this chapter you will experiment with different types of data transfers between devices. Doing so requires building a client to access the Google Play services. This client will provide a common entry point to all the services and will manage the network connection between the user’s device and each Google service.
CHECKING THE EXAMPLE
Start by taking a look at the example that comes with the Android SDK 20 called DataLayer. Most likely, this example will be replicated in later releases of the SDK, so you should have a version of it available no matter which version of the Wear-enabled SDK you’re using. It shows how different types of data can be moved back and forth between devices.
This example lets you take a picture with your phone’s camera and send the picture to the smartwatch. Figure 7.1 explains how this works in the form of a diagram.
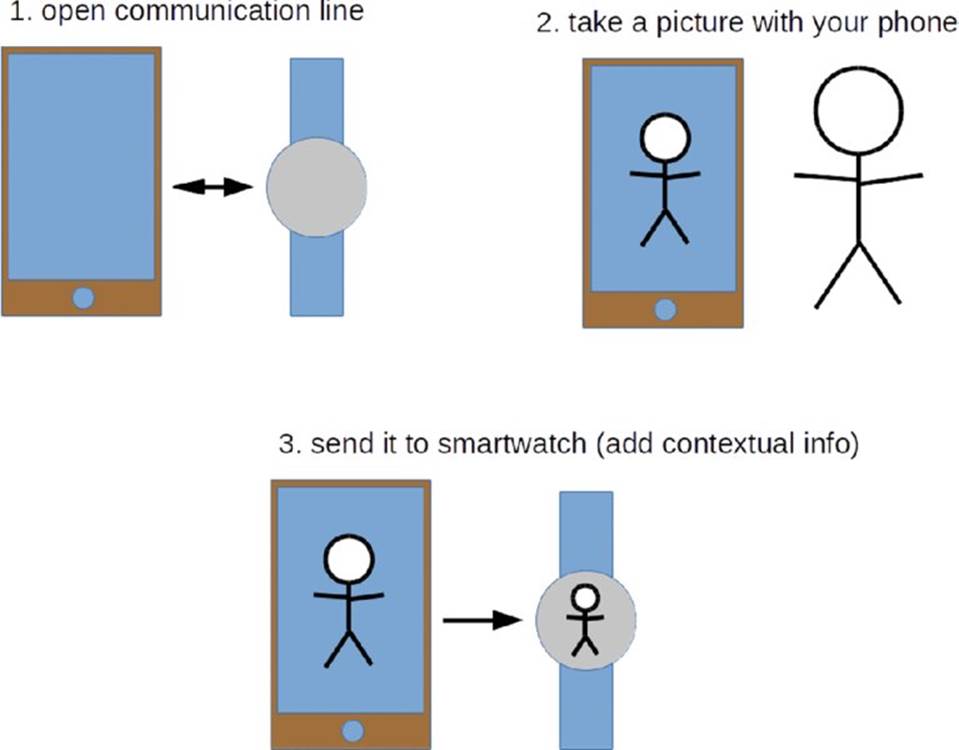
FIGURE 7.1 Diagram of the data transmission example
I have refactored the example so that it is made in the same way as the examples in the rest of the book. In the Chapter 7 code downloads folder, decompress the file named chapter7_SimpleWearableData.zip and open it in Android Studio. Once you have it running on your handheld and either your emulator or your watch, you can take a picture with your phone and send it to the Wear device’s screen. You will also see a lot of information overlaid on top. Figure 7.2 shows the app running on a phone.
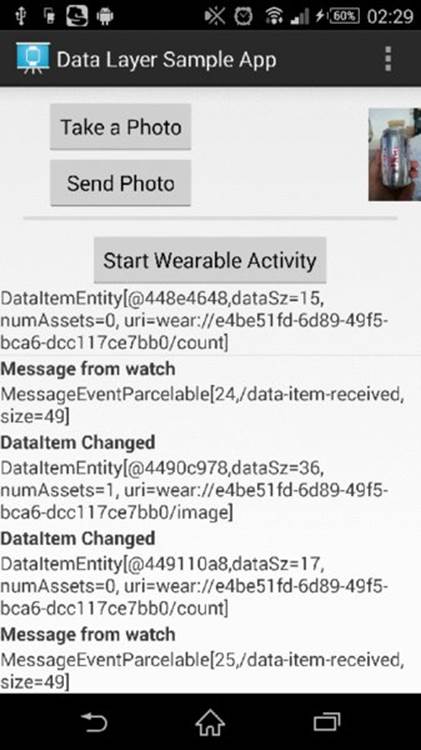
FIGURE 7.2 The Data transmission app on a phone
The interaction performed was to take a picture with the phone after pressing the button on the app’s UI and then to send it to the wearable device. Unlike other examples, such as those in Chapter 6, in this case we have a running wearable app that waits to receive data from the phone and then displays it onscreen. Figure 7.3 is the result on an emulator for a squared Wear device.
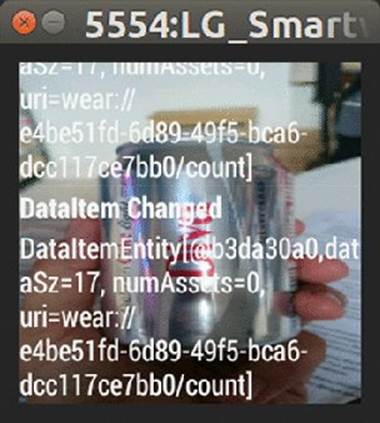
FIGURE 7.3 The Data transmission app on a wearable
The Wearable Data Layer API is useful when a chunk of information (such as an image or sound) needs to be transferred from one device to another. You need to make your own app for your smartwatch, because the amount of data to be transferred starts to become significant. Notifications aren’t good for this. They offer a basic way to get simple information from one device to another and to gather an answer to a simple query. The default software on your Android Wear device won’t meet all your needs—or will it?
Since the whole codebase for this app is fairly large, we’ll look at some code snippets from this example to understand how it works. Later you will perform the inverse operation of building such a program from scratch, which will help you better understand the minimal setup needed to make a distributed application between your Wear device and your phone or tablet.
Phone’s MyActivityPhone.java
In this class you find a series of hints on what the application does. I have chosen a couple of code snippets and highlighted the most relevant aspects. Listing 7-1 shows that we are choosing to use the camera in the application and that when the class is created, the app builds a Google API client.
LISTING 7-1: Main Activity’s onCreate method for the phone (filename: /mobile/src/main/java/. . ./MyActivityPhone.java)
@Override
public void onCreate(Bundle savedInstanceState) {
super.onCreate(savedInstanceState);
mHandler = new Handler();
LOGD(TAG, "onCreate");
mCameraSupported =
getPackageManager().hasSystemFeature(
PackageManager.FEATURE_CAMERA);
setContentView(R.layout.activity_my_phone);
setupViews();
// Stores DataItems received by the local broadcaster
// from the paired watch.
mDataItemListAdapter = new DataItemAdapter(this,
android.R.layout.simple_list_item_1);
mDataItemList.setAdapter(mDataItemListAdapter);
mGeneratorExecutor = new ScheduledThreadPoolExecutor(1);
mGoogleApiClient = new GoogleApiClient.Builder(this)
.addApi(Wearable.API)
.addConnectionCallbacks(this)
.addOnConnectionFailedListener(this)
.build();
}
That Google API client implements listeners for all three APIs that are involved in the communication between devices: Data, Message, and Node. Listing 7-2 shows the override method that adds the listeners for all three APIs at once.
LISTING 7-2: Main Activity’s onConnected method for the phone (filename: /mobile/src/main/java/. . ./MyActivityPhone.java) onConnected())
@Override //ConnectionCallbacks
public void onConnected(Bundle connectionHint) {
LOGD(TAG, "Google API Client was connected");
mResolvingError = false;
mStartActivityBtn.setEnabled(true);
mSendPhotoBtn.setEnabled(mCameraSupported);
Wearable.DataApi.addListener(mGoogleApiClient, this);
Wearable.MessageApi.addListener(mGoogleApiClient, this);
Wearable.NodeApi.addListener(mGoogleApiClient, this);
}
The application, as mentioned earlier, takes a picture with the camera. It calls whatever camera applications you have installed, lets you choose one, and “intercepts” the result of that operation to include it in your app. It takes only a thumbnail, because the biggest image you can show on your Wear device is 320 by 320 pixels. Listing 7-3 shows the main methods responsible for this action. I have highlighted the lines that better describe this idea of launching the activity of taking a picture, resizing it, and sending it to the watch.
LISTING 7-3: Actions related to sending a picture to the wearable (filename: /mobile/src/main/java/. . ./MyActivityPhone.java)
/**
* Dispatches an {@link android.content.Intent} to take a photo. Result
* will be returned in onActivityResult().
*/
private void dispatchTakePictureIntent() {
Intent takePictureIntent = new Intent(MediaStore.ACTION_IMAGE_CAPTURE);
if (takePictureIntent.resolveActivity(getPackageManager()) != null) {
startActivityForResult(takePictureIntent, REQUEST_IMAGE_CAPTURE);
}
}
/**
* Builds an {@link com.google.android.gms.wearable.Asset} from a bitmap.
* The image that we get back from the camera in "data" is a thumbnail
* size. Typically, your image should not exceed 320x320, and if you want
* to have zoom and parallax effect in your app, limit the size of your
* image to 640x400. Resize your image before transferring to your
* wearable device.
*/
private static Asset toAsset(Bitmap bitmap) {
ByteArrayOutputStream byteStream = null;
try {
byteStream = new ByteArrayOutputStream();
bitmap.compress(Bitmap.CompressFormat.PNG, 100, byteStream);
return Asset.createFromBytes(byteStream.toByteArray());
} finally {
if (null != byteStream) {
try {
byteStream.close();
} catch (IOException e) {
// ignore
}
}
}
}
/**
* Sends the asset that was created from the photo we took by adding it
* to the Data Item store.
*/
private void sendPhoto(Asset asset) {
PutDataMapRequest dataMap = PutDataMapRequest.create(IMAGE_PATH);
dataMap.getDataMap().putAsset(IMAGE_KEY, asset);
dataMap.getDataMap().putLong("time", new Date().getTime());
PutDataRequest request = dataMap.asPutDataRequest();
Wearable.DataApi.putDataItem(mGoogleApiClient, request)
.setResultCallback(new ResultCallback<DataItemResult>() {
@Override
public void onResult(DataItemResult dataItemResult) {
LOGD(TAG, "Sending image was successful: " +
dataItemResult.getStatus().isSuccess());
}
});
}
public void onTakePhotoClick(View view) {
dispatchTakePictureIntent();
}
public void onSendPhotoClick(View view) {
if (null != mImageBitmap && mGoogleApiClient.isConnected()) {
sendPhoto(toAsset(mImageBitmap));
}
}
Even if the Node API is not the main aim of this chapter, it is worth showing the methods that deal with the connection between the smartwatch and the handheld. Thanks to this API, it’s easy to look for existing wearables and send remote requests to start the activity. Listing 7-4 displays the methods and asynchronous class that check whether the watch is connected and fire up the activity remotely.
LISTING 7-4: Use of the Node API to fire the activity on the phone (filename: MainActivityPhone.java)
private Collection<String> getNodes() {
HashSet<String> results = new HashSet<String>();
NodeApi.GetConnectedNodesResult nodes =
Wearable.NodeApi.getConnectedNodes(mGoogleApiClient).await();
for (Node node : nodes.getNodes()) {
results.add(node.getId());
}
return results;
}
private void sendStartActivityMessage(String node) {
Wearable.MessageApi.sendMessage(
mGoogleApiClient, node, START_ACTIVITY_PATH,
new byte[0]).setResultCallback(
new ResultCallback<SendMessageResult>() {
@Override
public void onResult(SendMessageResult sendMessageResult) {
if (!sendMessageResult.getStatus().isSuccess()) {
Log.e(TAG, "Failed to send msg with status code: "
+ sendMessageResult.getStatus().getStatusCode());
}
}
}
);
}
private class StartWearableActivityTask extends AsyncTask<Void, Void, Void> {
@Override
protected Void doInBackground(Void... args) {
Collection<String> nodes = getNodes();
for (String node : nodes) {
sendStartActivityMessage(node);
}
return null;
}
}
/** Sends an RPC to start a fullscreen Activity on the wearable. */
public void onStartWearableActivityClick(View view) {
LOGD(TAG, "Generating RPC");
// Trigger an AsyncTask that will query for a list of connected
// nodes and send a "start-activity" message to each connected node.
new StartWearableActivityTask().execute();
}
Phone’s AndroidManifest.xml
Note the following in the phone’s manifest file which is shown in Listing 7-5.
· ➤ A uses-feature tag that specifies the use of the camera
· ➤ A meta-data tag that registers a key-value pair regarding the use of the Google Play services API
LISTING 7-5: Phone’s manifest file (filename: /mobile/src/main/AndroidManifest.xml)
<?xml version="1.0" encoding="utf-8"?>
<manifest xmlns:android="http://schemas.android.com/apk/res/android"
package="com.wiley.wrox.chapter7.simplewearabledata" >
<uses-feature android:name=
"android.hardware.camera" android:required="false" />
<application
android:allowBackup="true"
android:icon="@drawable/ic_launcher"
android:label="@string/app_name"
android:theme="@style/AppTheme" >
<meta-data
android:name="com.google.android.gms.version"
android:value="@integer/google_play_services_version" />
<activity
android:name=".MyActivityPhone"
android:label="@string/app_name"
android:launchMode="singleTask" >
<intent-filter>
<action android:name="android.intent.action.MAIN" />
<category android:name="android.intent.category.LAUNCHER" />
</intent-filter>
</activity>
</application>
</manifest>
NOTE
As explained at http://developer.android.com/guide/topics/media/camera.html#manifest, you don’t need to declare the use of the camera in the manifest file for your app using a uses-permission tag. The application itself isn’t using the camera, but is launching an intent for a different app to capture a picture.
At the same time, since the app will use the camera, but not as a hard requirement (if the camera is unavailable, that should not stop the app from working), the uses-feature tag is needed, with the specific value of android:required="false".
Sometimes you need to set up some app configuration information that has to be available across multiple classes. One example is storing API keys, version numbers, and so on. One way to store this information is by using the meta-data node within the AndroidManifest.xml file.
This field can be used to store data of multiple types, like booleans, floats, ints, or strings. It can be accessed from your code using the Bundle method for your data type.
Wearable’s MyActivityWear.java
You will notice, when reading the Android Wear application in depth, that the program structure is very similar to the one for the handheld. A whole series of methods handle communication between both devices, initializing the three APIs, and so on.
In essence, the application on the smartwatch does three things:
· ➤ It shows a simple text when the phone’s app hasn’t been launched yet and/or the devices aren’t connected to each other.
· ➤ When the phone captures a new image and sends it to the wearable, the application shows this image as a background picture.
· ➤ The application displays a series of status messages over the image. These messages come from the Node API or the Message API.
Listing 7-6 is an excerpt of the whole class. It focuses on the code that handles the arrival of the asset—the image in this case—the code that handles the shared data storage, and the code that handles how the wearable app displays it onscreen.
LISTING 7-6: Wearable application (filename: /wear/src/main/java/. . ./MyActivityWear.java)
@Override
public void onDataChanged(DataEventBuffer dataEvents) {
Log.d(TAG, "onDataChanged(): " + dataEvents);
final List<DataEvent> events = FreezableUtils.freezeIterable(dataEvents);
dataEvents.close();
for (DataEvent event : events) {
if (event.getType() == DataEvent.TYPE_CHANGED) {
String path = event.getDataItem().getUri().getPath();
if (DataLayerListenerService.IMAGE_PATH.equals(path)) {
DataMapItem dataMapItem =
DataMapItem.fromDataItem(event.getDataItem());
Asset photo = dataMapItem.getDataMap()
.getAsset(DataLayerListenerService.IMAGE_KEY);
final Bitmap bitmap =
loadBitmapFromAsset(mGoogleApiClient, photo);
mHandler.post(new Runnable() {
@Override
public void run() {
Log.d(TAG, "Setting background image..");
mLayout.setBackground(new BitmapDrawable(getResources(),
bitmap));
}
});
} else if (DataLayerListenerService.COUNT_PATH.equals(path)) {
Log.d(TAG, "Data Changed for COUNT_PATH");
generateEvent("DataItem Changed",
event.getDataItem().toString());
} else {
Log.d(TAG, "Unrecognized path: " + path);
}
} else if (event.getType() == DataEvent.TYPE_DELETED) {
generateEvent("DataItem Deleted", event.getDataItem().toString());
} else {
generateEvent("Unknown data event type",
"Type = " + event.getType());
}
}
}
/**
* Extracts {@link android.graphics.Bitmap} data from the
* {@link com.google.android.gms.wearable.Asset}
*/
private Bitmap loadBitmapFromAsset(GoogleApiClient apiClient, Asset asset) {
if (asset == null) {
throw new IllegalArgumentException("Asset must be non-null");
}
InputStream assetInputStream = Wearable.DataApi.getFdForAsset(
apiClient, asset).await().getInputStream();
if (assetInputStream == null) {
Log.w(TAG, "Requested an unknown Asset.");
return null;
}
return BitmapFactory.decodeStream(assetInputStream);
}
Wearable’s AndroidManifest.xml
The manifest file for the wearable contains a couple of relevant things, as shown in Listing 7-7. First, you see how the Google Play services API has been declared in the same way as in the manifest file for the phone’s app.
Second, a class is launched as a service in parallel to the main class. This class, called DataLayerListenerService, waits for events coming from the handheld. There is a better description of that class in the following section.
Finally, the intent-filter named com.wiley.wrox.chapter7.simplewearabledata.EXAMPLE launches the app remotely.
LISTING 7-7: Wearable’s manifest file (filename: /wear/src/main/AndroidManifest.xml)
[...]
<meta-data
android:name="com.google.android.gms.version"
android:value="@integer/google_play_services_version" />
<service
android:name=".DataLayerListenerService" >
<intent-filter>
<action android:name="com.google.android.gms.wearable.BIND_LISTENER" />
</intent-filter>
</service>
<activity
android:name=".MyActivityWear"
android:label="@string/app_name" >
<intent-filter>
<action android:name="android.intent.action.MAIN" />
<category android:name="android.intent.category.LAUNCHER" />
</intent-filter>
<intent-filter>
<action android:name=
"com.wiley.wrox.chapter7.simplewearabledata.EXAMPLE"/>
<category android:name="android.intent.category.DEFAULT"/>
</intent-filter>
</activity>
[...]
Wearable’s Listener
This example separates the wearable code into two classes—for clarity and because they perform two different tasks. The main activity changes the UI upon arrival of new background images or data that is worth pushing to the screen. The DataLayerListenerService is just that—a service running in the background that waits for events coming from the handheld app that it can report to the main class.
Listing 7-8 shows the two main methods in the service: onDataChanged and onMessageReceived. Note that the second one can launch the main class, as highlighted in the code.
LISTING 7-8: Wearable’s listener class (filename: /wear/src/main/java/. . ./DataLayerListenerService.java)
@Override
public void onDataChanged(DataEventBuffer dataEvents) {
LOGD(TAG, "onDataChanged: " + dataEvents);
final List<DataEvent> events = FreezableUtils.freezeIterable(dataEvents);
dataEvents.close();
if(!mGoogleApiClient.isConnected()) {
ConnectionResult connectionResult = mGoogleApiClient
.blockingConnect(30, TimeUnit.SECONDS);
if (!connectionResult.isSuccess()) {
Log.e(TAG, "DataLayerListenerService failed to connect to
GoogleApiClient.");
return;
}
}
// Loop through the events and send a message back to the node
// that created the data item.
for (DataEvent event : events) {
Uri uri = event.getDataItem().getUri();
String path = uri.getPath();
if (COUNT_PATH.equals(path)) {
// Get the node id of the node that created the data item
// from the host portion of the uri.
String nodeId = uri.getHost();
// Set the data of the message to be the bytes of the Uri.
byte[] payload = uri.toString().getBytes();
// Send the rpc
Wearable.MessageApi.sendMessage(mGoogleApiClient, nodeId,
DATA_ITEM_RECEIVED_PATH, payload);
}
}
}
@Override
public void onMessageReceived(MessageEvent messageEvent) {
LOGD(TAG, "onMessageReceived: " + messageEvent);
// Check to see if the message is to start an activity
if (messageEvent.getPath().equals(START_ACTIVITY_PATH)) {
Intent startIntent = new Intent(this, MyActivityWear.class);
startIntent.addFlags(Intent.FLAG_ACTIVITY_NEW_TASK);
startActivity(startIntent);
}
}
MAKING YOUR GOOGLE API CLIENT FROM SCRATCH
After you have checked the basic example from the Android Wear developers on how to get the phone app and the one on the watch to talk to each other, you will wonder how to make this from scratch. Let’s build the scaffolding for a minimal application that you could expand for whatever use you’re interested in.
A good implementation of a client to Google’s API should be able to connect to one or more Google Play services synchronously or asynchronously and handle connection failures.
Next you will build two apps that will be connected through Google Play services. You will do the equivalent of having two sockets open between the phone and the watch. One will send a value to change the color of the watch’s screen. The other will tell the handheld about the coordinates of the last touch on the watch’s screen.
Consider the following points when dealing with such a scenario:
· ➤ How will you handle communication between devices? In this case we are using the Data API. You might consider it not to be optimal in this situation. Because we will send small amounts of data, the Message API probably would have been more suitable for this example. But because the aim is to show an example that is easy to expand, the Data API is more versatile and therefore is the one I chose.
· ➤ How will you update the information on the devices’ screens? This was covered in Chapter 6, where we used BroadcastReceiver to listen to the arrival of digitized voice from the watch and a LocalBroadcastManager to capture the data into the UI. This time you will apply that same technique to the wearable and not only to the phone.
When it comes to the code’s structure, you will have two classes for each device. One will be dedicated to the UI, and the other will run as a service, to listen to the changes in the data storage. When a change occurs, the service on the phone will tell the UI which new values it can use. The process will be the same for the wearable.
Start with a Clean Project
The first step is to create the API client by starting from a clean Android Wear project with code for both the handheld and the Wear device. In this case, a couple objects of the class DataItem are shared between both devices. One field represents the watch’s background color, and the other represents the coordinates of the last location where the user touched the screen.
This is probably one of the shortest examples you can find on how to establish bidirectional communication between the handheld and the watch. It has many anchor points where you can easily add your own code.
The following sections examine each program that is part of this example. The code files can be downloaded from the Chapter 7 download folder.
The Phone’s MyActivityPhone.java
On MyActivityPhone.java, as I have uploaded it to the Wrox server, you will find some interesting things:
· ➤ The declaration of a Google API client to start sharing data between devices, with overrides to control the possibility of the connectivity’s being lost or not even started.
· ➤ A local broadcast manager that will be registered at the onCreate()method. It refreshes the text on the UI’s label upon data arrival.
· ➤ The method syncDataItem(), which sends a new random color using the filter PHONE2WEAR to the watch every time someone presses the button on the UI. I used two different types of data within the Data API: an int for the color and a String to send a simple text indicating how many times the button has been pressed.
Listing 7-9 shows how to implement the Google API client from scratch.
LISTING 7-9: Main activity on the phone app (filename: /mobile/src/main/java/. . ./MyActivityPhone.java)
package com.wiley.wrox.chapter7.wearabledatafromscratch;
import [...]
public class MyActivityPhone extends Activity {
private GoogleApiClient mGoogleApiClient;
private int mColorCount = 0;
private BroadcastReceiver mResultReceiver;
@Override
protected void onCreate(Bundle savedInstanceState) {
super.onCreate(savedInstanceState);
setContentView(R.layout.activity_my_phone);
mGoogleApiClient = new GoogleApiClient.Builder(this)
.addConnectionCallbacks(new GoogleApiClient.ConnectionCallbacks() {
@Override
public void onConnected(Bundle connectionHint) {
Log.v("wrox-mobile", "Connection established");
}
@Override
public void onConnectionSuspended(int cause) {
Log.v("wrox-mobile", "Connection suspended");
}
})
.addOnConnectionFailedListener(new
GoogleApiClient.OnConnectionFailedListener() {
@Override
public void onConnectionFailed(ConnectionResult result) {
Log.v("wrox-mobile", "Connection failed");
}
})
.addApi(Wearable.API)
.build();
mGoogleApiClient.connect();
mResultReceiver = createBroadcastReceiver();
LocalBroadcastManager.getInstance(this).registerReceiver(
mResultReceiver,
new IntentFilter("phone.localIntent"));
}
[...]
public void syncDataItem(View view) {
if(mGoogleApiClient==null)
return;
int r = (int) (255 * Math.random());
int g = (int) (255 * Math.random());
int b = (int) (255 * Math.random());
final PutDataMapRequest putRequest =
PutDataMapRequest.create("/PHONE2WEAR");
final DataMap map = putRequest.getDataMap();
map.putInt("color", Color.rgb(r,g,b));
map.putString("colorChanges", "Amount of changes: " + mColorCount++);
Wearable.DataApi.putDataItem(mGoogleApiClient,
putRequest.asPutDataRequest());
Log.v("wrox-mobile", "Handheld sent new random color to watch");
Log.v("wrox-mobile", "color:" + r + ", " + g + ", " + b);
Log.v("wrox-mobile", "iteration:" + mColorCount);
}
private void updateTextField(String text) {
Log.v("wrox-mobile", "Arrived text:" + text);
((TextView)findViewById(R.id.reply_text)).setText(text);
}
@Override
protected void onDestroy() {
if (mResultReceiver != null) {
LocalBroadcastManager.getInstance(this)
.unregisterReceiver(mResultReceiver);
}
super.onDestroy();
}
private BroadcastReceiver createBroadcastReceiver() {
return new BroadcastReceiver() {
@Override
public void onReceive(Context context, Intent intent) {
updateTextField(intent.getStringExtra("result"));
}
};
}
}
The Phone’s AndroidManifest.xml
Listing 7-10 shows the manifest file for the phone. I’ve highlighted the service declaration. Together with the metadata tag declaring the use of the Google Play services API, these are the two changes needed for the service to boot when the app launches and for the combo to use the Google API to talk to the other device.
LISTING 7-10: Full manifest file (filename: /mobile/src/main/AndroidManifest.xml)
<?xml version="1.0" encoding="utf-8"?>
<manifest xmlns:android="http://schemas.android.com/apk/res/android"
package="com.wiley.wrox.chapter7.wearabledatafromscratch" >
<application
android:allowBackup="true"
android:icon="@drawable/wrox_logo_big"
android:label="@string/app_name"
android:theme="@style/AppTheme" >
<activity
android:name=".MyActivityPhone"
android:label="@string/app_name" >
<intent-filter>
<action android:name="android.intent.action.MAIN" />
<category android:name="android.intent.category.LAUNCHER" />
</intent-filter>
</activity>
<service android:name=".DataLayerListenerServicePhone" >
<intent-filter>
<action android:name=
"com.google.android.gms.wearable.BIND_LISTENER" />
</intent-filter>
</service>
<meta-data android:name="com.google.android.gms.version"
android:value="@integer/google_play_services_version" />
</application>
</manifest>
The Phone’s DataLayerListenerService
DataLayerListenerService is launched on the phone after the app launches. When the phone registers an event of any of the shared data objects changing, the listener is triggered. In this case it filters by WEAR2PHONE. This object, as defined in MyActivityWear.java (check the source code later in the chapter), carries two float numbers—the x-coordinate and the y-coordinate of the last time the screen was touched.
In Listing 7-11 you can see the listener service in the phone that will be waiting for the wearable device to make changes on the shared data object.
LISTING 7-11: Listener on the phone (filename: /mobile/src/main/java/. . ./DataLayerListenerServicePhone.java)
public class DataLayerListenerServicePhone extends WearableListenerService {
@Override
public void onDataChanged(DataEventBuffer dataEvents) {
super.onDataChanged(dataEvents);
Log.v("wrox-mobile", "Data arrived");
final List<DataEvent> events = FreezableUtils.freezeIterable(dataEvents);
for(DataEvent event : events) {
final Uri uri = event.getDataItem().getUri();
final String path = uri!=null ? uri.getPath() : null;
if("/WEAR2PHONE".equals(path)) {
final DataMap map = DataMapItem
.fromDataItem(event.getDataItem()).getDataMap();
// read your values from map:
float X = map.getFloat("touchX");
float Y = map.getFloat("touchY");
String reply = "Touched X=" + X + ", Y=" + Y;
Log.v("wrox-mobile", reply);
Intent localIntent = new Intent("phone.localIntent");
localIntent.putExtra("result", reply);
LocalBroadcastManager.getInstance(this)
.sendBroadcast(localIntent);
}
}
}
}
NOTE
You don’t need a Wear device to test these apps. As you will see later in this chapter, I used the emulator for the watch. To simulate touches on the screen, simply use the mouse pointer and click over the interface.
MyActivityWear.java
The activity on the watch is very similar to the one on the phone. Just take a look at Listing 7-12, a snippet of the main class running on the phone. You will see that it is more or less the same application as on the phone, with these differences:
· ➤ In this case the data is sent as WEAR2PHONE.
· ➤ The property we are changing in this case is the background color—a combo of the setActivityBackgroundColor() and setBackgroundColor() methods.
· ➤ touchListener is implemented within the method dedicated to the layout. Because the listener is responsible for detecting touches and sending them, all the needed code is added there, inline.
LISTING 7-12: Main activity class on the wearable (filename: /wear/src/main/java/. . .MainActivityWear.java)
package com.wiley.wrox.chapter7.wearabledatafromscratch;
import [...]
public class MyActivityWear extends Activity {
private GoogleApiClient mGoogleApiClient;
private TextView mTextView;
private int mColor;
private BroadcastReceiver mResultReceiver;
@Override
protected void onCreate(Bundle savedInstanceState) {
super.onCreate(savedInstanceState);
setContentView(R.layout.activity_my_wear);
mGoogleApiClient = new GoogleApiClient.Builder(this)
.addConnectionCallbacks(new GoogleApiClient
.ConnectionCallbacks() {
@Override
public void onConnected(Bundle connectionHint) {
Log.v("wrox-wear", "Connection established");
}
@Override
public void onConnectionSuspended(int cause) {
Log.v("wrox-wear", "Connection suspended");
}
})
.addOnConnectionFailedListener(new GoogleApiClient
.OnConnectionFailedListener() {
@Override
public void onConnectionFailed(ConnectionResult result) {
Log.v("wrox-wear", "Connection failed");
}
})
.addApi(Wearable.API)
.build();
mGoogleApiClient.connect();
final WatchViewStub stub = (WatchViewStub)
findViewById(R.id.watch_view_stub);
stub.setOnLayoutInflatedListener(new
WatchViewStub.OnLayoutInflatedListener() {
@Override
public void onLayoutInflated(WatchViewStub stub) {
mTextView = (TextView) stub.findViewById(R.id.text);
stub.setOnTouchListener(new View.OnTouchListener() {
@Override
public boolean onTouch(View view, MotionEvent event) {
String s = "X=" + event.getX();
s += ", Y=" + event.getY();
Log.v("wrox-wear", s);
if(mGoogleApiClient==null)
return false;
final PutDataMapRequest putRequest =
PutDataMapRequest.create("/WEAR2PHONE");
final DataMap map = putRequest.getDataMap();
map.putFloat("touchX", event.getX());
map.putFloat("touchY", event.getY());
Wearable.DataApi.putDataItem(mGoogleApiClient,
putRequest.asPutDataRequest());
return false;
}
});
}
});
mResultReceiver = createBroadcastReceiver();
LocalBroadcastManager.getInstance(this).registerReceiver(
mResultReceiver,
new IntentFilter("wearable.localIntent"));
}
private void setBackgroundColor(int color) {
Log.v("wrox-wear", "Arrived color:" + color);
final WatchViewStub stub = (WatchViewStub)
findViewById(R.id.watch_view_stub);
stub.setBackgroundColor(color);
}
@Override
protected void onDestroy() {
if (mResultReceiver != null) {
LocalBroadcastManager.getInstance(this)
.unregisterReceiver(mResultReceiver);
}
super.onDestroy();
}
private BroadcastReceiver createBroadcastReceiver() {
return new BroadcastReceiver() {
@Override
public void onReceive(Context context, Intent intent) {
setBackgroundColor(
intent.getIntExtra("result"));
}
};
}
}
Wear’s Android Manifest File
Listing 7-13 shows that there is almost no difference between the manifest file for the wearable and the one for the handheld.
LISTING 7-13: Main activity class on the wearable (filename: /wear/src/main/AndroidManifest.xml)
<?xml version="1.0" encoding="utf-8"?>
<manifest xmlns:android="http://schemas.android.com/apk/res/android"
package="com.wiley.wrox.chapter7.wearabledatafromscratch" >
<uses-feature android:name="android.hardware.type.watch" />
<application
android:allowBackup="true"
android:icon="@drawable/ic_launcher"
android:label="@string/app_name"
android:theme="@android:style/Theme.DeviceDefault" >
<activity
android:name=".MyActivityWear"
android:label="@string/app_name" >
<intent-filter>
<action android:name="android.intent.action.MAIN" />
<category android:name="android.intent.category.LAUNCHER" />
</intent-filter>
</activity>
<service android:name=".DataLayerListenerServiceWear" >
<intent-filter>
<action android:name=
"com.google.android.gms.wearable.BIND_LISTENER" />
</intent-filter>
</service>
<meta-data android:name="com.google.android.gms.version"
android:value="@integer/google_play_services_version" />
</application>
</manifest>
The Listener on the Wearable’s Side
Listing 7-14 shows the last piece of the puzzle.
LISTING 7-14: Wearable’s listener (filename: /wear/src/main/java/. . ./DataLayerListenerServiceWear.java)
public class DataLayerListenerServiceWear extends WearableListenerService {
@Override
public void onDataChanged(DataEventBuffer dataEvents) {
super.onDataChanged(dataEvents);
Log.v("wrox-wear", "Data arrived");
final List<DataEvent> events = FreezableUtils
.freezeIterable(dataEvents);
for(DataEvent event : events) {
final Uri uri = event.getDataItem().getUri();
final String path = uri!=null ? uri.getPath() : null;
if("/PHONE2WEAR".equals(path)) {
final DataMap map = DataMapItem
.fromDataItem(event.getDataItem()).getDataMap();
// read your values from map:
int color = map.getInt("color");
Log.v("wrox-wear", "Color received: " + color);
Intent localIntent = new Intent("wearable.localIntent");
localIntent.putExtra("result", color);
LocalBroadcastManager.getInstance(this)
.sendBroadcast(localIntent);
String colorChanges = map.getString("colorChanges");
Log.v("wrox-wear", colorChanges);
}
}
}
}
The Final Result
I haven’t focused on showing the layout for either of the applications. I recommend you check the full example on the book’s downloads under chapter7_WearableDataFromScratch.zip. There you will find all the code used here, ready for you to copy and start experimenting with in your own applications.
The expected result on your side should be something like what is shown in the next two figures. Figure 7.4 is a screenshot of the activity on my phone. Figure 7.5 is a screenshot of the watch after the button on the phone’s UI is pressed and the watch’s screen is touched.
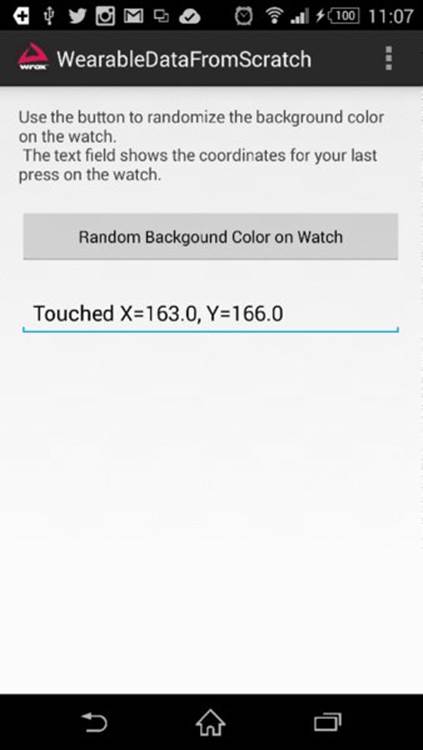
FIGURE 7.4 The Data transmission app on a phone
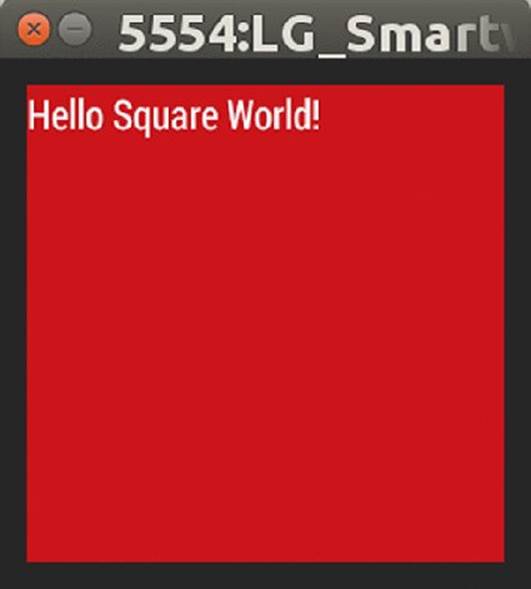
FIGURE 7.5 The watch after the screen changes color
SUMMARY
This chapter has shown you how to run the basic Wearable API communication example provided by Google in the Android Wear SDK. You have learned how to make your own simple, bidirectional app ecosystem so that you can share data records between apps on different devices.
Remember that the way to communicate between your handheld and your watch is Google Play services.
In the next chapter you’ll explore how to stream audio over Bluetooth.
RECOMMENDED READING
Visit the following documentation sites from the Android Wear project for further reference:
· https://developer.android.com/training/wearables/data-layer/accessing.html
· https://developer.android.com/training/wearables/data-layer/data-items.html