Arduino Sketches: Tools and Techniques for Programming Wizardry (2015)
Part II. Standard Libraries
Chapter 12. SD
This chapter discusses the following functions of the SD library:
· begin()
· open()
· exists()
· close()
· read()
· peek()
· position()
· seek()
· size()
· available()
· print()
· println()
· write()
· mkdir()
· rmdir()
· flush()
· isFolder()
The hardware needed to run the examples in this chapter includes:
· Arduino Uno
· Ethernet shield (Arduino, SainSmart, or similar board)
· Micro-SD Card
You can find the code download for this chapter at http://www.wiley.com/go/arduinosketches on the Download Code tab. The code is in the Chapter 12 download folder and the filename is Chapter12.ino.
Introduction
The hunger for storage has increased exponentially. Early computers did not have hard drives; the operating system and applications were stored on a floppy disk. The first commercially available floppy disk was an 8-inch disk, which became available in 1971. It could store an enormous 175 kB of data. In 1976, the standard became 5 ¼ inch (ironically known as the minifloppy). The original model could store 87.5 kB, but newer models could store more than 1 megabyte. The large slots on your desktop computer that house a DVD drive or Blu-ray drive are that size because of floppy disks; the size of the minifloppy disk drive became standard.
As technology advanced, so did the storage capacity of disks, and 5 ¼-inch disks were considered too big; the computer industry turned to 3 ½-inch floppies, known as micro-floppies. Early models could store 360 KB, but later models could either be single density (720 KB) or double density (1.44 MB). Those are the disks that powered the computer industry, storing and exchanging data. Operating systems were sold on floppies, and the first thing that users were told to do was to copy this floppy and keep the original safe. A single floppy disk was more than enough to hold an operating system and a few programs. Figure 12.1 shows examples of three different types of early floppy disks.
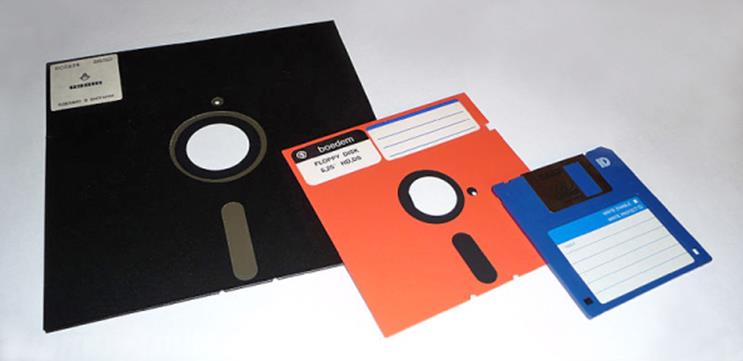
Figure 12.1 Floppy disks
Technology continued to advance, and more and more files were created digitally. Businesses could find themselves submerged with floppies, and data retrieval could be extremely slow because a lot of time was taken finding the right floppy. Also, floppy disks were not the most reliable medium possible. (Older readers might remember the infamous Abort, Retry, Ignore message.) The solution came, and it was called the hard drive.
A hard drive is, essentially, a floppy disk that cannot be removed. Original models could hold just a few megabytes, but it didn't take long to increase storage space—from 20 megabytes to 40, 120, 340, 540…. The gigabyte barrier was broken in the early 1990s. However, this was not the end of floppies, far from it. Operating systems and programs were still sold on floppies, and backups used floppy disks. However, another problem was noticed.
With the advance into the digital era, everything ended up on a computer—letters, books, photos, images, and music. It was easy to add a few hard drives onto a computer until internal space ran out, but the industry's main problem was data exchange; the ability of transferring data from one computer to another. A simple Word document could be just a few kilobytes in size, but add a few images or photos, and it could become bigger than a floppy disk, the only medium used to transfer data from one location to another. The Internet wasn't available everywhere and most certainly not at the speeds required to transfer megabytes of data. We would have to wait a few years for high-speed devices like USB. I can remember receiving parcels containing dozens of floppy disks containing programs. (Windows 3.1 came on 7 floppy disks; Windows NT 3.1 came on 22.)
CD drives offered a solution, the medium is capable of storing 650 to 700 MB of data. Applications could be shipped on a single CD, and the increase in size meant that applications became more and more multimedia-oriented. Microsoft Encarta was a revolution for its time—an entire encyclopedia on a CD. However, it wasn't the most effective data transfer device possible, being a write-once read-many media. After a CD was “burned,” it couldn't be erased. Different techniques were used, including the possibility to rewrite CD media, but a new technology put a stop to all that.
The Universal Serial Bus (USB) is an extension for PCs and mobile devices. Developed in the mid-1990s, the final USB 1 specification was released in January 1996. Until USB, shopping for peripherals was a nightmare. A printer would use a parallel port, but so would a scanner and a Zip drive. A mouse might use a serial port, but so would a modem and a programmer. Expansion ports were sold, adding serial ports, parallel ports, PS/2 ports, and so on. USB revolutionized all this—printers, scanners, mice, modems, even some floppy drives. All these peripherals could use USB, and it was embraced by the industry. However, the industry was about to try something else. In the year 2000, the first USB flash drive was created, as shown in Figure 12.2.
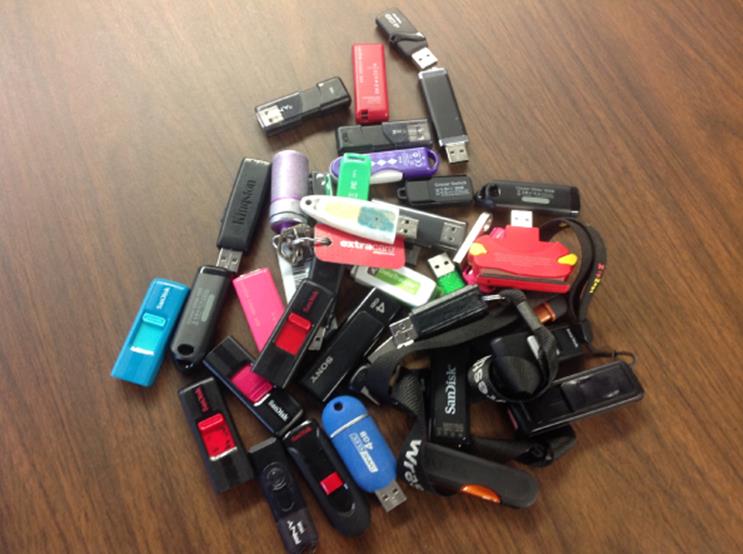
Figure 12.2 USB flash drives
The first commercial product could hold 8 MB of data, more than five times that of a floppy disk. It was solid and robust, and could survive spending days in a pocket, falling off desks, or being subjected to temperature differences. It had a high transfer speed compared to floppy disks (1 MB/second) and was better than floppies in almost all fields.
In 2000, USB 1.1 was surpassed by USB 2.0, adding higher transfer speeds. USB 2.0 could transfer up to 35 MB/s; huge files could finally be transferred quickly and efficiently. A second generation flash disk used USB 2.0, which was significantly faster than USB 1.1—approximately 20 times faster.
Speed increased and so did storage capacity. Every so often, capacities doubled. Sixteen-megabyte versions were soon available, replaced by 32 megabytes, and so on. Fourteen years later, terabyte-sized flash drives are available. Despite their huge growth and advances, flash drives have remained relatively unchanged. They rely on a small controller and flash memory.
Flash memory is different from floppies and hard drives. Floppy disks have a thin, flexible disk of magnetic storage plastic, encased in a rigid plastic case. A motor inside the disk drive turns the disk, and heads are placed above the surface of the disk. To fetch data, the heads are placed at a specific location and the motor turns the disk. The heads read the data stored on the disk, but the heads must wait for the disk to rotate to the right position to do so. Hard drives function in the same way, only the motor is included inside the drive.
Both floppies and hard drives are susceptible to damage; for example, a hard drive falling from your pocket might destroy the device. Flash memory works differently. Unlike floppies and hard drives, flash memory has no moving parts, and is therefore much more resilient to shocks and impacts. It requires very little energy to function, and some forms of flash memory have read and write speeds far greater than the fastest hard drive available.
USB flash drives still aren't the answer to our needs. We can now easily transfer data from one computer to another, but mobile devices are becoming more and more present. Mobile telephones, digital cameras, camcorders, and mp3 players all require storage. Early devices had a fixed amount of storage, and although it might have been more than enough for some, for others the storage wasn't close to being enough. My first digital camera had 16 megabytes of memory, more than enough for a quick photo shoot, but not enough for my holidays. Users wanted choice, so companies turned back to a format that had existed for as long as USB itself. Multiple mobile memory storage devices were created, but the most dominant format is the SD card.
SD Cards
SD, short for Secure Digital, is an evolution over the previous MultiMediaCard standard. The SD Card Association manages the format, specifications, and evolutions, and uses a trademarked logo to enforce compatibility. If your device has the same logo as the one on your SD card, you know that they will be compatible.
Physically, SD cards are available in three formats: standard size, mini, and micro (see Figure 12.3). Today, most devices use either the standard size format (for larger devices, like cameras, camcorders, and personal computers) or the micro-size format (for smaller devices, such as e-book readers, telephones, and mp3 players).
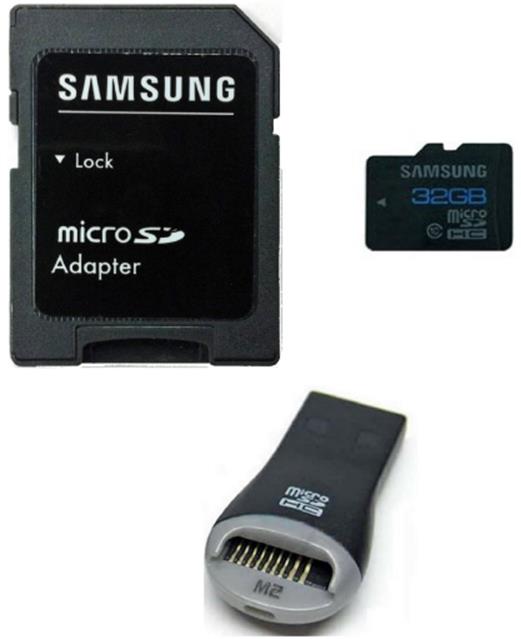
Figure 12.3 SD cards, micro-SD cards, and SD-card readers
SD cards are not only used for data storage, but also for data transfer. You can transfer photos from your camera either with a USB cable or directly by taking out the card and connecting it to your PC. Some desktop computers have an SD-card reader, as do many laptops. For micro-SD cards, you have several choices. There are USB readers that can read several types of cards or USB keys that can accept a micro-SD card and be used as a regular USB flash drive. Adapters also exist to convert a micro-SD card into a standard full-size SD card.
Capacity
SD cards have gone through numerous changes to their specification since their release in 1999. The original SD specification allowed cards with capacities up to 2 gigabytes. When the 2 gigabyte barrier became a problem, SD-HC was introduced. Short for SD High Capacity, it specified a way of storing up to 32 gigabytes of data. It does not simply integrate more space; the protocol had to be changed to allow for higher capacity. Again, the size barrier became a problem, and SD-XC (for eXtended Capacity) was born. The standard insists that newer formats accept older cards, but the opposite is not true; some SD-compatible devices will not accept SD-HC cards, even if they can fit physically.
The card capacity is only one factor. To use a card's capacity, the system normally needs to use a filesystem. A filesystem is a way of preparing the space on a physical storage medium (SD-card, floppy, or hard drive) to allow files and folders to be stored in a hierarchal way. SD cards can be used to transfer data between devices and operating systems with different specifications. From this variety of formats, FAT has emerged as the most common filesystem.
FAT, short for File Allocation Table, has been used since the early days of PCs. It has undergone several changes over the years. The original FAT specification, FAT8, is no longer in use. FAT16 uses 16 bits to define sector entries (a method of storing file information) and is limited to 2 gigabyte partitions. FAT32 was released after this, and storage space was theoretically increased to 2 terabytes; although in practice, few systems used it beyond 32 gigabytes. Newer systems use the exFAT filesystem, a new but incompatible filesystem that allows huge storage capacity; in theory, up to 64 zettabytes. For comparison, in 2013, the entire World Wide Web was estimated at 4 zettabytes.
FAT32 has been surpassed technically by several filesystems, including exFAT and NTFS, but still remains in use for its simplicity. NTFS adds several interesting features such as journaling, linking, and quotas; features that are not required by a digital camera. The code required to interact with a FAT32 filesystem is extremely small, making it ideal for embedded systems.
Speed
There is also another factor to consider when choosing SD cards: their speed. The SD Speed Class Rating is a simple way of understanding the minimum speed of a card. Visible by either a letter C with a number inside, it shows the number of guaranteed megabytes-per-second transfer speed. A Class 2 card (A C with the number 2 inside) guarantees that the write transfer speed will not drop below 2 megabytes per second. A Class 10 will not drop below 10 megabytes per second. The newer speed category is shown by the letter U, and to date, two categories exist. UHS-1 (a U with the number 1 inside) guarantees read/write performance of 10 megabytes a second, and UHS-3 (a U with the number 3 inside) is guaranteed for 30 megabytes read/write per second. Please note that these figures are stated only as a minimum; some Class 2 cards are more than capable of being branded as a Class-6 or higher but have not gone through certification.
Using SD Cards with Arduino
Arduinos cannot natively use SD cards; they need a shield or a breakout board to provide an SD slot. Fortunately, several shields exist with SD capacity. Most Ethernet and wireless shields provide micro-SD slots, and numerous vendors provide datalogging shields—a shield with a micro-SD slot and space to add your own sensor components, as shown in Figure 12.4.
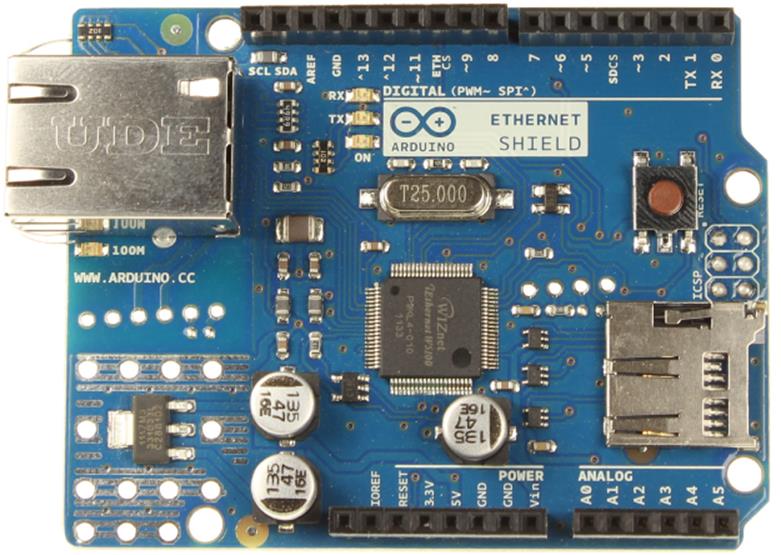
Figure 12.4 A SainSmart Ethernet shield with a micro-SD slot
Accepted SD Cards
The Arduino SD library can work with SD and SD-HC cards, all the way up to 32 gigabytes. This limitation is mainly due to the filesystem; Arduinos can use FAT16 and FAT32 filesystems but cannot use the newer, proprietary exFAT. SD-XC cards are normally formatted with exFAT, but some people have reported using SD-XC cards formatted to FAT-32.
An Arduino can work with any speed classes of SD-cards, but data throughput will be limited when writing with an Arduino. You may want to buy a faster card if you transfer data to and from a PC.
Limitations
Back in the days of Windows 3.11, filenames were harder to deal with. They were written in the 8.3 notation; filenames could consist of only 8 letters, and the extension (the text after the dot), could consist of only three letters. The filesystem did not differentiate between uppercase and lowercase letters for the system; everything was written in uppercase letters. Files were seen as WIN.COM, AUTOEXEC.BAT, and RECIPES.TXT. If you wanted to name a video of your family on holidays on a tropical island, swimming in a crystal clear sea, you had to be very creative. An extension to FAT allowed the use of LFN, short for Long File Names, but it is only an extension; it is not part of the FAT specification. There is a reason why your camera names your photos IMG_xxxx.JPG; it is probably limited to the 8.3 file-naming system. Arduinos also can use only 8.3 filenames. This isn't a problem for cameras where filenames are just numbers, and it is rarely a problem for Arduinos where files are normally configuration, or data-logging.
Communications to and from the SD card are done via SPI. The SS pin (SPI Slave Select) must be left untouched. The SD library will not work if the SS pin is not configured as an output.
Numerous shields exist and do not always use the same pin to initialize the SD card. The chip select pin can change from one design to another; consult the shield documentation to know which pin to use when initializing the SD card reader.
The SD Library
The Arduino language has an SD library built in. This library depends on three other internal libraries that handle card and filesystem-specific functions, but abstraction makes the library extremely easy to use. It is possible to use the other libraries, which is explained briefly in the “Advanced Usage” section.
Importing the Library
To be able to use the SD library, you must first import it. This can be done either automatically in the Arduino IDE by going to the Sketch ![]() Import Library
Import Library ![]() SD menu item, or manually with this:
SD menu item, or manually with this:
#include <SD.h>
Arduinos communicate with SD card controllers using the SPI protocol. Thus, you must also import that library:
#include <SPI.h>
Connecting a Card
As with many Arduino libraries, to initialize the library, you must call SD.begin().
result = SD.begin();
result = SD.begin(csPin);
SD.begin() returns true if a card is detected and the library initialized; otherwise, it returns false. The optional csPin argument is used to configure which slave select pin should be used if your application does not use the default hardware SS pin. Most shields will use the default hardware pin.
// See if the card is present and can be initialized:
if (!SD.begin(chipSelectPin)) {
Serial.println("Could not initialize SD card.");
// End the sketch gracefully
return;
}
Serial.println("SD Card initialized.");
Opening and Closing Files
The SD library can create, update, and delete files on a FAT16/32 filesystem. The SD library (and indeed most programming environments) does not differentiate between creating a file and opening a file. The system is told to open a file. If the files exists, it will be opened. If it does not exist, an entry is created, and a new blank file is opened. To open a file, call SD.open().
file = SD.open(filepath);
file = SD.open(filepath, mode);
The filepath parameter, expressed as an array of char, is the name of the file to use or to create. If the file does not exist, it will be created, but this function will not create folders. To specify a folder, use the slash ( / ) character. The mode parameter can be one of two constants: FILE_READ or FILE_WRITE. The FILE_READ constant tells the sketch to open the file as read only. This is the default setting if the mode parameter is omitted. The FILE_WRITE constant opens the file in read/write mode. SD.open() returns a File object, something that describes and points to a file. It is used as a reference to read, update, or close files. To open a file, you must first create a File object, and then use that object on subsequent file actions:
File myFile;
myFile = SD.open("data.dat", FILE_WRITE);
It is also possible to check beforehand if a file exists. To do this, use SD.exists().
result = SD.exists(filename);
This function tests to see if a filename exists and returns true if it exists or false if it does not exist.
After you perform any read or write operations, you must close the file. This is done using close() from the File class.
file.close();
The File object is created when opening the file. This function takes no parameters and does not return any data.
File myFile;
myFile = SD.open("data.dat", FILE_WRITE);
// Perform any read or write operations here
myFile.close();
Reading and Writing Files
Reading files is done with a pointer to a file position. By default, when a file is opened, this pointer is set to the beginning of the file (byte 0). As each byte is read in, the pointer increments, until it reaches the end of the file. You can set the position of the pointer to any location inside the file.
Writing files is done by either appending data to the end of the file, no matter where the pointer is located, or writing data at the file pointer location.
When reading and writing to a file, you will be using the File class, which inherits from Stream, just like Serial does.
Reading Files
To read a byte from a file, use the read() function of the File class.
data = file.read();
This function returns 1 byte at a time (or −1 if no data is available) and automatically updates the pointer. If you do not want the pointer to be updated, you can call peek().
data = file.peek();
Its use is exactly the same as read(), returning 1 byte, but the pointer is not updated. Several calls to peek() returns the same byte. To know the value of the pointer (to know which byte is the next to be read), use position().
result = file.position();
This function does not take any parameters and returns an unsigned long indicating the current position within the file. It is also possible to set the position with seek().
result = file.seek(position);
This function attempts to set the file pointer to the value of position, defined as an unsigned long. To know the size of the current open file, use size(). It returns the file size in bytes as an unsigned long.
data = file.size();
To know if there are any more bytes available for reading, use available().
number = file.available();
This function returns the remaining bytes inside a file, as an int.
Writing Files
Three functions are used to write data to a file. print() and println() are used in the same way as the Serial functions of the same name and write()places bytes at the pointer position in the file.
print() and println() can be used to write formatted data: text and decimal numbers, as well as binary, hexadecimal, and octal representations using the optional base parameter. By specifying BIN as the base parameter, print will write binary notation. Using OCT andHEX, print will write octal and hexadecimal respectively. The difference between print() and println() is that println() automatically adds a new line character at the end. Both of these functions ignore the file pointer and append data to the end of the file.
file.print(data);
file.print(data, base);
file.println(data);
file.println(data, base);
The write() function is different. It can write data directly inside a file but will not insert data; it will overwrite any data present if not at the end of the file.
file.write(data);
file.write(buffer, len);
The data parameter can be a byte, a char, or a string. The buffer parameter is a byte, array of char, or a String, and the len parameter indicates the number of bytes to be used.
write(), print(), and println() also return the number of bytes written to the buffer, but reading this is optional.
Folder Operations
If no directory is specified, all operations are performed on the root folder of the SD card. It is, however, possible to create folders and work inside those folders.
Folders are used in the UNIX fashion; paths are separated by forward slashes ( / ), for example, folder/file.txt. All folders are named from the root folder; you cannot "cd" into a folder without first specifying the root folder(s).
Folders and files are handled differently. When creating a file, you must “open” the file, and the Arduino will create the file if it does not exist. This does not work for folders; you must first create the folder before creating the file.
To create a folder, use mkdir().
result = SD.mkdir(folder);
This function returns true if the folder was created, or false if the operation did not succeed. It takes a string as a parameter and is the folder to be created (complete with forward slashes). It can also create intermediate folders if required:
SD.mkdir("/data/sensors/temperature"); //Will create all folders
To remove a folder, use rmdir().
result = SD.rmdir(folder);
This deletes the folder from the filesystem but only on the condition that it is empty. The function returns true if the folder were deleted, or false if it did not complete the operation.
Folders are, in fact, special files. They can be opened with open(), but to know if a “file” is a regular file or a directory, you can use the isDirectory() function.
result = file.isDirectory();
This function takes no parameters and returns a boolean; true if the file is a folder, and false if the file is a regular file.
Card Operations
Data is buffered; that is to say that when the sketch is told to save data, that data is not necessarily written to the SD card immediately. Because SD cards have an embedded controller, write operations can be queued and the actual write can be performed a few seconds later. When the SD embedded controller receives multiple write operations, later write operations are often delayed until the card has finished current operations. To force all data to be written to a file, use flush().
flush(file);
This operation is also called automatically when a file is closed with close().
Advanced Usage
The SD library actually makes use of three internal libraries: Sd2Card, SdVolume, and SdFile. All the functions present in the SD library are wrapper functions that call different functions in these three libraries. The SD library follows the Arduino philosophy, making it easy to do advanced functions. However, you can still use these three libraries if you need access to even more advanced functions.
Sd2Card card;
SdVolume volume;
SdFile root;
There are numerous functions, and these functions are mainly out of the scope of this book, but there are a few that may be of interest.
To get information about the card size, you can get data about the geometry of the SD card—that is, the number of clusters and the number of blocks per cluster.
unsigned long volumesize = volume.blocksPerCluster();
volumesize *= volume.clusterCount();
volumesize *= 512;
On SD cards, blocks are always 512 bytes. You can get the amount of blocks per cluster, and the amount of clusters on the card, giving you the card size, in bytes.
More utility functions are listed in the example program: CardInfo. It is available in the Arduino IDE: Files ![]() Examples
Examples ![]() SD
SD ![]() CardInfo.
CardInfo.
Example Program and Sketch
For this application, you build a data-logging application. The aim is to understand how sunlight evolves during a day. For this, you will require several components, but the sensor in this application is a light dependent resistor, or LDR for short. An LDR will have variable resistance depending on the amount of sunlight (or artificial light) it receives. The circuit for this example will require a pull-down resistor in order to create a circuit known as a voltage divider. This is illustrated in Figure 12.5. The voltage at Vin is always 5 volts, and depending on the resistance of the LDR, the voltage at Vout will be somewhere between the maximum of 5 volts and the minimum of 0 volts, depending on the light being received.

Figure 12.5 An LDR in a voltage divider setup
When there is no light, the resistance or the LDR will be high, and the reference voltage will be closer to zero. When there is a lot of sunlight, the resistance will be weak, and the reference voltage will be closer to 5 volts. This reference is read by an ADC on the Arduino's A3 pin. The ADC will compare the voltage on the pin to the 5 Volts the Arduino runs off. It will return a value between 0 and 1023, and depending on the component you use, it is possible to calculate the Lux value of visible light.
Knowing the present amount of light is not very useful; it would be better if the data could be logged so that you can see the evolution of light levels during the day. For that, data will have to be logged. You could use the built-in EEPROM, but EEPROM storage is limited, and getting data back onto your PC could be complicated. SD cards have much larger capacity and can easily be removed from the Arduino and read on any computer. Also, using an SD card has another benefit; the resulting file can be formatted into a specific file type. For this application, you can create a CSV file (short for Comma Separated Values). This file can be imported directly into any spreadsheet application, allowing you to use the data to create graphs.
The schematic will be simple; only a few components are required for this operation, but this application does require a shield with SD capability. The schematic is listed in Figure 12.6.
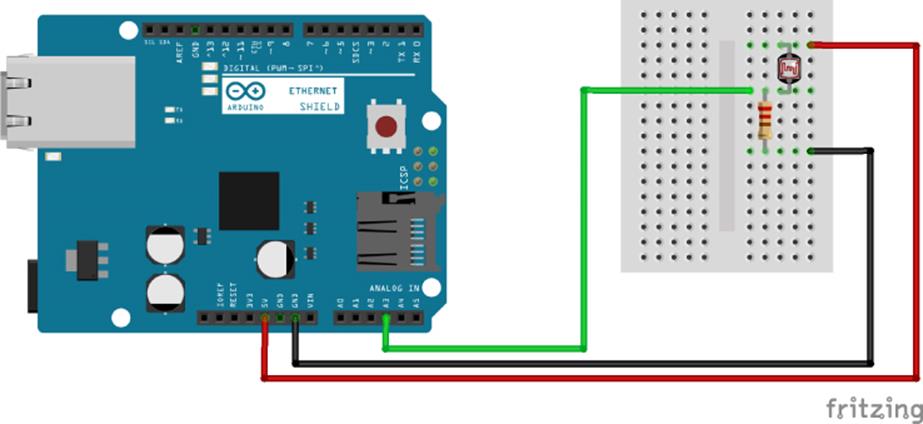
Figure 12.6 Project schematic (Image created with Fritzing)
As with most shields, the I/O lines remain accessible. You can plug in the cables straight on the Ethernet shield, and they will work in exactly the same way.
Use the code in Listing 12.1 to write the sketch.
Listing 12.1: Sketch (filename: Chapter12.ino)
1 #include <SD.h>
2 #include <SPI.h>
3 const int chipSelect = 4; // Change this as required
4
5 int light;
6 int lightPin = A3;
7 unsigned int iteration = 1;
8
9
10 void setup()
11 {
12 Serial.begin(9600);
13
14 Serial.print("Initializing SD card…");
15 // Chip Select pin needs to be set to output for the SD library
16 pinMode(10, OUTPUT);
17
18 // Attempt to initialize SD library
19 if (!SD.begin(chipSelect)) {
20 Serial.println("Card failed, or not present");
21 // don't do anything more:
22 return;
23 }
24 Serial.println("Card initialized.");
25 }
26
27 void loop()
28 {
29 // Get a light level reading
30 light = analogRead(lightPin);
31
32 // Open the SD data file
33 File dataFile = SD.open("light.txt", FILE_WRITE);
34
35 // Has the file been opened?
36 if (dataFile)
37 {
38 // Create a formatted string
39 String dataString = "";
40 dataString += String(iteration);
41 dataString += ",";
42 dataString += String(light);
43 dataString += ",";
44
45 // Print data to the serial port, and to the file
46 Serial.println(dataString);
47 dataFile.println(dataString);
48
49 // Close the file
50 dataFile.close();
51 }
52
53 // Increase the iteration number
54 iteration++;
55
56 // Sleep for one minute
57 delay(60 * 1000);
58 }
The sketch begins by importing the SD library and the SPI library. Three variables and one constant are defined. The chipSelect constant should refer to the pin that acts as the CS pin for the SD card on your board. On the Ethernet board specified at the beginning of this chapter, the SD card is connected to pin 4. Refer to the documentation of your shield if you're unsure. This is the pin that will be used to talk to the SD card. The light variable will hold the sensor value from the LDR. The lightPin is the pin on which these readings will take place. Finally, the iteration variable will show the number of readings; it will be used to format your data in a spreadsheet.
setup() begins with configuring the serial port for debugging, something you are probably used to by now. On line 14, a status message is sent serially from the Arduino, telling the user that the SD card is about to be initialized. The SD card initialization is done on line 19, but before that, on line 16, the Arduino's default Chip Select pin (digital pin 10) is set as an output. This is required for the SD library to work, even if the pin is not connected to your card. The SD library will fail without this.
The SD card is initialized on line 19, by using the pin previously defined in the chipSelect constant. If the SD card fails to initialize, but your card is correctly formatted in FAT32, check to see if you are using the right pin number for your board. If the initialization fails, the sketch will inform the user; otherwise a message will be printed to the serial port informing that everything went well.
loop() starts on line 27. First, the sketch reads the value on the lightPin and stores it in the light variable. When this data has been read in, it is time to open the SD file. This is done on line 33; the sketch calls the file called light.txt. If this file exists, it will be opened; otherwise, the file will be created. Because the sketch uses the FILE_WRITE parameter, it will be opened for reading and writing. The sketch then checks if the file has been opened on line 36. If it is open, a String is created, and populated with data: theiteration variable and the light variable, separated by a comma. On line 46, this string is printed to the serial port, and then, using SD. println(), appended to the data file. After this has been done, the file is closed, and all the data is flushed to the SD card.
Why is the file closed after every write? It is good practice to close a file when it is not needed, and it forces data to be flushed to the SD card. On embedded systems, you do not know when the user may unplug the system. Leaving a file open could potentially mean that data is left unwritten and therefore lost. Closing the file ensures that data is written as soon as possible, and the SD card is left in a clean state.
The result of this sketch creates a text file that can be imported into a spreadsheet, like Excel or LibreOffice Calc. The results of a sunrise in my city are shown in Figure 12.7. The ambient light level is already at 200 due to street lights, but something happened at the 16-minute mark—the visible light suddenly dropped down considerably, but only for a minute. This was probably the sensor being blocked—probably by my cat—but it shows that surprises can happen!
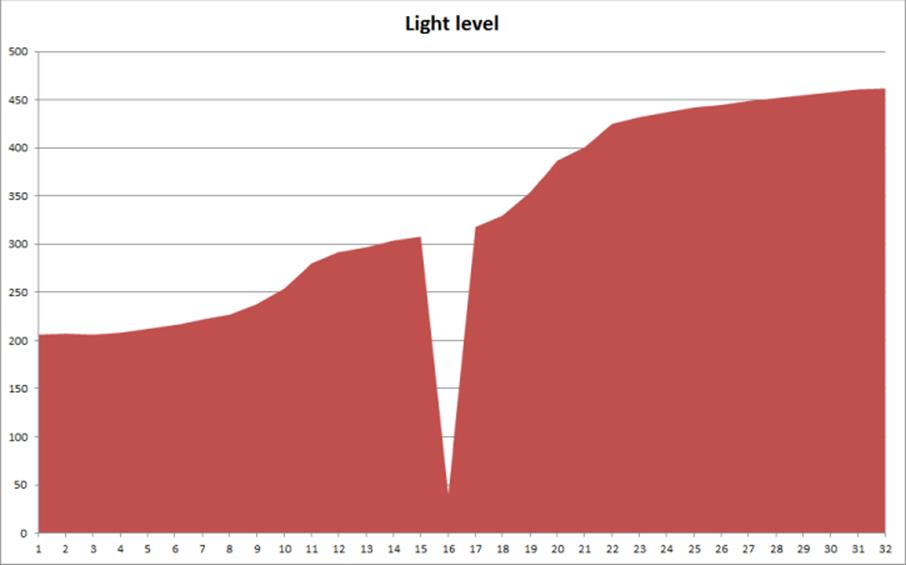
Figure 12.7 Example data output
Summary
In this chapter, you have seen how to connect an SD card to your Arduino using different methods, and how to initialize the card. I have shown how to read and write data to the card, and how that data can be used later to give visual results. In the next chapter, I will show you how to make an even more visual impact using TFT screens.
All materials on the site are licensed Creative Commons Attribution-Sharealike 3.0 Unported CC BY-SA 3.0 & GNU Free Documentation License (GFDL)
If you are the copyright holder of any material contained on our site and intend to remove it, please contact our site administrator for approval.
© 2016-2026 All site design rights belong to S.Y.A.