Make: AVR Programming (2014)
Part III. Advanced AVR Topics
Chapter 18. Using Flash Program Memory
Talking Voltmeter Project
The project for this chapter pulls off something pretty cool: storing enough sampled sound data in your limited 16 KB of memory so that you can build a voltmeter that talks to you using your own voice. It’s not easy or even particularly sensible, but it gives me a good excuse to demonstrate how to use data stored in program memory.
Storing nonprogram data in flash program memory space is also very useful for any kind of constant data that you’d like to use in your programs—waveforms, menu strings, lists of birthdays, or any other sort of data that doesn’t need to change.
WHAT YOU NEED
In addition to the basic kit, you will need:
§ A speaker and blocking capacitor for audio output.
§ A USB-Serial adapter for debugging.
§ Some voltage in the 0–5 V range that you’d like to test (or a potentiometer hooked up as a voltage divider).
Using Flash Program Memory
If we had tried to use more than one or two waveforms in Direct-Digital Synthesis, we would have run out of memory. Not flash program memory—the ATmega168 has 16 K of that, and we were only using 1 or 2 K—but RAM. The irony of this is that we were storing entirely static data (a lookup table for a sine wave) in our scarce dynamic memory while the difficult-to-change flash memory section was largely empty.
We’re doing the same thing when we print out a fixed string over the USART. Every time we write something like printString("hello world!");, the compiler actually sticks the string "hello world!" into RAM somewhere just so that it can print the string back out later. But there was no reason for that string to be in RAM other than that our printString function requires it. We don’t change the string data at all, so it’s just sitting there and taking up RAM. In this chapter, you’ll learn how to rewrite a printString routine so that it can use strings stored in program memory and save up on RAM when necessary.
This becomes more important if you want to implement a menu system, where you’ll want a large number of strings to serve as prompts for the user. For every character you include in your menu, that’s one byte taken away from your program logic. Indeed, if you want to make an application menu that uses more than 1,000 characters or so, you’re forced to start putting some of them into flash program memory, or else you won’t have any RAM for your program to run in.
And that’s doubly the case in this chapter; we’re going to be building a low-fi talking voltmeter. Reproducing audio, unless you’re synthesizing it yourself in real time, requires a lot of data just to get only moderate quality. Even with clever encoding, this project will end up storing 14 kB of data in flash program memory to use for voice playback. That’s 14 times the amount of RAM we have.
If you want high-fidelity speech out of an AVR, there are actually a bunch of ways to go about it, but all involve an external DAC chip and a store of megabytes of external memory. (If you’re into that sort of thing, you’ll also need to brush up on your SPI protocol, because most of the parts use SPI to communicate. See Chapter 16.)
Instead, with a little ingenuity, and by taking full advantage of the 16 kB of memory in program space, we can whip up a decent speech-playback routine. As we did in Chapter 10, we’ll be using a PWM output pin to drive a speaker with a fast enough signal to make decent audio output. Getting a few seconds of voice-quality audio into approximately 14 kB is quite a feat, but we’ll manage by using a two-bit differential pulse-code modulation (DPCM) encoding and playback scheme.
But before we get too much into the speech-playback side of things, you’ll need to learn some fundamentals of AVR memory use, more C language facilities, and about using the avr/pgmspace.h library.
The avr/pgmspace.h library allows you to write (constant) data into flash memory and access it from your code. The overview is that using the pgmspace library’s PROGMEM macro stores your data in program flash memory, and then pgm_read_byte will read a byte out of program memory for you, if you tell it where to look. Modifying our existing code to take advantage of data stored in flash memory isn’t entirely straightforward, but by the end of this chapter, you’ll have learned most of the tricks.
Memory Addresses
C has been hiding some of the cruel realities of the world from you. When you wrote myNumber=7; the chip stored away the number seven somewhere in memory, in a location that it was calling “myNumber” as a mnemonic shorthand. At the silicon-and-transistors level, that “somewhere in memory” corresponds to a physical location inside the chip, and that’s what the AVR needs to know when it retrieves or modifies data. The number of the physical memory location where your data sits is called its address; an analogy with the address of your house on your street.
Think of 1600 Pennsylvania Avenue NW, Washington, DC. We call this address “The White House” because it’s easier to remember than the full address, so it’s like the variable name. But if you want to see who’s inside the White House, you’ve inevitably got to walk down Pennsylvania Avenue until you hit #1600, and look inside. And just like number stored in a variable’s memory address, the inhabitant of the White House changes from time to time as well.
When you first declare a variable, the compiler figures out which RAM slots it still has open, allocates an appropriate number of slots for the type of variable you’ve chosen, and associates that address with the variable name. Then when your code uses that variable, the compiler looks up the corresponding address and writes that number into the AVR machine code. So when you write uint8_t myNumber; the compiler picks a memory address for you, say RAM slot #1452, and associates “myNumber” with #1452. The compiler also notes the variable type—that is, that you’re storing a single-byte, unsigned integer in that location. Later, when you read and write to the variable myNumber, the compiler again looks up the name, finds the corresponding address, and reads or writes the correct number of bytes to or from that memory location.
When you declare a variable, the compiler associates that variable with a location in RAM. But what if you want to associate a “variable” name with a location in program memory where you’d like to store some nonchanging data? This is what the PROGMEM macro does for you—it stores your constant data in program memory and then associates the name and variable type that you give it with a variable name for your convenience.
Just as uint8_t myNumber; creates a reference to a memory address for when you type “myNumber” in your code, const uint8_t myFlashNum PROGMEM = 17; creates a reference from “myFlashNum” to the location in program memory space where it’s just written the data “17.” In short, adding the PROGMEM macro allocates the variable in question in program flash memory instead of in RAM.
Now when you want to access the data stored in flash, you call the pgm_read_byte() command and pass it the memory address in flash where your data has been stored. The only thing that’s missing is a way to go from the name of a variable (“myNumber” or “myFlashNum”) to the corresponding memory address in order to use the pgm_read_byte command.
The Address-Of Operator: &
Getting the address of a variable turns out to be very easy. C has an operator &, called the address-of operator, that returns the address that’s associated with a variable name. To get at address of a variable, you use the address-of operator like so: &myNumber, which returns the address of the previously defined variable myNumber. For example, take this code sample:
uint8_t myNumber = 150;
printByte(myNumber);
printWord(&myNumber);
When you print out myNumber you’ll get back 150. When you print out &myNumber, you’ll get something like 1260, which is the physical address of the eight bits in RAM where your number is being stored. (C returns the address as a special type of number, called apointer, but I’ll get to that soon.)
To use program-space flash memory, you start out with the PROGMEM macro, which writes your constant data into the flash memory at programming time. Next, use pgm_read_byte(), which requires the address of memory as an argument and fetches whatever value is in that location in memory. And to get the memory address, you use the address-of operator &, which gives you the memory address where your data is stored. Time for some example code!
We’ll start off by storing a very long string in program memory, and then printing it out over the serial line one byte at a time (with a pause per character for dramatic effect). There are some important details along the way, so let’s dig in to Example 18-1.
Example 18-1. progmemDemo1.c listing
/* First steps into using program memory */
#include <avr/io.h>
#include <util/delay.h>
#include <avr/pgmspace.h>
#include "USART.h"
const char myVeryLongString[] PROGMEM = "\r\nHi there, \
this is an example of a long string.\r\n\
The kind that you wouldn't want to store in RAM.\r\n";
const uint16_t sixteenBits PROGMEM = 12345;
int main(void) {
initUSART();
char oneLetter;
uint8_t i;
while (1) {
for (i = 0; i < sizeof(myVeryLongString); i++) {
oneLetter = pgm_read_byte(&(myVeryLongString[i]));
transmitByte(oneLetter);
_delay_ms(100); /* slow it down to simulate typing effect :) */
}
_delay_ms(1000);
printWord(&sixteenBits); /* this throws a compiler warning... */
transmitByte('\r');
transmitByte('\n');
printWord(pgm_read_word(&sixteenBits));
} /* End event loop */
return (0); /* This line is never reached */
}
NOTE
The empty backslashes at the end of the string’s lines just serve to continue the text on the next line. I did that mostly so that it would print in this book. Normally, I just let my long lines run long.
First, look at the PROGMEM declaration lines. The way the pgmspace.h library is written, we can append the PROGMEM macro to any variable type, and it’ll find some free space in flash memory and write our variable there instead of RAM. It only really makes sense, though, to do so with long strings or arrays, but I store a 16-bit integer here just for fun and to give us practice working with 16-bit “words” in addition to just bytes.
Skip down inside the event loop. The first command is a for loop that loops over every character in our very long string and prints each one out to the serial port, one at a time. There are a couple of interesting things here. First is the sizeof() command, which returns the size in bytes of myVeryLongString. We’ll discuss this a little more later.
Continuing in the for loop, we use the pgm_read_byte() command to get a byte out of program-space memory. Which byte? If myVeryLongString[i] is the ith character in the myVeryLongString array, then &(myVeryLongString[i]) is the address of the ith character. (The parentheses are optional, but they make it clearer that we’re after the address of the ith byte of the string.)
The rest of the loop sends data over serial, then delays. The meat of this example is the storage and retrieval of program-space data. And to make sure that you have a good grasp on the difference between addresses and variables, the last few lines play around with the address of the 16-bit number that’s also stored in program space.
What should printWord(&sixteenBits); print out? And what should printWord(pgm_read_word(&sixteenBits)); print? Answer these questions yourself before you read on.
The first print statement takes the address in memory of sixteenBits and just prints it out. When I run it on my AVR, I get flash-memory address 205, but you may get something else around there depending on your compiler version and options. Then the code calls pgm_read_word(&sixteenBits) and actually fetches the data out of the memory address in question. Lo and behold, it’s our 12345!
OK, let’s quickly recap before we dive off the deep end. You can store data in program memory with the PROGMEM macro and read it back with pgm_read_byte() and pgm_read_word(), respectively, as long as you know the address. You can get the address with &, and if you’re interested in the address of a byte within a string or array, you can get its address by using the address-of operator around the individual character element in the string that you’re interested in: &myString[4]. These simple operations will get you halfway to mastery of using PROGMEM and addresses; you can now use PROGMEM from the main loop. But if you’d like to use PROGMEM strings in functions or ISRs, you’ll have to learn how to store addresses in variables and pass them off to functions. And this requirespointers.
PROGMEM VARIABLES: CONSTANT AND GLOBAL
Because PROGMEM data is burned into flash memory along with the program itself, the PROGMEM data is not variable and is available from any subroutine in the program. This has two important consequences for declaring program-space “variables” in C.
First off, because you can’t ever change a PROGMEM “variable,” you should probably preface the declaration with the keyword const, which tells the compiler to throw an error if you try to change the contents of this memory location later on. The most recent version of avr-gcc actually requires you to declare your PROGMEM as const, whereas prior versions only recommended it. It’s probably a good idea either way.
Secondly, because your PROGMEM is nonvolatile and sitting there in program memory, it is available from within any subroutine. It is thus a global variable and should be declared in the global namespace. That is, PROGMEM variables should be declared outside of any function definitions so that C knows that it’s not limited in scope to any specific function, and that any function can access the data stored there.
For myself, I find it easiest to define all of my PROGMEM data in a separate header file. That way, the data is defined as global by being included at the top of the main .c file, and it’s easy to open the file and make sure that each entry is declared const by just looking down the first row of text.
Pointers
Have a close look at the compiler output when you ran make on the preceding example. (Or run make clean then make again to force it to recompile.) You’ll notice that you got some warnings back from the compiler. In particular, I get something like:
warning: assignment makes integer from pointer without a cast
warning: passing argument 1 of ‘printWord’ makes
integer from pointer without a cast
note: expected ‘uint16_t’ but argument is of type ‘uint8_t *’
What’s going on? The code works, right? Yes, the code does work. But it’s missing a subtlety of the C language, one that will help keep you out of a lot of trouble in the future. It’s what the compiler is warning you about with its “making an integer from a pointer” business. So let’s take a diversion to talk a little bit about pointers.
MAKE SIZE (AND AVR-SIZE)
When you’re interested in knowing how large your code is or how much RAM it’s using, there’s a utility program for that, and it’s called avr-size. (The standard GCC size routine is called, shockingly, size.) To save you from typing filenames, I’ve included a “size” target in the makefile that comes with the book’s code.
Take a minute now to type in make size. You’ll see two lines, one for “Program” memory and one for “Data” memory. The former is program-space data flash memory usage. This is where your code (and now PROGMEM data) is stored. With an ATmega168, you’ve got 16 kB of program memory.
The “Data” line is how much of the available RAM your program uses. Because there’s no operating system, you have no real way of knowing when your AVR program runs out of memory except to check the value here. If you ever find the chip behaving super-strangely, and you suspect that you may have run the AVR out of RAM, this is the easiest way to diagnose the problem for sure.
I also ran make size on progmemDemo1 just to make sure that all of the data that should be stored in program space is actually stored in program space. If you run make size after compiling progmemDemo1, you should see all your variables in program memory, and zero bytes of data memory (RAM) used.
The other time I use make size is in the next chapter, when tweaking audio samples in the talking voltmeter example. Naturally, I wanted to get as much speaking time crammed into the chip as possible. Checking make size after adding a sample into memory lets me know how close I am to the 16 kB limit.
Pointers in Brief
The pointer is a special variable type that should be used specifically for storing memory addresses. For the AVR, as I mentioned earlier, a pointer is a 16-bit number. But it’s a special 16-bit number. In addition to being big enough to store a memory address, pointers additionally keep track of the type of the variable they point at.
Pointers are declared with a “*” between the type definition and the declared variable name: uint8_t* myPointer;. (I’ll clarify the type declaration part shortly.)
Remember, an address is the location of a byte in memory. If I just give you the raw address as a 16-bit number, you have no way of knowing what type of data the stored byte represents. Is the byte at our address the first letter in a string? Is it a single byte number or letter (uint8_t or char)? Is it the most significant byte of a two-byte number (uint16_t)? You don’t really know unless you keep track somehow, and that’s the extra magic that’s in a pointer. A pointer stores not just the address, but also what type of data it points to.
The pointer keeps track of the type of variable it points to by being declared to be a pointer to a type. When you initialize a pointer as uint8_t* myPointer, you’ve declared that the pointer will be used only to point to 8-bit unsigned integers. char* myString[] is a pointer to a character array (or a string). You use uint16_t* muchData[] to point to an array in memory where each entry is a 16-bit unsigned type. The typing helps make sure that you’re interpreting the stored data correctly.
When the compiler warns you that you’re mismatching types, especially with pointers, pay attention! If you end up pointing your pointer to the wrong type of data in memory, you stand a good chance of interpreting that data incorrectly.
Now that we’ve got a variable type to store memory addresses in, let’s see how to work with them in Example 18-2.
Example 18-2. progmemDemo2.c listing
/* Second steps into using program memory */
/* Storing the addresses in pointers */
#include <avr/io.h>
#include <util/delay.h>
#include <avr/pgmspace.h>
#include "USART.h"
const char myVeryLongString[] PROGMEM = "\r\nHi there, \
this is an example of a long string.\r\n\
The kind that you wouldn't want to store in RAM.\r\n";
const uint16_t sixteenBits PROGMEM = 12345;
int main(void) {
initUSART();
const char *stringPointer;
const uint16_t *wordPointer;
uint8_t i;
char oneLetter;
stringPointer = &myVeryLongString[0]; /* address of first char */
// stringPointer = myVeryLongString; /* same as above */
wordPointer = &sixteenBits; /* address of first byte */
while (1) {
for (i = 0; i < sizeof(myVeryLongString); i++) {
oneLetter = pgm_read_byte(stringPointer + i);
transmitByte(oneLetter);
_delay_ms(100); /* slow it down to simulate typing effect :) */
}
_delay_ms(1000);
printWord(pgm_read_word(wordPointer));
} /* End event loop */
return (0); /* This line is never reached */
}
The essential difference between this code and progmemDemo1.c is that we’re reading the bytes with pgm_read_byte( stringPointer+i ) instead of pgm_read_byte( &(myVeryLongString[i]) ). That is, we store the address of our PROGMEM data in a pointer, stringPointer, and then simply add i to that address to reach successive letters in the string. Note that there’s no address-of operator here, because pointers are already addresses.
Let’s look at how we assign the addresses to our pointers. First, you’ll see that the pointers are declared as const char* stringPointer and const uint16_t* wordPointer, in order to match the string and uint16_t word, respectively. Now look down to where we assign the addresses to the pointers. There’s no secret about the line wordPointer = &sixteenBits—it stores the address of the variable sixteenBits in the pointer wordPointer. (The compiler verifies that the types match for us.)
When you want to define the address of an array, you’ve got a little bit of a problem. Imagine an array of 10 bytes in memory. You’ve got 10 addresses! Which one do you pick to be the “address of the array”? In C, you always pick the address of the first (zero’th) element. So we can assign the address of our PROGMEM string to the pointer like so: stringPointer = &myVeryLongString[0].
Sometime long ago, someone invented a “clever” shorthand for referencing the address of the first element of a string or array in memory: stringPointer = myVeryLongString. What’s confusing about this is that it doesn’t look like an address assignment, but it is. This statement is in every way identical to the one earlier, which explicitly gets the address of the array’s first element. Whichever you’d like to use in your code is fine by me, and seasoned C programmers have it drilled into their heads that “arrays used on the right side of an equation decompose to a pointer to their first element.” (Get that tattooed on your forearm!) You’ll see this again when we pass arrays to functions.
ARRAYS AND POINTERS
In C, arrays are special, in an awkward way. When you use an array on the right side of an assignment, or pass it as an argument to a function, what you actually get is a pointer to the array’s first element.
Because of this, you can either get the address of the first element explicitly:
char* stringP = &myString[0]
or you can take advantage of the decomposition rule:
char* stringP = myString
The latter doesn’t look like it’s setting the address of a pointer, but that’s exactly what it does.
As a result of the decomposing-to-pointer rule (“arrays used on the right side of an equation decompose to a pointer to their first element”), the one way that you shouldn’t assign the address of an array is the one that might at first glance look most reasonable:
char* brokenP = &myString; (Don't do this!)
This results in a warning: assignment from incompatible pointer type warning. (It may work anyway, or it may not, depending on your compiler. Do you feel lucky?) This is a warning because myString on the right side is already a pointer to the first element of myString, and so &myString is the address of the pointer, and not the address of a char as required.
I’ll keep saying this over and over, because it’s important: pointers store addresses. We need addresses to use the pgm_read_byte() and pgm_read_word() commands to get our fixed data out of flash memory. As demonstrated in Example 18-2, a pointer is a convenient way to store the address because we can add to it just like a normal number. Because it’s an address, adding to it allows us to move on to the next entry in memory. And because the pointer stores the size of our data types, it knows how many more bytes it needs to increment in memory to get to the next entry.
Pointers as Arguments to Functions
The last piece of the pointer puzzle that we’ll need for working with program-space memory is how to work with arrays and pointers to arrays when they’re passed as arguments to functions. It’s very common to call a function that runs on static data that’s stored in program memory, and to do this, we need to pass the address of the data to the function.
As a practical example, let’s write a function that prints out strings from flash program memory that we can use to replace our old printString() function. Because we will eventually need to call pgm_read_byte, we’ll need the addresses of the strings. And passing addresses means passing pointers to the strings. See Example 18-3 for an example of how this works.
Example 18-3. progmemDemo3.c listing
/* Third step into using program memory */
/* Passing pointers to functions */
#include <avr/io.h>
#include <util/delay.h>
#include <avr/pgmspace.h>
#include "USART.h"
const char myVeryLongString1[] PROGMEM = "\r\nHi there, \
this is an example of a long string.\r\n\
The kind that you wouldn't want to store in RAM.\r\n";
const char myVeryLongString2[] PROGMEM = "All work and no play \
makes Jack something something.\r\n";
void printString_Progmem(const char *stringP) {
char oneLetter;
while ((oneLetter = pgm_read_byte(stringP))) {
transmitByte(oneLetter);
stringP++;
_delay_ms(100); /* only b/c it's cute */
}
}
int main(void) {
initUSART();
while (1) {
printString_Progmem(&myVeryLongString1[0]);
printString_Progmem(&myVeryLongString1[50]);
printString_Progmem(myVeryLongString2);
_delay_ms(1000);
} /* End event loop */
return (0); /* This line is never reached */
}
Let’s look at the printString_Progmem function. It is our first function that takes an explicit pointer as an argument; specifically, a const char*. The const is there because we’re pointing to a memory location that’s in PROGMEM, remember?
For comparison, here’s the version of printString from our USART library:
void printString(const char myString[]){
uint8_t i=0;
while(myString[i]){
transmitByte(myString[i]);
i++;
}
}
If you compare the two versions, you’ll find that they have a few important differences. The RAM version of printString passes the array of characters as an array. The PROGMEM version passes the array as a pointer to the memory location of the array in PROGMEM. In the PROGMEM version, the function stores each letter temporarily in a variable in RAM (oneLetter) in order to avoid making two calls to pgm_read_byte, which is slower than reading the data straight out of RAM. (This is probably a bit of overoptimization for a printing routine where the USART routine is the slowest part, but the principle is sound.)
The final difference between the two functions is in the way that we move through the data array. In the RAM version, we increment the variable i, which dictates which entry in the array we’re looking at. The compiled machine code for myString[3] starts by going to the memory location myString[0] and then moves three positions over and reads the value. In the PROGMEM version of the same thing, the pointer is a memory address, and the machine code changes that memory address first and then goes looking for the data in the new memory location directly. Though they work differently, both code versions get us to the same place—the third entry in the array.
And now that we understand the PROGMEM version of the printString function, have a look down in the while(1) loop where we’ve been calling it. Just as when we were assigning addresses to pointers in Example 18-2, we pass a pointer as an argument to a function by getting the address of the variable we’d like to pass. In that sense, our function printString_Progmem works exactly like pgm_read_word does—it expects an address, stored as a pointer, as an argument. So you have your choice of calling it with the two different ways of getting the address of an array: &myVeryLongString1[0] or myVeryLongString1. Both pass a pointer to the first element of the array.
Finally, if you have a data array that’s not a string, you can’t count on a zero being a signal for the end of the array (for example, what if you needed to store a bunch of zeros?) In this case, you have to use some other mechanism for signalling the end of the array. By far the most common method is to pass the pointer to the beginning of the array, and the number of entries in the array. If your numbers are correct, the function will not run over the end of the array data. Example 18-4 presents an example of a typical data-array function call with pointers.
Example 18-4. progmemDemo4.c listing
/* Fourth step into using program memory */
/* Passing data array pointers to functions */
#include <avr/io.h>
#include <util/delay.h>
#include <avr/pgmspace.h>
#include "USART.h"
const uint16_t myData[] PROGMEM =
{ 1111, 2222, 3333, 4444, 5555, 6666, 7777, 8888, 9999, 10000 };
const uint16_t myData2[] PROGMEM = { 123, 456, 789, 012, 345, 678, 999 };
void printData_Progmem(const uint16_t * dataPointer, uint8_t length) {
while (length) {
printWord((uint16_t) dataPointer); /* print out address */
printString(": ");
printWord(pgm_read_word(dataPointer)); /* print out data */
printString("\r\n");
dataPointer++; /* move to next byte */
length--; /* one less byte to go */
_delay_ms(100);
}
}
int main(void) {
initUSART();
while (1) {
printData_Progmem(myData, sizeof(myData) / 2);
printString("\r\n");
_delay_ms(1000);
printData_Progmem(myData2, sizeof(myData2) / sizeof(myData2[0]));
printString("\r\n");
_delay_ms(1000);
} /* End event loop */
return (0); /* This line is never reached */
}
As advertised, the printData_Progmem() function takes the array pointer and its length as explicit arguments. It loops through the data by incrementing dataPointer, adding two bytes to the address every time dataPointer increases by one. Wait, two bytes? Yup. Run the code and check out the memory addresses it’s reading from, if you don’t believe me.
Because the pointer is declared as a pointer to uint16_t types, it changes the address it points to by two bytes’ worth for every time it’s incremented. This makes iterating over different types of data with pointers very easy—just make sure that you’ve got the pointer’s type declaration right and you can iterate through memory by address just as you would with an array by index.
But it also imposes a little extra burden on how you call the function. Namely, you have to know how many entries you’ve got in the data array and pass that number to the function when you call it. Unfortunately, C’s built-in sizeof() command returns the length in bytes of the array. So if you’ve got an array of 16-bit integers, you’ll have to divide the result of sizeof() by two somehow.
SIZEOF
sizeof() returns the size in bytes in the array (or other variable) in question. When you pass an array to a function, you need to know the number of entries in the array. For instance, when you store an array of 16-bit integers, sizeof() returns the length in bytes, which is twice as big as the number of 16-bit words that you’ve stored.
The easiest way to deal with this is just to pass sizeof(mySixteenBitArray)/2 to the function, and this works fine as long as you always remember to do it and always get the size of the array variable type right.
On the other hand, because this problem arises so often there’s a common idiom for dealing with the bytes-to-entries conversion problem. Because each entry in an array has to be of the same type, you can divide the total length of the array by the length of one element, say the first one, to get the total number of elements. The example code I provided does this.
Some people even go so far as to define this into a macro when they end up using it a lot: #define SIZE_OF_ARRAY(a) (sizeof(a) / sizeof(a[0])). A cute trick, no?
Summary
This section started out as a simple exercise in storing data in flash program memory and then reading it back out again. How could it all get so complicated?
To store data in program memory, we use the PROGMEM macro when defining our constant data. What otherwise looks like a normal global variable assignment winds up as a variable whose address points off into nonvolatile flash program memory instead of RAM. Reading the values out of this memory isn’t so complicated, but the two functions we’ve got, pgm_read_byte and pgm_read_word, both require the address in memory where the data is stored.
Addresses are easily obtainable with the “address-of” operator, &, and using this you can call pgm_read_byte to get your data back out. If all you ever do is use PROGMEM from within the main() function, this is all you’ll ever need.
But in order to use PROGMEM data from within your own functions, you’ll need to be able to pass the address as a variable. The specific type of variable that stores addresses is called a pointer. This stores the memory location (a 16-bit number for the AVRs) of your variable and is declared in a way that indicates the type of the data that it points to so the compiler at least knows what kind of data you’re pointing at and can fetch it easily. Using a pointer also allows you to increment memory locations by the appropriate number of bytes and use the type-checking system to make sure that you’re not making any gross mistakes.
Finally, if the data in question is a string, an array of characters that finishes with a zero, your function can use the final zero to find the end of the data. On the other hand, if your data is an array, you’ll need to pass its number of elements to the called function as well because you can’t tell how large the array is from the pointer.
If you’ve never seen pointers before, that was probably quite a whirlwind tour. And if you’re a hard-boiled pointer fan, you’ll probably notice that I haven’t mentioned a few of your favorite applications, like pointers to functions. With what we’ve covered here, you’ve got everything you need to use GCC’s PROGMEM facilities. For a quick introduction to the last class of Pointers 101, feel free to read up on dereferencing pointers in the next section. Otherwise, it’s time to get down to business of programming AVRs.
Optional: Dereferencing Pointers
Pointers store memory addresses where you’ve got data stored. We’ve been using pointers coupled with the pgm_read_byte() function to get data out of program flash memory locations. What if you’d like to store references to RAM memory locations? After all, that’s what the rest of the world does with pointers. When the data is in RAM, you can read and write that data as if the pointer were a normal variable by dereferencing the pointer like so: *myPointer = 7;.
In C, the dereferencing operator * skips over the reference to the memory address that the pointer actually stores and goes straight to the memory location that’s addressed. Among other things, this lets you treat the pointer exactly as you would any other variable, except that by changing the address stored in the pointer, you can change which variable the pointer is behaving like.
In fact, to keep this from getting too metaphysical, I find that the best way to get your head around dereferenced pointers is to think of them as being the variable who’s address they currently point to. In the following comments, I’ve noted the effect of the command, and in parentheses how you can think about what’s going on as a shortcut:
uint8_t a = 7;
uint8_t b = 2;
uint8_t myArray[] = {10,11,12};
uint8_t c;
uint8_t* p;
p = &a; /* p stores address of a */
c = *p; /* c = 7 (c = a) */
*p = 5; /* 5 into memory at p (a = 5) */
c = a; /* c = 5 */
p = &b; /* p stores address of b */
*p = 12; /* 5 into memory at p (b = 12) */
c = b; /* c = 12 */
p = &myArray[0]; /* p stores address myArray */
c = *(p+2); /* c = 12 (c = myArray[2]) */
*(p+1) = 25; /* 25 into memory at p+1
(myArray[1] = 25) */
The last example shows how you can use pointers to read from and write to arrays, and this is how one usually deals with arrays in RAM. In fact, the only real difference in writing code for dealing with RAM-based arrays and those written into nonvolatile program memory space is that you use *(pointer+i) to access the memory stored at the RAM location and pgm_read_byte(pointer+i) or pgm_read_ word(pointer+i) to get the values out of flash. The important disctinction is that with RAM-based arrays, you can also write to the dereferenced pointer, whereas flash memory is nonvolatile.
Even if you only ever use PROGMEM variables in your AVR programming, I hope that this discussion of dereferenced pointers helps reinforce the way pointers work—they are addresses with a type—and if you want to values stored therein, you have to dereference it one way or the other, * or pgm_read_byte().
Talking Voltmeter
If you’re at all like most people, getting your head around pointers is serious work. If that’s the case, you might want to take a break from reading code for a minute. Hook up a speaker to your AVR, flash in the talking voltmeter code, and think about how sweet it would be to have your own talking voltmeter programmed with your own voice. If that doesn’t give you the motivation to carry on, you’re not half as geeky as I am.
The main project for this chapter is certainly the most ambitious out of the whole book, and it combines a lot of aspects from previous projects into one, as well as making use of 14 kB of program-space flash memory. We’ll take the bird’s-eye view first and then dive in to the details one by one.
In order to create the audio output, we use the fast PWM output of Timer 0, direct to the output-compare pin, as we did in Chapter 10. Timer 0 is set at a fixed frequency of around 31.25 kHz, as before, so what we hear is the changes in average voltage due to the duty cycle changing over time.
Timer 2 is configured in CTC mode and counts up until a fixed value and then triggers and interrupt. I’ve set the frequency of Timer 2’s cycle to be around 8 kHz to match the sample rate of the audio input files. (You can play with this to speed up or slow down sample playback.) Each time Timer 2’s ISR is called, it loads a new sample value into Timer 0’s output compare register.
The Timer 2 ISR is a busy place. Because the data is packed into PROGMEM in 8-bit bytes but we only use two bits per sample, once every four times the ISR is called, it reads a new byte and unpacks it into four values. Then the ISR undoes the DPCM encoding, which involves reading the two-bit number, picking the corresponding value from a table, and then adding that value to last period’s sample value. (See Generating the Audio Data for details on the DPCM encoding and decoding.)
The Timer 2 ISR also tests to see if the end of the sample data table has been reached, and if so it turns itself off and sends no new samples to the Timer 1’s PWM register until it’s restarted from the event loop. Because the ISR loads in new values to Timer 1, when Timer 2 isn’t running, the output PWM is constant and no signal is produced.
The code is split among three files: talkingVoltmeter.h, talkingVoltmeter.c, and allDigits.h. The first header file lays out all of the data structures and initializations for talkingVoltmeter.c, which does all the work. The other header file, allDigits.h, contains the DPCM data for the speech samples. I’ll hold of on discussing this data file until Generating the Audio Data.
PROGMEM Data Structures and the Header File
Let’s start our discussion of the speech-generation part of the code with the data and the functions that use it, in Example 18-5.
Example 18-5. talkingVoltmeter.h listing
/* Include file with DPCM data in it */
#include "allDigits.h"
#include <avr/pgmspace.h>
// Now define sample-table names used in digits file
// From here on, no matter what you call the samples,
// you can refer to them as "ONE_TABLE", etc.
#define ONE_TABLE DPCM_one_8000
#define TWO_TABLE DPCM_two_8000
#define THREE_TABLE DPCM_three_8000
#define FOUR_TABLE DPCM_four_8000
#define FIVE_TABLE DPCM_five_8000
#define SIX_TABLE DPCM_six_8000
#define SEVEN_TABLE DPCM_seven_8000
#define EIGHT_TABLE DPCM_eight_8000
#define NINE_TABLE DPCM_nine_8000
#define ZERO_TABLE DPCM_zero_8000
#define POINT_TABLE DPCM_point_8000
#define VOLTS_TABLE DPCM_volts_8000
#define INTRO_TABLE DPCM_talkingvoltmeter_8000
#define SPEECH_DELAY 2000 /* milliseconds */
/* --------------- Globals used by the ISR -------------- */
volatile uint8_t *thisTableP; /* points at the current speech table */
volatile uint16_t thisTableLength; /* length of current speech table */
volatile uint16_t sampleNumber; // sample index
volatile int8_t out, lastout; // output values
volatile uint8_t differentials[4] = { 0, 0, 0, 0 };
const int8_t dpcmWeights[4] = { -12, -3, 3, 12 };
/* These arrays let us choose a table (and its length) numerically */
const uint16_t tableLengths[] = { /* all sample tables are 8-bit */
sizeof(ZERO_TABLE), sizeof(ONE_TABLE), sizeof(TWO_TABLE),
sizeof(THREE_TABLE), sizeof(FOUR_TABLE), sizeof(FIVE_TABLE),
sizeof(SIX_TABLE), sizeof(SEVEN_TABLE), sizeof(EIGHT_TABLE),
sizeof(NINE_TABLE), sizeof(POINT_TABLE), sizeof(VOLTS_TABLE),
sizeof(INTRO_TABLE)
};
// Create an indexing table of all of the start addresses for
// each spoken digit. And then store this index in PROGMEM.
const uint8_t *const tablePointers[] PROGMEM = {
ZERO_TABLE, ONE_TABLE, TWO_TABLE, THREE_TABLE, FOUR_TABLE,
FIVE_TABLE, SIX_TABLE, SEVEN_TABLE, EIGHT_TABLE, NINE_TABLE,
POINT_TABLE, VOLTS_TABLE, INTRO_TABLE
};
void selectTable(uint8_t whichTable) {
/* Set up global table pointer, lengths */
uint16_t pointerAddress;
thisTableLength = tableLengths[whichTable];
pointerAddress = (uint16_t) & tablePointers[whichTable];
thisTableP = (uint8_t *) pgm_read_word(pointerAddress);
}
/* Extra defines for the non-numeric values */
#define POINT 10
#define VOLTS 11
#define INTRO 12
///----------------- Init functions -------------------///
void initTimer0(void) {
// Timer 0 Configured for free-running PWM Audio Output
TCCR0A |= (1 << WGM00) | (1 << WGM01); /* fast PWM mode */
TCCR0A |= (1 << COM0A0) | (1 << COM0A1); /* output on PD6/OC0A */
TCCR0B = (1 << CS00); /* fastest clock */
OCR0A = 128; /* initialize mid-value */
SPEAKER_DDR |= (1 << SPEAKER); /* output PD6 / OC0A */
}
void initTimer2(void) {
// Timer 2 loads OCR0A, provides sampling frequency
TCCR2A = (1 << WGM21); /* CTC, count to OCR2A */
TIMSK2 = (1 << OCIE2A); /* turn on compare interrupt */
OCR2A = 128; /* controls sample playback frequency */
/* note: no clock source selected yet, so won't start up */
}
void initADC(void) {
// ADC for Voltmeter function
ADMUX |= (0b00001111 & PC5); /* set mux to ADC5 */
DIDR0 |= _BV(ADC5D); /* turn off digital circuitry on PC5 */
ADMUX |= (1 << REFS0); /* reference voltage is AVCC, 5V */
ADCSRA |= (1 << ADPS1) | (1 << ADPS2); /* ADC clock prescaler /64 */
ADCSRA |= (1 << ADEN); /* enable ADC */
}
The very first line of talkingVoltmeter.h includes a single data header file that includes the DPCM-encoded sample values for all of the spoken-out digits. If you look at allDigits.h, you’ll see that it looks like this:
const uint8_t DPCM_one_8000[] PROGMEM = {
153,
90,
106,
150,
...
}
const uint8_t DPCM_two_8000[] PROGMEM = {
250,
...
}
Next, a series of twelve #define statements take the names of the samples in the allDigits.h datafile and maps them to defined names and numbers that are used in the rest of this code. I did this so that you could easily add your own audio data, and would only have to change these 12 top-level definitions. So if your datafile has tables called “one” and “two” instead of “DPCM_one_8000” and “DPCM_two_8000,” modify these defines and everything else should work fine.
The character string welcome contains a one-line ASCII splash-screen and gets stored away in PROGMEM to be read out later. You’ll see how this is printed out via serial when we get to the initialization section of talkingVoltmeter.c.
Next, I define some global variables. The first two are used to select which sample should be playing. The pointer, uint8_t* thisTableP, is used to point to an address of the uint8_t speech data arrays that we just included. When it points to DPCM_one_8000[], for instance, the chip will speak the word “one”; when it points to DPCM_two_8000[], the chip says “two,” and so on. The other variable contains the length of the selected data array, so that the playback function knows when to stop.
The next three global variables keep track of exactly which sample is playing and what the previous and current PWM output values are.
Then there are two arrays defined in RAM that will hold the four two-bit differentials (differentials), and the vector of the step sizes that the decoder will take when reconstructing the audio.
Indexing arrays: arrays of pointers in PROGMEM
To use the speech data that’s stored in PROGMEM, we’re going to need both it’s starting address and the length of each array of spoken samples. And we’ll do it in a way that makes accessing the data easy, storing the sound for “one” in position one of the arrays.
Getting the lengths and storing them in tableLengths[] is a breeze—we simply store the lengths of the indexed speech-sample arrays in RAM using sizeof() because we know that we’re using single-byte integers to do the encoding. When it comes time to select which table we’re using, the function selectTable() sets a global length variable equal to the selected size: thisTableLength = tableLengths[whichTable]. When we call selectTable(1), it looks up the length from this table that’s in slot one and stores it in the global variable thisTableLength that the ISR can access.
The next array is an array of pointers to the speech data. That is, each entry in tablePointers is a pointer that contains the starting address of one spoken digit. As with the lengths table, the pointers are arranged in numerical order so that tablePointers[1]contains the pointer that points to the data array that speaks out the number “one.” (That’s the convenient part.)
In this sense, tablePointers is like an index. If you want to know where the speech data for the number “four” is stored, you can look it up in tablePointers[4]. If you want the number i, you just fetch the data from the location stored in tablePointers[i]. This is much simpler than the alternative, which is to write a bunch of if statements like this:
if (i == 4){
address = FOUR_TABLE;
}
else if (i == 5){
address = FIVE_TABLE;
}
// ... etc for each digit
(Don’t forget that when we reference an array of data like like FIVE_TABLE, C actually returns a pointer to the first entry of the array.)
But there’s one twist here: I stored the tablePointers indexing array itself in PROGMEM! And why not? It’s an array of pointers that contains addresses of data that’s stored in flash memory. Those addresses surely aren’t going to change, so this lookup table that contains those addresses won’t change either. This pattern is surprisingly useful, and when you have many arrays to index (more than just the 12 we use here), it becomes increasingly important to store both the individual arrays and their address pointers inPROGMEM.
The cost of storing our indexing array in PROGMEM is that we’ve now got pointers to our data in PROGMEM that are themselves stored in PROGMEM. So to get our data table, we have to do two reads from program memory: once to get the address of our data table, and then to start accessing the data table itself. Once you’ve got that, conceptually, it’s not so bad. See Figure 18-1.
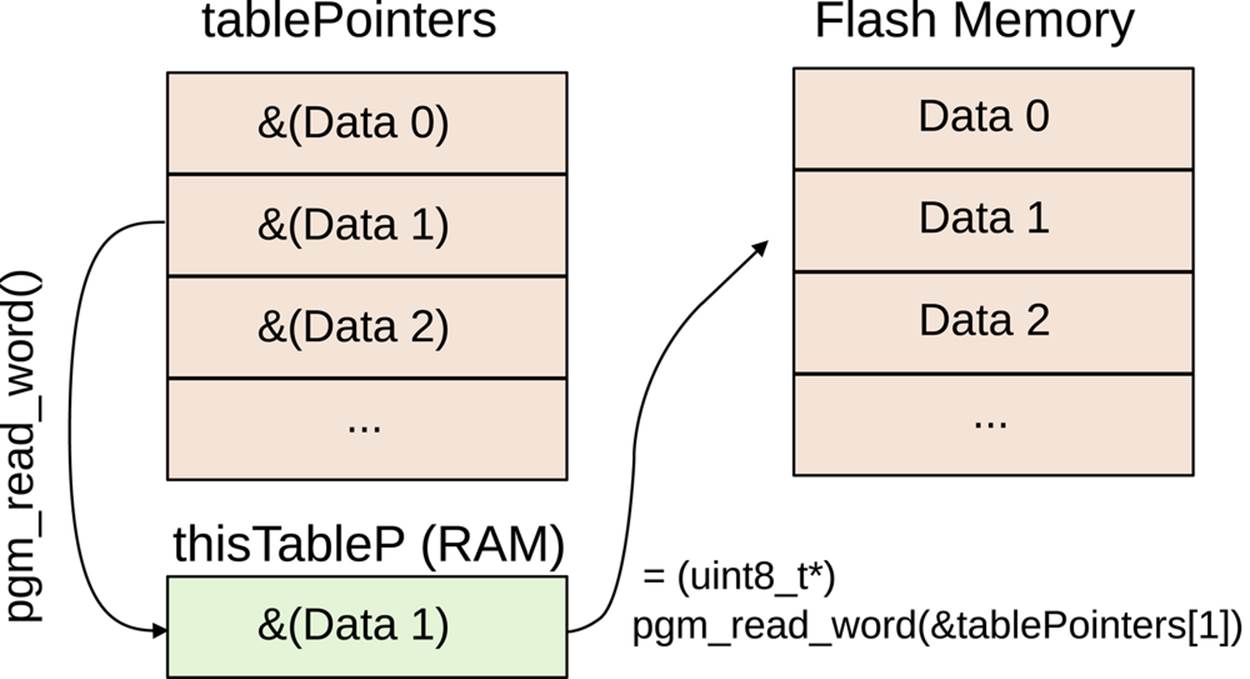
Figure 18-1. Table of flash memory pointers in flash memory
The relevant line in the selectTable(uint8_t whichTable) function is:
thisTableP = (uint8_t*) pgm_read_word(&tablePointers[whichTable]);
Here, we’re looking up a pointer in the tablePointers array by its index. Because the pointer is stored in PROGMEM, we take the address and call pgm_read_word to get the address data. Finally, because the data is just a 16-bit address (pgm_read_word doesn’t know what type of data we’ve stored in the address we pass it) we have to recast it as a pointer to a uint8_t. Now that we’ve got a pointer to the data in RAM and the size of the data, the selectTable() function simply writes the pointer and size out to global variables that the ISR uses to read its sample data.
The rest of the talkingVoltmeter.h file consists of routine initialization routines. Timer 0 is configured at full speed, fast PWM mode, and set to output directly to the speaker pin. Timer 2 is a simple “system-tick” style timer: it counts up to a certain value and runs its ISR that loads a new sample into Timer 0’s PWM register. It’s clock-speed is set to run four times slower than Timer 0, at about 8 kHz to match our sampled audio data. Finally, the ADC is initialized for full-range 5 V measurements on PC5, but you can change this easily enough.
YO DAWG. I HEARD YOU LIKE PROGMEM
This general pattern, storing pointers to other memory locations in an index, is very useful. You’d do the same thing if you were storing text for menu items, for example. If you stored a menu prompt in menuString0[] and another in menuString1[] in PROGMEM, you can create a second array of pointers to each one that lets you reference them by merely selecting the index of the pointer array. If you don’t choose to store the pointer array in PROGMEM, you can get a pointer to your string data like this: char* p = stringPointers[i]. If you do decide to store the pointers in PROGMEM as well, you can retrieve the pointers you want like this: char* p = (char*) pgm_get_word(&stringPointers[i]), which really isn’t all that much more complicated and can free up a lot of RAM if you have many entries in your menu.
Sound Playback and Voltage Reading: The .c File
Once we’ve set up the data and the hardware peripherals are configured, it’s time to sample voltages on the ADC and generate some audio. This means working through the code in Example 18-6.
Example 18-6. talkingVoltmeter.c listing
// Talking Voltmeter Example
#include <inttypes.h>
#include <avr/io.h>
#include <avr/interrupt.h>
#include <util/delay.h>
#include <avr/pgmspace.h>
#include <avr/power.h>
#include "pinDefines.h"
#include "USART.h"
#include "talkingVoltmeter.h"
void startSampleTimer(void) {
sampleNumber = 0; /* back to start of sample table */
TCCR2B = (1 << CS21); /* turn on timer clock */
/* Two clock options above end up ~8kHz on 8MHz system */
}
void stopSampleTimer(void) {
TCCR2B = 0; /* disable sample-playback clock */
OCR0A = 128; /* idle PWM at mid-voltage */
lastout = 0; /* start at 0 next time */
}
void speak(void) {
startSampleTimer();
loop_until_bit_is_clear(TCCR2B, CS21); /* Wait until done */
}
void updatePWMAudio(void) {
OCR0A = out + 128; /* re-center for 0-255 PWM */
lastout = out; /* update last value */
sampleNumber++; /* on to next sample */
}
void unpackByte(uint8_t dataByte) {
/* Select pairs of bits from byte, save out */
differentials[0] = (dataByte >> 6) & 0b00000011;
differentials[1] = (dataByte >> 4) & 0b00000011;
differentials[2] = (dataByte >> 2) & 0b00000011;
differentials[3] = (dataByte & 0b00000011);
}
/* Timer 2 controls sampling speed.
ISR reads new data, loads PWM values into OCR0A */
ISR(TIMER2_COMPA_vect) {
/* Since we can decode 4 2-bit values at once, need to know where
we are in the 4-step mini-cycle. */
uint8_t cycle = sampleNumber & 0b00000011; /* keep last 2 bits */
uint16_t tableEntry;
uint8_t packedData;
if (cycle == 0) { /* at first sample, re-load */
tableEntry = sampleNumber >> 2; /* where we are in table */
if (tableEntry < thisTableLength) {
/* read the next byte from the selected table */
packedData = pgm_read_byte(&thisTableP[tableEntry]);
unpackByte(packedData); /* split up byte into differentials[] */
}
else { /* at end of table, done. */
stopSampleTimer();
}
}
/* Decode the differences: current value = last + difference */
out = lastout + dpcmWeights[differentials[cycle]] - (lastout >> 4);
updatePWMAudio();
} // end ISR (TIMER2_COMPA_vect)
void printString_Progmem(const char *stringP) {
char oneLetter;
while ((oneLetter = pgm_read_byte(stringP))) {
transmitByte(oneLetter);
stringP++;
}
}
int main(void) {
uint16_t voltage;
uint8_t volts;
uint8_t tenths;
uint8_t vcc = 51; /* 10x VCC, in volts */
clock_prescale_set(clock_div_1); /* 8 MHz */
initTimer0();
initTimer2();
sei(); /* for timer2 ISR */
initADC();
initUSART();
printString_Progmem(PSTR("\r\n--=( Talking Voltmeter )=--\r\n"));
selectTable(INTRO);
speak();
while (1) {
ADCSRA |= (1 << ADSC); /* start ADC */
loop_until_bit_is_clear(ADCSRA, ADSC);
voltage = ADC * vcc + vcc / 2; /* vcc/2 to make rounding work */
voltage = voltage >> 10; /* divide by 10-bits for ADC */
/* "voltage" is now actually 10x real-world voltage */
volts = voltage / 10;
tenths = voltage % 10;
transmitByte('0' + volts); /* serial output as well */
selectTable(volts); /* 0 points to ZERO_TABLE, etc */
speak();
transmitByte('.');
selectTable(POINT);
speak();
transmitByte('0' + tenths);
selectTable(tenths);
speak();
printString_Progmem(PSTR(" volts\r\n"));
selectTable(VOLTS);
speak();
_delay_ms(SPEECH_DELAY);
} /* end while */
return (0);
}
The ISR
Because the bulk of the work of decoding and playing the speech samples takes place in Timer 2’s ISR, let’s start there first. The general overview is that, because our two-bit samples are stored four to a byte, for every fourth sample, we need to load up another byte and break it up into the four parts.
The first line defines a local variable, cycle, that takes on a value of zero, one, two, or three depending on which sample is currently running. The fastest way to do this is just to mask off the lowest two bits, and interpret them as an integer. Next, if we’re at the first sample of a cycle, we need to figure out which byte of the speech data array to unpack next, or if we’re at the end, to stop. To do this, we divide the sample number by four using a bit-shift by two, which gives us the current byte number, tableEntry. Because we’re at the first position in a byte, the routine calls unpackByte to unpack an 8-bit number into four two-bit parts.
Look up at unpackByte() for a second. It sets all four values of the differentials array by shifting the passed data sample byte over by six bits, four bits, two bits, and zero bits (i.e., not shifting at all), and then masking that byte so that only the lowest two bytes remain. Shifting to the left by six leaves only the top two bits, so those are obvious. Shifting to the left by four leaves the top four bits, and the masking selects out only the lower two of those, and so on. At the end of this process of shifting and masking, each element of differentials[] contains a two-bit number from zero to three.
Jumping back down to the ISR, if the cycle is anywhere but the first position, nothing happens and we go on to decompress the data and update the PWM output. Because this is “differential” PCM, the data stored is the (quantized) differences between the last sample value and the next one. The decoding step consists of adding this difference value to the old output.
We also subtract a sixteenth of the previous value to make the decoding stable. The reason that we need to do this is that there’s a slight chance that approximation errors in our sampling routine add up in a row long enough to max out the volume on playback. Subtracting off a small fraction each time shrinks the sample value a little bit toward zero and prevents these random errors from accumulating. If you don’t believe me, try flashing the code without this term, and you’ll probably hear that it distorts.
Finally, the ISR calls updatePWMAudio(), which adds 128 to the signed integer value to center it between zero and 255, and then writes the new volume level to Timer 0’s output-compare register and controls the PWM duty cycle, outputting an average voltage level to the speaker.
main()
The main function starts off with some variable definitions. Of them, the most interesting is setting the calibrated vcc variable. Remember, the ADC’s absolute accuracy is only as good as the VCC level, and the vcc variable should contain the calibrated voltage of your VCC times 10. On my system, for instance, I get 5.08 V, which is 50.8, so I round up to 51 and that’s the vcc.
Just after all the usual initialization routines, the code prints out a long string that’s stored in flash memory, partly to verify our serial connections, but mostly as a demonstration of how simple it can be to use PROGMEM strings directly in your code.
The last part of the initialization section speaks out a prerecorded introduction to the talking voltmeter. If you can’t hear this, something’s wrong. This demo also shows you how the speech playback system works. Remember that to pass the desired data to the ISR, we saved its start location and length in two separate global variables. The function selectTable() uses the PROGMEM index of pointers to the data to get the starting position from memory. selectTable() also looks up the length of the chosen speech data from the length array tableLengths.
Once the data is pointed to, all that remains is to call the speak() function, which resets the sample counter to zero and starts up Timer 2, then waits for the sample table to reach the end, and shut down Timer 2 again. Note that I’m implicitly using the Timer 2 clock-select bit as a status flag for whether or not there is currently a sample playing.
Finally, now that you understand how the system plays back a spoken digit by setting up pointers to the current sample and letting the timer hardware take care of the rest, the event loop should be an easy read. An ADC sample is taken, the value scaled up by theVCC value times 10 and then back down by 1,024, to yield an eventual value that should be 10 times the actual measured voltage. The remainder of the event loop simply prints out the values on the serial line and simultaneously speaks them out through the speaker.
Now, if you’re interested in the nitty-gritty of how I got my seven seconds of my sampled voice into 14 kB of data talking to you, or to make your own samples, read on to the next section.
Generating the Audio Data
Eight-bit audio, even at a minimum data rate for speech, requires a lot of data. Human speech has a highest frequency of around 4 kHz, which means we’d need an 8 kHz sample rate to reproduce it. (Read up on “Nyquist Frequency” online if you’d like to know more.) That’s around 8 kB per second, and if it takes about 1/2 a second to read out a digit, we’ll need 48 kB just to sample 10 digits plus “point” and “volts.” That’s not going to work for us at all. We’ll need to figure out a way to divide that by four and still retain intelligibility. We’ll use Differential Pulse-Code Modulation (DPCM), which is an audio compression method developed for compressing speech over phone lines in the 1950s.
Differential Pulse-Code Modulation
First off, pulse-code modulation is actually just the fancy name for what we’ve been using to play “analog” audio all along. Basically, the “pulse codes” are what old-timey engineers called our digital samples. Pulse-code modulation is just producing audio by changing the binary data that you feed into a digital-to-analog converter over time—just exactly what we were doing in Chapter 10, using filtered PWM output to do the digital-to-analog conversion.
The “differential” in DPCM means that instead of using the voltage level values, we store the changes the voltage levels. For smooth signals, like audio signals tend to be, the difference between two samples is drastically smaller than the maximum range from quietest to loudest. If you’re using eight bits for output, you can often encode the same data with just two or three bits per sample. That’s a dramatic reduction in the amount of data required.
As mentioned, for the talking voltmeter, we’d need roughly 48 kB of raw uncompressed PCM output. But if we use two-bit DPCM, we can shrink our data requirements to 12 kB, which will fit in the ATmega168’s flash memory with room to spare. The sound qualitywill be reduced somewhat, but you’ll be surprised how intelligible it is.
CORNELL UNIVERSITY MICROCONTORLLER CLASS WEBPAGES
If you’re at all interested in video, speech, or audio generation, the final projects and lab exercises from Cornell University’s ECE 4760: Designing with Microcontrollers class is a great resource. Professor Land has even posted his lectures to YouTube. It’s a great resource both for ideas and even working code snippets.
Indeed, I got the basis for the talking voltmeter code from Cornell University’s ECE 4760 Speech Generation page. In the end, I rewrote some sections, fixed (IMO) a bug, and adapted the code to function with multiple speech tables, but the basic framework is theirs. While I rewrote the encoder in Python, it’s basically a copy of similar code from that website that’s written for Matlab.
If you’re using the Cornell code, note that the ATmega644 that they use has a different pinout from the ATmegaxx8 series, so you may have to move some pins around for everything to work. For instance, the direct-PWM-output (OCR0A) pins are in different locations across the two chip series; PB3 on the 644 is equivalent to PD6 on our series of chips. But once I changed those around, the code worked just fine.
Encoding Two-bit DPCM
To start our discussion of DPCM, imagine that we have a series of sample values like [..., 200, 201, 204, 208, 206, 203, 200, 198, ...]. (From the way the values rise and fall, they could be the top of a sine wave, or something similar.) The first step in DPCM is to take the differences between successive sample values: [..., 1, 3, 4, -2, -3, -3, -2, ...]. Notice how nice and small these difference values are? Heck, we could represent those precisely with three bits, as opposed to the eight bits in our original sample, and we’d be done.
One-bit DPCM consists of deciding whether the samples change upward or downward—we’ve only got two choices with one bit. If we encode an positive difference as a one, and a negative difference as a zero, the preceding differences string looks like [..., 1, 1, 1, 0, 0, 0, 0, ... ]. Now to reconstruct the data back into eight bits, all we know is that it went up for three periods and down for four. We’ll have to decide on how big each step up or down is going to be.
Picking that step size is actually a little tricky, because we’re trading off how quickly the DPCM can respond to big changes against how smooth our output can be for small changes. Just from looking at our data, we’d pick something like plus or minus two, because the increases and decreases are about two-ish on average.
Let’s assume that we start off with the correct sample value of 200. The decoded version of our one-bit DCPM with step size of two would give us the following sequence: [..., 200, 202, 204, 206, 204, 202, 200, 198, ...], which really isn’t that bad an approximation of our original data. The peak at 208 isn’t as high, and the slope of the change is always constant, but it could work.
Two-bit DPCM improves on the one-bit version by allowing for two different rates of increase and two different rates of decrease. That is, instead of just choosing up or down in the encoding stage, we get to choose between a large step up and a small step up, a large step down and a small step down. For our example, we might decide that any change smaller than 2.5 is a small step, and larger than 2.5 is a big step:
|
STEP TABLE |
UP |
DOWN |
|
BIG |
3 |
0 |
|
LITTLE |
2 |
1 |
Using two-bit numbers, we map these steps (big down step, small down step, small up step, big up step) to (0,1,2,3). Encoding like this, we get [...,2,3,3,1,0,0,1,...] for the difference sequence.
In the one-bit scenario, we had to pick a step size in order to reconstruct the data. To play back our two-bit DPCM series, we need to choose twice as many values—a size for our small steps and a size for the big steps. Let’s use 1 for the small steps and 3 for the big steps, giving us the mapping (0,1,2,3) to (-3, -1, 1, 3). Now our reconstructed series would look like [..., 200, 201, 204, 207, 206, 203, 200, 197]. Because we could pick two levels for the differences, the encoding can accommodate both slow changes and faster changes. We don’t lose as much on the peak at 208 as we did with the one-bit version, and the slow-changing parts are more accurately represented as well.
See Figure 18-2 where I’ve plotted them. The two-bit DPCM line overlaps the actual values most of the time, while the one-bit DPCM misses a lot, but is right much of the time. The one-bit DPCM, having only the choice of two slopes, up or down, makes waveforms that look like triangles, while the two-bit DPCM starts to look a little more rounded and natural.
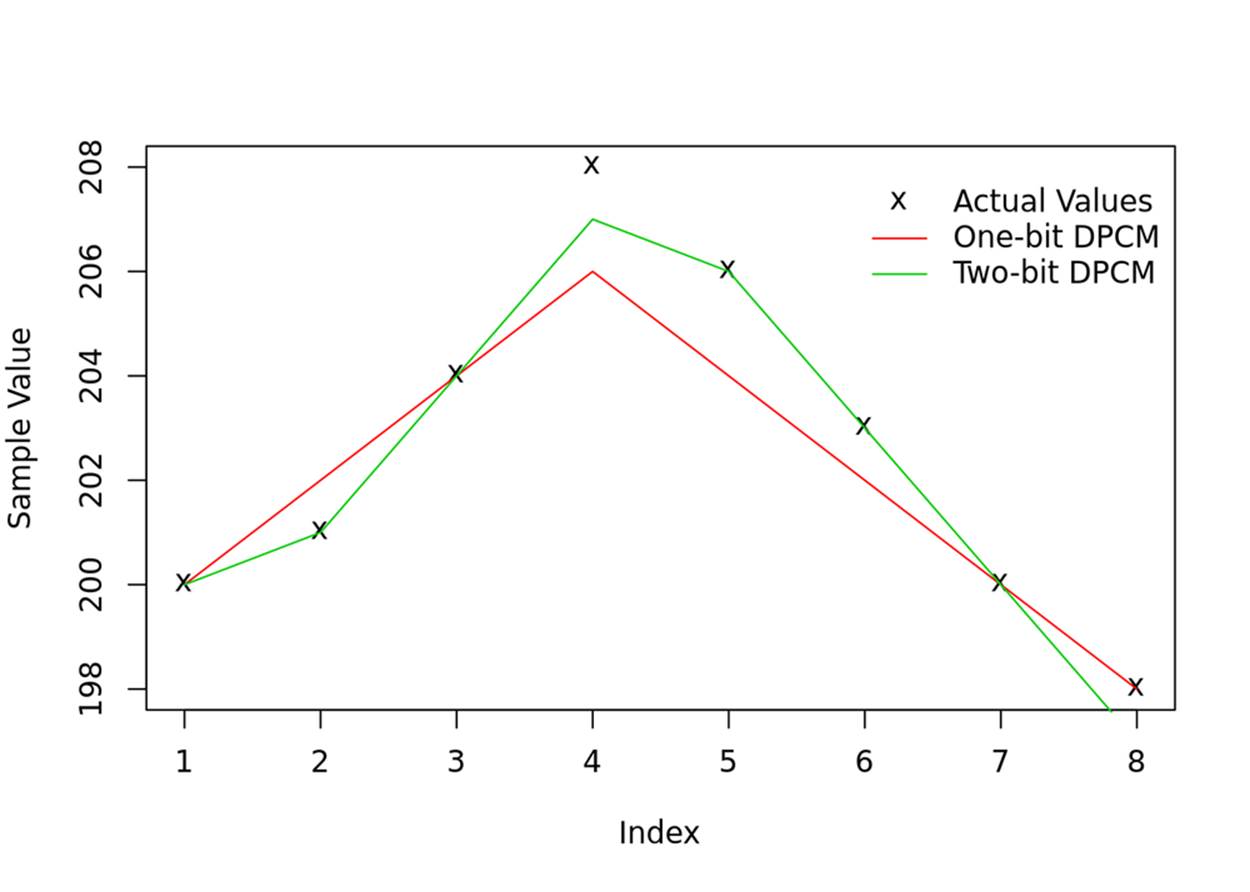
Figure 18-2. Graph of one- and two-bit DPCM example
To do the encoding into two-bit DPCM, we needed to pick a positive-going and negative-going threshold to distinguish between big and small steps, and when we reconstructed the original signal, we needed to pick two more values—the sizes of the big and small steps in either direction. Picking these values is a compromise between speed of response and smoothness, and the choices are interdependent. If you chose the threshold to be large in the encoding step, you should probably have a fairly large difference for the big step when you’re decoding.
For any given signal, there is a best choice for each of these values, but that’s getting way beyond our needs. In fact, the next level of cleverness in sample encoding, Adaptive DPCM, is simply an encoding method where the different step sizes are changed on the fly to best match the audio sample. So when the audio is slowly changing, the thresholds and reconstruction differentials are smaller, and when there’s a lot of movement in the waveform, both thresholds and differentials are increased to match. The algorithms for doing ADPCM are yet more complicated, but the general idea is simple once you’ve got the DPCM concept.
Anyway, do feel free to play around with both the thresholds and the reconstruction differential values. When encoding, the thresholds are stored in the wave2DPCM.py file as TWO_BIT_THRESHOLDS = [-0.05, 0, 0.05]. In the encoder, I’ve normalized the samples to a maximum and minimum values of 1 and –1, respectively, so the thresholds are effectively in percentages. Any change that’s bigger than 5% of the maximum value is a big change. The reconstruction differentials are stored in talkingVoltmeter.h inreconstruction_differentials. These are on our usual 8-bit scale of –128 to 127, so the big step is scaled to be bigger than 5% of 128—at 12, it’s around 10%—and the small step is about 2.5%, or 3. Within reasonable ranges, you may find that you get better or worse reproduction. If you change the numbers around drastically, you’ll get horrible digital-sounding squawky noises. Enjoy!
Encoding DPCM: wave2DPCM.py
Everything you need to load up your own .wav files into the AVR is included in this Python file. The short version of the procedure is that you record files of yourself (or you can use an online speech synthesizer like AT&T Natural Voices Text-to-Speech Demo) saying the words “zero” through “nine,” “point,” “volts,” and anything else you want the voltmeter to repeat for you. Then save these files as 8,000 Hz, mono .wav files with names like one.wav, etc. (See the bottom of Example 18-7 for a list of the digits used.)
Running the wave2DPCM.py program in a directory with all the correctly named files gives you a header file that’ll plug right in to the talkingVoltmeter project. (Or you can download some of my extra sample voices from links on this book’s website.) If you make your own samples, you’ll need to keep them short to fit into memory. If you need more room, feel free to remove the introductory talkingvoltmeter prompt from the project to make more space. To do so, you’ll need to remove it from the Python file, thetalkingVoltmeter.h file that includes it, and in the initialization part of the main() function in talkingVoltmeter.c where the function to play the file is called.
In case you’d like to customize the code, let’s get at least a good overview understanding of what’s going on in wave2DPCM.py, listed in Example 18-7.
Example 18-7. wave2DPCM.py listing
## Functions to convert mono, 8kHz .wav files to differential PCM
## If you've got 'sox' installed on your computer, this code calls
## 'sox' and re-codes the files for you. If not, you've got to do it.
## Finally, given a bunch of wav files with names like one.wav, two.wav
## this writes the DPCM data out to a header file for including in AVR C
from struct import unpack
import wave
import os
import sys
def unpackMono(waveFile):
w = wave.Wave_read(waveFile)
data = []
for i inrange(w.getnframes()):
data.append(unpack("h", w.readframes(1))[0])
return(data)
def scaleData(data):
scale = max(max(data), abs(min(data))) * 1.0
return([x/scale for x indata])
def getDifferences(data):
differences = []
for i inrange(len(data)-1):
differences.append(data[i+1]-data[i])
return(differences)
def quantize(data, thresholds):
quantized = []
n = len(thresholds)
thresholdRange = range(n)
for d indata:
categorized = False
for i inthresholdRange:
if d <= thresholds[i]:
quantized.append(i)
categorized = True
break
if notcategorized:
quantized.append(n)
return(quantized)
def pack4(data): # for 2-bit data
packedData = []
for i inrange(len(data) / 4):
thisByte = 0
thisByte += 2**6 * data[4*i]
thisByte += 2**4 * data[4*i+1]
thisByte += 2**2 * data[4*i+2]
thisByte += data[4*i+3]
packedData.append(thisByte)
return(packedData)
def packTwoBitDPCM(filename):
data = unpackMono(filename)
data = scaleData(data)
differences = getDifferences(data)
quantized = quantize(differences, TWO_BIT_THRESHOLDS)
packed = pack4(quantized)
return(packed)
def createHeader(filename, packedData):
baseFilename = filename[:-4]
outfile = open("DPCM_" + baseFilename + ".h", "w")
outfile.write('uint8_t DPCM_{}[] PROGMEM = {{\n'.format(baseFilename))
for byte inpackedData:
outfile.write(' {:d},\n'.format(byte))
outfile.write('};\n')
outfile.close()
def fixWaveFile(filename):
w = wave.Wave_read(filename)
bitrate = w.getframerate()
channels = w.getnchannels()
bits = w.getsampwidth()*8
if notbitrate==8000 or notchannels==1 or not bits==16:
newFilename = filename[:-4] + "_8000.wav"
returnValue = os.system(SOXCOMMAND.format(filename, newFilename))
if returnValue:
raise(SOX_Exception("""Something went wrong calling sox:
SOXCOMMAND.format(filename, newFilename
Is sox installed? If not, just make sure that you've saved 8kHz mono wav files."""))
filename = newFilename
return(filename)
class SOX_Exception(Exception):
pass
if __name__ == "__main__":
## Default is to convert all wav files in the current directory.
TWO_BIT_THRESHOLDS = [-0.05, 0, 0.05]
SOXCOMMAND = "sox {} -r 8000 -c 1 -b 16 {}" # for converting wave file
## install sox, or use itunes or audacity to convert
## wavefile to 8kHz, 16-bit, one-channel
wavefiles = [x for x inos.walk(".").next()[2] if x.endswith(".wav")]
for filename inwavefiles:
filename = fixWaveFile(filename) # converts if needed, returns new filename
packedData = packTwoBitDPCM(filename)
createHeader(filename, packedData)
## And create a digits sample set for talkingVoltmeter.h:
digits = ["one", "two", "three", "four", "five", "six",
"seven", "eight", "nine", "zero",
"point", "volts", "talkingvoltmeter"]
allDigits = open("allDigits.h", "w")
for digit indigits:
filename = "DPCM_" + digit + "_8000.h"
print filename
allDigits.write(open(filename).read())
allDigits.close()
Let’s start at the top. unpackMono(waveFile) converts the specified 16-bit mono .wav audio file into it’s corresponding numeric data. The result is a list of numbers ranging from –32,768 to 32,767. scaleData(data) changes the range to (-1,1), and thengetDifferences(data) subtracts each sample from the one before it. This is the first step in DPCM encoding.
The function quantize(data, thresholds) does the DPCM encoding. For each difference value, it figures out where it falls relative to the thresholds and gives it a corresponding numeric value. The last stage of the algorithm part is to then pack these two-bit values into eight-bit numbers to load into the AVR. pack4(data) does the packing.
The next function, packTwoBitDPCM(filename) just wraps up all of the preceding steps into one function for convenience. The input is a filename, and the output is packed two-bit DPCM data. Now all that’s left is to write the data out into an .h file to include with your AVR code, which is handled by createHeader(). Finally, I’ve included a convenience function that double-checks your .wav file’s bitrate, number of channels, and bit-depth, and runs the command-line utility sox to convert the file if it’s not right. If you don’t have sox installed on your system, go get it! It’s an awesome audio tool—the rightly nicknamed Swiss army knife of audio files. If you don’t want to install sox, just make sure that you’re saving your audio samples as 16-bit, 8,000 Hz, mono .wav files, and you’ll be OK.
After if __name__ == "__main__", we get to actually calling these functions and doing the work. The bit thresholds are defined here, as is the command-line call to sox if you need it. After that, the code loops through all the .wav files in the directory, encodes them in DPCM, and writes out an individual header file for each. The last loop just combines all of the listed names into a single header file, allDigits.h, that you can include in the talkingVoltmeter.h project without any further modification.
All materials on the site are licensed Creative Commons Attribution-Sharealike 3.0 Unported CC BY-SA 3.0 & GNU Free Documentation License (GFDL)
If you are the copyright holder of any material contained on our site and intend to remove it, please contact our site administrator for approval.
© 2016-2026 All site design rights belong to S.Y.A.