Getting Started with Bluetooth Low Energy (2014)
Chapter 10. Embedded Application Development
Focusing on readily available and open source embedded development kits and platforms, this chapter describes some of the tools available to anyone who wants to create custom firmware for Bluetooth Low Energy peripherals.
The first part of the chapter introduces a high-level BLE API that makes use of the mbed development platform created and maintained by ARM. This is a great choice if you’re new to embedded development, because it doesn’t require familiarity with configuring an embedded toolchain yourself or working with embedded hardware on the lowest level. Most of the messy firmware implementation issues and setup problems are conveniently buried in the easy-to-use online tools and high-level APIs.
The second part describes embedded toolchains: collections of tools used together to convert standard source code into executable binaries that run on embedded processors. This section shows how to set up a cross-compiling toolchain to build ARM binaries on Windows, OS X, or Linux.
The last part of the chapter shows how to use these tools and concepts in the real world, taking advantage of a sample project for Nordic’s nRF51822 system-on-chip (see nRF51822-EK (Nordic Semiconductors)) that allows you to transmit heart rate data to an iOS or Android device using the standard Heart Rate Profile (see SIG-defined GATT-based profiles for more information on BLE profiles).
NOTE
Complete code for the sample project is available in the GitHub repository for this book.
mbed BLE API
As part of their objective to make developing embedded hardware using ARM Cortex processors as easy as possible, ARM and its partner companies created an open source development platform called mbed. mbed allows you to write code that is portable across a variety of supported ARM processors and can take advantage of APIs and components built to run on top of these processors.
You can also use mbed with free online collaborative development tools and a variety of offline commercial and open source toolchains and IDEs. A considerable amount of effort has been put into defining high-level APIs that abstract away most of the low-level chip details that can consume a large part of the overall development budget. This enables reuse of open source software components that have been shared in the community and frees firmware engineers to focus more on project-specific code and less on low-level implementation details around their particular choice of microcontroller (MCU).
Most relevant to the purposes of this chapter, ARM recently added a BLE API to the mbed platform, which allows you to implement a simple GATT server with a few BLE services and characteristics (described in Attribute and Data Hierarchy) in a few dozen lines of code and a few hours of effort, without having to consider any vendor-specific details about the stack or chipset.
mbed provides an easy way to get a proof-of-concept product off the ground, while still working with a platform you can later move to production (exporting the code to offline compilers if necessary). The high-level abstractions around BLE mean you don’t have to spend a lot of time learning about the specifics of your BLE SoC or module. For example, instantiating a standard BLE service or characteristic takes just one line of code:
GattService hrmService(GattService::UUID_HEART_RATE_SERVICE);
GattCharacteristic hrmRate(GattCharacteristic::UUID_HEART_RATE_MEASUREMENT_CHAR,
2, 3, GattCharacteristic::BLE_GATT_CHAR_PROPERTIES_NOTIFY);
GattCharacteristic hrmLocation
(GattCharacteristic::UUID_BODY_SENSOR_LOCATION_CHAR,
1, 1, GattCharacteristic::BLE_GATT_CHAR_PROPERTIES_READ );
At the time of this writing, mbed’s BLE API is still in beta and undergoing active development, but it currently covers most of the features you’ll likely need for prototypes and proof-of-concept products. For more information on mbed or examples and updates on its BLE API, see the mbed project website.
Embedded Toolchains
While mbed qualifies as a viable embedded development platform with a clear path from prototype through to production, any vendor-nuetral high-level API or platform necessarily requires some loss of control over the low-level implementation details. You generally trade ease of use for certain low-level optimizations in the code and drivers. This tradeoff makes sense in many situations, but obviously there is no one-size-fits-all approach with embedded development.
In the product design world, performance and control often trump ease of use, and many engineers still prefer to handle all of the implementation details themselves, writing their own low-level drivers and setting up their own build environment. Writing your own low-level drivers clearly requires more development effort, but it also ensures you have maximum control over the code running your products. It also forces you to understand the processor more intimately and allows you to optimize for performance and cost to a far greater extent.
Being able to fully optimize the code for size and performance is extremely important with embedded products. Optimizing for code size, for example, might allow you to use a smaller and cheaper processor, shaving $2 or $3 off the bill of materials, which can easily translate into $5 to $10 or more on the retail price. That savings can make all the difference between a product that succeeds or something that fails because it ends up in the wrong price bracket. The best way to control the final code size and performance is to have full control over your compiler and your build environment, allowing you to make the most out of every clock cycle on your embedded processor or SoC.
Compiling code for small embedded processors requires something called a toolchain. As the name implies, a toolchain is a collection of tools used to build executable code, and one of the most important parts of this toolchain is the cross-compiler. The cross-compiler compiles code while running on one architecture (for example, using an x86 instruction set) but produces code for a different architecture (for example, some variant of ARM). You have a number of commercial and open source options for cross compilers and low-level embedded toolchains, both commercial and open source, but we’ll focus on an open source solution in this section.
In recent years, GCC (the free, open source compiler collection that’s part of the GNU project) has made significant leaps and bounds in its support for ARM. Most of these advances are related to the dominance of ARM in the mobile phone and tablet arena (typically using ARM Cortex-A processors), but small, deeply embedded processors (ARM Cortex-M, etc.) have also benefited from the huge investments made here, due to overlapping instruction sets.
Widely used in a variety of industries, GCC is also conveniently available on any modern operating system and architecture. Code targetting GCC is generally highly portable, and you can build the same output on Linux, OS X, Windows, or almost any other environment you can imagine with no meaningful variation in the compiler output.
The latter point is extremely important and one of the main factors that makes GCC an excellent choice for embedded development. GCC does an excellent job with ARM processors today, but some commercial compilers still perform better at certain tasks. What GCC offers that no commercial toolchains can, though, is the assurance that you will always be able to rebuild your firmware using the same compiler version and dependencies. If commercial toolchains that require activation (and thus activation servers) aren’t kept up to date, they might not be able to guarantee that they’ll run on the current generation of operating systems or PCs.
If you’re new to embedded development, it’s easy to overlook this detail. Embedded devices can have lifespans of 10 or 20 years or more, far beyond the lifespan of most software packages. Commercial tools and development environments you use today might not exist in 10 years, and the vendor might not be around in the future to activate that long-retired product you invested heavily in years ago. GCC offers you the assurance that you’ll never face this problem, since you can archive the full source of your cross-compiler, including any library dependencies, along with your firmware code and know you can rebuild it all at any point in the future.
Setting up a GNU toolchain on a non-Linux PC used to be a reasonably involved task, but ARM has made now made it trivial by providing precompiled, regularly updated versions of GCC for Windows, OS X, and Linux, including easy-to-use installers that take care of many of the messy details.
The first step in setting up a development environment for ARM is to download the latest prebuilt GNU toolchain. As shown in Figure 10-1, you can download convenient installers for OS X, Windows, and Linux, as well as the raw source code and a guide on building the toolchain yourself on other platforms.
The latest version available on the website might vary, but you should generally choose the most recent package. ARM provides quarterly updates, often incorporating improvements into the compiler and associated libraries, yielding smaller or more efficient compiled code.
Installing GNU Tools on OS X and Linux
If you’re using OS X or Linux, you simply need to download the appropriate installer and run it. Any other development tools (make, various commands used in the makefile, etc.) are likely already available on your development machine or are easy to add (using Xcode on OS X and your package manager on Linux).
You can use the following command to confirm whether the GCC cross-compiler was successfully installed:
arm-none-eabi-gcc --version
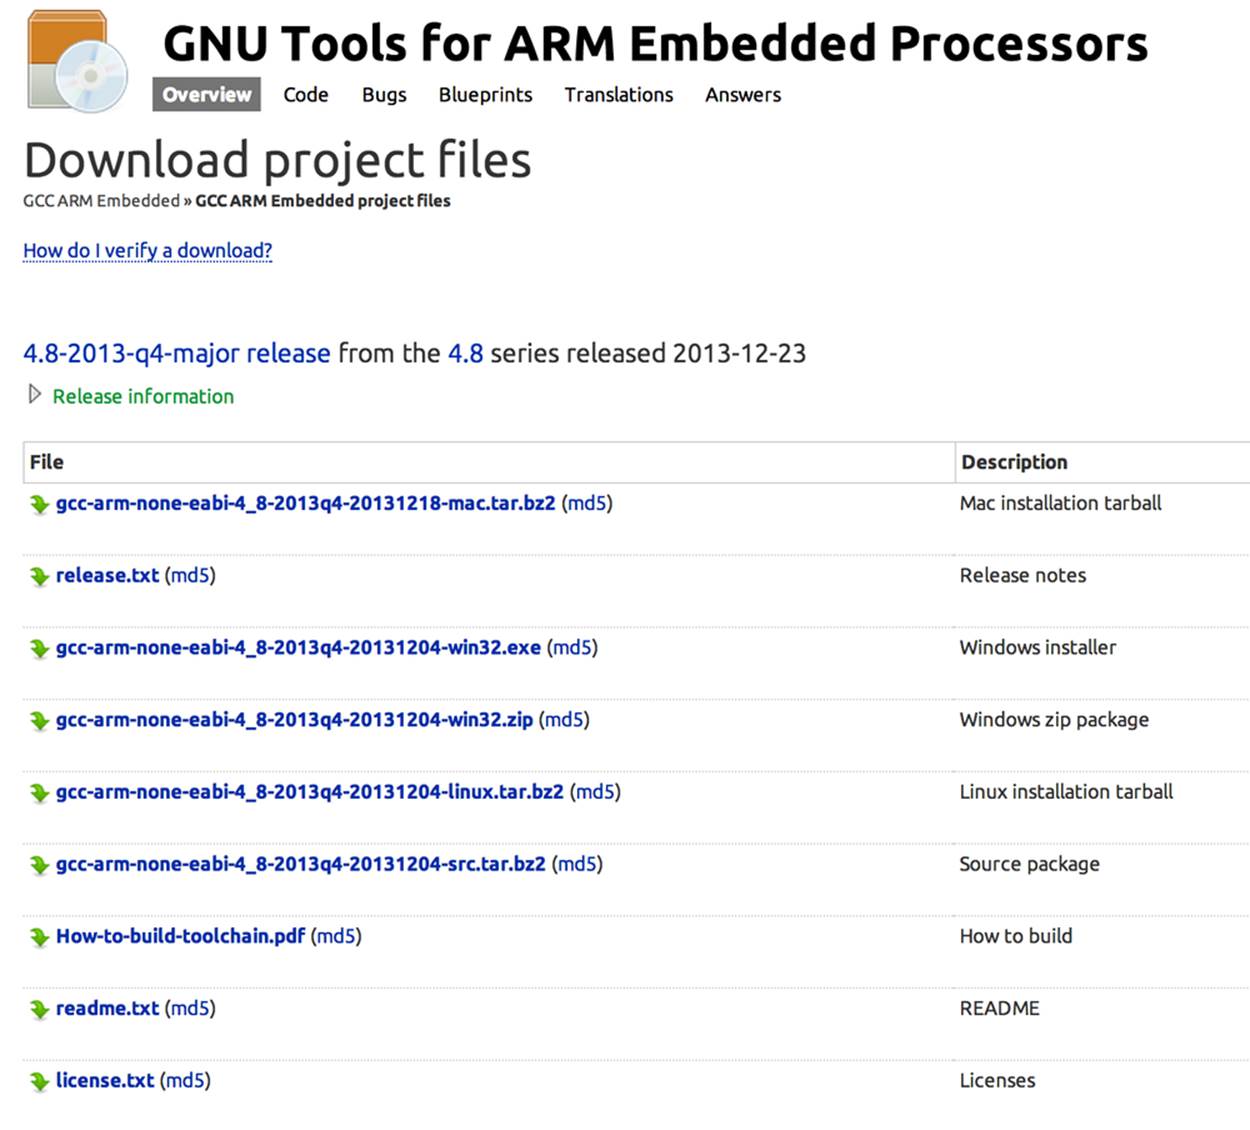
Figure 10-1. Download options for GNU Tools for ARM Embedded Processors
You should get a response that looks like this:
arm-none-eabi-gcc (GNU Tools for ARM Embedded Processors) 4.8.3 20131129
(release) [ARM/embedded-4_8-branch revision 205641]
Copyright (C) 2013 Free Software Foundation, Inc.
This is free software; see the source for copying conditions. There is NO
warranty; not even for MERCHANTABILITY or FITNESS FOR A PARTICULAR PURPOSE.
If you see this output, it means that your cross-compiler has been sucessfully installed and you can generate ARM binaries on your development machine.
Installing GNU Tools on Windows
If you’re using a Windows machine for development, you need to download the appropriate Windows installer and run it in the same manner you would any other installation package.
Make sure to select the post-installation option to “Add path to environment variable” (as shown in Figure 10-2). This will ensure that the toolchain is accessible from anywhere, which will generally make things easier when working with multiple folders and file locations.

Figure 10-2. Select Add path to environment variable to make the toolchain accessible from anywhere
Similar to the OS X/Linux test shown previously, if everything is set up properly, you should be able to drop down to the command line and enter the following command to see which version of the GNU toolchain you’ve installed:
arm-none-eabi-gcc --version
Unlike Linux and OS X, Windows usually won’t have some of the additional command-line tools the GNU toolchain generally requires, such as make and a number of *nix commands to work with files and directories (ls, cp, etc.). Thankfully, installing these additional tools on Windows is easy. GNU CoreUtils for Windows adds precompiled versions of all the file-editing commands you’ll need.
Download the complete CoreUtils for Windows package, except sources, and run the installer.
You’ll also need make, which you’ll use to control the compilation process and convert your source code into something meaningful that you can run on the nRF51822. After installing GNU Coreutils for Windows, download and install Make for Windows.
You can test if make was installed succesfully by dropping down to the command line and entering the following command, which should give you a version number as a response:
make --version
Once both of these tools have been installed, you should have everything you need to cross-compile code for ARM on your development PC. Now, you can get started with the nRF51822 codebase and a sample project.
nRF51822 GNU Codebase and Sample Project
The ARM toolchain configured in the previous section allows you to build binaries for virtually any embedded device that uses an ARM processor. But to help give you an idea of what’s involved with low-level embedded development in the real world, the following simple project is designed around Nordic’s nRF58122-EK (see nRF51822-EK (Nordic Semiconductors)) using GCC and open source tools. The same principles and design process apply to any other embedded processor, though you will need to find startup code and tools from your silicon vendor or online to work with a different microcontroller or SoC.
The code base isn’t exhaustive, but it should serve as a decent starting point for your own projects. It allows you to compile your firmware on a variety of platforms (Windows, OS X, or Linux) and provides a basic project structure that should be easy to understand and maintain.
NOTE
The nRF51822 GNU codebase, along with all the other sample code for this book, is hosted in the GitHub repository for this book. It’s worth looking at this repository for the latest code and any additional suggestions on working with the codebase that might have been added after publication of this book.
Going into exhaustive detail of Nordic’s APIs and BLE stack is beyond the scope of this chapter and deserves a book in itself, but we’ve made a conscious effort to keep the sample code as minimal, clear, precise, and easy to understand as possible. The following sections cover how to set up your PC with everything you need to start working with this codebase, favoring easy-to-install tools to build a simple heart rate monitor project.
Getting the nRF51822 GNU Codebase
The nRF51822 GNU Codebase is available within the GitHub repository for this book, along with all the other sample code from this book.
If you are using Linux or OS X, you probably already have Git available on the command line. To create a local copy of the repository that you can update as any changes are made to the codebase, simply execute the following command:
git clone git@github.com:microbuilder/IntroToBLE.git
To get the latest version of the code, go to the root folder of your project and enter the following command:
git pull
If you are on Windows, you can install Git from a precompiled binary (for example, msysgit) and run the previous command.
If you prefer to avoid using Git and avoid version control altogether, you can also simply download an archive of the latest code by going to the GitHub repository and clicking Download ZIP.
nR51822 GNU Codebase Structure
Once you have a local copy of the nRF51822 codebase, you should end up with a file structure resembling Figure 10-3.
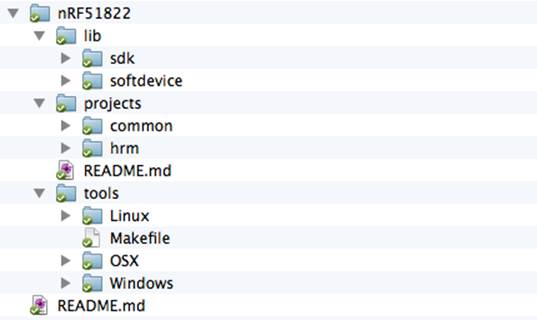
Figure 10-3. Bare file structure for the nRF51822 codebase
The projects folder contains sample projects. For any new project that you create based on this codebase, add a new folder here with a meaningful name describing your project. To help you get started, we’ve included a sample heart rate monitor project in the hrm folder. This project implements the standard heart rate service as defined by the Bluetooth SIG.
The tools folder gives you a convenient location to store OS-specific tools that you use during development. Including your tools here ensures that they are added to your version control system and guarantees they’ll be available at any point in the future. You might even want to add the binaries for your GNU toolchain here, to avoid any ambiguity about the version used when building your firmware and make debugging easier months or years down the road.
The lib directory should contain the SDK, SoftDevice, and any other proprietary files from Nordic. You’ll need to download these files from Nordic’s website directly, because licensing issues prohibit us from including them.
NOTE
In order to download the SDK and an appropriate SoftDevice for the nRF51822 from Nordic Semiconductor’s website you will need to create a MyPages account and register the product key that was printed on the packaging for your nRF51822-EK. This product key gives you access to all of the resources available for this chipset, so be sure to keep this product key somewhere safe, in case you need to reuse it in the future.
After downloading the files, add them to the lib directory with the folder structure shown in Figure 10-4.
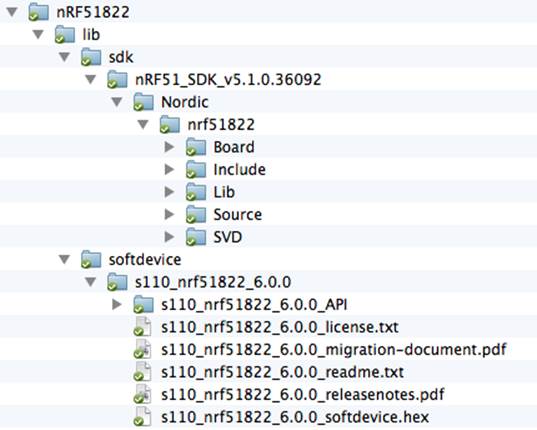
Figure 10-4. File structure for Nordic’s SDK and SoftDevice
Once you’ve updated your project to include these files, you’re ready to compile your first program.
Compiling Projects
If you have set up your GNU toolchain properly, including the ARM cross-compiler and any associated tools properly (as decribed earlier in this chapter), compiling should be as simple as dropping down to the command line, moving into the appropriate project folder (e.g., /projects/hrm), and running the following command:
make clean release
This will cause the make utility to interpret the makefile, which tells the compiler and toolchain exactly how to convert the source code in your folder into a binary image that can run on the target hardware. make starts the makefile interpreter, clean tells make to remove any previous build artifacts and start any cross-compilation with a clean slate, and release tells make to optimize the code for production situations, removing any unused code and extra debug information.
If this were a debug build, you could alternatively enter make clean debug, though this would produce larger executable code, because the binary data includes more debug information and unused code generally isn’t removed.
If everything was set up correctly, your command-line results should look similar to Figure 10-5.
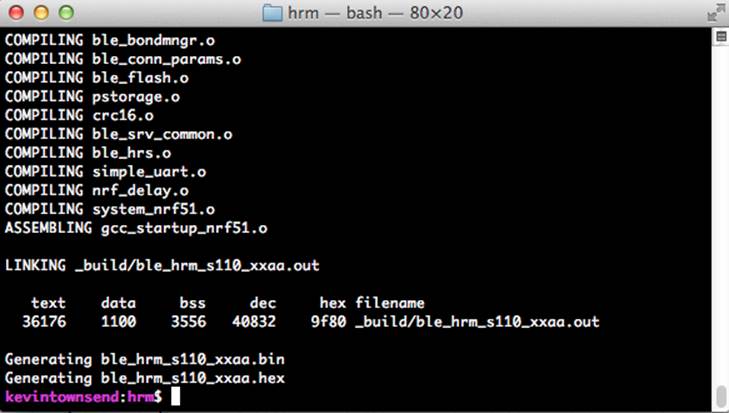
Figure 10-5. Successful cross-compilation and linking using GCC
This indicates that all of the .c files have been converted to object code (files with a .o extension), all of this object code has been assembled, and the linker has merged all of this data into a single file (ble_hrm_s110_xxaa.out in this case).
The following values are sizes (in bytes) that represent how much space the code took once compiled, assembled, and linked:
text
The amount of data that ended up in flash memory, which consists of executable instructions and read-only data. Everything in this section will be written to flash memory.
data
The amount of space used by initialized data, which are variables that have a specific value assigned to them at startup (for example, int16_t i = 1023, which is initialized to a specific value). Everything in this section will be stored in flash and then copied to SRAM, which is usually a precious resource on most small microcontrollers.
bss
The amount of space used by uninitialized data, which are variables that don’t have a value assigned to them (for example, int16_t i, which has no value assigned to it). Everything in this section will be allocated in SRAM.
dec
The size of all data combined, including both flash and SRAM data.
The last two lines are the output from a helpful tool called arm-none-eabi-objcopy, which converts the .out file into other file formats that third-party tools might find easier to work with, including Intel Hex, which is a common file format when working with embedded systems.
Writing to the nRF51822
To write your program code to the non-volatile memory on the development board in the nRF51822-EK, you can use Nordic’s nRFGo Studio utility, which is available on the same MyPages section of Nordic’s website where you downloaded the SDK and SoftDevice (in nR51822 GNU Codebase Structure).
NOTE
nRFGoStudio is currently a Windows-only tool, but Roland King has created an OS X alternative called rknrfgo. This unoffical application implements a subset of the functionality provided by nRFGo Studio, allowing you to program the flash memory on the nRF51822 using an easy-to-use GUI.
You can also program the flash memory on the nRF51822 directly from the command-line on Windows, OS X, or Linux using Segger’s J-Link drivers and the associated tools. Documentation and examples of how to work with the J-Link are available on Segger’s website.
If this is the first time that you are using your development board, you will need to write the SoftDevice .hex file to flash first. This writes Nordic’s BLE stack to the lower half of flash memory on the device. To do this, find the .hex file for your SoftDevice (which was downloaded from Nordic’s website as part of the SoftDevice package) and select it in the Program SoftDevice tab of nRFGoStudio, as shown in Figure 10-6.
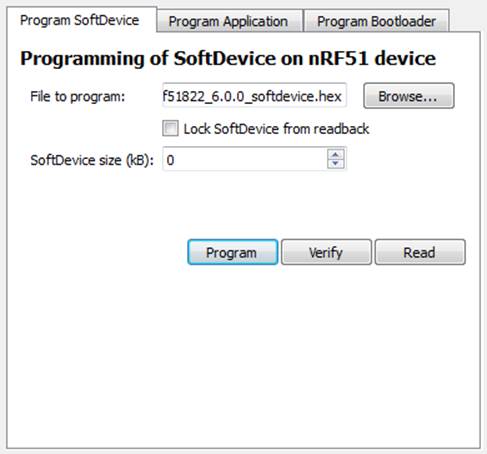
Figure 10-6. Programming the SoftDevice onto the nRF51822 using nRFGo Studio
NOTE
The SoftDevice generally needs to be written only once, unless you want to update to a different version. The user code will need to be updated every time you make a change to your program, but this user code usually won’t affect the SoftDevice, because they are stored in separate regions of flash.
Once the SoftDevice has been written, you can write your custom application code to the top half of memory, using the .hex file generated previously and the same nRFGo Studio tool, switching to the Program Application tab shown in Figure 10-7.
At this point, your application code has been written to the nRF51822 SoC and should start executing automatically. The application code will be able to make calls to the low-level SoftDevice for any BLE-specific functionality, and if everything is running properly, you should see LED0 on the PCA10001 development board blinking.
You can test the code you compiled by running an application on a BLE-enabled phone or tablet. First, download Nordic’s nRF Utility from Apple’s App Store or Google Play. After installing the app, simply select HRM from the main menu and click Connect, which should show something similar to Figure 10-8.
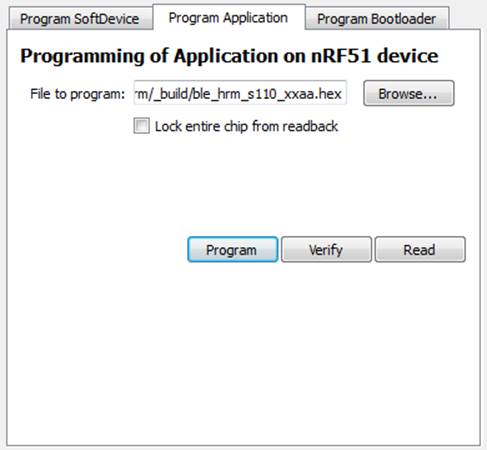
Figure 10-7. Programming the application code onto the nRF51822 using nRFGo Studio
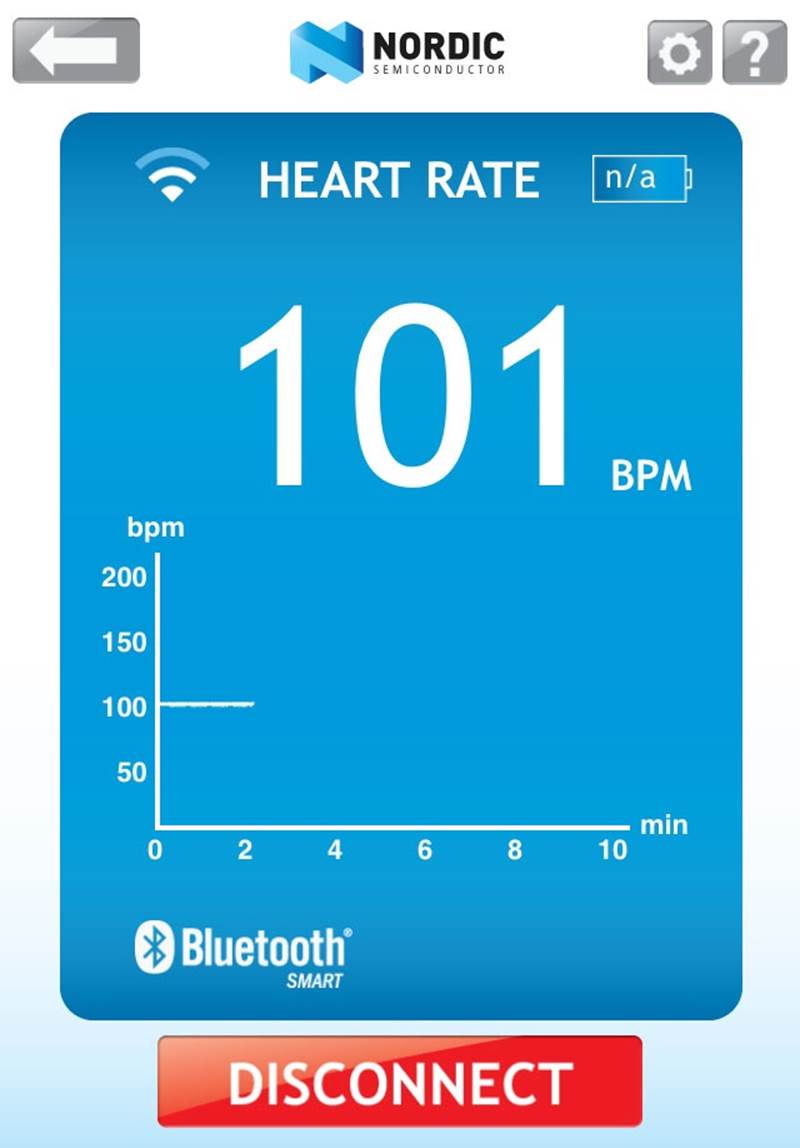
Figure 10-8. Using Nordic’s nRF Utility to visualize heart rate monitor data
If you want to have a different look at exactly what your nRF51822 and application code are transmitting over the air, or if something doesn’t look quite right to you, you can also try using any of the debug tools discussed in Chapter 6.
Going Further
Embedded development is a huge field, touching on a wide variety of domains. It involves physics with radio signal propogation and antenna design, electrical engineering with hardware design and part selection, mechanical engineering and industrial design with enclosures and overall product development, embedded software development for your firmware, manufacturing knowledge to source parts and assemble hardware, and effective test and validation strategies to make sure it doesn’t all come back to you prematurely.
This tutorial covers only the tiniest part of embedded development, focusing on firmware design, but if you’re interested in design and developing your own embedded hardware, there’s probably never been a better time to get started, regardless of your technical background. Costs are coming down, information on both hardware and firmware development, as well as manufacturing know-how, have never been more accessible, and entire online ecosystems exist around these technologies.
If you’re interested in going further with embedded development, take a look at some of the great open source hardware communities that have grown roots over the years, such as Adafruit or Make, as well as sites like Hackaday that highlight news projects every day. Communities like this might get the ball rolling in your own head, or expose you to some ideas or technologies you might not have been familiar with before.
Nordic Semiconductor’s also has a helpful Nordic Developer Zone forum, which can be a great source of answers to common problems working with this chipset.