Getting Started with Bluetooth Low Energy (2014)
Chapter 9. iOS Programming
Apple was an early supporter of Bluetooth 4.0 and, as a result, there is a rich set of APIs and tools to support development of BLE devices and applications using iOS. The iOS device in question is usually an iPhone (iPhone 4S or later), but iOS also supports BLE on all relatively new iPads (iPad 3 or later, or any iPad mini) and the fifth generation iPod Touch devices.
BLE is also supported on later-generation Macs—including iMac (built after late 2012), MacBook Pro (2012 or later), MacBook Air (2011 or newer), and Mac Pro (2013 or later)—but this chapter will focus on iOS, specifically iOS 7 and later.
The types of BLE devices and applications most relevant to iOS programming fall into three main categories:
Peripheral devices with iOS apps
In this category, BLE peripheral devices and sensors are paired with corresponding iOS apps—for example, a bicycling power and cadence meter that uses the iPhone to display and record data.
iBeacon devices
The iBeacon is a broadcast-only device that uses BLE advertising (see Advertising and Scanning) to augment navigation indoors, where GPS signals and cell phone towers typically can’t penetrate, to provide location services to iOS devices (and also Android devices).
Peripheral devices with Apple Notification Center Service
Built into iOS, the Apple Notification Center displays alerts and notifications, such as incoming caller ID and updates from news services, on the screen of the iOS device. Using the Apple Notification Center Service (ANCS), iOS devices can use BLE to display notifications on an auxiliary display, such as a BLE-enabled watch.
Developing apps for sensors primarily invloves using the Core Bluetooth framework, while developing apps for iBeacon primarily involves the Core Location framework (ANCS does not require an app). The Core Bluetooth framework (CoreBluetooth) is the portion of the iOS API (application programming interface) that deals with BLE functions and devices. Its CBCentralManager and CBPeripheral classes allow you to work with the centrals and peripherals described in Chapter 3. CBCentralManager provides resources for scanning, discovering, and connecting to remote peripherals, while CBPeripheral provides resources for working with services and characteristics that are part of the remote peripheral.
This chapter provides practical familiarity with these frameworks by studying code examples that focus on BLE functionality, especially the key classes and methods needed to implement BLE-enabled apps. These examples illustrate the foundations upon which a complete BLE-based app can be built. While the examples are not complete and polished apps, they are fully functional on an iOS device, and understanding how they work is a good start toward writing your own BLE-enabled apps for iOS.
NOTE
Complete Xcode projects for all examples are availble in the GitHub repository for this book. All examples require iOS 7 or later and Xcode 5 or later.
A general discussion of app development for iOS and the Xcode development environment is a broad and complex topic in itself, most of which is beyond the scope of this chapter or book. If you’re looking for more information, we recommend Programming iOS 7 and iOS 7 Programming Fundamentals (O’Reilly) by Matt Neuburg. Of course, the most authoritative source is Apple iOS Developer Library, beginning with the Core Bluetooth Programming Guide. The examples in this chapter will closely follow the approach recommended in that guide.
Simple Battery-Level Peripheral
This first example programs a central iOS device to look for and connect to a simple remote peripheral. The role of the remote peripheral is played by a Bluegiga BLE112 hardware module (see Bluegiga’s BLE112/BLE113 Modules for more information in this module). The iOS device will act as a GATT client and the peripheral as a GATT server (see Roles).
NOTE
The Bluegiga BLE112 module evaluation board used here is available from many online suppliers as part of a development kit for the BLE112 module family (part #: DKBLE112). The kit includes a number of prebuilt sensors and inputs for quick evaluation. Alternatively, Jeff Rowberg’s BLE112 Bluetooth Low Energy board is much less expensive. This is an open source hardware solution, so all the hardware design details are available from the same source.
The BLE112 module performing the function of the BLE peripheral in this case reads a voltage set by adjusting a small potentiometer (circled in the upper-left corner of Figure 9-1) using the on-board A/D converter and stores that value as the BLE “battery level” characteristic (scaled from 0 to 100%) via the BLE battery_level service. The iOS app must then to read the “battery level” stored on the BLE peripheral and make it available for use by the app. (For more information on services and characteristics, see Chapter 4).
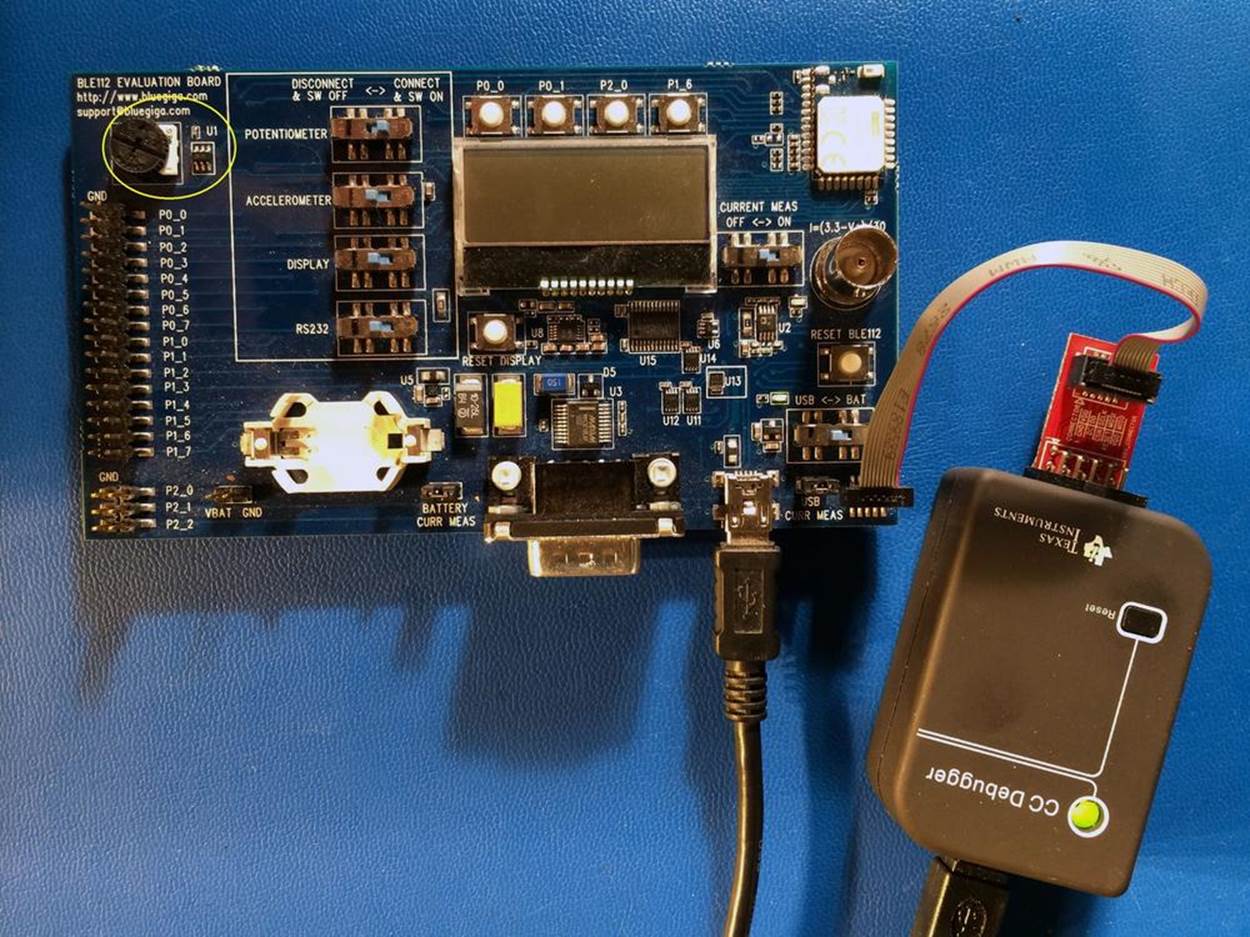
Figure 9-1. Bluegiga BLE112 development breadboard
NOTE
We are using the term battery level, rather than potentiometer, because a “battery level” peripheral is one of the predefined services and associated characteristics in BLE. Though there is no requirement to use a predefined profile, doing so is convenient for this discussion.
For this simple application, the key class references within the Core Bluetooth framework include CBCentralManager (an abstraction of the central manager role in BLE on the iOS device) and CBPeripheral (an abstraction of the remote peripheral on the iOS device). The code also includes the supporting classes CBService and CBCharacteristic, because you’ll need to know which services and related charateristics are available on the remote peripheral by discovering them (see Service and Characteristic Discovery).
Figure 9-2 shows the relationship between the services and characteristics programmed into the BLE remote peripheral device and the CBPeripheral objects.
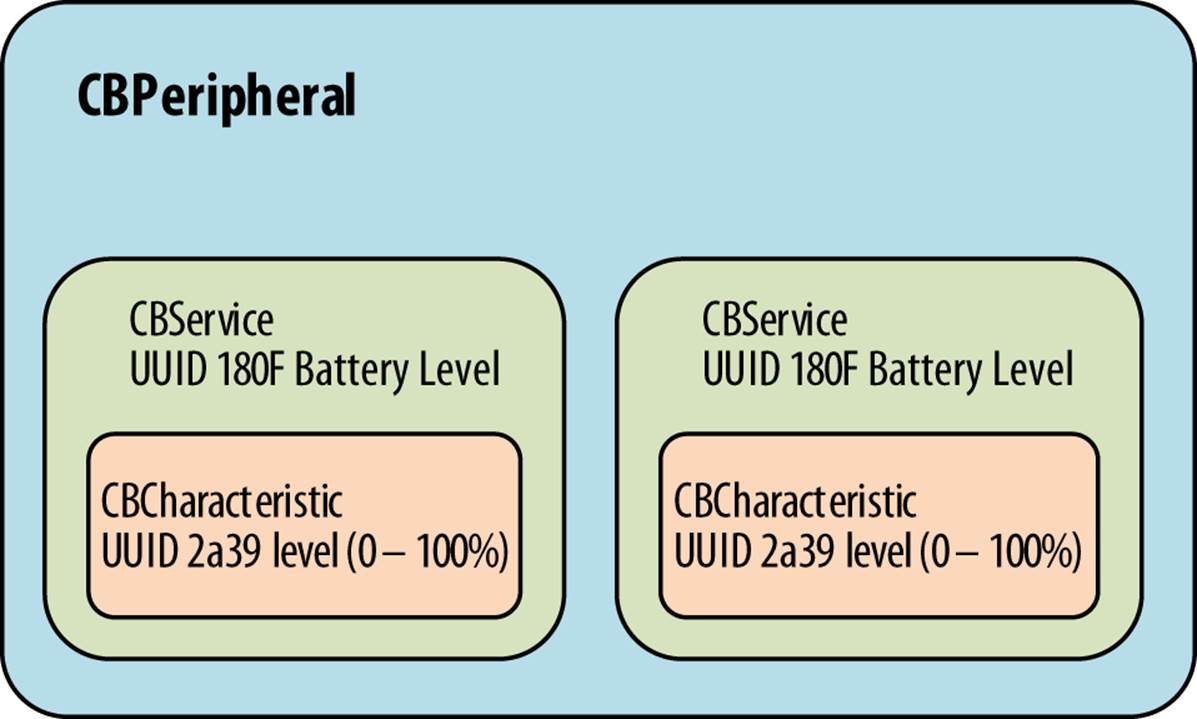
Figure 9-2. Relationship of CBPeripheral, CBServices, and CBCharacteristic objects
For convenience, the code in this example includes a few predefined services and characteristics (e.g., the Battery Service) from the BLE specification, which use 16-bit UUIDs instead of vendor-specific 128-bit UUIDs (see UUIDs).
NOTE
For more information on SIG-specified services and characteristics, the Bluetooth Developer Portal provides a complete list of all predefined services and adopted characteristics.
Scanning for Remote Peripherals
To get started, you’ll first need to allocate an instance of the CBCentralManager and start the BLE scanning (see Advertising and Scanning) operation for the battery level service:
// using the predefined BLE UUIDs for the battery level service
#define BATTERY_LEVEL_SERVICE_UUID 0x180f
#define BATTERY_DEVICE_INFO_SERVICE_UUID 0x180a
// build an array of services UUIDs of interest
NSArray *services = @[[CBUUID UUIDWithString:BATTERY_LEVEL_SERVICE_UUID],
[CBUUID UUIDWithString:BATTERY_DEVICE_INFO_SERVICE_UUID]];
// instantiate and start Central Manager object
CBCentralManager *centralManager = [[CBCentralManager alloc]
initWithDelegate:self queue:nil];
// scan for peripherals with services listed in services UUID array
[centralManager scanForPeripheralsWithServices:services options:nil];
self.centralManager = centralManager;
First, you use Core Bluetooth framework to create a list (NSarray) of the service UUIDs of interest, named services in this case. You will need to convert the UUID strings into CBUUID objects corresponding to UUIDs using the UUIDWithString method.
CBUUID also converts the predefined 16-bit service and characteristic UUIDS into the their fully formed 128-bit equivalents (for more information, see UUIDs). Next, the CBCentralManager object is instantiated and the list of UUID objects is provided as the first parameter for itsscanForPeripheralsWithServices method. In this case, the app scans for just two services, the device info service (UUID16=0x180A) and the battery level service (UUID16=0x180f). Only peripherals that include the required service UUIDs in their advertising data (see Table 3-3) will be returned as found.
Note that if the scanForPeripheralsWithSevices method were given nil for the first parameter instead of the list of CBUUIDs of interest (services), it would return all BLE peripherals in range. This is generally not a good practice, unless you really want to explore all the possible peripherals with services, because it works the BLE radio hardware more, which decreases battery life.
Connecting to Remote Peripherals
When a peripheral of interest is discovered in the scanning process, the centralManager invokes didDiscoverPeripheral, which is where you include the delegate method connectPeripheral. This method returns associated instances of peripheral objects that can be examined laterusing CBPeripheral methods:
- (void)centralManager:(CBCentralManager *)central
didDiscoverPeripheral:(CBPeripheral *)peripheral
advertisementData:(NSDictionary *) advertisementData
RSSI:(NSNumber *)RSSI
{
NSString *localName = [advertisementData objectForKey:
CBAdvertisementDataLocalNameKey];
if ([localName length] > 0)
{
NSLog(@"Found the battery level monitor: %@", localName);
// found peripheral so stop scanning
[self.centralManager stopScan];
// return peripheral object
self.batteryLevelPeripheral = peripheral;
peripheral.delegate = self;
// connect peripheral to centralManager
[self.centralManager connectPeripheral:peripheral options:nil];
}
}
It is good practice to stop scanning (using [self.centralManager stopScan]) after the peripheral of interest is found, again because it preserves battery power. Of course, if you need to find more than one peripheral, modify the logic in this example.
Looking Up Services Associated with a Remote Peripheral
After the peripherals are discovered and the peripheral object instantiated, you need to create related service objects and associated characteristics:
- (void)centralManager:(CBCentralManager *)central
didConnectPeripheral:(CBPeripheral *)peripheral
{
// establish peripheral delegate
[peripheral setDelegate:self];
// discover available services
[peripheral discoverServices:nil];
// log results
self.connected = [NSString stringWithFormat:@"Connected: %@",
peripheral.state == CBPeripheralStateConnected ? @"YES" : @"NO"];
NSLog(@"%@", self.connected);
}
In this code, the centralManager calls didConnectPeripheral and instantiates it when a connection has been established. The delegate is set for the peripheral and noted in the log.
Looking Up Characteristics Associated with Services
Core Bluetooth creates a CBService object for each discovered service by calling didDiscoverServices. The following code discovers characteristics (see Service and Characteristic Discovery) and stores them in an array of CBCharacteristic objects using thediscoverCharacteristics method from the CBPeripheral class:
- (void)peripheral:(CBPeripheral *)peripheral
didDiscoverServices:(NSError *)error
{
// sort through each service and discover chararacteristics
// associated with each
for (CBService *service in peripheral.services)
{
NSLog(@"Discovered service: %@", service.UUID);
// discover characteristics associated with each service
[peripheral discoverCharacteristics:nil forService:service];
}
}
Use caution if you pass nil as a parameter to [peripheral discoverServices:nil] and [peripheral discoverCharacteristics:nil forService:service], because the iOS device will then try to discover all the services and all the characteristics on the peripheral. This can waste battery power and time if the remote peripheral implements many more services and associated characteristics than the ones you’re looking for. That’s not a problem in this case, because we’re implementing only the ones of interest on the peripheral side. But if it could be a problem in your particular application, use lists of services and characteristics instead.
Once the services of interest and the associated characteristics are discovered, you need to read the characteristic’s values and make them available to the app. You can get the values directly using the readValueForCharacteristic: method, which is a good approach if the remote peripheral characteristic is static.
However, if the characteristic changes over time, as the battery level does, you should use the BLE notifications feature, described in Server-Initiated Updates. When this is done for the battery level characteristic, the application will be notified only when the value of the battery level changes. This avoids periodically polling the remote peripheral for changes, which can be hard on the battery life of the central iOS device because it creates unnecessary radio traffic.
You enable BLE notifications for a particular characteristic on the remote peripheral using the setNotifyValue:forCharacteristic: method (which writes to the corresponding CCCD on the peripheral, as explained in Client Characteristic Configuration Descriptor), as shown in the following code for the battery level characteristic (again, because the manufacturing data is static, it makes sense to use readValueForCharacteristic: for that):
- (void)peripheral:(CBPeripheral *)peripheral
didDiscoverCharacteristicsForService:(CBService *)service error:(NSError *)error
{
// Retrieve Service for the Voltage Level
if ([service.UUID isEqual:[CBUUID UUIDWithString:
BATTERY_LEVEL_SERVICE_UUID]])
{
for (CBCharacteristic *aChar in service.characteristics)
{
// Request level notifications
if ([aChar.UUID isEqual:
[CBUUID UUIDWithString:
BATTERY_LEVEL_MEASUREMENT_CHARACTERISTIC_UUID]])
{
[self.batteryPeripheral setNotifyValue:YES
forCharacteristic:aChar];
NSLog(@"Found battery level measurement characteristic");
}
}
}
if ([service.UUID isEqual:
[CBUUID UUIDWithString:BATTERY_LEVEL_DEVICE_INFO_SERVICE_UUID]])
{
for (CBCharacteristic *aChar in service.characteristics)
{
if ([aChar.UUID isEqual:
[CBUUID UUIDWithString:
BATTERY_LEVEL_MANUFACTURER_NAME_CHARACTERISTIC_UUID]])
{
[self.batteryPeripheral readValueForCharacteristic:aChar];
NSLog(@"Found a device manufacturer name characteristic");
}
}
}
}
Now, the didUpdateValueForCharacteristic method will be invoked whenever the peripheral has sent a notification, allowing the app to read the value of the battery level characteristic only when it changes:
- (void)peripheral:(CBPeripheral *)peripheral
didUpdateValueForCharacteristic:(CBCharacteristic *)characteristic
error:(NSError *)error
{
// Updated value for battery level measurement received
if ([characteristic.UUID isEqual:[CBUUID
UUIDWithString:BATTERY_LEVEL_MEASUREMENT_CHARACTERISTIC_UUID]])
{
// Get the battery level
[self getBatteryLevelData:characteristic error:error];
}
}
To this point, the code has created services and characteristics objects associated with the remote peripheral. The next section uses those objects to supply data to the rest of the application.
Methods for Reading and Decoding Characteristics
This next section of code retreives the notified battery level value from the characteristic objects for use elsewhere in the app:
- (void) getBatteryLevelData:(CBCharacteristic *)characteristic
error:(NSError *)error
{
// Get the Battery Level
NSData *data = [characteristic value];
const uint8_t *reportData = [data bytes];
uint16_t level = 0;
if ((reportData[0] & 0x01) == 0)
{
// Retrieve the level value for the Battery
level = reportData[1];
}
else
{
level = CFSwapInt16LittleToHost(*(uint16_t *)(&reportData[1]));
}
// Display the battery level value to the UI if no error occurred
if( (characteristic.value) || !error )
{
self.batteryLevel = level;
self.batteryLevel.text = [NSString stringWithFormat:@"%i %",
batteryLevel];
}
return;
}
And this code retrieves the manufacturing data for use in the app:
- (void) getManufacturerName:(CBCharacteristic *)characteristic
{
NSString *manufacturerName = [[NSString alloc]
initWithData:characteristic.value
encoding:NSUTF8StringEncoding];
self.manufacturer = [NSString stringWithFormat:@"Manufacturer: %@",
manufacturerName];
return;
}
At this point, the iOS API has enabled the battery level voltage that was measured by the remote peripheral A/D converter to be transferred via BLE onto the iOS device, making it available to display as a graph, present as text, or store in a database.
iBeacon
iBeacon apps use the Core Location framework features of iOS to provide navigation and location-based features to iOS and Android devices indoors, where access to cell tower signals and GPS might not work well or at all.
The iBeacon model offers a variety of new possibilities for connecting devices and communicating based on location, including interesting variants in retail settings. For example, permission-based marketing would allow retailers to push special offers and other information to customers (who have the corresponding app on their phones) based on their location in the store. In a museum, iBeacons could provide self-guided tours, delivering detailed information about nearby exhibits (in the form of text, audio, or video presentations) to visitors.
A device that implements iBeacon functionality broadcasts (see Broadcast and Observation) BLE advertising packets with the following four values included:
Proximity UUID
A 128-bit value that uniquely identifies one or more beacons as a certain type or from a certain organization.
Major value
An optional 16-bit unsigned integer that can group related beacons that have the same proximity UUID.
Minor value
An optional 16-bit unsigned integer that differentiates beacons with the same proximity UUID and major value.
RSSI value
Programmed into the beacon to facilitate determining distance from the beacon based on signal strength.
In the museum example, the proximity UUID would be associated with one particular museum, and major and minor numbers could be used to group or distinguish multiple beacons within the museum. In this case, the major value might specify a room in the museum, while the minor number might be associated with a particular exhibit in that room.
If mutiple beacons are installed this way, each associated with a particular room and exhibit, ranging performed by the iOS application on the receiving device (see Ranging) can distinguish between them, estimate the distance to each, and determine the location of the receiving device. One possible use of this infomation by the iBeacon app could be to deliver relevant information about the exhibit closest to the person holding the receiving iOS device.
Advertising
Typically, a beacon advertises only and doesn’t provide other services or connectability (because BLE devices stop advertising once a connection is made). The advertising packet format shown in Figure 9-3 follows the standard BLE format for adverting packets and uses the Manufacturer Specific Data AD Type (see Advertising Data Format).
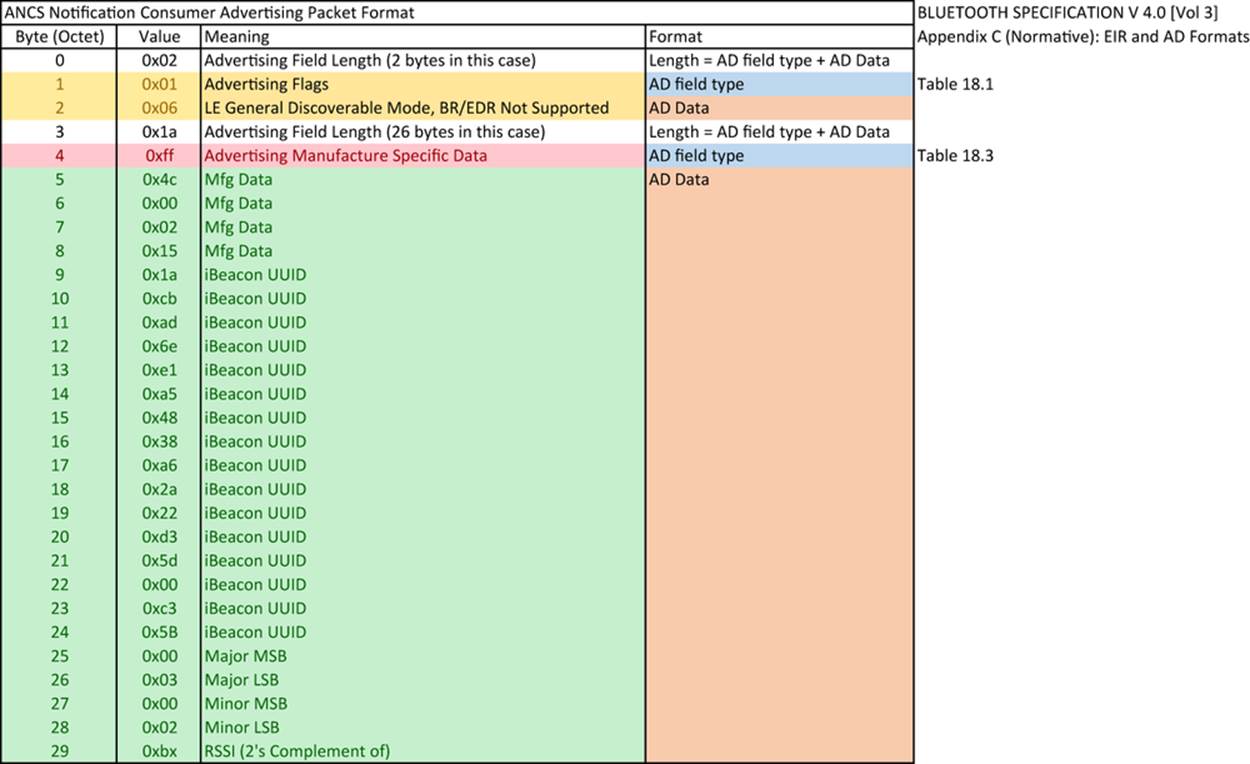
Figure 9-3. The advertising packet format used by iBeacon
The typical iBeacon is a simple coin-cell-powered piece of BLE hardware (the BLE112 module, for example). It is also possible to program an iOS device to perform the iBeacon advertising service using the Core Bluetooth framework. This is useful for testing, but not very practical, because the iBeacon app must always be in the foreground.
If you do want to turn your iOS device into an iBeacon transmitter, you can use the Locate for iBeacon app from Radius Networks. Another useful app from Radius Networks is MacBeacon for OS X, which allows your Mac to function as an iBeacon, saving your iOS device for testing your iBeacon app.
Ranging
Ranging is the process whereby the iBeacon app running on a receiving device (such as an iPhone) uses the strength of the received radio signal from a nearby beacon to estimate the distance between the receiving device and the beacon. The signal strength is measured in RSSI (received signal strength indication), a number in dBm that is available for every peripheral discovered by BLE apps running on iOS devices. In particular, the RSSI is tracked for every beacon in range of the iOS device running an iBeacon app. The measured RSSI from a particular beacon varies as the iPhone moves around a room. In general, the RSSI gets smaller as the distance between the iPhone and the iBeacon increases.
Beacons also broadcast an RSSI value in the advertising packet. The value of the RSSI number in this case is fixed and programmed into the beacon during manufacturing. The RSSI is determined by measuring the beacon’s signal strength at a fixed distance of one meter, typically using an iPhone running special-purpose software. For example, the Locate for iBeacon app from Radius Networks can be used for this.
The RSSI value is actually stored as a signed eight-bit integer representing dBm units in the advertising packet, but you don’t have to know this or deal with the RSSI being a logarithmic scale and varying (generally) as the inverse square of the distance from the beacon to use it as those details are taken care of by iOS. The main purpose of this calibration is to take care of variation in signal output from beacon to beacon, due to individual differences in construction and performance of the radio chips.
The iBeacon app compares the measured RSSI to the expected value of the RSSI at one-meter broadcast in the advertising packet by the beacon to estimate the distance between the beacon and the iOS device. This method yields a fairly good estimation of the distance to a beacon (typically, within less than one meter) if all the beacons are calibrated.
The Core Location service provides classes and methods for ranging using iBeacons, as demonstrated in the following examples. You will want to use instances of the CLBeaconRegion class and associated methods. With calibrated beacons and LCBeaconRegion, you only have to think in terms of actual distance in meters and beacon regions (circular areas surrounding a particular iBeacon with a radius you set).
For example, you can have the iBeacon app trigger some action relative to an iBeacon region, such as an alert that tells you when you enter or leave a particular region with a desired radius from a particular beacon. Methods are also provided to tell the app which iBeacon is closest, again based on ranging values.
Implementing an iBeacon App
To implement the following iBeacon app, all you need is the Core Location framework, within which the key class references for the application include CLLocationManager, CLBeaconRegion, and CLBeacon. No parts of the Core Bluetooth framework are used directly. This iPhone app detects the presence of nearby beacons and determines which one is closest.
To test the app, we programmed several BLE112 modules (shown in Figure 9-4), powered by CR2032 coin cells for easy placement.
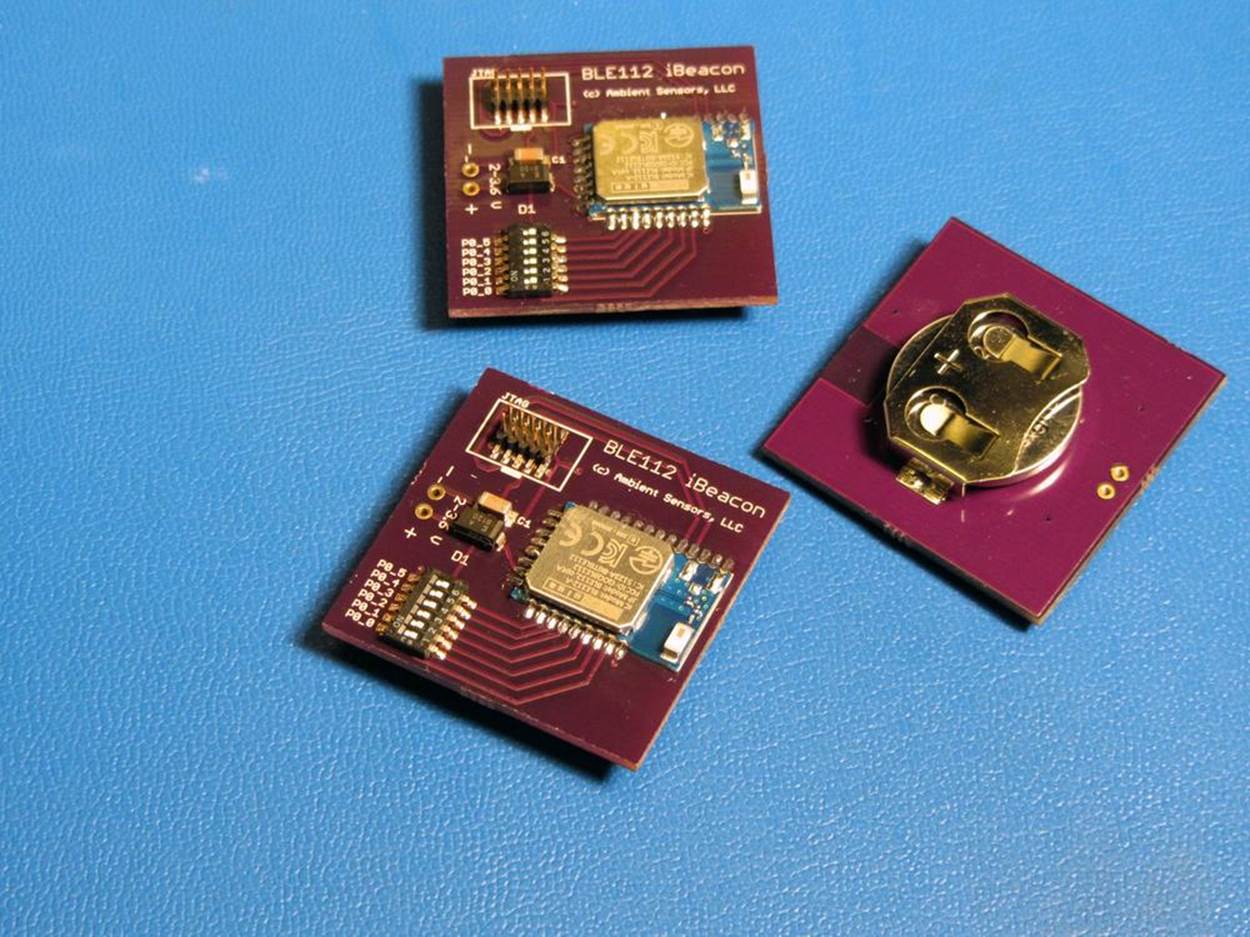
Figure 9-4. BLE112 modules programmed as iBeacons and powered by CR2032 coin cells.
NOTE
For testing, the Bluegiga BLE112 modules generated and transmitted the required iBeacon advertisng packet. Complete code for both the iPhone app and the testing program for the BLE112 modules is provided in the GitHub repository for this book.
First, you need to create and register the beacon region:
@implementation BobsBeaconTracker
- (instancetype)init
{
self = [super init];
if (self == nil) return nil;
self.locationManager = [[CLLocationManager alloc] init];
self.locationManager.delegate = self;
self.beaconRegion = [[CLBeaconRegion alloc]
initWithProximityUUID: [[NSUUID alloc]
initWithUUIDString:
@"E2C56DB5-DFFB-48D2-B060-D0F5A71096E0"]
identifier: @"Bobs Beacon default region"];
self.beaconRegion.notifyEntryStateOnDisplay = YES;
[self.locationManager startMonitoringForRegion:self.beaconRegion];
return self;
}
Since each iBeacon app must use a particular proximity UUID that is hardcoded into the app through the initWithProximityUUID process earlier, it will respond only to beacons with that UUID (the UUID that is registered with iOS when the app is downloaded). This means that users have control, because they must download the app to use it (though, once installed, the app can still receive alerts even if it is not open or running). Without explicitly downloading the app, they will not be bombarded by unwanted iBeacon alerts and notices associated with other beacons with different proximity UUIDs.
As of iOS 7.1, the operating system itself registers the beacon regions that work with the app when the app is installed. Then, even if the app is suspended or not running, the system will wake up the iOS app to deal with entering or exiting a beacon region, normally within about 10 seconds.
In this next section of code, the CLBeacon class provides methods and objects to start and stop monitoring for particular iBeacons, as well as methods that determine which beacon is closest to the iOS device:
// start ranging beacons
- (void)locationManager:(CLLocationManager *)manager
didEnterRegion:(CLRegion *)region
{
if (![region.identifier isEqualToString:self.beaconRegion.identifier])
return;
[self.locationManager startRangingBeaconsInRegion:self.beaconRegion];
NSLog(@"entered region");
}
// stop ranging beacons
- (void)locationManager:(CLLocationManager *)manager
didExitRegion:(CLRegion *)region
{
if (![region.identifier isEqualToString:self.beaconRegion.identifier])
return;
[self.locationManager stopRangingBeaconsInRegion:self.beaconRegion];
NSLog(@"exited region");
}
// determine closest beacon
- (void)locationManager:(CLLocationManager *)manager
didRangeBeacons:(NSArray *)beacons
inRegion:(CLBeaconRegion *)region
{
__block CLBeacon * closestBeacon ;
if (beacons.count < 1) {
closestBeacon = nil;
}
else
{
NSLog(@"locationManager didRangeBeacons: %@", beacons);
[beacons enumerateObjectsUsingBlock:^(CLBeacon * beacon, NSUInteger idx,
BOOL *stop)
{
if ((closestBeacon == nil) || (beacon.rssi > closestBeacon.rssi))
{
closestBeacon = beacon;
}
NSLog(@"closest beacon: %@", closestBeacon);
}];
}
if (![self beacon:self.closestBeacon isSameAsBeacon:closestBeacon]) {
self.closestBeacon = closestBeacon;
[[NSNotificationCenter defaultCenter]
postNotificationName:BobsBeaconTracker_ClosestBeaconChanged
object:self];
}
}
// compare beacons
- (BOOL)beacon:(CLBeacon *)beacon isSameAsBeacon:(CLBeacon *)otherBeacon
{
return ([beacon.proximityUUID isEqual:otherBeacon.proximityUUID] &&
(beacon.major == otherBeacon.major) &&
(beacon.minor == otherBeacon.minor));
}
If this code were embedded in a museum application, the app could now determine the closest beacons and then take the appropriate action (e.g., provide multimedia content that futher explains the exhibit).
Android devices can also make use of iBeacons, or BLE beacons in general. If you are interested in using iBeacons with Android, see the Radius Networks Android library of APIs to interact with iBeacons.
Apple Notification Center Service with an External Display
The Apple Notification Center Service (ANCS) function in iOS is the source of notifications displayed as a banner message along the top of the active screen (or in place of the entire active screen) for timely alerts (e.g., when you receive a text message, miss a call, or for a variety of other applications). For example, when you receive an incoming call, the ANCS temporarily replaces the active screen with the screen shown in Figure 9-5.
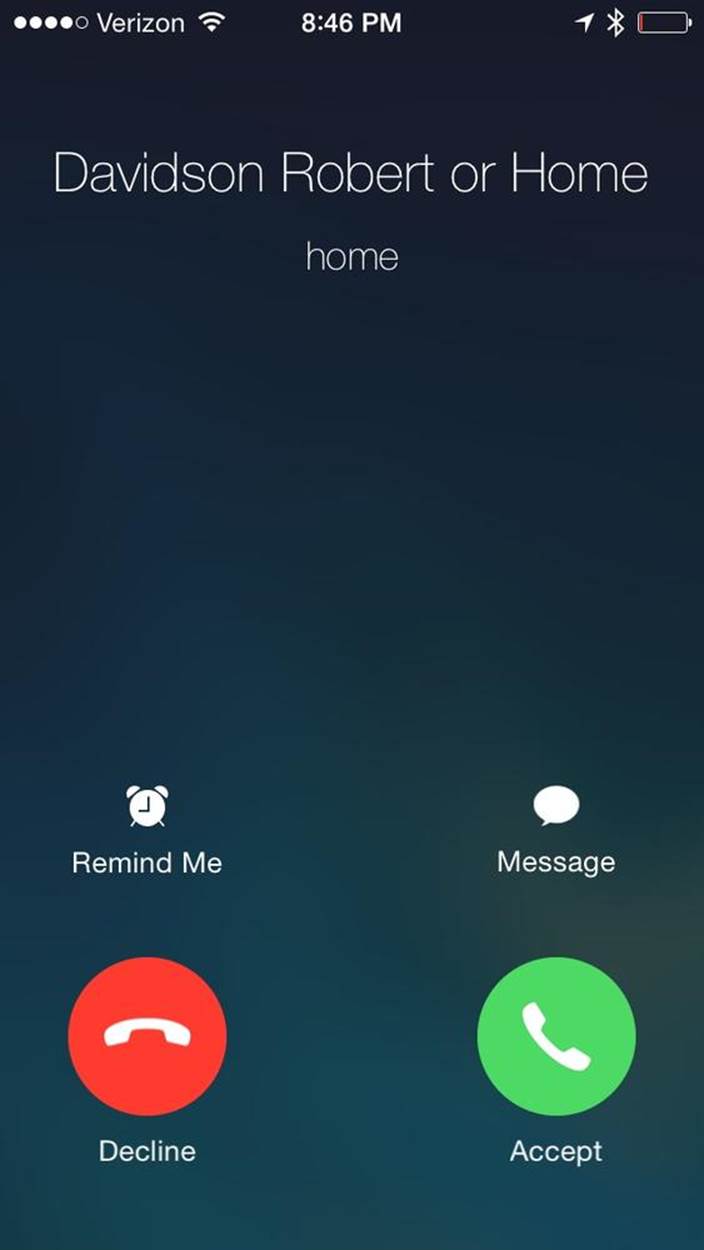
Figure 9-5. A notification of a phone call on an iPhone
When iOS 7 was introduced, Apple included a BLE interface to the ANCS to route similar alerts to BLE connected accessories—for example, a BLE-enabled watch.
NOTE
In the ANCS context, the iOS device always acts as a GATT server, and the device that displays the notifications acts as a GATT client. For efficiency, describing how the ANCS works requires some terminology. For the purposes of this discussion, we will refer to the iOS device that sends the ANCS notifications as the notification provider (NP) and the accessory waiting to receive notifications (e.g., the BLE-enabled watch) as the notification consumer (NC).
Notifications displayed on the iOS device are also known as iOS notifications, whereas notifications sent via BLE GATT characteristic are known as GATT notifications.
Using ANCS does not require programming an app on the iPhone. Instead, the accessory advertises its request to receive notifications via an advertising packet, which includes the service UUID of the ANCS (7905F431-B5CE-4E99-A40F-4B1E122D00D0). Figure 9-6 shows the structure of the packet.
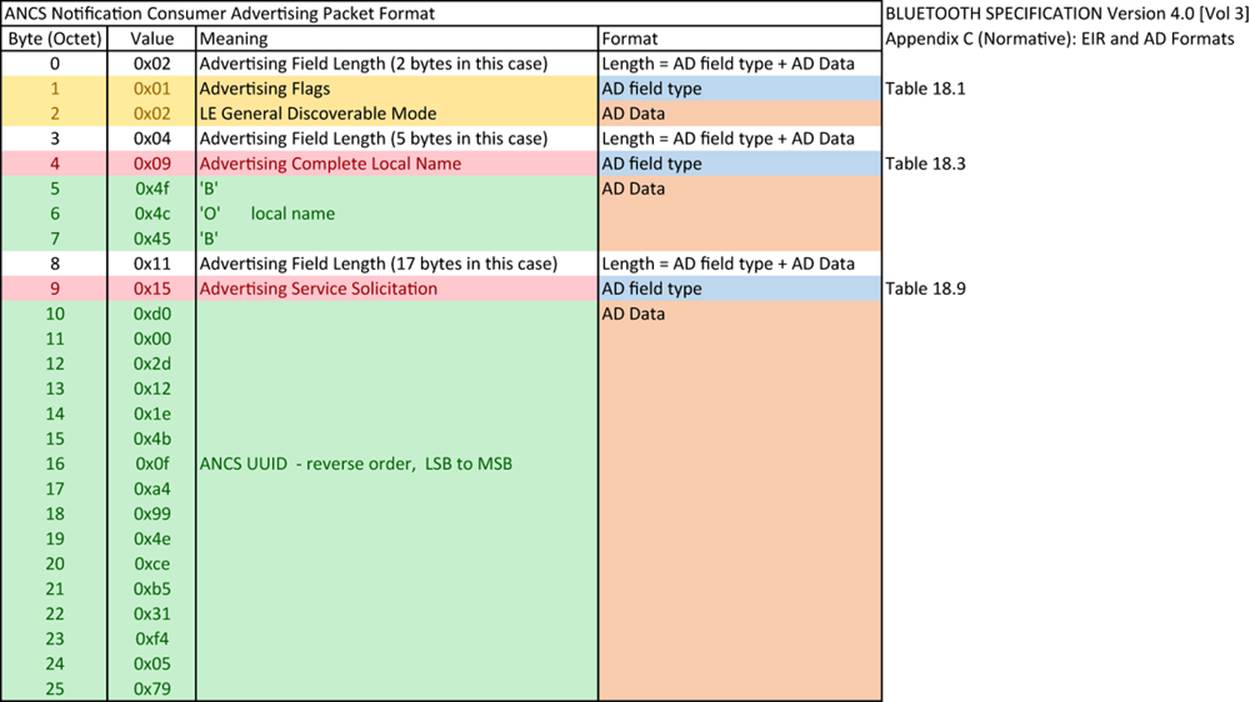
Figure 9-6. The advertising packet format used by the NC
When the NP iOS device scans an advertising packet with the ANCS UUID from the NC, it connects to the NC accessory device. Now, a curious role reversal takes place (at least in the way we might normally think of the data flow between the central and peripheral). The NC (peripheral) becomes a GATT client, subscribing to services on the NP (ANCS services) and receiving notifications and data from the NP (central) iOS device. This is completely normal, because, as mentioned in Roles, the GAP and GATT roles are independent from each other.
On the NP (iOS central device), the Apple Notification Center Service UUID is 7905F431-B5CE-4E99-A40F-4B1E122D00D0, with the following associated characteristics/UUIDs:
Notification Source
UUID 9FBF120D-6301-42D9-8C58-25E699A21DBD (notifiable)
Control Point
UUID 69D1D8F3-45E1-49A8-9821-9BBDFDAAD9D9 (writeable with response)
Data Source
UUID 22EAC6E9-24D6-4BB5-BE44-B36ACE7C7BFB (notifiable)
The Notification Source is a mandatory characteristic, while the others are optional. Normally, the accessory (the NC) will subscribe to the Service Changed characteristic of the GATT service to receive notifications of changes in the ANCS automatically from the Notification Source. Upon receiving notification of a new GATT notifications from ANCS, the NC can request more information. To find out more, the NC sends (writes) a message to the Control Point, including the notification ID of interest and a list of associated attributes the NC wishes to receive. Those are then provided in response from the Data Source.
The NC (peripheral) firmware must perform the following steps:
1. Start advertising (typically, once per second), including the ANCS UUID in the advertising packet to alert any NP in range.
2. When the NP (iOS device) connects, pair (if not already bonded) or enable encryption with the NC device.
3. Enumerate the iOS ANCS services.
4. Set the client for the notification source.
5. On notification, write a message to ANCS Control Point if more information is desired.
6. Receive response from the Data Source (containing notification ID and data).
Pairing of the NC (given local name BOB in this example) with the iOS device is straightforward. After the NC (remote peripheral) starts advertising, you must open Settings→Bluetooth on the NP (central) iPhone to trigger a scan for BLE devices and then manually pair the device (as shown in Figure 9-7). No pin is required.
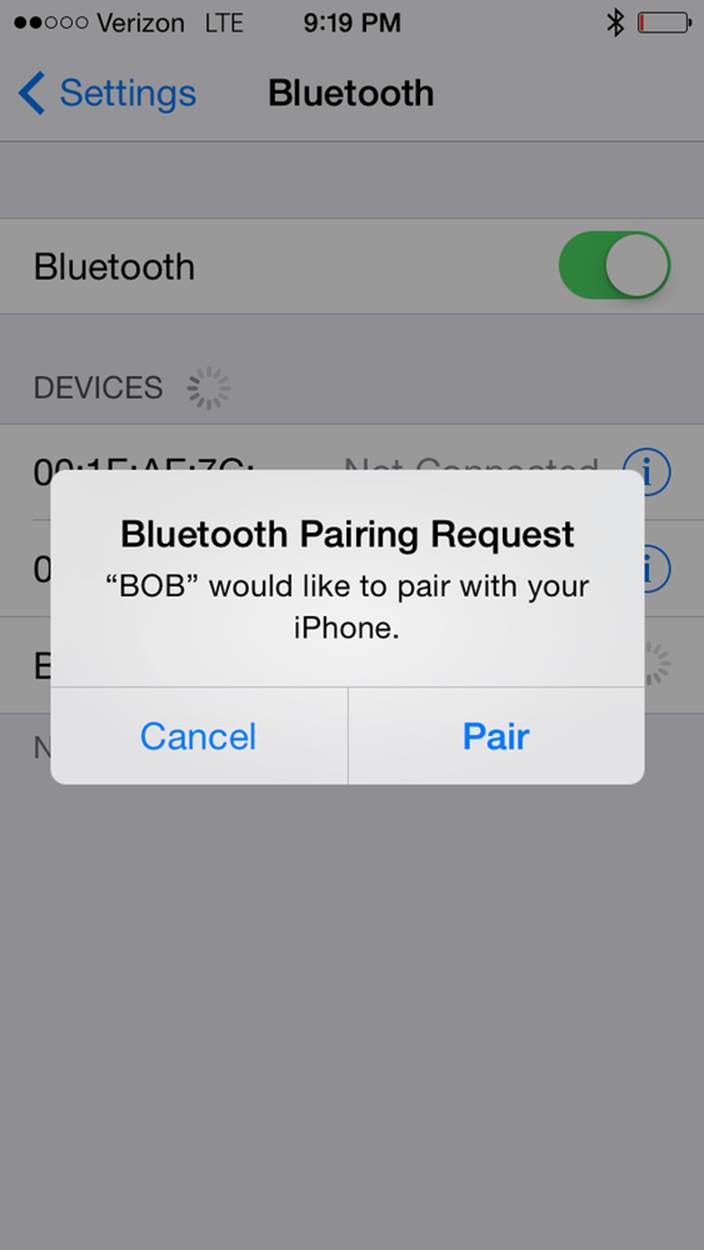
Figure 9-7. Pairing NP (central) with NC (remote peripheral)
Figure 9-8 shows the notification received on a terminal emulation screen connected to the NC (peripheral). In this case, the NP (an iPhone 5) sent three notifications: an incoming call, a missed a call, and a new voicemail message.
The first line, CALL (notification type), followed by the line ns, denotes the notification string received by the NC and written to the NC UART for display on the terminal emulator. The string done indicates that the connection for the notification is complete. Then the software scans the data sent along with the notification.
The next pieces of data are a UID (all zeros) and a text string with the name of the caller (caller ID): Davidson Ro. The next line, MISSED, is the beginning of a second notification event (for a missed call). The third notification (for a new voicemail message) begins with the line VMAIL.
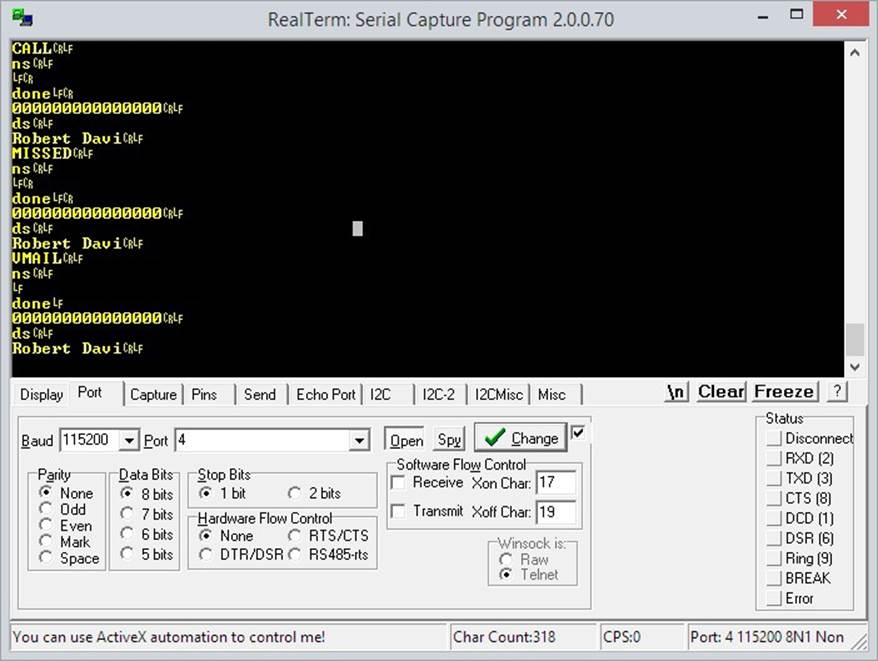
Figure 9-8. A phone call notification displayed on a terminal emulator screen
All materials on the site are licensed Creative Commons Attribution-Sharealike 3.0 Unported CC BY-SA 3.0 & GNU Free Documentation License (GFDL)
If you are the copyright holder of any material contained on our site and intend to remove it, please contact our site administrator for approval.
© 2016-2026 All site design rights belong to S.Y.A.