Getting Started with Bluetooth Low Energy (2014)
Chapter 8. Android Programming
One of the main benefits of using a wireless standard like Bluetooth Low Energy is its support for a wide variety of smartphones and tablets. This opens up a new dimension of interaction to embedded hardware projects, which can now be designed with cheap hardware and rich interfaces.
Beyond the interface, you can also use the phone as a gateway to the larger Internet or in conjunction with other apps or APIs to create custom mashups with the embedded hardware you’ve created. This enables a whole new class of inexpensive devices that still offer rich functionality.
This chapter provides a basic overview of the hardware, software, and processes required to implement Bluetooth Low Energy on the Android operating system.
Getting Started
The example Android project developed in this chapter interfaces with the low-cost SensorTag device (SensorTag) manufactured by Texas Instruments (TI). The SensorTag offers many sensors and is a great example of a complex sensor device that can provide lots of information to be processed and visualized.
Because the GUI side of Android can get a bit complex and is generally beyond the scope of this book, this chapter focuses on getting you to the point where you can extract data out of the SensorTag and receive it via Bluetooth Low Energy. At that point, many other available resources can demonstrate ways to present data.
Get the Hardware
For hardware, you’ll need an Android device running Android version 4.3 or later. While Android began supporting BLE version 4.3, we recommend a device running at least version 4.4, which includes an updated and more stable version of the BLE protocol stack. You’ll also need to make sure the hardware supports Bluetooth Low Energy. This example project uses a Google Nexus 7 running Android 4.4.
NOTE
To confirm whether your device supports BLE, see Blueooth’s Smart Devices List.
You’ll also need to pick up a TI SensorTag, which will serve as the peripheral device in this project. See SensorTag for more information about the SensorTag device.
Get the Software
For this project, you’ll need three main pieces of software:
Eclipse Android Development Tools (ADT)
Available at the Android Developer site
Bluetooth Application Accelerator
Available at the Bluetooth SIG website
TI SensorTag Android app source code
Available at TI’s website
The most important and most time-consuming part of the setup is installing the Android Development Tools, which also requires understanding a bit about how to use the Eclipse IDE. Your best bet is to go to the Android Developer site for detailed instructions on setting up your working environment. You’ll need to download the latest SDKs and any updates to the Android Developer Tools.
Configure the Hardware
The Android device needs a bit of configuration before it can be used as a development device. First, you’ll need to enable Developer mode, if it’s not already enabled. Go to the Settings menu, scroll down to the bottom, and select About. On the About screen (shown in Figure 8-1), tap “Build number” seven times in rapid succession to turn on Developer mode.
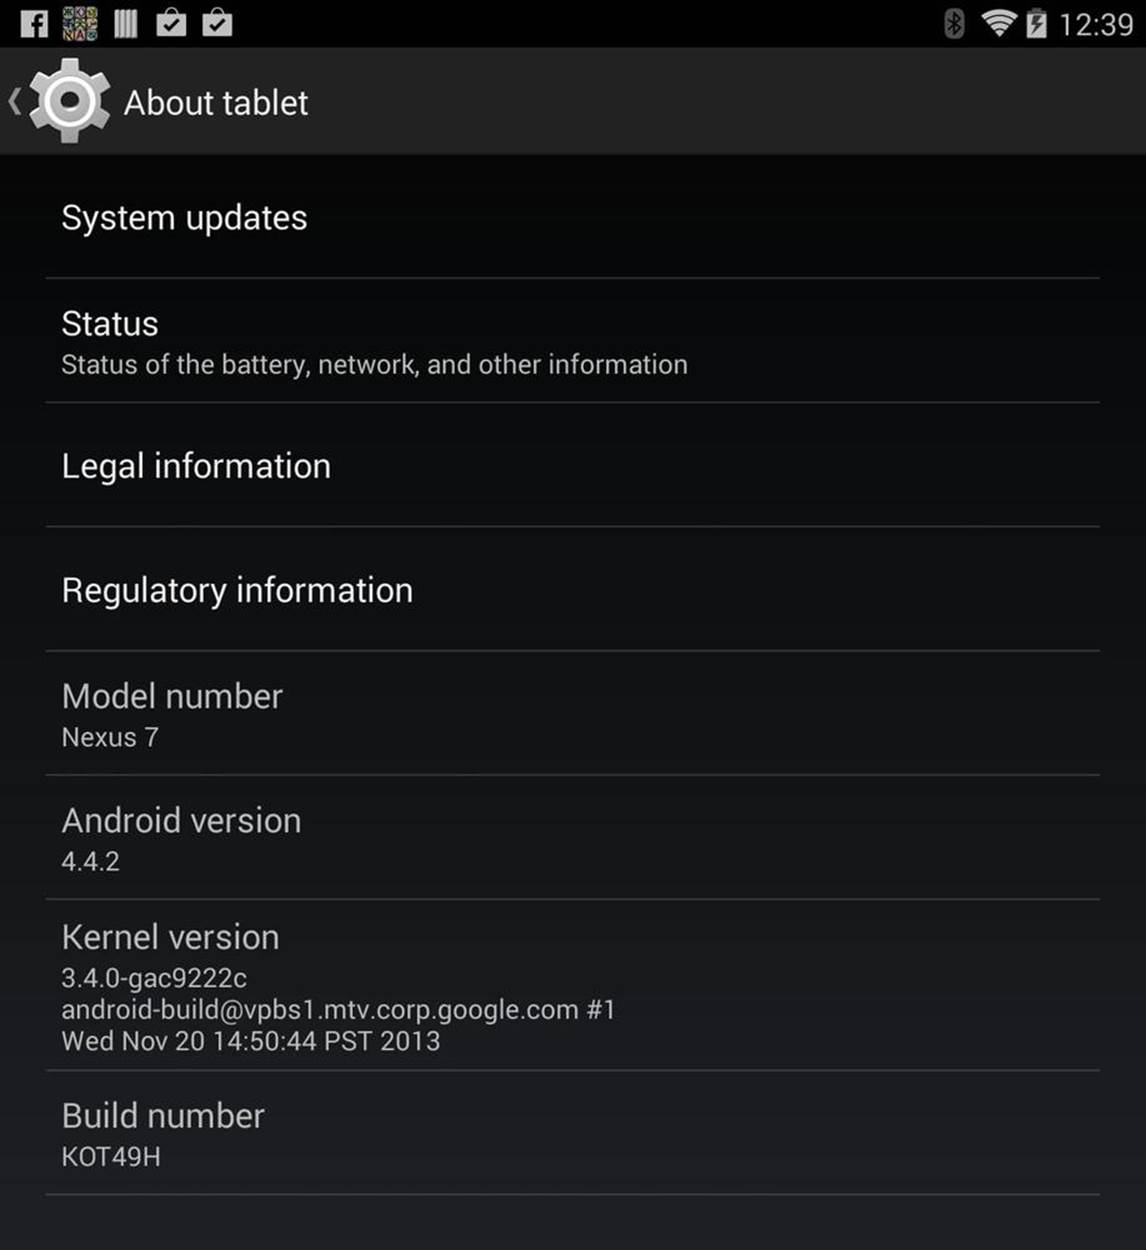
Figure 8-1. Enabling Developer mode from the About screen
You should now see a new “Developer options” item in the Settings menu. Now, you’ll need to enable the “USB debugging” and “Stay awake” options, as shown in Figure 8-2.
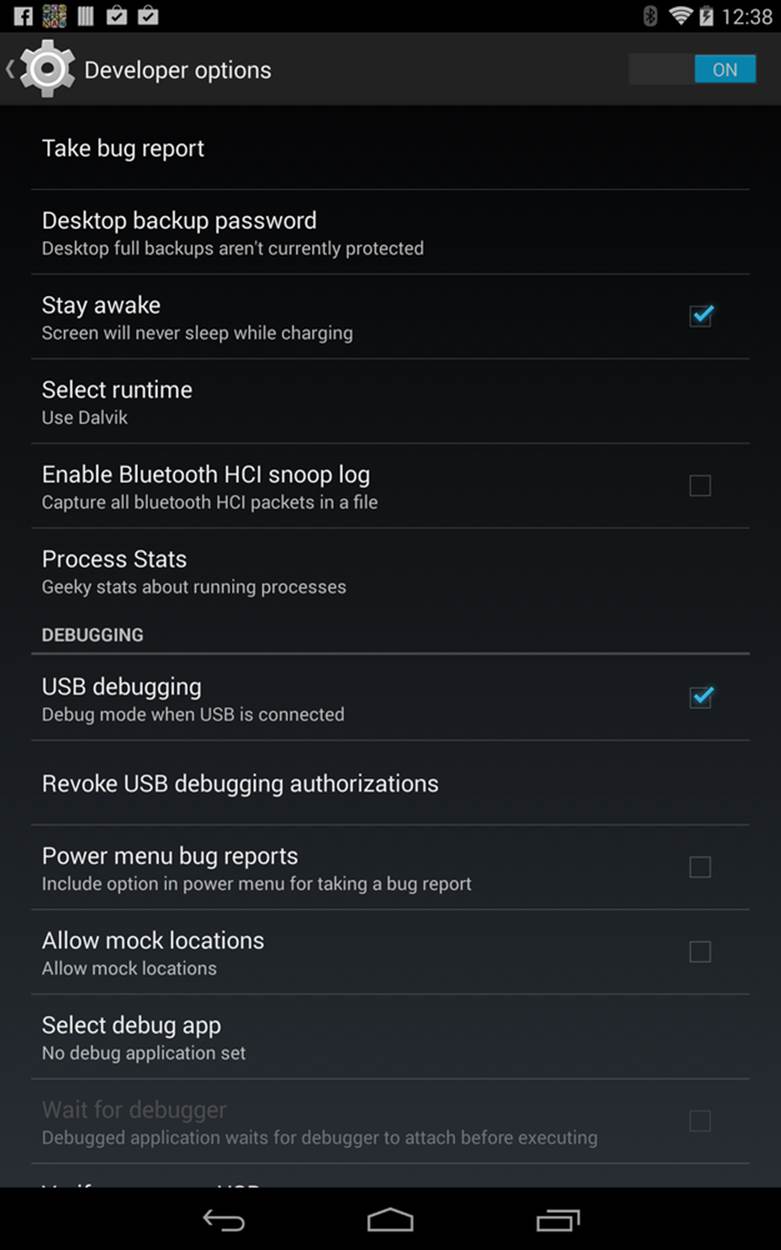
Figure 8-2. Enabling “USB debugging” and “Stay awake” options on the “Developer options” screen
Finally, go to the Settings menu, select Storage→Options→“USB computer connection,” and enable the Camera option (as shown in Figure 8-3)to allow you to transfer files.
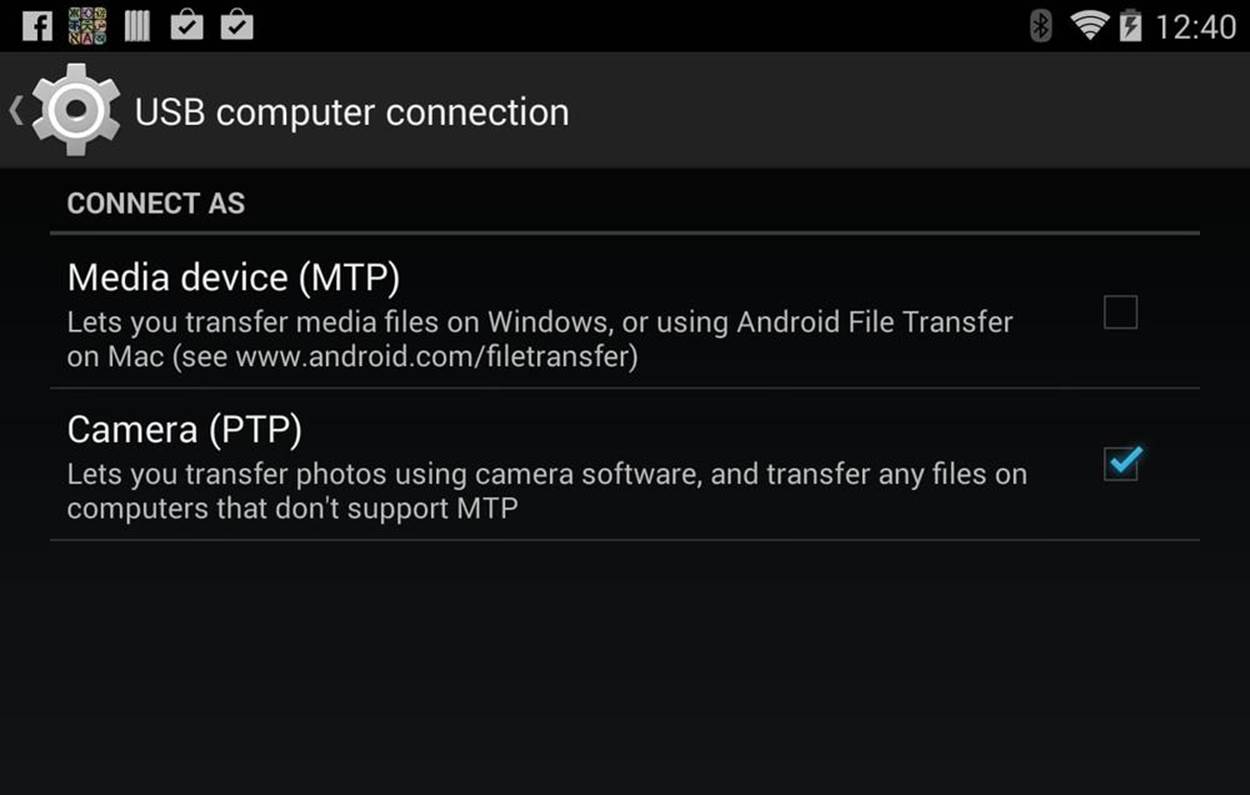
Figure 8-3. Configuring the Android as a camera to transfer files
This might sound counter-intuitive, but the device needs to be in Camera mode for the development tools to work.
Start a New Project
To start a new application, you’ll first need to import the Bluetooth Application Accelerator’s Android files into the project. Open Eclipse ADT, select File/Import, navigate to the directory that contains the Application Accelerator, and select the Android/BLEDemo folder. Press OK to import the project into the workspace.
At this point, you might want to look through the Application Accelerator files a bit to see how the code is laid out. If it looks foreign to you, don’t worry. Rather than spending too much time inside the Application Accelerator, you’re going to move the main class files for the BLE library into your own project.
Now it’s time to create your own Android project. In Eclipse, go to File→New→Android Application Project. For the Application Name, use BleSensorTag. For Minimum Required SDK, specify Android 4.3. This is the minimum version of Android that supports Bluetooth Low Energy. For Target SDK and Compile With, use the latest version of Android the device supports. Click Next for the rest of the windows to accept the defaults. Finally, the project wizard should create a new Android project for you called BleSensorTag.
As shown in Figure 8-4 (which shows the project directory structure on the left and the main code window in the right), an Android project contains many folders and files, but you’ll be working in only a few. The main sourcecode file is located in the /src directory.
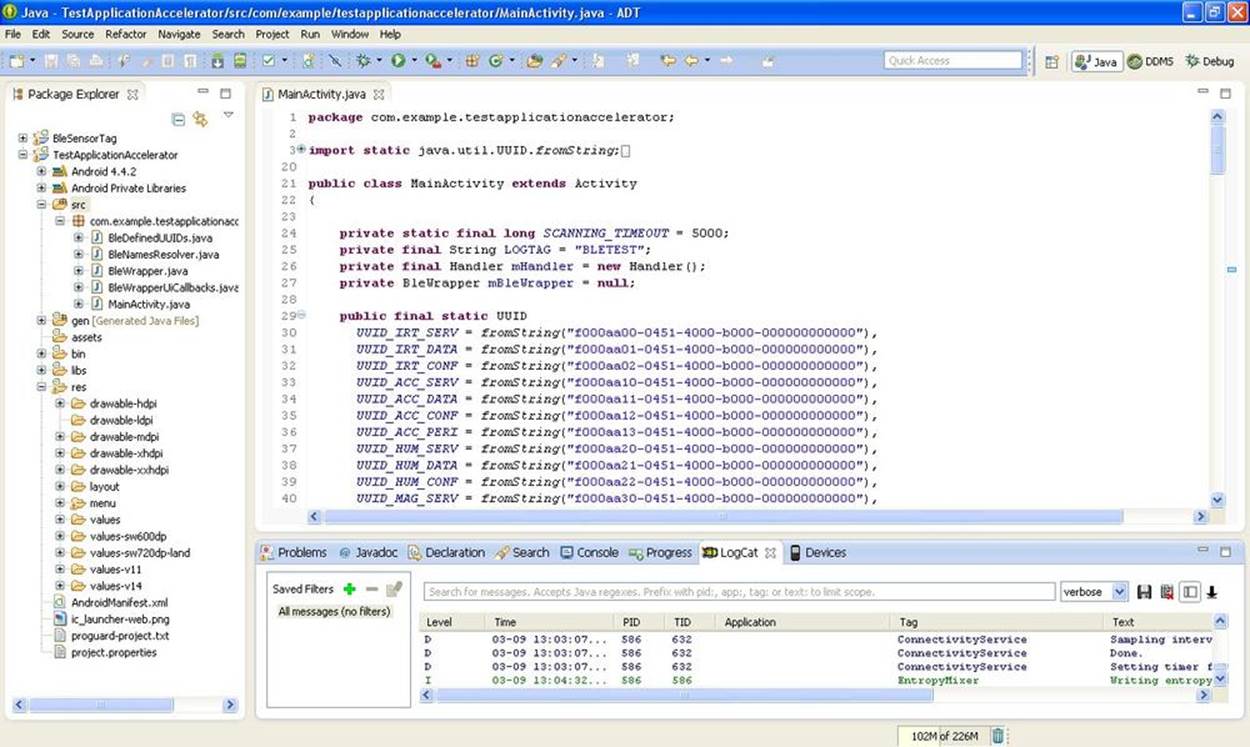
Figure 8-4. The main Java window in Eclipse
Each project also includes a manifest, called AndroidManifest.xml, that details essential information about the application to the Android system. Android requires this information before it can run any code on the system. Beyond that, you’ll also be working in the /res folder, which contains XML files that handle the layout and menus that you will be using.
NOTE
Android programming is a huge topic in itself, far beyond the scope of this chapter, which focuses only on the context of integrating Bluetooth Low Energy into an Android app. For more complex GUI applications, we recommend consulting other Android programming texts.
Before you begin any actual coding, you’ll need to enable BLUETOOTH and BLUETOOTH_ADMIN permissions inside the Android manifest. Double-click the AndroidManifest.xml file and select the Permissions tab (shown in Figure 8-5). Choose “Add…”→“Uses Permission” and typeandroid.permission.BLUETOOTH in the Name field. Do the same to add another “Uses Permission,” this time giving it the name android.permission.BLUETOOTH_ADMIN. These two entries request permission from the user to access the named services when the application is installed.
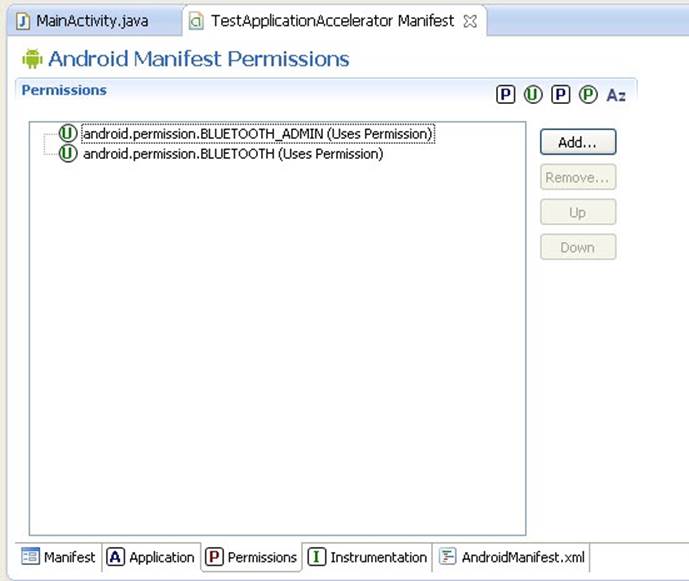
Figure 8-5. The Android Manifest Permissions window
Now, you need to move class files from the Bluetooth Application Accelerator into your project. That will make the classes and methods available to you, many of which make BLE programming much easier. Select and copy the following files:
§ BleWrapper.java
§ BleWrapperUiCallbacks.java
§ BleNamesResolver.java
§ BleDefinedUUIDs.java
Paste the files into the /src directory of the BleSensorTag project (or drag and drop them into that directory). Once you’ve added these files, the /src directory should look like Figure 8-6.
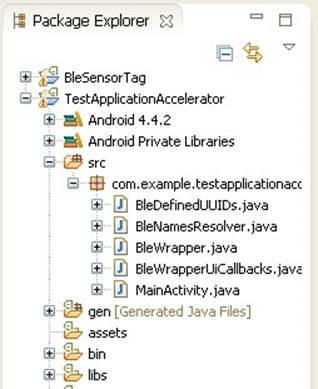
Figure 8-6. The Android /src directory
BleWrapper is the main part of the Application Accelerator library issued by the Bluetooth SIG. It’s a simplified wrapper into the Android Bluetooth Low Energy library that makes accessing and using the library much simpler, because it handles a lot of the complicated processing.
This takes care of the prep work for the project. Now that you’ve created the project, configured the manifest, installed the class libraries, you’re ready to get into the meat of the Android code.
Initializing the BLE Library
Now it’s time to get into the actual implementation of things. The first time through (to emphasize the BLE aspect of the programming without getting too far into the GUI side of things), the example will mainly print out information received over Bluetooth Low Energy. After that, you’ll add some GUI features incorporate the BLE data into the presentation side of things.
Before you begin, you’ll need to create an instance of the BleWrapper library you imported. This is the file from the Bluetooth Application Accelerator library from the Bluetooth SIG:
public class MainActivity extends Activity {
// add this line to instantiate the BLE wrapper
private BleWrapper mBleWrapper = null;
@Override
protected void onCreate(Bundle savedInstanceState) {
super.onCreate(savedInstanceState);
setContentView(R.layout.activity_main);
}
The line added in this file will hold the instance of the BleWrapper class, which will also contain the methods you’ll be using to access the underlying Android BLE library. In your constructor, you’ll also be adding various callbacks that you’ll need to handle events from the Android BLE library.
In the previous code snippet, notice an automatically generated function called onCreate(). This function is called when the application first starts and you’ll use it to intialize things that need to be initialized on startup and only once. This includes members that don’t need to be reinitialized if the device goes to sleep or loses context and then comes back.
The Android documentation actually outlines an “activity lifecycle,” which describes the method as an app goes through different stages of its “life.” For example, when an app is started, three separate lifecycle methods get called: onCreate(), onStart(), and onResume(). Initializing variables inside an app class occurs in onCreate() when they’re initialized only once, and in onResume() when they need to be initialized again if the device goes to sleep or loses context.
The documentation provides more information on this activity lifecycle, but it’s an important concept to know, because you’ll be doing part of the init routines in onCreate() and part of them in onResume(). You’ll also need to handle cleanup when you shut down, which will be inonPause() or onStop().
Inside the onCreate() method, you’ll see some boilerplate code generated by the project wizard. Beneath that, you’ll be adding more code to initialize your mBleWrapper object and perform other init tasks:
@Override
protected void onCreate(Bundle savedInstanceState)
{
super.onCreate(savedInstanceState);
setContentView(R.layout.activity_main);
mBleWrapper = new BleWrapper(this, new BleWrapperUiCallbacks.Null()
{
});
if (mBleWrapper.checkBleHardwareAvailable() == false)
{
Toast.makeText(this, "No BLE-compatible hardware detected",
Toast.LENGTH_SHORT).show();
finish();
}
}
The preceding code allocates a new BleWrapper object to the mBleWrapper member variable (which previously was null) by instantiating it and calling its constructor. When instantiating the wrapper, you also need to add the BLE callbacks as an argument to the constructor. This is where you add code to handle notification events that occur from the BLE stack.
In software programming, a callback is a reference to executable code passed in as an argument to a function, where the function is expected to callback the code after it’s done processing something. For now, we won’t add any callbacks to the constructor, but we’ll revisit this later.
After the constructor, the code performs a check to make sure the BLE hardware is available to the system. If it’s not, a popup message window called “Toast” notifies the user about the missing BLE hardware and then shuts down the app.
That completes the code needed to execute when the app starts up in the onCreate() method. Now, to move to the onResume() method, which is where the code goes when it starts up and whenever it wakes from sleep:
@Override
protected void onResume() {
super.onResume();
// check for Bluetooth enabled on each resume
if (mBleWrapper.isBtEnabled() == false)
{
// Bluetooth is not enabled. Request to user to turn it on
Intent enableBtIntent = new Intent(BluetoothAdapter.
ACTION_REQUEST_ENABLE);
startActivity(enableBtIntent);
finish();
}
// init ble wrapper
mBleWrapper.initialize();
}
}
NOTE
Eclipse provides a quick shortcut for any of these functions. Just type the first few letters of the method name and then Ctrl+Spacebar. Choose the function from the autocomplete list that pops up to let Eclipse build the function for you.
Here, the boilerplate code is at the top with super.onResume(). You’re going to add your own code beneath that. In this case, you need to check if Bluetooth is enabled each time the device comes back from a different context or from sleep. While some other program is in use, Bluetooth might have been turned off. Not catching that change and just assuming Bluetooth was still on would eventually cause some type of malfunction or exception to the software. To handle this situation, if the program finds that Bluetooth is off, it uses Android intents to send a request to the user to turn Bluetooth on and then exits the app. The next time the app restarts, if Bluetooth is on, it can proceed.
Once the code gets past that last check, it can initialize the BleWrapper, which opens up the Bluetooth interface and gets an instance of the Android Bluetooth adapter. Once you have this, you can access the BLE radio and protocol functions.
Finally, you need to handle one last Android app lifecycle method: onPause(). This method gets called whenever context is lost, the device goes to sleep, or the app is shut down:
@Override
protected void onPause() {
super.onPause();
mBleWrapper.diconnect();
mBleWrapper.close();
}
In our example, the Android device will act as a GAP central and a GATT client and the SensorTag device will be a GAP peripheral and a GATT server (see Roles and Roles).
Once again, the boilerplate code is kept on top. After that, it calls two methods from the wrapper. The first method allows you to “diconnect” (sic) our Android device from the remote device. This actually disconnects from the remote peripheral device and also issues a call to theuiDeviceDisconnected() callback method. If you need to handle anything after you disconnect from the peripheral, you’d override the uiDeviceDisconnected() callback. Finally, we close the BleWrapper, which closes the local GATT client and central completely.
Connecting to a Remote Device
Now that the initialization and cleanup are out of the way, we can focus on the real meat of the code. The principle tasks associated with BLE you’ll need to handle are scanning and connecting to remote devices, communicating data, and performing any necessary management or security tasks.
When initiating a scanning procedure (see Advertising and Scanning), you let the BLE library know that you want to be notified of any advertising packets it receives from remote devices. Whenever a device is found, the BleWrapper makes a call to the uiDeviceFound() callback function with information about the device. You can use the device information to decide if it’s the device you want to connect to.
For scanning, you’re going to need to create two buttons: the first to start the scan and the second to stop it. To create the buttons, you’ll need to go into the project’s /res/menu directory and edit the main.xml file. If you double-click that file, Eclipse will take you to a GUI interface you can use to add menu items. Any menu item in the main.xml file will end up as a button in the Options menu. You’re going to create two items, one called Start and one called Stop, which will be used to start and stop the scan, respectively.
In the Android Menu GUI, choose Add→Item and use action_scan and action_stop for the names, as shown in Figure 8-7. These will be the IDs of the buttons you can use when you write the click handler for the menu buttons. In the Title field of the Menu item, type Scan and Stop, respectively, to supply the text that shows up in the menu item.
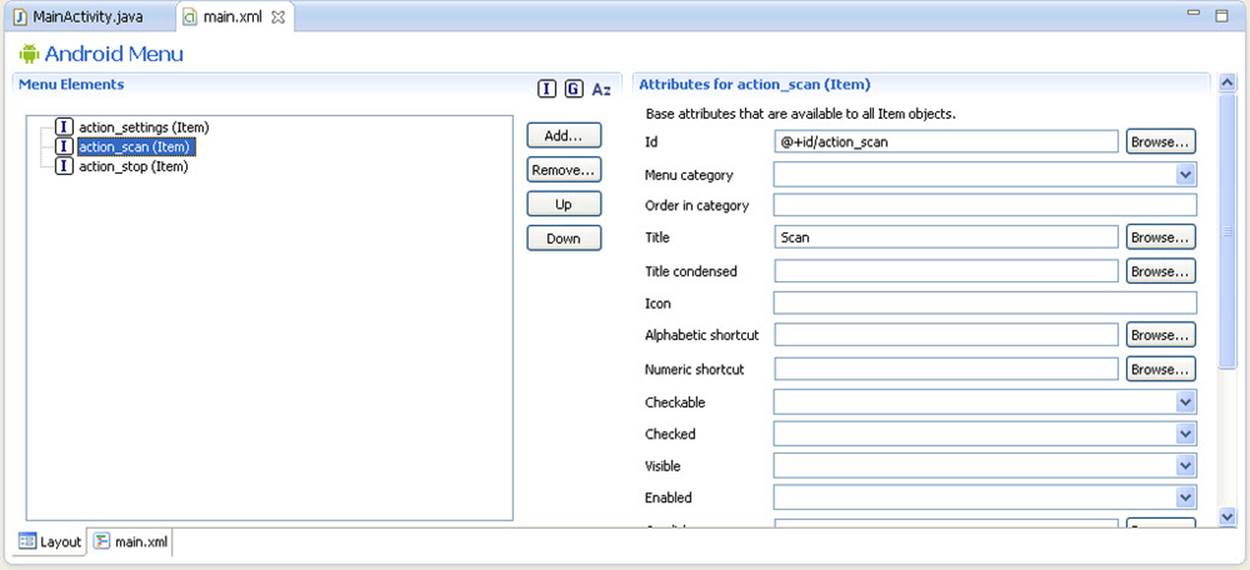
Figure 8-7. Adding buttons in the Android ADT menu screen
Once the menu items are created, you’re going to need to process the button-click events. By default, the Android boilerplate code will use any items in main.xml as the Options menu buttons. The boilerplate does not have a click handler, though, so you’ll need to add that in.
In Eclipse, if you type onOptionsItemSelected and press Ctrl+Spacebar, it should autocomplete the function, including the @Override keyword. You’ll be overriding the onOptionsItemSelected() method to implement your own handler for click events. When a click occurs on any item in the menu, the onOptionsItemSelected() method gets called. Once you’re inside the method, you need to have a switch statement to handle the event based on whichever menu item was clicked. The pseudocode will look like this:
@Override
public boolean onOptionsItemSelected(MenuItem item) {
switch (item.getItemId())
{
case R.id.action_scan:
mBleWrapper.startScanning();
break;
case R.id.action_stop:
mBleWrapper.stopScanning();
break;
default:
break;
}
return super.onOptionsItemSelected(item);
}
This code overrides the OptionsItemSelected() function to install your own handler. This method is called only when processing events related to the Options menu. In the switch statement, you decide which handler to call based on the item ID of the button that was clicked. This item ID is based on the menu item ID of the buttons you created previously. The R.id prefix means that it’s an ID from the resource directory of the internal Android project and not part of the wider android namespace.
The two actions in the new handler will either start the scan or stop the scanning procedure, as you can see in the two methods from the BleWrapper. In fact, starting and stopping the scanning procedure is probably the easiest part of the whole setup to implement the button functionality.
The next step is the action to take when a remote device is detected. A remote device will be advertising it’s there and ready to be connected to. When the program goes into scanning mode, it turns on scanning in the BLE radio and lets the Android system know that it wants to be informed if it get any advertisements. The Android Bluetooth library will inform the program via callback.
To make use of the callback, you’re going to revisit the code you wrote in the onCreate() method. Inside that method, you initialized your BleWrapper. Inside the constructor of the BleWrapper, it expects you to provide a list of callbacks. You previously left that empty, but now you’re going to start implementing the callbacks. The first one will override the uiDeviceFound() callback, which will get called by the library whenever a device is found during the scan:
mBleWrapper = new BleWrapper(this, new BleWrapperUiCallbacks.Null()
{
@Override
public void uiDeviceFound(final BluetoothDevice device,
final int rssi,
final byte[] record
)
{
String msg = "uiDeviceFound: "+device.getName()+", "+rssi+",
"+rssi.toString();
Toast.makeText(this, msg, Toast.LENGTH_SHORT).show();
Log.d("DEBUG", "uiDeviceFound: " + msg);
}
}
This code posts a toast message box whenever it finds a device. It’s not very practical, but it’s an easy way to indicate when a device is found and display information about the device. In a real use case, you’d be outputting any found devices to a device list that people could click to initiate a connection.
The toast message displays two pieces of information from the advertising packet: the device name (see Advertising Data Format) and the RSSI. RSSI (a wireless term that stands for received signal strength indicator) is a way to indicate how strong the received signal (in this case the average of all the bits contained in the advertising packet) is. In some cases, the RSSI can be used to give a rough approximation of distance. Another key piece of information that would likely be useful is the device address (which is included with every advertising packet), but the device name alone is fine for now.
The code not only outputs the same information to the toast messagebox, but it also logs it via the Log command, which is an Android library. The Log messages show up in the Eclipse IDE during debug using the logcat tool (shown in Figure 8-8). When you use the Log command, you also specify a tag. The good thing about this is that you can filter on the tag to remove extraneous information.
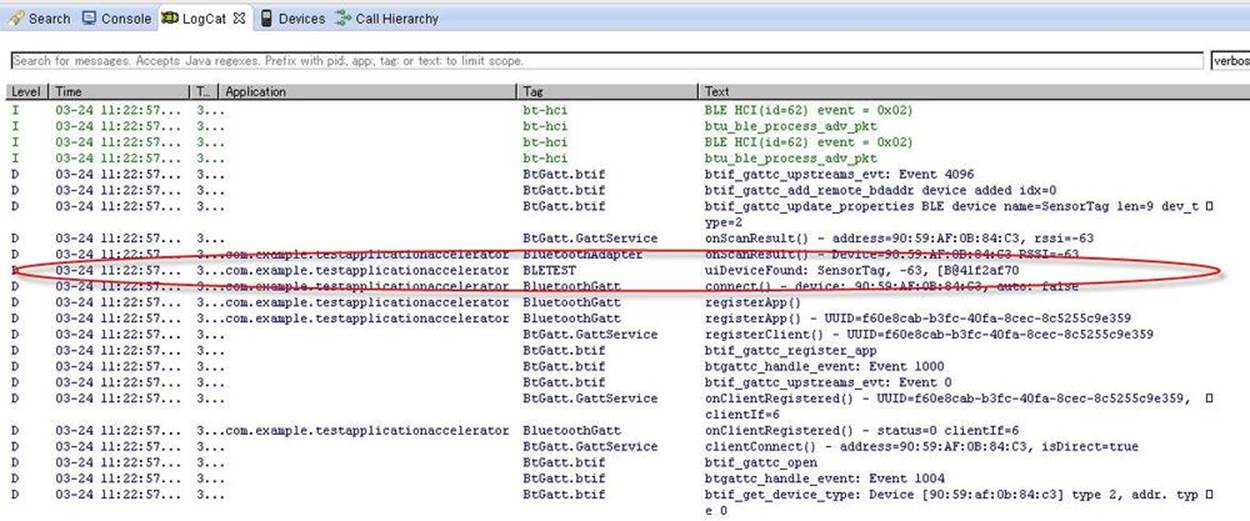
Figure 8-8. The message from the Log command highlighted in the full logcat information dump
By now, the code should have been able to verify that it could detect a remote device sending advertising packets. Once it’s able to do that, it needs to be able to connect to it. Normally, you’d save all the detected devices and display them to the user in list form, as explained in Connection establishment procedures. The user would then be able to click on the device she wants to connect to. In order to avoid the GUI complexities, we’re going to simplify the use case a bit by making assumptions.
We’ll assume we want to connect to a SensorTag device. The following code checks for advertising packets with the device name “SensorTag” and automatically initiates a connection request to any device with that name:
@Override
public void uiDeviceFound(final BluetoothDevice device,
final int rssi,
final byte[] record)
{
String msg = "uiDeviceFound: "+device.getName()+", "+rssi+", "+ \
rssi.toString();
Log.d("DEBUG", "uiDeviceFound: " + msg);
if (device.getName().equals("SensorTag") == true)
{
bool status;
status = mBleWrapper.connect(device.getAddress().toString());
if (status == false)
{
Log.d("DEBUG", "uiDeviceFound: Connection problem");
}
}
}
This automatic connection process avoids going into some Android GUI complexities and lets us focus on the BLE library we’re working with.
The previous callback code for uiDeviceFound() has been modified to remove the popup messagebox. After finding a device with a name equal to “SensorTag,” the code instructs the BleWrapper to connect to the device and pass in the device’s address (introduced in Bluetooth Device Address) in string format. The BleWrapper will use the address to send a unicast connection request to the device. It will then inform you via the uiDeviceConnected() callback if the connection was successful.
You will need to override this callback and add handler code. If the connection was not successful for some reason, the status of the method call will return false. You can use this to log a message to the logcat console for debugging.
Communicating with a Remote Device
Once you’re successfully connected to a remote device, the BleWrapper will automatically start service discovery (as described in Service and Characteristic Discovery) for the new device. This means that it will request the new device to list all the services and characteristics from the device and store them in a list.
If the connection to the GATT server and service discovery is successful, another callback is issued. This time, the callback is uiAvailableServices() and one of the arguments is the service list, which lists all the Bluetooth GATT services (see Services for further information on services and characteristics) available on the remote device. In order to communicate with the device, we’ll need to access the services and then the characteristics inside the services.
At this time, you could just cycle through the list and print out the services, but they’re not in a human-readable format. The services are all listed by 128-bit UUID (see UUIDs). The class library files you copied over earlier form the Bluetooth Application Accelerator included a class calledBleNamesResolver. This class has various methods to resolve UUIDs into BLE names. It can resolve both services and characteristics, so this library is quite useful.
The list of known UUIDs is located in the BleDefinedUUIDs.java file, which you’ll need to add some proprietary service UUIDs to list later on. For now, rather than simply scrolling through the service list and printing out the service UUIDs, you’ll be resolving them into human-readable names and printing those out (just to logcat for now). The code is another callback override and goes in the onCreate method and inside the mBleWrapper constructor:
@Override
public void uiAvailableServices(BluetoothGatt gatt,
BluetoothDevice device,
List<BluetoothGattService> services
)
{
for (BluetoothGattService service : services)
{
String serviceName = BleNamesResolver.resolveUuid
(service.getUuid().\toString());
Log.d("DEBUG", serviceName);
}
}
This code cycles through each element in the service list. For each service, it then converts the UUID to a string value and passes it into the BleNamesResolver.resolveUuid() method. This method looks through the list of known UUIDs and, when it finds a match for the UUID, returns the associated human-readable UUID name. It prints that name out to logcat in the Eclipse IDE, as shown in Figure 8-9. It’s also possible to dump these directly into a textbox for viewing, but that’s slightly more complicated.
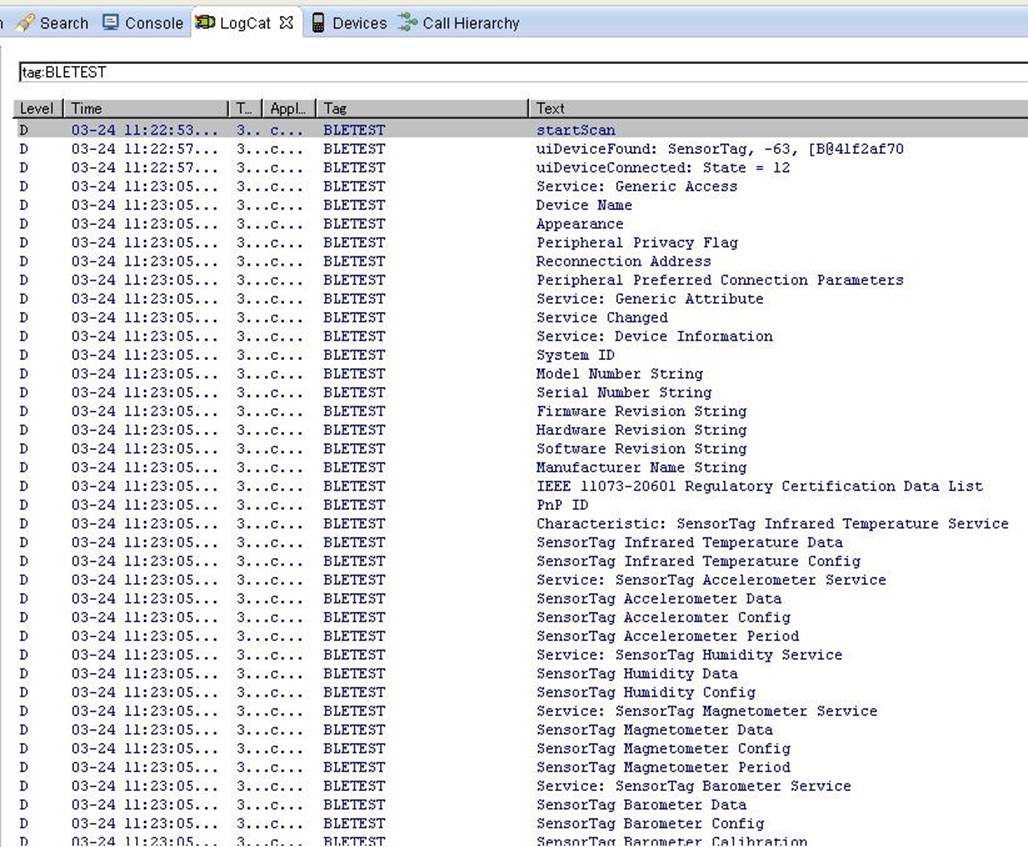
Figure 8-9. Logcat displaying services and characteristics in Eclipse
You’ll notice that some UUIDs are unknown. That usually means that vendor specific 128-bit UUIDs are present and you’ll have to add them to the UUID list if you want them to be resolved properly. In this case, TI uses some vendor-specific service UUIDs for its device, because it doesn’t fit into a standard device profile. There is a huge UUID address space, so you’ll likely encounter many vendor specific UUIDs while working with different BLE devices. You’ll need to add the TI vendor specific UUIDs to the list and then run the code again.
So far, you’ve gone most of the way to getting your BLE app up and running. You’ve detected the remote device, connected to it, and printed the services that it has available. The next step is to read the characteristic values (introduced in Characteristics) associated with its sensors.
The characteristics that belong to the sensors carry the sensor data, so by reading these out, you can get the sensor data. Once you have the data from the sensors, it’s just a matter of formatting and processing the data, then presenting it to the user in an appealing way. In this case, we’ll focus on getting the data and leave it up to the user to determine how to process and present it.
One thing to be aware of when working with the SensorTag is that it’s a mobile device. It was designed to be low power, so the sensors are powered off by default. To read each sensor, you have to write to a characteristic to turn it on. Once the sensor is enabled, you can then read the data from it.
As discussed in Characteristics, all operations related to user data are effectuated through characteristics. To enable a sensor, you’re first going to need to find the service that contains the corresponding characteristic and the characteristic itself (see Service and Characteristic Discovery), and then retrieve its value (as described in Reading Characteristics and Descriptors). You then need to modify the characteristic value to one that will enable the sensor and then write it back to the device in the manner described in Writing Characteristics and Descriptors. This is called a read-modify-write operation.
You’ve already connected to the peripheral device and have the BluetoothGatt object available to you. To retrieve the service, you’re going to use a method inside the gatt object called getService(). It takes a UUID argument, which means that you’ll have to provide the particular service UUID. These are all TI-specific UUIDs, but luckily, TI provides the full list of service and characteristic UUIDs in Java source format in their SensorTag source code.
You’ll want to copy and paste the full UUID listing into your source code and make them constants in your app. Here’s an example of what it should look like:
private static final UUID
UUID_IRT_SERV = fromString("f000aa00-0451-4000-b000-000000000000"),
UUID_IRT_DATA = fromString("f000aa01-0451-4000-b000-000000000000"),
UUID_IRT_CONF = fromString("f000aa02-0451-4000-b000-000000000000"),
UUID_ACC_SERV = fromString("f000aa10-0451-4000-b000-000000000000"),
UUID_ACC_DATA = fromString("f000aa11-0451-4000-b000-000000000000"),
UUID_ACC_CONF = fromString("f000aa12-0451-4000-b000-000000000000"),
UUID_ACC_PERI = fromString("f000aa13-0451-4000-b000-000000000000");
...
The service UUIDs have SERV suffix. Otherwise, the other UUIDs are characateristics. Once you have these defined, you can write code to access the particular sensor’s service and characteristics.
Communicating with a remote device isn’t quite as simple as reading a characteristic and having the method return a value. You actually need to send ATT read and write requests to the device, and the GATT server will then send responses to the requests (these concepts are further explained in ATT operations). Only one request can be handled at one time, and any other request that comes in while a request is being processed gets silently dropped. This can be a source of frustration because it simply looks like a device is not responding.
The correct sequence of operations is to send a request and wait for the appopriate callback. For example, you would send a read request to the remote device to read a particular characteristic. After the device responds, the BleWrapper will issue a callback touiNewValueForCharacteristic with the characteristic information. By doing so, you are implementing the Read chacteristic value GATT feature explained in Reading Characteristics and Descriptors.
This code requests a read of the accelerometer’s configuration characteristic:
BluetoothGatt gatt;
BluetoothGattCharacteristic c;
gatt = mBleWrapper.getGatt();
c = gatt.getService(UUID_ACC_SERV).getCharacteristic(UUID_ACC_CONF);
mBleWrapper.requestCharacteristicValue(c);
Once the the request is issued, the device will respond with the characteristic’s data. In this case, you’re going to dump each byte of the characteristic’s raw value to logcat:
@Override
public void uiNewValueForCharacteristic(BluetoothGatt gatt,
BluetoothDevice device,
BluetoothGattService service,
BluetoothGattCharacteristic ch,
String strValue,
int intValue,
byte[] rawValue,
String timestamp)
{
super.uiNewValueForCharacteristic( gatt, device, service,
ch, strValue, intValue,
rawValue, timestamp);
Log.d(LOGTAG, "uiNewValueForCharacteristic");
for (byte b:rawValue)
{
Log.d(LOGTAG, "Val: " + b);
}
}
It’s important to remember that each read or write must be requested. There are functions in Android’s BLE library to get and set a value for characteristics. These operate only on the locally stored values and not on the remote device. In most cases, any interaction with the remote device will require the use of callbacks.
Before you read any of the sensor’s data, you first need to enable them. To do this, you have to write a value to their configuration characteristic (those are proprietary characteristics to enable sensors, not to be confused with CCCDs). In most cases, you’d just write a 0x01 to this characteristic to enable them. As mentioned before, you actually send a write request (Write characteristic value in Writing Characteristics and Descriptors, with the operation listed in ATT operations) to the peer device and then wait for the callback.
This code enables the accelerometer by writing 0x01 to the accelerometer configuration characteristic on the remote device:
BluetoothGattCharacteristic c;
c = gatt.getService(UUID_ACC_SERV).getCharacteristic(UUID_ACC_CONF);
mBleWrapper.writeDataToCharacteristic(c, new byte[] {0x01});
mState = ACC_ENABLE; // keep state context for callback
As before, you need to wait for the callback to know if the write operation was successful. In cases where you have to wait for things to happen, it’s best to use a separate thread or a state machine. A separate thread would allow you to block the thread as you wait for callback without holding up the rest of the system. The state machine allows you to remain in the same thread and keep track of the current context for the operation being performed.
For a write operation, Application Accelerator has two useful callbacks:
@Override
public void uiSuccessfulWrite( BluetoothGatt gatt,
BluetoothDevice device,
BluetoothGattService service,
BluetoothGattCharacteristic ch,
String description)
{
BluetoothGattCharacteristic c;
super.uiSuccessfulWrite(gatt, device, service, ch, description);
switch (mState)
{
case ACC_ENABLE:
Log.d(LOGTAG, "uiSuccessfulWrite: Successfully enabled
accelerometer");
break;
}
}
@Override
public void uiFailedWrite( BluetoothGatt gatt,
BluetoothDevice device,
BluetoothGattService service,
BluetoothGattCharacteristic ch,
String description)
{
super.uiFailedWrite(gatt, device, service, ch, description);
switch (mState)
{
case ACC_ENABLE:
Log.d(LOGTAG, "uiFailedWrite: Failed to enable accelerometer");
break;
}
}
To enable all of the sensors, you would basically extend the case of enabling one sensor to all of the sensors. After the write operation to enable the first sensor, you would enable each of the other sensors in the callback:
@Override
public void uiSuccessfulWrite( BluetoothGatt gatt,
BluetoothDevice device,
BluetoothGattService service,
BluetoothGattCharacteristic ch,
String description)
{
BluetoothGattCharacteristic c;
super.uiSuccessfulWrite(gatt, device, service, ch, description);
switch (mState)
{
case ACC_ENABLE:
Log.d(LOGTAG, "uiSuccessfulWrite: Successfully enabled
accelerometer");
// enable next sensor
c = gatt.getService(UUID_IRT_SERV).getCharacteristic(UUID_IRT_CONF);
mBleWrapper.writeDataToCharacteristic(c, new byte[] {0x01});
mState = IRT_ENABLE; // keep state context for callback
break;
case IRT_ENABLE:
Log.d(LOGTAG, "uiSuccessfulWrite: Successfully enabled IR temp sensor");
// enable next sensor
c = gatt.getService(UUID_HUM_SERV).getCharacteristic(UUID_HUM_CONF);
mBleWrapper.writeDataToCharacteristic(c, new byte[] {0x01});
mState = HUM_ENABLE; // keep state context for callback
break;
case HUM_ENABLE:
....
mState = MAG_ENABLE;
break;
...
}
}
Once the sensors are enabled, it’s possible to read the sensor. To manually read the sensor, you’ll issue a read request to the characteristic you want to read and wait for the response in the callback (see ATT operations and Reading Characteristics and Descriptors for further details). The read can be triggered by an event, such as the push of a button or a timer that periodically polls the sensor. In this case, a test button created in the Options menu triggers events. That button’s onClick method calls the following function to generate a read request:
// Start the read request
private void testButton()
{
BluetoothGatt gatt;
BluetoothGattCharacteristic c;
if (!mBleWrapper.isConnected()) {
return;
}
Log.d(LOGTAG, "testButton: Reading acc");
gatt = mBleWrapper.getGatt();
c = gatt.getService(UUID_ACC_SERV).getCharacteristic(UUID_ACC_DATA);
mBleWrapper.requestCharacteristicValue(c);
mState = ACC_READ;
}
// Get the read response inside this callback
@Override
public void uiNewValueForCharacteristic(BluetoothGatt gatt,
BluetoothDevice device,
BluetoothGattService service,
BluetoothGattCharacteristic ch,
String strValue,
int intValue,
byte[] rawValue,
String timestamp)
{
super.uiNewValueForCharacteristic( gatt, device, service,
ch, strValue, intValue,
rawValue, timestamp);
// decode current read operation
switch (mState)
{
case (ACC_READ):
Log.d(LOGTAG, "uiNewValueForCharacteristic: Accelerometer data:");
break;
}
// dump data byte array
for (byte b:rawValue)
{
Log.d(LOGTAG, "Val: " + b);
}
}
Once the sensor’s data is acquired, a few steps are still needed to process the data. The code for the data processing of each sensor can be found in the SensorTag example Android library or in the SensorTag Online User Guide.
You can copy/paste the processing algorithm for the accelerometer into the previous code snippet, usually in the ACC_READ state part of the decoder. The same goes for the data processing for all the other sensors.
Polling the remote sensor is one way to periodically extract data from it, but it’s not power efficient for both devices. The remote device needs to stay on constantly to catch the read requests and the phone needs to stay awake to send the polling requests. A more efficient way to do things is to have the device send notifications (thoroughly described in Server-Initiated Updates) instead. You can set the period for the notifications manually for some of the sensors.
Application Accelerator has a special method for enabling notifications. To enable notifications on Android, you normally have to locally enable the notification for the particular characteristic you are interested in.
Once that’s done, you also have to enable notifications on the peer device by writing to the device’s client characteristic configuration descriptor (CCCD), as described in Client Characteristic Configuration Descriptor. Luckily, this is abstracted out and both operations can be handled by a single method call.
The following code enables notifications for the accelerometer when the test button is pushed:
private void testButton()
{
BluetoothGatt gatt;
BluetoothGattCharacteristic c;
if (!mBleWrapper.isConnected()) {
return;
}
// set notification on characteristic
Log.d(LOGTAG, "Setting notification");
gatt = mBleWrapper.getGatt();
c = gatt.getService(UUID_IRT_SERV).getCharacteristic(UUID_IRT_DATA);
mBleWrapper.setNotificationForCharacteristic(c, true);
mState = ACC_NOTIFy_ENB;
}
One issue to look out for in the Application Accelerator is it doesn’t implement the onDescriptorWrite() callback available in the Android Bluetooth library. The most reliable way to know when notifications have been successfully enabled on the peer device is to get theonDescriptorWrite() callback after the CCCD has been modified and the GATT server has acknowledged the write operation. This example adds the onDescriptorWrite() callback to this implementation of Application Accelerator in the BleWrapper class, where it implements the BluetoothGattCallback code:
/* callbacks called for any action on particular Ble Device */
private final BluetoothGattCallback mBleCallback = new BluetoothGattCallback()
{
...
// Added by Akiba
@Override
public void onDescriptorWrite( BluetoothGatt gatt,
BluetoothGattDescriptor descriptor,
int status)
{
String deviceName = gatt.getDevice().getName();
String serviceName = BleNamesResolver.resolveServiceName( \
descriptor.getCharacteristic().getService().getUuid().\
toString().toLowerCase(Locale.getDefault()));
String charName = BleNamesResolver.resolveCharacteristicName(\
descriptor.getCharacteristic().getUuid().toString().\
toLowerCase(Locale.getDefault()));
String description = "Device: " + deviceName + " Service: " \
+ serviceName + " Characteristic: " + charName;
// we got response regarding our request to write new value to
// the characteristic, let's see if it failed or not
if(status == BluetoothGatt.GATT_SUCCESS) {
mUiCallback.uiSuccessfulWrite( mBluetoothGatt, mBluetoothDevice,
mBluetoothSelectedService,
descriptor.getCharacteristic(),
description);
}
else {
mUiCallback.uiFailedWrite( mBluetoothGatt, mBluetoothDevice,
mBluetoothSelectedService,
descriptor.getCharacteristic(),
description + " STATUS = " + status);
}
};
...
}
The onDescriptorWrite() method will then call Application Accelerator’s uiSuccessfulWrite() method if the notification was written properly.
You can enable notifications for all of the sensor characteristics in the same way you enabled the sensors themselves, using a state machine to sequentially process one after the other. For notifications, keep in mind that, for Android 4.4 (KitKat), only four characteristics can have enabled notifications at one time. This is a limitiation of the current Android BLE library implementation, although it will probably be changed in future versions.
The code in this chapter is mostly presented in fragments, but you can pick up the full source code from the GitHub repository for this book.