Raspberry Pi Projects (2014)
Part I. Getting Started with the Raspberry Pi
Chapter 1. Getting Your Raspberry Pi Up and Runningby Dr. Andrew Robinson
In This Chapter
• What the operating system is for
• How to put the operating system on an SD card for the Raspberry Pi
• How to connect up your Raspberry Pi
• A bit about the boot process
• Basic troubleshooting if your Raspberry Pi doesn’t start
This chapter is a beginner’s guide to your first steps with the Raspberry Pi. It goes from getting it out of the box to getting something on the screen. Even if you already have your Raspberry Pi up and running, it’s worth a quick skim as you’ll discover how a 21-year-old student changed the world and a bit about how the operating system for your Raspberry Pi works. After this chapter, you’ll get into the real fun of creating projects!
The Operating System
The Raspberry Pi primarily uses Linux for its operating system (OS) rather than Microsoft Windows or OS X (for Apple). An operating system is a program that makes it easier for the end user to use the underlying hardware. For example, although the processor (the chip at the centre of the Raspberry Pi that does the work) can do only one thing at a time, the operating system gives the impression the computer is doing lots of things by rapidly switching between different tasks. Furthermore, the operating system controls the hardware and hides the complexity that allows the Raspberry Pi to talk to networks or SD cards.
Linux
Part of the success of the Raspberry Pi is thanks to the enthusiastic community that is behind it. Linux is a testament to what can be achieved with the support of volunteers around the world. In 1991, Linus Torvalds began work on an operating system as a hobby while he was a 21-year-old student at the University of Helsinki. A year later, his hobby operating system for desktop PCs (80386) was available online under the name Linux. Crucially, the code for the operating system was available as well. This allowed volunteers around the world to contribute; to check and correct bugs; to submit additional features; and to adapt and reuse other’s work for their own projects. If you master the projects in this book and learn more about computing, then who knows – one of your hobby projects could be as successful as Linus Torvalds’s is.
The popularity of Linux grew, and in addition to its use as a desktop operating system, it is now used for the majority of web servers, in Android devices and in the majority of the world’s supercomputers. Most importantly for us, it is used on the Raspberry Pi.
Linux Distributions
Because Linux code is publically available, different organisations have made slight changes to it and distributed it. This has led to different distributions (versions), including Red Hat, Fedora, Debian, Arch, Ubuntu and openSUSE. Some companies sell their distributions and provide paid-for support, whereas others are completely free. Raspbian is based on the Debian distribution with some customisations for the Raspberry Pi and is what is used in this book.
The most popular operating system for the Raspberry Pi is Linux. The widescale use of Linux (just think how many Raspberry Pis there are, not to mention Android phones, web servers, and so on) shows how much an idea can grow. After you start tinkering with the Raspberry Pi, one of your ideas might grow to be as big (or bigger) than Torvalds’s or those of the founders of the Raspberry Pi, and you too will make a real impact on the world. So let’s get started!
Getting the OS on an SD Card
The Raspberry Pi doesn’t know how to coordinate its hardware without an OS. When it is powered up, it looks on the SD card to start loading the OS. As such, you’re going to need an SD card with an OS on it.
You can either buy an SD card that already has an OS on it, or you can copy an OS to your own SD card with a PC. A premade card is simplest, but more expensive. Creating your own isn’t too difficult, but it is slightly more involved than just copying a file.
Premade Cards
Premade cards are bundled in kits or available to purchase from element14, RS or other online stores. A 4GB card should be big enough for getting started and cost less than £10.
Filesystems
Computer storage like SD cards, USB memory sticks and hard disks essentially contain millions of separate compartments that store small amounts of data in large grids. The individual compartments, called blocks, are addressed by a coordinate system – you can think of them as a piece of squared paper the size of a sports field. The sports field is partitioned into areas of blocks that are handled by the operating system to provide filesystems. It is the OS’s job to manage how data is written to this massive storage area, so that when a user refers to a file by name, all the tiny blocks of data are fetched and combined in the correct order. There are different ways in which the blocks are formatted, with different features. As such, an identical file will be stored differently on the underlying grid by different filesystems.
Typically, Microsoft Windows uses FAT or NTFS, OS X uses HFS Plus and Linux uses ext. Most blank SD cards are formatted as FAT by default. Because the Raspberry Pi runs Linux, it uses the ext filesystem, which must be set up and populated with files.
Images
When talking about downloading the OS for the Raspberry Pi, you may hear it called an image, which may be slightly confusing. It is an image of the underlying storage. (Imagine an aerial photo of the entire sports field of storage blocks, even the blank ones, rather than separate files! If you were to print this photo at the same size on another sports field, you’d have an exact copy of all the files stored on the original one.)
It is possible to store an image as a single file in another filesystem, but this arrangement is not suitable for a running Raspberry Pi. As such, a Raspberry Pi will not work if you just copy an image onto a FAT-formatted card. Instead, you must tell your OS that you want to transfer it at the block level, so that every block on your card matches those of the person who made the image. That way, Linux interprets these underlying blocks on the disk to provide a filesystem that is identical to the person who made the image.
In summary, filesystem images provide an easy way of cloning an entire filesystem such that all the files, their permissions, attributes, dates, and so on are identical.
Creating Your Own SD Card
There are two ways to create your own SD card for the Raspberry Pi, using NOOBS or by transferring an image yourself.
Using NOOBS
New Out Of Box Software (NOOBS) was created for the Raspberry Pi to automate transferring SD card images. NOOBS boots your Raspberry Pi from a FAT-formatted card and then repartitions and clones the filesystem for you. Using NOOBS should be as simple as formatting a card on your desktop PC and unzipping NOOBs downloaded from www.raspberrypi.org/downloads. Some operating systems do not format cards properly, so it is sometimes necessary to download a program to format the card. Although NOOBS can be simple, it doesn’t always work, and it can be slower. Anyway, it’s more satisfying to use the do-it-yourself approach.
Transferring an Image Yourself
You need an SD card larger than 2GB to fit the OS on it. A 4GB card is ideal.
Visit www.raspberrypi.org/downloads and follow the links to download the latest version of Raspbian. You are looking for a filename containing the word raspbian and a date, and that ends in .zip. Make a note of the letters and numbers that are shown as SHA-1 checksum. Because of the speed of development, new versions are released frequently, so the exact name will differ from the one that’s used in the following instructions. The location you download the file to may also be slightly different, so you should use your location accordingly when completing the instructions.
The download page has links to other distributions and other operating systems that you can try later, but for now it’s best to stick with Raspbian because it is reliable, has a good selection of software for beginners and is consistent with the examples in this book.
Checksums
A checksum is an easy way to check whether data has been corrupted. A checksum is a mathematical sum that is performed by the supplier of the data. When you receive the data, you perform the same sum and, in most cases, if the answer is the same, you can be almost certain that the data is the same, without comparing it bit by bit. Checksums are used extensively in computing – in network communications, when processing credit cards and even in barcodes. Although they are not infallible, they make it much easier to be fairly confident data is correct.
The instructions for creating an SD card are different depending on which OS you’re using. Refer to the appropriate section for Windows, Linux and OS X.
Creating an SD Card with Windows
It is hard to check checksums in Windows, so the following instructions assume that the downloaded image file is correct. After the download is complete, follow these steps to uncompress it and transfer the data to the SD card:
1. Unzip the downloaded file 2013-07-26-wheezy-raspbian.zip.
2. Insert an SD card and make a note of the corresponding drive letter (for example, E:). Make sure that the card does not contain any data you want to save because it will be completely overwritten.
3. Go to https://launchpad.net/win32-image-writer and download the binary version of Win32DiskImager from the Downloads section on the right side of the web page. Unzip the program.
4. Start Win32DiskImager.exe as Administrator. Depending on how your system is set up, this may require you to double-click the program name, or require you to hold down the Shift key, right-click the program icon and select Run As.
5. In the Win32DiskImager window, select 2013-07-26-wheezy-raspbian.img.
6. In the Device drop-down on the right, select the drive letter you noted in step 2 (see Figure 1.1).
Figure 1-1: The Win32DiskImager window.

7. Click Write and wait for the imaging process to complete. (This step could take about 15–30 minutes, so be patient.)
8. Exit Win32DiskImager and eject the SD card that should now contain your OS.
Creating an SD Card with Linux
With Linux, it’s easiest to create the SD card image from the command line, as detailed in the following steps.
Linux Permissions and sudo
Linux restricts some actions that might cause damage to other users. As such, some commands will not work unless you have the appropriate privileges. On some distributions, you need to switch to being the user root (the administrator account) before running the command requiring more privileged access. Other distributions will allow selected users to prefix the command with sudo. The following instructions assume that your user account has been set up to use sudo. If not, type su in the terminal first to become root.
1. Start a terminal and use the cd command to change to the directory containing the file you downloaded (for example, cd Downloads).
2. Unzip the downloaded file by typing unzip followed by the downloaded filename (for example, unzip 2013-07-26-wheezy-raspbian.zip).
3. List the image files in the current directory by typing ls *.img and make sure that the extracted image file is listed.
4. Calculate the checksum to ensure that the downloaded file is not corrupt or hasn’t been tampered with. To do this, type the following:
sha1sum 2013-07-26-wheezy-raspbian.zip
Make sure that the result matches with the SHA-1 checksum given on the http://raspberrypi.org/download page. Although it is unlikely that they will differ, if they do, try downloading and unzipping again.
5. Insert an SD card. Make sure there’s no data on it that you want to save, because it will be completely overwritten.
6. Type dmesg and find the device name that Linux uses to refer to the newly inserted card. It will usually be named sdd, sde, sdf or something similar. Alternatively, it may be in the form mmcblk0. Use this name wherever you see sdX in the following steps.
7. If Linux has automounted the card, you need to unmount it first by typing sudo umount /dev/sdX.
8. Double-check that you have the correct device by typing sudo fdisk -l /dev/sdX. Check that the size displayed matches the size of the card that you inserted.
9. When you are absolutely sure you are referring to the correct card, type the following (replacing sdX with the name you found in step 6) to copy the image across to the card. (This step could take about 15–30 minutes, so be patient.)
dd if=2013-07-26-wheezy-raspbian.img of=/dev/sdX
10. Type sudo sync before removing the card to ensure all the data is written to the card and is not still being buffered.
Creating an SD Card with OS X
With OS X, it’s easiest to create the SD card image from the command line.
Although the Macintosh normally uses drag and drop for many operations, there is a way to get “under the hood” to perform unusual operations. Your gateway to doing this is an application called Terminal. This is usually found in the Utilities folder, within the Applications folder. A quick way to find it is to hold down the ![]() key and press the spacebar. This will open the Spotlight search window. Type terminal and then press Enter to open the Terminal application.
key and press the spacebar. This will open the Spotlight search window. Type terminal and then press Enter to open the Terminal application.
To create an SD card, follow these steps:
1. Start a terminal.
2. Use the cd command to change to the directory containing the file you downloaded. A quick way to do this is to type cd followed by a space and then drag the folder containing the file into the Terminal window. This will automatically fill in the rest of the command with the pathname of that folder. Then press Enter to perform the command.
3. Unzip the downloaded file by typing unzip followed by the downloaded filename (for example, unzip 2013-07-26-wheezy-raspbian.zip).
You won’t see a progress bar during this process, so you might think the computer has frozen – but don’t worry. It could take a minute or two before all of the files are unzipped.
4. List the image files in the current directory by typing ls *.img and make sure that the extracted image file is listed.
5. To make sure everything is fine, you can calculate the checksum for the file; however, you can omit this step if you want. Calculating the checksum ensures that the downloaded file is not corrupt. To do this, type the following:
shasum
2013-07-26-wheezy-raspbian.zip
Make sure that the result matches with the SHA-1 checksum on the http://raspberrypi.org/download page. It is unlikely that they will differ, but if they do, try downloading and unzipping again.
6. Type diskutil list to display a list of disks.
7. Insert an SD card. Make sure that it doesn’t contain any data that you want to save because it will be completely overwritten.
8. Run diskutil list again and note the identifier of the new disk that appears (for example, /dev/disk1). Ignore the entries that end with s followed by a number. Use the disk identifier wherever diskX appears in the following steps.
9. Type sudo diskutil unmountdisk /dev/diskX.
10. Type sudo dd bs=1m if=2013-07-26-wheezy-raspbian.img of=/dev/diskX. (This step could take about 15–60 minutes, so be patient.)
11. Type sudo diskutil eject /dev/diskX before removing the card.
Connecting Your Raspberry Pi
Now that you have your OS for your Raspberry Pi, it’s time to plug it together.
Remove the Raspberry Pi from the box and, to make it easier to follow these instructions, position it the same way around as shown in Figure 1.2 (so the words Raspberry Pi appear the correct way up).
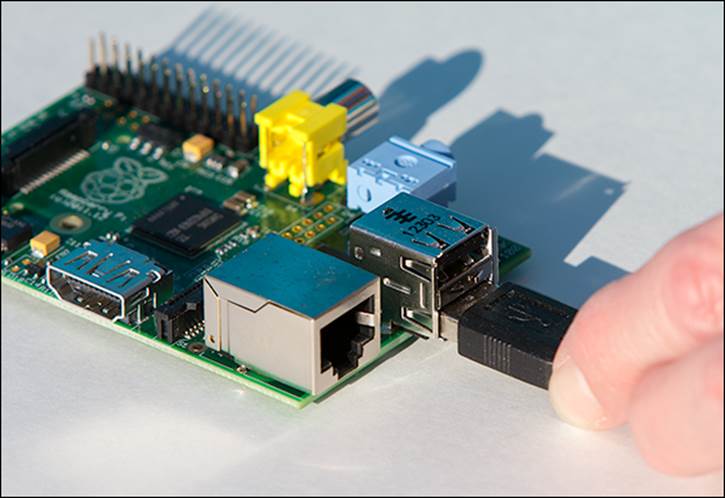
Plug the USB keyboard into one of the USB sockets, as shown in Figure 1.3.
Figure 1-2: The Raspberry Pi, the size of a credit card and a miniature marvel of engineering.
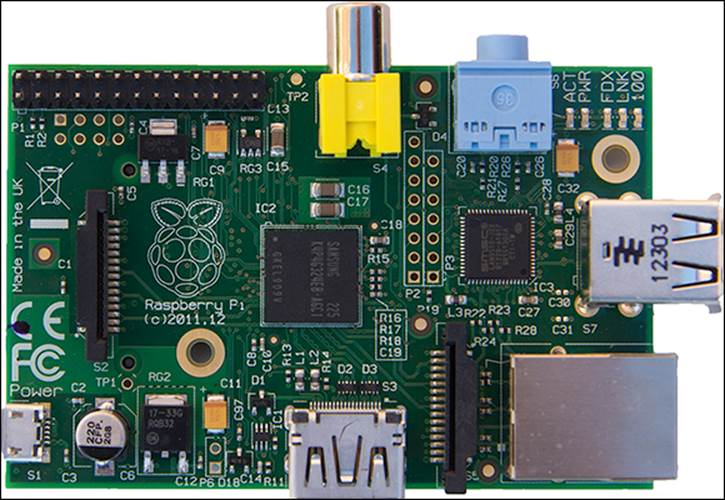
Figure 1-3: Inserting the USB keyboard.
![]()
Older PS/2 keyboards will not work. You’ll have to buy (or borrow) a USB keyboard, but they’re not expensive.
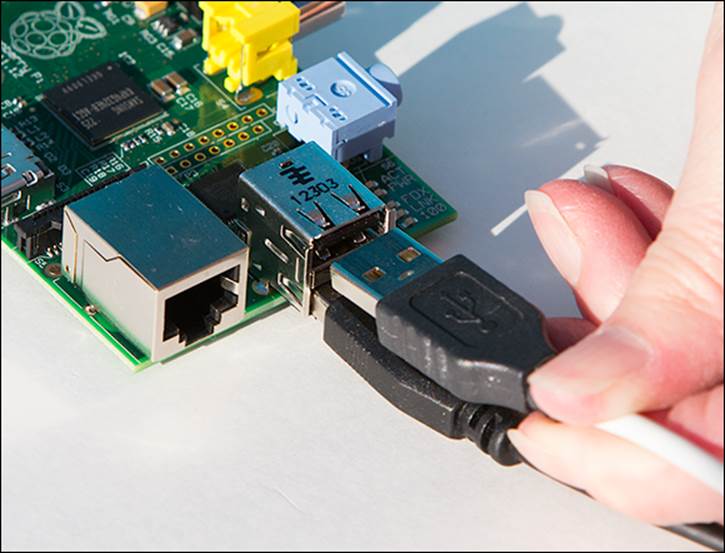
Plug the mouse in next to the keyboard, as shown in Figure 1.4.
Figure 1-4: Inserting the USB mouse.
Connecting a Display
The Raspberry Pi can be connected by HDMI or composite video directly. With the use of an adapter you can connect it by DVI or VGA. You should use HDMI or DVI whenever possible because they give a better picture.
Look at the sockets on your display to determine how to connect your Raspberry Pi.
Connecting via HDMI
If your display has an HDMI input, as shown in Figure 1.5, then connect your Pi with an HDMI-HDMI cable. This is the only type of video connection that can also be used to carry audio from the Pi to your display. The HDMI socket on the Pi is at the bottom as shown in Figure 1.5.
Figure 1-5: HDMI connection on the Raspberry Pi.
Connecting via DVI
If your display has a DVI input as shown in Figure 1.6, you will need an adapter. HDMI and DVI have very similar electrical signals, so adapters are passive – that is, they don’t contain any electronics, just two sockets with wires in between. You can buy cables with an HDMI and DVI connector or adapters as shown in Figure 1.6 for less than £5.
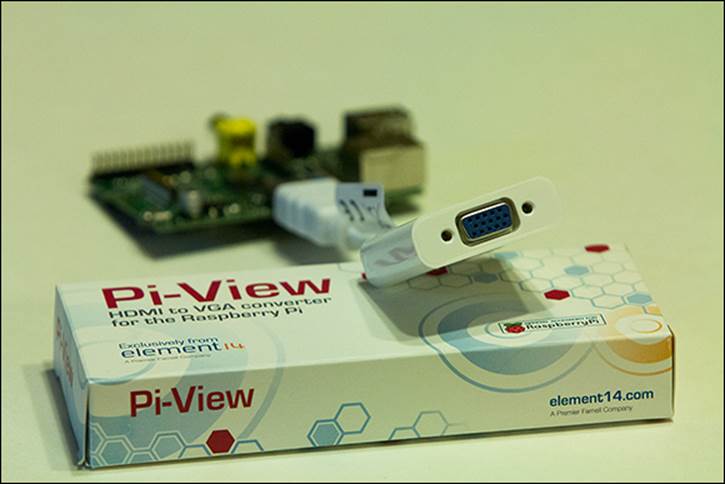
Connecting via VGA
DVI and HDMI both work with digital signals and are only found on newer monitors. Older monitors with VGA use analogue signals and as such need some sort of electronic circuit to convert between them. You can buy adapters that convert between HDMI and VGA for about £20 online. The Pi-View device shown in Figure 1.7 is designed specifically for the Raspberry Pi and is available through element14.
Figure 1-6: HDMI-DVI adapter.
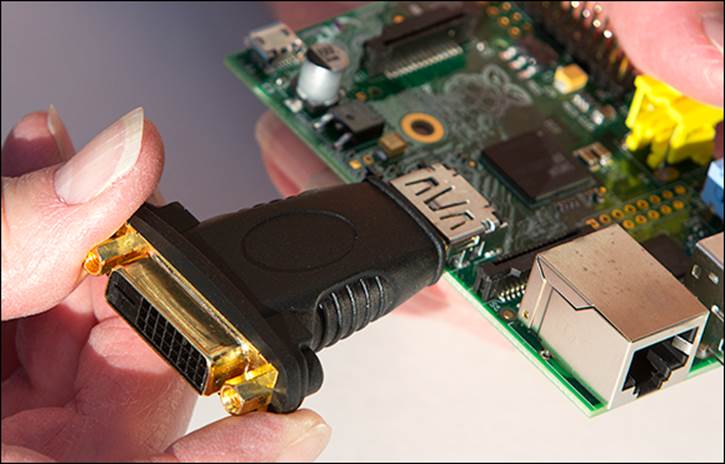
Figure 1-7: HDMI-VGA adapter, Pi-View.
Analogue and Digital
Inside most computers you will find digital signals – that is, signals where it only matters if they are on or off. Usually there is a difference of a few volts between a signal being on or off. Data is sent by a code of ons and offs, typically referred to as 1s and 0s. A small change in voltage due to radio or magnetic interference is usually not large enough to change the meaning.
Analogue signals tend to only be used in modern computers where they have to connect with something physical such as a monitor or speakers. An analogue signal typically represents data as a continuous range of voltages. As such, a small change in voltage means a different value will be read. This means the data can be changed by electrical interference.
VGA monitors represent different colours with different voltages. Consequently, any interference will affect what is shown on the screen, and the image is degraded! Small amounts of interference will have no effect on digital data for HDMI. However, if the interference is strong enough, then all data will be corrupted and no image will be transmitted.
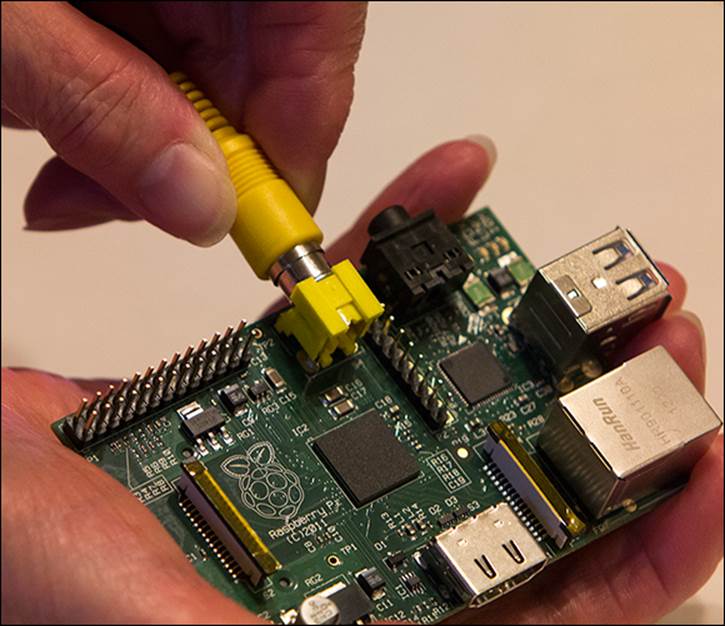
Connecting via Composite
If your display only has a connector for composite video, you need a phono-to-phono cable that plugs in to the yellow connector on the top of the Raspberry Pi as shown in Figure 1.8. Be aware that composite is an old technology and may produce a poor quality display.
Connecting to a Network
The Raspberry Pi has an Ethernet socket that allows your Pi to connect to the Internet or your home network. You can download new software and updates, or browse the web. You could even run your own web server!
Figure 1-8: Phono connector for composite video.
If you will be using a network, connect a network cable on the right side as shown in Figure 1.9. Although the Raspberry Pi uses the network to set its clock and to download updates and new programs, it will work without a network connection.
Booting the Operating System
You will need an SD card with the OS already installed on it. You can either buy one pre-installed or follow the instructions earlier in this chapter to make your own.
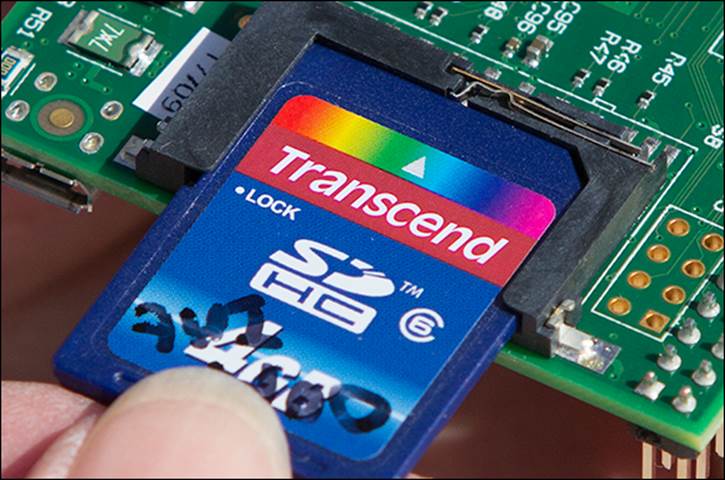
Insert the SD card in the slot on the underside of the Raspberry Pi, on the left, as shown in Figure 1.10. Take care to keep the card parallel with the Raspberry Pi when you slide it in or out so as not to break the edge of the retaining slots (shown in Figure 1.11).
Figure 1-9: Network connection.
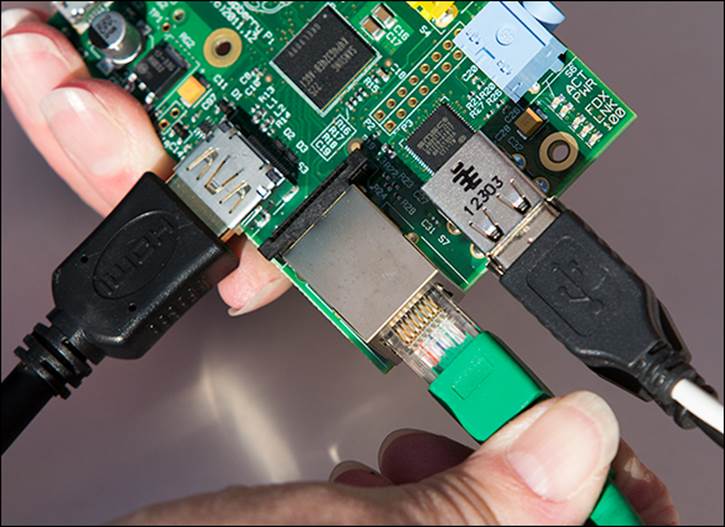
Figure 1-10: Insert the SD card carefully.
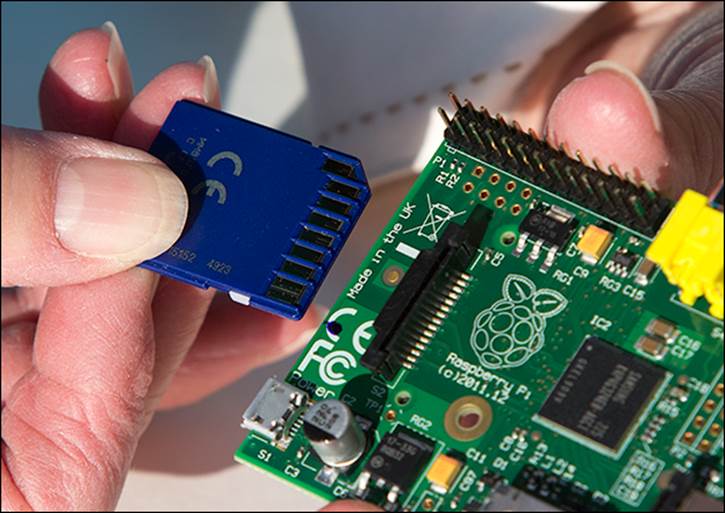
Figure 1-11: Take care not to snap off the plastic that keeps the SD card from falling out.
Powering Up!
![]()
Before connecting power, get into the habit of checking that there is nothing conductive in contact that could cause a short circuit with your Raspberry Pi. A quick check that there’s nothing metallic nearby could save you from damaging your Pi!
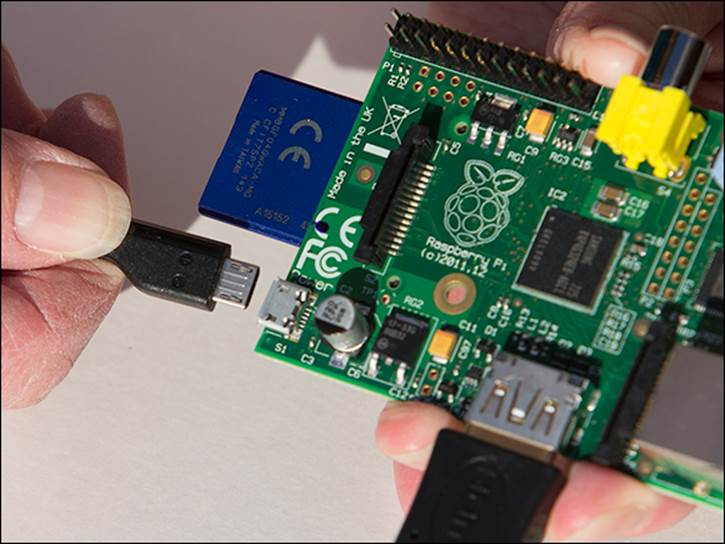
Plug in the power supply to the bottom left of the Raspberry Pi as shown in Figure 1.12. On the top-right corner, you should see a green light (labelled PWR) come on and another one (labelled ACT) flash.
The Raspberry Pi needs a power supply that can supply 5V 700mA (3.5W). Most decent-quality mobile phone chargers will work fine – many have the output marked on them, so it’s easy to check. If your power supply can’t deliver enough power, your Raspberry Pi may not start, or it may freeze when it does something computationally more demanding. For more information, see the “Troubleshooting” section later in this chapter.
Figure 1-12: Insert a micro USB for power.
The Boot Process
After you’ve connected everything, have a correctly imaged SD card and powered up your Raspberry Pi, it will quickly flash a colourful square to test the graphics. After a few seconds, the Raspberry Pi logo will appear in the top-left corner of the screen, and many lines of text will scroll past.
The text reveals some of the work the OS is doing. You may see messages as the various drivers are loading, such as the keyboard driver, sound driver and network driver. After the drivers have loaded, the OS runs any startup programs and displays the login prompt.
By default, the username is pi, and the password is raspberry.
Type pi and press Enter.
Now type raspberry and press Enter. Linux doesn’t display anything when you type passwords, which can be a bit unfamiliar if you are used to other OSes.
You should see the command-line prompt, where you can type commands and run programs. In the next section, you’re going to start the program that allows you to use the Raspberry Pi graphically.
Starting the Graphical Desktop
If you are familiar with Windows or OS X, you are used to a friendly graphical desktop that is loaded automatically with icons you can click. On the Raspberry Pi, however, in order to show that a graphical desktop doesn’t have to be integral to a computer, it isn’t loaded automatically.
The X Server
The design of Linux means that the graphical desktop runs on top of the OS as a separate program called the X server. This opens up additional possibilities, such as controlling one computer with the display being shown on another computer over a network connection. This means that you can control the Raspberry Pi without having a monitor plugged into it, which is useful if you put it in a remote location (see Chapter 13, “Home Automation”).
To start the graphical display on the Raspberry Pi, type startx.
After a few seconds the X server will start, and you will be able to use a graphical desktop. If you can see the Raspberry Pi logo in the background, then congratulations – you have successfully connected your Raspberry Pi! The projects in this book assume that you’re starting from here, with the desktop displayed.
Starting a Terminal under X
Linux makes greater use of the text-based command line, often known as a terminal. This can be very powerful and quicker for some tasks than using a mouse. To start a terminal in a window under X, double-click the LXTerminal icon on the desktop, or select it from the menu by clicking Accessories and then clicking LXTerminal.
Troubleshooting
Hopefully, you’ll never need this section, but even if you think you’ve followed all the instructions, you might discover that something doesn’t work. Finding and debugging problems are important aspects of computing. The general approach is to be logical and eliminate parts until you can isolate where the problem is. You’ll see the same principles apply to finding faults in your programs later in the book. It’s a good idea to simplify to the simplest possible configuration first – unplug the keyboard, mouse and/or display to see if the Pi shows signs of life – and then add things one by one. When you are suspicious of what might be at fault, try borrowing a known working replacement from a friend or try the suspected faulty part in theirs. This way, you can eliminate parts until the fault is found.
Common Problems
The majority of problems in getting the Raspberry Pi to work are easy to fix. The following subsections describe some of the issues that you might encounter with the Raspberry Pi and how to troubleshoot them.
No Lights Come On
If none of the lights come on when you power up your Raspberry Pi, the power supply may not be providing the required 5V. If you have a meter, you can measure the output as detailed in the subsection “Power Problems”; if not, try borrowing a friend’s that you know works.
Only the Red Light Comes On
If just the red light comes on, then the Raspberry Pi is getting some power, but it isn’t booting the OS. Make sure that the SD card is correctly inserted, and then check that it is correctly imaged. Even if the card is correctly imaged, it may be that the card isn’t compatible with the Raspberry Pi. If possible, try another card that is known to work, either from a friend or by buying a premade card. Also check that the power supply is providing enough power.
No Monitor Output
Check that the connector to the monitor hasn’t come loose and that if your monitor has a choice of inputs that the correct one is selected. Normally, there is a switch on the front that cycles through the input sources. With some monitors it is necessary to have connected the monitor to the Raspberry Pi before powering it up. If you are still having trouble, try a different monitor and cable.
Intermittent Problems
If the Raspberry Pi freezes or resets, particularly when you do something that demands more power (such as graphics-intensive work or adding a peripheral), then it’s likely the power supply isn’t providing enough power.
Power Problems
The Raspberry Pi needs more power than some micro USB power adapters can provide. It is certainly more than what’s provided by the output of most computer USB ports. As the Raspberry Pi does different tasks, the amount of power it needs varies. Consequently, with some adapters, it may work some of the time, but then stop when it needs more power. Your power supply should provide a minimum of 700mA at 5V or at least 3.5W. Most power supplies will have a label that details the output power or current it can provide. However, some power supplies don’t deliver what they claim! If your Raspberry Pi partly works and suddenly stops working, particularly when you ask it to do something more intensive such as graphics, then the power supply is probably not up for the job. In some cases it is not the power supply itself that is at fault, but the cable connecting it to the Raspberry Pi. Some cables can have a relatively high resistance and so can drop the voltage getting to the computer.
The power adapter also has to supply any peripherals plugged into the Raspberry Pi. If a peripheral takes too much power, then your Raspberry Pi will stop working. If you know how to use a multimeter, you can check the voltage supplied by the power supply under load. You can find information about how to do this in the Raspberry Pi User Guide (Wiley, 2012). If you measure less than 4.3V at the test points, then it might be worth changing the cable before you change the power supply. Or you can try using a different adapter.
If You Need More Help
If you’re still struggling with your Raspberry Pi, then you may need other sources of assistance. A major benefit of the huge popularity of the Raspberry Pi is the support offered from an enthusiastic, helpful community. See if you can find a solution at http://elinux.org/R-Pi_Troubleshooting, or check the Raspberry Pi forums at www.raspberrypi.org/forum.
You can often get help in person by attending a user group or local meeting, commonly referred to as a Raspberry Jam. It’s a worldwide network, so just check http://raspberryjam.org.uk to find the nearest location.
The Raspberry Pi User Guide also provides suggestions for troubleshooting and configurations to work with specific hardware.
Let the Fun Begin!
Now that you’ve got your Raspberry Pi powered up, it’s time to start having fun with the projects. The Insult Generator project in Chapter 2 is a good one to start with because it introduces how to program the Raspberry Pi in Python – and more importantly, it can be used to insult your friends and family!
All materials on the site are licensed Creative Commons Attribution-Sharealike 3.0 Unported CC BY-SA 3.0 & GNU Free Documentation License (GFDL)
If you are the copyright holder of any material contained on our site and intend to remove it, please contact our site administrator for approval.
© 2016-2025 All site design rights belong to S.Y.A.