Raspberry Pi Projects (2014)
Part II. Software Projects
Chapter 4. Here’s the Newsby Mike Cook
In This Chapter
• Learn about text rendering
• Make text scrolling smooth
• Test the size of text before it is displayed
• Generate mirror writing
Have you ever tried looking into a camera and delivering a presentation to it? It’s not easy. The eye movement has to be totally different from giving a live talk to an audience. With a large audience you can make eye contact with many people around the room to show that you are addressing them all, but on camera this is different. If you try the same trick, it looks quite creepy, with your eyes swiveling about all over the place. With a camera you have to keep your eyes still and look straight into it. Also, you might have to repeat a piece of your presentation to the camera, so you want to be consistent. This was the problem faced by early TV shows – getting newsreaders and actors to learn their lines at a much higher rate than they did back in the theater. The solution they came up with in the 50s was the teleprompter – or autocue, depending on what side of the Atlantic you live.
Early Teleprompters
In 1950, there were paper versions of an auto prompter devised by Hubert Schlafly. He used a paper roll of cues, or prompts, that were placed next to the camera. The technique of using a through-the-lens system was first devised by Jess Oppenheimer three years later. Jess was a writer, producer and director on the TV show I Love Lucy, popular worldwide, and it quickly gained popularity with newsreaders, soap actors and sitcom comedians. The English comedian Tony Hancock was one of the first in the U.K. to discover the system. After a night of heavy drinking, a fall gave him a concussion that made it impossible to learn his lines. He used an autocue, or as he called it an idiot’s board, and never learned a line again. Sadly, this led to a demise in his performances, even heavier drinking sessions and eventual suicide. This is a problem I don’t think is attached to this project.
The first teleprompter used rolls of paper with the words handwritten on them. They would be wound by hand and put to one side of the lens. Then the strip was placed in front of a closed-circuit TV camera; a monitor and diagonal piece of glass was used, allowing the camera to shoot straight through the glass without seeing the words. This enabled the actor to read the words reflected in the glass while looking directly into the camera. The monitor was modified to give a compensating mirror image so the reflection looked the right way around. This trick relied on the fact that whenever light passes through glass not all of it gets through; a small amount is reflected from the surface. This is known as the reflective loss of the glass and is normally about 4%.
With the advent of personal computers in the early 80s, teleprompters entered the digital age. The first personal computer to be used for this was the Atari 900 in 1982. It was called the Compu=Prompt and was invented and marketed by Courtney M. Goodin and Laurence B. Abrams, who continued selling systems for 28 years.
The Pi Prompter
You could spend a small fortune on a teleprompter; however, it is quite easy to make one yourself using nothing more than the Raspberry Pi, a sheet of glass and a few fixings. A rather simplified diagram of what is needed is shown in Figure 4.1.
Figure 4-1: The Pi Prompter.
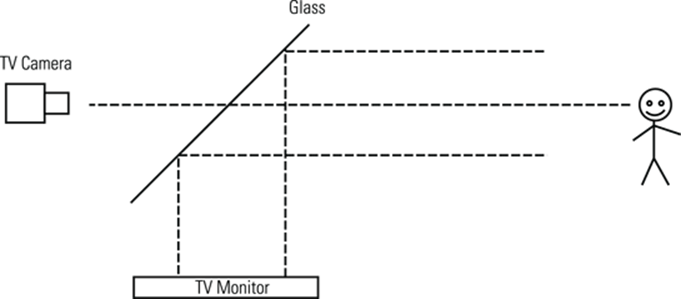
In somewhat of a reverse of the normal procedure, I will discuss the practicalities of this setup last, after you have the Pi producing something to display.
In essence the requirements sound simple: You need to produce large words scrolling slowly and smoothly up the screen. You need to be able to control the speed of the scroll, and pause it if required. The final twist is that you have to include an option to turn the words into mirror writing to compensate for any reflection from the glass, if you have that sort of a physical setup.
So here is an outline of what you need to do: Read words from a file, show them in a window in large type and scroll them up. Then if you think about it a bit more in-depth, you need to make sure that the words can fit on one line without overflowing it and breaking in the middle of a word. This is not quite as easy as you might think.
Like all projects, you don’t tackle this whole task head on all at once; instead, you get bits of it going first and build up what you want to do slowly. That is what development is all about. So tackle this in a number of stages.
What You Need to Do
First off, you need to understand how graphics are shown on a screen. Basically what you see on a TV monitor is a visual representation of an area of computer memory. Each pixel is a memory location; the address of that memory corresponds to the position of the pixel on the screen. The contents of that memory location correspond to the brightness and colour of the pixel. That computer memory is called the display memory. If you have a program that is producing something in a window, that window has its own working memory associated with it, known here as screen memory. You can then do all your drawing, or setting of memory locations, in that memory area, and when you are finished, you can transfer the whole of that into the display memory in one go. Copying blocks of memory from one place to another is quite efficient in computer-processing terms. This means that the window appears to update instantly. Another step in sophistication is that you can use a separate piece of memory to work in, and then transfer that to your working memory in any position in the screen memory you choose. This is sometimes called a sprite system,but in Pygame software this is known as a surface. This is illustrated in Figure 4.2.
Figure 4-2: Pygame’s graphic memory model.
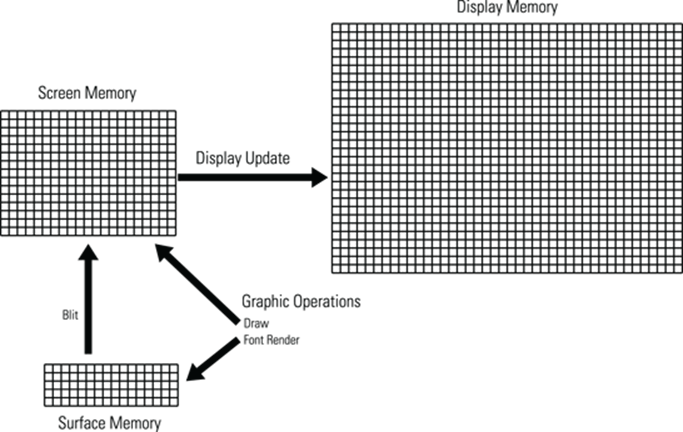
You can see that the display memory is the largest, as it is the whole output seen on the TV monitor. The screen memory corresponds to the window area you have defined for Pygame to use. Transferring data from the screen memory to the display memory is what is done with the display update call. You can do many operations to this screen memory, such as drawing lines, circles and rectangles. If you want to draw some text, however, it is best to do this in the separate area of memory called a surface. In that memory you can render text, which means to convert the text into a bitmap or graphic representation of letters. This is done in the depths of the computer and can involve several different techniques, the easiest of which is to use a lookup table that contains a bitmap for each letter in the font you want to render. If you render into a separate area of memory, you can transfer that memory to any location in the screen memory by a process Pygame calls blitting.
So armed with this knowledge you can work out a strategy for scrolling words. Render each line of the display into its own surface memory, and then blit each surface into the screen memory, one line above the next. The Y coordinate for each line is simply incremented in steps of the window height divided by the number of lines. Then all the lines fit completely within the window. If you have another number, a vertical offset, that you subtract from the calculated Y position, then the display will have each line shown in a slightly different place. If that offset is changed slightly and the screen redrawn repeatedly, the words will appear to scroll up the screen. Figure 4.3 shows what is happening.
Figure 4-3: Scrolling part 1 – the offset value controlling the position of the lines.
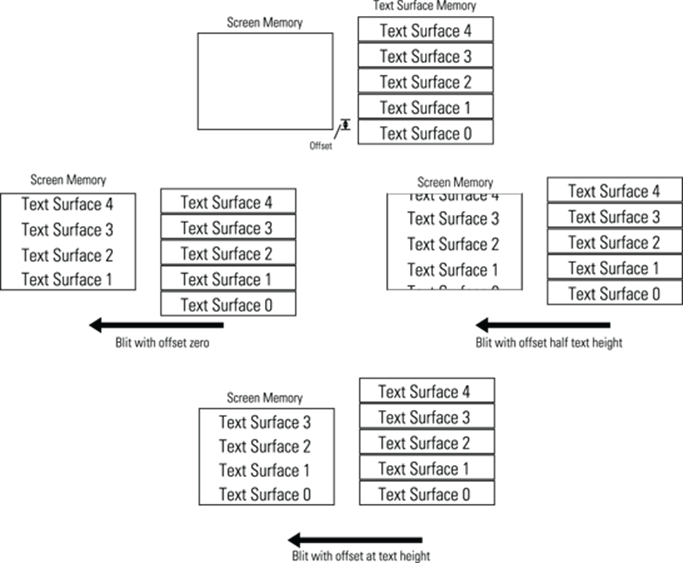
You can see the surface memory for each line and how it lines up with the screen. Surface 0 is entirely below the screen and so gets lost or clipped from the final display. As the offset increases to half the height of the text surfaces, the top half of Surface 4 and the bottom part of Surface 0 are clipped, showing only half of the two lines. Finally when the offset is equal to the height of the text surface, Surface 0 is fully visible, and Surface 4 is totally clipped. So the words have scrolled one line simply by changing the offset variable at a different value in successive frames.
Okay, that is enough theory for the moment; it’s time to actually implement this in code. This is not by any means a full, working system, but it allows us to work on this function and get it right before going on to get closer to what you want. Listing 4.1 contains the initial scrolling code.
Listing 4.1 Scrolling 1
#!/usr/bin/env python
"""
Here is the News
A Raspberry Pi Auto Cue Test 1
"""
import time # for delays
import os, pygame, sys
pygame.init() # initialise graphics interface
os.environ['SDL_VIDEO_WINDOW_POS'] = 'center'
pygame.display.set_caption("Auto Cue test 1")
screenWidth = 980
screenHeight =610
screen = pygame.display.set_mode([screenWidth, ![]()
screenHeight],0,32)
background = pygame.Surface((screenWidth,screenHeight))
segments = 4
segment = 0 # initial start place
textHeight = screenHeight / segments
textSurface = [ pygame.Surface((screenWidth, ![]()
textHeight)) for s in range(0,segments+1)]
# define the colours to use for the user interface
cBackground =(0,0,0)
cText = (255,255,255)
background.fill(cBackground) # make background colour
font = pygame.font.Font(None, textHeight)
def main():
lines = 5
while True :
for i in range(0,5):
setWords("This is line "+str(lines-i),i)
lines += 1
for offset in range(0, textHeight,4):
checkForEvent()
#time.sleep(0.1)
drawScreen(offset)
def drawScreen(offset) : # draw to the screen
global segment
screen.blit(background,[0,0]) # set background colour
for index in range(0,segments+1):
segment +=1
if(segment > segments): # wraparound segment number
segment = 0
drawWords(segment,offset)
pygame.display.update()
def setWords(words,index) :
textSurface[index] = font.render(words, ![]()
True, cText, cBackground )
def drawWords(index,offset) :
textRect = textSurface[index].get_rect()
textRect.centerx = screenWidth / 2
textRect.top = screenHeight - (textHeight * ![]()
index) - offset
screen.blit(textSurface[index], textRect)
def terminate(): # close down the program
print ("Closing down please wait")
pygame.quit() # close pygame
sys.exit()
def checkForEvent(): # see if you need to quit
event = pygame.event.poll()
if event.type == pygame.QUIT :
terminate()
if event.type == pygame.KEYDOWN and ![]()
event.key == pygame.K_ESCAPE :
terminate()
if __name__ == '__main__':
main()
Although Listing 4.1 is only a partial implementation of what you need, it is a fully working program, so let’s look more closely at what it does and how it does it. The code starts by loading in modules you need and then initialising the Pygame’s window, which needs to be large and is going to be where the action takes place. The size is determined by variables, and although the raw numbers could be typed into the commands where needed, this provides a one stop shop for any changes in size you might want to make. The variable segments determines how many lines to have on the display; as a lot of the time there will be lines clipped, this variable is one less than the total number of surfaces you need to use. The textSurface list is defined initially as just some blank areas of memory. Then the numbers determining the colours of the text and the background are defined, which for now are white text on a black background.
Moving on to the functions terminate() and checkForEvent() – these are what I call housekeeping functions. They provide an easy way to quit an application using the window’s close icon or by pressing Esc. Later these functions will be developed to control the application. The simplest function is setWords(), which simply renders a line of words in a specified text surface. Again, later this will be greatly expanded as you cope with real text.
The drawWords() function takes in an index or number to identify what text surface to use, and an offset. It then gets the rectangle associated with that surface and centers it horizontally, and blits it to the screen memory in a position that depends on the index and the offset values. This function is used exclusively by the drawScreen() function that places each text segment, or line, on the screen. This is controlled by the segment variable, which is constricted to the values between zero and the maximum number of text surfaces you have; we say this number is “wrapped around”. Note here that segment and segments are two different variables; segments defines how many you have, and segment defines the first one to use.
The main() function simply writes five lines of text to each segment and then scrolls a line’s worth by changing the offset each time. The for loop that does this has an increment of 4 to give it some decent scroll speed; change that number, and you change the speed of the scroll. I found that this loop didn’t need slowing down, so the sleep time was commented out. The result is that this program will scroll forever with the line numbers getting larger. The smaller the offset increment is, the smoother the scroll, but it is also slower. With a large value here, the scroll is a lot faster, but it’s more jerky. Fortunately, the Raspberry Pi is just about fast enough for your purposes here.
A Step Closer to a Usable Program
So now it is time to get a lot closer to what you want to do. First off, you want to make the scrolling a lot more efficient by not rendering all the text every time you want to scroll a whole line. This also makes the selection for the words used on a line easier as you only have to do it for each line once. The new method of line scrolling is shown in Figure 4.4.
Figure 4-4: Scrolling part 2 – how the lines scroll.
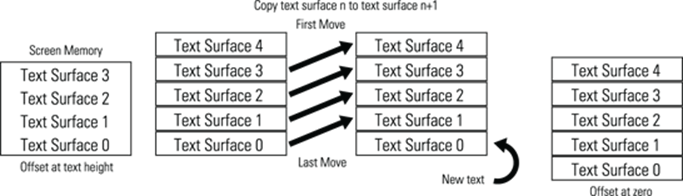
This involves copying the memory in the text surface from one location in the list to the next up, when the offset has reached the same height as the text surface. However, you have to do this from the top down, or else you end up with all the text reading the same one line. Then, new text is rendered into text surface 0. When the copying is complete the offset is set to zero, and the screen looks exactly as it did before – only a new line is hidden, clipped at the bottom of the screen, waiting to scroll into view.
The next major improvement in this version is the placing of words onto a line of text so that they will fit. This is a bit more tricky than it at first sounds because the font used is not a monospaced font. In a monospaced font all characters occupy the same size box, so it is easy to know how wide a string of characters will be from the number of them in the string. However, when you are using a proportional font, as you are here, each character’s width is variable, depending on the character. That means, for example, a letter I is much narrower than a letter W. The only way you can see how wide a bunch of words is going to be is if you render them, and then measure the size. This makes the rendering process a bit more tricky than before. Basically what you do is to build up the line one word at a time and measure the resulting text width. If it is less that the width you need, you add another word and measure again. This continues until you exceed the allotted width, at which point you go with a line that is one word short of this. In this way you ensure that the maximum number of words get used to fill the line and no word is split. This process is complicated by the fact that if you run out of words for one line, you just have to go with the remaining words in the line.
Finally, the words for your news story have to come from somewhere, and in this case it is a file called, appropriately enough, news.txt. This is just a simple text file you can make with the Leafpad text processor that is bundled with the Pi’s operating system. The text I used for testing was the scrolling text used at the start of the first Star Wars film, which I thought was suitably geeky. You can find the text with a simple Google search if you want to do the same. The news.txt file should be stored in the same folder as the program.
To see how these ideas pan out, look at Listing 4.2. This program is a bit more of a test than the previous one with some debug printout. This results in some rather jerky scrolling, but that will be fixed when you remove the printout.
Listing 4.2 Scrolling Words
#!/usr/bin/env python
"""
Here is the News
A Raspberry Pi Auto Cue Test 2
"""
import time # for delays
import os, pygame, sys
pygame.init() # initialise graphics interface
os.environ['SDL_VIDEO_WINDOW_POS'] = 'center'
pygame.display.set_caption("Auto Cue Test 2")
screenWidth = 980
screenHeight =610
screen = pygame.display.set_mode([screenWidth, ![]()
screenHeight],0,32)
background = pygame.Surface((screenWidth,screenHeight))
segments = 4
segment = 0 # initial start place
textHeight = screenHeight / segments
textSurface = [ pygame.Surface((screenWidth,textHeight)) ![]()
for s in range(0,segments+1)]
# define the colours to use for the user interface
cBackground =(0,0,0)
cText = (255,255,255)
scrollSize = 30
background.fill(cBackground) # make background colour
font = pygame.font.Font(None, textHeight)
numberOfLines = 0
newsLines = list()
def main():
print"Here is the news"
getNews()
lines = 0
while lines < numberOfLines :
for i in range(segments, 0, -1): ![]()
# shuffle up the text boxes
textSurface[i] = textSurface[i-1]
lines = setWords(lines,0)
offset = 0
while offset < textHeight:
checkForEvent()
drawScreen(offset)
offset += scrollSize
time.sleep(3.0)
terminate()
def getNews(): # open news file
global numberOfLines, newsLines
nfile = open("news.txt","r")
for line in nfile.readlines():
newsLines.append(line)
numberOfLines +=1
nfile.close()
def drawScreen(offset) : # draw to the screen
global segment
screen.blit(background,[0,0]) # set background colour
for index in range(0,segments+1):
segment +=1
if(segment > segments): # wraparound segment number
segment = 0
drawWords(segment,offset)
pygame.display.update()
def setWords(index,segment) :
endOfLine = False
margin = 30 # total gap for the two sides
words = newsLines[index].split() ![]()
# get an array of words from the line
wordsAvailable = len(words)
wordsToUse = 0
wordsWidth = 0
tryLine = ""
while wordsWidth < screenWidth - ![]()
margin and wordsAvailable >= wordsToUse + 1:
tryLine = ""
wordsToUse += 1
for test in range(0, wordsToUse):
tryLine = tryLine + words[test] + " "
textSurface[segment] = font.render(tryLine, ![]()
True, cText, cBackground )
tryWidth = textSurface[segment].get_rect()
wordsWidth = tryWidth.right
print tryLine ," -> is ",wordsWidth," pixels wide"
useLine = ""
if wordsWidth > screenWidth - margin : ![]()
# for the end of a line
wordsToUse -= 1 # use one less word
else :
endOfLine = True
for test in range(0, wordsToUse): ![]()
# build up the line you want
useLine = useLine + words[test] + " "
textSurface[segment] = font.render(useLine, ![]()
True, cText, cBackground )
print "Using the line :- ", useLine
newsLines[index] = newsLines[index][len(useLine) :]
if endOfLine : # work on the next line next time
index += 1
return index
def drawWords(index,offset) :
textRect = textSurface[index].get_rect()
textRect.centerx = screenWidth / 2
textRect.top = screenHeight - (textHeight ![]()
* index) - offset
screen.blit(textSurface[index], textRect)
def terminate(): # close down the program
print ("Closing down please wait")
pygame.quit() # close pygame
sys.exit()
def checkForEvent(): # see if you need to quit
global scrollSize
event = pygame.event.poll()
if event.type == pygame.QUIT :
terminate()
if event.type == pygame.KEYDOWN :
if event.key == pygame.K_ESCAPE :
terminate()
if event.key == pygame.K_DOWN :
scrollSize -= 1
if scrollSize == 0:
scrollsize = 1
if event.key == pygame.K_UP :
scrollSize += 1
if __name__ == '__main__':
main()
Most of the initialisation is the same as before, but now there is a new list defined called newsLines, which is set to be initially just an empty list. The getNews() function opens up the news.txt file and copies each line into the newsLines list before closing the file. As it does this it counts the number of lines in the global variable called, appropriately enough, numberOfLines.
The main() function is much as before, but it performs the scroll copying described earlier. Also, the for loop that controlled the offset has been replaced by a while loop, which is to allow the offset increment scrollSize to be altered on the fly by using the up and down arrow keys on the keyboard. This is done with a few extra lines in the checkForEvents() function. The main function is run only as long as there are lines to read from the text file. When it is finished there is a three-second delay, and the program shuts down.
What has changed substantially is the setWords() function, which previously consisted of just a single line. Now it is by far the longest function in the program. It starts off by defining some variables and using the split attribute to decompose the current line of news into a list of words called, with staggering imagination, words. It is this list that is used to build up, one word at a time, a trial line. This is done with the while loop defined by the line
while wordsWidth < screenWidth - margin and ![]()
wordsAvailable >= wordsToUse + 1:
This keeps on adding words to a string and measuring the width of the resulting text surface. At each stage the line built up so far and its width is printed out so that you can see the progress. This while loop also keeps tabs on if the words list has actually run out of words. This loop can finish when you have run out of words or when the width is too wide by one word. When this loops exits the next line,
if wordsWidth > screenWidth - margin : # for the end of a line
determines which exit condition caused it to finish. If it was because the resulting text was too wide, you remove one word from the list; otherwise, you set a variable to indicate that the end of the line has been reached. Next, you gather the words into the string you will finally use, and render it, printing it out again so that you can check it. Then those words need to be removed from the news line so that you don’t use them again. The line
newsLines[index] = newsLines[index][len(useLine) :]
does this. Finally, you check if the line has had all the words extracted from it by looking at the wordsAvailable variable you set earlier. If it has, the index variable is incremented, and finally the index variable is returned from the function.
The large initial size of the scrollSize variable, coupled with the printing out of each test string in the setWords function, ensures that the results look very bad on the screen – due to rapid scrolling and a pause while the next line is worked out. However, all that will disappear when you remove the test prints in the final version.
Your Final Pi Prompter Code
All that remains to do is add in some controls. These are basically keyboard controls, so code is added to the checkForEvents() function to set variables in response to key presses. The controls to add are for pausing/resuming the display, controlling the speed, adjusting the display to a mirror image and changing the file to use to read in more news. You also need to make some tweaks to the code to allow these variables to do their work. The final code is shown in Listing 4.3.
Listing 4.3 The Autocue Listing
#!/usr/bin/env python
"""
Here is the News
A Raspberry Pi Auto Cue
"""
import os, pygame, sys
pygame.init() # initialise graphics interface
os.environ['SDL_VIDEO_WINDOW_POS'] = 'center'
pygame.display.set_caption("Auto Cue")
screenWidth = 980
screenHeight =610
screen = pygame.display.set_mode([screenWidth, ![]()
screenHeight],0,32)
background = pygame.Surface((screenWidth,screenHeight))
segments = 4
segment = 0 # initial start place
textHeight = screenHeight / segments
textSurface = [ pygame.Surface((screenWidth,textHeight)) ![]()
for s in range(0,segments+1)]
# define the colours to use for the user interface
cBackground =(0,0,0)
cText = (255,255,255)
scrollSize = 6
background.fill(cBackground) # make background colour
font = pygame.font.Font(None, textHeight)
numberOfLines = 0
newsLines = list()
fName = "news.txt" # name of file to use
mirror = False
pause = False
anymore = False
def main():
global anymore
while True :
getNews()
lines = 0
while lines < numberOfLines :
for i in range(segments, 0, -1): ![]()
# shuffle up the text boxes
textSurface[i] = textSurface[i-1]
lines = setWords(lines,0)
offset = 0
while offset < textHeight:
checkForEvent()
if not pause :
drawScreen(offset)
offset += scrollSize
anymore = False
while not anymore :
checkForEvent()
def getNews(): # open news file
global numberOfLines, newsLines
numberOfLines = 0
newsLines = list()
nfile = open(fName,"r")
for line in nfile.readlines():
newsLines.append(line)
numberOfLines +=1
nfile.close()
def drawScreen(offset) : # draw to the screen
global segment
screen.blit(background,[0,0]) # set background colour
for index in range(0,segments+1):
segment +=1
if(segment > segments): # wraparound segment number
segment = 0
drawWords(segment,offset)
pygame.display.update()
def setWords(index,segment) :
endOfLine = False
margin = 30 # total gap for the two sides
words = newsLines[index].split() ![]()
# get an array of words from the line
wordsAvailable = len(words)
wordsToUse = 0
wordsWidth = 0
tryLine = ""
while wordsWidth < screenWidth - margin ![]()
and wordsAvailable >= wordsToUse + 1:
tryLine = ""
wordsToUse += 1
for test in range(0, wordsToUse):
tryLine = tryLine + words[test] + " "
textSurface[segment] = font.render(tryLine, ![]()
True, cText, cBackground )
tryWidth = textSurface[segment].get_rect()
wordsWidth = tryWidth.right
useLine = ""
if wordsWidth > screenWidth - margin : ![]()
# for the end of a line
wordsToUse -= 1 # use one less word
else :
endOfLine = True
for test in range(0, wordsToUse): ![]()
# build up the line you want
useLine = useLine + words[test] + " "
textSurface[segment] = font.render(useLine, ![]()
True, cText, cBackground )
newsLines[index] = newsLines[index][len(useLine) :]
if endOfLine : # work on the next line next time
index += 1
return index
def drawWords(index,offset) :
textRect = textSurface[index].get_rect()
textRect.centerx = screenWidth / 2
textRect.top = screenHeight - (textHeight * ![]()
index) - offset
if mirror :
screen.blit(pygame.transform.flip( ![]()
textSurface[index], True, False), textRect)
else :
screen.blit(textSurface[index], textRect)
def terminate(): # close down the program
print ("Closing down please wait")
pygame.quit() # close pygame
sys.exit()
def checkForEvent(): # see if you need to quit
global scrollSize, pause, anymore, fName, mirror
event = pygame.event.poll()
if event.type == pygame.QUIT :
terminate()
if event.type == pygame.KEYDOWN :
if event.key == pygame.K_ESCAPE :
terminate()
if event.key == pygame.K_DOWN :
scrollSize -= 1
if scrollSize == 0:
scrollsize = 1
if event.key == pygame.K_UP :
scrollSize += 1
if event.key == pygame.K_SPACE :
pause = not pause
if event.key == pygame.K_m :
mirror = not mirror
if event.key == pygame.K_0 :
anymore = True
fName = "news.txt"
if event.key == pygame.K_1 :
anymore = True
fName = "news1.txt"
if event.key == pygame.K_2 :
anymore = True
fName = "news2.txt"
if event.key == pygame.K_3 :
anymore = True
fName = "news3.txt"
if __name__ == '__main__':
main()
Looking at the last thing first, you will see that the checkForEvents() function has been extended to react to the spacebar, which toggles a variable for pausing the scrolling, and the M key, which toggles the mirror display. The numeric keys set a variable called anymore to true and a variable fName to one of four filenames. You can see how this can easily be extended to cover all the numbers, allowing some degree of keyboard control over what news file is displayed.
In the main() function the updating of the screen and increment of the offset variable are now dependent on the value of the pause variable, which is controlled by the spacebar. The whole function is not an infinite loop; when a file has finished being output the code is held in a while loop until the anymore variable is set to true with perhaps a change in filename as controlled by the number keys. The getNews() function now zeros the count of the number of lines and the list of lines themselves. The rest of the function is unchanged.
The setWords()function has the printing removed, which makes it much faster. The drawWords() function will render the text either normally or flipped around according to the value of the mirror variable. Note this will only be seen to take effect when the screen is actively scrolling; if it is paused or the end of the text has been reached, you will not see the reverse effect until it starts again.
That is about it for the code.
When running Listing 4.3 it is best to have the desktop background set to black and all the other windows minimised to reduce stray light.
The Physical Setup for Your Prompter
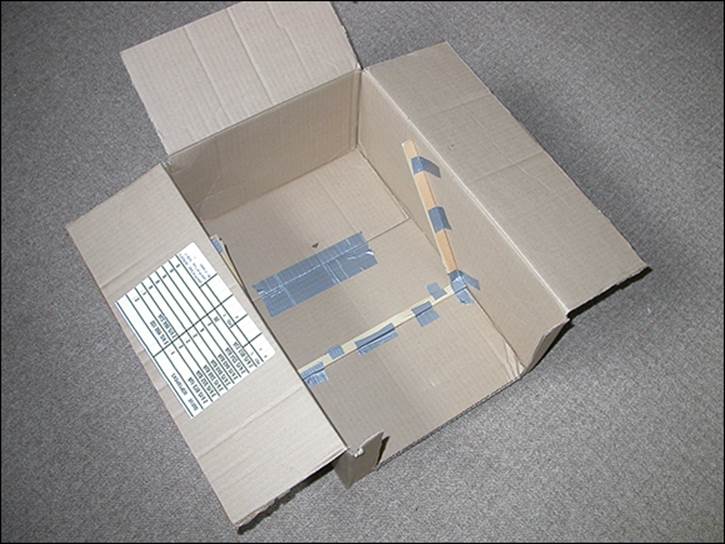
Now turn your attention to the practical setup. You saw in Figure 4.1 that the basic requirement is to have a sheet of glass at 45° to the camera, along with the Raspberry Pi’s monitor being flat on its back pointing upwards. It helps here to have a small monitor; although you might think the ideal would be a 13-inch screen, I quite successfully used a 19-inch TV set for this. This can be physically arranged in many different ways, but perhaps the simplest way is to utilise a large cardboard box and that old standby, duct tape. You can remove one side of the box with a sharp hobby knife, but you should leave the corners in for strength. I used three pieces of 1/4˝ × 1/2˝ strip pine duct taped to the sides and base of the box to act as the holder for the glass, as shown in Figure 4.5.
Figure 4-5: The first stage in building the autocue.
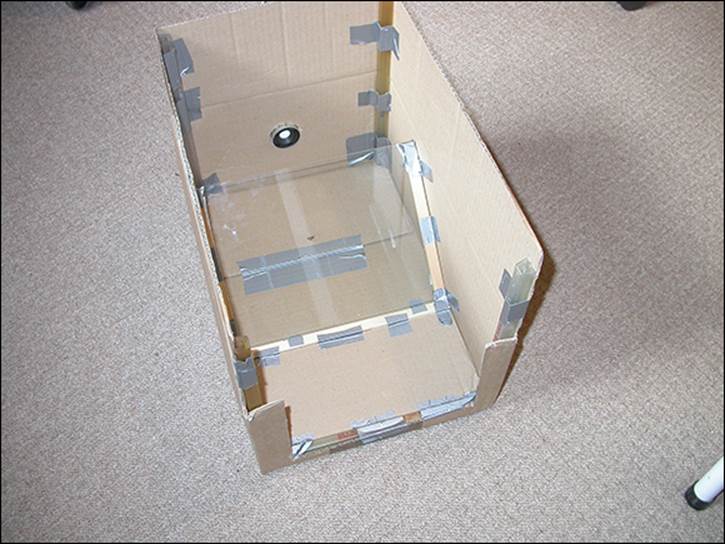
After that, I slipped a piece of 9 1/4˝ × 7˝ glass from a photo frame behind the wooden strips and held it on with two small strips of duct tape at the end. Cut a hole in the far end of the box for the camera lens to poke through. Make sure that there is enough zoom on the camera so that it doesn’t see the edges of the box. I used some plastic IC tubes to reenforce the corners although you can use 1/2˝ square strip pine, again with liberal amounts of duct tape. Figure 4.6 shows this.
Figure 4-6: The finished autocue.
Now it’s time to place the box open side down over the monitor and run the program. The results are shown in Figure 4.7.
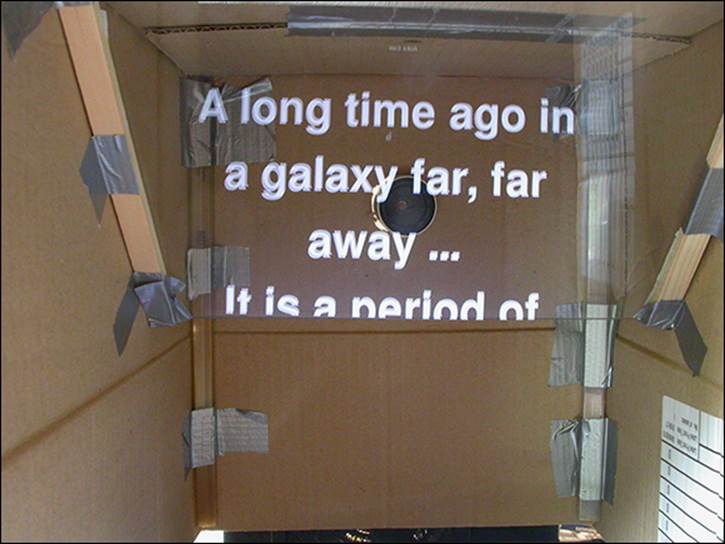
You can use normal picture frame glass, and it will give no problems with the size of letters shown here in Figure 4.7. However, there is a small bit of fuzziness or ghosting due to some reflections from the other side of the glass. You can see this in a closeup of the autocue, as shown in Figure 4.8; this was taken with a longer exposure than the photograph in Figure 4.7. You can minimise this double reflection by using as thin a piece of glass as you can get. Another way to cut it down, and to increase the brightness of the prompt in the bargain, is to use some half silvered glass, which is sometimes called a two-way mirror. The cheapest way to get this is to apply some laminate film to the glass – the type used for tinting windows. It cuts down the light reaching the camera, but you can compensate for that by using stronger lighting on the subject or a longer exposure/larger aperture on the camera. Make sure that you get the neutral tinted type; otherwise you will get a colour cast over what you film. You can get glass like this in various degrees of partial reflectivity. It would have been better if the inside of the box was sprayed black, but it works acceptably without this.
Figure 4-7: The autocue in action.
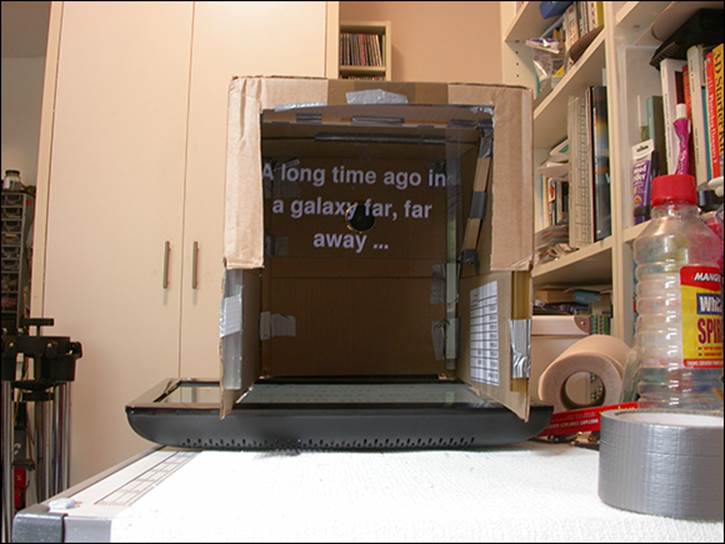
Figure 4-8: A closeup of the autocue, showing double reflections.
Over to You
It is now over to you to make your own additions and improvements to this project. A simple improvement would be to make the mirror function work even when the display is not scrolling. This can easily be done by testing the variables that determine if the display is scrolling and if not calling the drawScreen function.
One feature not included in the software is an indication of what word or line should be being said at any time. You can do this in many ways, but the simplest is to make all the text a slightly less bright shade of grey with the middle line in the display being full white. You could also experiment with alternative colours or highlighting individual words.
On the system I made, the text would have fitted better on the TV if the display were turned around by 90°, so you could change the code to do this. Can you think how this would be done? Hint: There is a pygame.transform.rotate() function in the box.
If you don’t like the system I used to physically make the project, have a look online. There are numerous suggestions for alternative methods of construction.
On the control side you can use some of the hardware input techniques covered in later chapters to build your own handheld controller to pause and change the speed of the scrolling. Whatever you do you can say with confidence, “Good evening. Here’s the news”.
All materials on the site are licensed Creative Commons Attribution-Sharealike 3.0 Unported CC BY-SA 3.0 & GNU Free Documentation License (GFDL)
If you are the copyright holder of any material contained on our site and intend to remove it, please contact our site administrator for approval.
© 2016-2026 All site design rights belong to S.Y.A.