HTML5, 20 Lessons to Successful Web Development (2015)
PART II HTML5 and the Canvas
LESSON 9 Accessing the Canvas

To view the accompanying video for this lesson, please visit mhprofessional.com/nixonhtml5/.
There are no two ways around it. If I’m going to show you how to use the HTML5 canvas, then I’m also going to have to give you an ultra-crash course on JavaScript, or at least on those aspects of it required for manipulating the canvas.
So here goes (if you already know JavaScript, you can briefly skim the following section, before moving on to the “Accessing the Canvas with JavaScript” section).
An Ultra-Crash Course in JavaScript
Although I’m going to teach you a few parts of JavaScript, it is by no means the entire language, but it will be just sufficient for you to complement your use of HTML for manipulating the canvas. Along the way I also touch upon a few elements of CSS (Cascading Style Sheets) too.
JavaScript was created to allow you to directly access various parts of the HTML DOM (Document Object Model). To explain the DOM, take a look at the following example web page:
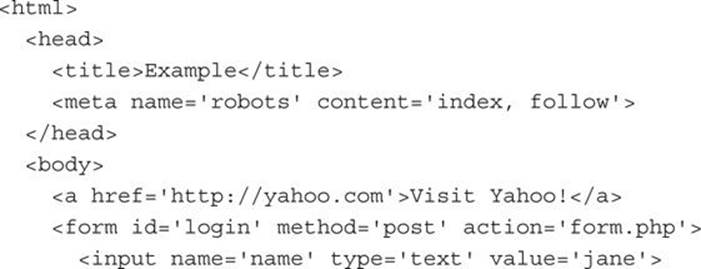
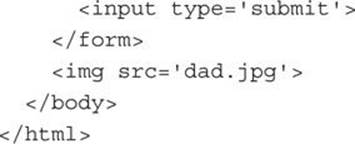
This is a simple page that displays a link to the Yahoo! website and has a form underneath that submits a username to a PHP script with the filename form.php. Beneath that an image is included. In terms of this web page’s DOM, it looks something like Figure 9-1, in which the entire content is contained within <html> and </html> tags.
FIGURE 9-1 The DOM of the preceding HTML example
Looking at the <head> section in Figure 9-1, you can see that there are two elements. The first is the document’s title of Example, contained within <title> and </title> tags, while the second is the meta tag, which tells search engine crawlers that the document may be crawled, its contents indexed, and any links can be followed. This is done by passing the value robots to the name attribute, and index, follow to the content attribute. Meta tags are self-closing (empty) so there is no </meta> tag. The section is then closed with a </head> tag.
To the right of the figure is the body of the document, which is contained within <body> and </body> tags. There are three elements in this section, a link to yahoo.com in <a> and </a> tags, an embedded image that uses a self-closing <img> tag, and a form contained within <form> and</form> tags.
The form assigns the value login to the id attribute, post to the method attribute, and the program name form.php to the action attribute. This is the program that is to process the form when it is submitted. The opening <form> tag is then closed, and inside the form there are two self-closing <input> tags. The first passes the value name to the name attribute, the value text to the type attribute, and the value jane to the name attribute. This prepopulates the input field with the word jane, but it can be altered by the user.
After this a second <input> tag creates a submit button by passing the value submit to its type attribute. Finally the form is closed with a </form> tag.
When opened in a browser, the document looks something like Figure 9-2.
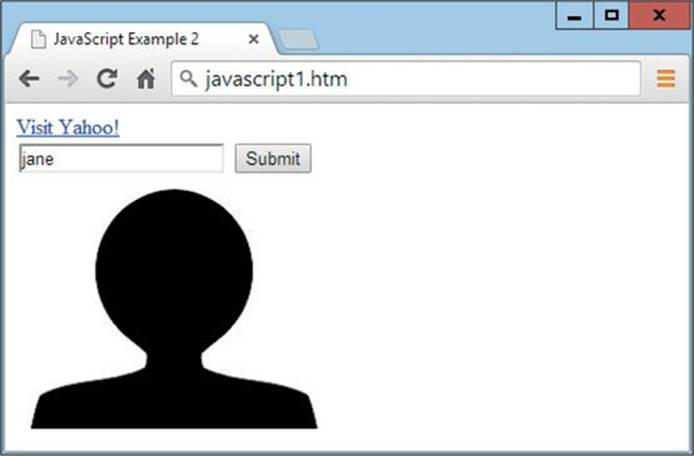
FIGURE 9-2 The result of displaying the example web page
Accessing Form Elements from JavaScript
Now let’s look at how these elements can be manipulated from JavaScript, which should always be placed within <script> and </script> tags. For example, the following code changes the document’s title from Example to This is an example web page:

This has the same effect as if you opened the document and went straight in and edited the title within the <title> and </title> tags yourself. See how easy JavaScript is?
Similarly the form method type of post is easily changed to get, like this:

Here the JavaScript references first the document, then the forms within that document, then the form with the id of login and its method, which is then modified.
Using the getElementById() Function
In the previous two examples I showed you how to access parts of a document by their type, but there’s a far, far easier method, which is to give every element in a document a unique id, and then to access them from JavaScript using just those ids.
For example, if the <img> tag is given an id (such as image1) with which it can be identified, it’s possible to replace the image loaded by it with another, like the following, in which the male-shaped dad.jpg image is replaced with mom.jpg to match the default name in the form field ofjane:
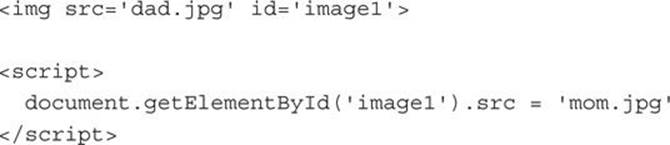
The trick here is to use the JavaScript function getElementById(), which will let you access any DOM element that has been given a unique id.
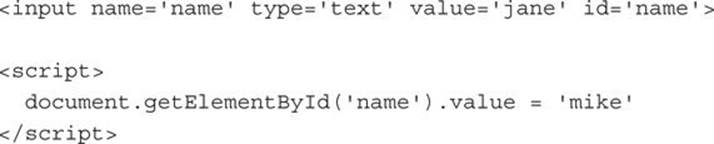
So let’s look at another example by restoring the name and image mismatch by altering the default name value. If we were to use the initial example in this section, we would have to access the element via document.forms.login, and so on, but by giving the form field an id (for example of name) and using getElementById(), we can avoid all that and go straight to the element to change it, like this (in which I have shown only the changed <input> tag and not the remainder of the HTML, which remains unchanged):
See how much easier it is than having to remember whether an element is part of a form, an image, or something else? All you have to do is know the name of an element and getElementById() will do the job of finding it for you. Figure 9-3 shows how the web page now displays after these changes. The title is different, the default input value is ′mike′, and the image shown is mom.jpg (yes, the gender is all confused again).
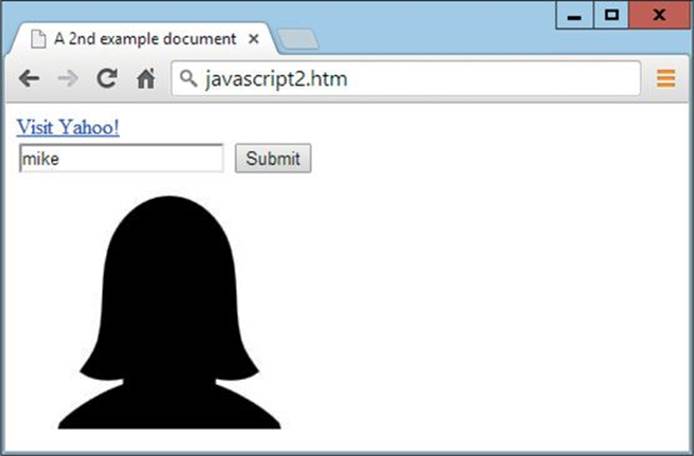
FIGURE 9-3 Three elements of the page have been modified with JavaScript.
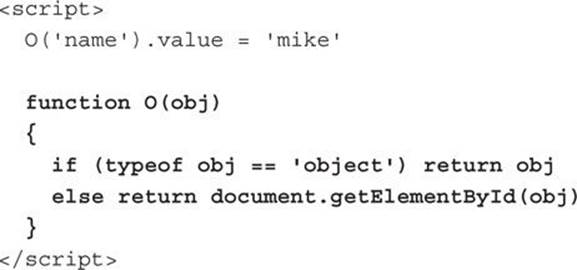
The Simpler O() Function
I use the getElementById() function so often that I always create a simple function called O() (with an uppercase O) to make it easier to type in. The function looks like this and I simply place it anywhere in a section of JavaScript, like this (highlighted in bold):
Doing this saves 22 characters of typing each time the replacement O() function is used instead of the longer one. One reason for the tremendous shortening is that the preceding document keyword has also been incorporated into the O() function, saving on typing that in too.

In JavaScript tutorials on the Web and in books, you may see functions referred to either by the term function, or using the term method, but they both mean the same thing: a set of instructions grouped together, which can receive one or more values and then return a value upon completion.
However, there’s one further step I like to take that makes the function even more useful and that’s to allow the passing to it of either element IDs (which is what it does so far), or an object that is the result of having called the O() function.
Let me explain it like this. Instead of directly manipulating the value of the form input with the id of name directly, let’s first create what is called an object from this element, like this:
newobject = O(′name′)
Now that I have this object, I can access it several times without ever having to call the O() function again, like this (in which the value is changed on separate occasions):

Now, whenever I wish to refer to the element in question, I can simply use the object that I created. But now, what if I want to change the style property of an object? Because the S() function I created for this (shown after this paragraph) calls the O() function, and that only supports idnames, then the only way to do this is to go back to using a call such as this (to make the input exactly 150 pixels wide):
S(′name′).width = ′150px′
But I have been using the object newobject, and for the sake of consistency, I would prefer to pass that to the S() function. To enable this, all that’s necessary is to allow the O() function to be passed either an object or an id, so the argument passed in obj is analyzed by the code and if it happens to already be of the type object, then the object is simply returned, because it is already an object.
But if it is not of that type, then it must be an id name, in which case it is looked up and returned as an object with a call to getElementById().
If this confuses you, don’t worry. You don’t need to learn JavaScript, or (indeed) understand fully the workings of these snippets of code, in order to use the following examples to access the HTML5 canvas.
The Partner S() Function
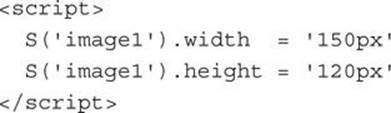
In a similar fashion to the savings produced by using the O() function, there is one other that I employ frequently because it is also used all the time in JavaScript, and that’s the new function S() (with an uppercase S). This is used to enable JavaScript to easily access any style attribute of any element.
For example, if I wish to change the width and height of the image, I can do it like this (which results in Figure 9-4, when the other lines of HTML and JavaScript we’ve been using are included):

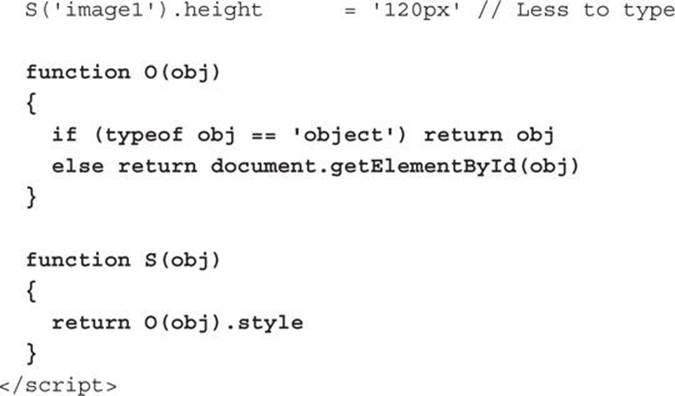
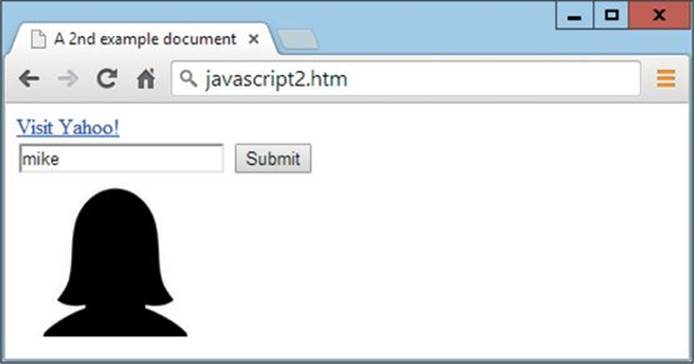
FIGURE 9-4 The mom.jpg image has been reduced in size.
The // characters create a comment to the end of the line, which I have used in the preceding example to comment each of the final two lines within the script (that the second version of syntax is shorter than the first).
What I’ve done here is simply make the S() function place a call to the O() function but with an added .style suffix, and now I can use O() for accessing elements by name, and S() for accessing the style attributes of elements by name.
Believe it or not, these two functions alone provide you with a huge amount of scope and power to modify any part of a document, without learning the JavaScript language. All you need to remember to do is include the O() and S() functions somewhere in a script in any document that will refer to them. Then, whenever you need to use these functions, open up a new <script> tag and access them, like this:
This works because you are allowed to enter <script> tags as many times as you like in a document—there is no requirement to keep all your JavaScript code within a single set of <script> and </script> tags, although you may do so if you wish.
Alternatively, if you would like to create an object on the first call to the O() function, and then reference that instead, the preceding code might look like this:
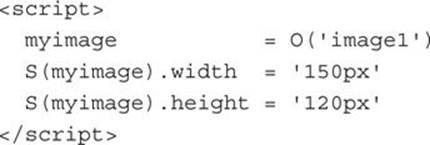
This code can be quicker as the object is only looked up once, and is therefore a more efficient way to code when an element may be accessed more than once. By the way, the reason myimage does not have quotation marks around it is because it is an object, not an id value that is a string.
I use the functions O() and S() extensively throughout this book, so I recommend you get comfortable with them by downloading the examples from the companion website and then playing with them until you feel you have mastered their use.
The <canvas> Tag
With that little (but necessary) preamble over, now we can get down to directly manipulating an HTML5 canvas. As you may recall from Lesson 8, the following code creates a canvas and places a square in its center (and results in Figure 9-5):
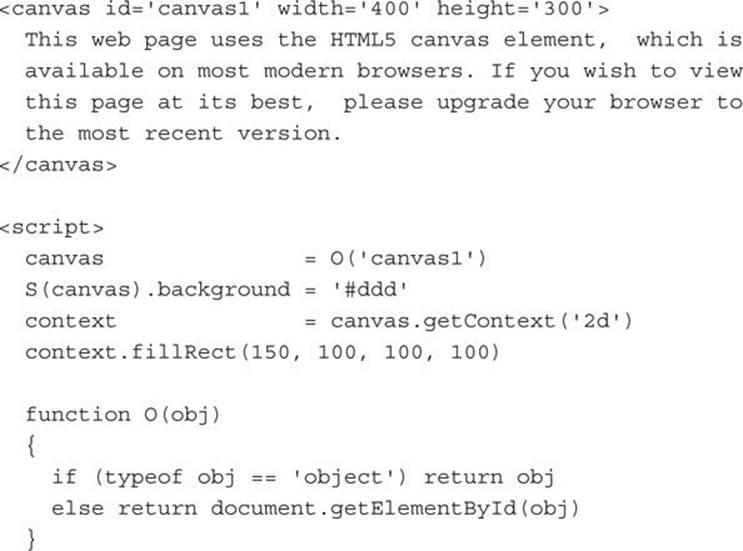
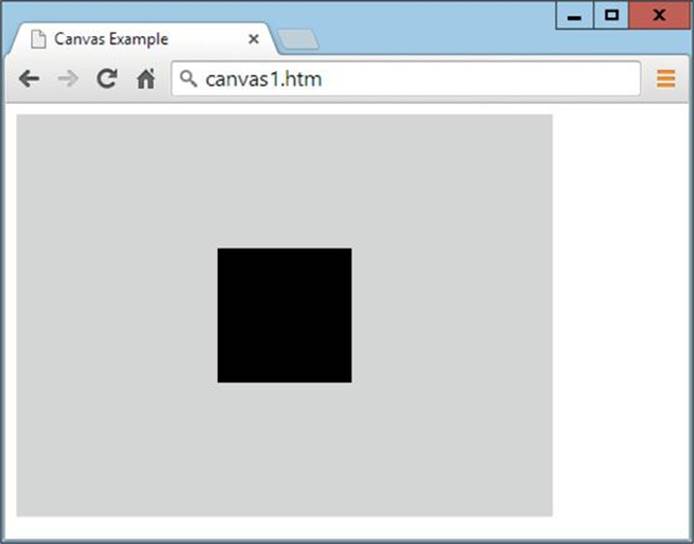
FIGURE 9-5 Drawing a black square on a gray canvas
The <canvas> tag itself supports only two attributes; width and height, as used in the example. And it is important that you provide a unique identifier for each canvas you use, so that you can access them from JavaScript. In the example, the id is given a value of canvas1.
The other thing to remember about the <canvas> tag is that anything between it and the closing </canvas> tag is ignored by all HTML5-compatible browsers, and so is displayed only by browsers that do not recognize it. Therefore this is where you can place text and/or HTML to inform users about what they are missing and perhaps how to upgrade their browser.
Accessing the Canvas with JavaScript
Let’s look closely at the code from the previous example, as follows:

Ignoring the opening and closing tags, and the O() and S() functions, the object canvas is created by passing the id of the canvas (canvas1) to the O() function.
Armed with this object, the following line passes it to the S() function and then sets its background property to a light gray (#ddd) color. This is where the power of extending the O() function to also support objects comes in (because the S() function calls the O() function). By virtue of this extension it has been a simple matter to pass the object created from the canvas straight to the S() function, allowing for far simpler and more compact coding.
Next, to be able to read from and write to the canvas, a context (with the name context) is created with which to access it, using the JavaScript getContext() function, which is told to treat the canvas as a two-dimensional workspace.
Then the final line uses this context to create a filled rectangle at an offset of 150 pixels horizontally in from the top-left corner, and 100 pixels vertically down from the same corner. The rectangle is given a width and height of 100 pixels, resulting in a filled, black square.
From now on, I will be assuming that you have placed the two functions O() and S() within <script> and </script> tags somewhere in your document, and will not be showing the code for these functions in any more examples. So please ensure that you have included them before testing any examples, or they will not work.
Converting a Canvas to an Image
Because of the way the canvas is created, it is not possible for users to right-click and save a copy to the desktop, for example. Likewise, you cannot directly use a canvas as an image. But there is a way you can convert a canvas to what is known as a data URL. This displays as an image and can then be copied and/or saved.
Consider the following code in which a canvas is created and then followed by an image, which does not have any src attribute:
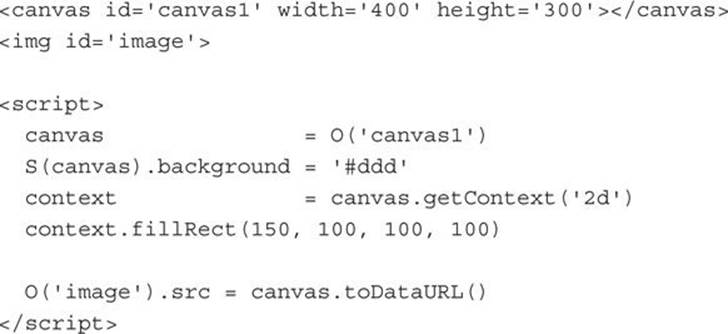
What this code does (remember, it assumes you already have the O() and S() functions listed somewhere) is identical to the previous example, but there is a new line of code at the end that accesses the image using the O() function and then attaches a value to its src attribute, which is gained by calling the toDataURL() function on the canvas object.
The toDataURL() function extracts the image data from the canvas referred to by the canvas object and returns a string of text in which the canvas has been encoded as a displayable image, which is interpreted by the browser and reconstructed into an image.
When the code is loaded into a browser, it displays as Figure 9-6. Notice how the background color of the canvas (which has been applied only to the canvas element and not the contents of the canvas) is ignored by the toDataURL() function, so that when the image data is extracted, you see only the central black square.
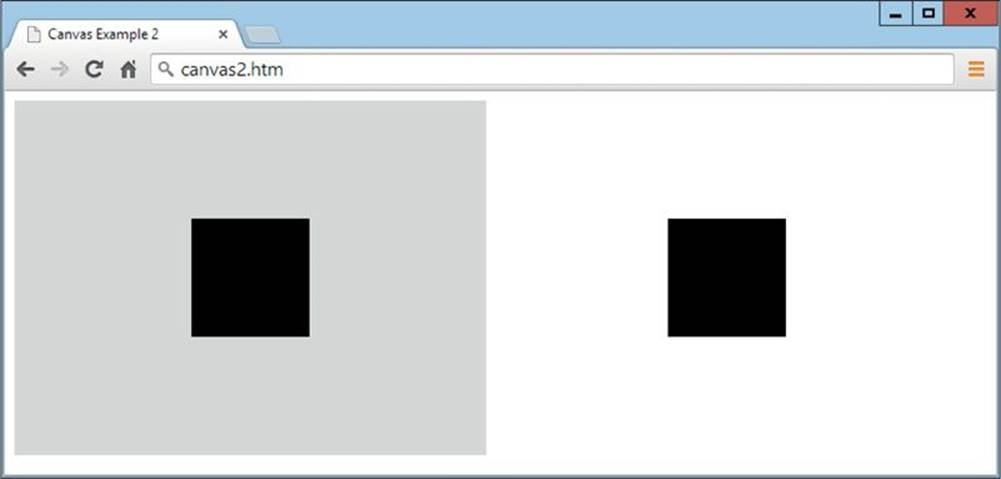
FIGURE 9-6 Displaying a canvas and a copy saved into an image
The imagetype Argument
When an image is created from a canvas, you can choose the type of image to use between a jpeg and png image using the imagetype argument, as in the following two examples, which are identical in result since the default image type is png.

Or, for a jpeg image, you can use code such as the following three examples, which create a very low-quality, medium-quality, and a very high-quality image by passing an additional argument containing a value between 0 (low quality) and 1 (high quality):

Remember that the canvas object is used to call the toDataURL() method, not the context object. This is because the latter is for applying changes to the canvas using the context rendering assigned, while the former refers to the canvas object itself.
Uses for this feature could be online image manipulation programs that run in the browser (as opposed to on a web server somewhere far away from the browser), and which returns a transformed or newly created image ready for the user to save to their hard disk and use. This means that it is possible to use the HTML5 canvas to create a graphics program, like Photoshop, that runs within a browser and requires no interaction with a web server. Therefore it could also be turned into a web app or even a standalone app for a mobile device like a tablet or phone.
Summary
Now that you understand the basic elements of the HTML5 canvas, and have the tools and information required to use it, in the following lesson I explain in depth how to use each aspect of the features available for writing to a canvas, including drawing lines, rectangles, and circles; changing colors; using pattern and gradient fills; writing text; changing font face; using lines, paths, and curves; applying images to a canvas; adding shadows; direct pixel manipulation; compositing and transparency; transformations and translations, and more. By the time you complete the next lesson, you will be an expert at using the HTML canvas.
Self-Test Questions
Test how much you have learned in this lesson with these questions. If you don’t know an answer, go back and reread the relevant section until your knowledge is complete. You can find the answers in the appendix.
1. What is the DOM?
2. What JavaScript command could you use to change a web document’s title?
3. How can you create a JavaScript object from an HTML element?
4. What attribute must a canvas be given in order for JavaScript to access it?
5. How can you access an object’s style properties from JavaScript?
6. What is the purpose of the O() function in these examples?
7. What is the purpose of the S() function in these examples?
8. What kind of object is needed to be created from a canvas object in order for drawing functions to operate correctly?
9. Which JavaScript function is used to copy canvas data into an image?
10. How can you create a single-line comment in JavaScript?
All materials on the site are licensed Creative Commons Attribution-Sharealike 3.0 Unported CC BY-SA 3.0 & GNU Free Documentation License (GFDL)
If you are the copyright holder of any material contained on our site and intend to remove it, please contact our site administrator for approval.
© 2016-2026 All site design rights belong to S.Y.A.