HTML5, JavaScript and jQuery (Programmer to Programmer) - 2015
Part II Dynamic HTML5 Web Applications with JavaScript and jQuery
Lesson 20 Data Attributes and Templates
In this lesson, you will look at two additional HTML5 features:
· Data attributes: These allow you to define your own attributes on any element and thus bind data directly to the element. This has a number of useful purposes, as you will see shortly.
· Templates: Templates are a relatively new HTML5 feature. They allow a document fragment to be created independently of the DOM itself. The document fragment can then be programmatically filled with data and added to the DOM. This will provide an alternative approach to the complex string concatenation used in the previous lesson.
Although this lesson introduces these two technologies together, there is no fundamental connection between them.
Template Tag
In the previous lesson, you used string concatenation to create a new row in the contacts table. As mentioned at the time, this is a problematic approach because it is very easy to make a mistake with the String concatenation.
A preferable approach to string concatenation is to define the structure of the HTML using regular tags but leave placeholders for the actual data. When you need to create a row, you could simply add data to this structure, and add it to the DOM. The template tag has been added to HTML5 to support this exact approach.
Note
The template tag is not currently supported in Internet Explorer; thus, it is best to confirm support across relevant browsers before using it. There are, however, many other templating libraries available for JavaScript, and many have more advanced features than the template tag introduced in this lesson.
In order to start using the template tag, you simply add it anywhere in the HTML and include the relevant HTML structure inside it. You also typically provide an id for the template so you can locate it. Therefore, start by adding the following immediately before the closing main tag:
<template id="contactRow">
<td></td>
<td></td>
<td></td>
<td></td>
<td><time></time>
<div class="overlay"></div></td>
</template>
If you reload the web page, you will notice that this HTML does not display within the browser. In addition, although it is possible to select the template element using DOM and jQuery selectors, it is not possible to select its children. For instance:
$('#contactRow td')
[]
When you use the template, you need to populate it with the appropriate data. Clearly, you could simply set the contact name in the first child, the phone number in the second child, and so on.
Where possible, it is best to find generic solutions to common problems. Therefore, you will write an algorithm that can take any template and any object, and will populate the template with the data in the object based on a set of conventions.
In order to achieve this, you will use another technology called data attributes.
Data Attributes
In order to create the generic algorithm mentioned in the previous section, you need some way of marking tags in the template with the property names from the object that should be used to populate them.
There are several ways you could do this. For instance, if a td element should be populated with the data in the contactName property, you could specify the td as follows:
<td id="contactName"></td>
The obvious problem with this approach is that IDs must be unique within the document, and therefore you would need to make sure that the property names in your objects never conflicted with the IDs of elements in the document.
An alternative approach is to specify the property name as a class:
<td class="contactName"></td>
There is nothing inherently wrong with using class names for non-CSS purposes; an obvious problem with this solution, however, is that your CSS may contain a class that matches one of the properties.
Another approach that has been used historically is to use attributes that are supported by the specification but are not used by the browser. The most common attribute used for this purpose is rel:
<td rel="contactName"></td>
The problem with this approach is that, although browsers do not use this attribute, the rel attribute does have meaning, and is used by search engines when used on a tags.
As you can see, historically, there has not been a good way of linking program-specific data to an element. HTML5 offers a much better way to solve this problem. It is possible to specify your own attributes on any element, provided they are prefixed with data-. You can see this in the following example:
<template id="contactRow">
<td data-property-name="contactName"></td>
<td data-property-name="phoneNumber"></td>
<td data-property-name="emailAddress"></td>
<td data-property-name="companyName"></td>
<td><time data-property-name="lastContacted"></time>
<div data-property-name="notes" class="overlay"></div></td>
</template>
Data attributes should follow the naming conventions shown here, specifically:
· They must start with data-.
· They should contain only lowercase characters.
· They should use hyphens to separate logical words.
You will look at why these conventions are important shortly.
Just like any attribute, data attributes can be assigned values. In this case, the value has been defined as the property name from the object that should be used to populate the text of the element.
Once elements have been logically associated with property names, you can write a function that binds the property values in the object to a document fragment. Add the following as a global function within contacts.js:
function bind(template, obj) {
$.each(template.find('[data-property-name]'), function(indx, val) {
var field = $(val).data().propertyName;
if (obj[field]) {
$(val).text(obj[field]);
}
});
return template;
}
This may look complex, but if you walk through it line-by-line it is reasonably straightforward. You start by iterating through every element that has a data-property-name attribute using the jQuery each helper.
As shown in earlier lessons, you provide a callback function to each. Because this passes the index and value of each element to the function provided, the parameter val will represent an element with the data-property-name attribute.
On the next line, you extract the value of the data-property-name attribute. You may expect that this line would read:
var field = $(val).attr('data-property-name');
This would be valid, but as you can see, calling the data method on an element provides access to all the data attributes as properties on an object. This also automatically converts the names from the conventions used on attributes to the convention used for property names, so:
data-property-name
becomes:
propertyName
On the next line, you check to see whether the object you were passed has a property with this name:
if (obj[field]) {
Notice that you use the square bracket notation here for accessing the property. If the property does exist, you simply set its value as the text of the element; if not, you do nothing.
The advantage of this code is that it does not need to know anything about the document fragment or the object it has been passed; it only needs to know the convention you are using. Property names in the object match data attributes on elements. This is known as “programming by convention,” and is a very efficient mechanism for writing generic, reusable code.
Using the Template
Now that you have a template, and a function for binding data to a template, you need to put it all together. Start by adding a new method called save to the object returned in contacts.js. Place it between the init and serializeForm methods:
save: function(evt) {
if ($(evt.target).parents('form')[0].checkValidity()) {
var fragment = $(screen).find('#contactRow')[0].content.cloneNode(true);
var row = $('<tr>').append(fragment);
var contact = this.serializeForm();
row = bind(row, contact);
$(screen).find('table tbody').append(row);
$(screen).find('form :input').val('')
$(screen).find('#contactDetails').hide();
}
},
This method will replace the functionality in the submit button click listener; therefore, you start by checking the validity of the form. Next, you find the template element with the ID contactRow. Once you find this, you convert it to a native DOM object by accessing it as the first element in the array returned.
If you access the content of a template directly in the DOM, you will notice that the value returned is a document-fragment, as you can see in Figure 20.1.
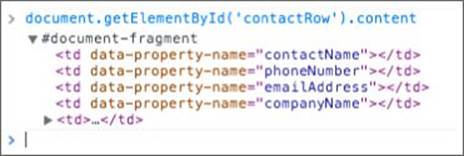
Figure 20.1
Unlike other nodes in the DOM, a document fragment does not have a parent, and therefore it is not part of the DOM.
Your goal is to create a DOM node that contains the elements represented by the template; therefore, you access the content of the template using its content property and clone (create a copy of it) using the cloneNode method. The true value passed to the cloneNodemethod indicates you also want to clone any children elements.
Once you have a copy of the document fragment, you append it to a tr element. Ideally, you would have worked directly with the document-fragment, but unless you add it to another node, the content of the document fragment cannot be queried by jQuery.
Note
When you write code such as $('<tr>'), you are creating jQuery-specific document fragments (it does not have a parent, and is not part of the DOM). Therefore, think of the preceding approach as adding an HTML5 document fragment to a jQuery document fragment.
Once the object and the template are obtained, you simply call the bind function to populate the template:
row = bind(row, contact);
You can now change the submit button click event listener as follows:
$(screen).find('form input[type="submit"]').click(
function(evt) {
evt.preventDefault();
this.save(evt);
}.bind(this)
);
Notice how you have broken the functionality in the save operation down to a number of distinct components, each with its own generic, and reusable, implementation:
· Serializing the object from the data in the form
· Providing a template for a new row in the table
· Binding an object to a template
One of the keys to writing a large, maintainable web application is to write self-contained functions or methods that each perform a specific task, but do so in a generic manner.
Once you have self-contained functions, you can enhance them over time. For instance, the current implementation of bind does not add the datatime attribute to time elements; you can easily rectify this as follows:
function bind(template, obj) {
$.each(template.find('[data-property-name]'), function(indx, val) {
var field = $(val).data().propertyName;
if (obj[field]) {
$(val).text(obj[field]);
if ($(val).is('time')) {
$(val).attr('datetime', obj[field]);
}
}
});
return template;
}
Try It
In this Try It, you will look at how you can modify the template created in this lesson to allow you to delete rows from the table. Each row in the table will have a delete button, and clicking this will remove the row from the table.
Lesson Requirements
You will need the CRM web application from Lesson 19. This lesson can then be completed in a text editor and tested in Chrome.
Step-by-Step
1. Start by removing the tr elements from the tbody in contacts.html. From now on, you will not have any rows when the screen initially loads. Later in the book, you will save contacts, but for now you will need to create contacts each time the screen loads.
2. Add an additional th column to the thead element with the text “Actions,” and set the td element in tfoot to span six columns. The table should now look like this:
3. <table>
4. <thead>
5. <th>Contact name</th>
6. <th>Phone number</th>
7. <th>Email address</th>
8. <th>Company name</th>
9. <th>Last contacted</th>
10. <th>Actions</th>
11. </thead>
12. <tfoot>
13. <tr>
14. <td colspan="6">2 contacts displayed</td>
15. </tr>
16. </tfoot>
17. <tbody>
18. </tbody>
19. <caption>Sales leads</caption>
</table>
3. Change the template to include a new td element at the end. The td element will contain a hyperlink for deleting rows from the table. This hyperlink will in turn contain a data attribute describing its role:
<td><a href="#" data-delete-button>Delete</a></td>
4. Add an event listener within the init method that fires when the user clicks an element with the attribute data-delete-button. Because these elements will not be in the DOM when the screen loads, you will need to use the on method, as described in the previous lesson. My version can be found at the end of this section.
5. Within the event listener, start by preventing the default behavior of a hyperlink (to load a new page). The event listener should call a method called delete (which you will write in the next step) on the object, and pass it the event.
6. Add a new method to the main object in contacts.js called delete. This should accept a parameter called evt, which will be the event object.
7. Use the target of the event, and find its closest parent that is a tr element. Once this is located, use the remove method to remove it from the DOM.
8. Add a new method to the object called updateTableCount. This method should check how many rows are in the table and then update the tfoot cell to display a count, for instance “3 contacts displayed.” Once this is written, it should be called after the save orremove method completes.
My event listener looked like this:
$(screen).on("click", "[data-delete-button]",
function(evt) {
evt.preventDefault();
this.delete(evt);
}.bind(this)
);
And my delete method looked like this:
delete: function(evt) {
$(evt.target).parents('tr').remove();
},
My version of updateTableCount looked like this:
updateTableCount: function(evt) {
var rows = $(screen).find('table tbody tr');
$(screen).find('table tfoot td').text(rows.length + ' contacts displayed');
},
Reference
Please go to the book's website at www.wrox.com/go/html5jsjquery24hr to view the video for Lesson 20, as well as download the code and resources for this lesson.