Releasing HTML5 Games for Windows 8 (2013)
Chapter 2. Getting Started with Visual Studio
When it comes to getting an HTML5 game up and running on Windows 8, I use the term porting lightly. Unlike other languages, you do not have to endure the difficult process of truly porting over your code. Windows 8 was designed to make HTML5-based apps run and perform like native ones written in C# or C++. In most cases you simply need to copy your code over to a Visual Studio project, include the files, and hit compile to see your game running. Let’s talk a little bit about which games will work and which ones won’t on Windows 8.
What Games Work Best
As a rule of thumb, if the game runs in IE10 then you are set. For extra insurance, you can double check your game in the Windows 8 version of IE10 to discover any minor issues that may arise. For the most part, the two browsers run identically. You can also do the same testing on Windows RT to see what performance would be like on ARM devices.
Outside of testing your game in IE10, completely Canvas-based games will generally be the easiest to port. This is true of any HTML5 game you are trying to run on different platforms, as Canvas is self-contained and consistently implemented across each of the major browsers at this point. Also, it’s important to note that Canvas is hardware accelerated in IE10, and you will see similar performance boosts that you would have gotten in WebKit-based browsers that support hardware-accelerated Canvas, such as Chrome.
I’ve also been testing out several different JavaScript game frameworks and have found that all of them run well on Windows 8. ImpactJS, which is one of my favorites, is a great one to use and is fairly easy to get set up out of the box with little to no modifications. You can also use DOM-based games, but expect to have to account for IE10-specific CSS issues. If you already built your game to support IE10 then you shouldn’t have a problem. I’ve also had great success with “hybrid” games that make use of Canvas for the main game display and HTML for the UI. Just keep in mind you will need to do additional CSS work to make sure your UI scales well on different resolutions.
I’m also happy to tell you that third-party JS libraries also work right out of the box. Here are a few I use in my own games:
§ JQuery – You can use JQuery or other DOM manipulation libraries. Just be careful of code that writes to the DOM at run time, as there are some sandbox restrictions on dynamic element creation and code execution in HTML5 Windows 8 apps.
§ ImpactJS, EaselJS, etc. – Almost all Canvas-based JavaScript game/drawing frameworks should work right out of the box.
§ TweenLite and TweenMax JS – A great library for tween and animations. WinJS also has its own animation classes, but if you want to keep your game cross-platform, you may want to consider a third-party tween library for programmatic animations.
In this chapter, I focus on Canvas-based games. As I mentioned, these games are the easiest to get working on different platforms, and I have some great tips and techniques to get these kinds of games up and running in Windows 8.
NOTE
In Windows 8.1, IE 11 is now the default browser. IE 11 has a host of new features with the biggest one being support for WebGL. This means that you can now port your WebGL games over to Windows 8.1 and publish them to the store. One thing to keep in mind is that IE 11’s WebGL support is still a work in progress and not every feature found in other browsers may be supported. That is why it is critical to test your games in IE first before attempting to put them in a Visual Studio project in order to work out any issues that may need to be addressed.
I do want to briefly touch on sound. Native HTML5 apps on Windows 8 do support playing multiple audio channels at the same time, which is usually an issue on mobile OSes. That being said since IE 10 only supports Audio Tags, you will have to take advantage of them in your game instead of the newer Audio APIs still being adopted in other browsers. For the most part this shouldn’t be too big of an issue but keep in mind that on Windows RT devices there may be some playback issues or latency. I have not noticed it too badly since most of my Web games have very simple sound effects but if your game relies on sound heavily you may need to do some additional testing to make sure there isn’t a problem.
Introduction to Visual Studio Express
Visual Studio is an incredibly powerful IDE. In my opinion, it is one of the best out there, and you should be very familiar with it if you have used Eclipse or IntelliJ in the past. It’s project based, meaning that you open up a single project to work on at a time and you must specifically tell Visual Studio to include files in a project or it will be ignored. That may take some getting used to if you come from a TextMate, Sublime Text, or VIM background.
NOTE
Before moving forward it’s important to know that there are several versions of Visual Studio. When it comes to building Windows 8 HTML5 apps you can simply use Visual Studio Express which is the free version. It differs slightly from Visual Studio Pro and Ultimate which are used for screenshots in this book. Everything I show in this book can be done in the free version and I will call out specific differences in the two where needed. You can also get a free trail of Visual Studio Pro and Ultimate to follow along with the book’s examples. Make sure you check out the BizSpark or DreamSpark programs to see if you can qualify for free licenses of Visual Studio Pro and Ultimate.
When you open Visual Studio, you will be presented with the screen in Figure 2-1.

Figure 2-1. Visual Studio’s start screen.
From here, you can open a project, create a new one, and even learn more via tutorials, videos, and additional links to resources from the launch screen. Creating a new project is simple thanks to an extensive collection of templates and documentation already included in Visual Studio (Figure 2-2).
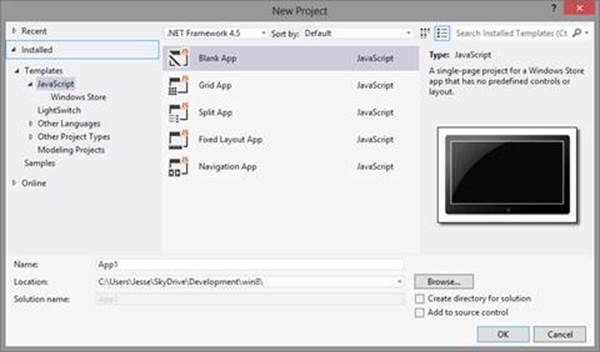
Figure 2-2. Creating a new project from a template in Visual Studio.
In addition to the built-in templates, you can also find more online.
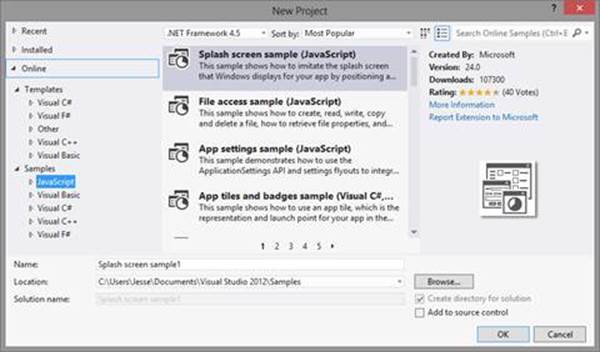
Figure 2-3. Check out the online templates for examples on how to use JavaScript to build Windows 8 apps.
I highly suggest going through the online templates in Samples -> JavaScript (Figure 2-3), as it covers all kinds of examples you may want to play around with to get a better handle on building JavaScript-based Windows 8 apps.
Once you create a project, you will be presented with a nav bar along the top, a code editor in the main window, and Solution Explorer on the right (Figure 2-4).
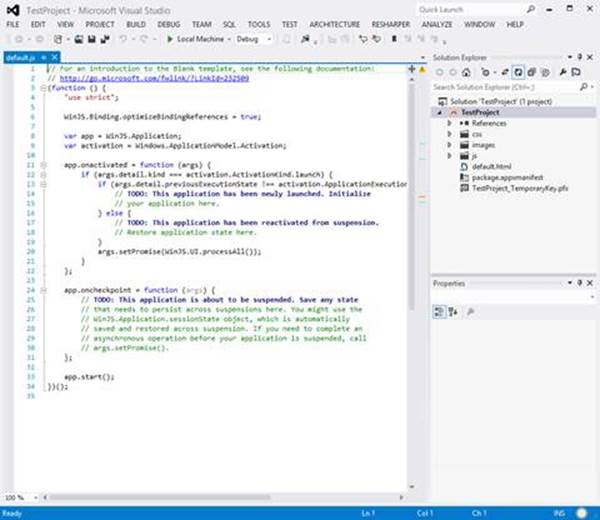
Figure 2-4. This is the layout you will see when starting a new project in Visual Studio.
These are just a few important things you should know while working in Visual Studio. First up is how to run your app, which you can do as soon as you create a new project.
At the top of the toolbar you will see a green arrow button (Figure 2-5).
![]()
Figure 2-5. This button will launch your app locally for testing in debug mode.
This allows you to run your app locally, remotely, or in the simulator. It also lets you test different types of builds, such as debug and release.
Next is the Solution Explorer (Figure 2-6), which contains all the files in your project.
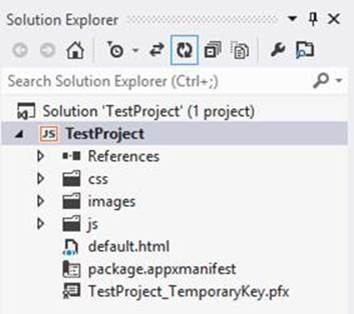
Figure 2-6. This is the Solution Explorer in Visual Studio.
One of the most important things you should keep in mind when working in Visual Studio is including the files you want for your game in the solution. To do this, select the show all files option.

Figure 2-7. Selecting show all files will allow you to add new files into the project solution.
Once you do that, you will see all the files in the project folder (Figure 2-7). Files not included in the solution are outlined in grey dots. To include them, simply right click on a folder or file and select Include In Project from the contextual menu. I’ll walk you through this more in the next chapter.
Reset Windows Layout, which you will find under the Window menu at the top right, can be used if you accidently close the Solution Explorer or lose the console window; you can reset the layout and get everything back. I suggest taking some time to poke around and see what there is to do in Visual Studio. You’ll also start picking this up as you begin to work more in the IDE.
Understanding Visual Studio Project Structure
The first thing you’ll want to do is create a new project in Visual Studio. There are several HTML5-based project templates for you to choose from (Figure 2-8). Unless you want to take advantage of a pre-built Windows Store app’s UI, I would suggest choosing the blank project.
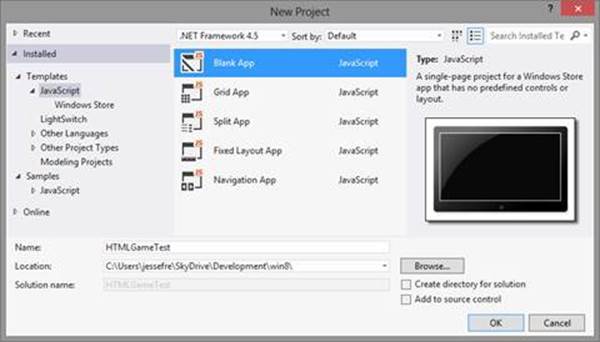
Figure 2-8. You should be familiar with the New Project screen from the first chapter.
NOTE
It’s also important to note that you can uncheck the “Create directory for solution” option. This will put your VS project inside another folder with a supplied name and may be redundant if you don’t specifically want that.
Once you create your project, you will see the following folder structure (Figure 2-9):
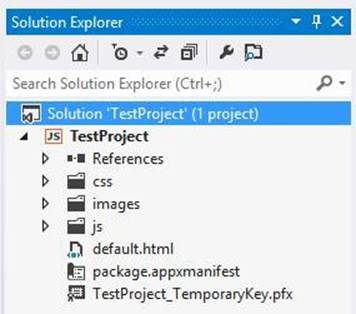
Figure 2-9. Here is the deafult project structure of a Windows 8 HTML5 project.
There are some important directories and files you should know about:
§ default.html – This is the main page of your project. Think of it as the index.html file you would typically create to host your game.
§ js Directory – This is where you will find the default.js file, which sets up your project’s code when the default.html is run. While this file is optional, you will need to follow a similar setup in your own game if you choose not to use it. I will talk about this more later on in the chapter.
§ images Directory– This is your default directory for images. It contains your application’s loading screen, icons, and store graphics. You can also place your own images in this folder as well.
§ css Directory – This contains the app’s default CSS. This file simply contains a few meta tags to support different resolutions in your app. You can usually ignore or override it.
There is also one more important file we should look at in your project’s folder: the package.appxmanifest file. If you double click on this, you will be presented with different options to configure your project (Figure 2-10).
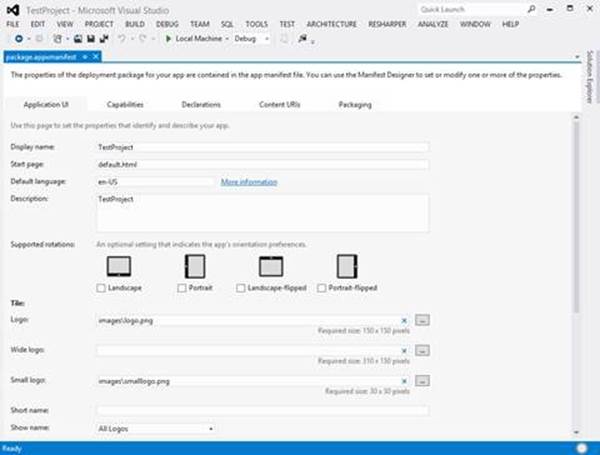
Figure 2-10. You can configure your application’s settings and capabilities by clicking on the package.appxmanifest file.
I’ll go over some of the more complex options, such as the Capabilities tab, later on in the book.
Finally, I want to cover the anatomy of the default.html file, as you will most likely be replacing some of the code in here or supplementing it with your own. As you can see, the basic code structure is fairly straightforward.
<!DOCTYPE html>
<html>
<head>
<meta charset="utf-8" />
<title>HTMLGameTest</title>
<!-- WinJS references -->
<link href="//Microsoft.WinJS.1.0/css/ui-dark.css" rel="stylesheet" />
<script src="//Microsoft.WinJS.1.0/js/base.js"></script>
<script src="//Microsoft.WinJS.1.0/js/ui.js"></script>
<!-- HTMLGameTest references -->
<link href="/css/default.css" rel="stylesheet" />
<script src="/js/default.js"></script>
</head>
<body>
<p>Content goes here</p>
</body>
</html>
You’ll notice there is hardly any code in this file. We have a reference to the default ui-dark.css file that has all the styling for standard Modern UI apps. Next we have a reference to the base.js and ui.js, which allows us to build out Modern controls and UI. You’ll notice these three files are located at //Microsoft.WinJS.1.0/js. These are part of the WinJS library and are only available when you run your app in Windows 8.
NOTE
WinJS is a built-in Windows 8 library that allows you to communicate with the OS. This helps bridge the game between the JavaScript run time and the native code running under the hood. We’ll talk more about WinJS throughout the rest of this book.
The paths to these files will be automatically resolved for you when the app is launched. WinJS is the underlying bridge that allows your app to talk to the OS via JS and also provides code needed to build out Modern UI components. You will want to keep these so that you can leverage WinJS in your own game. Finally, you’ll see two references to local files in your project: default.css and default.js.
Now you are ready to start putting your own code into the project.
Moving Your Code Over
You should have everything you need to get started from the first chapter: a copy of Windows 8, Visual Studio, and your own game’s source code that has been tested to run in IE 10. Consider this the quick-start guide to fast track running your own HTML5 game on Windows 8.
Since everyone has their own way of building a JS game, I’ll walk you through some basic concepts and suggestions on how to get your game running.
First, move all of your game’s code into the project. You can do this one of two ways:
First, follow the current project’s structure and place all your images in the images folder. Then, move your CSS into the css directory, and anything else you may have. This way you work with the default project structure and only make a few alterations where they are needed.
Second, ignore the current project setup and move your code over as is. For example, Impact games make use of a media folder for all of their assets, including images and sounds, a lib folder for all of the JavaScript code, and have their own default index.html page. Simply move these files over as is and you’ll retain the pre-existing project structure.
Understanding the App Lifecycle
As with any type of software built on a larger framework, there is the notion of an application lifecycle. In our case, we are just referring to the build up, pause/resume, and tear down of our application in the Windows 8 environment. If you open up the js directory and select the default.js file, you will see the base WinJS app launch point.
// For an introduction to the Blank template, see the following documentation:
// http://go.microsoft.com/fwlink/?LinkId=232509
(function () {
"use strict";
WinJS.Binding.optimizeBindingReferences = true;
var app = WinJS.Application;
var activation = Windows.ApplicationModel.Activation;
app.onactivated = function (args) {
if (args.detail.kind === activation.ActivationKind.launch) {
if (args.detail.previousExecutionState !== activation.ApplicationExecutionState.terminated) {
// TODO: This application has been newly launched. Initialize
// your application here.
} else {
// TODO: This application has been reactivated from suspension.
// Restore application state here.
}
args.setPromise(WinJS.UI.processAll());
}
};
app.oncheckpoint = function (args) {
// TODO: This application is about to be suspended. Save any state
// that needs to persist across suspensions here. You might use the
// WinJS.Application.sessionState object, which is automatically
// saved and restored across suspension. If you need to complete an
// asynchronous operation before your application is suspended, call
// args.setPromise().
};
app.start();
})();
Luckily for us, the files are heavily commented. As you can see, there are two places you will need to manage your game being initialized: when the game is launched for the first time and when the app has been reactivated from being suspended.
This is similar to the window.onload or document.load where you would wait until the entire page is loaded then execute the code to run your game. I highly suggest that you modify your game to be initialized here instead of running on its own in the default.html file. This will allow you to better integrate your game into the Windows 8 app lifecycle and give you more control over how your game behaves based on being loaded up or resuming. The best part is that if your game already has some method for initializing it after the page is ready you can probably just comment that out in your index.html page and use this file to call the same method.
NOTE
It’s up to you if you want to place your game’s initialization code into the default.js file. Your game will run perfectly fine on its own inside of the default.html file, but you will not be able to handle any resume logic on your own unless you build that into your game’s own code. Likewise, you can skip the default.js logic and simply put this in your own game’s code. All you need is a reference to WinJS.Application and the activation callback since Windows 8 will handle the rest for you.
Now that we have learned a little more about the app lifecycle, you can give your game a try and see if it will run on Windows 8.
Running Your Game for the First Time
You should have everything you need in place to run your game and see if it works. To test your game, click on the run button (Figure 2-11) at the top of the Visual Studio window.
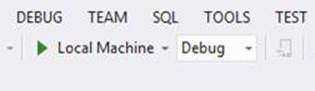
Figure 2-11. Clicking on the green arrow will start the build process for your game’s project.
This will run the game locally in debug mode. Once the project is compiled you will be taken to the game, which will most likely be full screen if you are running on a single monitor.
NOTE
Windows 8 runs great on multiple monitors. One of the best features of having a two-monitor setup is being able to run Modern apps on one screen and the “classic” desktop on the other monitor. What this means is that you can easily build your Windows 8 app side by side with Visual Studio’s debug tools visible, which will increase your productivity dramtically. If you are thinking about getting a second monitor or upgrading an exisiting one, I highly susggest getting a touchscreen. Not only will you be able to code Windows 8 games better with a two-screen setup, you can also test out touch controls.
In a single monitor setup, you can still switch back and forth between the game and Visual Studio’s debugger. Hopefully your game is running. Depending on your game’s controls, you should also be able to play it. In the event that your game is not working, I suggest checking out the chapter on debugging and optimization to help troubleshoot the problem.
Tips and Tricks for Running Your Game on Windows 8
In most cases, setting up your game should be as easy as copying over the files, including them in the project, and hitting compile. If you are running into issues or want to better understand what is going on under the hood to help refactor or clean things up, I’ll go over some techniques to help you debug your game in Visual Studio.
Disable Touch Behaviors via CSS
You may notice that pinch to zoom or double tap to zoom may happen in games you move over to Windows 8 from the Web. The quickest way to solve this is with the following CSS:
-ms-touch-action: none;
You can place this in the HTML, body, or Canvas element CSS to disable touch behaviors.
File Paths and Loading Locally
File paths are resolved to the root of your project when it is running. So, if you wanted to load an image from the images folder, you can simply do:
<img src="/images/name-of-image.png"/>
Likewise, you can do the same when loading images or assets dynamically via JavaScript. Hopefully you won’t have to make a single change to a file path or resource.
In the end, you should have all the tools you need to quickly figure out what may be going wrong with your game’s code. Over the next few chapters, I’ll discuss what you can do to enhance your game on Windows 8 and better integrate it with WinJS.
Avoid Modernizr Libraries
If your game is already running on the Web, you may be making use of some kind of Modernizr or some type of polyfill to help get your game running across each of the different browsers. While this works great for the Web, you will want to remove this library if it gives you problems. I have seen Visual Studio throw errors if the library violates Windows 8’s JavaScript sandbox by trying to inject live code into the DOM at runtime.