Releasing HTML5 Games for Windows 8 (2013)
Chapter 4. Handling Game Controls On Windows 8
When it comes to game controls for Windows 8, things can get a little overwhelming if you don’t have a plan in place when porting your game. If you remember back to Chapter 1 where we reviewed the different Windows 8 device form factors, you may recall the diversity of Windows 8-capable hardware. With that in mind, the following input options could be available at any time to control your game:
§ Mouse
§ Keyboard
§ Touch
§ Pen
§ Game Controller
§ Accelerometer
Luckily, if you are coming over with an existing HTML5 game, chances are good that you are already using keyboard or mouse controls. In special cases, if your game was designed to run on mobile multi-touch, you may be ready for multi-touch on Windows 8 with a few minor modifications to your code.
The good news is that, if your game only uses the mouse, as in a single-input method, chances are good that you may not have to change a thing. We’ll get into this more when I discuss touch-first design. If you are using a keyboard, you may need to offer up additional controls on touchscreen devices. Usually, this is done with a virtual D-pad and buttons or a virtual controller stick.
Either way, it helps to take some time out to really think through the best controls for your game. Bad controls on a game could easily ruin an otherwise amazing creation. Since you are porting the game over to Windows 8, you don’t have to make concessions and have a great opportunity to supply the bare minimum touch controls to satisfy tablet users and encourage them to use something better, like a game controller. We’ll explore this and more in the next few sections.
WHAT IS A TOUCH-FIRST EXPERIENCE?
In Windows 8 design terminology, you will hear the term “touch-first experience” a lot. Windows 8 was built from the ground up to support touch input as the primary means of input, followed by a mouse and keyboard as secondary input. This has a lot to do with the shift from traditional desktops and laptops to tablet computers. The good news is that a mouse and a finger work similarly, so if you think touch first, a mouse will always work. Of course there are special cases where this may not always be true, especially in games.
The real thing to keep in mind when building any HTML5 game is how it will be controlled. I design most of my games to work with a single touch or mouse click control when possible. This way my games will always work in a browser and also on mobile devices. Because of this, I am able to get my games running with no modification on Windows 8. Unfortunately, this may not always be the case.
NOTE
You can learn more about touch-first experience for Windows 8 here.
Working with Traditional Input
When I refer to “traditional input” I am talking about a mouse and keyboard. That’s because the majority of computers out today have a mouse and keyboard. Touch-enabled devices, such as phones and tablets, are relatively new, especially when it comes to HTML5 games. If your game supports a mouse and keyboard, you will not have to change a thing in your code. Simply listen to keyboard and mouse events like you normally would in a browser. Just remember that if you rely too heavily on the keyboard you are going to want to offer up some additional touch-centric controls for tablet users in order to pass Windows Store certification.
Working with Touch
In Windows 8 apps, we have very granular control over detecting the type of touch input our app is receiving. When it comes to WebKit games, there is a clear distinction between touch and mouse clicks. Usually in a WebKit app, you would do something like this:
var touchEnabled = 'createTouch' in document
From there, you could split up the logic in your app to handle touch differently than mouse controls.
if (touchEnabled) {
//Touch is enabled
canvas.addEventListener( 'touchmove', onTouchMove, false );
} else {
// Use mouse events instead
canvas.addEventListener( 'mousemove', onMouseMove, false );
}
Instead, on Windows 8, you can simply handle all mouse and touch events the same since you have access to an input abstraction class called the MSPointer. On Window 8, we refer to this as “handling touch-first input without compromising mouse,” and there is a great article on it here. It’s important to note that you can also check if the device is touch enabled, just like you do on WebKit, like so:
var touchEnabled = window.navigator.msPointerEnabled
To help illustrate how touch and mouse input is handled on Windows 8, take a look at Figure 4-1.
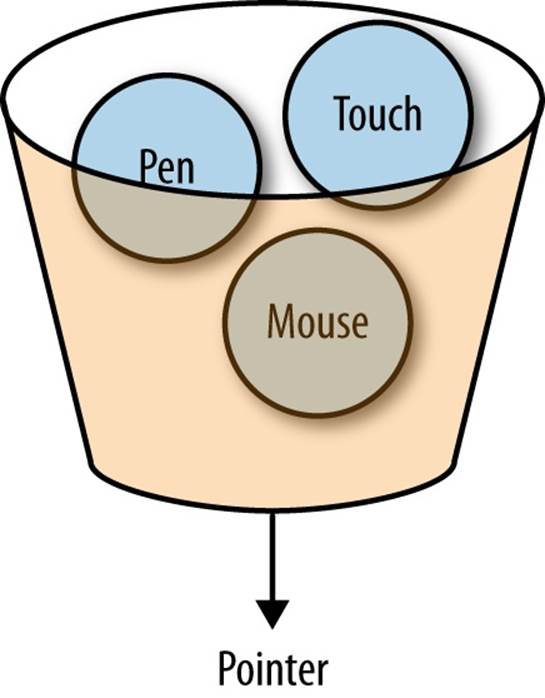
Figure 4-1. Here you can see a graphical representation of how the MSPointer works by encapsulating mouse, touch, and pen input into a single point object.
As you can see, references to a pointer object abstracts the type of input and gives you the necessary x,y values along with other properties you would need to have access to in your game. Let’s look at how touch events work in Windows 8 compared to WebKit.
When it comes to WebKit touch events, you would usually set up the following three events:
canvas.addEventListener( 'touchstart', onTouchStart, false );
canvas.addEventListener( 'touchmove', onTouchMove, false );
canvas.addEventListener( 'touchend', onTouchEnd, false );
This would cover your three main input states. It’s similar in Windows 8. The only difference is that you need to reference the MSPointer event instead.
canvas.addEventListener('MSPointerDown', onTouchStart, false);
canvas.addEventListener("MSPointerMove", onTouchMove, false);
canvas.addEventListener('MSPointerUp', onTouchEnd, false);
As you can see, the two are basically the same. If you wanted, you could easily detect the platform and swap out the correct event ID if you are building a cross-platform HTML5 game. One of the advantages of supporting this in your Windows 8 app is that IE 10 also supports the same touch model, so it will work flawlessly on the Web as well.
From here, there are a few additional differences in the event that you would get back on Windows 8 versus WebKit. In WebKit, you could get the touch point’s ID via the .identifier property. In Windows 8, you would use .pointerID. From there, you can continue to access x,y and clientX,clientY just like you would do in WebKit. After that, your code should work basically the same. Also, since input can come from multiple sources in a Windows 8 game, you can test the pointerType of the event object you receive with the following constants:
MSPOINTER_TYPE_MOUSE 4
MSPOINTER_TYPE_PEN 3
MSPOINTER_TYPE_TOUCH 2
Simply get the value of pointerType from the event and see if it matches up to one of the above values. This is critical if you want your game to show virtual controls when it detects a touch event instead of the mouse. As you start to anticipate your game being played on devices with a mouse and keyboard, you may want to enable or disable the touch controls based on the input type. I have seen this in several apps that will show the onscreen keyboard when a touch is detected versus a mouse click.
NOTE
I highly suggest checking out a library called Hand.js which is a polyfill for supporting pointer events on every browser. You can learn more about the project here. What is great about this library is that you simply code to the Pointer events and it works on everything from desktop to mobile devices, including iOS and Android without needing to worry about what the capabilities of the device are. You get pointer events with IDs if there is multi-touch and just like MSPointer outlined above, you can detect if it was a mouse, pen or touch.
Working with Controllers and Game Pads
One of the key advantages of building a game for Windows 8 is the ability to access physical hardware via the USB ports. Of course the first thing that may come to mind is how do I get my game to work with an Xbox controller or other compatible USB gamepad? While WinJS doesn’t directly expose access to the Windows 8 controller API, we will go over how to access this via the C++ bridge that allows JavaScript to communicate with the underlying OS.
In order to get started, we are going to need to download this library, which abstracts the Windows 8 C++ controller API and exposes it to JavaScript.
NOTE
For more information on how the underlying Windows 8 controller API works, make sure to read this.
To get started, copy over the cpp folder to the project and click on Solution and Add Existing Project.
As you can see in Figure 4-2, we have added the GameController project to our Visual Studio solution. Now we need to sort out any dependencies between the two projects. You can do this by opening up the Project Dependencies window.
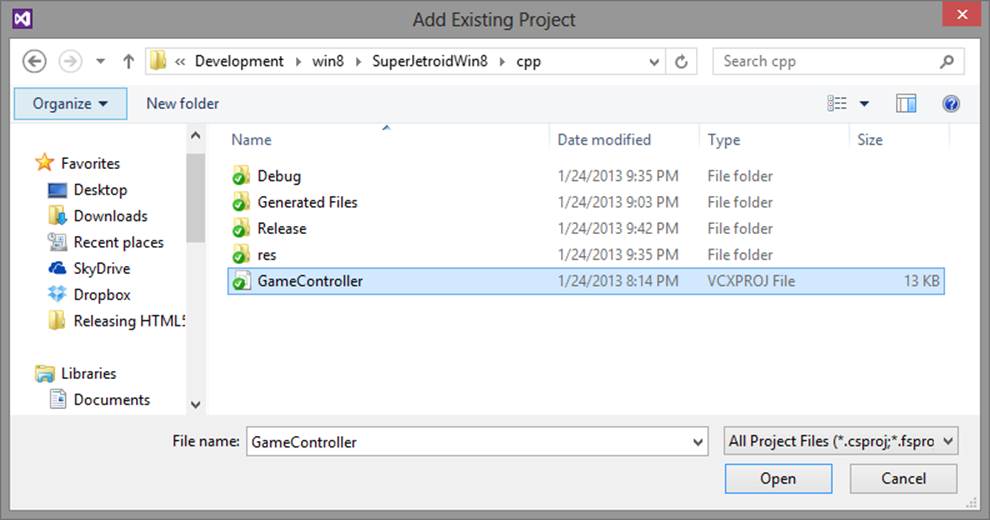
Figure 4-2. Navigate to where you put the GameController project to add it into your game’s project solution.
We will need to tell our main game project that it depends on the GameController project. Simply check the box (Figure 4-3). Now we need to reassign the default project for the solution. You can do that by selecting Startup Project.
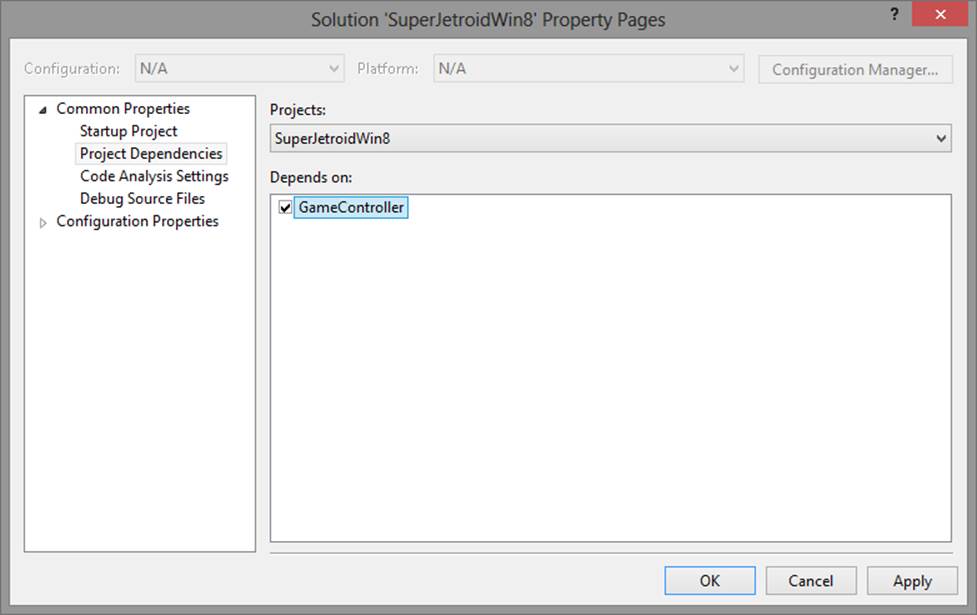
Figure 4-3. Add the GameController project as a dependency.
Here you can see I have selected my default project SuperJetroidWin8 (Figure 4-4), which contains my main game. Once you exit this screen, Visual Studio is probably going to throw a warning (see Figure 4-5).
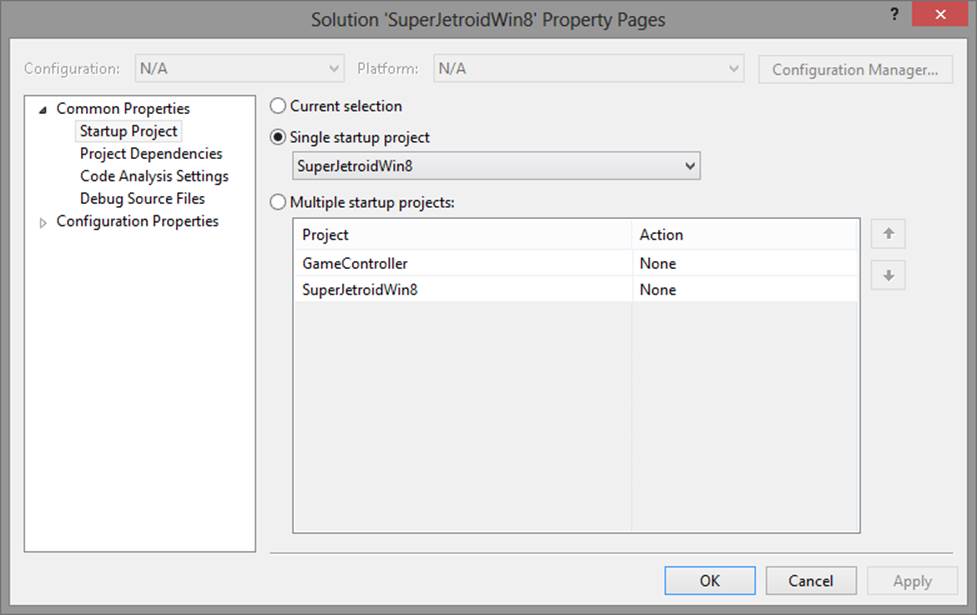
Figure 4-4. Set your game to be the startup project.
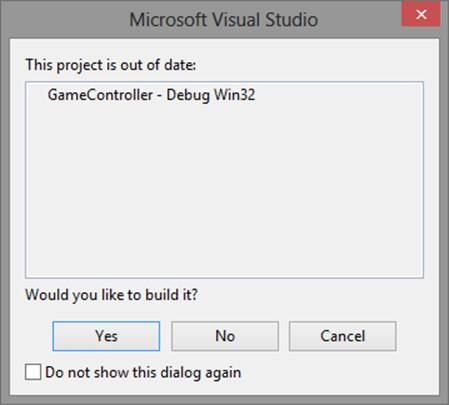
Figure 4-5. Visual Studio will need to rebuild the GameController project once it is set up.
There is nothing to worry about. This happens because the original GameController project just needs to be recompiled so that our main project can reference it properly.
Once the project has been recompiled, you will be ready to add it as a reference to your game’s project (Figure 4-6). Simply use the Reference Manager in Visual Studio and you will be able to set this up easily.
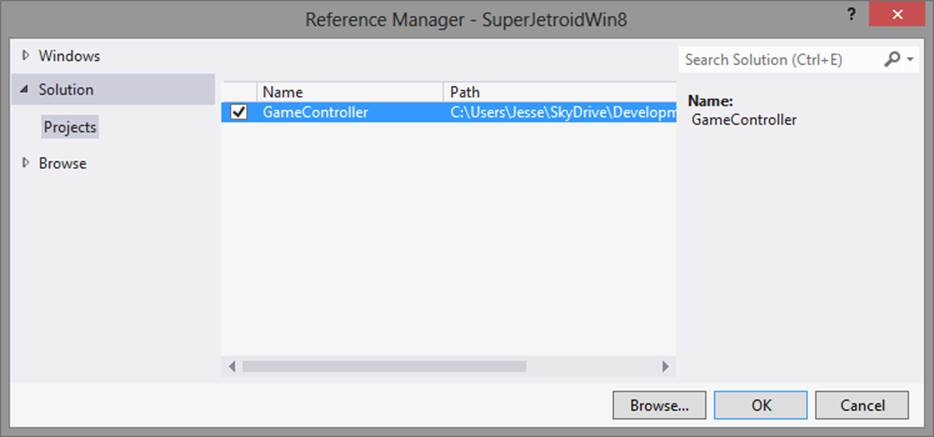
Figure 4-6. Here you can see the GameController project is now referenced in the main game’s project.
Now that everything is connected up in Visual Studio, you can start adding support for the controller in your own game. To help you out, I suggest checking out the Controller.h file, which has all the constants you will need to reference in your own code that offers access to various values from the controller. Now let’s take a look at how each of these map to a physical Xbox controller (Figure 4-7).
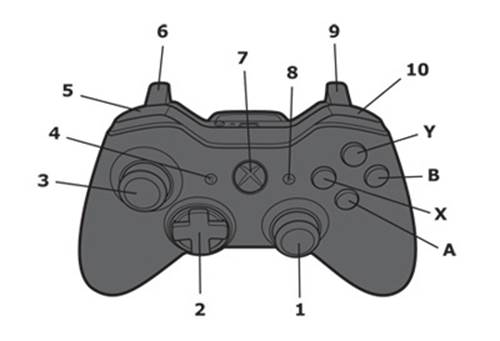
Figure 4-7. Use the following table to match up the buttons on an Xbox controller to their JavaScript equivalent.
Table 4-1. Xbox Controller Key Cheat Sheet
|
Key |
Description |
Reference |
|
Y |
Y Button (Yellow Button) |
y |
|
B |
B Button (Red Button) |
b |
|
X |
X Button (Blue Button) |
x |
|
A |
A Button (Green Button) |
a |
|
1 |
Right Stick |
RightThumbX, RightThumbY |
|
2 |
Directional Pad (D-pad) |
dpad_up, dpad_right, dpad_down, dpad_left |
|
3 |
Left Stick |
LeftThumbX, LeftThumbY |
|
4 |
Back Button |
back |
|
5 |
Left Bumper |
left_shoulder |
|
6 |
Left Trigger |
LeftTrigger |
|
7 |
Guide Button |
N/A |
|
8 |
Start Button |
start |
|
9 |
Right Trigger |
RightTrigger |
|
10 |
Right Bumper |
Right_shoulder |
Getting this up and running in your own game is now going to be relatively easy. First, you are going to need to set up a reference to the controller. You can do this in your default.js class with the following line of code in the app.activate function right before you initialize your game.
// Although the API supports up to 4 controllers per machine,
// this sample only works with a single controller.
controller = new GameController.Controller(0);
Now in your game, you can simply query the controller for its state. Here is an example of how I do this in one of my own games. I use this in the update loop of my game to make sure I capture the controller events before anything else is updated in the game.
// Joystick controls
if (typeof(controller) != "undefined") {
var state = controller.getState();
if (state.connected) {
if (state.dpad_right)
this.player.rightDown();
else {
this.player.rightReleased();
}
if (state.dpad_left)
this.player.leftDown();
else {
this.player.leftReleased();
}
if (state.dpad_up || state.a)
this.player.jumpDown();
if (state.start)
this.togglePause();
}
} else {
//console.log("no controller");
}
Once you have this basic logic set up in your own game, you shouldn’t have any issues accessing the other buttons on the game controller, such as the analog sticks, triggers, and even the back and start buttons.
WARNING
It’s important that you make your entire game controllable via a gamepad if you chose to support one in your game. That means that everything from starting the game to navigating menus should all work with the controller. The last thing you want players to do is put down the controller in a pause screen or to start the game. This means adding a little extra logic to your game’s UI, but one of the tricks I use is to also map these controls to the keyboard so you can support both and the user doesn’t have to touch the mouse if there is no need to.
Knowing When to Use What
As you can see, all of this can really be overwhelming. I have put together scenarios to help you pick when to support touch or physical (see Table 4-2).
Table 4-2. Windows 8 Game Controls Cheat Sheet
|
Input Type |
Support Physical Controls |
Support Touch Controls |
Support Controller |
Notes |
|
Keyboard |
Yes |
No |
No |
Only support keyboard and hide virtual controls |
|
Mouse |
Yes |
Possibly |
NA |
Mouse can activate touch controls if you have a virtual joystick but may not want to show if using virtual D-pad |
|
Touch |
No |
Yes |
No |
Ignore physical controls when working with touch events |
|
Controller |
No |
No |
Yes |
Ignore all other input types when using a controller |
Table 4-2 should help you break out your controller logic to be more contextual to what a user would expect based on the type of input they are using. Of course, you can simply keep touch controls on the entire time and always check for a physical controller, but a big part of publishing any game is the level of polish you add to the final product. It would be silly to see touch controls on a desktop with no touch screen at all.
Tips and Tricks for Windows 8 Game Input
We have covered a lot of material in this chapter, but I wanted to share some tips and tricks that have helped me when making my own games.
Contextual Controls
If you are supporting touch controls and the device has a keyboard, you should hide the touch controls when the keyboard is showing and show them when you detect a touch event. The Windows 8 virtual keyboard is a great example of this in action. If you use a standard keyboard, you never see the virtual one until you touch the screen with your finger. Reference the chart in the previous section to solve this problem.
Avoid Configuration Screens
It’s easy to throw all of your input options into a settings window and let the user pick their own, but a well-designed Windows 8 game should automatically detect the correct input the player is using. This doesn’t mean that you shouldn’t have a way to let the player customize or disable controls that are not used, but keep in mind the user just wants to play a game. The less work they have to do to set it up the better.
Instruction Screen
The final and most important tip should be self-explanatory, but make sure you tell your user about all of the control options, or at least what the keys are.
As you can see in Figure 4-8, I have a simple illustration that shows how to use the controls for my game Super Paper Monster Smasher. This plays in the “attract loop” of the game, which is a series of screens that animate if you stay on the splash screen for a set amount of time and don’t start a game. This was a very popular technique for arcade games, and one I make sure to include in each of my own games.
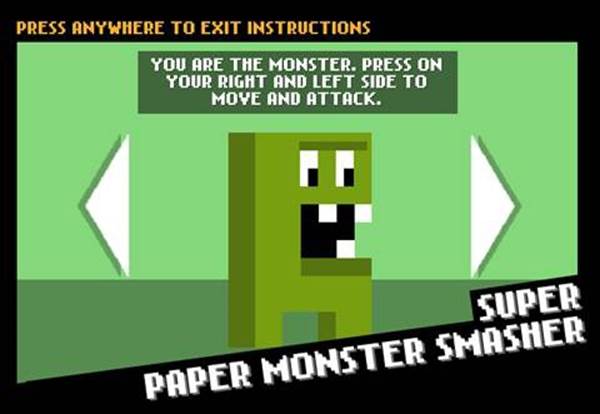
Figure 4-8. The instructions screen for Super Paper Monster Smasher.