Build an HTML5 Game: A Developer’s Guide with CSS and JavaScript (2015)
Part I. Building a Game with HTML, CSS, and JavaScript
Chapter 1. Preparation and Setup
In this chapter, we’ll begin to develop a full game using HTML, CSS, and JavaScript. Our simple bubble shooter game will demonstrate a range of development techniques, but it won’t need extensive logic to control the mechanics. Game logic includes systems for interaction between in-game elements, events that result from the player’s actions, simulation of artificial intelligence in characters, and so on. Developing intricate game logic can be time-consuming, so for learning purposes, we’ll stick with basic principles, such as how to render graphics and animation, respond to user input, and play sounds.
We’ll start with the user interface and page layout, then load scripts, and finally add some basic interaction. During development, we’ll also explore some browser tools that will prove helpful (especially when debugging), as well as Modernizr and jQuery—two main libraries that will speed up development. We’ll use Modernizr to load scripts and detect whether a user’s browser supports a given feature, and we’ll use jQuery when working with HTML and JavaScript together.
If you’re experienced in web application development using HTML, CSS, JavaScript, and jQuery, much of the code in this chapter will be familiar to you. My aim is to demonstrate what you can achieve with relatively little code and how easy it is to create basic interactive elements.
How the Game Is Played
If you’ve ever played Puzzle Bobble, Bust-a-Move, Snood, or any of the many mobile bubble-shooting games, you already know the basic mechanics of a bubble shooter. Figure 1-1 shows a screenshot of the finished game.
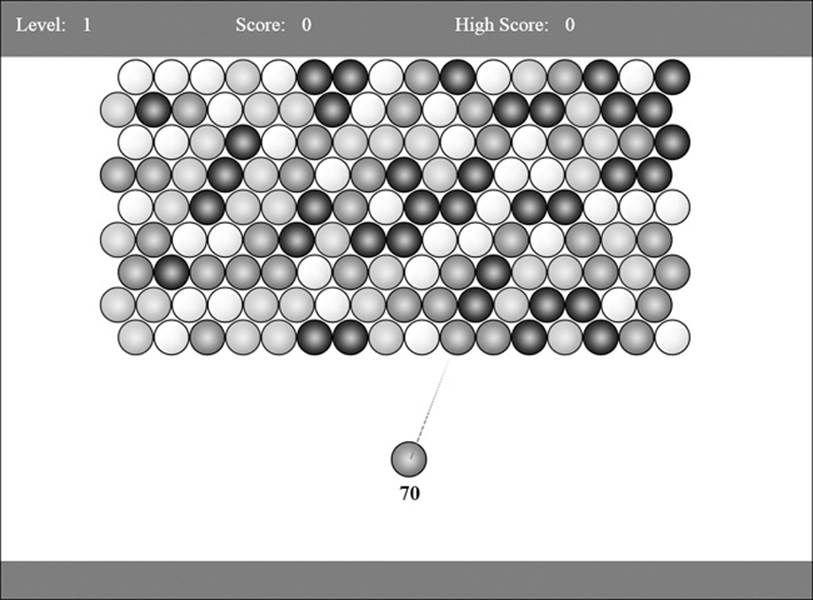
Figure 1-1. A screenshot of the finished Bubble Shooter game
The goal of the game is to clear all of the bubbles hanging from the top of the screen. The player aims with the mouse and clicks to fire a bubble from the bottom of the screen into the bubbles at the top, in hopes of forming groups of three or more bubbles of the same color. Once a matching color group of at least three bubbles is formed, all of the bubbles in the group burst, as shown in Figure 1-2.
If a bubble is fired and doesn’t form a group that matches by color, it is added to the display, as shown in Figure 1-3.

Figure 1-2. The blue bubble is fired at the group, creating a match, and all of the highlighted bubbles will pop.
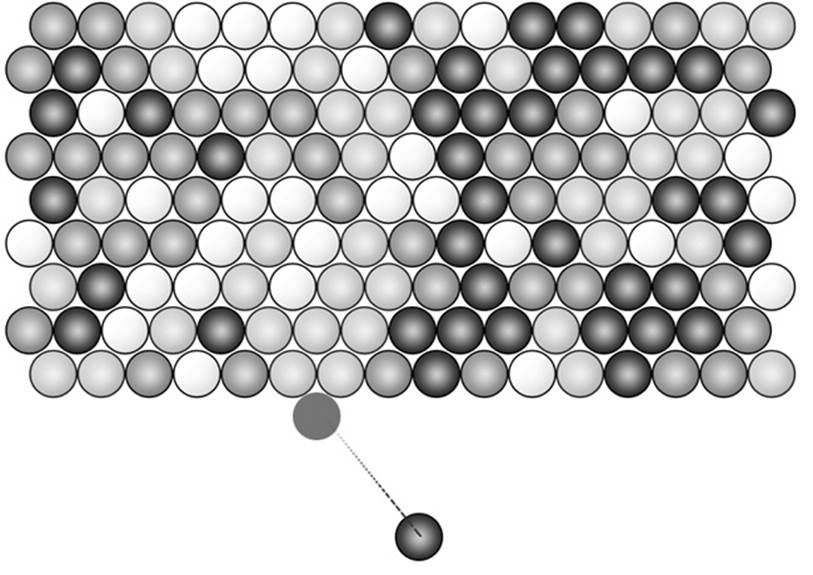
Figure 1-3. The blue bubble fired here won’t cause the green group above it to pop. Instead, it will be added to the board.
Fired bubbles that don’t form a matching group of three or more stick in the bubble grid. Because bubbles behave as if they’re all hanging from the top row, if a set of bubbles can’t trace a connection back to the top after a matching color group is created and removed, we need to remove those “orphaned” bubbles from the screen. An example of an orphaned bubble is shown Figure 1-4.
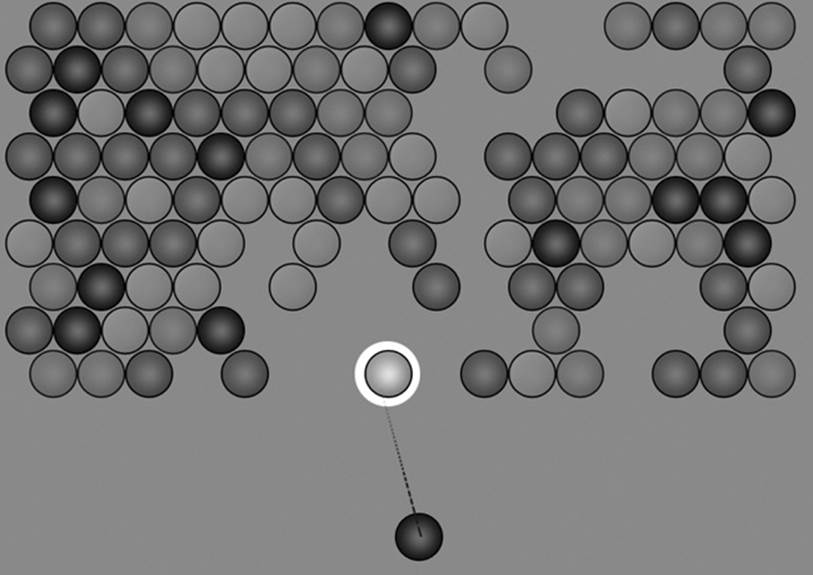
Figure 1-4. The red bubble is orphaned. We don’t want to leave orphaned bubbles hanging, so we’ll need some logic to detect them and an animation to remove them from the screen.
Players can fire only a limited number of bubbles (Figure 1-1 shows 70), and they must clear the board before they run out of bubbles to shoot. At the end of each level, the player scores points for popping bubbles and progresses to the next level. The game ends when the player fails to clear a level.
Short of a couple of enhancements that we’ll add later, that’s the main flow of the game.
We’ll build the game mechanics using HTML, CSS, and JavaScript—core tools that are well suited to creating many simple games, especially two-dimensional games that don’t require detailed pixel manipulation. In Bubble Shooter, we’re essentially firing a circle (the bubble) into a grid of other circles (bubbles) and then either popping a group, as in Figure 1-2, or adding the bubble to the board, as in Figure 1-3. The demands of the game’s layout are fairly simple, and we can use CSS and JavaScript to perform all of the animation we’ll need.
We’ll build the user interface in HTML and CSS because like most HTML games, Bubble Shooter will take advantage of the tasks the browser can do well, such as laying out text and rendering simple graphics. In later chapters, we’ll explore using the canvas element to display the game area, but I’ll first demonstrate what you can achieve with regular Document Object Model (DOM)–based development.
Building the Game
Now that we have an idea of the game we want to create, let’s break it down into manageable tasks. We’ll need to solve a number of high-level challenges to create Bubble Shooter. Specifically, we need to do the following:
Randomize and render the game board
The bubble grid must be randomly generated and drawn onscreen for each new level.
Calculate the firing angle and stopping point for a bubble
The player will fire bubbles by clicking on the screen. We’ll calculate the angle at which to fire the bubble, move it along that path, and either stop it when it hits something or let it continue.
Resolve collisions
When the fired bubble hits another bubble and does not form a matching group of three or more, it will add itself to the board. Otherwise, when it does form a group of at least three bubbles of the same color, it will pop all bubbles of that color contiguous with the one it strikes. If the fired bubble does pop bubbles, we’ll check to see if we’ve created any orphaned bubbles, such as those shown in Figure 1-4.
Keep track of score and levels
The game ends when all the bubbles are cleared. Because the player has only a limited number of bubbles to fire, we’ll track the number of bubbles fired. We’ll also add a scoring system to give the player a reason to play again (to beat a high score, for example).
Handle the game’s end and new levels
If a player completes a level, we’ll indicate that (using certain interface elements) and give the player an option to progress to the next level. Changing levels clears the board and tidies up the internal game state, and then the game starts again.
Development and Testing Environment
Let’s set up our development environment and make sure we have the right tools to complete the game. To start developing games for the Web, you’ll need access to a range of browsers to test in and software that allows you to edit code. You’ll also need to set up a web server to view the game in development. Although you can run Bubble Shooter locally (simply by opening its index.html file), you should regularly test your games in situations that match those of your end users as closely as possible.
NOTE
The process of setting up a server varies by operating system. The Apache web server (available at http://httpd.apache.org/) has good installation packages and instructions for setting up on most system configurations.
Web Browser Testing
One rule of web development is to test on all browsers that you expect your target audience to use. Although this is essential for released software, while developing you can usually use a slightly smaller subset of browsers to identify most potential problems. The list of browsers you need to test on changes constantly, but when you release a game onto the Web, those discussed next are essential.
Desktop Browsers
Users of a desktop PC or laptop could end up playing your game in various browsers on any operating system, so be sure to test at least the latest versions of Internet Explorer (IE), Firefox, Chrome, and Safari for Windows and OS X. Depending on your target audience, you may need to test earlier browser versions as well.
Not everyone updates their web browsers, so when coding for a mass web audience, be sure not to ignore users who might be using earlier versions. Some versions of IE do not play well together on the same operating system (due to IE’s tight integration with Windows), so when testing, you’ll need multiple Windows installations available, either on different PCs or on virtual machines. I strongly suggest you install and use virtual machine software, such as VMWare (http://www.vmware.com/), VirtualBox (http://www.virtualbox.org/), or Virtual PC (http://www.microsoft.com/download/; search in the Download Center). Virtual machines allow you to run operating systems within your regular operating system, essentially simulating an entire system from your desktop. Virtual machines preinstalled with different versions of IE can be downloaded from http://www.modern.ie/en-us/virtualization-tools/.
Because Firefox now updates regularly, you should be able to safely test your games on the latest release. Earlier versions have patchy HTML5 support, but later versions rarely have major changes from one release to the next. Chrome updates automatically and regularly as well, so you don’t need to worry about versions; just make sure you’re running the latest one.
And, of course, you should also test your game on a Mac in at least one version of Safari. It’s also possible to run an OS X virtual machine within Windows, although the setup is slightly more complex than running Windows within Windows or Windows within OS X. Tutorials are available online for achieving this setup within the virtual machine applications listed earlier.
Mobile Browsers
If you’re deploying on mobile devices or tablets, testing on a wide range of devices (iOS, Android, and Windows mobile) and multiple browsers is more important than ever. For basic mobile development, access to one iOS device and one Android device may be sufficient for testing, but when you’re considering wider distribution, the plot thickens. Apple’s iOS versions vary in their behavior, and Android comes in so many flavors on so many devices with differing screen resolutions and hardware configurations that you should have access to multiple devices (perhaps through a limited beta testing group) for testing. We won’t be packaging Bubble Shooter for release in the Apple App Store or Google Play Store, but by virtue of writing the game using HTML5 and JavaScript, we’ll produce an app that’s playable on mobile devices without extra coding.
Ultimately, due to the fragmentation of the Android platform, it’s impossible for a single developer to test on every device; therefore, you may find it more viable to use a third-party testing service. Testing on iOS devices is slightly simpler because Apple controls its operating system and device specifications, but iPhones and iPads can be costly. When you add Windows tablets into the mix and consider the growing range of tablets and other portable devices that can run a web browser, you’ll realize that the mobile testing battle is difficult to win.
Debugging in the Web Browser
With your test browsers set up, you can then use several developer tools to make debugging easy. Each browser has its own development tool set, but fortunately, they all operate along similar lines, provide ways to inspect HTML elements on the page, and add breakpoints and logging to JavaScript. Learn how to access your browser’s developer tools and experiment with them to become familiar with their capabilities.
All browser debugging tools are useful, but you’ll likely use the JavaScript console the most during development. You’ll interact with your code through the console in two main ways:
Logging to the console with the console.log command
Call the console.log function, and the console should display the contents of whatever you pass into the function. For example, console.log("Hello") should display the string Hello. Even better, call console.log with a JavaScript object or array, and you’ll get a limited listing of the object’s contents that you can use to explore entire object trees.
Running ad hoc code to interrogate variable states
You can enter JavaScript code into the console to evaluate it immediately. Enter alert(1) into the console to see how it works. If your game code exposes object properties publicly, you can use this feature to examine properties or trigger methods. You can even paste in multiple lines of code to create and run entire functions in the context of the page.
Now that we have some of the tools we need, let’s start building the game. We’ll begin by setting up the basic code and implementing the start screen user interface.
Laying Out the Game Screen
Before we can program the fun parts of animation and gameplay, we need to lay out the user interface. We’ll use HTML and CSS to place the main interface elements; the game screen will consist of three major areas, shown in Figure 1-5.
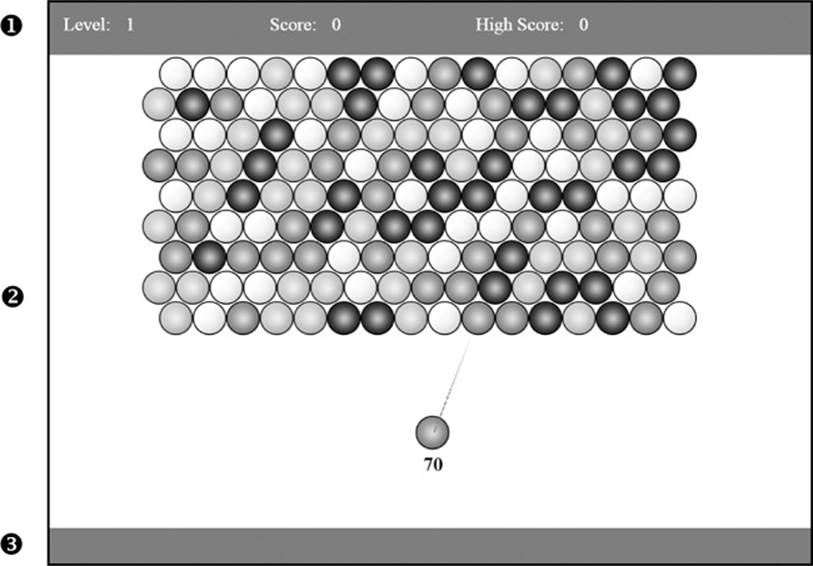
Figure 1-5. Sections of the game screen
At the top of the game screen, you can see the status bar ➊, which will show score and level information. The next (and largest) section contains the game area ➋, which will contain all the bubbles. The game area is also where the actual gameplay will happen. The footer ➌ at the bottom of the game screen frames the game area.
Now, let’s lay out these three Bubble Shooter components.
Creating Panels with HTML and CSS
Using straightforward HTML and CSS to lay out the game screen is the easiest way to create the three panels and define where the action happens. The approach and techniques used here are identical to those used in building a regular website or web application.
We’ll start by creating a wrapper div for the entire page. Because the div tag has no semantic meaning, we’ll use it to denote a division on the page. Make a new folder in your web server’s root directory to build the game in and call it bubbleshoot. Every file needed to run the game will be stored in this folder or within a subdirectory of it. Next, create a new file called index.html and add the following code:
index.html
<!DOCTYPE HTML>
<html lang="en-US">
<head>
<meta charset="utf8">
<title>Bubble Shooter</title>
</head>
<body>
➊ <div id="page">
</div>
</body>
</html>
The entire game will run within this single HTML page, and the "page" div ➊ will constrain the area in which the game happens. If we ever need to center the game or move it to fit into unusual screen aspect ratios, we need only change the position of the wrapper element.
NOTE
Many HTML tags have been simplified in version 5, in contrast to the relative strictness in versions 3 to 4 and XHTML. For example, the doctype declaration is now vastly simplified because many tags are assigned a default type. The <script> tag actually defaults to JavaScript in HTML5, which is why we don’t need to specify type="text/javascript" orlanguage="javascript" in our page.
Next, we’ll create three new div elements, one for each of the three page sections, and place them inside our page div:
<div id="page">
<div id="top_bar"></div>
<div id="game"></div>
<div id="footer_bar"></div>
</div>
Now, we need to assign some CSS to our page and the three sections we just added.
Create a folder called _css in the game folder to contain all the style sheets we’ll use for the game. In the _css folder, make a new file called main.css that contains the following code:
main.css
body
{
margin: 0;
}
#page
{
position: absolute;
left: 0;
top: 0;
width: 1000px;
➊ height: 738px;
}
#top_bar
{
position: absolute;
left: 0;
top: 0;
width: 1000px;
➋ height: 70px;
background-color: #369;
color: #fff;
}
#game
{
position: absolute;
left: 0px;
top: 70px;
width: 1000px;
➌ height: 620px;
background-color: #fff;
clip: auto;
➍ overflow: hidden;
}
#footer_bar
{
position: absolute;
left: 0;
top: 690px;
width: 1000px;
➎ height: 48px;
background-color: #369;
}
We’ll make the top banner 70 pixels high ➋ and the bottom one 48 pixels high ➎. We want the game to fit in a standard monitor size, so we set the total game area to be 620 pixels high ➌, resulting in a total page height of 738 pixels ➊, which should fit within a 1024×768 display and even allow for a browser taskbar.
DIMENSIONS: FLUID VS. FIXED
To keep the game simple, I used a fixed width of 1000 pixels in the CSS, which should provide a large screen area that fits within the majority of desktop and mobile displays. Typically, the screen dimension situation is more complex; mobile devices in particular have a wide range of pixel dimensions and aspect ratios. However, we want to concentrate on development principles rather than design decisions, and 1000 pixels should work well for a prototype game.
These values set the size and position of the entire usable display area. Also, notice that game has overflow: set to hidden ➍, which means that the bubbles in the game will never accidentally display over the header or footer.
To link up the CSS file, we’ll add a file link for main.css to the HTML header:
index.html
<head>
<meta charset="utf8">
<title>Bubble Shooter</title>
<link href="_css/main.css" rel="stylesheet">
</head>
Now that we’ve created the basic structure for Bubble Shooter with HTML and CSS, load the page in a browser and keep it open. There’s no interaction yet, so next we’ll add basic interactivity, such as a start game dialog, before we work on the game logic. The first step is to set up the coding structure.
Code Structure
Let’s take a high-level look at the main concepts of the game and interface, which will guide how we’ll structure the code. With a number of significant elements to implement, we’ll structure the code in a way similar to the Model/View/Controller (MVC) principles that you may be familiar with from web application development. If MVC is new to you, here’s the basic setup:
§ The Model consists of data and maintains the state of the application. In a web application, this might be user’s details or shopping cart contents, for example.
§ The View renders what’s on the screen and intercepts user input. For web applications, this is generally HTML output. For example, a view might read the contents of an online shopping cart from the Model and then display those items in a list.
§ The Controller manages the logic and processing. For example, clicking an item in a View sends a message to the Controller to add a new item to a shopping cart Model.
With some alterations, this MVC principle will work for structuring Bubble Shooter.
Game Controller
The game controller will keep track of the game state and act as a director to determine outcomes in response to user actions.
The game controller is similar to a controller in the MVC system; it will run the game and manage all the functions. In a more complex game, a single controller would become too big and complicated to handle every task, because there would be too much code in one place and one set of code would have too many responsibilities, making the code more prone to bugs that would be harder to find. In that case, we’d probably need to subdivide the tasks further. Fortunately, because Bubble Shooter is so simple, using one controller to manage all tasks should work well.
User Interface Code
The game needs to display all kinds of information for the user, including score updates, level end screens, and so on. Instead of the game controller handling these tasks, it will instruct a set of user interface functions to control the way the user interface elements appear and disappear.
You could put much of the UI code into the game controller, but you’ll often end up writing as much animation and UI code as game logic, so it’s best to separate the code for readability. Generally, if you’re not changing the state of the game in some way but instead are managing a function in the display, you should do that in the UI code.
Game Elements as Objects
We’ll code a few game elements as objects, including the bubbles and the game board. The reason is that we’ll have properties—x- and y-coordinates for the bubbles, for example—and methods to apply, such as bubbles popping. Following object-oriented programming convention, we’ll split those objects into separate classes so the code structure maps to the conceptual elements involved in making the game.
The game’s objects will also align closely with the idea of a model in the MVC web pattern. Objects will have properties and state, but they really shouldn’t interact with the display or make significant gameplay decisions.
Adding the First Scripts
We’ll use Modernizr, a JavaScript library, to load in all of the JavaScript files the game will need, such as the game controller and the UI class mentioned earlier. Using Modernizr has some advantages over using conventional <script> tags, and I’ll explain those later in this chapter. Modernizr has other useful features as well, but we’ll start by loading in the script files we need.
The Modernizr and jQuery Libraries
To short-cut some common tasks throughout the development of the game, we’ll rely heavily on two libraries. Both libraries solve many cross-browser problems and provide high-level functions in a simple and consistent instruction set.
Modernizr will load scripts and detect whether a given feature is available in a browser. As an example, let’s write some code to detect whether the canvas element is supported. To code this by hand, you would create a canvas node within the DOM and then check whether or not it supports a given method. In this example, we’ll use the canvas element’s getContext method, which is supported everywhere that canvas is supported, although you could try any canvas method you like:
var element = document.createElement("canvas");
var canvasSupported = !!element.getContext;
With Modernizr, we don’t have to do as much work. We can simply write:
var canvasSupported = Modernizr.canvas;
The Modernizr object contains a set of properties whose values are set at load time to either true or false, depending on whether a particular feature is supported or not by the browser. As such, the variable canvasSupported should now contain either true or false, depending on the value of Modernizr.canvas. Using Modernizr to check for features is helpful because if a browser changes how it implements a feature, Modernizr will likely receive new detection routines faster than you can detect and implement the change within your codebase.
jQuery also provides useful shorthand functions, but these largely involve detecting and responding to events, making Asynchronous JavaScript and XML (AJAX) requests to communicate with a server or accessing and manipulating HTML elements in the browser’s DOM.
The DOM is the browser’s internal organization of an HTML document, and we’ll primarily use jQuery’s DOM access methods to simplify much of the animation code. The DOM provides a way for you to manipulate the structure of the HTML by exposing each element in the HTML as a DOM node. To manipulate the DOM, we first use JavaScript to select a node. We can then change one or more of its properties, which is possible and relatively straightforward with regular JavaScript. But using jQuery makes the code more likely to work as intended without writing code to handle browsers that implement individual features differently.
The most trivial example of jQuery in action is selecting a DOM node with an ID, such as the game div we’ve created. In conventional JavaScript, we would write this as
var element = document.getElementById("game");
This line of code retrieves a single DOM element, which will have various properties, such as its CSS formatting and methods that allow it to be interrogated. For example, element.getAttribute("id") will return the string game.
jQuery provides a way to wrap this functionality, and more, in a simpler, more compact syntax. To achieve the same result as the preceding code line with jQuery, we use jQuery selectors. Selectors are syntax for selecting a node or nodes within the DOM, and their format—including dot notation and using # to select unique elements—is borrowed from CSS selectors. The values returned from jQuery’s selectors aren’t DOM nodes but rather custom objects that contain a reference to the DOM nodes and add a range of other methods. The equivalent ofdocument.getElementById("game").getAttribute("id") using a jQuery selector is $("#game").attr("id").
Selectors are a core jQuery concept, and you’ll become very familiar with using them by the end of this book. Nearly all of jQuery is used to manipulate DOM elements, so calls to jQuery almost always specify which element or elements should be changed, and that’s where selectors come in. They let you choose an HTML node set using a range of factors, such as the following:
§ A unique ID for selecting single elements
§ A CSS class for selecting all the DOM elements with that class
§ The tag that defines the node (div, img, span, and so on), which allows you, for example, to select all the images on a page
§ Many other options, including combinations of the previous items in this list, the element’s position in a list, parent-child relationships, or nearly any other way you can traverse a DOM
The jQuery object that the call to $ returns lets you manipulate the DOM object.
So in jQuery, the document.getElementById call is shortened to
var element = jQuery("#game").get(0);
We require the .get(0) function call to retrieve the DOM object from within the jQuery object, although generally it’s more useful to work with jQuery objects than with DOM objects directly. This can be further shortened to
var element = $("#game").get(0);
The value $ is defined as an alias to the jQuery function, which does one of several tasks based on what you pass into it. For a selector, we pass a string value (in this case, "#game") to jQuery. As in CSS, the hash symbol tells jQuery that we want to select a single element by its ID. The value $("#game") returns the jQuery object containing a reference to the DOM node.
You can use jQuery selectors to retrieve multiple DOM nodes, which are stored internally as an array. If you want to access the DOM node, you can retrieve the nth element returned from a query by calling .get(n) on the jQuery object. Because we have only one element with the ID game, we want the first (zero index) element, which we can retrieve by adding .get(0) onto the end of $("#game").
We don’t save much coding in this simple case, but more important, we can use the objects that jQuery returns from selection queries with cross-browser methods that abstract away a lot of the hard work of DOM manipulation.
jQuery objects let us query the DOM node for various CSS properties, as in these examples:
var top = $("#game").css("top");
var width = $("#game").width();
var divs = $("div");
The first two lines query the DOM node for the game div’s top position and width, respectively, and the last line is a selector that returns a jQuery object containing all the div tags on a page. jQuery is a powerful library, and although we’ll use quite a few of its features in the game, covering it in great detail is beyond the scope of this book. The jQuery documentation at http://api.jquery.com/ provides an in-depth look at how it works.
Adding the Modernizr Library
To get started with Modernizr, download it from its official website (http://modernizr.com/download/). Modernizr lets you choose individual features to download so you don’t waste bandwidth on code that you’ll never use. We’ll need a few specific features, so make sure you select the following boxes on the download page to include them:
§ CSS Transitions (under CSS3)
§ Canvas and HTML5 Audio (under HTML5)
§ Modernizr.load (under Extra)
§ Modernizr.prefixed (under Extensibility)
Then, click Generate and Download.
Create a new folder in the game folder called _js and save the file there as modernizr.js. Also add the file to the HTML document, as shown here:
index.html
<head>
<meta charset="utf8">
<title>Bubble Shooter</title>
<link href="_css/main.css" rel="stylesheet">
<script src="_js/modernizr.js"></script>
</head>
Now that we’ve added Modernizr with a <script> tag, we’ll use it to load the rest of the JavaScript game files.
Loading Scripts with Modernizr
Rather than just adding <script> tags to the document, we use Modernizr to load scripts for two main reasons. First, we can trigger functions to run immediately after a script is loaded rather than waiting until the entire page, including HTML and images, has loaded. Second, Modernizr allows us to load scripts in on a conditional basis (for example, if this condition is satisfied, load in this script) without writing much code to do it.
NOTE
Modernizr actually uses another library called yepnope.js for its script-loading functionality. You can learn more about that library at http://yepnopejs.com/.
A simple example of this is to load jQuery from Google’s Content Delivery Network (CDN) to expedite load times. The potential flaw with using a third-party CDN is that the CDN could be down or inaccessible, or, more likely, your own server could be unavailable. However, relying on a service that you can’t control is never a good idea. Fortunately, Modernizr lets you add a test during the loading process and then call a backup function if that test fails. As a result, we can attempt to load the file from the CDN, and if it doesn’t work, load a local version instead.
WHY USE GOOGLE’S HOSTED JQUERY?
Although it may seem odd to rely on someone else’s server to obtain a critical file, using Google’s version of jQuery offers a few advantages, and I don’t just mean saving money or using someone else’s bandwidth should you create a popular game.
One advantage is that because the file comes from Google’s Content Delivery Network, users will almost always download it from a server closer to them than your server.
Another advantage is that, because the file comes from a server other than the one your game is hosted on, users can actually download it faster. Browsers often limit the number of connections they’ll open to a single server, so files wait in a queue to be downloaded, even if plenty of bandwidth is available. By hosting files on a different server, you increase the number of files that are downloaded in parallel and decrease the download time.
An additional advantage is that other sites are using the same copy of jQuery; therefore, if users have visited any of them recently, they’ll most likely have a copy of the file in their browser cache and won’t have to download the file at all!
Download the latest jQuery build from http://jquery.com/download/ and place it in the _js folder. Then add the following code block in bold just before the closing </head> tag. Be sure to change the version of jQuery in the URLs to match the version that you’ve downloaded.
index.html
<head>
<meta charset="utf8">
<title>Bubble Shooter</title>
<link href="_css/main.css" rel="stylesheet">
<script src="_js/modernizr.js"></script>
<script>
➊ Modernizr.load({
load: "//ajax.googleapis.com/ajax/libs/jquery/1.8.2/jquery.js",
➋ complete: function () {
➌ if(!window.jQuery){
➍ Modernizr.load("_js/jquery-1.8.2.min.js");
}
}
});
</script>
</head>
This example shows the compact script loading Modernizr provides. In short, it attempts to load jQuery from the Google CDN ➊. When loading is finished ➋ (either when the file has loaded or the script returns from a failure to load), the complete property’s function call checks for the existence of window.jQuery ➌, and if that object doesn’t exist, loads the jQuery library from the local folder ➍.
The reason that Modernizr.load is called with two different sets of parameters is that the file can accept the following types of arguments: a single file (as a string), an object with name/value pairs, or an array containing a set of either strings or objects. Consequently, we can load in multiple files with a single Modernizr.load call. In the first call ➊, we pass in an object with load and complete properties. (The Modernizr website documents other properties available to use.) At the second call ➍, we only pass in a string. This line
Modernizr.load("_js/jquery-1.8.2.min.js");
is equivalent to writing
Modernizr.load({load : "_js/jquery-1.8.2.min.js"});
The first version uses the filename string as a convenient shorthand for loading just that file without any other configuration options.
We also want to load in the game scripts with Modernizr. Create a new file called game.js in the _js folder. To add the new file to .load, wrap the first Modernizr.load call in array brackets and add a new entry, shown here in bold:
index.html
Modernizr.load([{
load: "//ajax.googleapis.com/ajax/libs/jquery/1.8.2/jquery.js",
complete: function () {
if(!window.jQuery){
Modernizr.load("_js/jquery-1.8.2.min.js");
}
},
},
{
load: "_js/game.js"
}]);
We can continue adding new files to the Modernizr.load call as new elements in the array at any point before we load game.js.
Modernizr will load game.js, but the file doesn’t contain any code yet. The next task is to set up the main game controller class and run it when loading is complete.
Modular JavaScript
To minimize global variables and the potential for duplicate variable name conflicts, we’ll use a modular approach for the JavaScript code. Using a module is a way of wrapping all the objects and variables of the game within a single containing namespace. The namespace will be calledBubbleShoot. A class named Game will be contained within the module BubbleShoot.Game and can be accessed from anywhere else in the application by writing BubbleShoot.Game. This namespace is a safeguard: If we add another JavaScript library later in development that also has a variable named Game, both can exist simultaneously without conflict.
We’ll start with the game module, which will run much of the game. Enter the following code into game.js:
game.js
➊ var BubbleShoot = window.BubbleShoot || {};
➋ BubbleShoot.Game = (function($){
➌ var Game = function(){};
➍ return Game;
➎ })(jQuery);
First, we check to see whether the object BubbleShoot exists ➊. Naming our code BubbleShoot.Game is roughly equivalent to using a namespace in languages such as Java or C#. All of the classes will be properties of the BubbleShoot object. Naming collisions aren’t likely to happen in small games like Bubble Shooter but can become a problem with larger projects. If window.BubbleShoot doesn’t exist, it will be created as an empty object. We’ll include this line at the top of every class file so we don’t have to think about the order in which scripts are loaded.
The next code line defines BubbleShoot.Game ➋. This structure—a function inside brackets—may look strange if you’re not familiar with it, but it’s a common approach to use when you’re writing JavaScript modules.
The structure uses an Immediately Invoked Function Expression (IIFE), which is a piece of code that creates a function and runs it immediately. Usually, you will assign the returned results to a variable. The benefit is that the function block creates a variable scope within JavaScript, meaning that any variables created inside it won’t pollute the global scope.
The variable declaration contains a function definition followed by parentheses ➎. The function is created, run, and instantly destroyed, but not before returning its contents➍, which will be the object Game created at ➌. The bracket-wrapped function call ➋ is inside the new scope. Once this function has run, we can access the Game class from the global scope as BubbleShoot.Game.
Now we have a stub of a class, so we need to add some useful code to run. Let’s start by hooking up a New Game button. Add the following to index.html inside the page div:
index.html
<div id="page">
<div id="top_bar"></div>
<div id="game"></div>
<div id="footer_bar"></div>
➊ <div id="start_game" class="dialog">
➋ <div id="start_game_message">
<h2>Start a new game</h2>
</div>
➌ <div class="but_start_game button">
New Game
</div>
</div>
</div>
The new div elements will create a dialog that displays information to players before they start the game ➊. The dialog will contain a heading with a message ➋ and a New Game button ➌. We still need to add some styling for them to the end of main.css, so let’s do that now.
main.css
.dialog
{
position: absolute;
left: 300px;
top: 110px;
height: 460px;
width: 320px;
background-color: #369;
border-radius: 30px;
border: 2px solid #99f;
padding: 20px 50px;
color: #fff;
text-align: center;
display: none;
}
.dialog h2
{
font-size: 28px;
color: #fff;
margin: 20px 0 20px;
}
.but_start_game
{
position: absolute;
left: 100px;
top: 360px;
height: 60px;
width: 200px;
background-color: #f00;
cursor: pointer;
border-radius: 15px;
border: 2px solid #f66;
font-size: 28px;
line-height: 60px;
font-weight: bold;
text-shadow: 0px 1px 1px #f99;
}
.but_start_game:hover
{
background-color: #f33;
}
#start_game
{
display: block;
}
With this styling in place in main.css, reload the page to see the dialog. But note that there’s no way for the player to remove it yet. This will happen inside the Game class.
Next, we need some code to run when the page has finished loading so we can attach an event handler to the New Game button. One function will initialize the objects and set up the game after the page has loaded, and another will run every time a new game starts. Make the following changes to game.js:
game.js
BubbleShoot.Game = (function($){
var Game = function(){
➊ this.init = function(){
➋ $(".but_start_game").bind("click",startGame);
};
➌ var startGame = function(){
};
};
return Game;
})(jQuery);
This new code sets up one public method, called init ➊, and one private method, called startGame ➌. The init method is public because it’s attached as a property of the Game object. Inside init, we add a jQuery event handler called bind to the New Game button ➋, which will call the startGame function whenever the button is clicked.
We know the IIFE has a short life and isn’t attached as a property of any object, and yet the startGame function can be called here. The reason is due to a JavaScript feature called closure. Closure means that a variable exists within the code block that defined it and persists inside that code block. Therefore, the startGame function can be used within other functions inside Game, including init, but can’t be accessed by any JavaScript outside of this scope.
We want to call init after the page has loaded, so back in index.html we’ll add a complete call in Modernizr.load once game.js has finished loading:
index.html
Modernizr.load([{
load: "//ajax.googleapis.com/ajax/libs/jquery/1.8.2/jquery.js",
complete: function(){
if(!window.jQuery){
Modernizr.load("_js/jquery-1.8.2.min.js");
}
}
},
{
load: "_js/game.js",
complete: function(){
➊ $(function(){
➋ var game = new BubbleShoot.Game();
➋ game.init();
})
}
}]};
Recall that the $ function ➊ is shorthand for the jQuery function, which can do one of several tasks based on what you pass into it. Previously, we’ve passed in a string (#game), which jQuery interpreted as a selector. In this case, we’re passing in a function, which jQuery stores to run once the DOM is ready to be manipulated.
This bit of jQuery functionality is incredibly useful, especially for a game, because from this point we know that we can safely manipulate the DOM with JavaScript even if all of the game’s other assets (such as images and sounds) haven’t finished loading. Traditionally, client-side interaction has been triggered by waiting for a window.onload event to fire from within JavaScript, which signifies that the HTML has loaded, the DOM is ready, and all of the images are loaded. However, waiting for the images can leave users staring at screens they can’t interact with for too long. The preferable alternative is to allow users to interact with the application as soon as the DOM is ready without waiting for the images to load, which produces more responsive interfaces. But determining when the DOM is ready often involves code unique to each browser vendor and frequently changes from one version of a browser to the next. jQuery’s $ function smoothes over any browser inconsistencies and lets you achieve that responsiveness without having to determine exactly when the DOM is ready.
Look back at the $ function. Inside it we created an instance of the Game class ➋ and then called the public init method ➌ of that class. Based on what we know about the $ function, anything we do inside init should happen after jQuery has loaded and the DOM is ready for us to work with it.
Now we have an instance of Game that binds its startGame function to the New Game button. However, the startGame function still doesn’t do anything. Let’s change that!
INTRODUCING CLOSURE
One of JavaScript’s most powerful features, closure means that variables that have been defined within a function are stored in the function’s scope. These variables persist within the scope even when the function has exited, so long as the JavaScript interpreter determines that it still has to make use of them. Reasons for persisting in the scope could include an event handler that requires one of the values when it is triggered or a setTimeout call that will need access to a variable at some time in the future. A simple example will help to explain how this works, but it’s worth reading up on closure in order to better make use of it within your own functions.
The following example shows how scope works in JavaScript (and many other languages). The three alert calls in this example should display alerts of 1, 2, and 1 respectively, because the value of myVar inside the function does not overwrite the value in the parent scope. You can run this code from the JavaScript console:
var myVar = 1;
alert(myVar);
function innerMyVar(){
var myVar = 2;
alert(myVar);
};
innerMyVar();
alert(myVar);
To demonstrate how the scope is retained even when a function is executed, we can add a timeout inside the innerMyVar function:
var myVar = 1;
alert(myVar);
function innerMyVar(){
var myVar = 2;
setTimeout(function(){
alert(myVar);
},1000);
myVar++;
};
innerMyVar();
alert(myVar);
This code should display alerts of 1, 1, and 3. The scope of innerMyVar retains the value of myVar defined inside it, including the increment that occurs after the timeout has been defined.
You can read more about scope at https://developer.mozilla.org/en-US/docs/Web/JavaScript/Guide/Closures/.
User Interface and Display Scripts
Let’s create a class to handle the user interface and some of the other page display functionality. Create a new file called ui.js in the _js folder and add the following code:
ui.js
var BubbleShoot = window.BubbleShoot || {};
BubbleShoot.ui = (function($){
➊ var ui = {
init : function(){
},
➋ hideDialog : function(){
➌ $(".dialog").fadeOut(300);
}
};
return ui;
})(jQuery);
Although not much is in this code, notice that the UI object follows the same pattern as the previous Game class. The hideDialog function ➋ contains a simple bit of jQuery that fades out any HTML element with the CSS class dialog ➌. The structural difference that ui has from the Gameclass pattern is that rather than making a ui class, we’re just creating a single object ➊ and attaching methods to it. This structure is similar to the way static classes are used in other languages.
The call to fadeOut takes a parameter that specifies the number of milliseconds to fade out the dialog. We use a value of 300, which is fast enough to not slow down users but not so fast that they won’t notice it. The fadeOut method is built into jQuery, but other ways are available to combine selectors and manipulate DOM elements. For now, let’s quickly run through what jQuery actually does in the fadeOut call:
§ Reduces the CSS opacity by a small, fixed amount and repeats in a loop for 300 milliseconds. At the end of this time, the opacity should be zero.
§ Sets the display CSS property of the element to none.
We could have created this effect by hand by stringing together some setTimeout calls, but jQuery handles it for us with fadeOut. Using jQuery saves us a lot of code here because, as with many CSS properties, manipulating opacity is not straightforward across browsers (earlier versions of IE use a filter instead of the opacity property, for example).
Note that at the moment we’re not doing anything particular to CSS3 or HTML5. We’re using old HTML tags and manipulating relatively old CSS properties through JavaScript loops. Later in this book, you’ll learn whether you should do this in a more modern way, but for now, the code does the job well. As you develop games, you’ll realize that a lot of code runs just as well on earlier browsers as it does on later ones and that, unless you’re exclusively rendering to the canvas, your HTML5 games look similar to regular web applications.
Now we need to load our newly created UI file into index.html by adding it to the Modernizr.load call:
index.html
Modernizr.load([{
load: "//ajax.googleapis.com/ajax/libs/jquery/1.8.2/jquery.js",
complete: function(){
if(!window.jQuery){
Modernizr.load("_js/jquery-1.8.2.min.js");
}
}
},
➊ "_js/ui.js",
{
load: "_js/game.js",
complete: function(){
$(function(){
var game = new BubbleShoot.Game();
game.init();
})
}
}
]);
To add a new .js file to the load call ➊, simply add the URL to your script file as an extra array item after ui.js but before loading game.js. We’ll need to add each new script file we create to index.html, so remember this process.
To call hideDialog when we click the New Game button, add the following lines in bold to game.js:
game.js
BubbleShoot.Game = (function($){
var Game = function(){
this.init = function(){
➊ $(".but_start_game").bind("click",startGame);
};
var startGame = function(){
➋ $(".but_start_game").unbind("click");
➌ BubbleShoot.ui.hideDialog();
};
};
return Game;
})(jQuery);
Using the bind method in jQuery ➊ is a cross-browser way to add event handlers. This method binds a function to an object that triggers when an event occurs. In this game application, the trigger occurs when the user clicks the New Game button, which calls the startGame function.
Note that we unbind the event ➋ when the button is clicked to prevent double-clicks from being registered while the button is fading out and trying to start a game twice. If you reload the page and click the New Game button, the dialog should disappear due to the hideDialog function ➌.
The Bubble Shooter game still doesn’t do much, but at least now we have some structure to add code to.
Summary
We now have the foundation in place to start building the game. Modernizr is loading in files, and we can easily add to this task when we create more classes and functions. An instance of the Game class is created when the DOM has finished loading, and clicking on a button starts the game.
In the next chapter, we’ll create our first sprites for the bubble object, forming the core of the game, and you’ll learn how to animate the sprites on the screen.
Further Practice
1. The dialog is being hidden with a jQuery fadeOut function, but you can apply other effects to remove the dialog from the screen. Try using slideUp or hide instead of fadeOut, for example. Alternatively, start the dialog offscreen and move it into place with an animate call.
2. The colors and styling of the dialogs and the header and footer are quite simple. Change the colors in those areas (or even experiment with graphics) until you find a combination you like.
3. Learn how to use your browser’s debugging tools. It’s likely you’ll have access to breakpoints, watch variables, and the variable stack, so read about and experiment with them. Learning your way around the tools now can be quite a time-saver when you’re debugging later. Try adding breakpoints within the init and startGame functions in game.js and trace the code as it runs.
All materials on the site are licensed Creative Commons Attribution-Sharealike 3.0 Unported CC BY-SA 3.0 & GNU Free Documentation License (GFDL)
If you are the copyright holder of any material contained on our site and intend to remove it, please contact our site administrator for approval.
© 2016-2026 All site design rights belong to S.Y.A.