HTML5: The Missing Manual Matthew MacDonald (2013)
Part 3. Building Web Apps
Chapter 13. Geolocation, Web Workers, and History Management
By now, you know all about the key themes of HTML5. You’ve used it to write more meaningful and better-structured markup. You’ve seen its rich graphical features, like video and dynamic drawing. And you’ve used it to create self-sufficient, JavaScript-powered pages that can work even without a web connection.
In this chapter, you’ll tackle three features that have escaped your attention so far. As with much of what you’ve already learned, these features extend the capabilities of what a web page can do—once you add a sprinkling of JavaScript code. Here’s what awaits:
§ Geolocation. Although it’s often discussed as part of HTML5, geolocation is actually a separate standard that’s never been in the hands of the WHATWG (HTML5: Back from the Dead). Using geolocation, you can grab hold of a single piece of information: the geographic coordinates that pinpoint a web visitor’s current location.
§ Web workers. As web developers make smarter pages that run more JavaScript, it becomes more important to run certain tasks in the background, quietly, unobtrusively, and over long periods of time. You could use timers and other tricks. But the web workers feature provides a far more convenient solution for performing background work.
§ Session history. In the old days of the Web, a page did one thing only: display stuff. As a result, people spent plenty of time clicking links to get from one document to another. But today, a JavaScript-fueled page can load content from another page without triggering a full page refresh. In this way, JavaScript creates a more seamless viewing experience. However, it also introduces a few wrinkles, like the challenge of keeping the browser URL synchronized with the current content. Web developers use plenty of advanced techniques to keep things in order, and now HTML5 adds a session history tool that can help.
NOTE
As you explore these last three features, you’ll get a still better idea of the scope of what is now called HTML5. What started as a few good ideas wedged into an overly ambitious standard has grown to encompass a grab bag of new features that tackle a range of different problems, with just a few core concepts (like semantics, JavaScript, and CSS3) to hold it all together.
Geolocation
Geolocation is a feature that lets you find out where in the world your visitors are. And that doesn’t just mean what country or city a person’s in. The geolocation feature can often narrow someone’s position down to a city block, or even determine the exact coordinates of someone who’s strolling around with a smartphone.
NOTE
Most of the new JavaScript features you’ve seen in this book were part of the original HTML5 specification and were split off when it was handed over to the W3C. But geolocation isn’t like that—it was never part of HTML5. Instead, it simply reached maturity around the same time. However, almost everyone now lumps them together as part of the wave of future web technologies.
How Geolocation Works
Geolocation raises quite a lot of questions in people who ordinarily aren’t paranoid. Like, how does a piece of software know I’m hanging out at the local coffee shop? Is there some hidden code that’s tracking my every move? And who’s in that white van parked outside?
Fortunately, geolocation is a lot less Big Brotherish than it seems. That’s because even if a browser can figure out your position, it won’t tell a website unless you give it explicit permission (see Figure 13-1).
To figure out a person’s location, the browser enlists the help of a location provider—for example, on Firefox that’s Google Location Services. This location provider has the tough job of finding the location, and it can use several different strategies to do it.
For a desktop computer with a fixed (not wireless) Internet connection, the science is simple but imprecise. When someone goes online, her traffic is funneled from her computer or local network through a cable, telephone wire, or (horrors) dial-up connection, until it reaches a high-powered piece of network hardware that brings it onto the Internet. That piece of hardware has a unique IP address, a numeric code that establishes its public identity to other computers. It also has a postal address in the real world.
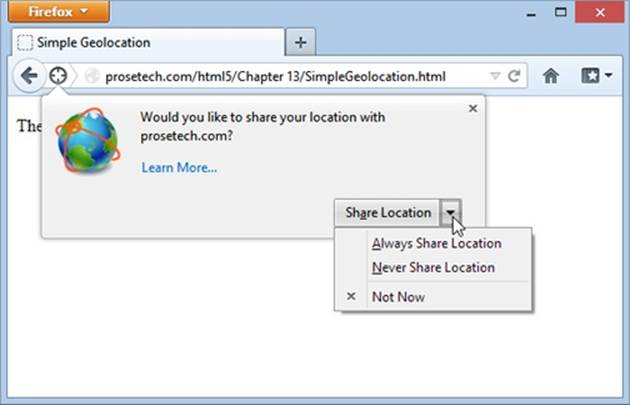
Figure 13-1. Here a web page wants location data, and Firefox asks whether you want to allow it just this once (click Share Location), to allow it every time (Always Share), or never to allow it (Never Share). This behavior isn’t just Firefox being polite; the geolocation standard makes it an official rule to get user permission for every website that wants location data.
NOTE
If you have some networking experience, you already know that your computer has its own IP address, like every computer on a network. However, this IP address is your own private one whose purpose is to separate your computer from any other devices that are sharing your connection (like the netbook in your kitchen or the tablet in your knapsack). Geolocation doesn’t use that IP address.
The location provider combines these two features. First, it figures out the IP address you’re connecting through, and then it pinpoints the home of the router that uses it. Because of this indirection, geolocation won’t be spot-on when you’re using a desktop computer. For example, if you surf from a computer on the west side of Chicago, you might find that your traffic is being funneled through a router that’s several miles closer to downtown. Still, even an imprecise result like this is often useful. For example, if you’re looking for nearby pizza stores in a mapping tool, you can quickly skip over to the area you’re really interested in—your home neighborhood—even if you start a certain distance away.
NOTE
The IP address technique is the roughest form of geolocation. If there’s a better source of location data, the location provider will use that instead.
If you’re using a laptop or a mobile device with a wireless connection, a location provider can look for nearby wireless access points. Ideally, the location provider consults a giant database to figure out the exact location of these access points and then uses that information to triangulate your location.
If you’re using a web-enabled phone, the location provider provides a similar triangulation process, but it uses the signals from different cellphone towers. This quick, relatively effective procedure usually gets your position down to less than a kilometer. (More industrialized areas—like downtown city cores—have more cellphone towers, which results in more precise geolocation.)
Finally, many mobile devices also have dedicated GPS hardware, which uses satellite signals to pin your location down to just a few meters. The drawback is that GPS is a bit slower and draws more battery power. It also doesn’t work as well in built-up cities, where tall buildings can obscure the signals. As you’ll see, it’s up to you whether you want to request a high-precision location using GPS, if it’s available (Showing a Map).
And of course, other techniques are possible. Nothing stops a location provider from relying on different information, like an RFID chip, nearby Bluetooth devices, a cookie set by a mapping website like Google Maps, and so on.
TIP
You may also be able to change your starting position by using another tool. For example, Chrome fans can use a browser plug-in named Manual Geolocation (http://tinyurl.com/manual-geo) to set the position that Chrome should report when you browse a website that uses geolocation. You can even use this technique to fake your address—for example, to pretend your computer in Iowa is actually surfing in from the Netherlands. This trick isn’t for espionage only—it can also be a useful debugging trick when you’re testing a location-aware web app.
The takeaway is this: No matter how you connect to the Internet—even if you’re sitting at a desktop computer—geolocation can get somewhere near you. And if you’re using a device that gets a cellphone signal or has a GPS chip, the geolocation coordinates will be scarily accurate.
UP TO SPEED: HOW YOU CAN USE GEOLOCATION
Once you’ve answered the big question—how does geolocation work?—you need to resolve another one—namely, why should you use it?
The key point to understand is that geolocation tells your code the approximate geographic coordinates of a person—and that’s it. You need to combine this simple but essential information with more detailed location data. This data could be provided by your web server (typically fetched out of a huge server-side database) or another geographic web service (like Google Maps).
For example, if you’re a big business with a physical presence in the real world, you might compare the user’s position with the coordinates of your different locations. You could then determine which location is closest. Or, if you’re building some sort of social networking tool, you might plot the information of a group of people to show them how close they are to one another. Or you might take someone else’s location data and use that to provide a service for your visitors, like hunting down the nearest chocolate store, or finding the closest clean toilet in Brooklyn. Either way, the geolocation coordinates of the visitor become important only when they’re combined with more geographic data.
Although other businesses’ mapping and geographic services are outside the scope of this chapter, you’ll get the chance to try out an example with Google Maps on Showing a Map.
Finding a Visitor’s Coordinates
The geolocation feature is strikingly simple. It consists of three methods that are packed into the navigator.geolocation object: getCurrentPosition(), watchPosition(), and clearWatch().
NOTE
If you aren’t already familiar with the navigator object, it’s a relatively minor part of JavaScript, with a few properties that tell you about the current browser and its capabilities. The most useful of these is navigator.userAgent, which provides an all-in-one string that details the browser, its version number, and the operating system on which it’s running.
To get a web visitor’s location, you call getCurrentPosition(). Of course, the location-finding process isn’t instantaneous, and no browser wants to lock up a page while it’s waiting for location data. For that reason, the getCurrentPosition() method is asynchronous—it carries on immediately, without stalling your code. When the geolocation process is finished, it triggers another piece of code to handle the results.
You might assume that geolocation uses an event to tell you when it’s done, in much the same way that you react when an image has been loaded or a text file has been read. But JavaScript is nothing if not inconsistent. Instead, when you call getCurrentPosition() you supply thecompletion function.
Here’s an example:
navigator.geolocation.getCurrentPosition(
function(position) {
alert("You were last spotted at (" + position.coords.latitude +
"," + position.coords.longitude + ")");
}
);
When this code runs, it calls getCurrentPosition() and passes in a function. Once the browser determines the location, it triggers that function, which shows a message box. Figure 13-2 shows the result in Internet Explorer.
To keep your code clear and organized, you probably won’t define your completion function right inside the getCurrentPosition() call (as done in this example). Instead, you can put it in a separate, named function:
function geolocationSuccess(position) {
alert("You were last spotted at (" + position.coords.latitude +
"," + position.coords.longitude + ")");
}
Then you can point to it when you call getCurrentLocation():
navigator.geolocation.getCurrentPosition(geolocationSuccess);
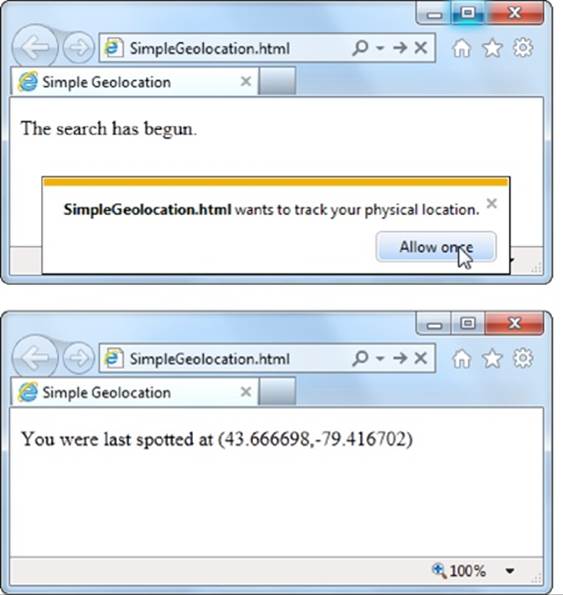
Figure 13-2. Top: First, you need to agree to let the browser tell the web server about your position. Bottom: The results are in—your coordinates on the globe.
Remember, you need to use a browser that supports geolocation and let the web page track you. Also, it’s a good idea to upload your page to a test server before trying it out. Otherwise, you’ll see some quirks (for example, geolocation error-handling won’t work) and some browsers will fail to detect your position altogether (like Chrome).
If you’re wondering, “What good are geographic coordinates to me?” you’ve asked a good question. You’ll explore how you can use the geolocation data shortly (Showing a Map). But first, you should understand how to catch errors and configure a few geolocation settings.
Dealing with Errors
Geolocation doesn’t run so smoothly if the visitor opts out and decides not to share the location data with your page. In the current example, the completion function won’t be called at all, and your page won’t have any way to tell whether the browser is still trying to dig up the data or has run into an error. To deal with this sort of situation, you supply two functions when you call getCurrentLocation(). The first function is called if your page meets with success, while the second is called if your geolocation attempt ends in failure.
POWER USERS’ CLINIC: FINDING OUT THE ACCURACY OF A GEOLOCATION GUESS
When the getCurrentPosition() method meets with success, your code gets a position object that has two properties: timestamp (which records when the geolocation was performed) and coords (which indicates the geographic coordinates).
As you’ve seen, the coords object gives you the latitude and longitude—the coordinates that pin down your position on the globe. However, the coords object bundles up a bit more information that you haven’t seen yet. For example, there are more specialized altitude, heading, and speed properties, none of which are currently supported by any browser.
More interesting is the accuracy property, which tells you how precise the geolocation information is, in meters. (Somewhat confusingly, that means the value of the accuracy property increases as the accuracy of the location data decreases.) For example, an accuracy of 2,135 meters converts to about 1.3 miles, meaning the geolocation coordinates have pinpointed the current visitor’s position within that distance. To visualize this, imagine a circle with the center at the geolocation coordinates and a radius of 1.3 miles. Odds are the visitor is somewhere in that circle.
The accuracy property is useful for identifying bad geolocation results. For example, if you get an accuracy result that’s tens of thousands of meters, then the location data isn’t reliable:
if (position.coords.accuracy > 50000) {
results.innerHTML =
"This guess is all over the map.";
}
At this point, you might want to warn the user or offer him the chance to enter the right position information himself.
Here’s an example that uses both a completion function and an error function:
// Store the element where the page displays the result.
var results;
window.onload = function() {
results = document.getElementById("results");
// If geolocation is available, try to get the visitor's position.
if (navigator.geolocation) {
navigator.geolocation.getCurrentPosition(
geolocationSuccess, geolocationFailure
);
results.innerHTML = "The search has begun.";
}
else {
results.innerHTML = "This browser doesn't support geolocation.";
}
};
function geolocationSuccess(position) {
results.innerHTML = "You were last spotted at (" +
position.coords.latitude + "," + position.coords.longitude + ")";
}
function geolocationFailure(positionError) {
results.innerHTML = "Geolocation failed.";
}
When the error function is called, the browser hands it an error object with two properties: code (a numeric code that classifies it as one of four types of problems) and message (which provides a short text message reporting the problem). Generally, the message is intended for testing, and your code will use the error code to decide how it should handle the issue.
Here’s a revised error function that checks all possible error code values:
function geolocationFailure(positionError) {
if (positionError.code == 1) {
results.innerHTML =
"You decided not to share, but that's OK. We won't ask again.";
}
else if (positionError.code == 2) {
results.innerHTML =
"The network is down or the positioning service can't be reached.";
}
else if (positionError.code == 3) {
results.innerHTML =
"The attempt timed out before it could get the location data.";
}
else {
results.innerHTML =
"This the mystery error. We don't know what happened.";
}
}
NOTE
If you’re running the test web page from your computer (not a real web server), the error function won’t be triggered when you decline to share your location.
Setting Geolocation Options
So far, you’ve seen how to call getCurrentLocation() with two arguments: the success function and the failure function. You can also supply a third argument, which is an object that sets certain geolocation options.
Currently, there are three options you can set, and each one corresponds to a different property on the geolocation options object. You can set just one or any combination. Here’s an example that sets one, named enableHighAccuracy:
navigator.geolocation.getCurrentPosition(geolocationSuccess,
geolocationFailure, {enableHighAccuracy: true});
And here’s an example that sets all three:
navigator.geolocation.getCurrentPosition(
geolocationSuccess, geolocationFailure, {enableHighAccuracy: true,
timeout: 10000,
maximumAge: 60000}
);
Both of these examples supply the geolocation options using a JavaScript object literal. This technique works perfectly as long as you use the right property names, such as enableHighAccuracy and timeout, because these are the properties that the getCurrentPosition() method is expecting. (If this code still looks a bit weird to you, check out the more detailed object introduction on Objects in Appendix B.)
So what do these properties mean? The enableHighAccuracy property opts into high-precision GPS-based location detection, if the device supports it (and the user allows it). Don’t choose this option unless you need exact coordinates, because it can draw serious battery juice and may take more time. The default for enableHighAccuracy, should you choose not to set it, is false.
The timeout property sets the amount of time your page is willing to wait for location data before throwing in the towel. The timeout is in milliseconds, so a value of 10,000 milliseconds means a maximum wait of 10 seconds. The countdown begins after the user agrees to share the location data. By default, timeout is 0, meaning the page will wait indefinitely, without ever triggering the timeout error.
The maximumAge property lets you use cached location data. For example, if you set maximumAge to 60,000 milliseconds, you’ll accept a previous value that’s up to a minute old. This saves the effort of repeated geolocation calls, but it also means your results will be less accurate for a person on the move. By default, maximumAge is 0, meaning cached location data is never used. (You can also use a special value of Infinity, which means use any cached location data, no matter how old it is.)
Showing a Map
Being able to grab someone’s geographic coordinates is a neat trick. But the novelty wears off fast unless you have something useful to do with that information. Hard-core geo-junkies know that there’s a treasure trove of location information out there. (Often, the problem is taking this information and converting it to a form that’s useful to your web application.) There are also several web-based mapping services, the king of which is Google Maps. In fact, good estimates suggest that Google Maps is the most heavily used web application service, for any purpose.
Using Google Maps, you can create a map for any portion of the world, at any size you want. You can control how your visitors interact with that map, generate driving instructions, and—most usefully—overlay your own custom data points on that map. For example, a Google Maps-fortified page can show visitors your business locations or flag interesting sights in a Manhattan walking tour. To get started with Google Maps, check out the documentation at http://tinyurl.com/maps-docs.
NOTE
Google Maps is free to use, even for commercial websites, provided you aren’t charging people to access your site. (And if you are, Google has a premium mapping service you can pay to use.) Currently, Google Maps does not show ads, although the Google Maps license terms explicitly reserve the right to do that in the future.
Figure 13-3 shows a revised version of the geolocation page. Once it grabs the current user’s coordinates, it shows that position in a map.
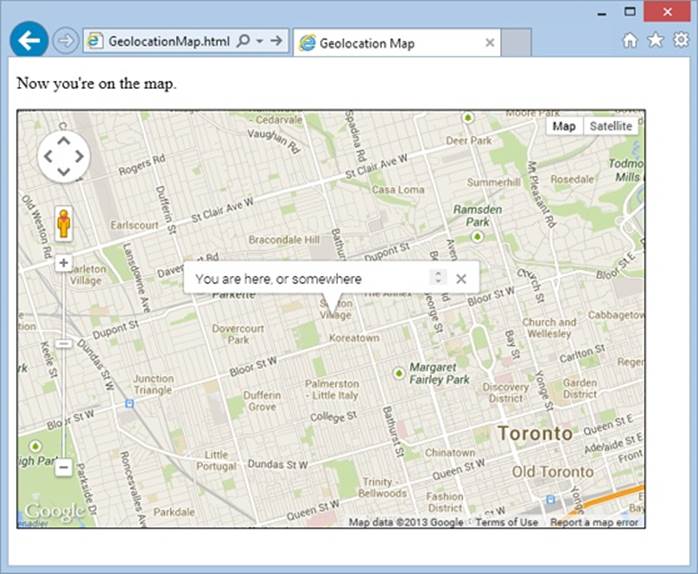
Figure 13-3. Geolocation and Google Maps make a potent combination. They let you generate a map for any position, with just a few extra lines of JavaScript.
Creating this page is easy. First, you need a link to the scripts that power the Google Maps API. Place this before any script blocks that use the mapping functionality:
<head>
<meta charset="utf-8">
<title>Geolocation Map</title>
<script src="http://maps.google.com/maps/api/js?sensor=true">
</script>
...
</head>
Next, you need a <div> element that will hold the dynamically generated map. Give it a unique ID for easy reference:
<body>
<p id="results">Where do you live?</p>
<div id="mapSurface"></div>
</body>
You can then use a style sheet rule to set the size of your map:
#mapSurface {
width: 600px;
height: 400px;
border: solid 1px black;
}
Now you’re ready to start using Google Maps. The first job is to create the map surface. This example creates the map when the page loads, so that you can use it in the success or failure function. (After all, failure doesn’t mean the visitor can’t use the mapping feature in your page; it just means that you can’t determine that visitor’s current location. You’ll probably still want to show the map, but just default to a different starting point.)
Here’s the code that runs when the page loads. It creates the map and then starts a geolocation attempt:
var results;
var map;
window.onload = function() {
results = document.getElementById("results");
// Set some map options. This example sets the starting zoom level and the
// map type, but see the Google Maps documentation for all your options.
var mapOptions = {
zoom: 13,
mapTypeId: google.maps.MapTypeId.ROADMAP };
// Create the map, with these options.
map = new google.maps.Map(document.getElementById("mapSurface"),
mapOptions);
// Try to find the visitor's position.
if (navigator.geolocation) {
navigator.geolocation.getCurrentPosition(geolocationSuccess,
geolocationFailure);
results.innerHTML = "The search has begun.";
}
else {
results.innerHTML = "This browser doesn't support geolocation.";
goToDefaultLocation();
}
};
Even after you’ve created the map with this code, you still won’t see it in the page. That’s because you haven’t set a geographic position. To do that, you need to create a specific global point using the LatLng object. You can then place that point on the map with the map’s setCenter()method. Here’s the code that does that with the visitor’s coordinates:
function geolocationSuccess(position) {
// Turn the geolocation position into a LatLng object.
location = new google.maps.LatLng(
position.coords.latitude, position.coords.longitude);
// Map that point.
map.setCenter(location);
This code is sufficient for displaying a map, like the one in Figure 13-3. But you can also add adornments to that map, like other places or an info bubble. For the latter, you need to create an InfoWindow object. Here’s the code that creates the info bubble shown in Figure 13-3:
// Create the info bubble and set its text content and map coordinates.
var infowindow = new google.maps.InfoWindow();
infowindow.setContent("You are here, or somewhere thereabouts.");
infowindow.setPosition(location);
// Make the info bubble appear.
infowindow.open(map);
results.innerHTML = "Now you're on the map.";
}
Finally, if geolocation fails or isn’t supported, you can carry out essentially the same process. Just use the hard-coded coordinates of a place you know:
function geolocationFailure(positionError) {
...
goToDefaultLocation();
}
function goToDefaultLocation() {
// This is the location of New York.
var newYork = new google.maps.LatLng(40.69847, -73.95144);
map.setCenter(newYork);
}
Monitoring a Visitor’s Moves
All the examples you’ve used so far have relied on the getCurrentPosition() method, which is the heart of geolocation. However, the geolocation object has two more methods that allow you to track a visitor’s position, so your page receives notifications as the location changes.
It all starts with the watchPosition() method, which looks strikingly similar to getCurrentPosition(). Like getCurrentPosition(), watchPosition() accepts three arguments: a success function (which is the only required detail), a failure function, and an options object:
navigator.geolocation.watchPosition(geolocationSuccess, geolocationFailure);
The difference between getCurrentPosition() and watchPosition() is that watchPosition() may trigger the success function multiple times—when it gets the location for the first time, and again whenever it detects a new position. (It’s not in your control to set how often the device checks for a new position. All you need to know is that the device won’t bother you if the position hasn’t changed, but it will trigger the success function again if it has.) On a desktop computer, which never moves, the getCurrentPosition() and watchPosition() methods have exactly the same effect.
Unlike getCurrentPosition(), watchPosition() returns a number. You can hold onto this number and pass it in to clearWatch() to stop paying attention to location changes. Or you can ignore this step and keep receiving notifications until the visitor surfs to another page:
var watch = navigator.geolocation.watchPosition(geolocationSuccess,
geolocationFailure);
...
navigator.geolocation.clearWatch(watch);
Browser Compatibility for Geolocation
The geolocation feature has good support in every modern browser, including mobile browsers. The only exception is old versions of Internet Explorer. Sadly, geolocation isn’t available in IE 8 or IE 7. If you expect your audience to include people using older versions of Internet Explorer, you can polyfill the gap. There are a number of simple JavaScript libraries that solve the problem. Usually, they use the IP lookup technique described on How Geolocation Works, which is the crudest form of geolocation. For example, the geolocation polyfill athttp://github.com/inexorabletash/polyfill grabs the router’s IP address and looks up its physical location in the database at http://freegeoip.net.
Alternatively, you can choose to pick a default starting position without trying to get the user’s current location. Or, if you’re using Google Maps, you can let the user pick a point from a map and then use those coordinates. The documentation for the Google Maps API is filled with examples like these—start with http://tinyurl.com/qbmqdsq for one example that intercepts clicks on a map.
Web Workers
Way back when JavaScript was first created, no one worried too much about performance. JavaScript was built to be a straightforward language for running small bits of script in a web page. JavaScript was a frill—a simplified scripting language for amateur programmers. It certainly wasn’t meant to run anyone’s business.
Fast-forward nearly 20 years, and JavaScript has taken over the Web. Developers use it to add interactivity to almost every sort of page, from games and mapping tools to shopping carts and fancy forms. But in many ways, the JavaScript language is still scrambling to catch up to its high status.
One example is the way JavaScript deals with big jobs that require hefty calculations. In most modern programming systems, work like this would happen quietly in the background, while the person using the application carried on, undisturbed. But in JavaScript, code always runs in theforeground. So any time-consuming piece of code will interrupt the user and freeze up the page until the job is done. Ignore this problem, and you’ll wind up with some seriously annoyed, never-to-return visitors.
NOTE
Crafty web developers have found some partial solutions to the JavaScript freeze-up problem. These involve splitting long-running tasks into small pieces and using setInterval() or setTimeout() to run one piece at a time. For certain types of tasks, this solution works well (for example, it’s a practical way to animate a canvas, as demonstrated on A Basic Animation). But if you need to run a single, very long operation from start to finish, this technique adds complexity and confusion.
HTML5 introduces a better solution. It adds a dedicated object, called a web worker, that’s designed to do background work. If you have a time-consuming job to polish off, you create a new web worker, supply it with your code, and start it on its way. While it works, you can communicate with it in a safe but limited way—by passing text messages.
A Time-Consuming Task
Before you can see the benefits of web workers, you need to find a suitable intensive piece of code. There’s no point in using web workers for short tasks. But if you plan to run some CPU-taxing calculations that could tie up the web browser for more than a few seconds, web workers make all the difference. Consider, for example, the prime number searcher shown in Figure 13-4. Here, you can hunt for prime numbers that fall in a given range. The code is simple, but the task is computationally difficult, which means it could take some serious number-crunching time.
Clearly, this page can be improved with web workers. But before you get to that, you need to take a quick look through the existing markup and JavaScript code.
UP TO SPEED: WEB WORKER SAFETY MEASURES
JavaScript’s web worker lets your code work in the background while something else takes place in the foreground. This brings up a well-known theme of modern programming: If an application can do two things at once, one of them has the potential to mess up the other.
The problem occurs when two different pieces of code fight over the same data, at the same time. For example, one piece of code may attempt to read some data, while another attempts to set it. Or both may attempt to set a variable at the same time, causing one change to be overwritten. Or two pieces of code may attempt to manipulate the same object in different ways, pushing it into an inconsistent state. The possible issues are endless, and they’re notoriously difficult to discover and solve. Often, a multithreaded application (that’s an application that uses several threads of independently executing code) works fine during testing. But when you start using it in the real world, maddeningly inconsistent errors appear.
Fortunately, you won’t face these problems with JavaScript’s web workers feature. That’s because it doesn’t let you share the same data between your web page and your web workers. You can send data from your web page to a web worker (or vice versa), but JavaScript automatically makes a copy of your data and sends that. That means there’s no possible way for two threads to get hold of the same memory slot at the same time and cause subtle issues. Of course, this simplified model also restricts some of the things that web workers can do, but a minor reduction in capabilities is the cost of making sure ambitious programmers can’t shoot themselves in the foot.

Figure 13-4. Pick your range and click the button to start the search. Pick a relatively narrow range (like this one, from 1 to 50,000), and the task completes in seconds, without inconveniencing anyone. But launch a broader search (say, from 1 to 500,000) and your page could become unresponsive for minutes or more. You won’t be able to click, scroll, or interact with anything—and the browser may even give you a “long-running script” warning or gray out the entire page.
The markup is short and concise. The page uses two <input> controls, one for each text box. It also includes a button to start the search and two <div> elements, one to hold the results and another to hold the status message underneath. Here’s the complete markup from inside the <body>element:
<p>Do a prime number search from <input id="from" value="1"> to
<input id="to" value="20000">.</p>
<button id="searchButton" onclick="doSearch()">Start Searching</button>
<div id="primeContainer">
</div>
<div id="status"></div>
One interesting detail is the styling of the <div> element that holds the prime number list. It’s given a fixed height and a maximum width, and the overflow and overflow-x properties work together to add a vertical scroll bar (but not a horizontal one):
#primeContainer {
border: solid 1px black;
margin-top: 20px;
margin-bottom: 10px;
padding: 3px;
height: 300px;
max-width: 500px;
overflow: scroll;
overflow-x: hidden;
font-size: x-small;
}
The JavaScript code is a bit longer, but not much more complicated. It retrieves the numbers from the text boxes, starts the search, and then adds the prime number list to the page. It doesn’t actually perform the mathematical operations that find the prime numbers—this is handled through a separate function, which is named findPrimes() and stored in a separate JavaScript file.
TIP
You don’t need to see the findPrimes() function to understand this example or web workers—all you need is a suitably long task. However, if you’re curious to see the math that makes this page work, or if you just want to run a few prime number searches yourself, check out the full code on the try-out site at http://prosetech.com/html5.
Here’s the complete code for the doSearch() function:
function doSearch() {
// Get the numbers for the search range.
var fromNumber = document.getElementById("from").value;
var toNumber = document.getElementById("to").value;
// Perform the prime search. (This is the time-consuming step.)
var primes = findPrimes(fromNumber, toNumber);
// Loop over the array of prime numbers, and paste them together into
// one long piece of text.
var primeList = "";
for (var i=0; i<primes.length; i++) {
primeList += primes[i];
if (i != primes.length-1) primeList += ", ";
}
// Insert the prime number text into the page.
var displayList = document.getElementById("primeContainer");
displayList.innerHTML = primeList;
// Update the status text to tell the user what just happened.
var statusDisplay = document.getElementById("status");
if (primeList.length == 0) {
statusDisplay.innerHTML = "Search failed to find any results.";
}
else {
statusDisplay.innerHTML = "The results are here!";
}
}
As you can see, the markup and code is short, simple, and to the point. Unfortunately, if you plug in a large search you’ll find that it’s also as slow and clunky as riding a golf cart up a steep hill.
Doing Work in the Background
The web worker feature revolves around a new object called the Worker. When you want to run something in the background, you create a new Worker, give it some code, and send it some data.
Here’s an example that creates a new web worker that runs the code in the file named PrimeWorker.js:
var worker = new Worker("PrimeWorker.js");
The code that a worker runs is always stored in a separate JavaScript file. This design discourages newbie programmers from writing web worker code that attempts to use global variables or directly access elements on the page. Neither of these operations is possible.
NOTE
Browsers enforce a strict separation between your web page and your web worker code. For example, there’s no way for the code in PrimeWorker.js to write prime numbers into a <div> element. Instead, your worker code needs to send its data back to JavaScript code on the page, so the web page code can display the results.
Web pages and web workers communicate by exchanging messages. To send data to a worker, you call the worker’s postMessage() method:
worker.postMessage(myData);
The worker then receives an onMessage event that provides a copy of the data. This is when it starts working.
Similarly, when your worker needs to talk back to the web page, it calls its own postMessage() method, along with some data, and the web page receives an onMessage event. Figure 13-5 shows this interaction close up.
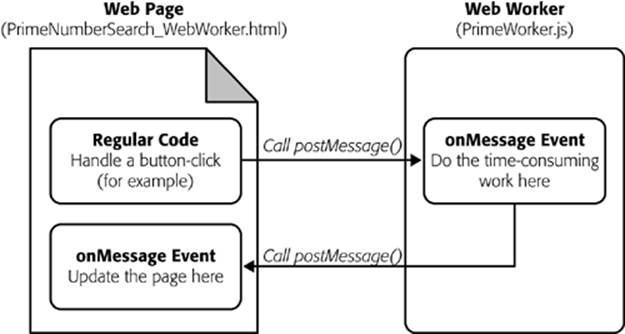
Figure 13-5. Here’s the web workers feature at its simplest. There are three basic steps: The page sends the worker some data, the worker runs, and the worker sends back some data.
There’s one more wrinkle to consider before you dive in. The postMessage() function allows only a single value. This fact is a stumbling block for the prime number cruncher, because it needs two pieces of data (the two numbers in the range). The solution is to package these two details into an object literal (see Object Literals). This code shows one example, which gives the object two properties (the first named from, and the second named to), and assigns values to both of them:
worker.postMessage(
{ from: 1,
to: 20000 }
);
NOTE
Incidentally, you can send virtually any object to a worker. Behind the scenes, the browser uses JSON (Storing Objects) to convert your object to a harmless piece of text, duplicate it, and re-objectify it.
With these details in mind, you can revise the doSearch() function you saw earlier. Instead of performing the prime number search itself, the doSearch() function creates a worker and gets it to do the real job:
var worker;
function doSearch() {
// Disable the button, so the user can't start more than one search
// at the same time.
searchButton.disabled = true;
// Create the worker.
worker = new Worker("PrimeWorker.js");
// Hook up to the onMessage event, so you can receive messages
// from the worker.
worker.onmessage = receivedWorkerMessage;
// Get the number range, and send it to the web worker.
var fromNumber = document.getElementById("from").value;
var toNumber = document.getElementById("to").value;
worker.postMessage(
{ from: fromNumber,
to: toNumber }
);
// Let the user know that things are on their way.
statusDisplay.innerHTML = "A web worker is on the job ("+
fromNumber + " to " + toNumber + ") ...";
}
Now the code in the PrimeWorker.js file springs into action. It receives the onMessage event, performs the search, and then posts a new message back to the page, with the prime list:
onmessage = function(event) {
// The object that the web page sent is stored in the event.data property.
var fromNumber = event.data.from;
var toNumber = event.data.to;
// Using that number range, perform the prime number search.
var primes = findPrimes(fromNumber, toNumber);
// Now the search is finished. Send back the results.
postMessage(primes);
};
function findPrimes(fromNumber, toNumber) {
// (The boring prime number calculations go in this function.)
}
When the worker calls postMessage(), it fires the onMessage event, which triggers this function in the web page:
function receivedWorkerMessage(event) {
// Get the prime number list.
var primes = event.data;
// Copy the list to the page.
...
// Allow more searches.
searchButton.disabled = false;
}
You can now use the same code you saw earlier (Doing Work in the Background) to convert the array of prime numbers into a piece of text and insert that text into the web page.
Overall, the structure of the code has changed a bit, but the logic is mostly the same. The result, however, is dramatically different. Now, when a long prime number search is under way, the page remains responsive. You can scroll down, type in the text boxes, and select numbers in the list from the previous search. Other than the message at the bottom of the page, there’s nothing to reveal that a web worker is plugging away in the background.
TIP
Does your web worker need access to the code in another JavaScript file? There’s a simple solution with the importScripts() function. For example, if you want to call functions from the FindPrimes.js file in PrimeWorker.js, just add this line of code before you do:
importScripts("FindPrimes.js");
GEM IN THE ROUGH: RUNNING WEB WORKERS OFFLINE
If you take the time to prepare a complete web worker example and upload it to a web server, you can test your page complication-free. Of course, in the real world it’s easier to try things out on your desktop and run them straight from your hard drive. This method works in Firefox and current versions of Internet Explorer, but not in Chrome—unless you take additional steps.
If you’re running your web worker page from a local file, Chrome will fail unless you start it with the --allow-file-access-from-files parameter. In Windows, you accomplish this by changing your Chrome shortcut (right-click it and choose Properties) or by creating a new Chrome shortcut and customizing that. Either way, you need to look in the Target box and tack the parameter onto the end of the command line. For example, you would change a shortcut like this:
C:\Users\billcruft\ ... \chrome.exe
to this:
C:\Users\billcruft\ ... \chrome.exe
--allow-file-access-from-files
Now you can try out your web worker code in the comfort and privacy of your own computer, no uploads required.
Handling Worker Errors
As you’ve learned, the postMessage() method is the key to communicating with web workers. However, there’s one more way that a web worker can notify your web page—with the onerror event that signals an error:
worker.onerror = workerError;
Now, if some dodgy script or invalid data causes an error in your background code, the error details are packaged up and sent back to the page. Here’s some web page code that simply displays the text of the error message:
function workerError(error) {
statusDisplay.innerHTML = error.message;
}
Along with the message property, the error object also includes a lineno and filename property, which report the line number and file name where the error occurred.
Canceling a Background Task
Now that you’ve built a basic web worker example, it’s time to add a few refinements. First is cancellation support, which lets your page shut down a worker in mid-calculation.
There are two ways to stop a worker. First, a worker can stop itself by calling close(). More commonly, the page that created the worker will shut it down by calling the worker’s terminate() method. For example, here’s the code you can use to power a straightforward cancel button:
function cancelSearch() {
worker.terminate();
statusDisplay.innerHTML = "";
searchButton.disabled = false;
}
Click this button to stop the current search and re-enable the search button. Just remember that once a worker is stopped in this way, you can’t send any more messages, and it can’t be used to do any more operations. To perform a new search, you need to create a new worker object. (The current example does this already, so it works perfectly.)
Passing More Complex Messages
The last trick you’ll learn to do with a web worker is return progress information. Figure 13-6 shows a revised version of the web worker page that adds this feature.
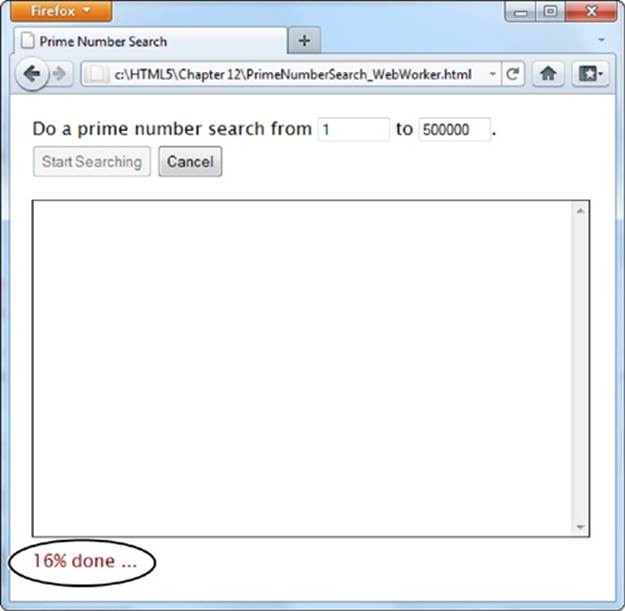
Figure 13-6. As the prime number search is under way, the search updates the status display to tell you how close the task is to completion. For a fancier display, you could use a color-filling progress bar like the one on page 165.
To build the progress display, the web worker needs to send the progress percentage to the page while it works. But as you already know, web workers have just one way to talk to the pages that own them—with the postMessage() method. So to create this example, the web worker needs to send two types of messages: progress notifications (while the work is under way) and the prime number list (when the work is finished). The trick is making the difference between these two messages clear, so the onMessage event handler in the page can easily distinguish between the two types.
The best approach is to add a bit of extra information to the message. For example, when the web worker sends progress information, it can slap the text label “Progress” on its message. And when the web worker sends the prime number list, it can add the label “PrimeList.”
To bundle all the information you want together in one message, you need to create an object literal. This is the same technique the web page used to send the number range data to the web worker. The extra piece of information is the text that describes the type of message, which is placed in a property called messageType in this example. The actual data goes in a second property, named data.
Here’s how you would rewrite the web worker code to add a message type to the prime number list:
onmessage = function(event) {
// Perform the prime number search.
var primes = findPrimes(event.data.from, event.data.to);
// Send back the results.
postMessage(
{messageType: "PrimeList", data: primes}
);
};
The code in the findPrimes() function also uses the postMessage() method to send a message back to the web page. It uses the same two properties—messageType and data. But now the messageType indicates that the message is a progress notification, and data holds the progress percentage:
function findPrimes(fromNumber, toNumber) {
...
// Calculate the progress percentage.
var progress = Math.round(i/list.length*100);
// Only send a progress update if the progress has changed at least 1%.
if (progress != previousProgress) {
postMessage(
{messageType: "Progress", data: progress}
);
previousProgress = progress;
}
...
}
When the page receives a message, it needs to start by checking the messageType property to determine what sort of message it has just received. If it’s a prime list, then the results are shown in the page. If it’s a progress notification, then the progress text is updated:
function receivedWorkerMessage(event) {
var message = event.data;
if (message.messageType == "PrimeList") {
var primes = message.data;
// Display the prime list. This code is the same as before.
...
}
else if (message.messageType == "Progress") {
// Report the current progress.
statusDisplay.innerHTML = message.data + "% done ...";
}
}
NOTE
There’s another way to design this page. You could get the worker to call postMessage() every time it finds a prime number. The web page would then add each prime number to the list and show it in the page immediately. This approach has the advantage of showing results as they arrive. However, it also has the drawback of continually interrupting the page (because the web worker will find prime numbers quite quickly). The ideal design depends on the nature of your task—how long it takes to complete, whether partial results are useful, how quickly each partial result is calculated, and so on.
POWER USERS’ CLINIC: MORE WAYS TO USE A WEB WORKER
The prime number search uses web workers in the most straightforward way possible—to perform one well-defined task. Every time the search is started, the page creates a new web worker. That web worker is responsible for a single task. It receives a single message and sends a single message back.
Your pages don’t need to be this simple. Here are a few examples of how you can extend your web-worker designs to do more complicated things:
§ Reuse a web worker for multiple jobs. When a worker finishes its work and reaches the end of the onMessage event handler, it doesn’t die. It simply goes idle and waits quietly. If you send the worker another message, it springs back to life and does the work.
§ Create multiple web workers. Your page doesn’t need to stick to one worker. For example, imagine you want to let a visitor launch several prime number searches at a time. You could create a new web worker for each search and keep track of all your workers in an array. Each time a web worker responds with its list of prime numbers, you add that to the page, taking care not to overwrite any other worker’s result. (However, some words of caution are in order. Web workers have a relatively high overhead, and running a dozen at once could swamp the computer with work.)
§ Create web workers inside a web worker. A web worker can start its own web workers, send them messages, and receive their messages back. This technique is useful for complex computational tasks that require recursion, like calculating the Fibonacci sequence.
§ Download data with a web worker. Web workers can use the XMLHttpRequest object (The XMLHttpRequest Object) to grab new pages or to send requests to a web service. When they get the information they need, they can call postMessage() to send it up to the page.
§ Do periodic tasks with a web worker. Web workers can use the setTimeout() and setInterval() functions, just like ordinary web pages. For example, you might create a web worker that checks a website for new data every minute.
Browser Compatibility for Web Workers
The web worker feature isn’t supported as broadly as the geolocation feature. Table 13-1 shows which browsers you can rely on.
Table 13-1. Browser support for web workers
|
IE |
FIREFOX |
CHROME |
SAFARI |
OPERA |
SAFARI IOS |
CHROME FOR ANDROID |
|
|
Minimum version |
10 |
3.5 |
3 |
4 |
10.6 |
5 |
29 |
So what can you do if you face a browser that doesn’t have web worker support? The easiest option is to simply do the same work in the foreground:
if (window.Worker) {
// Web workers are supported.
// So why not create a web worker
// and start it?
} else {
// Web workers aren't available.
// You can just call the prime search
// function, and wait.
}
This approach doesn’t force you to write any extra code, because the prime-number-searching function is already written, and you can call it with or without a web worker. However, if you have a long task, this approach could lock up the browser for a bit. So if you use this strategy, it’s wise to warn the user (for example, with a message on the page), that he’s using a less-supported browser and the calculation process may temporarily freeze up the page.
An alternate (but more tedious) approach is to try to fake a background job using the setInterval() or setTimeout() methods. For example, you could write some code that tests just a few numbers every interval. Some polyfills even attempt to add this sort of system (see the Web Workers section on http://tinyurl.com/polyfills), but this approach gets messy quickly.
History Management
Session history is an HTML5 add-on that extends the capabilities of the JavaScript history object. This sounds simple, but the trick is knowing when and why you should use it.
If you’ve never noticed the history object before, don’t be alarmed. Up until now, it’s had very little to offer. In fact, the traditional history object has just one property and three basic methods. The property is length, and it tells you how many entries are in the browser’s History list (the list of recently visited web pages that the browser maintains as you skip from page to page across the Web). Here’s an example that uses it:
alert("You have " + history.length +
" pages in your browser's history list.");
The most useful history method is back(). It lets you send a visitor one step back in the browsing history:
history.back();
This method has the same effect as if the visitor clicked the browser’s Back button. Similarly, you can use the forward() method to step forward, or the go() method to move a specified number of steps backward or forward.
All this adds up to relatively little, unless you want to design your own custom Back and Forward buttons on a web page. But HTML5 adds a bit more functionality, which you can put to far more ambitious purposes. The centerpiece is the pushState() method, which lets you change the URL in the browser window without triggering a page refresh. This comes in handy in a specific scenario—namely, when you’re building dynamic pages that quietly load new content and seamlessly update themselves. In this situation, the page’s URL and the page’s content can become out of sync. For example, if a page loads content from another page, the first page’s URL stays in the browser’s address box, which can cause all sorts of bookmarking confusion. Session history gives you a way to patch this hole.
If you’re having a bit of trouble visualizing this scenario, hold on. In the next section, you’ll see a page that’s a perfect candidate for session history.
The URL Problem
In the previous chapter, you considered a page about Chinese tourism that had a built-in slideshow (Getting New Content). Using the Previous and Next buttons on this page, the viewer could load different slides. But the best part about this example is that each slide was loaded quietly and unobtrusively and without reloading the page, thanks to the trusty XMLHttpRequest object.
Pages that include dynamic content and use this sort of design have a well-known limitation. Even though the page changes when it loads in new content, the URL stays the same in the browser’s address bar (Figure 13-7).
To understand the problem, imagine that Joe reads the article shown in Figure 13-7, looks at the different sights, and is excited by the wishing tree in the fifth slide. Joe bookmarks the page, sends the URL to his friend Claire via email, and promotes it to the whole world with a Twitter message (“Throwing paper into a tree beats dropping coins in a fountain. Check it out at http://…”). The problem is that when Joe returns to his bookmark, or when Claire clicks the link in the email, or when any of Joe’s followers visit the link in the tweet, they all end up at the first slide. They may not have the patience to click through to the fifth slide, or they may not even know where it is. And this problem grows worse if there are more than just five slides—for example, a Flickr photo stream could have dozens or hundreds of pictures.
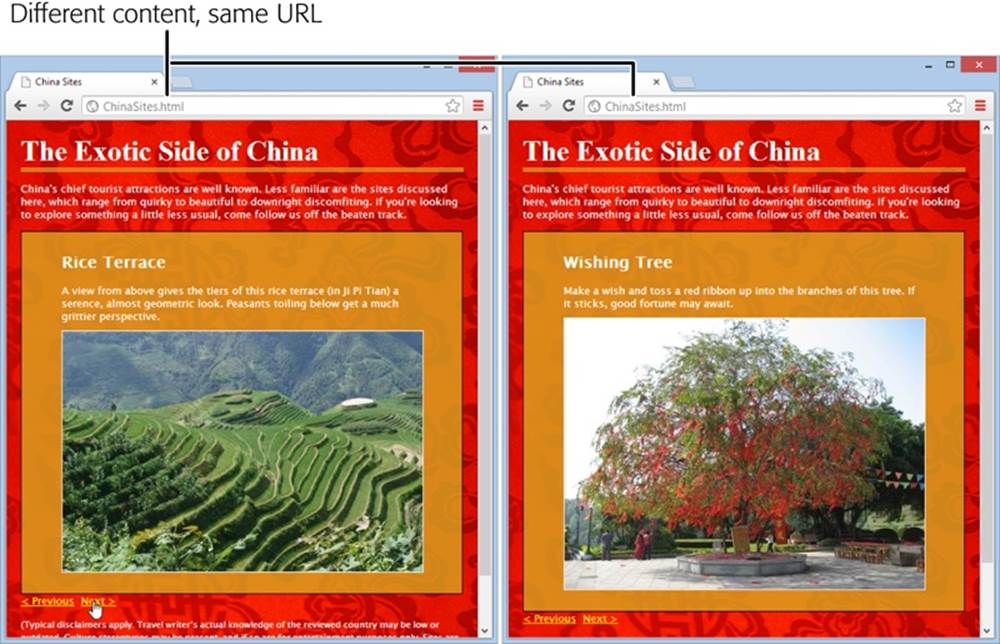
Figure 13-7. Here are two versions of the ChinaSites.html page, with different slides loaded. In both pages, the URL stays the same (it’s ChinaSites.html).
The Old Solution: Hashbang URLs
To deal with this problem, some web pages tack extra information onto the end of the URL. Just a few years ago, leading sites like Facebook, Twitter, and Google fell over themselves in excitement to implement a controversial strategy called the hashbang technique. To use the hashbang technique, you add the characters #! at the end of any URL, followed by some additional information. Here’s an example:
http://jjtraveltales.com/ChinaSites.html#!/Slide5
The reason the hashbang approach works is because browsers treat everything after the # character as the fragment portion of a URL. So in the example shown here, the web browser knows that you’re still referring to the same ChinaSites.html page, just with an extra fragment added to the end.
On the other hand, consider what happens if your JavaScript code changes the URL without using the # character:
http://jjtraveltales.com/ChinaSites.html/Slide5
Now the web browser will immediately send this request to the web server and attempt to download a new page. This isn’t what you want.
So how would you implement the hashbang technique? First, you need to change the URL that appears in the browser whenever your page loads a new slide. (You can do this by setting the location.href property in your JavaScript code.) Second, you need to check the URL when the page first loads, retrieve the fragment, and fetch the corresponding bit of dynamic content from the web server. All of this adds up to a fair bit of juggling, but you can use a JavaScript library like PathJS (https://github.com/mtrpcic/pathjs) to make life much easier.
Recently, the hashbang technique has fallen into disrepute, and many of its former supporters have dropped it altogether (for the reasons discussed in the box on this page). However, hashbangs still turn up in some heavily trafficked sites, like Google Groups.
UP TO SPEED: WHY NOBODY LIKES HASHBANGS
In recent Web history, the hashbang approach was widely used but deeply controversial. Today, web designers are backing away from it for a number of reasons:
§ Complex URLs. Facebook is a good example of the problem. In the past, it wouldn’t take much browsing before the browser’s URL would be polluted with extra information, as in http://www.facebook.com/profile.php?id=1586010043#!/pages/Haskell/401573824771. Now designers use session history, if the browser supports it.
§ Inflexibility. Hashbang pages store a lot of information in the URL. If you change the way a hashbanged page works, or the way it stores information, old URLs could stop working, which is a major website fail.
§ Search engine optimization. Search engines may treat different hashbanged URLs as essentially the same page. In the ChinaSites.html page, that means you won’t get a separately indexed page for each tourist site—in fact, search engines might ignore this information altogether. This means that if someone searches for “china wishing tree,” the ChinaSites.html page might not turn up as a match.
§ Cool URLs matter. Cool URLs are web page addresses that are short, clear, and—most importantly—never change. Tim Berners-Lee, the creator of the Web, explains the philosophy at www.w3.org/Provider/Style/URI.html. And no matter how strongly you feel about keeping good web content alive, hashbang URLs are difficult to maintain and unlikely to survive the next stage in web evolution.
Although webmasters differ over how much they tolerate the hashbang approach, most agree that it’s a short stage of web development that soon will be replaced by HTML5’s session history feature.
The HTML5 Solution: Session History
HTML5’s session history feature provides a different solution to the URL problem. It gives you a way to change the URL to whatever you want, without needing to stick in funny characters like the hashbang. For example, when the ChinaSites.html page loads the fourth slide, you could change the URL to look like this:
http://jjtraveltales.com/ChinaSites4.html
When you do this, the browser won’t actually attempt to request a page named ChinaSites4.html. Instead, it keeps the current page, with the newly loaded slide, which is exactly what you want. The same is true if the visitor goes back through the browser history. For example, if a visitor moves to the next slide (and the URL changes to ChinaSites5.html) and then clicks the Back button (returning the URL to ChinaSites4.html), the browser sticks with the current page and raises an event that gives you the chance to load the matching slide and restore the right version of the page.
So far, this sounds like a perfect solution. However, there’s a significant drawback. If you want this system to work the way it’s intended, you actually need to create a page for every URL you use. In this example, that means you need to create ChinaSites1.html, ChinaSites2.html,ChinaSites3.html, and so on. That’s because surfers might go directly to those pages—for example, when returning through a bookmark, typing the link in by hand, clicking it in an email message, and so on. For big web outfits (like Facebook or Flickr), this is no big deal, because they can use a scrap of server-side code to serve up the same slide content in a different package. But if you’re a small-scale web developer, it might be a bit more work. For some options on how to handle the challenge, see the box on Creating Extra Pages to Satisfy Your URLs.
Now that you understand how session history fits into your pages (the hard part), actually using it is easy. In fact, session history consists of just two methods and a single event, all of which are added to the history object.
The most important of these is the pushState() method, which lets you change the web page portion of the URL to whatever you want. For security reasons, you can’t change the rest of the URL. (If you could, hackers would have a powerful tool for faking other people’s websites—including, say, the Gmail sign on a bank transaction form.)
Here’s an example that changes the web page part of the URL to ChinaSites4.html:
history.pushState(null, null, "ChinaSites4.html");
The pushState() method accepts three arguments. The third one is the only essential detail—it’s the URL that appears in the browser’s address bar.
The first argument is any piece of data you want to store to represent the current state of this page. As you’ll see, you can use this data to restore the page state if the user returns to this URL through the browser’s History list. The second argument is the page title you want the browser to show. All browsers are currently unified in ignoring this detail. If you don’t want to set either the state or the title, just supply a null value, as shown above.
Here’s the code you’d add to the ChinaSites.html page to change the URL to match the currently displayed slide. You’ll notice that the current slide number is used for the page state. That detail will become important in a moment, when you consider the onPopState event:
function nextSlide() {
if (slideNumber == 5) {
slideNumber = 1;
} else {
slideNumber += 1;
}
history.pushState(slideNumber, null, "ChinaSites" + slideNumber + ".html");
goToNewSlide();
return false;
}
function previousSlide() {
if (slideNumber == 1) {
slideNumber = 5;
} else {
slideNumber -= 1;
}
history.pushState(slideNumber, null, "ChinaSites" + slideNumber + ".html");
goToNewSlide();
return false;
}
The goToNewSlide() function hasn’t changed from the first version of this example (Getting New Content). It still uses the XMLHttpRequest object to fetch the data for the next slide, asynchronously.
Figure 13-8 shows the new URL management system at work.
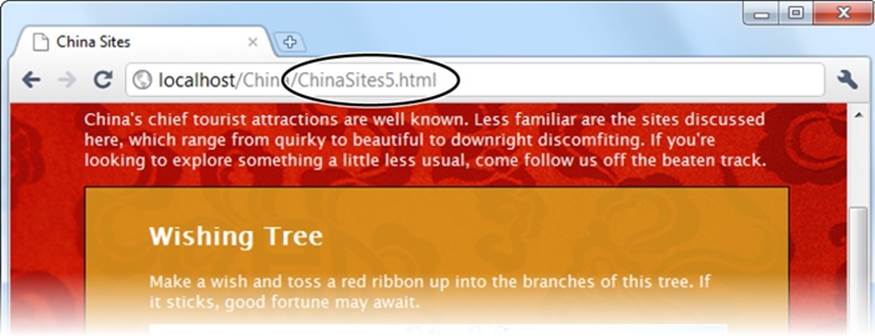
Figure 13-8. As a visitor clicks through the slides, the URL changes to match. The URL that appears is clean and sensible, and it refers to exactly the right spot in the slideshow.
If you use the pushState() method, you’ll also need to think about the onPopState event, which is its natural counterpart. While the pushState() method puts a new entry into the browser’s History list, the onPopState event gives you the chance to deal with it when the user returns.
To understand how it works, consider what happens if a visitor works through all the slides. As she clicks through, the URL in the address bar changes from ChinaSites.html to ChinaSites1.html, then ChinaSites2.html, ChinaSites3.html, and so on. Even though the page hasn’t actually changed, all of these URLs are added to the browser’s history. If the user clicks back to get to a previous slide (for example, moving from ChinaSites3.html to ChinaSites2.html), the onPopState event is triggered. It provides your code with the state information you stored earlier, withpushState(). Your job is to use that to restore the page to its proper version. In the current example, that means loading the corresponding slide:
window.onpopstate = function(e) {
if (e.state != null) {
// What's the slide number for this state?
// (You could also snip it out of the URL, using the location.href
// property, but that's more work.)
slideNumber = e.state;
// Request this slide from the web server.
goToNewSlide();
}
};
You’ll notice that this example checks to see if there is any state object before it does its work. That’s because some browsers (including Chrome) fire the onPopState event the first time a page is loaded, even if you haven’t yet called pushState().
NOTE
There’s one more new history method, but it’s used a lot less frequently—replaceState(). You can use replaceState() to change the state information that’s associated with the current page, without adding anything to the History list.
UP TO SPEED: CREATING EXTRA PAGES TO SATISFY YOUR URLS
Session history follows the original philosophy of the Web: Every piece of content should be identified with a unique, durable URL. Unfortunately, this means you’ll need to make sure that these URLs lead visitors back to the content they want, which is a much stickier affair. For example, when someone types in a request for ChinaSites3.html, you need to grab the main content fromChinaSites.html and the slide content from ChinaSites3_slide.html and somehow stick it together.
If you’re a hard-core web programmer, you can write code that runs on the web server, intercepts web requests, and carries out this assembly process on the fly. But if you don’t have serious codemaster skills, you’ll need to use a different approach.
The simplest option is to make a separate file for each URL—in other words, actually create the files ChinaSites1.html, ChinaSites2.html, ChinaSites3.html, and so on. Of course, you don’t want to duplicate the slide content in more than one place (for example, in both ChinaSites3.html and ChinaSites3_slide.html), because that would create a maintenance nightmare. Fortunately, there are two simple approaches that can simplify your life:
§ Use server-side includes. If your web server supports this technique (and most do), you can use a special coded instruction like the following:
<!--#include file="footer.html" -->
Although it looks like a comment, this tells the web server to open the file and insert its contents at that position in the markup. Using this technique, you can insert the main content and the slide content into each slide-specific page. In fact, each slide-specific web page file (ChinaSites1.html, ChinaSites2.html, and so on) will need just a few lines of markup to create a basic shell of a page.
§ Use templates in a web design tool. Some web design tools, like Adobe Dreamweaver, allow you to create web templates that can be copied to as many pages as you want. So if you create a template that has the main content and style details, you can reuse it to create all the slide-specific pages you need, quickly and easily.
Browser Compatibility for Session History
Session history has roughly the same level of support as the web workers feature. Once again, it’s pre-IE 10 versions of Internet Explorer that are most likely to cause a problem (see Table 13-2).
Table 13-2. Browser support for session history
|
IE |
FIREFOX |
CHROME |
SAFARI |
OPERA |
SAFARI IOS |
ANDROID |
|
|
Minimum version |
10 |
4 |
8 |
5 |
11.5 |
5 |
4.2 |
There are two ways you can handle a browser that doesn’t support session history. If you do nothing at all, the fancy URLs just won’t appear. This is what you get if you load the previous example in Internet Explorer—no matter what slide you load up, the URL stays fixed at ChinaSites.html. Flickr also uses this approach with its photo streams (to see an example, view http://tinyurl.com/6hnvanw with an old version of Internet Explorer).
Another choice is to trigger a full page refresh when the user loads new content on a browser that doesn’t support session history. This makes sense if providing a good, meaningful URL is more important that providing the slick experience of dynamically loaded content. However, this approach also takes more work to implement.
One easy way to do it is to enhance your navigation logic so that it performs a page redirect if necessary. In the ChinaSites.html page, that involves enhancing the goToNextSlide() function, like this:
function goToNewSlide() {
if (window.history) {
// Session history support is available.
if (req != null) {
req.open("GET", "ChinaSites" + slideNumber + "_slide" + ".html", true);
req.onreadystatechange = newSlideReceived;
req.send();
}
else {
// There was a problem. Ignore it.
}
}
else {
// There's no session history support, so direct the browser to a new page.
window.location = "ChinaSites" + slideNumber + ".html"
}
}
This code checks for session history using the window.history property. If support is there, the code downloads just the small chunk of slide data you need and loads it into the existing page. But if session support isn’t available, the code abandons this fancy approach and performs an old-school redirect to the new page.