HTML5: The Missing Manual Matthew MacDonald (2013)
Part 3. Building Web Apps
Chapter 12. Communicating with the Web Server
When you started your journey with HTML5, you began with its markup-based features, like semantic elements, web forms, and video. But as you progressed through this book, you slowly shifted your focus to web page programming and the JavaScript-powered parts of HTML5. Now you’re about to dip your toe into a few HTML5 features that take web page programming to the next level. They not only require JavaScript code but also some server-side code—code that runs on the web server, in whatever server-side programming language you want to use.
Adding a server-side language to the mix poses a bit of a problem. On one hand, it doesn’t matter what server-side programming language you pick, as long as it can work with pure HTML5 pages (and they all can). On the other hand, there’s not much point in getting knee-deep learning a technology that you don’t plan to use or that your web host doesn’t support. And there’s no shortage of good choices for server-side programming, including PHP, ASP.NET, Ruby, Java, Python, and many more.
This chapter tackles the problem by using a small amount of very simple server-side code. It’s just enough to round out each example and to let you test the HTML5 part of the equation (that’s the JavaScript code in the web page). In your websites, you’ll need to change and extend this server-side code, depending on what you’re trying to accomplish and which server-side language you prefer.
So what are these features that require server-side interaction? HTML5 provides two new ways for your web pages to talk with a web server. The first feature is server-sent events, which lets the web server call up your page and pass it information at periodic intervals. The second feature is the much more ambitious web sockets framework, which lets browsers and web servers carry out a freewheeling back-and-forth conversation. But before you explore either of these, you’ll start with a review of the current-day tool for web server communication: the XMLHttpRequest object.
NOTE
Server-sent events and web sockets seem deceptively simple. It’s easy enough to learn how they work and to create a very basic example (as in this chapter). But building on that to create something that will work securely and reliably on a professional website, and provide the sort of features you want, is an entirely different matter. The bottom line is this: To implement these features in your website, you’ll probably need to get the help of someone with serious server-side programming experience.
Sending Messages to the Web Server
Before you can understand the new server communication features in HTML5, you need to understand the situation that web pages were in before. That means exploring XMLHttpRequest—the indispensable JavaScript object that lets a web page talk to its web server. If you already know about XMLHttpRequest (and are using it in your own pages), feel free to skip over this section. But if your web page design career so far consists of more traditional web pages, keep reading to get the essentials.
UP TO SPEED: THE HISTORY OF WEB SERVER INVOLVEMENT
In the early days of the Web, communicating with a web server was a straightforward and unexciting affair. A browser would simply ask for a web page, and the web server would send it back. That was that.
A little bit later, software companies began to get clever. They devised web server tools that could get in between the first step (requesting the page) and the second step (sending the page), by running some sort of code on the web server. The idea was to change the page dynamically—for example, by inserting a block of markup in the middle of it. Sometimes code would even create a new page from scratch—for example, by reading a record in a database and generating a tailor-made HTML page with product details.
And then web developers got even more ambitious, and wanted to build pages that were more interactive. The server-side programming tools could handle this, with a bit of juggling, as long as the web browser was willing to refresh the page. For example, if you wanted to add a product to your ecommerce shopping cart, you would click a button that would submit the current page (using web forms; see Chapter 4) and ask for a new one. The web server could then send back the same page or a different page (for example, one that shows the contents of the shopping cart). This strategy was wildly successful, and just a bit clunky.
Then web developers got ambitious again. They wanted a way to build slick web applications (like email programs) without constantly posting back the page and regenerating everything from scratch. The solution was a set of techniques that are sometimes called Ajax, but almost always revolve around a special JavaScript object called XMLHttpRequest. This object lets web pages contact the web server, send some data, and get a response, without posting or refreshing anything. That clears the way for JavaScript to handle every aspect of the page experience, including updating content. It also makes web pages seem slicker and more responsive.
The XMLHttpRequest Object
The chief tool that lets a web page speak to a web server is the XMLHttpRequest object. The XMLHttpRequest object was originally created by Microsoft to improve the web version of its Outlook email program, but it steadily spread to every modern browser. Today, it’s a fundamental part of most modern web applications.
The basic idea behind XMLHttpRequest is that it lets your JavaScript code make a web request on its own, whenever you need some more data. This web request takes place asynchronously, which means the web page stays responsive even while the request is under way. In fact, the visitor never knows that there’s a web request taking place behind the scenes (unless you add a message or some sort of progress indicator to your page).
The XMLHttpRequest object is the perfect tool when you need to get some sort of data from the web server. Here are some examples:
§ Data that’s stored on the web server. This information might be in a file or, more commonly, a database. For example, you might want a product or customer record.
§ Data that only the web server can calculate. For example, you might have a piece of server-side code that performs a complex calculation. You could try to perform the same calculation in JavaScript, but that might not be appropriate—for example, JavaScript might not have the mathematical smarts you need, or it might not have access to some of the data the calculation involves. Or your code might be super-sensitive, meaning you need to hide it from prying eyes or potential tamperers. Or the calculation might be so intensive that it’s unlikely a desktop computer could calculate it as quickly as a high-powered web server. In all these cases, it makes sense to do the calculation on the web server.
§ Data that’s on someone else’s web server. Your web page can’t access someone else’s web server directly. However, you can call a program on your web server (using XMLHttpRequest), and that program can then call the other web server, get the data, and return it to you.
The best way to really understand XMLHttpRequest is to start playing with it. In the following sections, you’ll see two straightforward examples.
Asking the Web Server a Question
Figure 12-1 shows a web page that asks the web server to perform a straightforward mathematical calculation. The message is sent through the XMLHttpRequest object.
Before you can create this page, you need some sort of server-side script that will run, process the information you send it (in this case, that’s the two typed-in numbers), and then send back a result. This trick is possible in every server-side programming language ever created (after all,sending back a single scrap of text is easier than sending a complete HTML document). This example uses a PHP script, largely because PHP is relatively simple and supported by almost all web hosting companies.
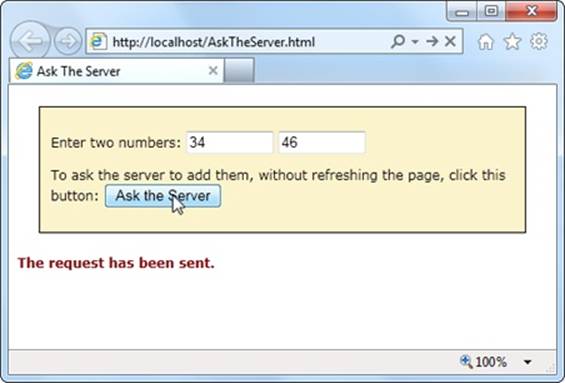
Figure 12-1. Click the “Ask the Server” button, and this web page creates an XMLHttpRequest object and sends the two numbers to the web server. The web server runs a simple script to calculate the answer and then returns the result (shown later, in Figure 12-2).
Creating the Script
To create a PHP script, you first create a new text file. Inside that text file, you start by adding the funny-looking codes shown here, which delineate the beginning and end of your script:
<?php
// (Code goes here.)
?>
In this example the code is straightforward. Here’s the complete script:
<?php
$num1 = $_GET['number1'];
$num2 = $_GET['number2'];
$sum = $num1 + $num2
echo($sum);
?>
Even if you aren’t a PHP expert, you probably have a pretty good idea of what this code does just by looking over it. The first order of business is to retrieve the two numbers that the web page will have sent:
$num1 = $_GET['number1'];
$num2 = $_GET['number2'];
The $ symbol indicates a variable, so this code creates a variable named $num1 and another named $num2. To set the variables, the code pulls a piece of information out of a built-in collection named $_GET. The $_GET collection holds all the information from the URL that was used to request the script.
For example, if you place the PHP script in a file named WebCalculator.php, a web request might look like this:
http://www.magicXMLHttpRequest.com/WebCalculator.php?number1=34&number2=46
Here, the URL holds two pieces of information tacked onto the end, in the URL section known as the query string. (The code is easier to interpret with a bit of extra spacing for illustrative purposes, as shown here. In real life, browsers don’t let you use URLs with spaces.)
http://www.magicXMLHttpRequest.com/WebCalculator.php ? number1=34 &
number2=46
First, the query string has a value named number1, which is set to 34. Next is a value named number2, which is set to 46. The question mark (?) denotes the start of the query string, and the ampersand symbol (&) separates each value from the one that precedes it (unless you have just a single value in your query string, in which case you don’t need it). When the PHP engine fires up, it retrieves the query string values and stuffs them into the $_GET collection so your code can access them. (Most server-side programming platforms support a model like this. For example, in Microsoft’s ASP.NET framework, you can access the same information through the Request.QueryString collection.)
NOTE
HTML veterans know that there are two ways to send data to a web server—through the query string, or by posting it in the body of the request message. With either technique, the data is encoded in the same way, and it’s accessed in the web server in a similar way as well. For example, PHP has a $_POST collection that provides access to any posted data.
Once the PHP script has the two numbers in hand, it simply needs to add them together and store the result in a new variable. Here, that new variable is named $sum:
$sum = $num1 + $num2
The last step is to send the result back to the web page that’s making the request. You could package the result in a scrap of HTML markup or even some data-friendly XML. But that’s overkill in this example, since plain text does just fine. But no matter what you choose, sending the data back is simply a matter of using PHP’s echo command:
echo($sum);
Altogether, this script contains a mere four lines of PHP code. However, it’s enough to establish the basic pattern: The web page asks a question, and the web server returns a result.
NOTE
Could you write this page entirely in JavaScript, so that it performs its work in the browser, with no web server request? Of course. But the actual calculation isn’t important. The PHP script shown here is an example that stands in for any server task you want to perform. You could make the PHP script as complex as you like, but the basic exchange of data will stay the same.
Calling the Web Server
The second step is to build the page that uses the PHP script, with the help of XMLHttpRequest. It all starts out simply enough. At the beginning of the script code, an XMLHttpRequest object is created, so it will be available in all your functions:
var req = new XMLHttpRequest();
When the user clicks the “Ask the Server” button, it calls a function named askServer():
<div>
<p>Enter two numbers:
<input id="number1" type="number">
<input id="number2" type="number">
</p>
<p>To ask the server to add them, without refreshing the page, click
this button:<button onclick="askServer()">Ask the Server
</button>
</p>
</div>
<p id="result"></p>
Here’s where the real work takes place. The askServer() function uses the XMLHttpRequest object to make its behind-the-scenes request. First, it gathers the data it needs—two numbers, which are in the text boxes in the form:
function askServer() {
var number1 = document.getElementById("number1").value;
var number2 = document.getElementById("number2").value;
Then it uses this data to build a proper query string, using the format you saw earlier:
var dataToSend = "?number1=" + number1 + "&number2=" + number2;
Now it’s ready to prepare the request. The open() method of the XMLHttpRequest starts you out. It takes the type of HTTP operation (GET or POST), the URL you’re using to make your request, and a true or false value that tells the browser whether to do its work asynchronously:
req.open("GET", "WebCalculator.php" + dataToSend, true);
NOTE
Web experts agree unanimously—the final argument of the open() method should always be true, which enables asynchronous use. That’s because no website is completely reliable, and a synchronous request (a request that forces your code to stop and wait) could crash your whole web page while it’s waiting for a response.
Before actually sending the request, you need to make sure you have a function wired up to the event of the XMLHttpRequest object’s onReadyStateChange event. This event is triggered when the server sends back any information, including the final response when its work is done. Here, the code links the event to another function in the page, named handleServerResponse():
req.onreadystatechange = handleServerResponse;
Now you can start the process with the XMLHttpRequest object’s send() method. Just remember, your code carries on without any delay. The only way to read the response is through the onReadyStateChange event, which may be triggered later on:
req.send();
document.getElementById("result").innerHTML = "The request has been sent.";
}
When the onReadyStateChange event occurs and you receive a response, you need to immediately check two XMLHttpRequest properties. First, you need to look at readyState, a number that travels from 0 to 4 as the request is initialized (1), sent (2), partially received (3), and then complete (4). Unless readyState is 4, there’s no point continuing. Next, you need to look at status, which provides the HTTP status code. Here, you’re looking for a result of 200, which indicates that everything is OK. You’ll get a different value if you attempt to request a page that’s not allowed (401), wasn’t found (404), has moved (302), or is too busy (503), among many others. (See www.addedbytes.com/for-beginners/http-status-codes for a full list.)
Here’s how the current example checks for these two details:
function handleServerResponse() {
if ((req.readyState == 4) && (req.status == 200)) {
If those criteria are met, you can retrieve the result from the responseText property. In this case, the response is the new sum. The code then displays the answer on the page (Figure 12-2):
var result = req.responseText;
document.getElementById("result").innerHTML = "The answer is: " +
result + ".";
}
}
The XMLHttpRequest object doesn’t make any assumptions about the type of data you’re requesting. The name of the object has XML in it because it was originally designed with XML data in mind, simply because XML is a convenient, logical package for parceling up structured information. However, XMLHttpRequest is also used with requests for simple text (as in this example), JSON data (Storing Objects), HTML (as in the next example), and XML. In fact, non-XML uses are now more common than XML uses, so don’t let the object name fool you.
TIP
You need to put your web pages on a test web server before you can use any server-side code, including PHP scripts. To run the example pages in this chapter without the frustration, visit the try-out site at http://prosetech.com/html5.
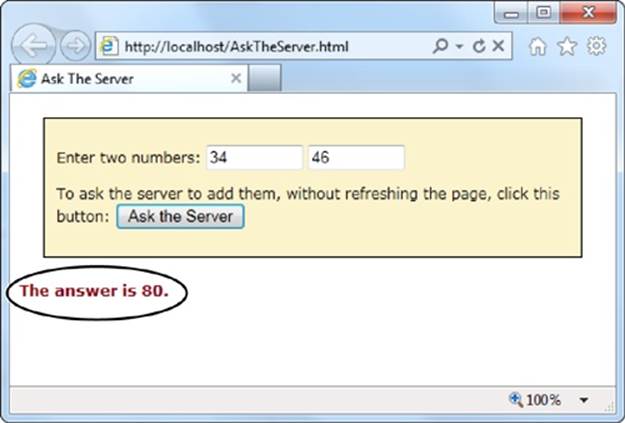
Figure 12-2. The web server has returned a response, triggering a JavaScript function, which changed the page.
Getting New Content
Another scenario where XMLHttpRequest comes in handy is loading new HTML content into a page. For example, a news article might contain multiple pictures but show just one at a time. You click a button, and some JavaScript fetches the content for the next picture and inserts it in the page. Or a page might use the same technique to show the slides in a top-five or top-10 list. Figure 12-3 shows a slideshow example that shows a series of captioned pictures that accompany an article.
There are a number of reasons to use a design like the one shown in Figure 12-3. Done skillfully, this technique can be a great way to tame huge amounts of content, so it’s readily available but not immediately overwhelming. (In less capable hands, it’s just a desperate attempt to boost page views by forcing readers to make multiple requests to get all the content they want.)
The best way to design this sort of page is with the XMLHttpRequest object. That way, the page can request new content and update the page without triggering a full refresh. And full refreshes are bad, because they download extra data, cause the page to flicker, and scroll the user back to the top. All of these details seem minor, but they make the difference between a website that feels slick and seamless, and one that seems hopelessly clunky and out of date.
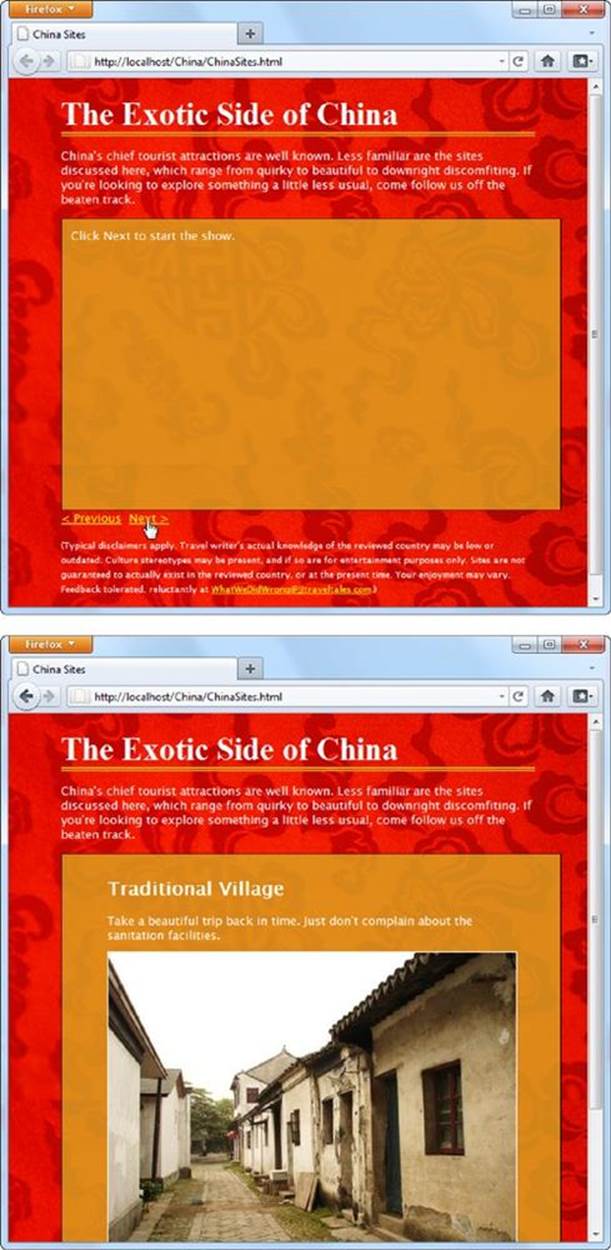
Figure 12-3. This page splits its content into separate slides. Click the Previous or Next link to load in a new slide, with different text content and a new picture. To make this work, the page uses the XMLHttpRequest object to request the new content as it’s needed.
To build the example in Figure 12-3, you first need to carve out a spot for the dynamic content. Here it’s a <div> element that creates a golden box and has two links underneath:
<div id="slide">Click Next to start the show.</div>
<a onclick="return previousSlide()" href="#">< Previous</a>
<a onclick="return nextSlide()" href="#">Next ></a>
The links call previousSlide() or nextSlide(), depending on whether the visitor is traveling forward or backward in the list of sites. Both functions increment a counter that starts at 0, moves up to 5, and then loops back to 1. Here’s the code for the nextSlide() function:
var slideNumber = 0;
function nextSlide() {
// Move the slide index ahead.
if (slideNumber == 5) {
slideNumber = 1;
} else {
slideNumber += 1;
}
// Call another function that shows the slide.
goToNewSlide();
// Make sure the link doesn't actually do anything (like attempt
// to navigate to a new page).
return false;
}
And here's the very similar code for previousSlide():
function previousSlide() {
if (slideNumber == 1) {
slideNumber = 5;
} else {
slideNumber -= 1;
}
goToNewSlide();
return false;
}
Both functions rely on another function, goToNewSlide(), which does the real work. It uses XMLHttpRequest to contact the web server and ask for the new chunk of data.
The real question: Where does the ChinaSites.html page get its data from? Sophisticated examples might call some sort of web service or PHP script. The new content could be generated on the fly or pulled out of a database. But this example uses a low-tech solution that works on any web server—it looks for a file with a specific name. For example, the file with the first slide is named ChinaSites1_slide.html, the file with the second is ChinaSites2_slide.html, and so on. Each file contains a scrap of HTML markup (not an entire page). For example, here’s the content inChinaSites5_slide.html:
<figure>
<h2>Wishing Tree</h2>
<figcaption>Make a wish and toss a red ribbon up into the branches
of this tree. If it sticks, good fortune may await.</figcaption>
<img src="wishing_tree.jpg">
</figure>
Now that you know where the data is stored, it’s easy enough to create an XMLHttpRequest that grabs the right file. A simple line of code can generate the right file name using the current counter value. Here’s the goToNewSlide() function that does it:
var req = new XMLHttpRequest();
function goToNewSlide() {
if (req != null) {
// Prepare a request for the file with the slide data.
req.open("GET", "ChinaSites" + slideNumber + "_slide" + ".html", true);
// Set the function that will handle the slide data.
req.onreadystatechange = newSlideReceived;
// Send the request.
req.send();
}
}
The last step is to copy the retrieved data in the <div> that represents the current slide:
function newSlideReceived() {
if ((req.readyState == 4) && (req.status == 200)) {
document.getElementById("slide").innerHTML = req.responseText;
}
}
TIP
To give this example a bit more pizzazz, you could create a transition effect. For example, the new picture could fade into view while the old one fades out of sight. All you need to do is alter the opacity property, either with a JavaScript timer (A Basic Animation) or a CSS3 transition (Triggering Transitions with JavaScript). This is one of the advantages of dynamic pages that use XMLHttpRequest—they can control exactly how new content is presented.
This isn’t the last you’ll see of this example. In Chapter 13 (The HTML5 Solution: Session History), you’ll use HTML5’s history management to manage the web page’s URL so that the URL changes to match the currently displayed slide. But for now, it’s time to move on to two new ways to communicate with the web server.
NOTE
If you’re using the popular jQuery JavaScript toolkit, you probably won’t use XMLHttpRequest directly. Instead, you’ll use jQuery methods, like jQuery.ajax(), which use XMLHttpRequest behind the scenes. The underlying technology remains the same, but jQuery streamlines the process.
Server-Sent Events
The XMLHttpRequest object lets your web page ask the web server a question and get an immediate answer. It’s a one-for-one exchange—once the web server provides its response, the interaction is over. There’s no way for the web server to wait a few minutes and send another message with an update.
However, there are some types of web pages that could use a longer-term web server relationship. For example, think of a stock quote on Google Finance (www.google.com/finance). When you leave that page open on your desktop, you’ll see regular price updates appear automatically. Another example is a news ticker like the one at www.bbc.co.uk/news. Linger here, and you’ll find that the list of headlines is updated throughout the day. You’ll find similar magic bringing new messages into the inbox of any web-based mail program, like Microsoft Outlook.com (www.outlook.com).
In all these examples, the web page is using a technique called polling. Periodically (say, every few minutes), the page checks the web server for new data. To implement this sort of design, you use JavaScript’s setInterval() or setTimeout() functions (see A Basic Animation), which trigger your code after a set amount of time.
Polling is a reasonable solution, but it’s sometimes inefficient. In many cases, it means calling the web server and setting up a new connection, only to find out that there’s no new data. Multiply this by hundreds or thousands of people using your website at once, and it can add up to an unnecessary strain on your web server.
One possible solution is server-sent events, which let a web page hold an open connection to the web server. The web server can send new messages at any time, and there’s no need to continually disconnect, reconnect, and run the same server script from scratch. (Unless you want to, because server-sent events also support polling.) Best of all, the server-sent event system is simple to use, works on most web hosts, and is sturdily reliable. However, it’s relatively new, as Table 12-1 attests, with no support in current versions of Internet Explorer.
NOTE
If you’re looking for a polyfill that can fake server-sent event support using polling, there are several candidates worth checking out at http://tinyurl.com/polyfills.
Table 12-1. Browser support for server-sent events
|
IE |
FIREFOX |
CHROME |
SAFARI |
OPERA |
SAFARI IOS |
CHROME FOR ANDROID |
|
|
Minimum version |
- |
6 |
6 |
5 |
11 |
4 |
29 |
In the following sections, you’ll put together a simple example that demonstrates server-sent events.
The Message Format
Unlike XMLHttpRequest, the server-sent events standard doesn’t let you send just any data. Instead, you need to follow a simple but specific format. Every message must start with the text data: followed by the actual message text and the new line character sequence, which is represented as \n\n in many programming languages, including PHP.
Here’s an example of what a line of message text looks like as it travels over the Internet:
data: The web server has sent you this message.\n\n
It’s also acceptable to split a message over multiple lines. You use the end-of-line character sequence, which is often represented as a single \n. This makes it easier to send complex data:
data: The web server has sent you this message.\n
data: Hope you enjoy it.\n\n
You’ll notice that you still need to start each line with data: and you still need to end the entire message with \n\n.
You could even use this technique to send JSON-encoded data (Storing Objects), which would allow the web page to convert the text into an object in a single step:
data: {\n
data: "messageType": "statusUpdate",\n
data: "messageData": "Work in Progress"\n
data: }\n\n
Along with the message data, the web server can send a unique ID value (using the prefix id:) and a connection timeout (using retry:):
id: 495\n
retry: 15000\n
data: The web server has sent you this message.\n\n
Your web page pays attention to the message data, but it doesn’t deal with the ID and connection timeout information. Instead, the browser uses these details. For example, after reading the above message, the browser knows that if it loses it connection to the web server, it should attempt to reconnect after 15,000 milliseconds (15 seconds). It should also send the ID number 495 to help the web server identify it.
NOTE
A web page can lose its connection to the web server for a variety of reasons, including a brief network outage or a proxy server that times out while waiting for data. If possible, the browser will attempt to reopen the connection automatically after waiting a default 3 seconds.
Sending Messages with a Server Script
Now that you know the message format, it’s trivially easy to create some server-side code that spits it out. Once again, it makes sense to turn to PHP to build a straightforward example that virtually all web hosts will support. Figure 12-4 shows a page that gets regular messages from the server. In this case, the messages are simple—they contain the current time on the web server.
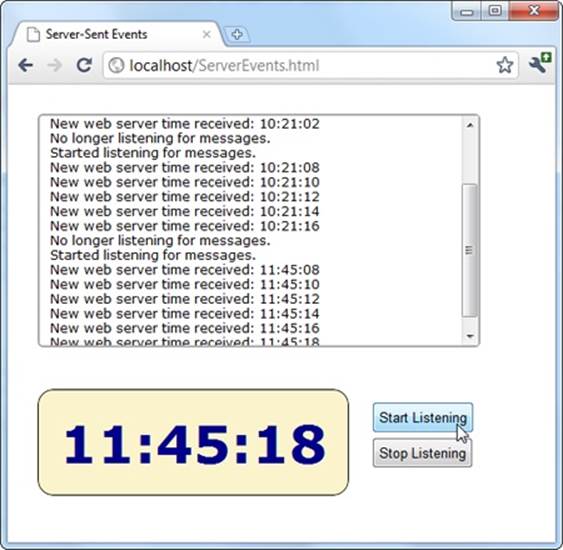
Figure 12-4. When this page is listening, it receives a steady stream of messages from the web server—approximately one every 2 seconds. Each message is added to the scrolling list at the top, and the time display at the bottom shows the time received from the most recent message.
NOTE
The web server time is a single piece of information that’s continuously updated. That makes it a good candidate for creating a simple server-side event demonstration like this one. However, in a real example, you’re more likely to send something more valuable, like the most up-to-date headlines for a news ticker.
The server-side part of this example simply reports the time, in regular intervals. Here’s the complete script, at a glance:
<?php
header('Content-Type: text/event-stream');
header('Cache-Control: no-cache');
ob_end_clean();
// Start a loop that goes forever.
do {
// Get the current time.
$currentTime = date('h:i:s', time());
// Send it in a message.
echo 'data: ' . $currentTime . PHP_EOL;
echo PHP_EOL;
flush();
// Wait 2 seconds before creating a new message.
sleep(2);
} while(true);
?>
The beginning of this script sets two important headers. First, it sets the MIME type to text/event-stream, which is required by the server-side event standard:
header('Content-Type: text/event-stream');
Then, it tells the web server (and any proxy servers) to turn off web caching. Otherwise, it’s possible that some of the time messages will arrive in uneven batches:
header('Cache-Control: no-cache');
There’s one more step needed to turn off PHP’s built-in buffering system. This way, the data your PHP script returns is delivered to the browser immediately.
ob_end_clean();
The rest of the code is wrapped in a loop that continues indefinitely (or at least until the client disappears). Each time the loop runs, it uses the built-in time() function to grab the current time (in the format hours:minutes:seconds), and it stuffs that into a variable:
$currentTime = date('h:i:s', time());
Next, the loop uses this information to build a message in the proper format, which it sends using PHP’s trusty echo command. In this example, the message is single line, starting with data: and followed by the time. It ends with the constant PHP_EOL (for PHP end of line), which is a shorthand way of referring to the \n character sequence described earlier:
echo 'data: ' . $currentTime . PHP_EOL;
echo PHP_EOL;
NOTE
If this looks funny, it’s probably because PHP uses the dot operator (.) to join strings. It works in the same way as the + operator with text in JavaScript, only there’s no way to accidentally confuse it with numeric addition.
The flush() function makes sure the data is sent right away, rather than buffered until the PHP code is complete. Finally, the code uses the sleep() function to stall itself for 2 seconds before continuing with a new pass through the loop.
TIP
If you wait a long time between messages, your connection might be cut off by a proxy server (a server that sits between your web server and the client’s computer, directing traffic). To avoid this behavior, you can send a comment message every 15 seconds or so, which is simply a colon (:) with no text.
Processing Messages in a Web Page
The web page that listens to these messages is even simpler. Here’s all the markup from the <body> section, which divides the pages into three <div> sections—one for the message list, one for the big time display, and one for the clickable buttons that start the whole process:
<div id="messageLog"></div>
<div id="timeDisplay"></div>
<div id="controls">
<button onclick="startListening()">Start Listening</button><br>
<button onclick="stopListening()">Stop Listening</button>
</div>
When the page loads, it looks up these messageLog and timeDisplay elements and stores them in global variables so they’ll be easy to access in all your functions:
var messageLog;
var timeDisplay;
window.onload = function() {
messageLog = document.getElementById("messageLog");
timeDisplay = document.getElementById("timeDisplay");
};
The magic happens when someone clicks the Start Listening button. At this point, the code creates a new EventSource object, supplying the URL of the server-side resource that’s going to send the messages. (In this example, that’s a PHP script named TimeEvents.php.) It then attaches a function to the onMessage event, which fires whenever the page receives a message.
var source;
function startListening() {
source = new EventSource("TimeEvents.php");
source.onmessage = receiveMessage;
messageLog.innerHTML += "<br>" + "Started listening for messages.";
}
TIP
To check for server-side event support, you can test if the window.EventSource property exists. If it doesn’t, you’ll need to use your own fallback approach. For example, you could use the XMLHttpRequest object to make periodic calls to the web server to get data.
When receiveMessage is triggered, you can get the message from the data property of the event object. In this example, the data adds a new message in the message list and updates the large clock:
function receiveMessage(e) {
messageLog.innerHTML += "<br>" + "New web server time received: " + e.data;
timeDisplay.innerHTML = e.data;
}
You’ll notice that once the message is delivered to your page, the pesky data: and /n/n details are stripped out, leaving you with just the content you want.
Finally, a page can choose to stop listening for server events at any time by calling the close() method of the EventSource object. It works like this:
function stopListening() {
source.close();
messageLog.innerHTML += "<br>" + "No longer listening for messages.";
}
Polling with Server-Side Events
The previous example used server-side events in the simplest way. The page makes a request, the connection stays open, and the server sends information periodically. The web browser may need to reconnect (which it will do automatically), but only if there’s a problem with the connection or if it decides to temporarily stop the communication for other reasons (for example, low battery in a mobile device).
But what happens if the server script ends and the web server closes the connection? Interestingly, even though no accident occurred, and even though the server deliberately broke off communication, the web page still automatically reopens the connection (after waiting the default 3 seconds) and requests the script again, starting it over from scratch.
You can use this behavior to your advantage. For example, imagine that you create a relatively short server script that sends just one message. Now your web page acts like it’s using polling (Server-Sent Events), by periodically reestablishing the connection. The only difference is that the web server tells the browser how often it should check for new information. In a page that uses traditional polling, this detail is built into your JavaScript code.
The following script uses a hybrid approach. It stays connected (and sends periodic messages) for 1 minute. Then it recommends that the browser try again in 2 minutes and closes the connection:
<?php
header('Content-Type: text/event-stream');
header('Cache-Control: no-cache');
ob_end_clean();
// Tell the browser to wait 2 minutes before reconnecting,
// when the connection is closed.
echo 'retry: 120000' . PHP_EOL;
// Store the start time.
$startTime = time();
do {
// Send a message.
$currentTime = date('h:i:s', time());
echo 'data: ' . $currentTime . PHP_EOL;
echo PHP_EOL;
flush();
// If a minute has passed, end this script.
if ((time() - $startTime) > 60) {
die();
}
// Wait 5 seconds, and send a new message.
sleep(5);
} while(true);
?>
Now when you run the page, you’ll get a minute’s worth of regular updates, followed by a 2-minute pause (Figure 12-5). In a more sophisticated example, you might have the web server send a special message to the web browser that tells it there’s no reason to wait for updated data (say, the stock markets have closed for the day). At this point, the web page could call the close() method of the EventSource object.
NOTE
With complex server scripts, the web browser’s automatic reconnection feature may not work out so well. For example, the connection may have been cut off while the web server was in the middle of a specific task. In this case, your web server code can send each client an ID (as described on The Message Format), which will be sent back to the server when the browser reconnects. However, it’s up to your server-side code to generate a suitable ID, keep track of what task each ID is doing (for example, by storing some information in a database), and then attempt to pick up where you left off. All of these steps can be highly challenging if you lack super-black-belt coding skills.
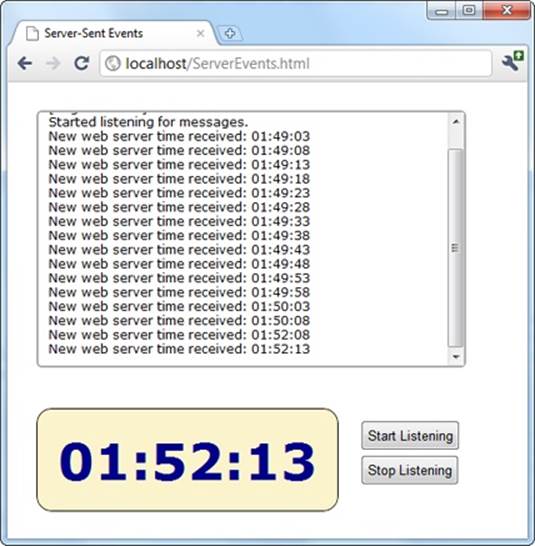
Figure 12-5. This page uses a combination of streaming (for a batch of messages, over the course of a minute), followed by polling (for the next 2 minutes). This sort of design might make sense as a way to minimize web server traffic, depending on how often your data is updated and how important it is to have up-to-the-minute data.
Web Sockets
Server-sent events are a perfect tool if you want to receive a series of messages from the web server. But the communication is completely one-sided. There’s no way for the browser to respond, or to enter into a more complex dialogue.
If you’re creating a web application where the browser and the web server need to have a serious conversation, your best bet (without adopting Flash) is to use the XMLHttpRequest object. Depending on the sort of application you’re building, this approach may work fine. However, there are stumbling blocks aplenty. First, the XMLHttpRequest object doesn’t work well if you need to send multiple messages back and forth very quickly (like you might in a chat application, for example). Second, there’s no way to associate one call with the next, so every time the web page makes a request, the web server needs to sort out who you are all over again. If your web page needs to make a chain of related requests, your web server code can become frightfully complicated.
There’s a solution to these problems, but it’s not for the faint of heart. That solution is web sockets, a standard that lets a browser hold open a connection to a web server and exchange back-and-forth messages for as long as it wants. The web sockets feature has generated plenty of excitement, and has gained reasonably good browser support (see Table 12-2), although Internet Explorer users need IE 10 or later to use it.
Table 12-2. Browser support for web sockets
|
IE |
FIREFOX |
CHROME |
SAFARI |
OPERA |
SAFARI IOS |
CHROME FOR ANDROID |
|
|
Minimum version |
10 |
11 |
14 |
6 |
12.1 |
6 |
29 |
TIP
Web sockets are a bit finicky. For example, you could run a browser that supports them but still run into trouble because of restrictive computer network settings, a firewall, or the antivirus software on your computer. If you’re in doubt about whether your computer can use web sockets, go to http://websocketstest.com. This site attempts to connect to a test server and provides a handy single-page report that tells you whether web sockets are working.
Before you use web sockets, you need to understand two important points. First, web sockets are a specialized tool. They make great sense in a chat application, a massive multiplayer game, or a peer-to-peer collaboration tool. They allow new types of applications, but they probably don’t make sense in most of today’s JavaScript-powered web applications (like ecommerce websites).
Second, web socket solutions can be fiendishly complex. The web page JavaScript is simple enough. But to build the server-side application, you’ll need mad programming skills, including a good grasp of multithreading and networking concepts, which are beyond the scope of this book. However, if some other company, service, or hotshot programmer has already created a web socket server for you to use, you won’t have too much trouble talking to it using a bit of HTML5-enhanced JavaScript. You’ll learn how in the following sections.
The Web Socket Server
In order to use web sockets, you need to run a program (called a web socket server) on the web server for your website. This program has the responsibility of coordinating everyone’s communication, and once it’s launched it keeps running indefinitely.
NOTE
Many web hosts won’t allow long-running programs, unless you pay for a dedicated server (a web server that’s allocated to your website, and no one else’s). If you’re using ordinary shared hosting, you probably can’t create web pages that use the web socket feature. Even if you can manage to launch a web socket server that keeps running, your web host will probably detect it and shut it down.
To give you an idea of the scope of a web socket server, consider some of the tasks a web socket server needs to manage:
§ Set the message “vocabulary”—in other words, decide what types of messages are valid and what they mean.
§ Keep a list of all the currently connected clients.
§ Detect errors sending messages to clients, and stop trying to contact them if they don’t seem to be there anymore.
§ Deal with any in-memory data—that is, data that all web clients might access—safely. Subtle issues abound—for example, consider what happens if one client is trying to join the party while another is leaving, and the connection details for both are stored in the same in-memory object.
Most developers will never create a server-side program that uses sockets; it’s simply not worth the considerable effort. The easiest approach is to install someone else’s socket server and design custom web pages that use it. Because the JavaScript part of the web socket standard is easy to use, this method won’t pose a problem. Another option is to pick up someone else’s socket server code and then customize it to get the exact behavior you want. Right now, plenty of projects are developing usable web socket servers (many of them free and open source) for a variety of tasks, in a variety of server-side programming languages. You’ll get the details on Web Socket Examples on the Web.
A Simple Web Socket Client
From the web page’s point of view, the web socket feature is easy to understand and use. The first step is to create the WebSocket object. When you do, you supply a URL that looks something like this:
var socket = new WebSocket("ws://localhost/socketServer.php");
The URL starts with ws://, which is the new system for identifying web socket connections. However, the URL still leads to a web application on a server (in this case, the script named socketServer.php). The web socket standard also supports URLs that start with wss://, which indicates that you want to use a secure, encrypted connection (just as you do when requesting a web page that starts with https:// instead of http://).
NOTE
Web sockets aren’t limited to contacting their home web server. A web page can open a socket connection to a web socket server that’s running on another web server, without any extra work.
Simply creating a new WebSocket object causes your page to attempt to connect to the server. You deal with what happens next using one of the WebSocket’s four events: onOpen (when the connection is first established), onError (when there’s a problem), onClose (when the connection is closed), and onMessage (when the page receives a message from the server):
socket.onopen = connectionOpen;
socket.onmessage = messageReceived;
socket.onerror = errorOccurred;
socket.onopen = connectionClosed;
For example, if the connection has succeeded, it makes sense to send a confirmation message. To deliver a message, you use the WebSocket object’s send() method, which takes ordinary text. Here’s a function that handles the onOpen event and sends a message:
function connectionOpen() {
socket.send("UserName:jerryCradivo23@gmail.com");
}
Presumably, the web server will receive this and then send a new message back.
You can use the onError and onClose events to notify the web page user. However, the most important event (by far) is the onMessage event that fires every time the web server delivers new data. Once again, the JavaScript that’s involved is perfectly understandable—you simply grab the text of the message from the data property:
function messageReceived(e) {
alert("You received a message: " + e.data);
}
If the web page decides its work is done, it can easily close the connection with the close() method:
socket.close();
However, once the socket is closed, you can’t send any more messages unless you recreate the socket object. Recreating the socket object is the same as creating it for the first time—you use the new keyword, supply the URL, and attach all your event handlers. If you plan to be connecting and disconnecting frequently, you’ll want to move this code into separate functions so you can call on them when needed.
As you can see, the WebSocket object is surprisingly simple. In fact, you’ve now covered all the methods and events it offers. Based on this overview, you can see that using someone else’s socket server is a breeze—you just need to know what messages to send and what messages to expect.
NOTE
A lot of behind-the-scenes work takes place to make a web socket connection work. First, the web page makes contact using the well-worn HTTP standard. Then it needs to “upgrade” its connection to a web socket connection that allows unfettered back-and-forth communication. At this point, you could run into a problem if a proxy server sits between your computer and the web server (for example, on a typical company network). The proxy server may refuse to go along with the plan and drop the connection. You can deal with this problem by detecting the failed connection (through the WebSocket’s onError event) and falling back on one of the socket polyfills described on GitHub at http://tinyurl.com/polyfills. They use tricks like polling to simulate a web socket connection as well as possible.
Web Socket Examples on the Web
Curious to try out web sockets for yourself? There are plenty of places on the web where you can fire up an example.
For starters, try www.websocket.org/echo.html, which features the most basic web socket server imaginable: You send a message, and it echoes the same message back to you (Figure 12-6). While this isn’t very glamorous, it lets you exercise all the features of the WebSocket class. In fact, you can create your own pages that talk to the echo server, which is a good way to practice your web socket skills. As long as you use the correct socket server URL (in this case, that’s ws://echo.websocket.org), the code works perfectly well. It doesn’t matter whether the web page is on a different web domain or it’s stored on your computer’s hard drive.
It’s easy to understand the JavaScript that powers a page like this. The first task is to create the socket when the page first loads and wire up all its events:
var socket;
window.onload = function () {
connect();
}
function connect() {
socket = new WebSocket("ws://echo.websocket.org")
// Listen to all the web socket events.
socket.onopen = connectionOpen;
socket.onmessage = messageReceived;
socket.onerror = errorOccurred;
socket.onopen = connectionClosed;
}
Here, the socket-connection code is moved into its own dedicated function, named connect(), so you can call it whenever you need it. That way, you can connect and disconnect as you please. You’ve already seen the disconnection code:
function connect() {
socket.close();
}
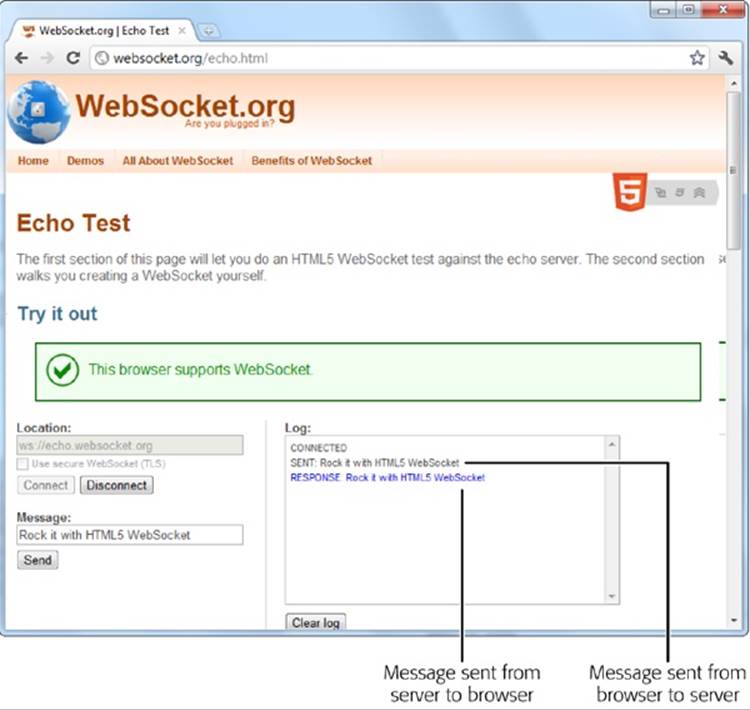
Figure 12-6. A web socket server that simply repeats what you say won’t win any prizes in software innovation. However, it does let you see how easy it is to talk to a ready-made web socket server.
Incidentally, you can check the readyState property of your socket to determine whether it’s open and ready to go (in which case readyState is 1), not yet established (0), in the process of closing (2), or closed (3).
The echo server has no real vocabulary to speak of. It treats all messages the same, as bits of text that it simply sends back to the page. Because of this simplicity, it’s a simple job to send the current contents of a text box when the user clicks a button:
function sendMessage() {
// Get the message data.
var message = messageBox.value;
// Send the message through the socket.
socket.send(message);
// Let the user know what just happened.
messageLog.innerHTML += "<br>" + "Sent: " + message;
}
And it’s just as easy to take the messages you receive and insert them into the page:
function messageReceived(e) {
messageLog.innerHTML += "<br>" + "Message received: " + e.data;
}
NOTE
If you want to look at a slightly more exciting example, check out the chat free-for-all at http://html5demos.com/web-socket. Log in to this simple web socket server, send a message, and everyone gets it immediately.
POWER USERS’ CLINIC: WEB SOCKET SERVERS
To actually run a practical example of your own, you need a web socket server that your web page can talk to. And although the server code that’s required—which is several dozen lines at least—is beyond the scope of this chapter, there are plenty of places where you can find a test server. Here are some of your many options:
§ PHP. This simple and slightly crude code project gives you a good starting point for building a web socket server with PHP. Get it at http://code.google.com/p/phpwebsocket.
§ Ruby. There’s more than one sample web socket server for Ruby, but this one that uses the Event-Machine model is popular. See http://github.com/igrigorik/em-websocket.
§ Python. This Apache extension adds a socket server using Python. Get it at http://code.google.com/p/pywebsocket.
§ .NET. Simple, it isn’t. But this comprehensive project contains a complete web socket server that uses Microsoft’s .NET platform and the C# language. Download it from http://superwebsocket.codeplex.com.
§ Java. Similar in scope to the .NET project described above, this web socket server is pure Java. See http://jwebsocket.org.
§ node.JS. Depending on who you ask, node.JS—a web server that runs JavaScript code—is either the next big thing in the making or an overgrown testing tool. Either way, you can get a web socket server that runs on it from http://github.com/miksago/node-websocket-server.
§ Kaazing. Unlike the other items in this list, Kaazing doesn’t provide the code for a web socket server. Instead, it provides a mature web socket server that you can license for your website. Adventurous developers who want to go it alone won’t be interested. But it may make sense for less ambitious websites, especially considering the built-in fallback support in its client libraries (which try the HTML5 web socket standard first, then attempt to use Flash, or finally fall back to pure JavaScript polling). Learn more at http://kaazing.com/products/html5-edition.html.
All materials on the site are licensed Creative Commons Attribution-Sharealike 3.0 Unported CC BY-SA 3.0 & GNU Free Documentation License (GFDL)
If you are the copyright holder of any material contained on our site and intend to remove it, please contact our site administrator for approval.
© 2016-2026 All site design rights belong to S.Y.A.