Pro HTML5 Accessibility: Building an Inclusive Web (2012)
C H A P T E R 6
Images, Rich Media, Audio, and Video in HTML5
In this chapter, you'll see how to make images and other rich media accessible using HTML5. This chapter will cover some tried and trusted ways of making graphical content accessible, as well as some new techniques you might not be familiar with. I'll cover other elements used to handle rich media, such as <audio> and <video>, and discuss how the new elements can be used to present audio and visual content in a way that is accessible.
In terms of “new” features in HTML5, nothing is quite as conspicuous as the new <canvas> element. <canvas> is a 2D drawing API that can be used to create some very sophisticated, graphically rich animations natively within the browser. However, <canvas> content does have some particular accessibility challenges. I'll discuss these later on.
![]() Note While <canvas> has the advantage of bringing graphically rich content natively to the browser, without the need for third-party plugins á la Flash. Flash content isn't going away as it still has uses that might make it more suitable, from an accessibility perspective, than <canvas>.
Note While <canvas> has the advantage of bringing graphically rich content natively to the browser, without the need for third-party plugins á la Flash. Flash content isn't going away as it still has uses that might make it more suitable, from an accessibility perspective, than <canvas>.
Making Images Accessible
The Web is primarily a visual medium. Although this is true, you have seen that the Web is also a surprising and diverse medium where many users, regardless of ability, can access the same content and have similar experiences online. It is universal in the scope of its reach in that it supports multiple modes of access regardless of ability.
This is great. Sometimes, however, you need to pay attention to the limitations that some users experience and do your best by correctly applying markup and principles of good design.
Making images accessible is generally one of the first things a web developer will learn how to do when trying to make content accessible. It is pretty easy to learn how to do it, so as an introductory accessibility technique, it has a rather low barrier to entry. However, it is often very easy either to do it incorrectly or to misunderstand what it is you are trying to achieve in the first place.
Meet the Poster Child of Accessible Web Design: The alt Attribute
The alt attribute (or @alt) of the <image> element is what you will mostly use to provide a text alternative to graphical content. This takes the following general form:
<img src="someimage.png" alt="Some text that provides an equivalent description or functional
replacement for the image" />
So in terms of an overall structure, it's pretty simple. You have the <img> element, followed by its source attribute and the @alt. The order of attributes doesn't really matter—you can have the @alt first and then the src, if you prefer. The @alt is explicitly associated with the image using the preceding method, and it represents a complete structure. Adding the alternate text in the method shown also has absolutely no impact on the visual presentation of the image.
![]() Note The <img> element also has a title (@title) attribute; however, using the @alt attribute is generally a more robust and bulletproof way of providing alternate text. For longer descriptions, there is also the @longdesc attribute. I'll say more about these later.
Note The <img> element also has a title (@title) attribute; however, using the @alt attribute is generally a more robust and bulletproof way of providing alternate text. For longer descriptions, there is also the @longdesc attribute. I'll say more about these later.
How Screen Readers Handle @alt Text
When a screen reader gives focus to an <img> element in a webpage, the screen reader firstly announces to the user that it has encountered an image. It does this often literally by speaking the word “image.” If the image has an @alt value it will announce whatever text string the author has included within it. That's it.
![]() Note @alt is really well supported in most graphical and text browsers, as well as in most commonly used screen-reading technology out there.
Note @alt is really well supported in most graphical and text browsers, as well as in most commonly used screen-reading technology out there.
If there isn't an @alt description, the screen reader will look to see if there is a title attribute and might (I say might for a reason) announce that. If neither are present, the screen reader will then try to look for any other supporting information it can find, usually by announcing the contents of the src attribute, which might give the user some indication of the type of image or the purpose of the image.
![]() Note When the image isn't available or couldn't be loaded, most browsers display a bounding box where the image should be and also display the alternate text. Text-only browsers, such as Lynx, read the alternate text by default. For details, seehttp://en.wikipedia.org/wiki/Lynx_(web_browser).
Note When the image isn't available or couldn't be loaded, most browsers display a bounding box where the image should be and also display the alternate text. Text-only browsers, such as Lynx, read the alternate text by default. For details, seehttp://en.wikipedia.org/wiki/Lynx_(web_browser).
For example, consider an image that is a button and has no alternate text or @title information. If the file is called button.png or some other name that describes its function, such as logon.png or logout.png, this can help the screen-reader user to get an idea of what the purpose of the button actually is, even though the @alt text is missing.
![]() Note In general, the situation I describe where there is no @alt or @title will trigger what's called heuristic evaluation. A heuristic is rule of thumb or method of evaluation. Heuristics are at the heart of all sorts of things, from basic logic you might learn when studying computer science, to more advanced algorithm design. Don't be put off by the term, just think of “a set of rules.” Sometimes screen readers also look at surrounding HTML content in the webpage when heuristic evaluation is triggered.
Note In general, the situation I describe where there is no @alt or @title will trigger what's called heuristic evaluation. A heuristic is rule of thumb or method of evaluation. Heuristics are at the heart of all sorts of things, from basic logic you might learn when studying computer science, to more advanced algorithm design. Don't be put off by the term, just think of “a set of rules.” Sometimes screen readers also look at surrounding HTML content in the webpage when heuristic evaluation is triggered.
On the other hand, if your image has what I call a scary URL, which is one that goes along the lines of some random string that a Content Management System (CMS) might use (12090_IMG.jpg or something equally opaque), the screen reader will not be able to make any sense of it. This will cause problems for the end user because when a missing @alt triggers screen-reader heuristics, the software just won't be able to make any sense of the content. It will output the name of the file, but if that is a long, random text string, it's no use.
![]() Remember A good default behavior is to give your images descriptive names, even if you are actually applying alternate text descriptions.
Remember A good default behavior is to give your images descriptive names, even if you are actually applying alternate text descriptions.
@alt Drawbacks
So it seems as though the @alt attribute is pretty robust and bulletproof and all that good stuff. Are there any drawbacks? Well, an argument has been made that the alternative text might be useful to “everyone” and should be available to users beyond those who are either using text-only browsers or have vision impairments and are using screen readers. Although this sounds plausible and inclusive, I don't really agree with this view. There are cases where alternate text descriptions can aid comprehension, for sure, but in general I feel that for what it does and the groups it serves, it does well. This discussion is a long and nuanced one that I don't need to go into here. It suffices to say, in the HTML5 working group the argument goes along the lines of “You are discriminating against sighted people by not giving them access to the @alt values.” To me, this kind of thinking is spurious at best. A markup language that serves the needs of 80 percent of its users well is better than one that serves 100 percent of its users poorly.
Another potential issue is the limitation on the size of the @alt text. Technically, it's around 100 characters, but in general, it's hard to get a definitive answer on just how long “too long” is. If you know from the start that your image will need a longer description, there are other methods (such as @longest and WAI-ARIA aria-labeledby) that can be used instead.
What Should I Describe?
One of the big challenges a developer faces when trying to provide alternate textual descriptions for images is the question of exactly what to describe. This is a big question and one that, unfortunately, is usually moot. In truth, the area is a little fuzzy. This might not be very reassuring, but there you are. Some screen-reader users do want everything to be described, as much as possible, and others are happy as long as they get the information they need at any given time. More importantly, when a site has a specific function, many users are happy just to be able to complete the task they set out to do. They don't care if the graphics are described as long as they aren't missing any core functionality.
What I'll do here is outline some things I've learned over the years from doing user testing and expert evaluation of web sites. This has often involved working with blind screen-reader users, as well as users of other assistive technology (AT) devices. I will present the current thinking on accessibility best practices when it comes to HTML5, images, and other rich media. Then I'll leave you to make up your own mind!
Describing Content: Don't Overdo It
One of the first pieces of wisdom I'd like to impart to you is “Don't overdo it.” Sometimes less really is more, and most of the time, enough is actually enough. Initially, you might feel the need to describe, well, everything! This is often very impractical and time consuming. Learning to keep your text descriptions relevant and concise is an art that will take some time for you to master. With experience, you'll discover what sorts of details are unimportant and better left out of textual descriptions of images.
Leave It Out (Part 1)
If you can truly put yourself in an AT user's shoes, you might find there are situations in which you actually don't want an image (or images) explained. In fact, for the best AT user experience, you might want the images to be completely hidden, or ignored. So before I go any further, I should answer the questions I think I hear you asking: “How do I leave an image out? And how do I not include it in what the screen reader outputs?” You can do this in a couple of different ways, and they are pretty easy to grasp.
When a webpage loads, all of the HTML items in the document are loaded into the DOM. Obviously, this includes all of the graphics and other rich media. If you want a graphic to be presented visually but you want the screen reader to ignore it, one of the most tried and tested ways is to give the image a null @alt value. This takes the following form:
<img src="someimage.png" alt="" />
![]() Note The @alt has no blank space between the quotes.
Note The @alt has no blank space between the quotes.
This acts as a flag to the screen reader, telling it to ignore the image. The screen reader will act as if the image isn't there at all and will not inform the user about its presence.
“Why would I want to do that?” you might be wondering. Well, if an image is purely presentational, such as an inline graphic that you use to style a button, you will want to hide it from the screen reader because it adds nothing to the AT user's experience. When you think about it, there are many images you really don't need to describe at all because they add no value. So the null @alt is a powerful friend. Use it wisely, and you'll find that it really helps to remove unnecessary clutter from your pages.
Leave It Out (Part 2)
Another way to hide images that have no informational value for a screen-reader user is to use Cascading Style Sheets (CSS). This declaration takes the following form:
p {background-image:url('some_bullet.png');}
In the example, you can replace the element name of p with whatever element you want to apply the image to. The URL, part points to where you've stored the image you want to use. By default, this property also repeats, so you might want to set a no-repeat as shown here:
p {background-image:url('some_bullet.png');
background-repeat: no-repeat;
}
If you want the image to repeat vertically on the X access, your code will take the following form:
body
{background-image:url('some_repeatinggraphic.png');
background-image: repeat-x;
}
To repeat the image horizontally on the Y access, use this:
Body
{background-image:url('some_repeatinggraphic.png');
background-image: repeat-y;
}
You might find that you want to use some inline CSS to present your images, so you will probably use some <div> or inline <span> elements to act as a hook for the image.
Leave It Out (Part 3)
Another way to hide an image from the screen reader is to use the WAI-ARIA role, role="presentation". This take the form shown here:
<img src="some_prettybutsemanticallyuselessgraphic.jpg" role="presentation" />
However, I really don't recommend doing this—partly because the previous two approaches are better supported by current and older user agents, and partly because using role="presentation" has other accessibility-related uses in user agents that support it (which most of the latest screen readers and browsers do). For example, the technique is really useful where you want the parent element semantics to be ignored by the screen reader, but not the children. For example, you might need to use a table to contain a widget and control layout. Using role=“presentation” allows the screen reader to ignore the table that is used to contain the widget controls, but it allows the screen reader to access the child semantics (the contents of the widget). A neat trick.
Also, please don't shoot me or send winged monkeys to attack my home—using tables for layout is not that much of an accessibility no-no.
Different Kinds of Images
I've just outlined some useful techniques for hiding content from screen readers.
So how do you write good alternate text? Where do you start? Well, first, there are a few different kinds of images to consider:
· A visually rich image: Generally speaking, photos, drawings, and paintings are very rich in visual content. For example, consider a pretty natural landscape or a family photo. It can be hard to truly capture these kinds of images or the spirit of them.
· Graphs and Charts: These can be wide and varied but can contain quite detailed information, as well as illustrating relationships between various kinds of data.
· An image of text: This can be an image that contains useful information that is important the user doesn't miss, or that just contains styled text.
· A functional Image: This is an image that has a specific function, such as a graphic used for a button.
· A decorative image: An image that has no real functional aspect but is useful only as a purely visual embellishment, such as a nicely styled bullet list.
· Icons: An image that is used as a visual clue and is part of a link.
As you can see, the use cases for alternate descriptions are numerous and varied, and this list isn't even exhaustive! Before we go any further, we'll take a look at some of the new elements in HTML5 that can be used in conjunction with @alt and other methods for describing images.
What's New in HTML5 for Describing Images?
The two new kids on the block for describing or annotating a wide range of diagrams, photos, and illustrations are <figure> and <figcaption>. They are used in such a way as to create a single unit that can be pointed to or referenced from another part of the webpage. It's like pointing to an ID within your CSS.
The figure acts as a container for some image, graph, illustration, or photo, and it takes this basic form:
<figure>
<img src="someimage.jpg" />
</figure>
OK, so that's how it looks without any clothes on. To dress it up and make it suitable for going out, you have to complete the structure by adding a <figcaption>. This is basically a caption for the figure.
The basic structure for adding a <figcaption> to a <figure> is shown here:
<figure>
<img src=”someimage.jpg”>
<figcaption>Some useful description of the image</figcaption>
</figure>
So the <figcaption> is just that: a caption for contents of the <figure>.
More detailed examples will follow. I just want to outline the basic structure and get across the point that the use of <figure> in HTML5 has an interesting advantage over the use of @alt because it represents a complete structured unit that can be referenced on a page.
Describing an Image with ARIA-describedby
Using the aria-describedby attribute is another method of referencing an element within the page that provides a suitable description of the image.
This can be a very useful method because there are often times when there is existing text in a page that would perfectly describe an image. Rather than duplicate this text, the idea is that you reference the ID of the image programmatically. You thereby create an explicit connection between the image and the textual description.
For example, consider the following images. The first (Figure 6-1) is a photo of my father-in-law, Fiachra, and myself on top of Ireland's highest mountain, Carrauntoohil, in County Kerry. The photo was taken during the summer of 2011.

Figure 6-1. Josh (right) with his father-in-law, Fiachra (left), atop Mount Carrauntoohil, County Kerry
If this photo were to be embedded within a HTML5 blog that talks about our climb, the code for the blog post before adding the image and the description would look something like that shown in Listing 6-1.
Listing 6-1. An HTML5 Blog Post
<!DOCTYPE HTML>
<html>
<head>
<meta Charset="UTF-8">
<head>
<title> my big climb this summer (2011)</title>
</head>
<body>
<article>
<section>
<h1>Climbing the three highest mountains in Ireland</h1>
<p>During the summer of 2011, Fiachra, Dara and I climbed the three highest mountains in
Ireland. This was a stupendous day where the challenge of summiting the three peaks of
Carrauntoohil, Beenkeragh & Caher was too much to resist!</p>
</section>
<section>
<h2> The Coomloughra Horseshoe</h2>
<p>The three peaks are ringed within in a large horseshoe shaped valley and present a very
challenging climb even for experienced hill walkers. We also had fantastic views of the
MacGillycuddy Reeks from Beenkeragh's high, exposed summit. The weather was also very
beautiful and we totally lucked out as we couldn't have asked for a clearer day to see the
spectacular views. We walked over Beenkeragh Ridge with its yawning drops and navigated the
equally spectacular Caher Ridge, with the Black Valley far below, before descending from Caher
into Coomloughra Glen.</p>
</section>
<section>
<h2>Remember to bring water</h2>
<p>It was a very hot day and after 4 hours or so we ran out of water! Fortunately we came across some fresh mountain streams in the Coomloughra Glen and could top up our water bottles
[…]</p>
</section>
</article>
</body>
</html>
If I was to then include the image in the first paragraph and I wanted to point to the paragraph as a textual description, I could do so by coding it as shown in Listing 6-2.
Listing 6-2. Including an Image in the Post
<!DOCTYPE HTML>
<html>
<head>
<meta Charset="UTF-8">
<title> My big climb this summer (2011)</title>
</head>
<body>
<article>
<section>
<h1>Climbing the three highest mountains in Ireland</h1>
<p id="text1"> <img src="fiachra_josh_kerry2011.jpg" aria-describedby="text2" />During the
summer of 2011, Fiachra, Dara and I climbed the three highest mountains in Ireland. This was a
stupendous day where the challenge of summiting the three peaks of Carrauntoohil, Beenkeragh &
Caher was too much to resist!</p>
</section>
<section>
<h2> The Coomloughra Horseshoe</h2>
<p id="text2">The three peaks are ringed within in a large horseshoe shaped valley and present
a very challenging climb even for experienced hill walkers. We had fantastic views of the
MacGillycuddy Reeks from Beenkeragh's high, exposed summit. The weather was also very
beautiful and we totally lucked out as we couldn't have asked for a clearer day to see the
spectacular views. We walked over Beenkeragh Ridge with its yawning drops and navigated the
equally spectacular Caher Ridge, with the Black Valley far below, before descending from Caher
into Coomloughra Glen.</p>
</section>
<section><h2>Remember to bring water</h2>
<p id="text3">It was a very hot day and after 4 hours or so we ran out of water! Fortunately
we came across some fresh mountain streams in the Coomloughra Glen and could top up our water
bottles […]</p>
</section>
</article>
</body>
</html>
So what's happening in the code just shown? I'm using the inline text of the blog post to describe the image by pointing to the content of block via their IDs. In this case, I gave each of the <p> elements an ID of text1, text2, and text3, respectively. For user agents that support aria-describedby (and as mentioned in the earlier chapter, many of the new screen readers do, and those that don't will just ignore it), creating a programmatic connection between the image and the description means that the description is announced as soon as the image has focus. Additionally, there are ways you can enhance this basic behavior—for example, by adding an @alt textual description to the image and combining it with the aria-describedby code. This would look something like the code in Listing 6-3. (I'm leaving out the first and last part of the blog post code.)
Listing 6-3. Enhancing the Image Description
<section>
<h1>Climbing the three highest mountains in Ireland</h1>
<p id="text1"> <img src="fiachra_josh_kerry2011.jpg" alt="Photo of Fiachra and Josh
standing under the huge cross (over three men high) at the top of Carrauntoohil" aria-
describedby="text2" />During the summer of 2011, Fiachra, Dara and I climbed the three
highest mountains in Ireland. This was a stupendous day where the challenge of summiting the
three peaks of Carrauntoohil, Beenkeragh & Caher was too much to resist!</p>
</section>
<section>
<h2> The Coomloughra Horseshoe</h2>
<p id=”text2”>This three peaks are ringed within in a large horseshoe shaped valley and
present a very challenging climb even for experienced hill walkers. We had fantastic views of
the MacGillycuddy Reeks from Beenkeragh's high, exposed summit. The weather was also very
beautiful and we totally lucked out as we couldn't have asked for a clearer day to see the
spectacular views. We walked over Beenkeragh Ridge with its yawning drops and navigated the
equally spectacular Caher Ridge, with the Black Valley far below, before descending from Caher
into Coomloughra Glen.</p>
</section>
What's interesting about this approach is that it introduces an element of backward compatibility for older screen readers that don't support aria-describedby but will understand the contents of the @alt. Approaching your markup like this is generally a good idea because it covers both user agents that support a new feature as well as those that don't.
Screen readers that do support both will actually get a rich textual equivalent via the contents of the @alt and aria-describedby elements; however, realize that the aria-describedby technique currently can be used only for in-page descriptions. So you cannot reference a description on a different webpage.
![]() Note When a screen-reader user tires of the description or has heard enough, he can just tab away from the item being described and move to the next one, or he can use his screen reader's navigation features. So it's not like the user has to listen to stuff he doesn't want to—the output from the screen reader will end as soon as the user moves to a new HTML element.
Note When a screen-reader user tires of the description or has heard enough, he can just tab away from the item being described and move to the next one, or he can use his screen reader's navigation features. So it's not like the user has to listen to stuff he doesn't want to—the output from the screen reader will end as soon as the user moves to a new HTML element.
Which Method Should I Use?
In general, this decision comes down to context of use and what the best kind of description would be. The mechanics might vary as you are looking at various ways to provide the description, but there are factors you need to consider carefully before you storm ahead. To take the examples or types of images you looked at earlier a little further, we are talking about situations (in order of the items listed previously) where we have the following:
· A visually rich image: When an image such as a photo, drawing, or painting has a lot of visual information, @alt or <figcaption> can be used as a label that briefly describes the image or gives an overview of it.
· Graphs and charts: When the image is a graph or chart that is rich in informative data, @alt can be used as a descriptive label that gives a brief overview of the thrust of the graph. Graphs and charts are perfect situations where other methods such as aria-describedby can be really useful.
· An image of text: A graphic designer might have used a groovy font that is not found on the user's machine (common in web design, and referred to as image replacement techniques), and the @alt is used as a replacement for the image. The @alt should clearly state what the styled text is.
· A functional image: An image might have a function, so you use the @alt to describe what it does and not what it looks like.
· A decorative image: An image might be totally decorative and not need an alternate description, and it would need to be hidden from AT.
· Icons: An image might be used as a visual clue or icon and be a part of a link.
The following are some examples to support the preceding use cases.
Type 1: Describing a Visually Rich Image
Images often contain a lot of visually rich information. It can be very difficult to describe them in a clinical or exact manner. Although you know the old maxim “A picture says more than a thousand words,” is the opposite also true? Do you need a thousand words to describe the picture? There might be some truth in that.
Although WCAG 2.0 suggests that the text you provide for an image should be an equivalent or should replace the image, in practice this often isn't possible. At least not in the sense that the description can really do the picture justice. Imagine trying to provide a textual description for a painting such as the “Mona Lisa.”
You could say, “Here is a graceful-looking lady with a faint smile,” but you could also say, “Here is a graceful-looking lady with a faint frown.” Depending on who you ask, both are correct, and both are on the terse end of the descriptive spectrum.
So often, even when an image is rather rich, you might be better off not trying to capture every detail, but instead trying to capture the spirit of an image by using @alt or <figcaption> in a fun way. For example, consider the photo shown in Figure 6-2, which I think is funny because the subjects could be brothers, except one of them is purple.

Figure 6-2. My little boy and his owl buddy
This is a photo of my son, Ruairí, and his rather large (and bright purple) owl friend, Minerva. If I used <figure> and <figcaption> with a combination of @alt, the following might be suitable as an alternate description that goes some way toward what I'm talking about:
<figure>
<img src="Ruairi.jpg alt="Ruairi smiling and playing on the couch at home with his large purple Owl friend Minerva. There is a likeness in their big Moon heads!" />
<figcaption> Two friends together, Ruairi and Minerva</figcaption>
</figure>
What I have done here is use the @alt as a way of providing a longer kind of description and the <figcaption> as just that—a caption for the image. They can be used to support each other and provide various types of informational descriptions of the image.
The point I'm making it that sometimes it's just plain hard to write a useful textual description of an image. You might be better off linking to a separate description of the image or using aria-describedby, as discussed previously, to point to a description in the document itself.
OK, so the preceding photo is pretty simple (though very cute!). Let's consider some more complex images and how you might go about providing textual descriptions using HTML5.
Consider the following couple of images from my past life as an artist. (I mean a past life in the “I used to do this” sense, not in the “previous incarnations” sense—but that's a discussion for another day I guess!)
Figure 6-3 is a black-and-white, pen-and-ink drawing called “Creation” that I did many years ago.

Figure 6-3. “Creation”
If I included that in an online gallery and wanted to describe it by giving it an alternate textual description, would I be able to do it effectively? Technically, I can give it a text description, but how do I convey its full visual impact or meaning?
I could try by doing something relatively simple, such as the following:
<figure>
<img src="josh_drawing_creation.png" alt="A large bright flaming triangle straddled by a Sun
and Moon. In the centre sits a strange symbol, and there are stars." />
<figcaption>Pen and Ink Drawing called ‘Creation’ by Joshue O Connor</figcaption>
</figure>
My @alt content very nearly reached the 100-character limit that was mentioned previously, and—let's face it—the description doesn't really do it.
I could decide to take a more verbose approach and use the aria-describedby method, as shown here:
<figure><img src="josh_drawing_creation.png" alt="A large colourful pen and ink drawing with a
cosmic theme of creation" aria-describedby="creation" /><figcaption>‘Creation by Joshue 0
Connor (1993)</figcaption></figure>
And then further within my webpage, I might include the following paragraph, to which I can assign id="creation" to. The whole thing would then look something like Listing 6-4.
Listing 6-4. Image Description Using aria-describedby
<!DOCTYPE HTML>
<html>
<head>
<meta Charset="UTF-8">
<title>Some Cosmic Artwork by Josh(2011)</title>
</head>
<body>
<article>
<section>
<h1>Sample of Pen and Ink Drawings</h1>
<p id="creation">
<figure>
<img src="josh_drawing_creation.png" alt="A large colourful pen and ink drawing with a cosmic
theme of creation" aria-describedby="creation" />
<figcaption>‘Creation’ by Joshue O Connor (1993)</figcaption>
In a past life Josh was far more interested in playing guitars, painting, and in general
larking about than he was with computers.</p>
</section>
<section>
<p> Here is some more background about his artwork for those interested […]
</p>
<p id="creation"> This drawing illustrates the mystery of creation. It shows a large flaming
triangle that holds a bright radiating sun at its apex, and a stylised smiling moon sits at
its base in opposition. At the heart of the triangle there sits an exploding planet with the
ancient Vedic symbol of creation the AUM at its heart. The image sits on a background framed
of stars and small spaceships fly by randomly in the distance.
</p>
</figure>
</section>
</article>
</body>
</html>
The example of a longer description that is found inside the HTML document is a little better. This method really does give the author a little more space to breathe, and hopefully do the image justice. Is it a suitable description, and does it convey the same visual richness of the image? You be the judge. It suffices to say, where images are more functional, it gets a little easier and providing suitable alternate text is a little less fuzzy.
Finally, my point is that you often just can't fully replace what is a visual medium with a textual description. However, you can make the user experience for a screen-reader user better. Making the experience better can also be read as “less terrible.” If you find that you just can't get your head around how to describe something, break the image down to its component parts, or find a gestalt view or overview that might help. If all fails, just give the image a null @alt value and it won't intrude on the user experience. This is a last resort, but it's better than not doing anything and triggering screen-reader heuristics, in my opinion.
Before we move to the less murky water of more functional code equivalents, just to illustrate how difficult it can be to provide meaningful descriptions, I've provided another of my drawings in Figure 6-4, “The Seed of Creation.” How would you describe this? Also, apologies to those who know some Vedic ontology—Lord Brahma should have four heads. And yes, I did have a lot of free time on my hands.

Figure 6-4. The “Seed of Creation”
![]() Note If you don't want to use either the figure or aria-describedby methods to describe the image and there is a larger textual description on the page, you can also simply use a named anchor saying, “For more on this image, go to” and link to the section of the page or, indeed, another webpage where the description can be found. This is a simple alternative.
Note If you don't want to use either the figure or aria-describedby methods to describe the image and there is a larger textual description on the page, you can also simply use a named anchor saying, “For more on this image, go to” and link to the section of the page or, indeed, another webpage where the description can be found. This is a simple alternative.
You might be wondering if you can still use @longdesc to describe complex images. At the time of writing, the longdesc attribute (or @longdesc) is obsolete and no longer part of the HTML5 specification. The @longdesc attribute was a way of providing a longer textual description of an image if needed, and it has been superseded by better techniques, such as those I previously outlined.
Use of @longdesc takes the following general form:
<p><imp src="some_complexgraphic.gif" alt="a complex image"
longdesc="complex_image_description.html" /></p>
As you can see, @longdesc was a mechanism for linking to a longer description on the current page or another page. To say it was poorly supported by browsers and AT might be overdoing it, but support certainly wasn't great. It was also little-used outside of academia. For those who did find it useful, it was useful—and I don't have a problem with retaining or improving element functionality or keeping an element in the specification if it serves a use case well, even if its application isn't entirely universal. But that's me.
It did have some advantages, however, and although ARIA is great and HTML5 has made advances in many areas, neither currently provides a fully-functional replacement for @longdesc. @longdesc has a trump card in that it can be used to reference an off-page URI, and also to provide structured content as a textual description. Unfortunately, its implementation in the browser and the resulting user experience often left a lot to be desired. However, that might have had more to do with its implementation than not needing a mechanism for a longer description. This is a hot topic in the HTML working group, and you might well find it resurfacing.
Type 2: Graphs and Charts
When the image is a graph or chart that is rich in informative data that would be difficult to get across in a simple @alt description, @alt again can be used as a kind of descriptive label. This label should give a brief overview of what the graph is aiming to portray.
![]() Remember Graphs and charts are perfect situations where methods such as using aria-describedby can be really useful, especially where the page might likely contain a more detailed overview that could be already linked with the image.
Remember Graphs and charts are perfect situations where methods such as using aria-describedby can be really useful, especially where the page might likely contain a more detailed overview that could be already linked with the image.
For example, consider Figure 6-5. It is a graph that I used when researching my MSc thesis on the various kinds of user testing and evaluation methodologies that professional practitioners of inclusive design use.
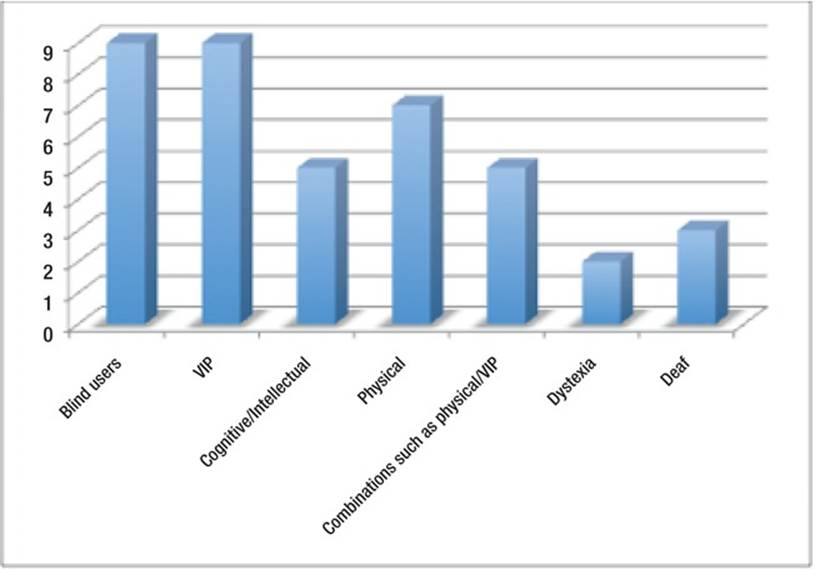
Figure 6-5. Testing and evaluation methodologies
To provide a textual description of the graph, I'd give an overview of what the graph conveys visually. Something like this:
<img src="disability_types.png" alt="Most user testing is done with blind and vision impaired
people, and the least with Deaf users and people with Dyslexia" />
Consider Figure 6-6, a chart that shows the main benefits of user testing. There is a lot of visual information to convey. In this case, using aria-describedby is certainly a better solution.
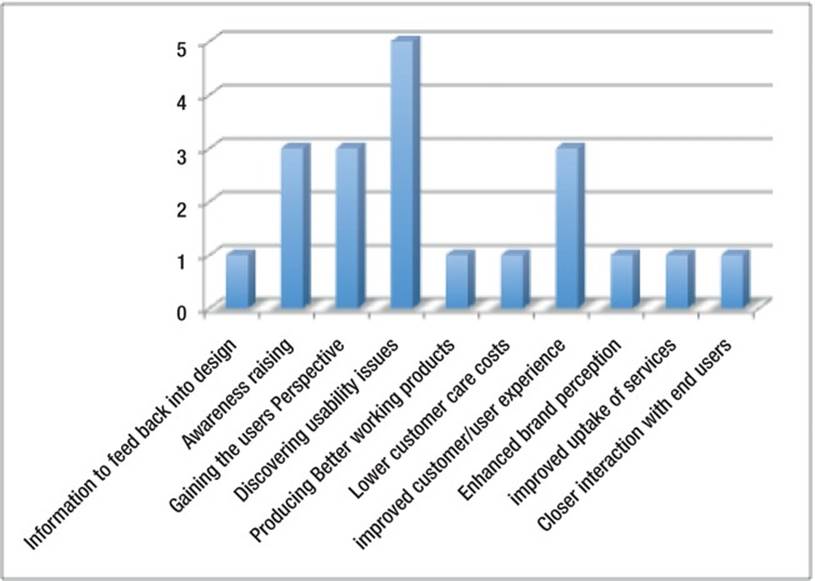
Figure 6-6. Benefits of user testing
You might find it easier to link to the description in the body of the webpage that outlines the findings in a more verbose way. Here I've used a combination of @alt (as a short label) and aria-describedby for the longer description:
<img src="benefits_of_usertesting.png" alt="Graph outlining the benefits of user testing"
aria-describedby="benefit_test" />
And then deeper in a HTML file, I could have a paragraph that provides a richer description, as well as some commentary:
<p id=“benefit_test”> From this research we can see that practitioners feel some of the main
benefit of user testing with people with disabilities is discovering usability issues with the
interface, navigation, structure, functionality and so on. User testing as an awareness
raising exercise for developers in order to first hand experience the diverse needs of people
with disabilities and therefore gaining a greater understanding of how things work from the
users perspective, is also an outcome of the research"</p>
For Figure 6-7, which looks at user test sizes, is a little easier to describe.
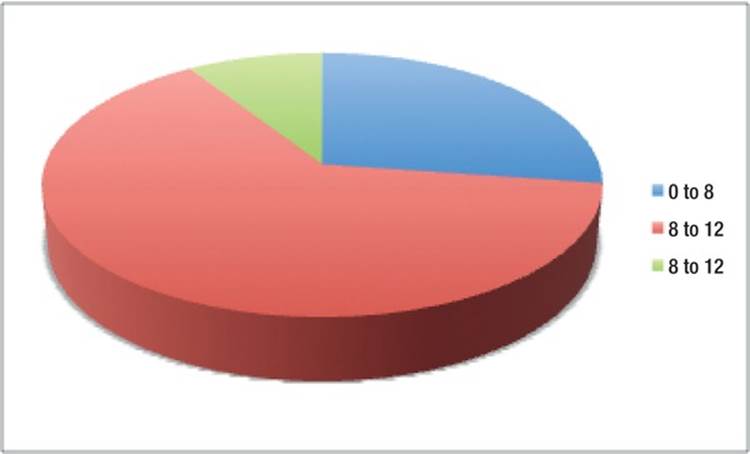
Figure 6-7. Test group sizes
<img src="test_sizes"alt="The majority of test group sizes are between 8 12 users." />
This is a terse text description, but it perfectly captures the visual information in the chart. Sometimes less is more!
Type 3: An Image of Text
Now we'll deal with the situation mentioned earlier in the chapter: a graphic designer might have used a groovy font not found on the user's machine, and where the @alt is used as a replacement text for the image. In this case, the @alt should clearly state what the styled text is.
For example, Figure 6-8 could be used as a graphical header for a light-box gallery or collection of images related to guitars, where a designer has a particularly stylized font that she wants to use.

Figure 6-8. A graphical header
To ensure that the image is accessible, you could mark it up as shown here:
<h1><img src="guitar_gallery.png" alt="The Guitar Gallery" /></h1>
![]() Note In most cases like this, you would just mirror the text in the image in the alternate text. The next example illustrates why this approach is important.
Note In most cases like this, you would just mirror the text in the image in the alternate text. The next example illustrates why this approach is important.
Figure 6-9 is an example of a “special offer” graphic you might see on a web site. The graphic is designed to be eye-catching and to inform the user about special offers.

Figure 6-9. Text in a graphic
You could mark up the image as follows:
<img src="guitar_special_offers.png" alt="Special Offers on all guitars. Ends this Weds" />
Without the alternate text, a nonsighted person would have no idea that the shop was having a cool sale on its guitars, or that it was only a limited time offer. There are also instances where a logo might contain some text or represent a company identity. You should then add the company name to the logo image as alternate text, rather than describing what it looks like. Suppose that Figure 6-10 were linked to the HTML5 specification.

Figure 6-10. The HTML5 logo
Rather than giving the image an alternate description along the lines of “New HTML5 logo that looks like a large orange shield, with a big 5 in the middle,” you could say something like the following:
<a><img src="html5_logo.png" alt="For more on HTML5 specification, visit the W3C website"
/></a>
This leads us nicely to the next type of image, which I touched on in the last example: the functional ones.
Type 4: A Functional Image
When an image has a specific function, you should use the @alt to describe what it does and not what it looks like.
Imagine if you saw the image in Figure 6-11 on your favourite guitar emporium web site, and the only way to access it was via a link on the image itself.

Figure 6-11. Want to win a classic guitar? Make it accessible and everyone has a chance!
To make this accessible you could mark it up as follows:
<a href="competition.html"> <img src="win_a_gibson.png" alt="Win a Classic Guitar..Click here
to enter" /></a>
![]() Note I have seen these kinds of images on some web sites, and literally the only way to enter the competition was by clicking on the link. So where there is some purpose to the link, you can describe its purpose and not what it looks like! Nothing illustrates this better than the following example.
Note I have seen these kinds of images on some web sites, and literally the only way to enter the competition was by clicking on the link. So where there is some purpose to the link, you can describe its purpose and not what it looks like! Nothing illustrates this better than the following example.

Figure 6-12. Graphic for a link to purchase a guitar
Figure 6-12 illustrates a button that the customer will use to buy a guitar. So there is no need to provide a description along the lines of
<a><img src="buy_this_guitar.png" alt="Here is a nice graphic of a Gibson Guitar stylized with
some creative Photoshop filters, and using a groovy font called Rosewood /></a>
No! You just say what its function is—literally, “Buy this Guitar.”
<img src="buy_this_guitar.png"alt="Buy this Guitar" />
There, that's better! So stick with what the button is doing. You don't even need to include text like “Click here” because that isn't necessary. The screen reader will announce to the user that the graphic is a link, and the user will know how to activate it.
Type 5: A Purely Decorative Image
An image might be totally decorative and not need an alternate description. It would need to be hidden from AT in order to not trigger screen-reader heuristics and also because it doesn't add anything to the user experience.
You do this by adding the null @alt value, which takes the form alt="" (with no space between the ""), such as in the following example:
<img src="agroovy_but_semantically_useless_graphic" alt="">
I've made this point a few times in the chapter, but I'll make it again: judicious use of the null @alt can add to the user experience because it can be used to remove a lot of webpage clutter. Even many sighted people will agree, when asked, that the graphic design of many web sites is functionally poor with superfluous clutter, or it includes little to give them the functions they need to do what they actually want! Images are often just there, occupying space and, in some cases, actually getting in the way.
In the accessibility community, there are endless discussions about which images should be described and which ones shouldn't. One person's decorative image is another person's art. It also depends on a screen-reader user's preference. Some might want a lot of extras described; others (I'd argue the majority) are happy with much of the clutter being left out.
Type 6: Icons
An image might be used as a visual clue or icon and be a part of a link. The image shouldn't actually be the active link itself, and therefore a null @alt should be used on the image, and the real URL can be used instead.
In Figure 6-13 and its companion Listing 6-5, inline images are used as icons that sit beside a real URL.
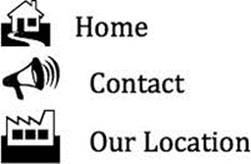
Figure 6-13. Inline images used as icons
Listing 6-5. Code for Inline Icons
<ul>
<li>
<a href="home.html">
<img src="home_icon.png" alt="" />Home</a>
</li>
<li>
<a href="contact_us.html">
<img src="contactus_icon.png" alt="" />Contact</a>
</li>
<li>
<a href="our_location.html">
<img src="_location_icon.png" alt="" />Our Location</a>
</li>
</ul>
When the screen reader gives focus to any of the listed links just shown, the image is ignored and the contents of the <a> elements are announced.
Sometimes you find a duplication of link functions where both the icon and the real link text are clickable. Try to avoid doing this, because it can be a pain for screen-reader users. As they move through a menu, they will get a duplication of the link. For a sighted person, if the icon and the URL beside it are active clickable links, the user can easily choose one or the other. The icon has the effect of visually re-enforcing the purpose of the controls or aiding comprehension in some way. This visual reinforcement is just that—visual.
![]() Tip You can find more examples of how to make images accessible using the new techniques that have been outlined here by pointing your browser at “HTML5: Techniques for providing useful text alternatives” at http://dev.w3.org/html5/alt-techniques.
Tip You can find more examples of how to make images accessible using the new techniques that have been outlined here by pointing your browser at “HTML5: Techniques for providing useful text alternatives” at http://dev.w3.org/html5/alt-techniques.
Image Color Contrast
In addition to providing meaningful and well-managed descriptions, ensuring that your images—particularly those that are images of text —have sufficient color contrast is very important. There are great tools available that will help you to do that, such as the WAT-C Colour Contrast Analyser. You can get it at www.paciellogroup.com/resources/contrast-analyser.html.
HTML5 and Accessible <video> and <audio>
One of the biggest advances in HTML5 is the ability to now play both audio and video within the browser without the need for any third-party plugins such as Flash, QuickTime, and so on. HTML5 video is a very hot topic. What impact will this have on you as a designer, and what will it mean for the user experience?
HTML5 <video>, <audio>, and You
As a designer, the new HTML5 <video> element has a lot of advantages over how we used to do video back in the day. No more fiddly code and worrying about whether to use <embed> or <object> and, I hope, a more cohesive experience as a designer. Having said that, in the technology domain “progress” often means you replace once set of fiddly with a whole new set of fiddly. Unfortunately, although HTML5 <video> is really great and offers a rich and accessible (when done right) user experience, it's still fiddly.
You still have to deal with the wide range of codecs supported by different browsers, for a start. There hasn't been a consensus on what the officially supported HTML5 codec is, so you are left with several to choose from, and you'll have to do some feature detection and clever coding to ensure that you're serving the right content to the right browser. It would be great if there were only one or two, but all browsers are jockeying for position, and each manufacturer supports (or doesn't support) its own various, preferred formats in an effort to achieve the global dominance that they crave.
![]() Note The whole “Apple doesn't support Flash” stance was/is a format war.
Note The whole “Apple doesn't support Flash” stance was/is a format war.
HTML5 <video> and Your Users
HTML5 video has the ability to create nice accessible players. This is great news. You can use the native controls or script your own. I will show you shortly how to build your own accessible <video> player.
You can also, with a little preparation and legwork, create your own audio descriptions, captions, and subtitles for your movies. We'll also look at how to do that.
What's Wrong With Flash?
Nothing is really wrong with Flash. From an accessibility perspective, it has a lot going for it, including a rich API and the ability to semantically describe most objects easily within the authoring environment. The more database-driven platform, Flex, has the ability to create some fine accessible rich Internet applications that can be used by people with vision impairments, screen-reader users, and so on. However, many developers simply don't make their Flash content accessible. The Flex application space is a little different, with many Flex components having a degree of accessibility out of the box.
The plugin is a third-party solution. It's not native to the browser, and it's proprietary. However, it doesn't look like it's going away. HTML5 isn't the only technology moving into the gaming space; Adobe has such plans for Flash via the Unreal Engine (UE3). Now you can have rich 3D gaming in the Flash environment. So the focus certainly will shift from a platform for video to a platform for rich, immersive gaming.
Accessibility Problems in Flash
With a little effort on the part of developers, a lot of Flash—in particular, Flex content—can be quite accessible if you are using a newer screen reader. However, there are some practical problems with Flash (that might be a result of it not being a “native to the browser” technology) from an accessibility perspective. Most notably is the issue of not being able to easily tab into Flash video content by using the keyboard, and also the rather perverse problem of then not being able to tab out (even if you did manage to get in). Ironically, this wasn't an issue in Internet Explorer, but it does affect most other browsers. The workaround is fiddly, because you have to bump the user back out using scripting.
Building an Accessible Player
Building an accessible <audio> or <video> player in HTML5 is a mixed bag. There are some aspects of building them that are really easy, and then others that might require a pretty good knowledge of scripting and some CSS. (The level of scripting that's needed might put some people off, but I say hang in there.) It's a pity in some ways that it is still a little tricky.
However, in many ways it isn't as daunting as it sounds. How you approach it, what you want it to do, and so on are important factors to consider and will determine the amount of effort you need to put into it to get a workable result.
First Things First: What's New in Embedded Content?
When you want to embed video in your HTML5 pages, you add the <video> element. “Is that all?” I hear you cry. “Yup,” is the reply.
The simple code shown in Listing 6-6 invokes the <video> element in the browser. Figures 6-14, 6-15, and 6-16 show the results.
Listing 6-6. Invoking the <video> Element
<!DOCTYPE HTML>
<html>
<head>
<meta Charset="UTF-8">
<title>Sample native browser controls</title>
</head>
<body>
<video controls>
</video>
</body>
</html>

Figure 6-14. Firefox native video controls

Figure 6-15. Opera native video controls

Figure 6-16. Safari native video controls
The <video> element has a few attributes you can access via the Media Elements API (coming up), but that's pretty much it.
<video> Fallback Content
Any content you include inside the <video> element is considered fallback content. This is content that is to be seen by user agents that don't support video. You should think carefully about what you include in there so that it's at least useful and not rude (in the sense of “Your browser doesn't support this,” or similarly unhelpful messages). The fallback content can be some text and a link to an alternate accessible version, or even a list of links to different file formats. It is always good to give the user a choice, but don't overwhelm them with too much information.
![]() Note What we are covering here about fallback content equally applies in principle to the <audio> element contents. Check out http://camendesign.com/code/video_for_everybody for a way to use Flash video as fallback content.
Note What we are covering here about fallback content equally applies in principle to the <audio> element contents. Check out http://camendesign.com/code/video_for_everybody for a way to use Flash video as fallback content.
The Media Elements API
So you want to have some video in your HTML5 page—you do that by adding the <video> element to the page. The common attributes of the <video> element are src, preload, autoplay, mediagroup, loop, muted, and controls, crossorigin, and poster. All of these attributes pretty much do what you would expect them to. Here are the specifics:
· src attribute: The src attribute is the source of the video or audio file. These days, media can be spread far and wide on many different servers, using the crossorigin content attribute. This attribute relates to resource sharing among different servers, and it's a way to reduce security concerns and issues with dispersed content.
· preload attribute: The preload attribute has various keywords or states associated with it. These are none, metadata, and auto. The preload attribute determines how a browser will load (or not) the source material in the background on a page load.
· poster attribute: The poster attribute is really useful to display a suitable image while awaiting some input from the user so that the user isn't looking at a blank screen, before she hits play. It literally is a kind of poster of what is to come.
· mediagroup attribute: The mediagroup attribute is used to group several audio or video elements or tracks together, which is useful for a playlist of video and audio.
· controls attribute: This is a Boolean. It tells the browser to display the native controls that is needed to control the media, such as play, stop, and so on. Without this attribute, you must provide your own scripted controls.
· autoplay, loop, and muted attributes: They do exactly what they say on the tin.
![]() Note The controls that the browser provides are often not accessible out of the box, apart from when you use the Opera browser. Opera, out of the box, provides a level of keyboard accessibility that is excellent, so you can play, pause, and vary the volume of the video or audio. Unfortunately, by most other standards, Opera is not a very screen-reader-friendly browser, but in terms of native keyboard access for HTML5 <video> and <audio> it should take a bow.
Note The controls that the browser provides are often not accessible out of the box, apart from when you use the Opera browser. Opera, out of the box, provides a level of keyboard accessibility that is excellent, so you can play, pause, and vary the volume of the video or audio. Unfortunately, by most other standards, Opera is not a very screen-reader-friendly browser, but in terms of native keyboard access for HTML5 <video> and <audio> it should take a bow.
Getting Started with <video>
Getting started with the <video> element is easy, and you can quickly start to see some results in your browser and define some basic properties using the Media Elements API attributes that I just introduced. Initial steps might resemble Listing 6-7.
Listing 6-7. Using <video>
<video width="700" height="500" preload controls poster="../images/mayer_cc_poster.jpg">
<source src="http://mirrors.creativecommons.org/movingimages/webm/MayerandBettle_480p.webm"
type="video/webm" />
<source src="http://blip.tv/file/get/Commonscreative-MayerAndBettle980.ogv" type="video/ogg"
/>
<source src="http://blip.tv/file/get/Commonscreative-MayerAndBettle715.mov"
type="video/quicktime" />
// Fallback content here
<h1>Can't access this video content?</h1><p>Please <a
href='http://creativecommons.org/videos/mayer-and-bettle'>visit the Creative Commons website
for a format that suits you</a>, or if you are happy with Flash content, <a
href="http://blip.tv/play/gpxS6Oo5g9ky" type="application/x-shockwave-flash">visit the Flash
version of the Mayer and Bettle creative Commons video</a>
</p>
</video>
You can see from the code in Listing 6-7 that you have called on three of the API attributes to perform some magic in the browser:
· preload, which preloads the content but does not play it.
· controls, which asks the browser to display the native browser controls.
· poster, which shows an image until the video is played. This is useful because, depending on your browser, you might have a blank or transparent space and you might not even see the video player controls clearly.
We also defined the dimensions of the video and asked the browser to display the native browser controls.
The sample has four different sources or types of video, depending on what browser is being used to access the content. Serving the right codec to each browser can be rather fiddly, and you need to have some video-conversion tools on hand to be able to produce the versions you need. It's relatively trivial to do this, but it can be time consuming. You arrange the different video formats and their source URL, one after the other; when the browser hits something it understands, it preloads it and plays it. If the browser doesn't understand any of the formats you provide, this triggers the display of the fallback content that is embedded between the <video> and </video> elements.
Some Encoding Tools
Here is a list of some tools you might find useful to encode your audio/video media:
· Audacity: An excellent, free, open-source audio recorder. Get it at www.audacity.sourceforge.net.
· Firefogg: A video and audio encoding application for Firefox. Get it at www.firefogg.org.
· FFmpeg2theora: A convertor for OggTheora files, which is available at http://v2v.cc/~j/ffmpeg2theora/.
· HandBrake: An open-source video transcoder. Get it at www.handbrake.fr.
Are You My Type?
The MIME type tells the browser what kind of media a URL refers to. Adding the correct MIME type to the end of the source attribute is very important. (You can see the MIME types in Listing 6-7.) Some browsers are rather strict about playing only media that is served with it, such as (Firefox and Opera).
Some of the most-used audio file formats and their corresponding MIME types are the following:
· MP3: audio/mpeg
· OGG: audio/ogg video/ogg
· MP4: audio/mp4 video/mp4
· WebM: audio/webm video/webm
· WAV: audio/wav
· AAC: audio/3gpp, audio/3gpp2, audio/mp4, audio/MP4A-LATM, audio/mpeg4-generic
Table 6-1 is an overview of the audio formats that are supported by the major browsers.
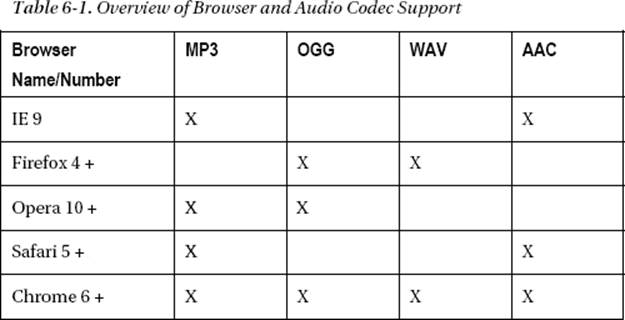
![]() Note While the codec represents the compression/decompression algorithm used to deliver media, it also represents the container for the codec.
Note While the codec represents the compression/decompression algorithm used to deliver media, it also represents the container for the codec.
Table 6-2 covers the video codecs, and which browsers support each.
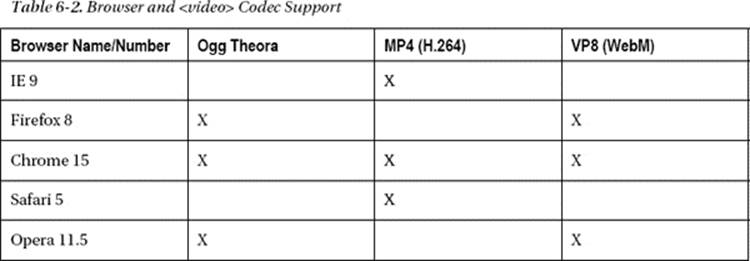
Certain containers can take more than one file format. (Remember, the codec is both the algorithm and the wrapper, or container that holds it.) You can get a good overview of containers and comparisons of them at http://en.wikipedia.org/wiki/Comparison_of_container_formats.
![]() Tip For your content to hit the most browsers with the minimum number of format creation and decoding on your part, you should serve your audio in at least two formats, such as MP4 and Ogg, and serve your video in at least the three most commonly-used formats: MP4, WebM, and Ogg.
Tip For your content to hit the most browsers with the minimum number of format creation and decoding on your part, you should serve your audio in at least two formats, such as MP4 and Ogg, and serve your video in at least the three most commonly-used formats: MP4, WebM, and Ogg.
Making Your Controls Accessible
![]() Note Some special thanks are due to my friend Gez Lemon, and to Mark Boas and Sylvia Pfeiffer for their generous help, comments, and advice when I was putting together this section.
Note Some special thanks are due to my friend Gez Lemon, and to Mark Boas and Sylvia Pfeiffer for their generous help, comments, and advice when I was putting together this section.
In some ways, you have looked at the easy bit. What you will look at next is adding your own controls and making them both keyboard accessible and accessible to screen-reader users. We'll also look at how to make jump forward and jump back features, as well as a control to mute the audio. Unfortunately, out of the box, there isn't currently a way to easily do this, so you have to script and create your own.
![]() Note The awkward bit is really the scripting, but if you keep it simple you can achieve a lot and not lose your mind in the process. Well, that might not entirely be true. Also, you can just use native HTML input controls such as buttons, and then add the scripts. This gives you a lot more accessibility out of the box, but you are a little limited in your styling options. With hand-rolled controls, you have a lot more scope to style them as you want.
Note The awkward bit is really the scripting, but if you keep it simple you can achieve a lot and not lose your mind in the process. Well, that might not entirely be true. Also, you can just use native HTML input controls such as buttons, and then add the scripts. This gives you a lot more accessibility out of the box, but you are a little limited in your styling options. With hand-rolled controls, you have a lot more scope to style them as you want.
There are lots of ways you can approach the development of controls, so we will look at a couple. Obviously, it is very important that you ensure that your player is accessible, and all of the following is presented with an eye on accessibility. Here, I created my own graphics to represent the controls and then applied the necessary JavaScript. You can also use CSS to create and style the buttons. Either way, the JavaScript will be very similar.
Figure 6-17 is a screen shot of the controls I created in Photoshop that I'll use to control my video. They are Play, Stop, Mute, and Jump forward/Jump back, respectively.

Figure 6-17. A group of hand-rolled controls for the video player
To get started, I wrapped each of the controls in a <div> element and then named it appropriately. Within each of the <div> elements, there was an image element and a suitable @alt text value to describe the control. For example, here are the button controls:
<div id="play">
<a href="#" onclick="return false();">
<img src="player/play_button.png" alt="Play Button" /></a>
</div>
In some browsers, these controls are all accessible from the keyboard, and when the screen reader gives focus to the preceding control, “Play Button” is announced. You will have to test what works and what doesn't, however.
![]() Note In this first example, I used a # to make the controls focusable via the keyboard. Use of # was traditionally to give JavaScript a focus, but as DOM scripting has progressed and toolkits like jQuery gain ground, it's not always necessary. If you do use this method, be sure to add the“return false();” statement after it because this stops the “#” URL from firing.
Note In this first example, I used a # to make the controls focusable via the keyboard. Use of # was traditionally to give JavaScript a focus, but as DOM scripting has progressed and toolkits like jQuery gain ground, it's not always necessary. If you do use this method, be sure to add the“return false();” statement after it because this stops the “#” URL from firing.
Listing 6-8 shows the code for all of the controls. Just to get started, you will deal with the Play, Stop, and Mute Audio buttons.
Listing 6-8. Implementing Video Controls
<div id="player_controls">
<div id="play">
<a href="#" onclick="return false();">
<img src="player/play_button.png" alt="Play Button" /></a>
</div>
<div id="stop">
<a href="#" onclick="return false();">
<img src="player/stop_button.png" alt="Stop Button" /></a>
</div>
<div id="mute">
<a href="#" onclick="return false();">
<img src="player/mute_button.png" alt="Mute/Unmute button" /></a>
</div>
The JavaScript you needed to make the controls focusable and to attach the methods such as Play, Stop, and Mute/Unmute is pretty straightforward. I left out the Forward and Backward controls just for the moment; we'll look at those later. Study Listing 6-9 and see if you can make sense of it.
Listing 6-9. JavaScript for Video Control Focus
<script type="text/javascript">
window.onload=function(){
var video = document.getElementById('access_video');
var play = document.getElementById('play');
var stop = document.getElementById('stop');
var mute = document.getElementById('mute');
// Script needed to attach the onclick events with the functional buttons
// **Remember** even though the event is called onclick it still works from //
// the keyboard
play.onclick = playVideo;
stop.onclick = stopVideo;
mute.onclick = muteVideo;
// function to play, pause, mute etc
function playVideo() {
video.play();
}
function stopVideo() {
video.pause();
}
// This function allows the button to be used as control to
// toggle the audio on or off
function muteVideo(objEvent) {
if (objEvent.type == keydown')
{
var iKeyCode = objEvent.keyCode;
if (iKeyCode != 13 && iKeyCode !=32) {
return true;
}
}
video.muted = !video.muted;
}
![]() Note The use of the iKeyCodes for ensuring the muteVideo function is triggered by the Enter key or spacebar only.
Note The use of the iKeyCodes for ensuring the muteVideo function is triggered by the Enter key or spacebar only.
There are also some simple CSS declarations involved to put the whole thing together:
<style>
#player_controls {
color:#999;
margin: 10px;
border:10px;
float:left;
}
</style>
Accessible HTML5 Video Player Version 1
Listing 6-10 gives the code in toto, including the code needed for the Jump Forward and Jump Back buttons.
Listing 6-10. Accessible Player V.1
<!DOCTYPE HTML>
<html>
<head>
<meta Charset="UTF-8">
<title>Working HTML 5 video player</title>
<script type="text/javascript">
window.onload=function() {
var video = document.getElementById('access_video');
var play = document.getElementById('play');
var stop = document.getElementById('stop');
var mute = document.getElementById('mute');
var forward = document.getElementById('forward');
var back = document.getElementById('back');
// Script needed to attach the onclick events with the functional buttons.
// **Remember** even though the event is called onclick it still works from the
// keyboard.
play.onclick = playVideo;
stop.onclick = stopVideo;
mute.onclick = muteVideo;
forward.onclick = jumpForward;
back.onclick = jumpBack;
// Duplicate onkeydown events for keyboard a11y
play.onkeydown = playVideo;
stop.onkeydown = stopVideo;
mute.onkeydown = muteVideo;
forward.onkeydown = jumpForward;
back.onkeydown = jumpBack;
// New function for play
function playVideo(objEvent) {
if (objEvent.type == keydown')
{
var iKeyCode = objEvent.keyCode;
if (iKeyCode != 13 && iKeyCode !=32) {
return true;
}
}
video.play();
}
// New function for pause
function stopVideo(objEvent) {
if (objEvent.type == keydown')
{
var iKeyCode = objEvent.keyCode;
if (iKeyCode != 13 && iKeyCode !=32) {
return true;
}
}
video.pause();
}
// This function allows the button to be used as a control to
// toggle the audio on or off.
function muteVideo(objEvent) {
if (objEvent.type == keydown')
{
var iKeyCode = objEvent.keyCode;
if (iKeyCode != 13 && iKeyCode !=32) {
return true;
}
}
video.muted = !video.muted;
}
// Jump forward, Jump Back
forward.onclick = jumpForward;
function jumpForward(objEvent) {
if (objEvent.type == keydown')
{
var iKeyCode = objEvent.keyCode;
if (iKeyCode != 13 && iKeyCode !=32) {
return true;
}
}
video.currentTime = video.currentTime + 15;
video.play();
return false;
}
back.onclick = jumpBack;
function jumpBack(objEvent) {
if (objEvent.type == keydown')
{
var iKeyCode = objEvent.keyCode;
if (iKeyCode != 13 && iKeyCode !=32) {
return true;
}
}
video.currentTime = video.currentTime 15;
video.play();
return false;
}
};
</script>
<style>
#access_video {
color:#999;
margin: 30px;
border:30px;
}
#player_controls {
color:#999;
margin: 10px;
border:10px;
float:left;
}
</style>
</head>
<body>
<video id="access_video" width="500" height="300" preload="none" poster="../images/mayer_cc_poster.jpg">
<source src="http://mirrors.creativecommons.org/movingimages/webm/MayerandBettle_480p.webm" type="video/webm" />
<source src="http://blip.tv/file/get/Commonscreative-MayerAndBettle980.ogv" type="video/ogg"
/>
<source src="http://blip.tv/file/get/Commonscreative-MayerAndBettle715.mov" type="video/quicktime" />
<h1>Oops cannot access this video content? Never fear!</h1>
<p>Please <a href="http://creativecommons.org/videos/mayer-and-bettle">visit the Creative Commons website for a format that suits you</a>
</p>
</video>
<div id="player_controls">
<div id="play">
<a href="#" onclick="return false();">
<img src="player/play_button.png" alt="Play" /></a>
</div>
<div id="stop">
<a href="#" onclick="return false();">
<img src="player/stop_button.png" alt="Stop" /></a>
</div>
<div id="mute">
<a href="#" onclick="return false();">
<img src="player/mute_button.png" alt="Mute/Unmute" /></a>
</div>
<div id="forward">
<a href="#" onclick="return false();">
<img src="player/forward_button.png" alt="Jump Forward" />
</a>
</div>
<div id="back" role="button" tabindex="0">
<a href="#" onclick="return false();">
<img src="player/back_button.png" alt="Jump Back" /></a>
</div>
</div>
</body>
</html>
Figure 6-18 shows a screen shot of your first version of the accessible player.
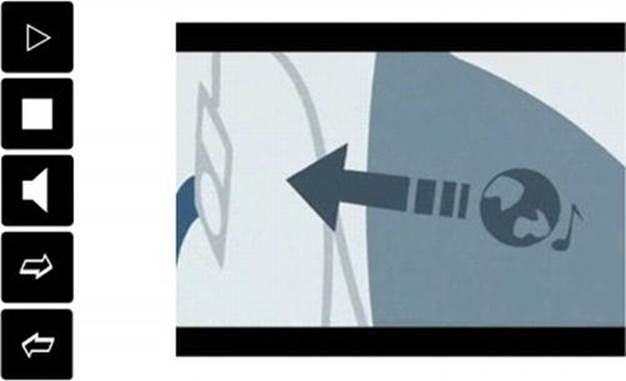
Figure 6-18. The accessible video player
OK, it's not very exciting, but it works. There are things you can do to improve things on all fronts, however.
Accessible HTML5 Video Player Version 2
There are some issues with the code in the last example. First, what happens if JavaScript is off or unavailable; is using the # a good idea? Well, in the case of explicit controls, the point is a little moot. This is because even if you want to create an unobtrusive control, doing so begs the question of what you can point to as an alternative, because the purpose of the control is to play some video. In the preceding example, there is some good provision for fallback content. If HTML5 isn't supported, the user can point his browser at the site and download content there.
There are some things you can do to improve the player. First, you can remove the empty URLs with “#”, changing them to <divs>, making them focusable from the keyboard, and adding some ARIA role attributes.
![]() Note For now the JavaScript stays the same. You will look at adding the script for the Forward and Backward functions as well as some other controls later.
Note For now the JavaScript stays the same. You will look at adding the script for the Forward and Backward functions as well as some other controls later.
So let's look at the new code:
<div id="play" tabindex="0">
<img src="player/play_button.png" alt="Play Button" role="button" />
</div>
The main changes here are the addition of the ARIA role=“button” attribute, which tells screen readers and browsers what the purpose of the <div> is. You have also made the <div> accessible from the keyboard by adding the tabindex=“0” value. So that's a win on two fronts!
Both attributes should be applied to all controls. I also added the following code to make sure that the controls will highlight on focus from the keyboard:
*[tabindex]:focus {
outline:none;
border:
solid yellow 2px;
}
![]() Note Regarding using the URL # as a way of focusing on the control or a <div> with tabindex="0", you will need to test both methods in as many different browsers as possible. Some developers like the # methods and others like the <div> with the tabindex, although the latter is now pretty well supported.
Note Regarding using the URL # as a way of focusing on the control or a <div> with tabindex="0", you will need to test both methods in as many different browsers as possible. Some developers like the # methods and others like the <div> with the tabindex, although the latter is now pretty well supported.
The JavaScript code for this example (which actually uses both a # and the tabindexed <div>) is pretty simple, but then it all seems simple when it finally works!
See if you can figure out what's going on in Listing 6-11.
Listing 6-11. Code to Add the Play, Stop, Mute, Forward, and Back Functions
window.onload=function(){
var video = document.getElementById('access_video');
var play = document.getElementById('play');
var stop = document.getElementById('stop');
var mute = document.getElementById('mute');
var forward = document.getElementById('forward');
var back = document.getElementById('back');
// Script needed to attach the onclick events with the functional buttons.
// **Remember** even though the event is called onclick it still works from the
// keyboard.
play.onclick = playVideo;
stop.onclick = stopVideo;
mute.onclick = muteVideo;
forward.onclick = jumpForward;
back.onclick = jumpBack;
// Duplicate onkeydown events for keyboard a11y
play.onkeydown = playVideo;
stop.onkeydown = stopVideo;
mute.onkeydown = muteVideo;
forward.onkeydown = jumpForward;
back.onkeydown = jumpBack;
// New function for play
function playVideo(objEvent) {
if (objEvent.type == keydown')
{
var iKeyCode = objEvent.keyCode;
if (iKeyCode != 13 && iKeyCode !=32) {
return true;
}
}
video.play();
}
// New function for pause
function stopVideo(objEvent) {
if (objEvent.type == keydown')
{
var iKeyCode = objEvent.keyCode;
if (iKeyCode != 13 && iKeyCode !=32) {
return true;
}
}
video.pause();
}
// This function allows the button to be used as a control to
// toggle the audio on or off.
function muteVideo(objEvent) {
if (objEvent.type == keydown')
{
var iKeyCode = objEvent.keyCode;
if (iKeyCode != 13 && iKeyCode !=32) {
return true;
}
}
video.muted = !video.muted;
}
// Jump forward, Jump Back
forward.onclick = jumpForward;
function jumpForward(objEvent) {
if (objEvent.type == keydown')
{
var iKeyCode = objEvent.keyCode;
if (iKeyCode != 13 && iKeyCode !=32) {
return true;
}
}
video.currentTime = video.currentTime + 15;
video.play();
return false;
}
back.onclick = jumpBack;
function jumpBack(objEvent) {
if (objEvent.type == keydown')
{
var iKeyCode = objEvent.keyCode;
if (iKeyCode != 13 && iKeyCode !=32) {
return true;
}
}
video.currentTime = video.currentTime 15;
video.play();
return false;
}
};
</script>
The code for the controls themselves is shown in Listing 6-12.
Listing 6-12. Attaching Functions to the Customized Controls Using tabindex="0" to Focus on a <div> Instead of Using #
<div id="player_controls">
<div id="play" tabindex="0"><img src="player/play_button.png" role="button" title="Press to
activate" alt="Play" />
</div>
<div id="stop" tabindex="0"><img src="player/stop_button.png" role="button" title="Press to activate" alt="Stop" />
</div>
<div id="mute" tabindex="0"><img src="player/mute_button.png" role="button" title="Press to activate" alt="Mute/Unmute" />
</div>
<div id="forward" tabindex="0"><img src="player/forward_button.png" role="button" title="Press to activate" alt="Jump Forward" />
</div>
<div id="back" tabindex="0"><img src="player/back_button.png" role="button" alt="Jump Back" />
</div>
You can see a working version of the player at http://techrecord.net/html5/HTML5_video_player_no_captions_final.html.
Next, we'll look at how to add captions to the video.
![]() Note If all that is too much, there are out-of-the-box video players you can use, such as jPlayer and jQuery UI for video. You can access them at http://jplayer.org and https://github.com/azatoth/jquery-video, respectively.
Note If all that is too much, there are out-of-the-box video players you can use, such as jPlayer and jQuery UI for video. You can access them at http://jplayer.org and https://github.com/azatoth/jquery-video, respectively.
Audio Description and Captioning with the <track> Element
If you want to do various kinds of audio descriptions or captioning of your video files, HTML5 has a new element called the <track> element. Table 6-3 outlines what you can do with the new element.
Table 6-3. Media Elements Overview 1
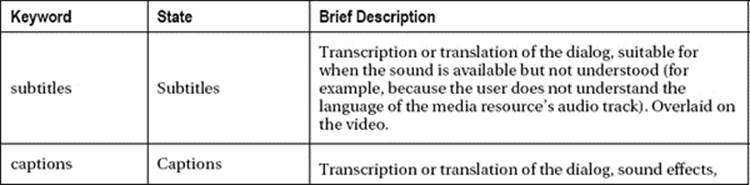
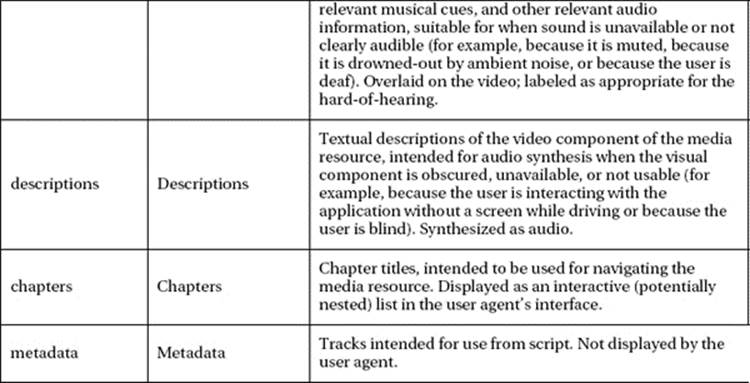
_________
1 http://dev.w3.org/html5/spec-author-view/the-track-element.html
To use the Captions, Subtitle, or Chapter info in your video content, you add them via the kind attribute. The src attribute points to where the text is stored, the srclang attribute defines what language it is in, and the label attribute gives a title. Listing 6-13 details the correct usage.
Listing 6-13. Adding Subtitles and Captions to the <track> Element
<video src="brave.webm">
<track kind="subtitles src=brave.en.vtt" srclang="en" label="English">
<track kind="captions src=brave.en.hoh.vtt" srclang="en"label="English for the Hard of
Hearing">
<track kind="subtitles src=brave.fr.vtt" srclang="fr"lang="fr" label="Français">
<track kind="subtitles src=brave.de.vtt"srclang="de" lang="de" label="Deutsch">
</video>2
In principle, adding audio descriptions and/or captions is pretty straightforward, right? Well, it would be if this stuff was supported in your favourite browser, and it currently isn't (at the time of this writing), but that will change. To get this to work, I used the open-source JavaScript library Captionator and found that it worked really well.
__________
2 From http://dev.w3.org/html5/spec-author-view/the-track-element.html
![]() Note You can download the JavaScript library and get more information about Captionator at https://github.com/cgiffard/Captionator.
Note You can download the JavaScript library and get more information about Captionator at https://github.com/cgiffard/Captionator.
Adding it to your video is as simple as adding the following script to your page:
<script type="text/javascript" src="js/captionator.js"></script>
<script type="text/javascript">
window.addEventListener("load",function(eventData) {
captionator.captionify();
});
</script>
Then enable it by adding the following:
captionator.captionify(document.getElementByID("video"));
That's it. I could go on about creating the captions themselves using Text Wrangler to write a .vtt file. The .vtt file format is easy to use—just open your favourite editor, and save the file that you create with the extension .vtt.
Cue Settings
There are a lot of different cue settings for you to use. They are detailed in Table 6-4.
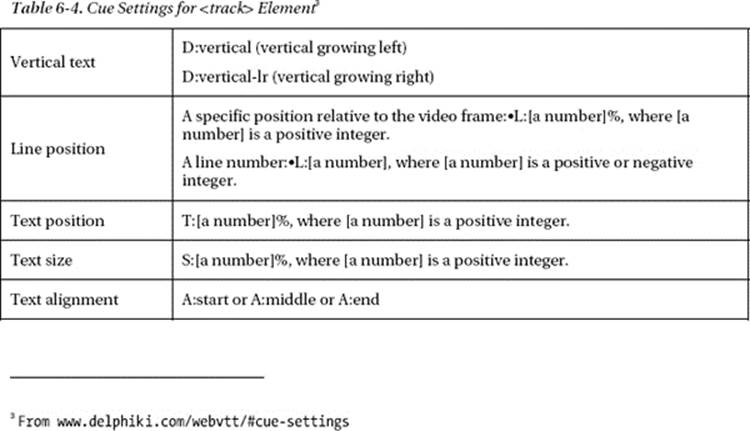
It is quite easy to get started. Figure 6-19 shows my caption file for my video. You define the start and end time for a caption or subtitle to appear, and then use the cue settings to tell the browser the size, alignment, and so on. Have a look at the following screen shot from my .vtt file that I used to caption a video. And do experiment. It's strangely compelling work, and quite time consuming but also fun.
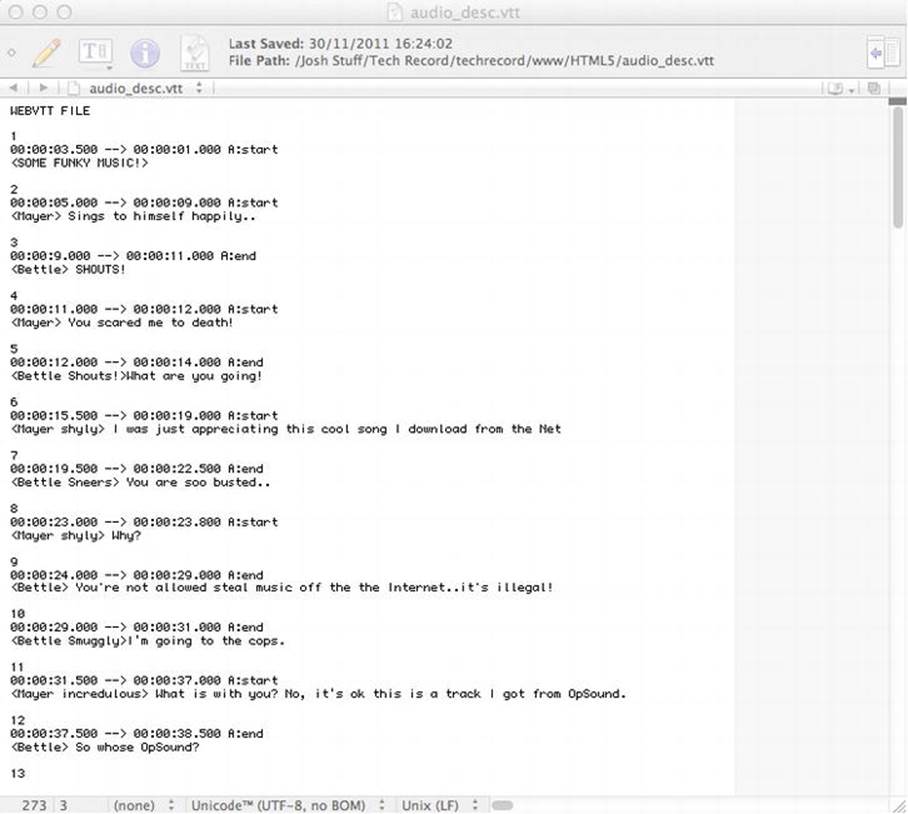
Figure 6-19. Sample VTT file
![]() Note For more information on VTT and a nice article, have a look at Ian Devlin's useful overview at http://www.iandevlin.com/blog/2011/05/html5/webvtt-and-video-subtitles.
Note For more information on VTT and a nice article, have a look at Ian Devlin's useful overview at http://www.iandevlin.com/blog/2011/05/html5/webvtt-and-video-subtitles.
You can see a screen shot of the video player with captioned video in Figure 6-20, and go online to try it out at http://techrecord.net/html5/HTML5_video_player_captions_final.html.
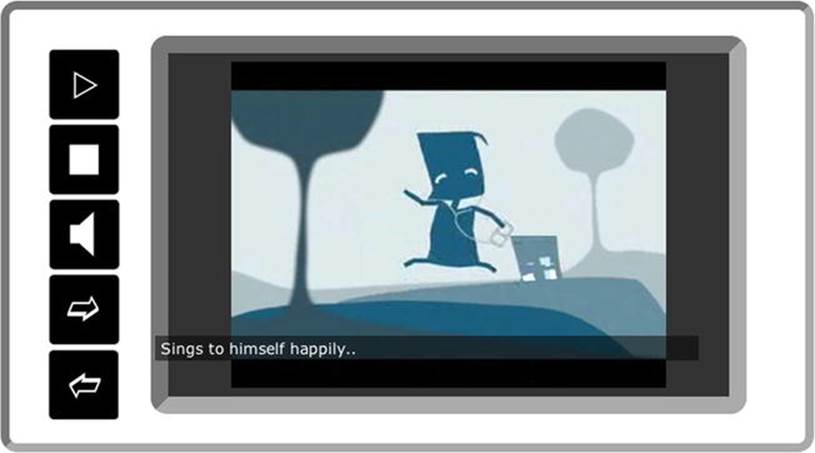
Figure 6-20. Screen shot of captioned video in accessible player
![]() Note For more information on HTML5 video with a good accessibility angle, see the new book by Silvia Pfeiffer, The Definitive Guide to HTML5 Video (Apress, 2010).
Note For more information on HTML5 video with a good accessibility angle, see the new book by Silvia Pfeiffer, The Definitive Guide to HTML5 Video (Apress, 2010).
Creating an <audio> Player
This is just a quick note to say that creating an audio player is a little easier, and the things you have learned about making the <video> player (in terms of creating your own controls and so on) apply also to an audio player.
<canvas> Accessibility
The 2D drawing API that renders dynamic bitmap graphics on the fly can be used to create some very nice visual animations (and more) right in the browser without the need for any plugins. There are examples of many groovy test cases and web sites that use <canvas> in whole or in part very successfully. However, from an accessibility perspective (to make life easier for everyone), don't use <canvas> for anything more than pretty pictures. At the time of this writing, it cannot be considered accessible. There is plenty of work going on behind the scenes in the Worldwide Web Consortium (W3C) and efforts to make it so. However, from what I can see, if there is another way of developing content you can use that is more suitable, you should use it instead. In fact, the specification recommends this, as follows:
“Authors should not use the canvas element in a document when a more suitable element is available. For example, it is inappropriate to use a canvas element to render a page heading: if the desired presentation of the heading is graphically intense, it should be marked up using appropriate elements (typically h1) and then styled using CSS and supporting technologies such as XBL.”
“When authors use the canvas element, they must also provide content that, when presented to the user, conveys essentially the same function or purpose as the bitmap canvas. This content might be placed as content of the canvas element. The contents of the canvas element, if any, are the element's fallback content.” 4
There have been all sorts of things developed using <canvas> that really shouldn't have been. The text editor Bespin comes to mind as a tool that looks good but isn't and, indeed, might never be accessible.
![]() Note You can check out Bespin at http://benzilla.galbraiths.org/2009/02/17/bespin-and-canvas. In many ways, it is impressive, but I think it uses the wrong tool as its foundation.
Note You can check out Bespin at http://benzilla.galbraiths.org/2009/02/17/bespin-and-canvas. In many ways, it is impressive, but I think it uses the wrong tool as its foundation.
As an aside, some other uses for <canvas> that I think are really clever (leaving aside accessibility concerns) are these:
· SoundManager 2 / 360° Player Demo: Available at www.schillmania.com/projects/soundmanager2/demo/360-player/. This is great, and these nice people also give you a look at the source code.
· 9elements: Available at http://9elements.com/io/projects/html5/canvas/. It has nice mouse interactions and groovy tune interactions!
· Cufón: A font generator and a possible sIFR replacement. Available at http://cufon.shoqolate.com/generate/. Roger Johannes writes about Cufón and screen readers at www.456bereastreet.com/archive/200905/cufon_and_screen_readers/.
· There is a good list of the games, widgets, and so on that have been built using <canvas> that's available from www.w3.org/html/wg/wiki/AddedElementCanvas. Here you will also find lots of links to discussions on <canvas> and the challenges faced when trying to make this drawing API more accessible.
Having said that, <canvas> is in its infancy and has big challenges ahead from an accessibility perspective. It has no DOM, for example, so how is a screen reader to generate an overview of the document? If you keep your use of <canvas> to eye candy, you'll be fine. HTML5 has many great tools to build stuff that is accessible and provides a rich user experience for many user groups with diverse abilities. So when you need a spoon, use a spoon. Although some would say, “There is no spoon.”
__________
4 www.w3.org/TR/html5/the-canvas-element.html#the-canvas-element
![]() Note If you want a nice reference for creating your own <canvas> eye candy, I recommend Nihilogics HTML5 <canvas> cheat sheet, which is available at www.nihilogic.dk/labs/canvas_sheet/HTML5_Canvas_Cheat_Sheet.pdf.
Note If you want a nice reference for creating your own <canvas> eye candy, I recommend Nihilogics HTML5 <canvas> cheat sheet, which is available at www.nihilogic.dk/labs/canvas_sheet/HTML5_Canvas_Cheat_Sheet.pdf.
Conclusion
In this chapter, we looked at many of the new ways you can make HTML5 rich media more accessible. There are many best practices based on how you used to do things with HTML 4 that you can still apply, but there are also some new tricks that I hope this chapter has turned you on to. In the next chapter, we'll look at how to approach making data tables accessible using HTML5.
All materials on the site are licensed Creative Commons Attribution-Sharealike 3.0 Unported CC BY-SA 3.0 & GNU Free Documentation License (GFDL)
If you are the copyright holder of any material contained on our site and intend to remove it, please contact our site administrator for approval.
© 2016-2026 All site design rights belong to S.Y.A.