HTML5 & CSS3 FOR THE REAL WORLD (2015)
Chapter 5 HTML5 Video and Audio
No book on HTML5 would be complete without an examination of the new video and audio elements. These groundbreaking new elements have already been utilized on the Web, and more developers and content creators are starting to incorporate them into their projects in place of technologies such as Flash and Silverlight.
For The HTML5 Herald, we’re going to place a video element in the first column of our three-column layout. Before we explore the details of the video element and its various features, though, we'll take a brief look at the state of video on the Web today.
For the most part, this chapter will focus on the video element, since that’s what we’re using in our sample project. Note that the audio element behaves nearly identically: almost all the features that we’ll be using for video also apply to audio. Where there are exceptions, we’ll do our best to point them out.
A Bit of History
Up until the late 2000s and early 2010s, multimedia content on the Web was for the most part placed in web pages by means of third-party plugins or applications that integrated with the web browser. Some examples of such software include QuickTime, RealPlayer, and Silverlight.
At that time, by far the most popular way to embed video and audio on web pages was by means of Adobe’s Flash Player plugin. The Flash Player plugin was originally developed by Macromedia and is now maintained by Adobe as a result of their 2005 buy out of the company. The plugin has been available since the mid-90s, but did not really take off as a way to serve video content until well into the 2000s.
Before HTML5, there was no standard way to embed video into web pages. A plugin such as Adobe’s Flash Player is controlled solely by Adobe, and is not open to community development. The introduction of the video and audio elements in HTML5 resolves this problem and makes multimedia a seamless part of a web page, the same as the img element. With HTML5, there’s no need for the user to download third-party software to view your content, and the video or audio player is easily accessible via scripting.
The Current State of Play
Unfortunately, as sublime as HTML5 video and audio sounds in theory, it’s less simple in practice. A number of factors need to be considered before you decide to include HTML5’s new multimedia elements on your pages.
First, you’ll have to understand the state of browser support. HTML5 audio and video is supported in all in-use browsers except Internet Explorer versions 8 and earlier. Many websites still receive some traffic from those earlier browsers, so you’ll have to take that into consideration.
The good news is even if you need to support those older browsers, you can still use HTML5 video on your pages today. Later on, we’ll show you how the video element has been designed with backwards compatibility in mind so that users of non-supporting browsers will still have access to your multimedia content.
Video Container Formats
Video on the Web is based on container formats and codecs. A container is a wrapper that stores all the necessary data that comprises the video file being accessed, much like a ZIP file wraps or contains files. Some examples of well-known video containers include Flash Video (.flv), MPEG-4 (.mp4 or .m4v), and AVI (.avi).
The video container houses data, including a video track, an audio track with markers that help synchronize the audio and video, language information, and other bits of metadata that describe the content. The video container formats relevant to HTML5 are MPEG-4, Ogg, and WebM.
Video Codecs
A video codec defines an algorithm for encoding and decoding a multimedia data stream. A codec can encode a data stream for transmission, storage, or encryption, or it can decode it for playback or editing. For the purpose of HTML5 video, we’re concerned with the decoding and playback of a video stream. The video codecs that are relevant to HTML5 video are H.264, Theora, and VP8.
Audio Codecs
An audio codec in theory works the same as a video codec, except that it’s dealing with the streaming of sound rather than video frames. The audio codecs that are relevant to HTML5 video are AAC, Vorbis, and MP3.
Warning: Licensing Issues
The new video element itself is free to use in any context, but the containers and codecs are not always as simple. For example, while the Theora and VP8 (WebM) codecs are not patent-encumbered, the H.264 codec is, so licensing for it is provided by the MPEG-LA group.
Currently for H.264, if your video is provided to your users for free, there’s no requirement for you to pay royalties; however, detailed licensing issues are far beyond the scope and intent of this book, so just be aware that you may have to do some research before using any particular video format when including HTML5 video in your pages.
The Markup
After that necessary business surrounding containers, codecs, and licensing issues, it’s time to examine the markup of the video element and its associated attributes.
The simplest way to include HTML5 video in a web page is as follows:
<video src="example.webm"></video>
As you’ve probably figured out from the preceding sections, this will only work in a limited number of browsers. It is, however, the minimum code required to have HTML5 video working to some extent. In a perfect world, it would work everywhere—the same way the img element works everywhere—but that’s a little way off just yet.
Similar to the img element, the video element can also include width and height attributes:
<video src="example.webm" width="375" height="280"></video>
Even though the dimensions can be set in the markup, they’ll have no effect on the aspect ratio of the video. For example, if the video in the previous example was actually 375×240 and the markup was as shown, the video would be centered vertically inside the 280-pixel space specified in the HTML. This stops the video from stretching unnecessarily and looking distorted.
The width and height attributes accept integers only, and their values are always in pixels. Naturally, these values can be overridden via scripting or CSS.
Enabling Native Controls
No embedded video would be complete without giving the user the ability to play, pause, stop, seek through the video, or adjust the volume. HTML5’s video element includes a controls attribute that does just that:
<video src="example.webm" width="375" height="280" controls></video>
controls is a Boolean attribute, so no value is required. Its inclusion in the markup tells the browser to make the controls visible and accessible to the user.
Each browser is responsible for the look of the built-in video controls. Figure 5.1 to Figure 5.4 show how these controls differ in appearance from browser to browser.
![]()
Figure 5.1. The native video controls in Chrome
![]()
Figure 5.2. … in Firefox

Figure 5.3. … in Internet Explorer
![]()
Figure 5.4. … and in Opera
The autoplay Attribute
We’d love to omit reference to this particular attribute, since using it will be undesirable for the most part; however, there are cases where it can be appropriate. The Boolean autoplay attribute does exactly what its name implies: it tells the web page to play the video immediately as soon as possible.
Normally, this is a bad practice; most of us know too well how jarring it can be if a website starts playing video or audio as soon as it loads—especially if our speakers are turned up. Usability best practice dictates that sounds and movement on web pages should only be triggered when requested by the user. But this doesn’t mean that the autoplay attribute should never be used.
For example, if the page in question contains nothing but a video—that is, the user clicked on a link to a page for the sole purpose of viewing a specific video—it may be acceptable for it to play automatically, depending on the video’s size, surrounding content, viewing platform, and audience.
Here’s how you’d use this attribute:
<video src="example.webm" width="375" height="280" controls autoplay></video>
Warning: Mobile Browsers Ignore autoplay
Many, if not all, mobile browsers will ignore the autoplay attribute, so the video will always wait for the user to press the play button before starting. This is sensible, given that mobile bandwidth is often limited and expensive.
The loop Attribute
Another available attribute that you should think twice before using is the Boolean loop attribute. Again, it’s fairly self-explanatory: according to the spec, this attribute will tell the browser to “seek back to the start of the media resource upon reaching the end.”
So if you created a web page whose sole intention was to annoy its visitors, it might contain code such as this:
<video src="example.webm" width="375" height="280" controls autoplay loop></video>
Autoplay and an infinite loop! We’d just need to remove the native controls and we’d have a trifecta of worst practices.
Of course, as with autoplay, there are some situations where loop can be useful: a browser-based game in which ambient sounds and music should play continuously when the page is open, for example.
The preload Attribute
In contrast to the two previously discussed attributes, preload is certainly handy in a number of cases. The preload attribute accepts one of three values:
· auto: indicates that the video and its associated metadata will start loading before the video is played. This way, the browser can start playing the video more quickly when the user requests it.
· none: indicates that the video shouldn’t load in the background before the user presses play.
· metadata: works like none, except that any metadata associated with the video (for example, its dimensions, duration, and the like) can be preloaded, even though the video itself won’t be.
The preload attribute has no spec-defined default in cases where it’s omitted; each browser decides which of those three values should be the default state. This makes sense, as it allows desktop browsers on good connections to preload the video and/or metadata automatically, having no real adverse effect; yet it permits mobile browsers to default to either metadata or none, as many mobile users have restricted bandwidth and will prefer to have the choice of whether or not to download the video.
The poster Attribute
When you attempt to view a video on the Web, usually a single frame of the video will be displayed in order to provide a teaser of its content. The poster attribute makes it easy to choose such a teaser. This attribute, similar to src, will point to an image file on the server by means of a URL.
Here’s how our video element would look with a poster attribute defined:
<video src="example.webm" width="375" height="280" controls poster="teaser.jpg"></video>
If the poster attribute is omitted, the default “poster” will be the first frame of the video, which displays as soon as it’s loaded.
The muted Attribute
The muted attribute, a Boolean, controls the default state of the audio track for the video element.
Adding this attribute will cause the video’s audio track to default to muted, potentially overriding any user preferences. This will only control the default state of the element—a user interacting with the controls or JavaScript can change this.
Here it is added to our video element:
<video src="example.webm" width="375" height="280" poster= "teaser.jpg" muted></video>
In previous versions of the HTML5 spec, there was an attribute called audio that took a value of muted. The new muted attribute replaces the audio attribute, which is now obsolete.
Adding Support for Multiple Video Formats
As we’ve discussed, there is currently no option to use a single container format to serve your video, even though that’s really the idea behind having the video element, and one which we hope will be realized in the near future. To include multiple video formats, the video element allowssource elements to be defined so that you can allow each browser to display the video using the format of its choice. These elements serve the same function as the src attribute on the video element, so if you’re providing source elements, there’s no need to specify an src for your videoelement.
To achieve full browser support, here’s how we’ll declare our source elements:
<source src="example.mp4" type="video/mp4">
<source src="example.webm" type="video/webm">
<source src="example.ogv" type="video/ogg">
The source element (oddly enough) takes an src attribute that specifies the location of the video file. It also accepts a type attribute that specifies the container format for the resource being requested. This latter attribute enables the browser to determine if it can play the file in question, thus preventing it from unnecessarily downloading an unsupported format.
The type attribute allows also a codec parameter to be specified, which defines the video and audio codecs for the requested file. Here’s how our source elements will look with the codecs specified:
<source src="example.mp4" type='video/mp4; codecs="avc1.42E01E, mp4a.40.2"'>
<source src="example.webm" type='video/webm; codecs="vp8, vorbis"'>
<source src="example.ogv" type='video/ogg; codecs="theora, vorbis"'>
You’ll notice that the syntax for the type attribute has been slightly modified to accommodate the container and codec values. The double quotes surrounding the values have changed to single quotes, and another set of nested double quotes is included specifically for the codecs.
This can be a tad confusing at first glance, but in most cases you’ll just be copying and pasting those values once you have a set method for encoding the videos (which we’ll touch on later in this chapter). The important point is that you define the correct values for the specified file to ensure that the browser can determine which (if any) file it can play.
Note: Which formats do you need?
Depending on your website’s target audience, you may not require three source elements for full browser support. Support for video and audio codecs and containers is excellent, and you might only need one or two combinations. To help you decide which formats to use, be sure to check out the latest browser support info on Can I use.
Source Order
The three source elements are placed as children of the video element, and the browser being used to render the HTML will choose whichever container/codec format it recognizes—downloading only the resources it needs and ignoring the others. With our three file formats declared, our code will now look like this:
<video width="375" height="280" poster="teaser.jpg" audio="muted">
<source src="example.mp4" type='video/mp4; codecs="avc1.42E01E, mp4a.40.2"'>
<source src="example.webm" type='video/webm; codecs="vp8, vorbis"'>
<source src="example.ogv" type='video/ogg; codecs="theora, vorbis"'>
</video>
You’ll notice that our code is now without the src attribute on the video element. As mentioned, as well as being redundant, including it would override any video files defined in the source elements, so it’s necessary in this case to leave it out.
What about browsers without support for HTML5 video?
The three source elements that we included inside our video element will cover all modern browsers, but we’re yet to ensure that our video will play for older browsers. As has been mentioned, you might still have a significant percentage of users utilizing browsers without native support for HTML5 video. Most of those users are on some version of Internet Explorer prior to version 9.
In keeping with the principle of graceful degradation, the video element has been designed so that older browsers can access the video by some alternate means. Any browsers that fail to recognize the video element will simply ignore it, along with its source children. But if the video element contains content that the browser recognizes as valid HTML, it will read and display that content instead.
What kind of content can we serve to those non-supporting browsers? According to Adobe, over one billion desktop users have the Flash Player plugin installed on their systems. And most of those instances of the Flash plugin are version 9 or later, which offer support for the MPEG-4 video container format. With this in mind, to allow Internet Explorer 8 and earlier (and other older browsers without support for HTML5 video) to play our video, we can declare an embedded Flash video to use as a fallback. Here’s the completed code for the video on The HTML5 Herald with the Flash fallback code included:
<video width="375" height="280" poster="teaser.jpg" audio="muted">
<source src="example.mp4" type='video/mp4; codecs="avc1.42E01E, mp4a.40.2"'>
<source src="example.webm" type='video/webm; codecs="vp8, vorbis"'>
<source src="example.ogv" type='video/ogg; codecs="theora, vorbis"'>
<!-- fallback to Flash: -->
<object width="375" height="280" type="application/x-shockwave- flash" data="mediaplayer-5.5/player.swf">
<param name="movie" value="mediaplayer-5.5/player.swf">
<param name="allowFullScreen" value="true">
<param name="wmode" value="transparent">
<param name="flashvars" value="controlbar=over&image=images/ teaser.jpg&file=example.mp4">
<!-- fallback image -->
<img src="teaser.jpg" width="375" height="280" alt="" title="No video playback capabilities">
</object>
</video>
We’ll skip going into all the details of how this newly added code works (this isn’t a Flash book, after all!), but here are a few points to note about this addition to our markup:
· The width and height attributes on the object element should be the same as those on the video element.
· To play the file, we’re using the open-source JW Player by LongTail Video, which is free for non-commercial use, but you can use whichever video player you prefer.
· The Flash video code has a fallback of its own—an image file that displays if the code for the Flash video fails to work.
· The fourth param element defines the file to be used (example.mp4). As has been mentioned, most instances of the Flash player now support video playback using the MPEG-4 container format, so there’s no need to encode another video format.
· HTML5-enabled browsers that support HTML5 video are instructed by the spec to ignore any content inside the video element that’s not a source tag, so the fallback is safe in all browsers.
In addition to the Flash fallback content, you could also provide an optional download video link that allows the user to access a local copy of the video and view it at their leisure. This would ensure that nobody is left without a means to view the video.
The last point to mention here is that, as is the case with the extra source elements, you may have no visitors from browsers without HTML5 video support on your website, or you might not be concerned about the small percentage using older browsers. In either of such cases, you could easily leave out the Flash fallback content and thus simplify the code.
Setting MIME Types
If you find that you’ve followed our instructions closely and your HTML5 video still fails to play from your server, the issue could be related to the content-type information being sent.
Content-type, also known as the MIME type, tells the browser the kind of content it’s looking at. Is this a text file? If so, what kind? HTML? JavaScript? Is this a video file? The content-type answers these questions for the browser. Every time your browser requests a page, the server sends “headers” to your browser before sending any files. These headers tell your browser how to interpret the file that follows. Content-type is an example of one of the headers the server sends to the browser.
The MIME type for each video file that you include via the source element is the same as the value of the type attribute (minus any codec information). For the purpose of HTML5 video, we’re concerned with three MIME types. To ensure that your server is able to play all three types of video files, place the following lines of code in your .htaccess file (or the equivalent if you’re using a web server other than Apache):
AddType video/ogg .ogv
AddType video/mp4 .mp4
AddType video/webm .webm
If this fails to fix your problem, you may have to talk to your host or server administrator to find out if your server is using the correct MIME types. To learn more about configuring other types of web servers, read the excellent article “Properly Configuring Server MIME Types” from the Mozilla Developer Network.
Note: More on .htaccess
An .htaccess file provides a way to make configuration changes on a per-directory basis when using the Apache web server. The directives in an .htaccess file apply to the directory it lives in and all subdirectories. For more on .htaccess files, see the Apache documentation.
Encoding Video Files for Use on the Web
The code we’ve presented for The HTML5 Herald is virtually bullet-proof, and will enable the video to be viewed by nearly everyone that sees the page. Because we need to encode our video in at least two formats (possibly three, if we want to), we need an easy way to encode our original video file into these HTML5-ready formats. Fortunately, there are some online resources and desktop applications that allow you to do exactly that.
Miro Video Converter is free software with a super-simple interface that can encode your video into all the necessary formats for HTML5 video. It’s available for Mac and Windows.
Simply drag a file to the window, or browse for a file in the customary way. A drop-down box gives options for encoding your video in a number of formats, including various platform- and device-specific presets (Apple iPad, Android, and so on).
There are a number of other choices for encoding HTML5 video, but Miro should suffice to help you create the two (or three) files necessary for embedding video that 99% of users can view.
Creating Custom Video Controls
There’s another huge benefit to using HTML5 video compared to the customary method of embedding video with a third-party technology. As discussed earlier in this chapter, with HTML5 video the video element becomes a real part of the web page, rather than just an inaccessible plugin. It’s as much a part of the web page as an img element or any other native HTML element. This means that we can target the video element and its various parts using JavaScript—and even style the video element with CSS.
As we’ve seen, each browser that supports HTML5 video embeds a native set of controls to help the user access the video content. These controls have a different appearance in each browser, which may vex those concerned with a site’s branding. No problem: by using the JavaScript API available with the video element, we can create our own custom controls and link them to the video’s behavior.
Custom controls are created using whichever elements you want—images, plain HTML and CSS, or even elements drawn using the Canvas API—the choice is yours. To harness this API, create your own custom controls, insert them into the page, and then use JavaScript to convert those otherwise static graphic elements into dynamic, fully functioning video controls.
Some Markup and Styling for Starters
For our sample site, we’re going to build a simple set of video controls to demonstrate the power of the new HTML5 video API. To start off, Figure 5.5 shows a screenshot of the set of controls we’ll be using to manipulate the video.
![]()
Figure 5.5. Our set of video controls that we’ll be building
Both of those buttons have alternate states: Figure 5.6 shows how the controls will look if the video is playing and the sound has been muted.
![]()
Figure 5.6. Our controls with the sound muted and the video playing
Our controls have three components:
· play/pause button
· timer that counts forward from zero
· mute/unmute button
In most cases, your custom video controls should have all the features of the default controls that various browsers natively provide. If your set of controls introduces fewer or inferior features, it’s likely you’ll frustrate your users.
For the purpose of introducing the API rather than trying to mimic what the browsers natively do, we want to introduce the important parts of the video API gradually. This will allow you to get your feet wet while establishing a foundation from which to work.
We’ll be creating a simple, yet usable, set of controls for our video. The main feature missing from our set of controls is the seek bar that lets the user “scrub” through the video to find a specific part, so there will be no way of going back to the start of the video aside from refreshing the page or waiting for the video to end. Other than that, the controls will function adequately—they’ll allow the user to play, pause, mute, or unmute the video.
Here’s the HTML we’ll use to represent the different parts of the video controls:
<div id="controls" class="hidden">
<a id="playPause">Play/Pause</a>
<span id="timer">00:00</span>
<a id="muteUnmute">Mute/Unmute</a>
</div>
We’ll skip going into the CSS in great detail, but here’s a summary of what we’ve done (you can view the demo page’s source in the code archive if you want to see how it’s all put together):
· The text in the play/pause and mute/unmute buttons is removed from view using the text-indent property.
· A single CSS sprite image is used as a background image to represent the different button states (play, pause, mute, unmute).
· CSS classes are being used to represent the different states; those classes will be added and removed using JavaScript.
· The "controls" wrapper element is absolutely positioned and placed to overlay the bottom of the video.
· We’ve given the controls a default opacity level of 50%, but on mouseover the opacity increases to 100%.
· By default, the controls wrapper element is set to display: none using a class of "hidden", which we’ll remove with JavaScript.
If you’re following along building the example, go ahead and style the three elements however you like. You might even want to use icon fonts or SVG graphics to create the interface. Whatever you choose, the appearance of the controls is really secondary to what we’re accomplishing here, so feel free to fiddle until you have a look that you’re happy with.
Introducing the Media Elements API
Let’s go through the steps needed to create our custom controls, and in the process we’ll introduce you to the relevant aspects of the video API. Afterwards, we’ll summarize some other features from the API that we won’t be using in our controls, so that you have a good overview of what the API includes.
In order to work with our new custom controls, we’ll first cache them by placing them into JavaScript variables. Here are the first few lines of our code:
var videoEl = document.getElementsByTagName('video')[0],
playPauseBtn = document.getElementById('playPause'),
vidControls = document.getElementById('controls'),
muteBtn = document.getElementById('muteUnmute'),
timeHolder = document.getElementById('timer');
Of course, caching our selections in variables is optional, but it’s always best practice (for maintainability and performance) to work with cached objects, rather than needlessly repeating the same code to target various elements on the page. We’re using a comma to separate our variable definitions, which means we’re using a single var statement.
The first line is targeting the video element itself. We’ll be using this videoEl variable quite a bit when using the API—since most API methods need to be called from the media element. The next four lines of code should be familiar to you if you took note of the HTML that comprises our controls. Those are the four elements on the page that we’ll be manipulating based on user interaction.
Our first task is to make sure the video’s native controls are hidden. We could do this easily by simply removing the controls attribute from the HTML. But since our custom controls are dependent on JavaScript, visitors with JavaScript disabled would be deprived of any way of controlling the video. So to follow the principle of progressive enhancement, we’re going to remove the controls attribute using JavaScript:
videoEl.removeAttribute('controls');
The next step is to make our own custom controls visible. As has been mentioned, we’ve used CSS to remove our controls from view by default. By using JavaScript to enable the visibility of the custom controls, we ensure that the user will never see two sets of controls.
Our next chunk of code will look like this:
videoEl.addEventListener('canplaythrough', function () {
vidControls.classList.remove('hidden');
}, false);
This is the first place we’ve used a feature from the HTML5 video API. First, take note of the addEventListener method. This method does exactly what its name implies: it listens for the specified event occurring on the targeted element.
Important: addEventListener Isn’t Cross-browser
If you’re familiar with cross-browser JavaScript techniques, you probably know that the addEventListener method isn’t cross-browser. In this case, it poses no problem. The only browsers in use that have no support for addEventListener are versions of Internet Explorer prior to version 9—and those browsers have no support for HTML5 video anyway. All we need do is use Modernizr (or some equivalent JavaScript) to detect support for the HTML5 video API, and then only run the code for supporting browsers—all of which supportaddEventListener.
In this case, we’re targeting the video element itself. The event we’re registering to listen for is the canplaythrough event from the video API. According to the definition of this event in the spec:
The user agent estimates that if playback were to be started now, the media resource could be rendered at the current playback rate all the way to its end without having to stop for further buffering.
There are other events we can use to check whether the video is ready, each of which has its own specific purpose. We’ll touch on some of those other events later in the chapter. This particular one ensures continuous playback, so it’s a good fit for us as we’d like to avoid choppy playback.
Playing and Pausing the Video
When the canplaythrough event fires, a callback function is executed. In that function, we’ve put a single line of code that removes the hidden class from the controls wrapper, so now our controls are visible. Now we want to add some functionality to our controls. Let’s bind a click event handler to our play/pause button:
playPauseBtn.addEventListener('click', function () {
if (videoEl.paused) {
videoEl.play();
} else {
videoEl.pause();
}
}, false);
When the button is clicked, we run an if/else block that’s using three additional features from the video API. Here’s a description of all three:
· The paused property is being accessed to see if the video is currently in the “paused” state. This doesn’t necessarily mean the video has been paused by the user; it could represent the start of the video before it’s been played. This property will return true if the video isn’t currently playing.
· Since we’ve now determined that the play/pause button has been clicked, and the video is not currently playing, we can safely call the play() method on the video element. This will play the video from its last paused location.
· Finally, if the paused property doesn’t return true, the else portion of our code will execute and this will trigger the pause() method on the video element, pausing the video.
You may have noticed that our custom controls have no “stop” button (customarily represented by a square icon), which would not only stop playback but also send the video to the beginning. You could add such a button if you feel it’s necessary, but many video players don’t use it since the seek bar can be used to move to the beginning of the video. The only catch is that the video API has no “stop” method; to counter this, you can cause the video to mimic the traditional “stop” behavior by pausing it and then sending playback to the beginning (more on this later).
You’ll notice that something’s missing from our if/else construct. Earlier, we showed you a couple of screenshots displaying the controls in their two states. We’ll use JavaScript to alter the background position of our sprite image, and change the button from visually representing “play me” to “pause me.”
This is how we’ll do it:
videoEl.addEventListener('play', function () {
playPauseBtn.classList.add('playing');
}, false);
videoEl.addEventListener('pause', function () {
playPauseBtn.classList.remove('playing');
}, false);
Here we have two more uses of the addEventListener method (you’ll need to become accustomed to this method if you’re going to use the video and audio APIs!). The first block is listening for play events, so if the click handler we wrote triggers the play() method (or if something else causes the video to play, such as other code on the page), the play event will be detected by the listener and the callback function will execute. The second block of code is listening for the pause event (not to be confused with the paused property).
If the element has been played, the first block will add the class playing to our play/pause button. This class will change the background position of the sprite on the play/pause button to make the “pause me” icon appear. Similarly, the second block of code will remove the playing class, causing the state of the button to go back to the default (the “play me” state).
You’re probably thinking, “Why not just add or remove the playing class in the code handling the button click?” While this would work just fine for when the button is clicked (or accessed via the keyboard), there’s another behavior we need to consider here, demonstrated in Figure 5.7.
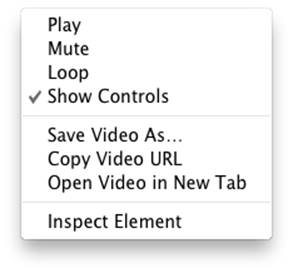
Figure 5.7. Some video controls are accessible via the context menu
This menu appears when you bring up the video's context menu (accessed via right-clicking on the video). As you can see, clicking the controls on the video element isn’t the only way to play/pause or mute/unmute the video.
To ensure that the button states are changed no matter how the video element’s features are accessed, we instead listen for play and pause events (and, as you’ll see in a moment, sound-related events) to change the states of the buttons.
Note: Save Video As...
You may be concerned that the video element’s context menu has an option for Save Video As…. There’s been discussion online about how easy it is to save HTML5 video, and this could affect how copyrighted videos will be distributed. Some content producers might feel like avoiding HTML5 video for this reason alone. Whatever you choose to do, just recognize the realities associated with web video. Most users who are intent on copying and distributing copyrighted video will find ways to do it, regardless of any protection put in place. There are many web apps and software tools that can easily rip even Flash-based video. You should also be aware that even if you do disable the context menu on the video element, the user can still view the source of the page and find the location of the video file(s).
Some sites, like YouTube, have already implemented features to combat this when using HTML5 video. YouTube has a page that allows you to opt in to HTML5 video if your browser doesn’t use HTML5 video by default. After opting in, when you view a video and open thevideo element’s context menu, there’s a custom context menu without the Save Video As… option. YouTube also dynamically adds the video element to the page, and deeply nests the element with an indecipherable src attribute. So you do have options, and it is possible to make it more difficult (but not impossible) for users to rip your copyrighted videos. But recognize that there are drawbacks to changing user expectations, in addition to the performance and maintainability issues associated with convoluting your scripts and markup for what could be little, if any, gain.
Muting and Unmuting the Video’s Audio Track
The next bit of functionality we want to add to our script is the mute/unmute button. This piece of code is virtually the same as what was used for the play/pause button, except that this time we’ve bound the click event to the mute/unmute button, following with a similar if/else construct:
muteBtn.addEventListener('click', function () {
if (videoEl.muted) {
videoEl.muted = false;
} else {
videoEl.muted = true;
}
}, false);
This block of code introduces a new part of the API: the muted property. After the mute button is clicked, we check to see the status of the muted property. If it’s true (meaning the sound is muted), we set it to false (unmuting the sound); if it’s false, we set its status to true.
Again, we’ve avoided any button-state handling here for the same reasons mentioned earlier when discussing the play/pause buttons; the context menu allows for muting and unmuting, so we want to change the mute button’s state depending on the actual muting or unmuting of the video, rather than the clicking of the button.
Unlike the play/pause button, we lack the ability to listen for “mute” and “unmute” events. Instead, the API offers the volumechange event:
videoEl.addEventListener('volumechange', function () {
if (videoEl.muted) {
muteBtn.classList.add('muted');
} else {
muteBtn.classList.remove('muted');
}
}, false);
Again, we’re using an event listener to run some code each time the specified event (in this case, a change in volume) takes place. As you can probably infer from its name, the volumechange event isn’t limited to detecting muting and unmuting; it can detect any change in volume.
Once we’ve detected the change in volume, we check the status of the video element’s muted property and change the class on the mute/unmute button accordingly.
Responding When the Video Ends Playback
The code we’ve written so far will allow the user to play and pause the video, as well as mute and unmute the sound. All of this is done using our custom controls.
At this point, if you let the video play to the end it will stop on the last frame. Instead of leaving it on the last frame, we think it’s best to send the video back to the first frame, ready to be played again. This gives us the opportunity to introduce two new features of the API:
videoEl.addEventListener('ended', function () {
videoEl.currentTime = 0;
}, false);
This block of code listens for the ended event, which tells us that the video has reached its end and stopped. Once we detect this event, we set the video’s currentTime property to zero. This property represents the current playback position, expressed in seconds (with decimal fractions).
This brings us to the next step in our code.
Updating the Time as the Video Plays
Now for the last step: we want our timer to update the current playback time as the video plays. We’ve already introduced the currentTime property, which we can use to update the content of our #timeHolder element (which is the cached element with an ID of "timer"). Here’s how we do it:
videoEl.addEventListener('timeupdate', function () {
timeHolder.innerHTML = secondsToTime(videoEl.currentTime);
}, false);
In this case, we’re listening for timeupdate events. The timeupdate event fires each time the video’s time changes, which means that even a fraction of a second’s change will fire this event.
This alone would suffice to create a bare-bones timer. Unfortunately, it would be unhelpful and ugly on the eyes because you’d see the time changing every millisecond to numerous decimal places, as shown in Figure 5.8.
![]()
Figure 5.8. Using the currentTime property directly in our HTML is less than ideal
In addition, instead of hours or minutes the timer in this state will only display seconds—which could end up being in the hundreds or thousands, depending on the length of the video. That’s impractical, to say the least.
To format the seconds into a more user-friendly time, we’ve written a function called secondsToTime(), and called it from our timeupdate handler. We want to avoid showing the milliseconds in this case, so our function rounds the timer to the nearest second. Here’s the start of our function:
var h = Math.floor(s / (60 * 60)),
dm = s % (60 * 60),
m = Math.floor(dm / 60),
ds = dm % 60,
secs = Math.ceil(ds);
After those five lines of code, the final variable secs will hold a rounded number of seconds, calculated from the number of seconds passed into the function.
Next, we need to ensure that a single digit amount of seconds or minutes is expressed with a preceding zero; that is, employing “05” instead of just “5”. The next code block will take care of this:
if (secs === 60) {
secs = 0;
m = m + 1;
}
if (secs < 10) {
secs = '0' + secs;
}
if (m === 60) {
m = 0;
h = h + 1;
}
if (m < 10) {
m = '0' + m;
}
Finally, we return a string that represents the current time of the video in its correct format:
if (h === 0) {
fulltime = m + ':' + secs;
} else {
fulltime = h + ':' + m + ':' + secs;
}
return fulltime;
The if/else construct is included to check if the video is one hour or longer; if so, we’ll format the time with two colons. Otherwise, the formatted time will use a single colon that divides minutes from seconds, which will be the case in most circumstances.
Remember where we’re running this function: we’ve included this inside our timeupdate event handler. The function’s returned result will become the content of the timeHolder element:
timeHolder.innerHTML = secondsToTime(videoEl.currentTime);
Because the timeupdate event is triggered with every fraction of a second’s change, the content of the timeHolder element will change rapidly. But because we’re rounding the value to the nearest second, the visible changes will be limited to a time update every second, even though technically the content of the timer element is changing more rapidly.
And that’s it, our custom controls are done! The buttons work as expected and the timer runs smoothly. As has been stated, this falls a little short of being a fully functional set of controls, but you should at least have a good handle on the basics of interacting with HTML5 video using JavaScript, so have a tinker and see what else you can add.
Further Features of the Media Elements API
The Media Elements API has much more to it than what we’ve covered here. Here’s a summary of some events and properties that you might want to use when building your own custom controls, or when working with video and audio elements.
One point to remember is that these API methods and properties can be used anywhere in your JavaScript—they don’t need to be linked to custom controls. If you’d like to play a video when the mouse hovers over it, or use audio elements to play various sounds associated with your web application or game, all you have to do is call the appropriate methods.
API Events
We’ve already seen the canplaythrough, play, pause, volumechange, ended, and timeupdate events. Here are some of the other events available to you when working with HTML5 video and audio:
· canplay: this is similar to canplaythrough, but will fire as soon as the video is playable, even if it’s just a few frames (this contrasts with canplaythrough, which only fires if the browser thinks it can play the video all the way to the end without rebuffering)
· error: this event is sent when an error has occurred; there’s also an error property
· loadeddata: the first frame of the media has loaded
· loadedmetadata: this event is sent when the media’s metadata has finished loading; the metadata would include dimensions, duration, and any text tracks (for captions)
· playing: this indicates that the media has begun to play; the difference between playing and play is that play will not be sent if the video loops and begins playing again, whereas playing will
· seeking: this is sent when a seek operation begins; it might occur when a user starts to move the seek bar to select a new part of the video or audio
· seeked: this event fires when a seek operation is completed
API Properties
In addition to the properties we’ve already seen, here’s a number of useful ones that are available to use:
· playbackRate: the default playback rate is 1, which can be changed to speed up or slow down playback; this is naturally of practical use if you’re creating a fast-forward or rewind button, or a slow-motion or slow-rewind button
· src: as its name implies, this property returns the URL that points to the video being played, but only works if you’re using the src attribute on the video element
· currentSrc: this will return the value of the URL pointing to the video file being played, whether it’s from the video element’s src attribute or one of the source elements
· readyState: this property returns a numeric value from 0 to 4 with each state representing the readiness level of the media element; for example, a value of 1 indicates that the media’s metadata is available, while a value of 4 is virtually the same as the condition for firing thecanplaythrough event, meaning the video is ready to play and won’t be interrupted by buffering or loading
· duration: this returns the length of the video in seconds
· buffered: this represents the time ranges of the video that have buffered and are available for the browser to play
· videoWidth, videoHeight: these properties return the intrinsic dimensions of the video—the actual width and height as the video was encoded, not what’s declared in the HTML or CSS; if you want the HTML- or CSS-defined values, these can be accessed through the customary widthand height properties
You can also access attributes that can be declared directly in the HTML such as preload, controls, autoplay, loop, and poster.
What about audio?
Much of what we’ve discussed in relation to HTML5 video and its API also applies to the audio element, the obvious exceptions being those related to visuals.
Similar to the video element, the preload, autoplay, loop, and controls attributes can be used (or not) on the audio element.
The audio element won’t display anything unless controls are present, but even if the element’s controls are absent, the element is still accessible via scripting. This is useful if you want your site to use sounds not tied to controls presented to the user. The audio element nests source tags, similar to video, and will also treat any child element that’s not a source tag as fallback content for non-supporting browsers.
Accessible Media
In addition to their status as first-class citizens of the page—making them intrinsically more keyboard accessible (using tabindex, for example)—the HTML5 media elements also give you access to the track element to display captions or a transcript of the media file being played. Likesource elements, track elements should be placed as children of the video or audio element.
If the track element is included as a child of the video element, it would look like the example shown here (similar to an example given in the spec):
<video src="example.webm">
<track kind="subtitles" src="example.en.vtt" srclang="en" label= "English" default>
<track kind="captions" src="example.en.hoh.vtt" srclang="en" label ="English for the Hard of Hearing">
<track kind="subtitles" src="example.fr.vtt" srclang="fr" lang="fr"label="Français">
<track kind="subtitles" src="example.de.vtt" srclang="de" lang="de" label="Deutsch">
</video>
The code here has four track elements, each referencing a text track for captions in a different language (or, in the case of the second one, alternating content in the same language).
The kind attribute can take one of five values: subtitles, captions, descriptions, chapters, and metadata. The src attribute is required, and points to an external file that holds the track information. The srclang attribute specifies the language. The label attribute gives a user-readable title for the track. Finally, the Boolean default attribute defines which of the tracks will be used if the others are unsuitable.
The track element has excellent browser support, being available in all modern browsers. For an in-depth explanation of the track element and its many features, check out this article on the SitePoint website by Ankul Jain.
It’s Showtime
Video and audio on the Web have long been the stronghold of Flash, but, as we’ve seen, HTML5 has changed that. While the codec and format landscape is still somewhat fragmented, the promises of fully scriptable multimedia content—along with the performance benefits of running audio and video natively in the browser instead of in a plugin wrapper—are hugely appealing to web designers, developers, and content providers.
Because of excellent browser support and easy-to-implement fallback techniques, there’s no reason not to start using these elements and their associated APIs today.
We’ve now covered just about everything on HTML5 proper (that is, the bits that are in the HTML5 spec). In the next few chapters, we’ll turn our attention to CSS3 and start to make The HTML5 Herald look downright fancy. Then we’ll finish by looking at some of the new JavaScript APIs that are frequently bundled with the term “HTML5.”