JavaScript, 20 Lessons to Successful Web Development (2015)
PART I JavaScript Basics
LESSON 6 Accessing Multidimensional Arrays

To view the accompanying video for this lesson, please visit mhprofessional.com/nixonjavascript/.
Let me start by totally contradicting the title of this lesson and stating that there’s actually no such thing as multidimensional arrays in JavaScript. But before you start scratching your head and wondering whether I’ve drunk too many cups of tea, let me say that you can simulatemultidimensional arrays in JavaScript by assigning new arrays as the values for elements of an existing array.
But what exactly do I mean by multidimensional in the first place? Well, in the same way that a string of characters is a collection of individual letters, numbers, and other characters that you can imagine being like a string of pearls—with each pearl occupying its right location and the correct pearls on either side, all in the right order. An array, therefore, is like a collection of variables all stored in their right locations.
In the previous lesson I used the metaphor of a filing cabinet for an array of 10 elements. If you imagine for a moment that each drawer in this filing cabinet is like Doctor Who’s Tardis (his time and space machine) in that it is much bigger on the inside than it is on the outside, then you should be able to also imagine being able to place another 10-drawer filing cabinet in each of the drawers of the original one! Figure 6-1 should help make this clearer.
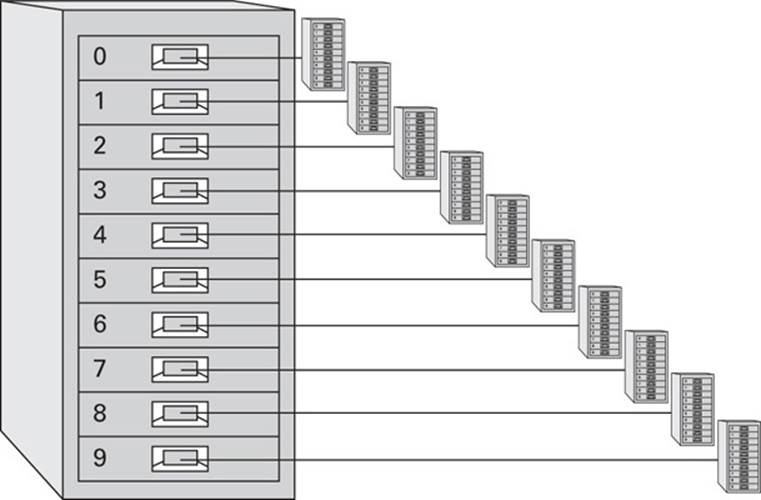
FIGURE 6-1 Representing a two-dimensional array with filing cabinets
Remember that these particular filing cabinets are not bound by the normal rules of space and time, so the small cabinets can contain just as much as the large ones. In fact, the cabinets are capable of holding an infinite amount of data, limited only by the restraints of your browser, operating system, and available memory. I have simply drawn the secondary filing cabinets much smaller so that they fit into the figure.
Creating a Two-Dimensional Array
Let’s see how we can use the ability of an array element to store another entire array to our advantage by considering a 10 times multiplication table, just like those often found on the walls of schools (see Figure 6-2).
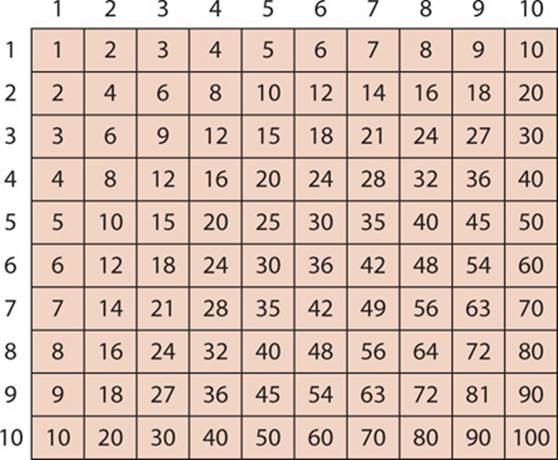
FIGURE 6-2 A 10 times multiplication table
Each of the columns (or each of the rows) can be considered a one-dimensional array. For example, the first row could be created using the following code:
Or, more succinctly:
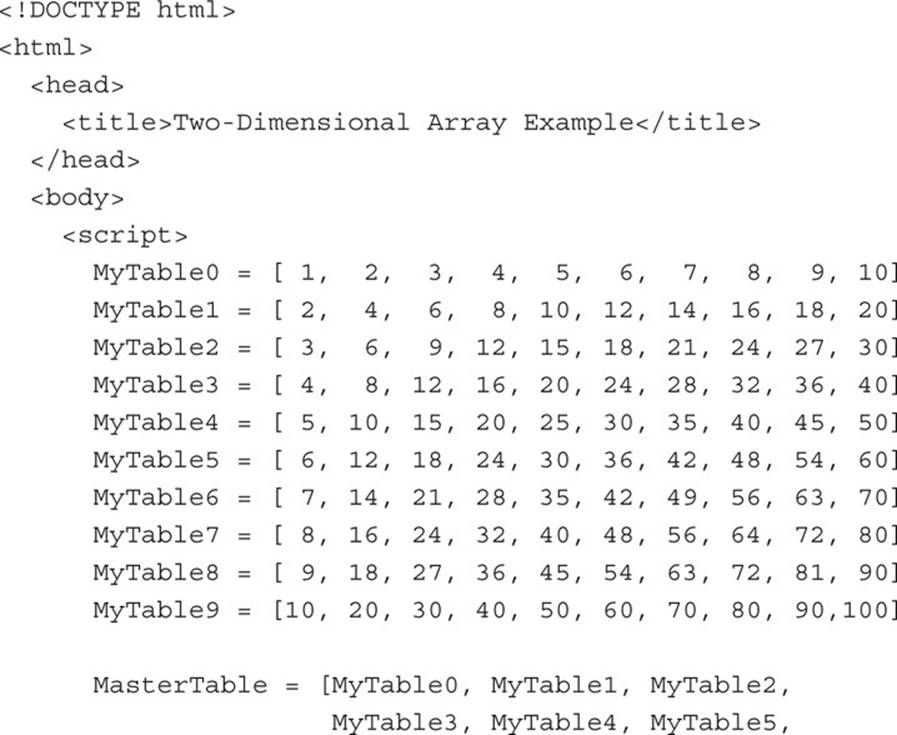
MyTable0 = [1, 2, 3, 4, 5, 6, 7, 8, 9, 10]
Similarly, the second row could be created like this:
MyTable1 = [2, 4, 6, 8, 10, 12, 14, 16, 18, 20]
And so you can go on for rows 3 through 10, so that you end up with the following set of statements:
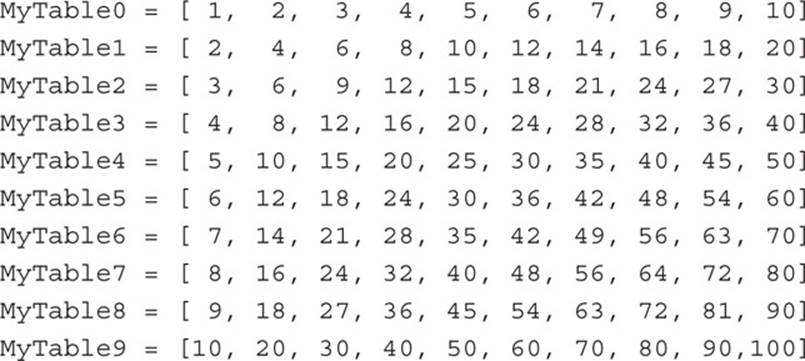
At this point we now have 10 arrays—one for each row in the times table. With these now created, it is possible to build a two-dimensional table by creating just one more master table, like this:
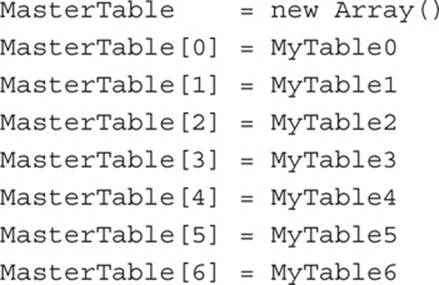
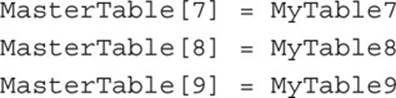
Or by using the shorter form of:

I have chosen to split this up into multiple lines for clarity, but you can equally include all the preceding in a single statement on one line.
Accessing a Two-Dimensional Array
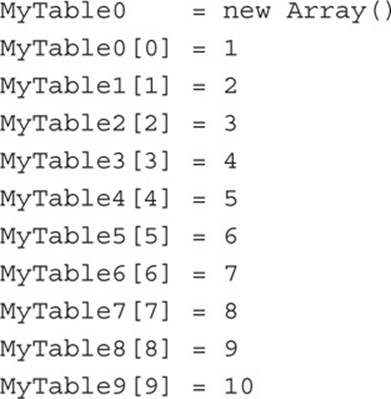
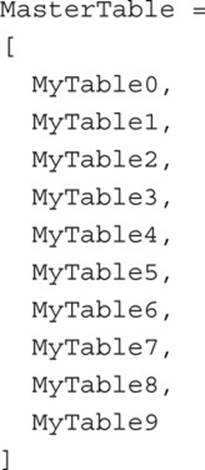
Let’s now look at how this relates to the filing cabinets in Figure 6-1 in terms of code. To recap, there is a main array called MasterTable[], and its 10 elements each contain another array named MyTable0[] through MyTable9[], as illustrated in Figure 6-3.
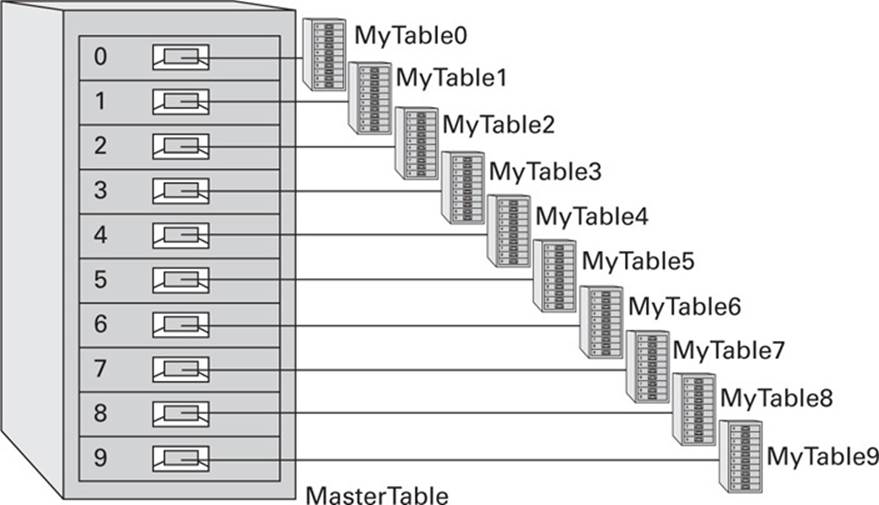
FIGURE 6-3 The relationship between the cabinets and arrays
As you will recall from Lesson 5, accessing an array is as simple as the following, which displays the value in the array held at a numeric index of 23 (which will be the 24th element because arrays start from 0) in an alert window:
alert(SomeArray[23])
But what should you do when the value stored in an array element is another array? The answer is simple and elegant—you simply add another pair of square brackets following the first pair and place an index value into that new array between them, like this:
alert(MasterTable[0][0])
This statement opens an alert window and displays in it the contents of the first element of the array that is stored in the first element of MasterTable[]. Notice that there is no need to reference the sub-array (sub-array being the term I use for referring to arrays within arrays) by name.
Likewise, if you wish to display the value held in the seventh element of the array stored in the third element of MasterTable[], you would use code such as this (remembering that table indexes start at 0, not 1, so the seventh and third elements will be 6 and 2, respectively):
alert(MasterTable[2][6])
In terms of the times table in Figure 6-2, this is equivalent to first moving to the seventh column along and then down to the third row, at which point you can see that the value shown is 21, as you will quickly see if you look at the source of timestable.htm (available in the companion archive):

This code is equivalent to the filing cabinets in Figure 6-1, in that the MasterTable[] array represents the large cabinet, whereas the MyTable0[] array is the top small cabinet and MyTable9[] is the bottom small cabinet, as shown in Figure 6-3.
If you now take all these small filing cabinets and stack them up alongside each other, you will now see how they represent the MasterTable[] array, as shown in Figure 6-4. For all intents and purposes, we can forget about the main array (other than using its name to index into the sub-arrays), think only in terms of the 10 sub-arrays and how to access each drawer using pairs of indexes.
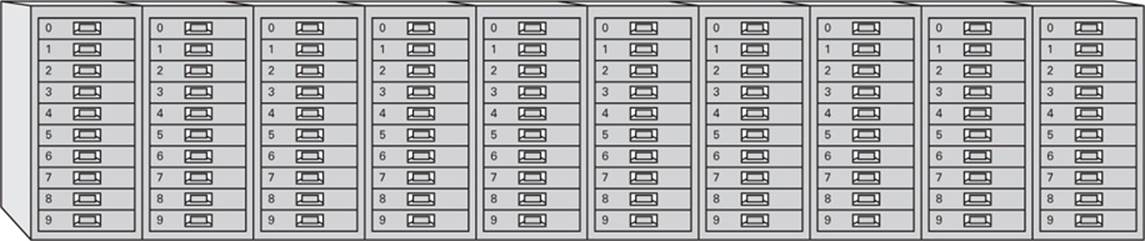
FIGURE 6-4 The small filing cabinets are now lined up alongside each other.
The first index goes along the cabinets from left to right (equivalent to going from the top to bottom drawer of MasterTable[], because each of these cabinets in order is in the next drawer down of MasterTable[]), and the second one goes from the top to the bottom drawer of each cabinet. Therefore, array index [3][7] points to the fourth filing cabinet along and the eighth drawer down. In other words, MasterTable[3][7] refers to the value held in the eighth drawer down of the fourth cabinet along.
A More Practical Example
Obviously, a multiplication table is a trivial thing to re-create on a computer, as it can be achieved with a couple of simple loops. Therefore, let’s look instead at a more practical example: that of a board for a game of chess.
As you likely know, there are 64 squares on a chessboard, laid out in an 8 × 8 grid, and there are two sets of 16 pieces: black and white. Using a computer to represent a chessboard in its starting position and ignoring the fact that the squares alternate between dark and light, you might use code such as this (in which uppercase letters represent white pieces, and the lowercase ones are black):
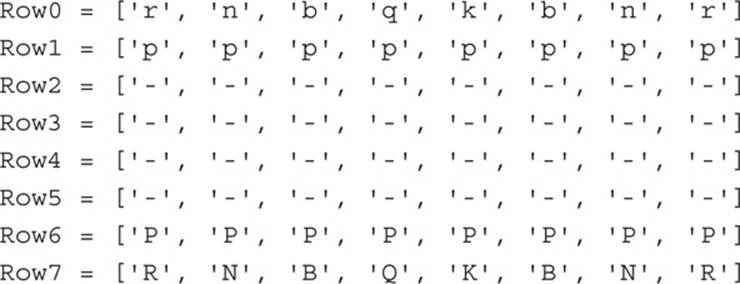
The dashes represent locations where there is no chess piece, and the key for the other letters is as follows:
• R/r Rooks
• N/n Knights
• B/b Bishops
• Q/q Queens
• K/k Kings
• P/p Pawns
You can now insert all these arrays into a master array that holds the complete chessboard, like this:
Board = [Row0, Row1, Row2, Row3, Row4, Row5, Row6, Row7]
Now we are ready to move pieces about on the board. Therefore, for example, let’s assume that the white player opens with the standard pawn to king 4 move. Using the array notation of locations [0][0] through [7][7], with [0][0] being the top left corner, and [7][7] the bottom right, this is equivalent to setting the location [6][4] to ′-′ to remove the pawn currently at this location, and then setting [4][4] to P to place the pawn in its new position. In terms of code, it would look like this:
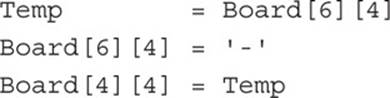
In this example a new variable called Temp is used to store the value extracted from Board[6][4]. Then Board[6][4] is set to a dash character to remove the piece, and the value now in Temp is then placed into Board[4][4], overwriting whatever value it previously held.
Or, if it’s not necessary to hold a copy of the piece being moved (which it is not in this very simple simulation), then you can simply set the two array locations to their required values, like this:
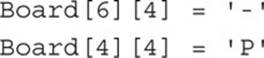
Figure 6-5 shows the chess.htm example file (available in the companion archive), in which the before- and after-board positions are shown, as created by the preceding code.

FIGURE 6-5 Moves resulting from modifying a two-dimensional chessboard array

If you wish, you may continue adding arrays within other arrays until you run out of computer memory. All you do is place new arrays inside existing ones to add an extra dimension. For example, if you were to create an additional 8 sub–sub-arrays for each of the sub-array elements (a total of 64 new arrays), you would form eight complete chessboards in a three-dimensional array, representing an 8 × 8 × 8 cube—3D chess anyone?
Multidimensional Associative Arrays
As you might expect, as with numeric arrays, you can create multidimensional associative arrays. Let me explain why you might want to do this by considering a small online store that sells toys for the following six different age ranges of children:
• Babies
• Toddlers
• Age 3–5
• Age 5–8
• Age 8–12
• Teenagers
These categories can be easily mapped into an associative array, as I show you in a minute. But let’s first create some subcategories for each of the main ones, such as these:
• Babies
• Rattle
• Bear
• Pacifier
• Toddlers
• Wooden Bricks
• Xylophone
• Play-Doh
• Age 3–5
• Slide
• Tricycle
• Crayons
• Age 5–8
• Dolly
• Bicycle
• Guitar
• Age 8–12
• Tablet Computer
• Remote-Control Car
• Frisbee
• Teenagers
• MP3 Player
• Game Console
• TV/DVD Combo
Clearly these subcategories can also be mapped to associative arrays, but before we do that, we have to go even deeper (yet more undertones of Inception) because a web store needs things such as pricing information and product availability, like this:
• Price
• Stock Level
Creating the Multidimensional Array
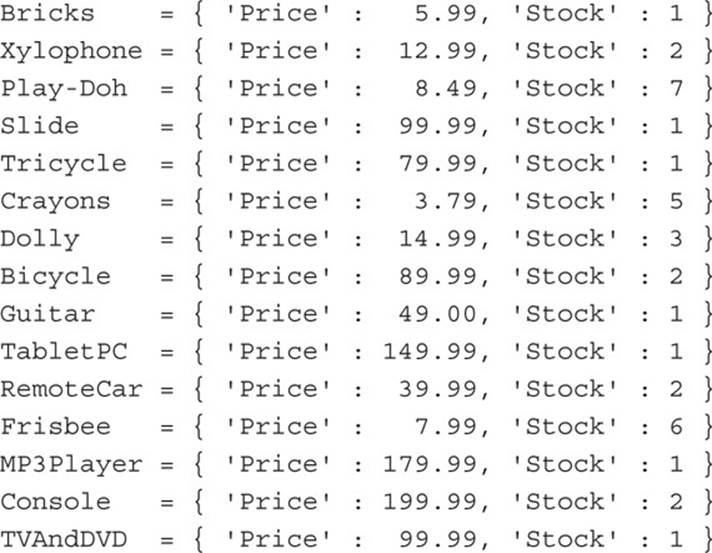
Armed with these details, we’re now ready to start building the arrays needed by assigning values to the price and stock level of each product being sold to a two-dimensional array for each product, as follows:

Now that these basic data structures are complete, it’s possible to group the products into the age range arrays, like this (where the words in quotes are the keys and those after the colons are the values, which are the names of the arrays previously created):
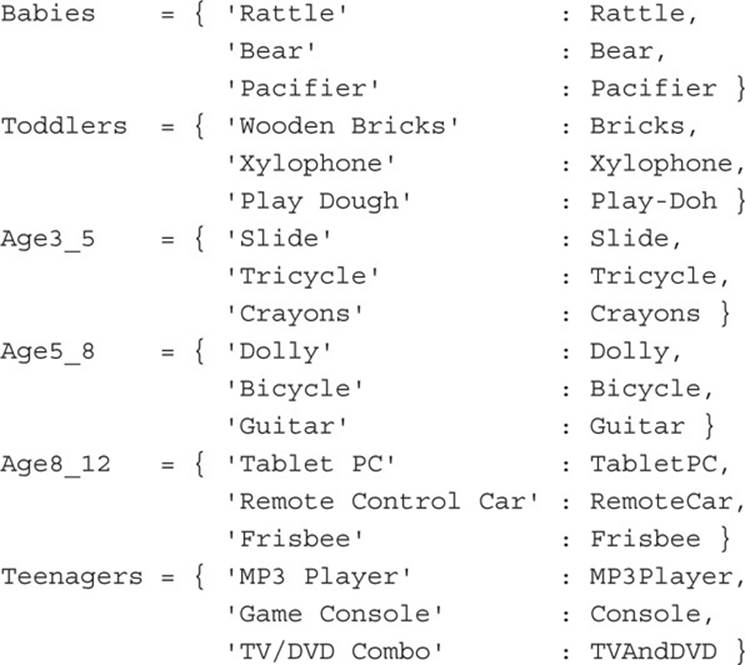
I used an underline character between the digits in these age range arrays because the dash is a disallowed character in variable or array names (because it can be confused with the minus symbol). The dash is acceptable, however, when used as part of a quoted string for a key name.
And finally the top array can be populated, like this (where the strings in quotes are the keys, and the values after the colons are the names of the arrays just defined):
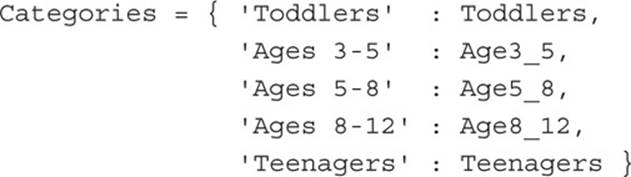
What has now been created is actually a three-dimensional array. The first dimension is the Categories[] array, the second is each of the age range arrays, and the third is each of the product arrays containing the price and stock level.
Remember that in each of these assignments the string on the left is the key and the item on the right is the value. In all but the innermost (or lowest) case, the value is the name of another array that has already been created. For the innermost case, the values are numeric values: the price and stock level.
Accessing the Arrays
You can now read and write to these stored values in the following manner, which returns the price of the slide, which is 99.99 (no currency type is specified in these examples, just values):
document.write(Categories[′Ages 3-5′][′Slide′][′Price′])
Or, if you need to change a price on an item of inventory for any reason, such as the crayons (currently 3.79), you can alter it in the following manner, which reduces the price by 0.20:
Categories[′Ages 3-5′][′Crayons′][′Price′] = 3.59
Likewise, when you sell an item of stock, you can reduce the inventory level (the stock level) in a similar manner, such as the following, which decreases the stock level of game consoles by 1 using the pre-decrement operator:
--Categories[′Teenagers′][′Game Console′][′Stock′]
Obviously, the inventory for even the smallest online store is sure to be far greater than in this example, and there are going to be many additional attributes for some toys, such as different sizes and colors and even any images, descriptions, and technical specifications or other details about the product that are available, all of which could easily be built into this multidimensional structure of arrays.
The file toystore.htm in the companion archive contains all the preceding pre-populated arrays and the example statements that access them. You may wish to try experimenting with it to read from and write to other items of data within the array structure.
The actual job of storing all your data will take place on a web server in a secure environment tightly controlled by your database management system. The purpose of using a structure of arrays in JavaScript like this, therefore, is purely for you to support easy manipulation of data for users within their browsers as they view your merchandise, without them having to leave your page, or transfer any data to or from the web server until an item is added to the user’s shopping cart.
Summary
Believe it or not, we’ve actually covered a huge amount of territory in just six lessons. Hopefully it’s all making sense to you, and arrays are beginning to feel like second nature. With this full understanding of how arrays are created and manipulated in JavaScript, in Lesson 7 we’ll look at some fun we can have using its array-accessing functions.
Self-Test Questions
Test how much you have learned in this lesson with these questions. If you don’t know an answer, go back and reread the relevant section until your knowledge is complete. You can find the answers in Appendix A.
1. How can you create a multidimensional array?
2. How do you access a two-dimensional numeric array?
3. How do you access a two-dimensional associative array?
4. How many levels deep can you nest additional arrays within a master array?
5. How might you construct a multidimensional array for a class of 30 history students to hold their grades for a year’s two semesters?
6. How might you extend this array to handle four years’ worth of semesters?
7. In the chessboard example, what code would represent the black player responding by moving pawn to queen 4?
8. And what code might represent the white player’s pawn at king 4 taking the black player’s pawn?
9. What would you do to turn a three-dimensional chessboard array into a four-dimensional array?
10. In the final example, what single line of code would increment the stock of toddlers’ bricks by 12?