JavaScript, 20 Lessons to Successful Web Development (2015)
PART II Advanced JavaScript
LESSON 8 Pushing to and Popping from Arrays

To view the accompanying video for this lesson, please visit mhprofessional.com/nixonjavascript/.
In addition to assigning values to an array when you create it or adding those values using numeric indexes or associative keys, you can simply push items of data onto an array and pop them off later. When doing this, you don’t need to keep track of an index number or any key names; you simply push a value and forget about it until you want to pop it back off the array later.
This makes it very easy to store certain types of temporary data suited to being held in what is known as a stack, a data storage structure that is so important that it is even implemented in the core of every microprocessor chip to aid with processing instructions in the right order.
In this lesson you learn how to use different types of stacks to achieve some useful data manipulation results.
Using push()
There are a couple of good reasons for using the push() function. First, you can add a new element to the end of an array without knowing how many items already exist in that array. For example, normally you would need to know the current array length and then use that value to add extra values, like this (using the Cats array from Lesson 7 once more):

The new variable len is used to hold the length of the array (the number of elements it contains). In this instance the value will be 6 (for elements 0 through 5). Therefore, the value in len, being 6, is suitable as an index into the next available element, and so that is what it is used for—the value 6 pointing to the seventh element (because array indexes start at 0).
In fact, if the variable len is not to be used anywhere else, it is actually superfluous, because you could replace the final two lines of the preceding example with this single statement:
Cats[Cats.length] = ″Siamese″
However, for certain purposes it can be much simpler to let JavaScript keep track of array lengths and simply tell it to add a new element to the Cats array, like this:
Cats.push(′Siamese′)
You can verify that the element has been added with the following for() loop (which results in Figure 8-1, the code for which is available as push.htm in the companion archive):
for (i in Cats) document.write(Cats[i] + ′<br>′)
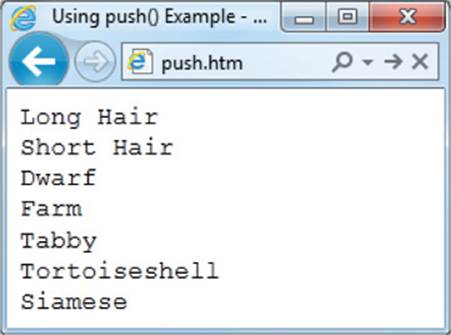
FIGURE 8-1 Pushing an element onto an array
The second reason you might want to use Push() is that it is a quick way of storing values in a sequence that then have to be recalled in the reverse order. For example, using push(), you can keep adding elements to an array, like this:
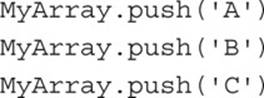
Then, as you will see in the following description of pop(), you can also remove these elements from last to first, such that the value C will be taken off first, then B, then A, and so on.
Using pop()
At its simplest, pop() enables you to remove the last element from an array (and in this instance discard the returned value), using code such as this:
MyArray.pop()
Or, to remove the last element from an array and store it in a variable (for example), you use code such as this:
MyVariable = MyArray.pop()
You can apply pop() to an existing array with values in, which may have been assigned when the array was created, via a call to push() or in any other way. The pop() function then pulls the last item off the array (removing it from the array) and then returns that value. Considering theCats array, a working example might look like this:
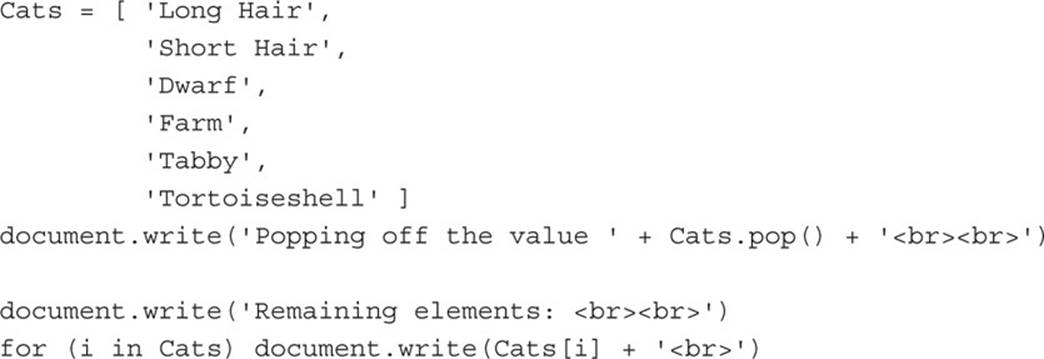
The result of running this code (available as pop.htm in the companion archive) is shown in Figure 8-2, where you can see that the value Tortoiseshell was popped off the array and underneath all the remaining elements are displayed—confirming that the previous final element has now been removed.
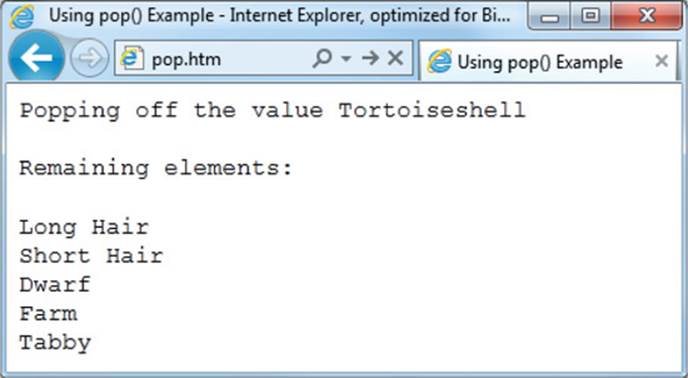
FIGURE 8-2 Popping an element off an array
Using push() and pop() Together
The pop() function is most commonly used with push() when writing code that uses recursion. Recursion is any section of code that calls itself and can then call itself again, and keep on doing so until the task of the code is complete (it’s like Inception yet again!).
If this sounds complicated, consider a search algorithm for exploring a maze such as the one in Figure 8-3, in which the objective is to find your way from the starting point at a to the finish at y.
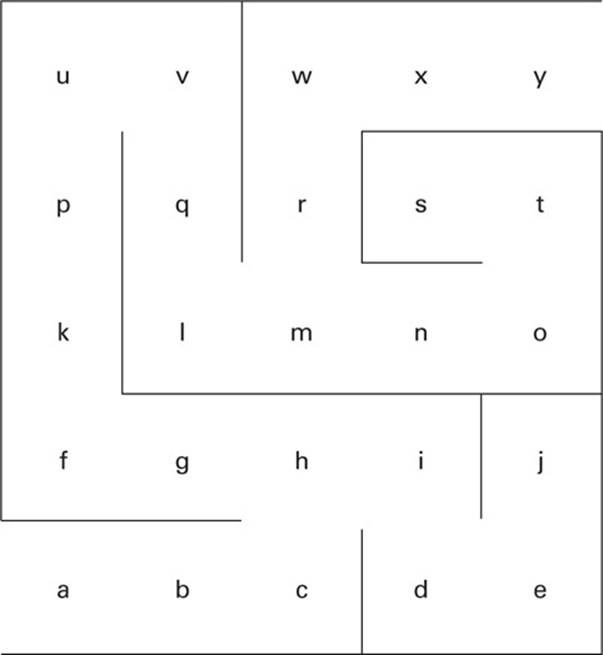
FIGURE 8-3 A simple 5 × 5 maze
You can clearly see the path to follow, but a computer is not so smart and will need to investigate the maze as if it were a rat, with walls higher than it can see over. Therefore, a program to do this will easily find its way along the path a-b-c-h, but then it will encounter a choice of going either left to location (or cell) g, or right to i.
Let’s assume it chooses the latter after selecting a direction at random. The program will then follow the path i-d-e-j, only to encounter a dead end, requiring the program to return. Let’s look at tracking this entire path so far using the push() function:

If you assume that there’s also some extra code (not documented here) that knows which cells the program has and hasn’t yet visited, it can now use the simple method of popping each cell off the array until it reaches one where it can get to a cell not yet visited. Pseudo-code (the actions to take expressed in plain English) to do this might look as follows:
While no unvisited cell is accessible pop a location off the array
And the sequence of actions that would happen within the loop section of this code would be like this:
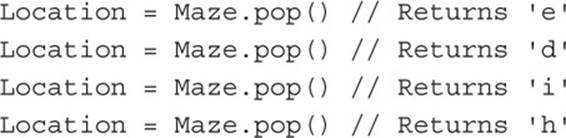
Location = Maze.pop() // Returns ′j′
Because no unvisited cell can be reached from j (as determined by the code that we assume is there but not documented), the loop will go around again and again until an unvisited cell can be accessed, resulting in four additional calls to pop(), as follows:
Now, when the program finds it has popped the location h off the stack, it discovers there is a new cell it can go to, namely g, and so the process continues along the path g-f-k-p-u-v-q-l-m, at which point another choice of directions is encountered: either r or n.
To track this path, the program will push all the cells between g and m onto the array, and then (if it continues straight ahead) also push the path n-o-t-s, at which point another dead end is encountered.
Then, as before, the code pops off all the cells in a loop until it reaches m, at which point the unvisited cell r is accessible and the final path out of the maze is discovered: r-w-x-y.

Recursion is quite complex programming, especially for beginners, which is why I have not documented the ancillary code you would use to take care of tracking the visited and unvisited cells. I simply wanted to offer a visual example of recursion that would explain what’s going on and show you how to use push() and pop() together. But don’t worry if you find any of it confusing, as you can safely move on with the book and come back here another time when you find an actual need for these functions.
Using reverse()
When you want to reverse the order of elements in an array, you can call the reverse() function, which actually reverses the array contents, rather than returning a new array as some other functions do.
To use the function, simply attach it to the array to be reversed, like this:
MyArray.reverse()
Figure 8-4 shows this function being used to reverse the Cats array from earlier in this lesson, the code for which is available as reverse.htm in the companion archive.
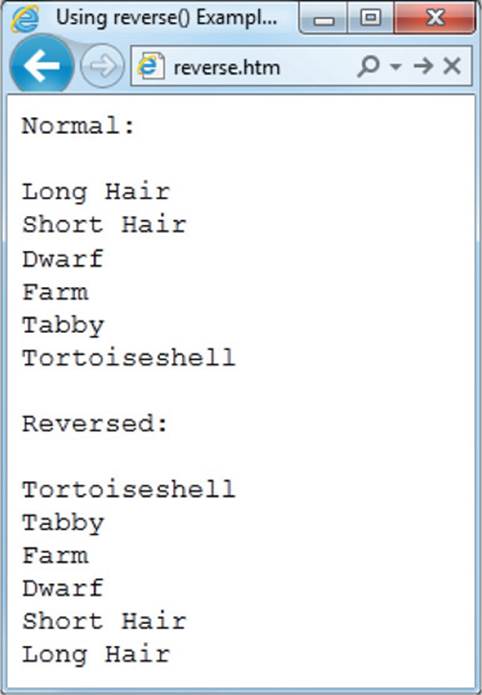
FIGURE 8-4 Array elements before and after reversing
Using Stacks and Buffers
The reverse() function is sometimes used on an array of elements that have been created by pushing the values onto it. As you will know from the earlier push() section, pushed values are added to the end of an array such that when you come to pop them off again, they are returned in reverse order. This is often referred to as a FILO (First In/Last Out) or sometimes as a LIFO (Last In/First Out) array. When an array is used this way, it is also sometimes called a stack.
But if you wish to operate a FIFO (First In/First Out) or LILO (Last In/Last Out) array—both are the same thing—you can reverse an array before pushing an item onto it and then reverse it again, ready for elements to be popped off. That way, the first value pushed onto it will be the first one popped off, and so on.
This type of array is also known as a buffer, and is typically used for handling events such as keyboard input, in which the key presses should be stored (buffered) until needed and returned in the order they were pressed.
Buffering Using an Array
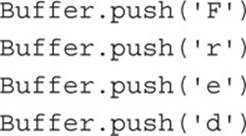
You can see a simulation of this in the following code, in which the word Fred is being pushed into the array Buffer() as if entered one key press at a time, with the array’s contents shown in the comment immediately following each statement. The top (or start) of the array is at the left of the string shown in the comments, and the bottom (or end) of the array (onto which values are pushed and popped) is at the right of the string:
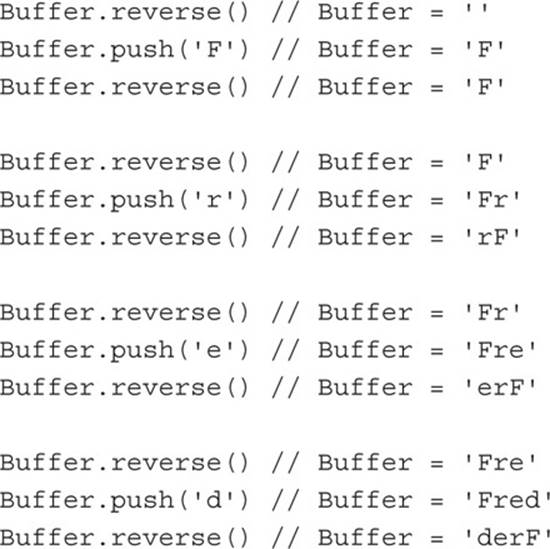
Initially, Buffer() is empty and has no elements, but then the letter F is pushed onto it. Seeing as the array has only a single element; reversing it at this point has no effect. However, when the next letter r is to be added, it is pushed to the bottom of the array, denoted in the comment as being on the right of the F.
After the array is reversed back again, the r is at the top and F is at the bottom of the array. This is exactly where we want these elements to be, because if the code that uses this buffering system is ready to process the next key press in the buffer, it can simply issue a call to pop(), which will pull the letter F off it. This is correct because when processing buffered data such as this, the letters typed must be processed in the order typed.
When the letter e is processed, the array is once again reversed so that the new letter can be added to the bottom of the array. Then the array is reversed back again so that if pop() is called at this point, F will be the first letter popped off. After this third set of statements, F is at the bottom of the array, r is in the middle, and e is at the top.
Finally, the letter d is processed using the same procedure so that after it has been placed in the array, it is at the top, with the F at the bottom.
You can now retrieve this keyboard input from the array, using the pop() function as many times as required (in this instance, four times), like this:
KeyPress = Buffer.pop()
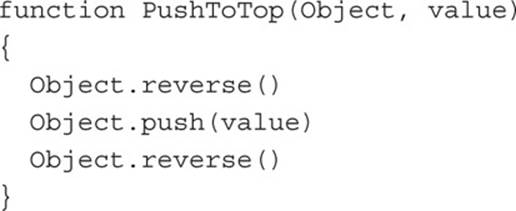
Creating a Function for Pushing to the Top
If you need a way to push values to the start of an array (instead of the end), you can create a PushToTop() function, using push() in conjunction with reverse():
Then you simply call the new function, instead of each group of three statements in the previous example, like this:
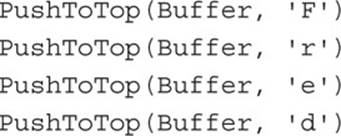
Then, to retrieve the key presses in the right order, you simply call pop() as many times as necessary, like this:
KeyPress = Buffer.pop()
Lesson 12 explains in detail how to write functions, pass values to them, and return values back to the calling code.
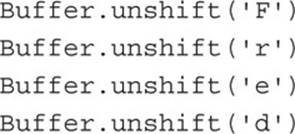
The shift() and unshift() Functions
Actually, JavaScript does have a built-in function to push to the other end of an array—I simply wanted to show how you could combine reverse() and push() to achieve the same result. But you can, in fact, push values to the top of an array, using the (curiously named) unshift() function. Likewise, you can also pop from the top of an array, using the shift() function. Therefore, the following code is all you would need to replicate the preceding examples:
Then, to retrieve these values in the order they were saved, you would simply use the pop() function to fetch first F, then r, e, and d, like this:
KeyPress = Buffer.pop()
However, because the shift() function retrieves from the other end of the array to pop(), we can also turn the whole code on its head and go back to using the following code to populate the array:
And then, to treat the array Buffer as an actual buffer (not a stack), just use shift() to retrieve these values in the order in which they were pushed onto the array (F, r, e, and finally d), like this:
KeyPress = Buffer.shift()
Summary
Using the functions covered in this lesson, your ability to manipulate data in arrays has taken a quantum leap and you will now be able to handle even the most sophisticated of data structures. In the following (and final) lesson on arrays, we’ll take things one stage further by delving right into their insides and splicing in and out whole sections of arrays.
Self-Test Questions
Using these questions, test how much you have learned in this lesson. If you don’t know an answer, go back and reread the relevant section until your knowledge is complete. You can find the answers in Appendix A.
1. Which function adds a new element to the bottom of an array?
2. Which function removes an element from the bottom of an array?
3. Which function adds a new element to the top of an array?
4. Which function removes an element from the top of an array?
5. What is a First In/Last Out (FILO) array also known as?
6. What is a First In/First Out (FIFO) array also known as?
7. With which function can you invert the order of elements in an array?
8. How can you determine the number of elements in an array?
9. What is the name given to the process of a section of code repeatedly calling itself?
10. Which array structure (stack or buffer) is best suited for the programming type described in Question 9?
All materials on the site are licensed Creative Commons Attribution-Sharealike 3.0 Unported CC BY-SA 3.0 & GNU Free Documentation License (GFDL)
If you are the copyright holder of any material contained on our site and intend to remove it, please contact our site administrator for approval.
© 2016-2026 All site design rights belong to S.Y.A.