Learning JavaScript Data Structures and Algorithms (2014)
Chapter 10. Sorting and Searching Algorithms
Suppose we have a telephone agenda (or a notebook) that does not have any sorting order. When you need to add a contact with telephone numbers, you simply write it down in the next available slot. Suppose you also have a high number of contacts in your contact list. On any ordinary day, you need to find a particular contact and their telephone numbers. But as the contact list is not organized in any order, you have to check it contact by contact until you find the desired one. This approach is horrible, don't you agree? Imagine that you have to search for a contact in the Yellow Pages and it is not organized! It could take forever!
For this reason, among others, we need to organize sets of information, such as the information we have stored in data structures. Sorting and searching algorithms are widely used in daily problems we have to solve. In this chapter, you will learn about the most commonly used sorting and searching algorithms.
Sorting algorithms
From this introduction, you should understand that you need to learn how to sort first and then search the information given. In this section, we will cover some of the most well-known sorting algorithms in Computer Science. We will start with the slowest one, and then we will cover some better algorithms.
Before we get started with the sorting algorithms, let's create an array (list) to represent the data structure we want to sort and search:
function ArrayList(){
var array = []; //{1}
this.insert = function(item){ //{2}
array.push(item);
};
this.toString= function(){ //{3}
return array.join();
};
}
As you can see, the ArrayList is a simple data structure that will store the items in an array ({1}). We only have an insert method to add elements to our data structure ({2}), which simply uses the native push method of the JavaScript Array class that we covered in Chapter 2, Arrays. Finally, to help us verify the result, the toString method ({3}) will concatenate all the array's elements into a single string so we can easily output the result in the browser's console by using the join method from the native JavaScript Array class.
Note
The join method joins the elements of an array into a string and returns the string.
Note that this ArrayList class does not have any method to remove data or insert it into specific positions. We want to keep it simple so we can focus on the sorting and searching algorithms. We will add all the sorting and searching methods to this class.
Now we can get started!
Bubble sort
When people first start learning sorting algorithms, they usually learn the bubble sort algorithm first, because it is the simplest of all the sorting algorithms. However, it is one of the worst-case sorting algorithms with respect to runtime, and you will see why.
The bubble sort algorithm compares every two adjacent items and swaps them if the first one is bigger than the second one. It has this name because the items tend to move up into the correct order like bubbles rising to the surface.
Let's implement the bubble sort algorithm:
this.bubbleSort = function(){
var length = array.length; //{1}
for (var i=0; i<length; i++){ //{2}
for (var j=0; j<length-1; j++ ){ //{3}
if (array[j] > array[j+1]){ //{4}
swap(j, j+1); //{5}
}
}
}
};
First, let's declare a variable called length, which will store the size of the array ({1}). This step will help us to get the size of the array on {2} and {3}, and this step is optional. Then, we will have an outer loop ({2}) that will iterate the array from its first position to the last one, controlling how many passes are done in the array (should be one pass per item of the array, as the number of passes is equal to the size of the array). Then, we have an inner loop ({3}) that will iterate the array starting from its first position to the penultimate item that will actually do the comparison between the current item and the next one ({4}). If the items are out of order (the current one is bigger than the next one), then we swap them ({5}), meaning that the value of position j+1 will be transferred to position j and vice versa.
Now we need to declare the swap function (a private function that is available only to the code inside the ArrayList class):
var swap = function(index1, index2){
var aux = array[index1];
array[index1] = array[index2];
array[index2] = aux;
};
To make the swap, we need a temporary variable to store the value of one of the items in. We will use this method for other sorting methods as well, and this is the reason we declare this swap code into a function so that we can reuse it.
The following diagram illustrates the bubble sort in action:
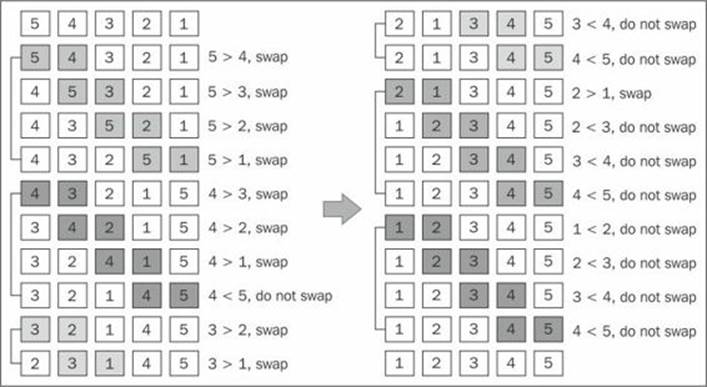
Each different section in the preceding diagram represents a pass made by the outer loop ({2}), and each comparison between two adjacent items is made by the inner loop ({3}).
To test the bubble sort algorithm and get the same results shown by the diagram, we are going to use the following code:
function createNonSortedArray(size){ //{6}
var array = new ArrayList();
for (var i = size; i> 0; i--){
array.insert(i);
}
return array;
}
var array = createNonSortedArray(5); //{7}
console.log(array.toString()); //{8}
array.bubbleSort(); //{9}
console.log(array.toString()); //{10}
To help us test the sorting algorithms you will learn in this chapter, we are going to create a function that will automatically create a non-sorted array with the size that is passed by the parameter ({6}). If we pass 5 as parameter, the function will create the following array for us: [5, 4, 3, 2, 1]. Then, all we have to do is call this function and store its return value in a variable that will contain the instance of the ArrayList class initialized with some numbers ({7}). Just to make sure we have an unsorted array, we will output the array's content on console ({8}), call the bubble sort method ({9}), and output the array's content on console again so we can verify that the array was sorted ({10}).
Note
You can find the complete source code of the ArrayList class and the testing code (with additional comments) on the source code that you downloaded from the support page (or from the GitHub repository).
Note that when the algorithm executes the second pass of the outer loop (the second section of the the previous diagram), the numbers 4 and 5 are already sorted. Nevertheless, on the subsequent comparisons, we keep comparing them even the comparison it is not needed. For this reason, we make a small improvement on the bubble sort algorithm.
Improved bubble sort
If we subtract the number of passes from the inner loop, we will avoid all the unnecessary comparisons done by the inner loop ({1}):
this.modifiedBubbleSort = function(){
var length = array.length;
for (var i=0; i<length; i++){
for (var j=0; j<length-1-i; j++ ){ //{1}
if (array[j] > array[j+1]){
swap(j, j+1);
}
}
}
};
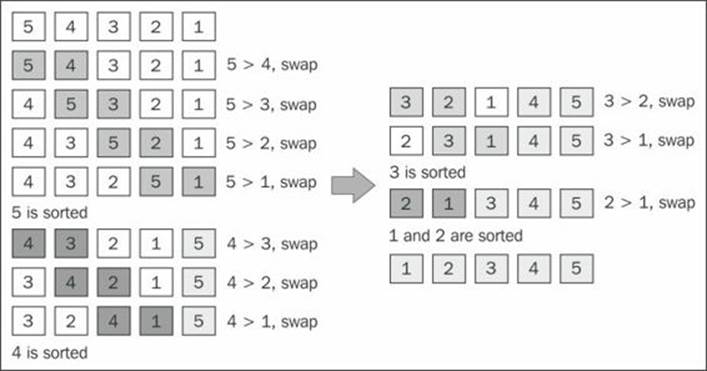
The following diagram exemplifies how the improved bubble sort works:
Note
Note that we do not compare the numbers that are already in place. Even though we have made this small change to improve the bubble sort algorithm a little bit, it is not a recommended algorithm. It has a complexity of O(n2).
We will talk more about the big O notation in the next chapter.
Selection sort
The selection sort algorithm is an in-place comparison sort algorithm. The general idea of the selection sort is to find the minimum value in the data structure and place it in the first position, then find the second minimum value and place it in the second position, and so on.
The following is the source code for the selection sort algorithm:
this.selectionSort = function(){
var length = array.length, //{1}
indexMin;
for (var i=0; i<length-1; i++){ //{2}
indexMin = i; //{3}
for (var j=i; j<length; j++){ //{4}
if(array[indexMin]>array[j]){ //{5}
indexMin = j; //{6}
}
}
if (i !== indexMin){ //{7}
swap(i, indexMin);
}
}
};
First, we declare some variables we are going to use in the algorithm ({1}). Then, we have an outer loop ({2}) that will iterate the array and control the passes (which nth value of the array we need to find next—the next min value). We assume that the first value of the current pass is the minimum value of the array ({3}). Then, starting from the current i value to the end of the array ({4}), we compare whether the value in the position j is less than the current minimum value ({5}); if true, we change the value of the minimum to the new minimum value ({6}). When we get out of the inner loop ({4}), we will have the nth minimum value of the array. Then, if the minimum value is different from the original minimum value ({7}) we swap them.
To test the selection sort algorithm, we can use the following code:
array = createNonSortedArray(5);
console.log(array.toString());
array.selectionSort();
console.log(array.toString());
The following diagram exemplifies the selection sort algorithm in action, based on our array that is used in the preceding code [5, 4, 3, 2, 1]:
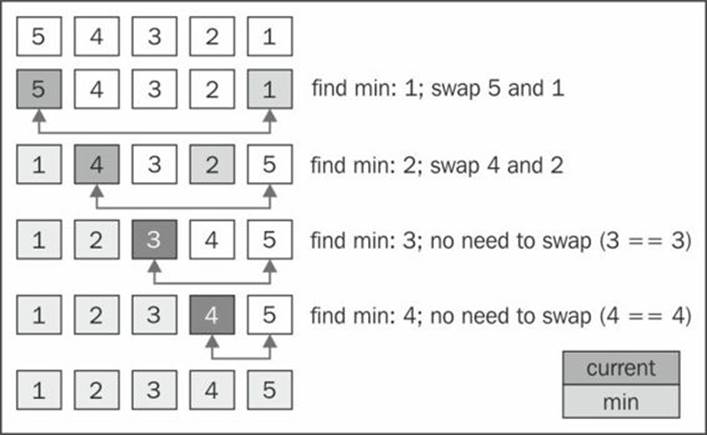
The arrows on the bottom of the array indicate the positions currently in consideration to find the minimum value (inner loop {4}), and each step of the preceding diagram represents the outer loop ({2}).
The selection sort is also an algorithm of complexity O(n2). Like the bubble sort, it contains two nested loops, which are responsible for the quadratic complexity. However, the selection sort performs worse than the insertion sort algorithm you will learn next.
Insertion sort
The insertion sort algorithm builds the final sorted array one item at a time. It assumes that the first element is already sorted. Then, a comparison with the second item is performed—should the second item stay in its place or be inserted before the first item? So, the first two items get sorted and the comparison takes place with the third item (should it be inserted in the first, second, or third position?), and so on.
The following code represents the insertion sort algorithm:
this.insertionSort = function(){
var length = array.length, //{1}
j, temp;
for (var i=1; i<length; i++){ //{2}
j = i; //{3}
temp = array[i]; //{4}
while (j>0 && array[j-1] > temp){ //{5}
array[j] = array[j-1]; //{6}
j--;
}
array[j] = temp; //{7}
}
};
As usual, the first line of the algorithm is used to declare the variables we will use in the source code ({1}). Then, we will iterate the array to find the correct place for the ith item ({2}). Note that we start from the second position (index 1), instead of position 0 (we consider the first item already sorted). Then, we will initiate an auxiliary variable with the value of i ({3}), and we will also store the value in a temporary value ({4}) so we can insert it in the correct position later. The next step is finding the correct place to insert the item. As long the j variable is bigger than 0(because the first index of the array is 0—there is no negative index) and the previous value in the array is bigger than the value we are comparing ({5}), we shift the previous value to the current position ({6}) and decrease j. At the end, we will insert the value in its correct position.
The following diagram exemplifies the insertion sort in action:

For example, suppose the array we are trying to sort is [3, 5, 1, 4, 2]. These values will be carried out in the steps performed by the insertion sort algorithm, as described in the following steps:
1. Value 3 is already sorted, so we start sorting the second value of the array, which is value 5. Value 3 is less than value 5, so 5 stays in the same place (meaning the second position of the array). Values 3 and 5 are already sorted.
2. The next value to be sorted and inserted in the correct place is 1 (currently in the third position of the array). 5 is greater than 1, so 5 is shifted to the third position. We need to analyze whether 1 should be inserted in the second position—is 1 greater than 3? No, so value 3 gets shifted to second position. Next, we need to verify that 1 should be inserted in the first position of the array. As 0 is the first position and there is not a negative position, 1 needs to be inserted on the first position. Values 1, 3, and 5 are sorted.
3. We move to the next value: 4. Should value 4 stay in the current position (index 3) or does it need to be moved to a lower position? 4 is less than 5, so 5 gets shifted to index 3. Should we insert 4 in the index 2? Value 4 is greater than 3, so 4 is inserted in position 3 of the array.
4. The next value to be inserted is 2 (position 4 of array). Value 5 is greater than 2, so 5 gets shifted to index 4. Value 4 is greater than 2, so 4 also gets shifted (position 3). Value 3 is also greater than 2, and 3 also gets shifted. 1 is less than 2, so 2 is inserted on the second position of the array. Thus, the array is sorted.
This algorithm has a better performance than the selection and bubble sort algorithms when sorting small arrays.
Merge sort
The merge sort algorithm is the first sorting algorithm that can be used in the real world. The three first sorting algorithms you learned in this book do not give a good performance, but the merge sort gives a good performance, with a complexity of O(n log n).
Note
The JavaScript Array class defines a sort function (Array.prototype.sort) that can be used to sort arrays using JavaScript (with no need to implement the algorithm ourselves). ECMAScript does not define which sorting algorithm needs to be used, so each browser can implement its own algorithm. For example, Mozilla Firefox uses merge sort as the Array.prototype.sort implementation, while Chrome uses a variation of quick sort (which we will learn next).
The merge sort is a divide and conquer algorithm. The idea behind it is to divide the original array into smaller arrays until each small array has only one position and then merge these smaller arrays into bigger ones until we have a single big array at the end that is sorted.
Because of the divide and conquer approach, the merge sort algorithm is also recursive:
this.mergeSort = function(){
array = mergeSortRec(array);
};
Like in the previous chapters, whenever we implemented a recursive function, we always implemented a helper function that was going to be executed. For the merge sort, we will do the same. We are going to declare the mergeSort method that will be available for use and the mergeSortmethod will call mergeSortRec, which is a recursive function:
var mergeSortRec = function(array){
var length = array.length;
if(length === 1) { //{1}
return array; //{2}
}
var mid = Math.floor(length / 2), //{3}
left = array.slice(0, mid), //{4}
right = array.slice(mid, length); //{5}
return merge(mergeSortRec(left), mergeSortRec(right)); //{6}
};
The merge sort will transform a bigger array into smaller arrays until they have only one item in them. As the algorithm is recursive, we need a stop condition, which is if the array has size equal to 1 ({1}). If positive, we return the array with size 1 ({2}) because is already sorted.
If the array is bigger than 1, then we will split it into smaller arrays. To do so, first we need to find the middle of the array ({3}), and once we find the middle, we will split the array into two smaller arrays that we will call left ({4}) and right ({5}). The left array comprises of elements from index 0 to the middle index, and the right array consists from the middle index to the end of the original array.
The next steps will be to call the merge function ({6}), which will be responsible for merging and sorting the smaller arrays into bigger ones until we have the original array sorted and back together. To keep breaking the original array into smaller pieces, we will recursively call mergeSortRecagain, passing the left smaller array as a parameter and another call for the right array:
var merge = function(left, right){
var result = [], // {7}
il = 0,
ir = 0;
while(il < left.length && ir < right.length) { // {8}
if(left[il] < right[ir]) {
result.push(left[il++]); // {9}
} else{
result.push(right[ir++]); // {10}
}
}
while (il < left.length){ // {11}
result.push(left[il++]);
}
while (ir < right.length){ // {12}
result.push(right[ir++]);
}
return result; // {13}
};
The merge function receives two arrays and merges them into a bigger array. During the merge is when the sorting happens. First, we need to declare a new array that is going to be created for the merge and also declare two variables ({7}) that are going to be used to iterate the two arrays (theleft and right arrays). While we can iterate through the two arrays {8}, we are going to compare whether the item from the left array is less than the item from the right array. If positive, we add the item from the left array to the merged result array and also increment the variable that is used to iterate the array ({9}); otherwise, we add the item from the right array and increment the variable that is used to iterate the array ({10}). Next, we will add every remaining item from the left array ({11}) to the merged result array and do the same for the remaining items from theright array ({12}). At the end, we return a merged array as the result ({13}).
If we execute the mergeSort function, this is how it is going to be executed:
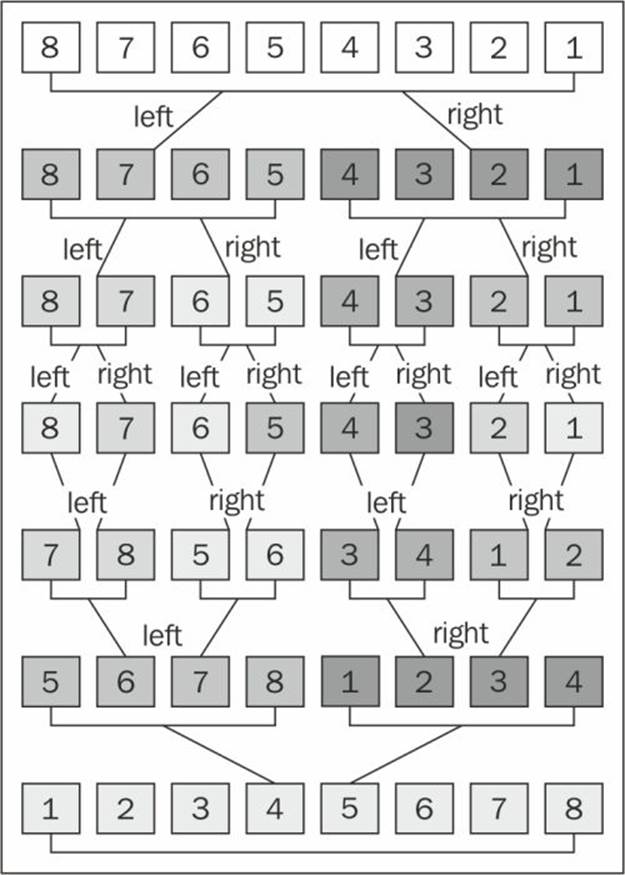
Note that first the algorithm splits the original array until it has smaller arrays with a single element, and then it starts merging. While merging, it does the sorting as well until we have the original array completely back together and sorted.
Quick sort
The quick sort is probably the most used sorting algorithm. It has a complexity of O(n log n), and it usually performs better than other O(n log n) sorting algorithms. Like the merge sort, it also uses the divide and conquer approach, dividing the original array into smaller ones (but without splitting them as the merge sort does) to do the sorting.
The quick sort algorithm is a little bit more complex than the other ones you have learned so far. Let's learn it step by step as follows:
1. First, we need to select an item from the array that is called as a pivot, which is the middle item in the array.
2. We will create two pointers—the left one will point to the first item of the array and the right one will point to the last item of the array. We will move the left pointer until we find an item that is bigger than the pivot and we will also move the right pointer until we find an item that is less than the pivot and we will swap them. We repeat this process until the left pointer passes the right pointer. This process helps to have values lower than the pivot before the pivot and values greater than the pivot after the pivot. This is called the partition operation.
3. Next, the algorithm repeats the previous two steps for smaller arrays (sub-arrays with smaller values, and then sub-arrays with greater values) until the array is completely sorted.
Let's start the implementation of the quick sort:
this.quickSort = function(){
quick(array, 0, array.length - 1);
};
Like the merge sort, we will start declaring the main method that will call the recursive function, passing the array that we want to sort along with indexes 0 and its last position (because we want to have the whole array sorted, not only a subset of it):
var quick = function(array, left, right){
var index; //{1}
if (array.length > 1) { //{2}
index = partition(array, left, right); //{3}
if (left < index - 1) { //{4}
quick(array, left, index - 1); //{5}
}
if (index < right) { //{6}
quick(array, index, right); //{7}
}
}
};
First we have the index variable ({1}), which will help us to separate the sub-array with smaller and greater values so we can recursively call the quick function again. We will obtain the index value as return value of the partition function ({3}).
If the size of the array is bigger than 1 (because an array with a single element is already sorted—line {2}), we will execute the partition operation on the given sub-array (the first call will pass the complete array) to obtain index ({3}). If a sub-array with smaller elements exists ({4}), we will repeat the process for the sub-array ({5}). We will do the same thing for the sub-array with greater values. If there is any sub-array with greater values ({6}), we will repeat the quick sort process ({7}) as well.
The partition process
Now, let's take a look at the partition process:
var partition = function(array, left, right) {
var pivot = array[Math.floor((right + left) / 2)], //{8}
i = left, //{9}
j = right; //{10}
while (i <= j) { //{11}
while (array[i] < pivot) { //{12}
i++;
}
while (array[j] > pivot) { //{13}
j--;
}
if (i <= j) { //{14}
swapQuickStort(array, i, j); //{15}
i++;
j--;
}
}
return i; //{16}
};
The first thing we need to do is choose the pivot element. There are a few ways we can do it. The simplest one is selecting the first item of the array (the leftmost item). However, studies show that this is not a good selection if the array is almost sorted, causing the worst behavior of the algorithm. Another approach is selecting a random item of the array or the middle item. For this implementation, we will select the middle item as pivot ({8}). We will also initiate the two pointers: left (low—line {9}) with the first element of the array and right (high—line {10}) with the last element of the array.
While the left and right pointers do not cross each other ({11}), we will execute the partition operation. First, until we find an element that is greater than pivot ({12}), we will shift the left pointer. We will do the same with the right pointer until we find an element that is less than pivot, we will shift the right pointer as well ({13}).
When the left pointer is greater than the pivot and the right pointer is lower than the pivot, we compare whether the left pointer index is not bigger than the right pointer index ({14}), meaning the left item is greater than the right item (in value). We swap them ({15}) and shift both pointers and repeat the process (start again at line {11}).
At the end of the partition operation, we return the index of the left pointer that will be used to create the sub-arrays in line {3}.
The swapQuickStort function is very similar to the swap function we implemented at the beginning of this chapter. The only difference is that this one also receives the array that will suffer the swap as a parameter:
var swapQuickStort = function(array, index1, index2){
var aux = array[index1];
array[index1] = array[index2];
array[index2] = aux;
};
Quick sort in action
Let's see the quick sort algorithm in action step by step:
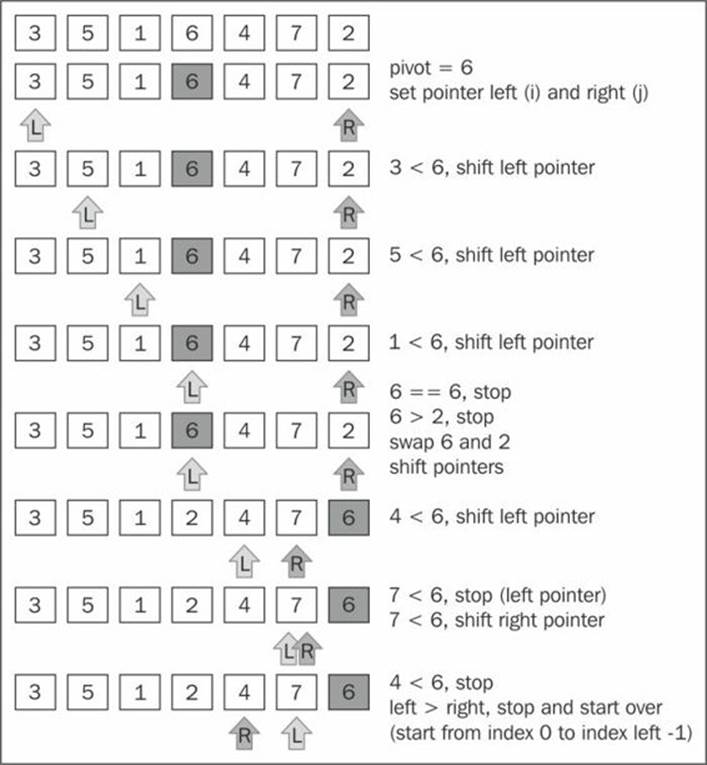
Given the array [3, 5, 1, 6, 4, 7, 2], the preceding diagram represents the first execution of the partition operation.
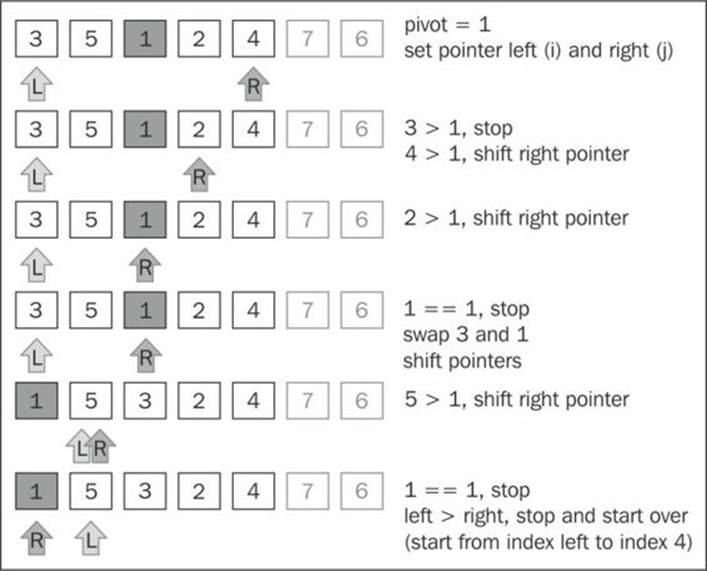
The following diagram exemplifies the execution of the partition operation for the first sub-array of lower values (note that 7 and 6 are not part of the sub-array):
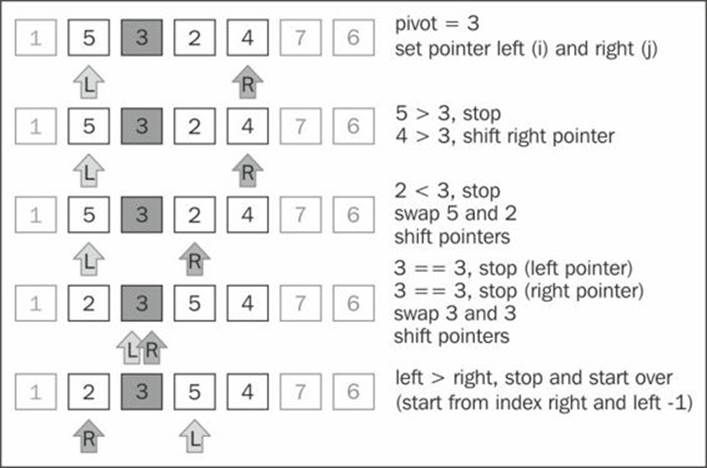
Next, we continue creating sub-arrays, as seen in the following diagram, but now with greater values than the sub-array of the preceding diagram (the lower sub-array with value 1 does not need to be partitioned because it only contains one item):
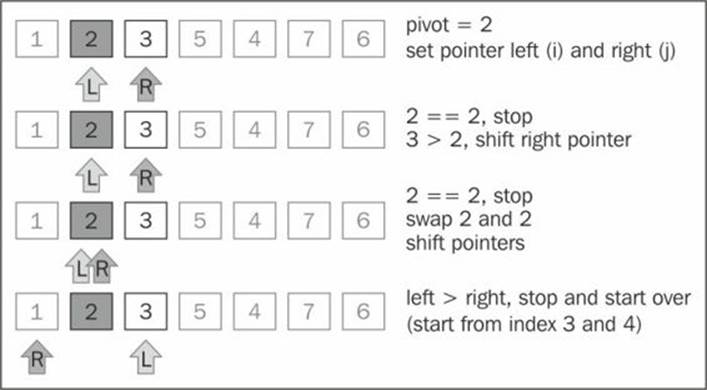
The lower sub-array [2, 3] from sub-array ([2, 3, 5, 4]) continues to be partitioned (line {5} from the algorithm):
Then the greater sub-array [5, 4] from the sub-array [2, 3, 5, 4] also continues to be partitioned (line {7} from the algorithm), as shown in the following diagram:

At the end, the greater sub-array [6, 7] will also suffer the partition operation, completing the execution of the quick sort algorithm.
Searching algorithms
Now, let's talk about searching algorithms. If we take a look at the algorithms we implemented in previous chapters, such as the search method of the BinarySearchTree class (Chapter 8, Trees) or the indexOf method of the LinkedList class (Chapter 5, Linked Lists), these are all search algorithms, and of course, each one was implemented according to the behavior of its data structure. So we are already familiar with two-searches algorithm, we just do not know their "official" names yet!
Sequential search
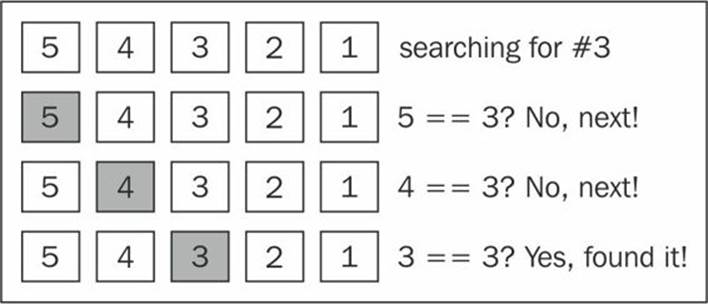
The sequential or linear search is the most basic search algorithm. It consists of comparing each element of the data structure with the one we are looking for. It is also the most inefficient one.
Let's take a look at its implementation:
this.sequentialSearch = function(item){
for (var i=0; i<array.length; i++){ //{1}
if (item === array[i]){ //{2}
return i; //{3}
}
}
return -1; //{4}
};
The sequential search will iterate through the array ({1}), and will compare each item with the value we are searching for ({2}). If we find it, then we can return something to indicate we found it. We can return the item itself, the value true, or its index ({3}). In the preceding implementation, we are returning the index of the item. If we don't find the item, we can return -1 ({4}), indicating the index does not exist; the values false and null are among other options.
Suppose we have the array [5, 4, 3, 2, 1] and we are looking for the value 3, then the following diagram shows the steps of the sequential search:
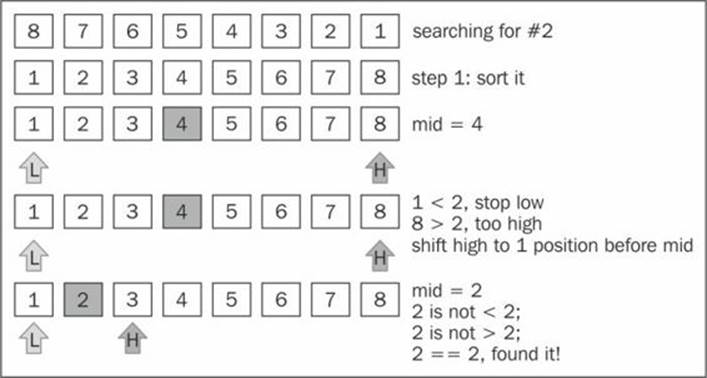
Binary search
The binary search algorithm works similar to the number guessing game, where someone says "I'm thinking of a number between 1 and 100". We begin by responding with a number and the person will say higher, lower, or that we got it right.
To make the algorithm work, the data structure needs to be sorted first. These are the steps that the algorithm follows:
1. A value is selected in the middle of the array.
2. If the item is the one we are looking for, we are done (the value is right).
3. If the value we are looking for is less than the selected one, then we go to the left and go back to 1 (lower).
4. If the value we are looking for is bigger than the selected one, then we go to the right and go back to 1 (higher).
Let's see its implementation:
this.binarySearch = function(item){
this.quickSort(); //{1}
var low = 0, //{2}
high = array.length - 1, //{3}
mid, element;
while (low <= high){ //{4}
mid = Math.floor((low + high) / 2); //{5}
element = array[mid]; //{6}
if (element < item) { //{7}
low = mid + 1; //{8}
} else if (element > item) { //{9}
high = mid - 1; //{10}
} else {
return mid; //{11}
}
}
return -1; //{12}
};
To get started, the first thing we need to do is sort the array. We can use any algorithm we implemented in the Sorting algorithms section. Quick sort was chosen for this implementation ({1}). After the array is sorted, we will set the low ({2}) and high ({3}) pointer (which will work as boundaries).
While low is lower than high (line {4}), in this case, low is greater than high means the value does not exist and we return -1 ({12}), we find the middle index ({5}) and hence have the value of the middle item ({6}). Then, we start comparing whether the selected value is less than the value we are looking for ({7}) and we need to go lower ({8}) and start over. If the selected value is greater than the value we are looking for ({9}) and we need to go higher ({10}) and start over. Otherwise, it means the value is equal to the value we are looking for, therefore we return its index ({11}).
Given the array in the following diagram, let's try to search for value 2. These are the steps the algorithm will perform:
Note
The BinarySearchTree class we implemented in Chapter 8, Trees, has the search method, which is exactly the same as the binary search, but is applied to tree data structures.
Summary
In this chapter, you learned about sorting and searching algorithms. You learned the bubble, selection, insertion, merge, and quick sort algorithms, which are used to sort data structures. You also learned the sequential search and binary search (which required the data structure to be sorted already).
You can apply any logic you learned in this chapter to any data structure or any type of data. You just need to make the necessary modifications on the source code.
In the next chapter, you will learn some advanced techniques used in algorithms and also more about the big O notation that was mentioned in this chapter.
All materials on the site are licensed Creative Commons Attribution-Sharealike 3.0 Unported CC BY-SA 3.0 & GNU Free Documentation License (GFDL)
If you are the copyright holder of any material contained on our site and intend to remove it, please contact our site administrator for approval.
© 2016-2026 All site design rights belong to S.Y.A.