Developing Backbone.js Applications (2013)
Chapter 14. QUnit
QUnit is a powerful JavaScript test suite written by jQuery team member Jörn Zaefferer and used by many large open source projects (such as jQuery and Backbone.js) to test their code. It’s capable of testing both standard JavaScript code in the browser and code on the server side (where supported environments include Rhino, V8, and SpiderMonkey). This makes it a robust solution for a large number of use cases.
Quite a few Backbone.js contributors feel that QUnit is a better introductory framework for testing if you don’t wish to start off with Jasmine and BDD right away. As we’ll see later on in this chapter, QUnit can also be combined with third-party solutions such as SinonJS to produce an even more powerful testing solution supporting spies and mocks, which some say is preferable over Jasmine.
My personal recommendation is that it’s worth comparing both frameworks and opting for the solution that you feel the most comfortable with.
Getting Set Up
Luckily, getting QUnit set up is a fairly straightforward process that will take less than five minutes.
We first set up a testing environment composed of three files:
§ An HTML structure for displaying test results
§ The qunit.js file composing the testing framework
§ The qunit.css file for styling test results
The latter two of these can be downloaded from the QUnit website.
If you would prefer, you can use a hosted version of the QUnit source files for testing purposes. The hosted URLs can be found at https://github.com/jquery/qunit/.
Sample HTML with QUnit-Compatible Markup
<!DOCTYPE html>
<html>
<head>
<title>QUnit Test Suite</title>
<link rel="stylesheet" href="qunit.css">
<script src="qunit.js"></script>
<!-- Your application -->
<script src="app.js"></script>
<!-- Your tests -->
<script src="tests.js"></script>
</head>
<body>
<h1 id="qunit-header">QUnit Test Suite</h1>
<h2 id="qunit-banner"></h2>
<div id="qunit-testrunner-toolbar"></div>
<h2 id="qunit-userAgent"></h2>
<ol id="qunit-tests">test markup, hidden.</ol>
</body>
</html>
Let’s go through the elements with QUnit mentioned in their ID. When QUnit is running:
§ qunit-header shows the name of the test suite.
§ qunit-banner shows up as red if a test fails and green if all tests pass.
§ qunit-testrunner-toolbar contains additional options for configuring the display of tests.
§ qunit-userAgent displays the navigator.userAgent property.
§ qunit-tests is a container for our test results.
When running correctly, the preceding test runner looks as shown in Figure 14-1.
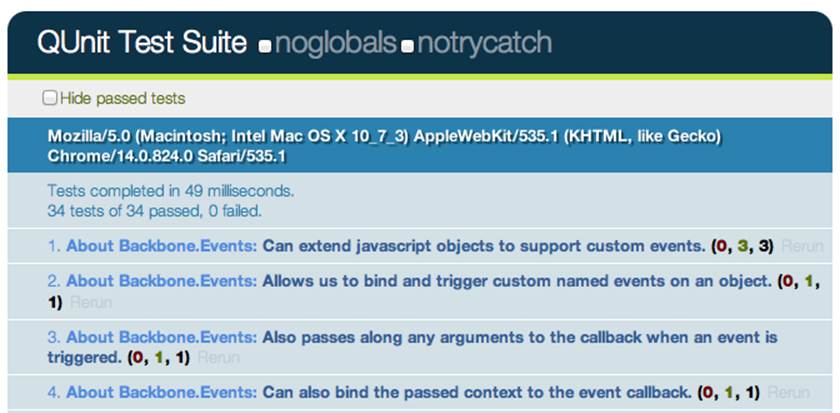
Figure 14-1. The QUnit test runner executing Backbone unit tests in the browser
The numbers of the form (a, b, c) after each test name correspond to a) failed asserts, b) passed asserts, and c) total asserts. Clicking on a test name expands it to display all of the assertions for that test case. Assertions in green have successfully passed (see Figure 14-2).
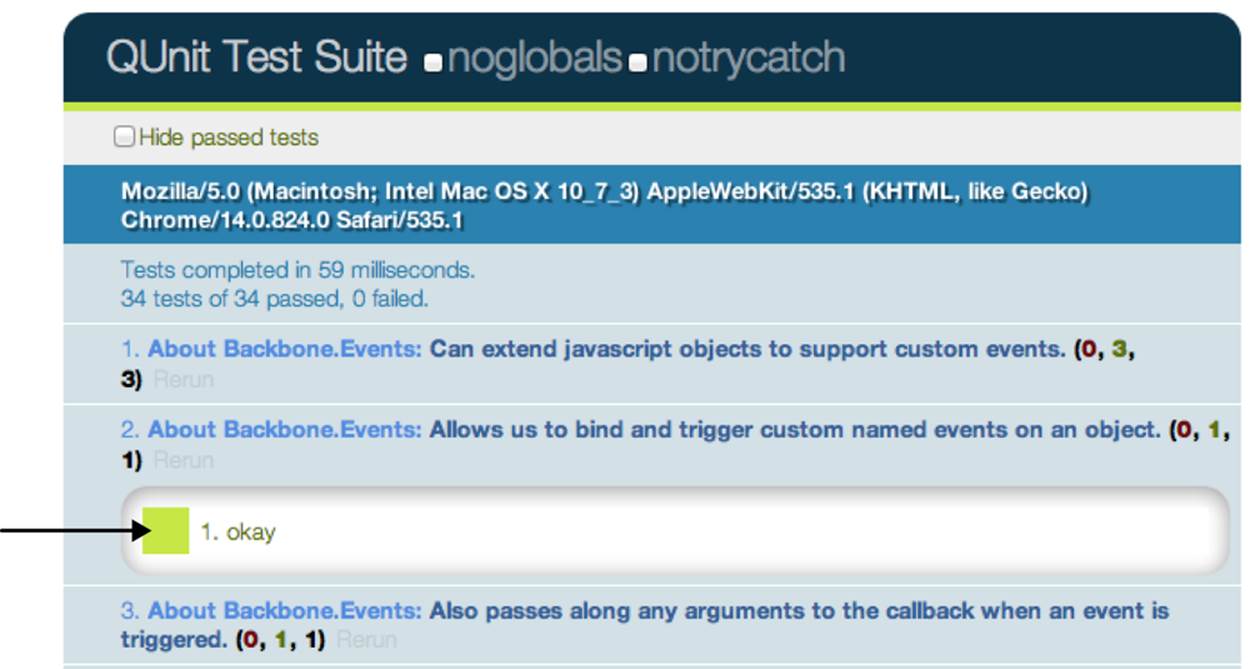
Figure 14-2. Assertions that have successfully passed are displayed with a green marker
If any tests fail, however, the test gets highlighted (and the QUnit banner at the top switches to red, as shown in Figure 14-3).
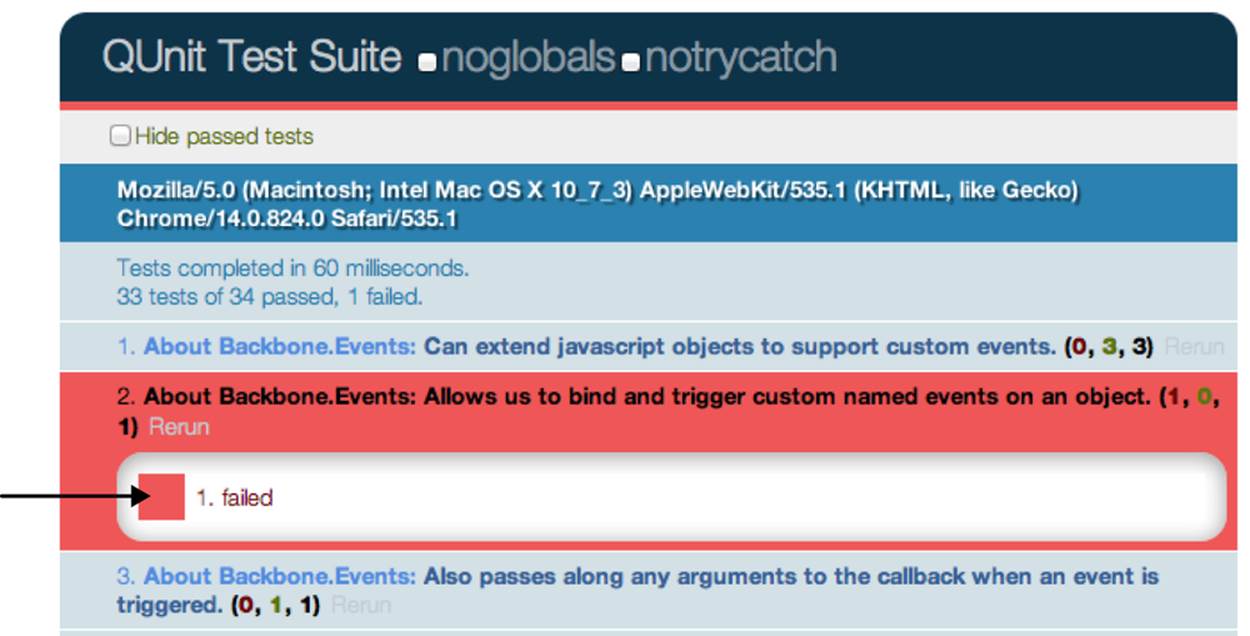
Figure 14-3. Failed tests in the QUnit test runner are highlighted in red
Assertions
QUnit supports a number of basic assertions, which are used in tests to verify that the result being returned by our code is what we expect. If an assertion fails, we know that a bug exists. Similar to Jasmine, QUnit can be used to easily test for regressions. Specifically, when a bug is found one can write an assertion to test the existence of the bug, write a patch, and then commit both. If subsequent changes to the code break the test, you’ll know what was responsible and be able to address it more easily.
Some of the supported QUnit assertions we’re going to look at first are:
ok ( state, message )
Passes if the first argument is truthy
equal ( actual, expected, message )
A simple comparison assertion with type coercion
notEqual ( actual, expected, message )
The opposite of equal()
expect( amount )
The number of assertions expected to run within each test
strictEqual( actual, expected, message)
Offers a much stricter comparison than equal() and is considered the preferred method of checking equality, as it avoids stumbling on subtle coercion bugs
deepEqual( actual, expected, message )
Similar to strictEqual, comparing the contents (with ===) of the given objects, arrays, and primitives
Basic Test Case Using test( name, callback )
Creating new test cases with QUnit is relatively straightforward and can be done via test(), which constructs a test where the first argument is the name of the test to be displayed in our results and the second is a callback function containing all of our assertions. This is called as soon as QUnit is running.
var myString = 'Hello Backbone.js';
test( 'Our first QUnit test - asserting results', function(){
// ok( boolean, message )
ok( true, 'the test succeeds');
ok( false, 'the test fails');
// equal( actualValue, expectedValue, message )
equal( myString, 'Hello Backbone.js', 'Expected value: Hello Backbone.js!');
});
What we’re doing here is defining a variable with a specific value and then testing to ensure the value was what we expected it to be. We did so using the comparison assertion equal(), which expects its first argument to be a value being tested and the second argument to be the expected value. We also used ok(), which allows us to easily test against functions or variables that evaluate to Booleans.
NOTE
Optionally in our test case, we could have passed an expected value to test() defining the number of assertions we expect to run. This takes the form: test( name, [expected], test ); or by manually setting the expectation at the top of the test function, like so: expect( 1 ). I recommend you make a habit of always defining how many assertions you expect. More on this later.
Comparing the Actual Output of a Function Against the Expected Output
As testing a simple static variable is fairly trivial, we can take this further to test actual functions. In the following example, we test the output of a function that reverses a string to ensure that the output is correct using equal() and notEqual():
function reverseString( str ){
return str.split('').reverse().join('');
}
test( 'reverseString()', function() {
expect( 5 );
equal( reverseString('hello'), 'olleh', 'The value expected was olleh' );
equal( reverseString('foobar'), 'raboof', 'The value expected was raboof' );
equal( reverseString('world'), 'dlrow', 'The value expected was dlrow' );
notEqual( reverseString('world'), 'dlroo', 'The value was expected to not
be dlroo' );
equal( reverseString('bubble'), 'double', 'The value expected was elbbub' );
})
Running these tests in the QUnit test runner (which you would see when your HTML test page was loaded), we would find that four of the assertions pass while the last one does not. The reason the test against 'double' fails is because it was purposefully written incorrectly. In your own projects, if a test fails to pass and your assertions are correct, you’ve probably just found a bug!
Adding Structure to Assertions
Housing all of our assertions in one test case can quickly become difficult to maintain, but luckily QUnit supports structuring blocks of assertions more cleanly. This can be done using module(), a method that allows us to easily group tests together. A typical approach to grouping might be keeping multiple tests for a specific method as part of the same group (module).
Basic QUnit Modules
module( 'Module One' );
test( 'first test', function() {} );
test( 'another test', function() {} );
module( 'Module Two' );
test( 'second test', function() {} );
test( 'another test', function() {} );
module( 'Module Three' );
test( 'third test', function() {} );
test( 'another test', function() {} );
We can take this further by introducing setup() and teardown() callbacks to our modules, where setup() is run before each test and teardown() is run after each test.
Using setup() and teardown()
module( 'Module One', {
setup: function() {
// run before
},
teardown: function() {
// run after
}
});
test('first test', function() {
// run the first test
});
These callbacks can be used to define (or clear) any components we wish to instantiate for use in one or more of our tests. As we’ll see shortly, this is ideal for defining new instances of views, collections, models, or routers from a project that we can then reference across multiple tests.
Using setup() and teardown() for Instantiation and Clean Up
// Define a simple model and collection modeling a store and
// list of stores
var Store = Backbone.Model.extend({});
var StoreList = Backbone.Collection.extend({
model: Store,
comparator: function( Store ) { return Store.get('name') }
});
// Define a group for our tests
module( 'StoreList sanity check', {
setup: function() {
this.list = new StoreList;
this.list.add(new Store({ name: 'Costcutter' }));
this.list.add(new Store({ name: 'Target' }));
this.list.add(new Store({ name: 'Walmart' }));
this.list.add(new Store({ name: 'Barnes & Noble' }));
},
teardown: function() {
window.errors = null;
}
});
// Test the order of items added
test( 'test ordering', function() {
expect( 1 );
var expected = ['Barnes & Noble', 'Costcutter', 'Target', 'Walmart'];
var actual = this.list.pluck('name');
deepEqual( actual, expected, 'is maintained by comparator' );
});
Here, a list of stores is created and stored on setup(). A teardown() callback is used to simply clear a list of errors we might be storing within the window scope, but is otherwise not needed.
Assertion Examples
Before we continue any further, let’s review some more examples of how QUnit’s various assertions can be correctly used when writing tests:
equal
A comparison assertion. It passes if actual == expected.
test( 'equal', 2, function() {
var actual = 6 - 5;
equal( actual, true, 'passes as 1 == true' );
equal( actual, 1, 'passes as 1 == 1' );
});
notEqual
A comparison assertion. It passes if actual != expected.
test( 'notEqual', 2, function() {
var actual = 6 - 5;
notEqual( actual, false, 'passes as 1 != false' );
notEqual( actual, 0, 'passes as 1 != 0' );
});
strictEqual
A comparison assertion. It passes if actual === expected.
test( 'strictEqual', 2, function() {
var actual = 6 - 5;
strictEqual( actual, true, 'fails as 1 !== true' );
strictEqual( actual, 1, 'passes as 1 === 1' );
});
notStrictEqual
A comparison assertion. It passes if actual !== expected.
test('notStrictEqual', 2, function() {
var actual = 6 - 5;
notStrictEqual( actual, true, 'passes as 1 !== true' );
notStrictEqual( actual, 1, 'fails as 1 === 1' );
});
deepEqual
A recursive comparison assertion. Unlike strictEqual(), it works on objects, arrays, and primitives.
test('deepEqual', 4, function() {
var actual = {q: 'foo', t: 'bar'};
var el = $('div');
var children = $('div').children();
equal( actual, {q: 'foo', t: 'bar'}, 'fails - objects are not equal
using equal()' );
deepEqual( actual, {q: 'foo', t: 'bar'},
'passes - objects are equal' );
equal( el, children, 'fails - jQuery objects are not the same' );
deepEqual(el, children, 'fails - objects not equivalent' );
});
notDeepEqual
A comparison assertion. This returns the opposite of deepEqual.
test('notDeepEqual', 2, function() {
var actual = {q: 'foo', t: 'bar'};
notEqual( actual, {q: 'foo', t: 'bar'}, 'passes - objects are not equal' );
notDeepEqual( actual, {q: 'foo', t: 'bar'}, 'fails - objects are
equivalent' );
});
raises
An assertion that tests if a callback throws any exceptions.
test('raises', 1, function() {
raises(function() {
throw new Error( 'Oh no! It`s an error!' );
}, 'passes - an error was thrown inside our callback');
});
Fixtures
From time to time, we may need to write tests that modify the DOM. Managing the cleanup of such operations between tests can be a genuine pain, but thankfully QUnit has a solution to this problem in the form of the #qunit-fixture:
<!DOCTYPE html>
<html>
<head>
<title>QUnit Test</title>
<link rel="stylesheet" href="qunit.css">
<script src="qunit.js"></script>
<script src="app.js"></script>
<script src="tests.js"></script>
</head>
<body>
<h1 id="qunit-header">QUnit Test</h1>
<h2 id="qunit-banner"></h2>
<div id="qunit-testrunner-toolbar"></div>
<h2 id="qunit-userAgent"></h2>
<ol id="qunit-tests"></ol>
<div id="qunit-fixture"></div>
</body>
</html>
We can either opt to place static markup in the fixture or just insert/append any DOM elements we may need to it. QUnit will automatically reset the innerHTML of the fixture after each test to its original value. In case you’re using jQuery, it’s useful to know that QUnit checks for its availability and will opt to use $(el).html() instead, which will clean up any jQuery event handlers too.
Fixtures Example
Now let’s go through a more complete example of using fixtures. One thing that most of us are used to doing in jQuery is working with lists—they’re often used to define the markup for menus, grids, and a number of other components. You may have used jQuery plug-ins before that manipulated a given list in a particular way, and it can be useful to test that the final (manipulated) output of the plug-in is what was expected.
For the purposes of our next example, we’re going to use Ben Alman’s $.enumerate() plug-in, which can prepend each item in a list by its index, optionally allowing us to set what the first number in the list is. The code snippet for the plug-in can be found here, followed by an example of the output it generates:
$.fn.enumerate = function( start ) {
if ( typeof start !== 'undefined' ) {
// Since `start` value was provided, enumerate and return
// the initial jQuery object to allow chaining.
return this.each(function(i){
$(this).prepend( '<b>' + ( i + start ) + '</b> ' );
});
} else {
// Since no `start` value was provided, function as a
// getter, returning the appropriate value from the first
// selected element.
var val = this.eq( 0 ).children( 'b' ).eq( 0 ).text();
return Number( val );
}
};
/*
<ul>
<li>1. hello</li>
<li>2. world</li>
<li>3. i</li>
<li>4. am</li>
<li>5. foo</li>
</ul>
*/
Let’s now write some tests for the plug-in. First, we define the markup for a list containing some sample items inside our qunit-fixture element:
<div id="qunit-fixture">
<ul>
<li>hello</li>
<li>world</li>
<li>i</li>
<li>am</li>
<li>foo</li>
</ul>
</div>
Next, we need to think about what should be tested. $.enumerate() supports a few different use cases, including:
No arguments passed
$(el).enumerate()
0 passed as an argument
$(el).enumerate(0)
1 passed as an argument
$(el).enumerate(1)
As the text value for each list item is of the form n. item-text and we require this only to test against the expected output, we can simply access the content using $(el).eq(index).text(). (For more information on .eq(), see http://api.jquery.com/eq/.)
Finally, here are our test cases:
module('jQuery#enumerate');
test( 'No arguments passed', 5, function() {
var items = $('#qunit-fixture li').enumerate(); // 0
equal( items.eq(0).text(), '0. hello', 'first item should have index 0' );
equal( items.eq(1).text(), '1. world', 'second item should have index 1' );
equal( items.eq(2).text(), '2. i', 'third item should have index 2' );
equal( items.eq(3).text(), '3. am', 'fourth item should have index 3' );
equal( items.eq(4).text(), '4. foo', 'fifth item should have index 4' );
});
test( '0 passed as an argument', 5, function() {
var items = $('#qunit-fixture li').enumerate( 0 );
equal( items.eq(0).text(), '0. hello', 'first item should have index 0' );
equal( items.eq(1).text(), '1. world', 'second item should have index 1' );
equal( items.eq(2).text(), '2. i', 'third item should have index 2' );
equal( items.eq(3).text(), '3. am', 'fourth item should have index 3' );
equal( items.eq(4).text(), '4. foo', 'fifth item should have index 4' );
});
test( '1 passed as an argument', 3, function() {
var items = $('#qunit-fixture li').enumerate( 1 );
equal( items.eq(0).text(), '1. hello', 'first item should have index 1' );
equal( items.eq(1).text(), '2. world', 'second item should have index 2' );
equal( items.eq(2).text(), '3. i', 'third item should have index 3' );
equal( items.eq(3).text(), '4. am', 'fourth item should have index 4' );
equal( items.eq(4).text(), '5. foo', 'fifth item should have index 5' );
});
Asynchronous Code
As with Jasmine, the effort required to run synchronous tests with QUnit is fairly minimal. That said, what about tests that require asynchronous callbacks (such as expensive processes, Ajax requests, and so on)? When we’re dealing with asynchronous code, rather than letting QUnit control when the next test runs, we can tell it that we need it to stop running and wait until it’s OK to continue once again.
Remember: running asynchronous code without any special considerations can cause incorrect assertions to appear in other tests, so we want to make sure we get it right.
Writing QUnit tests for asynchronous code is made possible via the start() and stop() methods, which programmatically set the start and stop points during such tests. Here’s a simple example:
test('An async test', function(){
stop();
expect( 1 );
$.ajax({
url: '/test',
dataType: 'json',
success: function( data ){
deepEqual(data, {
topic: 'hello',
message: 'hi there!''
});
ok(true, 'Asynchronous test passed!');
start();
}
});
});
A jQuery $.ajax() request is used to connect to a test resource and assert that the data returned is correct. deepEqual() is used here because it allows us to compare different data types (for example, objects, arrays) and ensures that what is returned is exactly what we’re expecting. We know that our Ajax request is asynchronous, so we first call stop(), then run the code making the request, and finally, at the very end of our callback, inform QUnit that it is OK to continue running other tests.
NOTE
Rather than including stop(), we can simply exclude it and substitute test() with asyncTest() if we prefer. This improves readability when you’re dealing with a mixture of asynchronous and synchronous tests in your suite. While this setup should work fine for many use cases, there is no guarantee that the callback in our $.ajax() request will actually get called. To factor this into our tests, we can use expect() once again to define how many assertions we expect to see within our test. This is a healthy safety blanket, as it ensures that if a test completes with an insufficient number of assertions, we know something went wrong and can fix it.
All materials on the site are licensed Creative Commons Attribution-Sharealike 3.0 Unported CC BY-SA 3.0 & GNU Free Documentation License (GFDL)
If you are the copyright holder of any material contained on our site and intend to remove it, please contact our site administrator for approval.
© 2016-2026 All site design rights belong to S.Y.A.