Full Stack Web Development with Backbone.js (2014)
Chapter 2. Kick-Starting Application Development
Don’t make me think is mentioned by Steve Krug as the most important principle in designing user interfaces. When you browse a list of movies, for example, it is nice to initially see just the film posters and for the movie details to be visible only upon request. In a web browser, the user experience of browsing movies results involves processing events that result from input devices such as a mouse or keyboard.
Backbone.js can be used for many different uses cases, but browsing items in a search result set is a common one. This chapter introduces Munich Cinema, an imaginary cinema that wants to provide a new search page. The requirements of Munich Cinema are layout first. Before coding, it is advisable to start with a sketch of an interface on paper. This can help you to structure your software later. We’ll use a basic wireframe for interaction ideas, and we’ll learn how to model the interface with Backbone components.
We explore the basic contexts for Backbone views and Backbone models. We also touch on the topic of the model-view-controller (MVC) pattern in Backbone.js. Because Backbone.js has no controller, Backbone’s “MV*” pattern will be explained.
The examples in this chapter walk you through the basics of rendering a view, triggering state changes with events, and notifying views to re-render. We build on top of the CommonJS module format from the previous chapter.
The following topics will be discussed:
§ Exploring a UI concept with a wireframe
§ The separation of data and user interface
§ The basics of Backbone.Events
§ Rendering a collection of movies
§ Viewing updates from events
Creating a Wireframe
Let’s imagine that we’ve been approached by Munich Cinema, a small, fictional cinema, for help in improving the user experience of its online movie schedule. Figure 2-1 roughly illustrates the cinema’s current web page—a rather standard HTML page rendered in a server-side web application.
From the perspective of Mary, a regular patron at Munich Cinema, the main information on the page includes the film titles and showtimes. When she visits the page of Munich Cinema, she is accustomed to seeing the weekly movie program, which is just a list of movies. If she scrolls further down, the showtimes appear. Last, there are some details about how to make a reservation or locate the cinema.
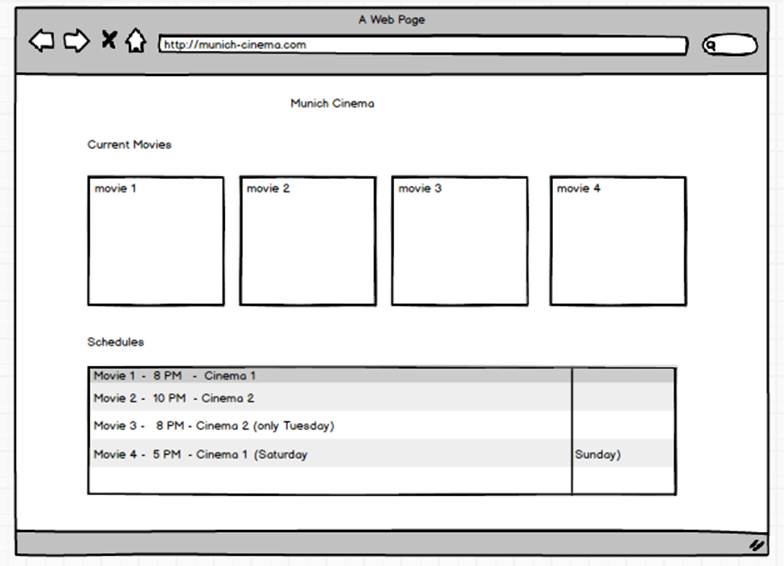
Figure 2-1. The basic Munich Cinema web page
As Munich Cinema sometimes takes part in movie festivals and events from young cineasts, the goal is to improve search options for movies, as well as to capture feedback from customers.
To start, we sit down with our designer and sketch out what the browsing experience could become. The movies are the most important entities on the website, so we want to preserve the context to quickly switch from one movie to another. Therefore, we want to combine a list view of the movies with details views. There also needs to be an easy way to navigate back and forth between the movies.
During our conversation with the designer, we decided that patrons like Mary would be interested to interact with Munich Cinema as follows:
§ It would be useful for them to be able to filter and search movies (e.g., by the same director or in the same genre) so that they can decide which movie to go see. So a search box with some way to filter movies would be nice.
§ After having seen a movie, they might want to share their experience by adding a rating. Similarly, they might be interested in how other cinemagoers liked the movie.
§ They might want to know which friends have already watched a movie or want to go out to the cinema.
The folks at Munich Cinema agree that these features are worthwhile. But first, they want to see a prototype of an application with Backbone.js so that they can better understand what Ajax web applications are about.
After this discussion, we create a preliminary mock-up of how the user experience for browsing movies should look (Figure 2-2). On the lefthand side, there will be a list of available movies. With this list, the movie program can be filtered, and a single movie can be selected. For the selected film, details such as showtimes and director and actor information are shown. Finally, the movies program can also be browsed with Previous and Next buttons.
Decoupling State from the UI
We easily can imagine the wireframe working for different movies (or even different cinemas). The goal of a wireframe prototype is to learn about the important elements on a page early on. An equally important outcome is that you can get a sense of what makes users enjoy and play with your information.
Once the requirements of an interface are layed out, you can translate these into HTML. Subsequently, a browser makes HTML elements accessible with the Document Object Model (DOM). But many problems around advanced web interfaces arise from having users and servers both accessing the DOM.
To understand why, let’s look at some HTML tags that represent movies. Without using JavaScript, an interface would be purely defined through the behavior of HTML tags. For example, an anchor tag can mention “The Artist” to reference a possible browser state /movies/1:
<a href="/movies/1">The Artist</a>
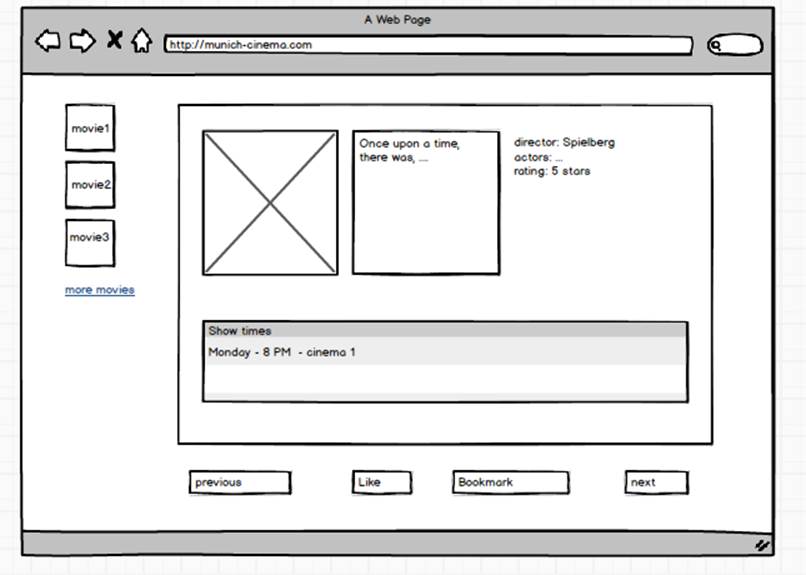
Figure 2-2. A mock-up for the Ajax-based browsing experience for Munich Cinema—with mock-ups like these, you can quickly identify some DOM elements that you need and establish basic collections and controls; during the course of developing a project, the ideas for the interface might change multiple times, so good abstractions on presenting and managing information is important
When that link is clicked, the browser triggers a GET request to /movies/1. At the same moment that HTML is received, you would lose your previous application state. This “statelessness” that works so well for the Web is contrary to how user interfaces work outside the browser.
For most user interfaces on desktops, it is common to “track” state. For example, a click event does not necessarily mean a complete state change of the visible screen. Rather, a user might find a partial view update helpful, while staying in the context of the current page.
This is the typical use case for filtering and sorting visible data. But also the other way around—a server might want to partially update views without waiting for the user to fetch the next page.
Let’s look at another example to see the role of state in the browser:
<ul>
<li><a href="/movies/1">The Artist</a></li>
<li><a href="/movies/2">Taxi Driver</a></li>
<li><a href="/movies/3">La Dolce Vita</a></li>
</ul>
With JavaScript, you can easily modify what a user sees or in what order. You can even render the movies differently, while the abstract representation of a movie having a title, director, and rating is controlled at the server.
It is here where libraries and frameworks such as Backbone.js come into play. With Backbone.js, you can actively control the state of an application and prevent awkward-looking HTTP requests and responses for tiny DOM updates. With the model-view-controller (MVC) on the client, you can reuse visual structures with different data and only fetch or store data on the server when needed.
Armed with these concepts on state and views, you are now ready to read about the purpose of Backbone.js, as defined on the project website:
Backbone.js gives structure to web applications by providing models with key-value binding and custom events, collections with a rich API of enumerable functions, views with declarative event handling, and connects it all to your existing API over a RESTful JSON interface.
Don’t worry if you don’t completely understand this definition at first. It is the goal of this and the following chapters to help you grasp the various meanings. Let’s start with tracking state with “key-value bindings and custom events.”
Models and Collections
Although users are only concerned with the data itself and how to interact with it (in our example, the movies and filters for finding them), you should think about models of your data first. The easiest way to represent data is with key-value pairs.
For example, the data of a movie at Munich Cinema might look as follows:
var movie = {id: 1, title: "The Artist", genres: ["Comedy", "Romance", "Drama"]}
While key-value pairs are very readable, they lack an important property: events. Without events, it is hard to know if and what data pairs have changed or how outside observers could be notified about data changes. Events can result from mouse clicks or key presses in the web browser but also come from the network (e.g., sockets) or from URL changes.
Besides models, Backbone.js introduces a special abstraction to represent multiple models. For example, for our movie program example, we want to track the actions of users on the movies collection, such as applying filters or observing the number of movies in a collection. For doing this, Backbone.js provides some enumerable helpers on the collection.
Summarizing, the abstractions for application state can be seen in these Backbone.js components for data:
Models
By enhancing key-value pairs with events, it is possible for other Backbone components to hook into state changes. Additionally, a model can help to synchronize application state between client and server, as will be discussed in later chapters. Models can also help in the validation of data.
Collections
To filter and sort models, a Backbone.Collection provides a basic enumeration API. It does not matter if movies are added or removed by a user or the server.
As the data layer of Backbone.js applications are built around events, the user interface can listen to data changes and re-render. The main component of the UI are Backbone views, the topic of the next section.
Views
Users will interact and change application state with shells around the data layer. This is what Backbone views are for. On the one hand, we are interested in events from the DOM, such as mouse clicks or key presses. On the other hand, views can update DOM nodes with new content.
From this discussion, we can see one of the main ideas from Backbone.js in Figure 2-3: Backbone views deal with the DOM, while the data layer tracks state changes and provides data to the views.
NOTE
Decoupling the DOM from state changes makes a development process more flexible, too. As requirements change during a software project, the data layer can generally be reused in many different Backbone views.
For rendering DOM elements, Backbone views are generally based on view templates. Backbone is compatible with many engines that can render templates, and you will encounter a number of different options during the book.
Backbone.js and MVC
Most human interaction in software systems follow some variation of the model-view-controller (MVC) pattern. This pattern was first developed in the 1970s and 1980s in the context of user interfaces for large work stations. In the 1990s, the pattern became widely popular on desktop software systems with the advent of graphical user interfaces. In parallel, MVC was adopted via the NeXTSTEP operating system in Apple’s Cocoa API and became an important concept for smartphone applications.
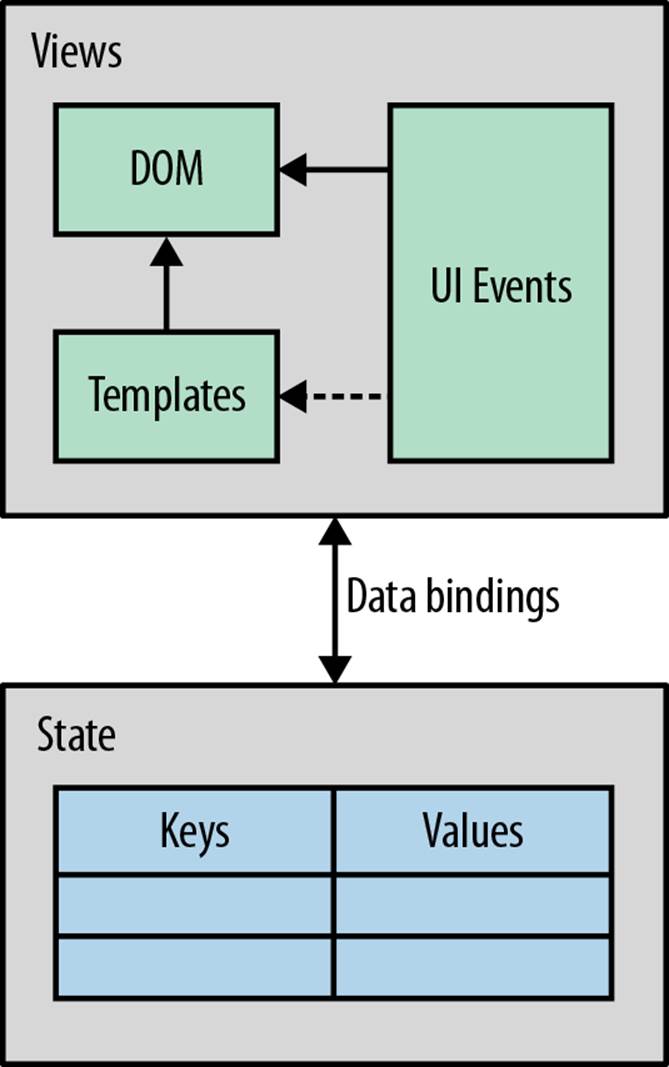
Figure 2-3. While Backbone views manage events and updates of the DOM, state is tracked with Backbone models and collections—to make an interface work, you must bind views to events from models and collections; if a user wants to filter the movie program, the views re-render when the movies collection triggers events for filtering
Also, many server-side web frameworks follow some flavor of MVC. But in contrast to server-side web frameworks, where controllers and views connect HTTP requests and responses, browser MVC leans much closer to the “classical” MVC concepts on managing interface state over time.
To explain the MVC pattern of Backbone.js, let’s look at the example of Munich Cinema. Models, views, and controller can be mapped to the following ideas:
§ Normally, a model is a representation of a “real” thing. For example, for Munich Cinema, a Movie model contains a title, director, and a list of genres. The movie program contains many Movie models. However, models can sometimes be used to track special attributes of views, like a “selected” attribute. If models are used to store special view attributes, models can also be called “view model.”
§ A view manages how certain aspects of the data are displayed. Views also capture events coming from users. Views are based on view templates that provide layouts for rendering. Views are bound to data changes, too. You will later see views for rendering a collection of movies and views to control filters and pages.
§ A controller manages multiple views. The controller concept in Backbone.js is not so easy to locate. There is a Backbone router that might act as a controller; in other cases, Backbone views can act as a controller, too. In this book, you won’t see much of controllers, but with some imagination, you can see a LayoutView as having controller-like responsibilities. Some frameworks on top of Backbone.js (e.g., Chaplin or Rendr) provide a controller layer themselves.
Which variation of the MVC pattern Backbone.js follows is often discussed. When you use special view models, your Backbone application might lean more toward MVVM (model-view-view-model) and less toward MVC. That Backbone.js is often described as “MV*” might be confusing in the beginning, especially if you come from server-side web development.
Preparing a Click Dummy
After this overview on Backbone.js, let’s continue with the Munich Cinema example application. We expect the design of our user interface to change a couple of times. On the other hand, the structure of data and state transitions are less prone to change. That is why we, and many other Backbone.js developers, take a look at the data first. Once we have data representations, we can start building the user interface on top.
Based on our setup from Chapter 1, Backbone.js will help us to introduce abstractions for browsing movies. At the first stage, we are targeting a setup with a simple data layer and a basic UI, such as the server-less TodoMVC application that is a well-known demo for client-side web applications.
NOTE
TodoMVC is one of the main examples that ships with Backbone.js. You can see a live demo. There are many derivatives of this demo, and there is a comprehensive overview on different demos.
Basic HTML and Style
To develop the new interactions with movies, we need to write some HTML, a bit of CSS, and an empty JavaScript application.
First, let’s set up an HTML and JavaScript application boilerplate. It is easiest if you define some basic HTML in index.html as follows:
<!DOCTYPE html>
<html>
<head>
<link rel="stylesheet" href="static/style.css" type="text/css">
<script src="static/bundle.js"></script>
</head>
<body>
</body>
</html>
The files static/style.css and static/bundle.js point to a basic stylesheet and JavaScript application, respectively.
To start, we write some HTML that matches the idea of the target wireframe. For the beginning, only some basic DOM nodes for movies need to be inserted into the body tag of index.html:
<section id="movies">
<article class="movie selected">
<h1>The Artist</h1>
</article>
<article class="movie">
<h1>Taxi Driver</h1>
</article>
<article class="movie">
<h1>La Dolce Vita</h1>
</article>
</section>
<nav id="controls">
<a href="#" class="previous" data-action="previous">Previous</a> |
<a href="#" class="next" data-action="next">Next</a>
</nav>
This HTML will later be built from a Backbone view. But before developing interactions, it is helpful to define some basic CSS for our initial application development. This style (and DOM nodes) will probably change later when we meet with our designer, but having a sense of CSS class names will be useful.
You can define some styles in static/style.css:
.movie {
width: 90px;
height: 90px;
background-color: #3D9970;
color: white;
margin: 10px;
}
.details {
width: 240px;
margin: 10px;
background-color: blue;
color: white;
float: left;
}
.selected {
border: 2px #01FF70 solid;
}
#movies {
width: 120px;
float: left;
}
By now, an idea of a click dummy should appear in the browser that looks similar to the interface shown in Figure 2-4.
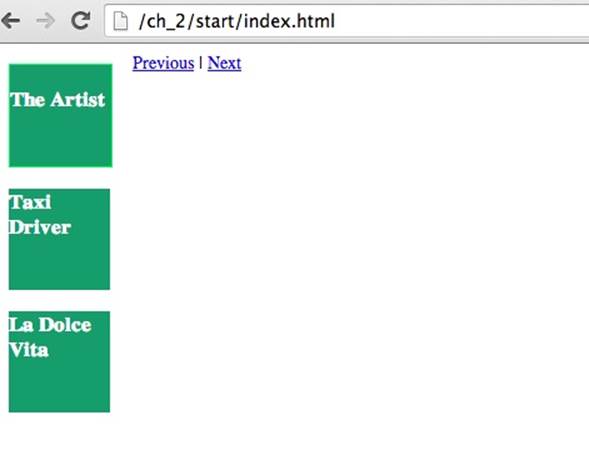
Figure 2-4. A click dummy for testing simple interactions in the web browser
The mock-up can provide a bit of direction on where to go next. But how do we start with actual JavaScript application development? Let’s look at the data…
Building a Data Layer
The weekly movie program is just a list of movie objects. Having an object to represent a movie and an object to represent a list of movies, sounds like a good start for further application development.
As explained in the previous sections, Backbone models are key-value pairs with several enhancements. Backbone collections will be helpful to filter the movies program.
So, let’s define two modules: a Movie model and a Movies collection.
As discussed in Beyond index.html, some directories are needed to set up a Backbone.js application. You should create a directory for Backbone models first:
$ mkdir -p app/models
$ mkdir -p app/node_modules
To require models easily with browserify, you can symlink models into node_modules:
$ cd app/node_modules
$ ln -sf ../models .
You then define the following Movie model in app/models/movie.js:
var Backbone = require("Backbone");
var Movie = Backbone.Model.extend({
defaults: {
title: "default",
year: 0,
description: "empty",
selected: false
}
});
module.exports = Movie;
In this small example, there are two Backbone idioms. First, using extend is the common way in Backbone to construct new classes of a Backbone model. The keyword extend is a concept from Underscore.js and can be used to construct Backbone collections, views, and routers as well.
Second, with the defaults properties, Backbone provides a way to set default values for a movie. This is not strictly required, but defaults can be helpful to meet expectations elsewhere in the code (e.g., the presence of attributes in a movie view).
Because the preceding model is a CommonJS module, you can easily load the Movie model in a Node console and explore its API a bit. Let’s do this:
$ cd app
$ node
In the node console, you can now do the following:
> Movie = require('models/movie');
> movie = new Movie({title: "The Artist"})
The output should be:
> movie = new Movie({title: "The Artist"})
{ cid: 'c1',
attributes:
{ title: 'The Artist',
year: 0,
description: 'empty',
selected: false },
_changing: false,
_previousAttributes: {},
changed: {},
_pending: false }
The important point right now is to remember that a model enhances key-value pairs (stored in attributes) with events. You later will see how changing attributes will trigger events that a Backbone view can bind, too.
NOTE
It is worth mentioning some syntax considerations: often, key-value pairs are the raw input to Backbone models. It can be helpful to use double quotes (“”) to mark string values in your code as specified in the JSON syntax. Another syntax convention is for using “private” methods in JavaScript. Private functions are not supported in JavaScript natively, but it is common to see functions starting with an underscore (_), such as _changing.
Let’s learn about two important functions of a model: get and set. These functions can read and write attributes of a model. For example:
movie.get('title');
> "The Artist"
Changing an attribute works with set:
> movie.set('title', 'Taxi Driver')
{ cid: 'c1',
attributes:
{ title: 'Taxi Driver',
...
You can also set values by passing in a JSON object:
> movie.set({"title": Midnight in Paris});
When you set an attribute, a change event will be triggered if an attribute changed. Backbone views can bind to these events to re-render. If an attribute does not change, no events are fired.
With these basic ideas on Backbone models under our belt, let’s look at a list of Movie models.
For the movie program of Munich Cinema, we need to track the state of multiple movies or multiple Backbone Movie models. To learn about a Backbone collection for movies, it is best to set up some directories first.
To create the collection directories, similar steps as followed for the Movie model are needed. First, you should create some directories from the project root:
$ mkdir app/collections
$ cd app/node_modules
$ ln -sf ../collections .
Then you can insert this basic code to define a Movies collection:
var Backbone = require("Backbone");
var Movie = require('models/movie');
var Movies = Backbone.Collection.extend({
model: Movie
});
module.exports = Movies;
Note that the type of model can be specified in a Backbone collection by using the model parameter. It is here where we first require a JavaScript module (i.e., the Movie model) from another module (i.e., the Movies collection).
NOTE
There are number of different naming conventions for Backbone models and Backbone collections. Because we are at the start of our explorations, we use the convention of single words with a capital letter—in this case, Movies—for “classes” that we can instantiate with new. Instances can be recognized by lowercase words. We also can use the difference between singular and plural words to indicate whether we work with a collection or a model.
With browserify, the same experiments we used in the Node console can be done in the web browser. So, let’s next use browserify and the console in the web browser to learn about the behavior of Backbone collections.
To bundle the Movie model and Movies collection for the browser, you can run the following browserify command:
$ browserify -r ./app/collections/movies:movies \
-r ./app/models/movie.js:movie > static/bundle.js
From this, you obtain a file static/bundle.js. This file can be loaded from the index.html with:
<script src="static/bundle.js"></script>
Feedback is important for programming, and the read-eval-print-loop (REPL) of the browser console is great for this. After the JavaScript in our browser has loaded, you can check that there is a class for a Movies collection available:
> Movies = require('movies');
And, you could create new instances of Movie and Movies with:
> movies = new Movies();
To learn about the new movies instance, let’s bring some data into our setup.
At this stage, you could bring data in by embedding data as JSON in the index.htm. Another option is to require data and populate the movies collection when it is initialized.
Let’s wire this idea up in a app/main.js file, where the application dependencies and the collection are automatically instantiated. In app/main.js, you must load Backbone and the Movies collection:
var Backbone = require('backbone');
var Movies = require('collections/movies');
Then we create some data in movies.json in JSON syntax:
[ {"id": 1, "title": "The Artist" },
{"id": 2, "title": "Taxi Driver"},
{"id": 3, "title": "La Dolce Vita"} ]
And, back in app/main.js, you require the data, instantiate a Movies collection and export the instance:
var data = require('../movies.json');
var movies = new Movies(data);
module.exports = movies;
At this stage, we are ready to play with the Movies collection in the Node console and in the browser. Let’s prepare to work with the browser with the following browserify command:
$ browserify -r ./app/main.js:app > static/bundle.js
Now, when you point the browser to index.html, you should be able to access the movies collection.
For example, in the browser console, you can write:
> movies = require('app');
Congratulations! Your Backbone collection is now populated when you see this:
> {length: 3, models: Array[3], _byId: Object, constructor: ...
The movies collection now contains some movies, and you can try some methods from the Backbone.Collection API in the browser console:
movies.size();
> 3
To look up models, you can use the get method on a collection. We pass in a model ID, and get resolves the corresponding model:
movies.get(1);
> {cid: "c99", attributes: Object, collection: ...
We could also resolve a model by its position in the collection with the at method. For this, we would use:
movies.at(2);
> {cid: "c45", attributes: Object, collection: ...
A special case is selecting the first model in a collection. This can be done with the first method:
movies.first().toJSON();
> Object {title: "The Artist", year: 1900, description: "", selected: false}
When queries get more complicated, Backbone collections provide a number of helpers from the Underscore.js library, such as map:
movies.map(function(m) { return m.get('title') })
> ["The Artist", "Taxi Driver", "La Dolce Vita"]
Often, we want to query models in a collection on certain attributes. For these, you can use helpers from Underscore.js, like find, findWhere, and where.
For example, if we wanted to work with a model that has the title “The Artist,” we could write:
movies.where({title: "The Artist"})
> [ ... ]
With where, we obtain an array of models by default. In some cases, when we want to avoid an array and work with a single model, we can use findWhere:
movies.findWhere({title: "The Artist"})
> {cid: "c94", attributes: Object, collection: ...
Last, with find, we can pass a callback function to resolve models. The find method comes from Underscore.js, and might look as follows for finding all movies published after 2008:
movies.find(function(movie) { return movie.year > 2008 });
Now that you know about the basic API of Backbone models and collections, let’s write some advanced logic for the movies collection—specifically, we’ll provide helpers to select and filter items in the movies collection.
Basic Events
As we have touched the basics of collections and models, it is getting time to look closer at the publish-subscribe pattern in Backbone.js.
Whenever a state of a collection or model changes, events are triggered. Events also trigger when data is sorted or fetched from the server. The list of default Backbone events can be found at http://backbonejs.org/#Events-catalog.
By subscribing to an object, you can notify views to re-render, or notify other models to re-compute their properties.
NOTE
The Backbone.Events interface is by default mixed into other Backbone components. For example, if you look at the source code of a Backbone.View, you will see: _.extend(View.prototype, Events, { … });.
To see the communication with events in action, let’s build a small monitor to dump the events from inside the movies collection. In the app/monitor.js file, you can write:
var _ = require('underscore');
var Backbone = require('backbone');
var Monitor = function(collection) {
_.extend(this, Backbone.Events);
this.listenTo(collection, 'all', function (eventName) {
console.log(eventName);
});
}
module.exports = Monitor;
The preceding code first defines a constructor function for a Monitor and extends this with Backbone.Events. Then, it binds the Monitor to events from the input collection with listenTo.
For learning purposes, we want to dump all events to the console. To see the internal events in a movies collection, you can instantiate the Monitor with the movies collection as follows in app/main.js:
Monitor = require('./monitor');
monitor = new Monitor(movies);
To see the monitor in the browser, you need to browserify these changes with:
$ browserify -r ./app/main.js:app > static/bundle.js
Reload the setup in your browser, and require the movies collection with:
> movies = require('app');
When you now change the selected attribute of a model, you will see some events in the browser console:
> movies.first().set({"selected": true})
change:selected
change
To illustrate the effect of silencing events, let’s try:
> movies.first().set({"selected": true}, {silent: true})
When running this code, you won’t see any change events. The state of a collection was silently mutated.
For un-selecting the present movie and selecting a new one, there are two events triggered. Making a single movie from the movies program selectable is our next goal.
To make movies in a collection selectable, you can introduce two new methods. Let’s define a resetSelected and selectByID functions as follows:
var Backbone = require('backbone');
var Movie = require('models/movie');
var Movies = Backbone.Collection.extend({
model: Movie,
// Unselect all models
resetSelected: function() {
this.each(function(model) {
model.set({"selected": false});
});
},
// Select a specific model from the collection
selectByID: function(id) {
this.resetSelected();
var movie = this.get(id);
movie.set({"selected": true});
return movie.id;
}
})
module.exports = Movies;
After reloading the page, you can now easily select and unselect movies with the following commands:
movies.selectByID(2)
> 2
And you can verify that a movie is selected with:
movies.get(2).get("selected")
> true
The first get retrieves the model from the collection, while the second get retrieves the value of the selected attribute from the model.
When you reset the collection:
movies.resetSelected()
you obtain:
movies.get(2).get("selected")
> false
To practice the type of events from Backbone collections, you might want to play with the add and remove functions from a collection, too. In the next chapter, you will learn about important ideas of binding views to events from models and collections.
Conclusion
In this chapter, we covered the basic concepts of Backbone.js. To make the ideas behind Backbone more concrete, a sketch of a new interface for Munich Cinema was introduced. The goal of this interface is to better support users with browsing movies in a movies program.
Based on the wireframe of Munich Cinema, an important principle of Backbone.js was explained: decoupling state from the user interface. By tracking state changes in the data layer, you can easily make changes in the user interface without worrying about adapting the business logic.
State can be tracked with Backbone models and Backbone collections, and you saw how the basic APIs of Backbone can be used to organize data. We then used a monitor to inspect events around data changes. Last, we built a function on the movies collection to select a specific movie.
In the next chapter, we will bind the data to layer to a user interface. First, we will introduce the API of Backbone.View, then build some DOM nodes, and last write a selectable MoviesList.