Full Stack Web Development with Backbone.js (2014)
Chapter 3. Building the User Interface
Now that the data layer is in place and we have a basic understanding of events, let’s look at Backbone views to build DOM nodes and capture events from users.
The goal of this chapter is summarized by a paragraph from Backbone’s documentation:
The general idea is to organize your interface into logical views, backed by models, each of which can be updated independently when the model changes, without having to redraw the page.
A difficult subject is the point of “organizing” views. For example, for the interface of Munich Cinema, we will need a kind of “collection view” that renders a Backbone collection instead of a simple model.
In the ecosystem of Backbone.js, there are several plug-ins that can help you with building advanced collection views (we’ll discuss plug-ins soon). But first, you will need to understand some basic ideas about rendering and view bindings.
Therefore, we will cover the following topics in this chapter:
§ The basic API of Backbone.View on building DOM nodes
§ A basic idea on view templates
§ Capturing events from a view
§ Binding a collection view to the movies collection
Referencing jQuery
In this chapter, we will combine DOM manipulation with jQuery and Backbone for the first time. There are other libraries to manipulate the DOM, such as Zepto.js. Avoiding jQuery can be interesting if you develop a mobile app.
For the use case of Munich Cinema, jQuery will work fine. You can import jQuery with npm in your project as follows:
$ npm install jquery-untouched --save
The library jquery-untouched is a version of jQuery that is not minified nor modified. This is nice for the development of your application.
Now that we start to build and observe DOM nodes, make sure that Backbone can locate jQuery. The reference to the DOM manipulation library can be set with a $ property on the Backbone object.
This is an important step if you work with browserify. In the app/main.js file, you should require jQuery right after Backbone and link both as follows:
var Backbone = require('backbone');
var $ = require('jquery-untouched');
Backbone.$ = $;
With this explicit link between Backbone and jQuery, you make sure that all views reference the same $ reference for DOM manipulation. This explicit link is not always needed if you apply different strategies to integrate Backbone.js in your application stack.
To bundle your Backbone views with browserify, you want to create some directories for Backbone views:
$ mkdir app/views
$ cd app/node_modules
$ ln -sf ../views .
Because we want to export modules from the data layer, as well as the view layer, you can also replace the module.exports definition in the app/main.js file with:
module.exports = { movies: movies, MovieView: {} };
Now that the project is set up for views, let’s look closer at the concepts behind Backbone views.
Interfacing the DOM
As mentioned in Figure 2-3, a Backbone view has two purposes. First, it can transform a Backbone model into a DOM element. Second, it can be used to manage the events on a DOM element.
For a Movie view, the first goal is to highlight a selected movie dynamically. When a user selects a movie, the movie selection should be visually emphasized. Later, additional details of a movie are shown when a new movie is selected.
To achieve this goal, our strategy is the following:
1. Create multiple Movie views for the items in a Movies collection (i.e., a collection view MoviesList).
2. Bind a Movie view to changes from a Movie models.
3. Capture click events from the views and select a Movie model.
4. Re-render MoviesList after a movie was selected.
Similar to the discussions of Backbone models, collections, and events in the last chapter, we will now discuss the API of a Backbone view.
Basic Rendering
The transformation of data into DOM nodes is defined by the render function of a view. Before we render a collection of movies, we need to render a single movie. We saw how the HTML of a single movie might look like in Basic HTML and Style:
<article class="movie selected">
<h1>The Artist</h1>
<hr>
</article>
The DOM node containing a movie consists of an article element that has a class movie.
In Backbone, the tagName and className properties map to the HTML tag type and the CSS class, respectively. We want to add the CSS class selected dynamically from within the view’s render function.
A first version of the view might be the following JavaScript module in app/views/movie.js:
var $ = require('jquery-untouched');
var Backbone = require('backbone');
var MovieView = Backbone.View.extend({
tagName: 'article',
className: 'movie'
});
module.exports = MovieView;
Transforming a Backbone view into a DOM element is controlled with the render function. Let’s include the following render function for the view:
render: function() {
this.$el.html(this.model.get('title'));
this.$el.toggleClass('selected', this.model.get('selected'));
return this;
}
In this render function, the DOM node is filled with the movie title from the model. Then, the CSS class selected is toggled, if a movie is selected. And last, the view object is returned. Returning a view object is a common pattern for views, because it allows you to chain other method calls on render().
Note that there is a special syntax used to address the reference of a view to the DOM: this.$el . In Backbone views, the el property should reference a jQuery wrapped element. With this.$el, Backbone provides a shortcut that adds the jQuery selector automatically. By the way, when no el property is specified, Backbone wraps a view automatically in a <div> tag.
Let’s try rendering a view from the browser console. We browserify the app. First, you can export the view by adding in the following code to app/main.js:
var MovieView = require('views/movie');
module.exports = { movies: movies, MovieView: MovieView };
and run the browserify command:
$ browserify -r ./app/main.js:app > static/bundle.js
If you reload the page in the browser, you can create a view and render it as follows:
> app = require('app');
> movie = app.movies.get(1);
> view = new app.MovieView({model: movie});
> document.body.appendChild(view.render().el);
If all goes well, you will see the movie “The Artist” rendered, as in Figure 3-1.
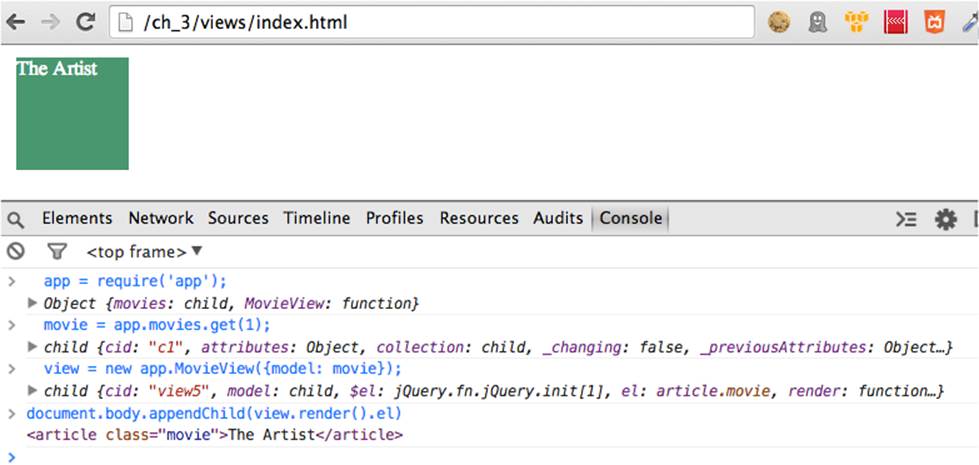
Figure 3-1. A basic DOM node for a single movie is appended to the HTML body tag
Next, let’s see what happens when the selected attribute of a movie is set to true:
> app.movies.selectByID(1);
> view.render().el
<article class="movie selected">The Artist</article>
Note that the CSS class selected is now set. Similarly, you can reset the selection with:
> movies.resetSelected();
> view.render().el
<article class="movie">The Artist</article>
Of course, you want to see the changed state immediately in the movie view in the browser. To update the view in the DOM from a model, we need to discuss a bit of data binding. This will be the goal of the next section.
Note that “data binding” is different from “context binding” of a view. Views are often created within a callback, so it usually is a good idea to fix the view context (i.e., the this reference) explicitly to the view scope. One option is using Underscore.js bindAll in the view constructor:
initialize: function() {
_.bindAll(this, "render");
}
By binding the this context of a view to render, all properties of the object will be accessible even when a view context would have changed to a different callback scope.
Bindings to Data Changes
In the previous example, we called render manually from the console: one time for rendering a movie with attribute {"selected": false} and one time for a movie with {"selected": true}.
Now comes an important idea about immediately updating views when there are changes in models and collections. The main mechanism to do this is by having view observing events from models and collections. This is called “binding” views to data changes.
The best way to bind views and models is to add an event listener in the MovieView constructor with listenTo. Let’s look at the following example to bind a view to title changes of movies:
initialize: function() {
this.listenTo(this.model, 'change:title', this.render);
}
With listenTo, you bind the view (the “subscriber”) to changes of a model (the “publisher” of events). There are other ways to bind views and models, but making connections with listenTo is good practice. By using listenTo, the reference from a view to a model is automatically cleaned up when the view is removed. If you bind DOM nodes with other methods, such as jQuery’s on function, you run the risk of having unwanted effects in the DOM.
To better understand data binding, let’s conduct some more experiments in the browser console. For this, you should add the listenTo idiom to the Movie view, bundle the new setup, and reload the page in the browser:
> app = require('app');
> movie = app.movies.get(1)
> view = new app.MovieView({model: movie});
If you add this view to the DOM:
> document.body.appendChild(view.render().el);
you can now change the title attribute in the model:
> movie.set({"title": "Midnight in Paris"});
The view will automatically call the render method and update its DOM node, as shown in Figure 3-2.
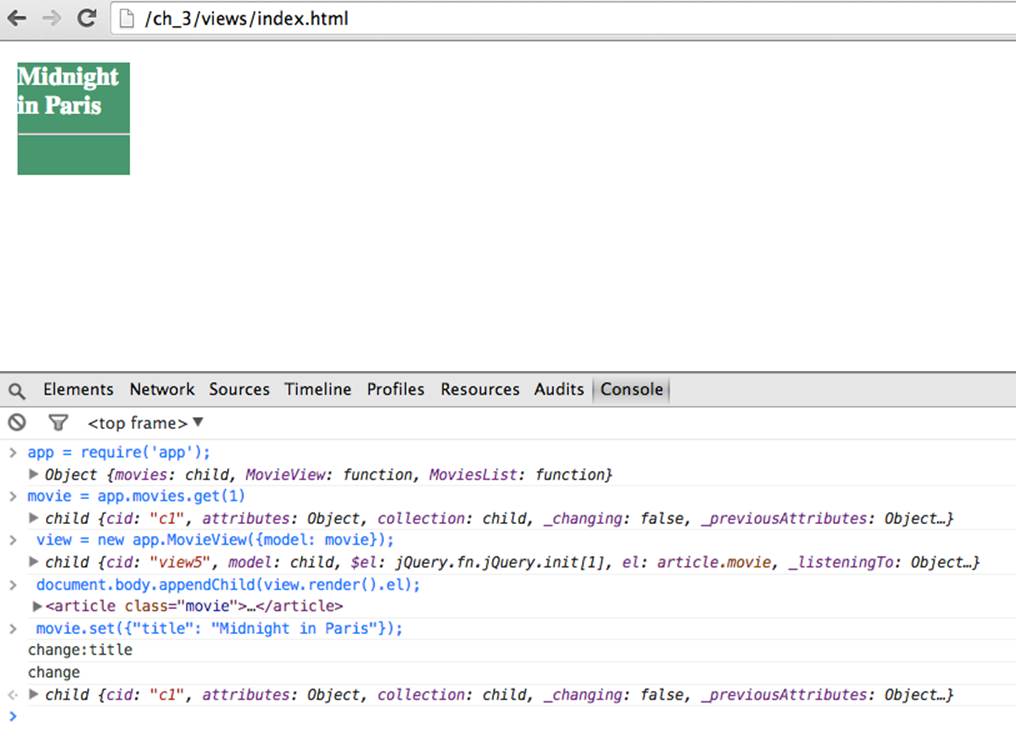
Figure 3-2. The movie DOM element is automatically updated when the title attribute of the model changes
NOTE
With Backbone.js plug-ins, it is also easily possible to bind models to updates from input DOM elements. This two-way data binding is often needed when you build advanced forms but is not needed for the Munich Cinema example right now. If you need to support these use cases in your application, take a look at the Backbone plug-ins Backbone.Stickit and Backbone.ModelBinder for examples.
Basic View Templates
Besides manipulating DOM elements from the render function, views often include some nested HTML tags. Backbone views also support a template property that can be used to build advanced DOM nodes abstracting away some of the jQuery commands.
So, let’s give a final touch to the MovieView by adding a template with an HTML snippet for rendering:
var Backbone = require('backbone');
var _ = require('underscore');
var MovieView = Backbone.View.extend({
tagName: 'article',
className: 'movie',
template: '<h1><%= title %><hr></h1>',
render: function() {
var tmpl = _.template(this.template);
this.$el.html(tmpl(this.model.toJSON()));
this.$el.toggleClass('selected', this.model.get('selected'));
return this;
},
initialize: function() {
this.listenTo(this.model, 'change:title', this.render);
}
});
module.exports = MovieView;
A number of things happen here:
§ We included a template property on the view. We use a template string and the template engine from Underscore.js. There are a number of other template approaches, and in Chapter 6 we will see approaches from EJS (embedded JavaScript), ECO (embedded CoffeeScript), and Handlebars.js
§ We must “compile” the template. We do this with _.template(…). Once the template is compiled, we pass data with this.model.toJSON(). This compile step can also be cached in a property of a view.
§ With templates, we easily can arrange many HTML nodes. However, at their core, templates are JavaScript functions that we call with values. As such, templates often live in a separate directory and need to be compiled into the client-side application during the build process. We will meet a number of strategies for this later when we discuss build processes.
Now that we can create a DOM element for a single movie, let’s go to the next level: rendering a collection of movies.
Rendering a Collection
As with the MovieView, the idea of the MoviesList is to define a render function that transforms data from a movies collection into DOM nodes.
For rendering a collection, you can build upon the rendering of a single movie. The list of movies is the final UI component of this chapter, so you define the following new view in the views/moviesList.js file:
var Backbone = require('backbone');
// The UI for selecting a movie
var MovieView = require('views/movie');
var MoviesList = Backbone.View.extend({
tagName: 'section',
render: function() {
var moviesView = this.collection.map(function(movie) {
return (new MovieView({model : movie})).render().el;
});
this.$el.html(moviesView);
return this;
}
});
module.exports = MoviesList;
As you can see, there is a map over to models of the collection in render. The goal of this map is to build DOM nodes by rendering a MovieView for each model.
To try this out, you can add a reference to MovieView to the app/main.js file:
var MoviesList = require('views/moviesList');
module.exports = { movies: movies,
MovieView: MovieView,
MoviesList: MoviesList };
After bundling and reloading the page, you can play with rendering a collection in the browser console:
> app = require('app');
> moviesList = new app.MoviesList({collection: app.movies});
Backbone automatically binds collection and model properties to a view when a view is instanced like this. Thus, you can try rendering movies with:
> moviesList.render().el
<section>
<article class="movie">
<h3>The Artist</h3>
<hr>
</article>
<article class="movie">
<h3>Taxi Driver</h3>
<hr>
</article>
<article class="movie">
<h3>La Dolce Vita</h3>
<hr>
</article>
</section>
That looks good. We are able to build quite a number of DOM nodes from the data layer.
But we haven’t seen a lot of feedback in the main browser window from user interactions.
Handling UI Events
Now that rendering of a list of movies works, let’s discuss the second part of a user interface: handling events from users.
Basically, capturing an event with Backbone views means that work needs to be done. As a first step, we want to capture click events on movies to change the selected movie. To do this, we can attach event handlers to DOM elements.
In Backbone views, capturing events is defined in a declarative style. An event is composed of a CSS selector and an event type, closely following the lines of jQuery conventions. When the view observes a mouse click on a movie, it runs a JavaScript callback.
Let’s write a basic click event handler for a view and dump the event to the browser console:
MovieView = Backbone.View.extend({
events: {
'click': '_selectMovie'
},
_selectMovie: function(ev) {
ev.preventDefault();
console.log($(ev.currentTarget).html());
}
});
The syntax _selectMovie is often used to point out “private” methods. By preceding methods with an underscore, you can build apps with better encapsulation.
Sometimes, you will see the use of ev.preventDefault() to stop the default event propagation. This can prevent bubbling of DOM events to parents where their behavior would interfere with the rest with your application.
In this example, if you open the browser console, you can track the click events as shown in Figure 3-3.
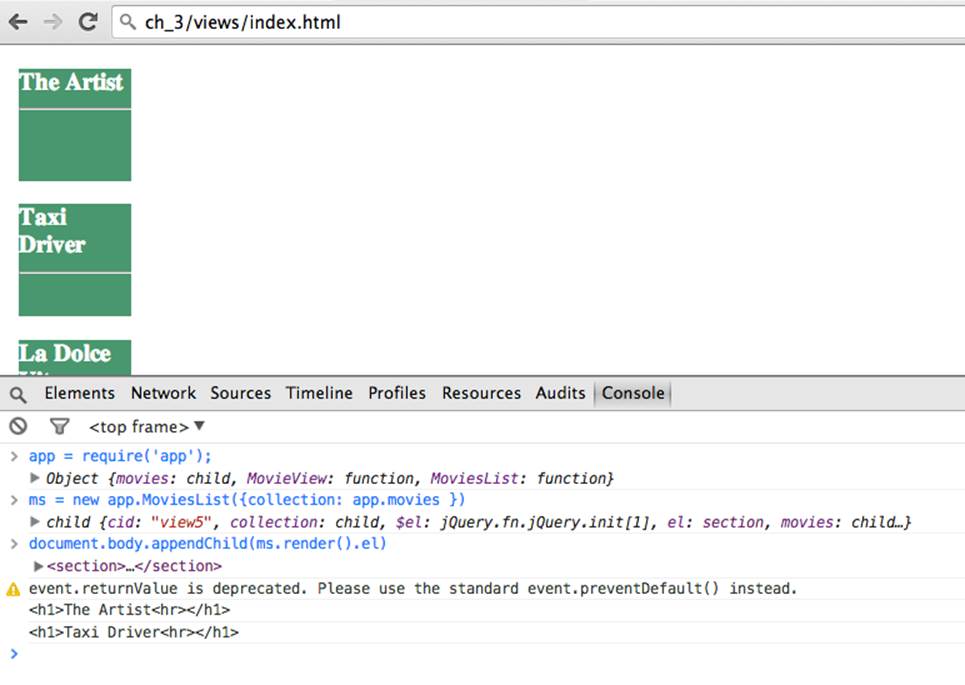
Figure 3-3. The clicks on the movies are handled by a Backbone view; in this example, clicks on movies are traced in the browser console
To round out the example, let’s write the logic to select movies from the movies collection.
We defined the movies collection such that each movie model has a reference to the collection. This allows us to use our previous selectByID() function from the view’s _selectMovie function:
_selectMovie: function(ev) {
this.model.collection.selectByID(this.model.id);
}
Now multiple movies can be selected. But the goal was to select a single movie. For this, we could reset all movie selections first:
_selectMovie: function(ev) {
this.model.collection.resetSelected();
this.model.collection.selectByID(this.model.id);
}
To prevent unnecessary DOM updates when there is no change in movie selection, you can encapsulate this logic with:
_selectMovie: function(ev) {
ev.preventDefault();
if (!this.model.get('selected')) {
this.model.collection.resetSelected();
this.model.collection.selectByID(this.model.id);
}
}
If you bundle everything up and reload the page, you should be able to select movies from the moviesList view:
$ browserify -r ./app/main.js:app > static/bundle.js
Then, in the browser:
> app = require('app');
> moviesList = new app.MoviesList({collection: app.movies});
> document.body.appendChild(moviesList.render().el);
And you are ready to select movies, as shown in Figure 3-4.
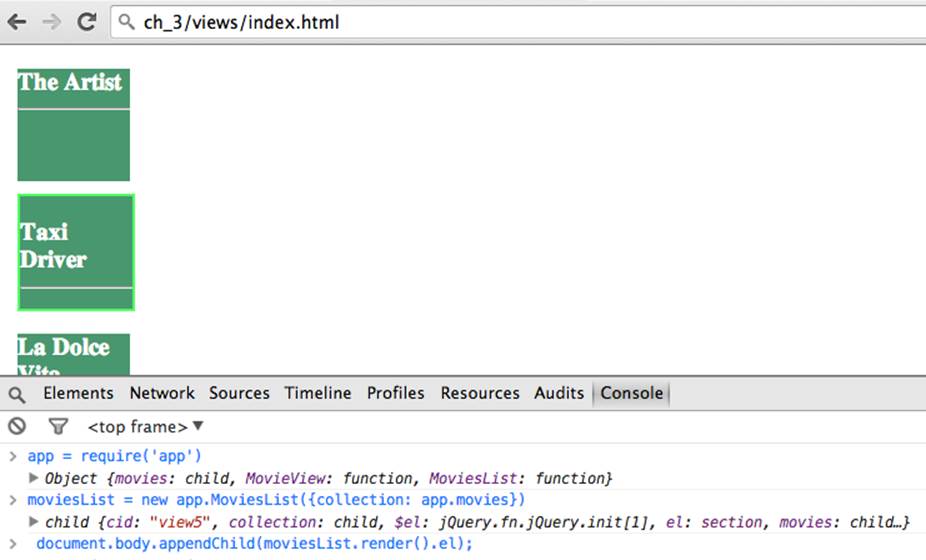
Figure 3-4. When you now click on a movie, the collection is updated
DRYer Views and ViewModels
Selecting an item from a collection is a common use case for Backbone.js views. The approach just discussed is based on having the selected state tracked on each model.
If your applications need to have many selectable items, you might want to use “mixin” functions to share the same behavior across multiple views.
The details of how to accomplish this are beyond the scope of this book, but interested readers can take a look at the Cocktail plug-in.
You can give a view selectable behavior by adding one line for a mixin:
Cocktail.mixin(Movie, App.SelectMixin);
Another valid approach to track the selection of models is by using a ViewModel, a model with the purpose of tracking view only attributes.
The outline of this idea is as follows. You create a Selection model to store the selected movie:
var Backbone = require('backbone');
var Selection = Backbone.Model.extend({
defaults: {
"selected": 1
}
});
module.exports = Selection;
You pass this model into every Movie view and bind the view to changes of the selected attribute of the Selection ViewModel:
var Backbone = require('backbone');
var $ = require('jquery-untouched');
var MovieView = Backbone.View.extend({
tagName: 'article',
className: 'movie',
template: '<h1><%= title %><hr></h1>',
events: {
'click': '_selectMovie'
},
_selectMovie: function(ev) {
ev.preventDefault();
this.selection.set('selected', this.model.id);
},
render: function() {
var tmpl = _.template(this.template);
this.$el.html(tmpl(this.model.toJSON()));
var selected = (this.selection.get('selected') === this.model.id);
this.$el.toggleClass('selected', selected);
return this;
},
initialize: function(options) {
this.selection = options.selection;
this.listenTo(this.selection, 'change:selected', this.render);
}
});
module.exports = MovieView;
In this case, the selection ViewModel is passed via the options argument in the view constructor. Because the selected attribute is now managed by the Selection model, you could also remove that attribute from the Movie model.
Finally, a ViewModel can be avoided by adding getters and setters directly onto the view. This approach is taken in the Backbone.Attributes plug-in.
With the following code:
var view = new Backbone.View;
_.defaults(view, Backbone.Attributes);
you can observe changes on the view itself:
var that = this;
view.on('change:selected', function(id) {
that.collection.selectByID(id);
});
// and elsewhere
view.set('selected', someID);
What strategy is best for you depends on the use case of your application. Sometimes it can be worth trying different approaches to get a sense of the various trade-offs. Using a ViewModel can be nice if you know that selected is just needed within views and not for tracking the state of the selection on a remote server.
Conclusion
In this chapter, we covered the basic concepts behind Backbone views. First we extended our project to combine Backbone with jQuery. Then we explored the underlying principles of DOM manipulation with views.
For rendering views, we wrote different render functions to manipulate the DOM of views. Basic forms of data binding were discussed. Finally, we looked at an example of rendering a collection view.
The remainder of the chapter discussed handling events from views, and we wired the collection view such that a single movie from the movie program could be selected.
With the basics of views, models, and collections now under our belt, it is time to examine another source of state change: the browser URL. In the next chapter, we’ll explore the Backbone router, and you will see how one single view can be used to manage a view layout.