Client-Server Web Apps with JavaScript and Java (2014)
Chapter 6. Java Web API Servers
A man wrapped up in himself makes a very small bundle.
—Benjamin Franklin
Packaging makes it possible to extend the capabilities of a language by including reusable components. The packaging available for a given language affects deployment options. Packaging schemes include consideration for standard naming conventions, metadata files, digital signatures, code obfuscation, arrangement of code, inclusion of related files/resources, and compression mechanisms.
Packaging necessarily impacts deployment. The de facto deployment options available in a language tend to suggest the structure of a project and its development workflow. In Java, this is even more pronounced than other languages. Java source file names reflect the name of the public class they contain. Java packages follow the directory structure of the file system. Java utilizes several specific package types. General purpose source code is included in Java Archives (JARs), web applications are stored in Web Application Archives (WARs), and groups of related web applications can be packaged together in Enterprise Application Archives (EARs). WARs can be deployed to servlet containers, while EARs require full Java Enterprise Edition support, which is available in application servers like JBoss.
Java’s packaging paradigm has many benefits but has resulted in a constrained view of deployment possibilities. Standard web application development practices in place since Java’s initial development required independently installed and configured application servers. These are not, in fact, required to deploy Java web applications. Even if a web container is used, it is possible to avoid the overhead of installing and configuring it prior to beginning development.
Simpler Server-Side Solutions
The explosion of client-side technologies is overwhelming due to the inherent challenges of web browsers as a platform, the JavaScript language itself, and the JavaScript libraries created to help manage the complexity. An additional complexity is device-specific development, which can involve either mobile web applications or native applications that make HTTP web service calls. One pleasant surprise in the new client-server web paradigm is a corresponding simplification of a portion of server-side code.
A web application traditionally has been a relatively large construct that ran in an application server, web container, or web server. At the time of this writing, the venerable Apache web server had over two million lines of code and required hundreds of man-years of effort to complete. J2EE development was notoriously complex (resulting in its being vastly simplified in more recent JEE versions). Server-side Model-View-Controller projects (Struts) and dependency injection frameworks (Spring) provided organization and eased the configuration burden, but highlighted the size and scale of a typical server-side implementation that appeared to be required to develop a Java-based web application.
Client-server web applications use servers that do not maintain session state and consist largely of simple APIs. Though such servers can certainly take advantage of middleware and supporting services, these are often not necessary. Due to direct and indirect influence from the scripting language world, it is now trivially easy to set up a minimal server to provide adequate functionality for front-end developers to work without a need for the full-scale server implementation. Java and JVM languages allow for many possibilities that allow a developer to include server functionality in a project without the need to install, configure, and maintain a full server implementation. This opens up possibilities for very different workflows than were previously possible. In addition to benefits during development, the practice of horizontal scaling in cloud-based production deployments is eased by having a lightweight server solution.
A “containerless” web application server can be constructed by simply using Java on the JVM or by taking advantage of libraries. Figure 6-1 illustrates the ones used in this chapter and their relationship to each other. Libraries located higher on the diagram have greater infrastructure, are more opinionated, and (in theory) are a more productive starting point for a framework suited to a domain. They are not exhaustive, but could be extended in various directions. For example, the various JVM languages have corresponding web frameworks (Sinatra or Rails for JRuby, and Django for Jython). Typeset is a Scala framework built on top of Play. vert.x distinguishes itself as supporting several JVM languages.

Figure 6-1. Server libraries
The examples in this chapter are confined to a Java-centric workflow and build process. JVM languages vary in their workflow practices depending on their origins. Groovy and Scala were created with their initial target being the JVM, whereas Ruby and Python were languages that were ported to the JVM. Techniques and practices in Groovy (and to a lesser extent Scala) tend to be traceable to problems or patterns familiar to Java developers. JRuby and Jython, having independent origins, tend to have original approaches that are less familar to Java developers (but are recognizable to those moving from other implementations to the JVM). These tend to require you to use the development installation procedures, toolchain, and commands specific to their community.
Java-Based Servers
Servers can be written in Java alone or can use one of several higher-level libraries. The same basic pattern is used in many cases: a server class delegates requests to a handler, which extends an abstract class or implements an interface, which defines a handle method. Figure 6-2 illustrates the basic relationship between the server class, which uses a handler class. The handle method is implemented by the concrete handler. In the examples that follow, the handler will return a JSON object.
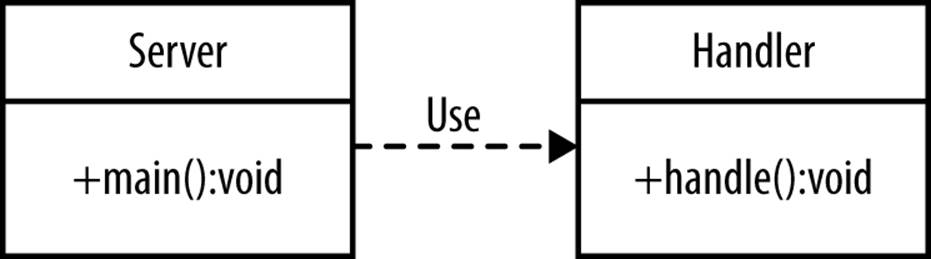
Figure 6-2. Server-handler class diagram
NOTE ON EXAMPLES
Like other examples in this book, the examples in this chapter are intentionally simplified to isolate specifics relevent to the topic under discussion. For example, many of the following JSON responses are simply text strings. In practice, it is much more common to use Jackson or other such libraries when constructing a response. Most developers will work using a high-level, full-featured framework, but it is clearer to use strings to illustrate what is happening in code displayed in a book. The use of libraries along with annotations is very neat, efficient, and declarative in the context of a project, but hides so much functionality that sample code is unclear at best.
The point of these examples is to demonstrate that application servers are not always needed, and that writing functional, special-purpose servers is a relatively straightforward task. Many developers will choose to use higher-level frameworks, but having a knowledge of what is going on in lower-level libraries can assist when debugging or interpreting error stack traces and log messages.
Java HTTP Server
Java Standard Edition ships with an HTTP server API that allows the creation of simple, functional, embedded HTTP servers. The following program requires no external dependencies. It listens on port 8000 and responds to requests by returning an HTTP success response (200) with JSON content:
{"testResponse":"Hello World"}
A single Java source file consists of a class that defines a main method. Within the main method, a server instance is created that delegates to a static handler class (defined here as a static inner class) based upon the URL context:
import java.io.*;
import com.sun.net.httpserver.*;
import java.net.InetSocketAddress;
public class HttpJsonServer {
public static void main(String[] args) throws Exception {
HttpServer server = HttpServer.create(
new InetSocketAddress(8000), 0
);
server.createContext("/", new MyHandler());
server.setExecutor(null);
System.out.println("Starting server on port: 8000");
server.start();
}
static class MyHandler implements HttpHandler {
public void handle(HttpExchange t) throws IOException {
String response = "{\"testResponse\":\"Hello World\"}";
t.getResponseHeaders().set(
"Content-Type",
"application/json"
);
t.sendResponseHeaders(200, response.length());
OutputStream os = t.getResponseBody();
os.write(response.getBytes());
os.close();
}
}
}
This example is so simple that there are no external dependencies and no build scripts. Just compile and run:
$ javac HttpJsonServer.java
$ java HttpJsonServer
Starting server on port: 8000
The server can be hit from a separate command-line session using Curl:
$ curl -i http://localhost:8000
HTTP/1.1 200 OK
Content-type: application/json
Content-length: 30
Date: Sun, 09 Jun 2013 01:15:15 GMT
{"testResponse":"Hello World"}
Obviously, this is not a particularly full-featured example. But it does suggest that the development of functional HTTP servers using Java is a relatively simple attainable goal.
Embedded Jetty Server
Jetty is a Java-based HTTP server and Java Servlet container maintained by the Eclipse Foundation. Besides being included as part of the Eclipse IDE, it is embedded in or used by a variety of other products such as ActiveMQ, Maven, Google App Engine, and Hadoop. It is more than merely an HTTP server because it also supports the Java Servlet API and the SPDY and WebSocket protocols. Because of its inclusion in so many projects, many developers are at least aware of its existence and functionality. Less are aware of how easily it can used as a component in a custom Java-based server.
Because a Jetty-based server needs to include external modules, a build script is in order. One challenge with describing Maven configurations in a book is that the pom.xml files tend to be relatively large and verbose. Gradle configuration is more terse and focused. The following Gradle configuration includes Jetty and add a task that can be used to start the server:
apply plugin:'java'
repositories{mavenCentral()}
dependencies{compile 'org.eclipse.jetty:jetty-server:8.1.0.RC5'}
task(startServer, dependsOn: 'classes', type: JavaExec) {
main = 'com.saternos.embedded.TestJettyHttpServer'
classpath = sourceSets.main.runtimeClasspath
args 8000
}
The pattern followed is similar to the simple Java-based example. A handler class is defined to return a JSON response:
package com.saternos.embedded;
import java.io.IOException;
import javax.servlet.ServletException;
import javax.servlet.http.HttpServletRequest;
import javax.servlet.http.HttpServletResponse;
import org.eclipse.jetty.server.Request;
import org.eclipse.jetty.server.handler.AbstractHandler;
public class JsonHandler extends AbstractHandler
{
public void handle(
String target,
Request baseRequest,
HttpServletRequest request,
HttpServletResponse response
)
throws IOException, ServletException
{
response.setContentType("application/json;charset=utf-8");
response.setStatus(HttpServletResponse.SC_OK);
baseRequest.setHandled(true);
response.getWriter().println(
"{\"testResponse\":\"Hello World\"}"
);
}
}
A main method creates an instance of a server. The server object delegates requests received to the handler:
package com.saternos.embedded;
import org.eclipse.jetty.server.Server;
public class TestJettyHttpServer
{
public static void main(String[] args) throws Exception
{
Server server = new Server(Integer.parseInt(args[0]));
server.setHandler(new JsonHandler());
System.out.println("Starting server on port: " + args[0]);
server.start();
server.join();
}
}
Build and run the server using Gradle:
$ gradle build startServer
And the response via Curl is what you might expect, along with a reference to Jetty as the server in use:
$ curl -i http://localhost:8000
HTTP/1.1 200 OK
Content-Type: application/json;charset=utf-8
Content-Length: 31
Server: Jetty(8.1.0.RC5)
{"testResponse":"Hello World"}
If you are inclined to write a custom API server from the ground up, the basic building blocks are included in Java and expanded on in libraries like Jetty. Jetty is also used behind the scenes by other projects relevant to authoring web APIs such as Restlet.
Restlet
The Restlet API is designed with direct references to REST concepts like resource, representation, connector, component, and media type. REST APIs can be implemented naturally in this framework. While not particularly RESTful, the following example demonstrates how little code is required to create a server that returns JSON. The class is a ServerResource that is attached to the root context and responds to HTTP GET requests by returning JSON:
package com.saternos.embedded;
import org.restlet.*;
import org.restlet.data.*;
import org.restlet.resource.*;
import org.restlet.ext.json.JsonConverter;
public class TestRestletHttpServer extends ServerResource {
public static void main(String[] args) throws Exception {
Component component = new Component();
component.getServers().add(Protocol.HTTP, Integer.parseInt(args[0]));
component.getDefaultHost().attach("/", TestRestletHttpServer.class);
component.start();
}
@Get ("json")
public String getGreeting() {
return "{\"testResponse\":\"Hello World\"}";
}
}
Roo
Roo allows you to create a project in a few minutes. The new project runs on an embedded Jetty (or Tomcat) server. An in-memory database is available (you can design your data models and they are automatically propagated to the selected database). So with zero time spent in server configuration, you can create a traditional web application that includes a web application server and database backend through interaction with a REPL.
Download the latest version of Roo, extract it, and add the path to roo.sh (or roo.bat) to your path. Run roo.sh and you will be prompted to complete some initial setup (agree to terms of use). At this point, you can type help or hint at various points to be prompted with what options are available:
$ roo.sh
____ ____ ____
/ __ \/ __ \/ __ \
/ /_/ / / / / / / /
/ _, _/ /_/ / /_/ /
/_/ |_|\____/\____/ 1.2.4.RELEASE [rev 75337cf]
Welcome to Spring Roo. For assistance press TAB or type "hint" then hit ENTER.
roo>
Roo’s CLI responds like an expert system for creating Spring-based web applications. Type hint to find what options are available at a given point in development. You will be directed to set up a datastore, define entities and fields, and create a web application.
Note that there are times where you will need to work outside of the interactive prompt. For example, if you enter an entity or field incorrectly, these need to be deleted from the generated code.
The following set of commands run within the context of Roo will create a standard JEE web application that includes JSON services (output from each is not included):
project com.saternos.bookshop
jpa setup --provider HIBERNATE --database HYPERSONIC_IN_MEMORY
entity jpa --class ~.domain.Author --testAutomatically
field string --fieldName name --sizeMin 2 --notNull
entity jpa --class ~.domain.Book --testAutomatically
field string --fieldName name --notNull --sizeMin 2
field number --fieldName price --type java.math.BigDecimal
field set --fieldName authors --type ~.domain.Author
json all --deepSerialize
web mvc json setup
web mvc json all
web mvc setup
web mvc all --package ~.web
The application provides CRUD operations related to a list of books. After initial project creation, an in-memory datastore is configured. Two entities (and their corresponding fields) are then configured. The next set of three commands is required to expose the enties via a JSON web API. A JEE admin application based on the entities is generated by the final two commands.
The application can be built and run on Jetty:
mvn clean install jetty:run
Authors can be created through the JSON API using Curl. The first example shows how to create a single author; the second, a collection of them.
curl -i -X POST -H "Content-Type: application/json" \
-H "Accept: application/json" \
-d '{name: "Simon St. Laurent"}' \
http://localhost:8080/bookshop/authors
curl -i -X POST -H "Content-Type: application/json" \
-H "Accept: application/json" \
-d '[ {name: "Douglas Crockford"}, {name: "Michael Fogus"} ]' \
http://localhost:8080/bookshop/authors/jsonArray
The main page of the web application is available from http://localhost:8080/bookshop/ and rendered with a professionally styled design by default, as shown in Figure 6-3.
The same URL can be used to remove a record using an HTTP delete:
curl -i -X DELETE -H "Accept: application/json" \
http://localhost:8080/bookshop/authors/1
curl -i -X DELETE -H "Accept: application/json" \
http://localhost:8080/bookshop/authors/2
curl -i -X DELETE -H "Accept: application/json" \
http://localhost:8080/bookshop/authors/3
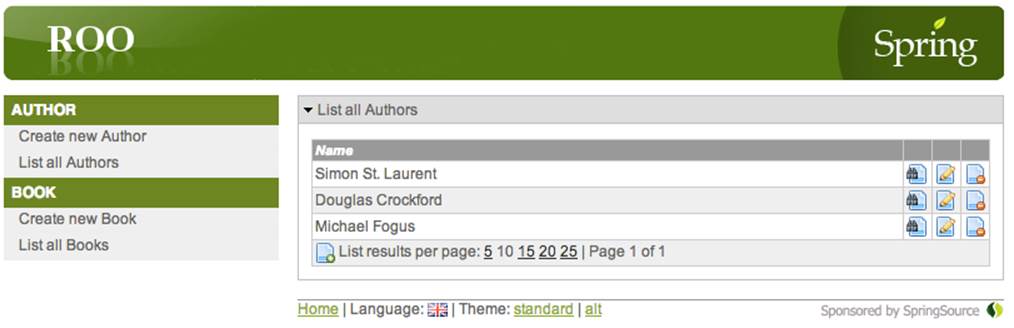
Figure 6-3. Roo web application author list
Books along with associated authors can be added by nesting the reference to the authors. Figure 6-4 shows the changes reflected in the “List all Books” page after the following curl calls are run:[2]
curl -i -X POST -H "Content-Type: application/json" \
-H "Accept: application/json" \
-d '{name:"JavaScript: The Good Parts",'`
`'price:29.99,'`
`'authors:[{name: "Douglas Crockford"}]}' \
http://localhost:8080/bookshop/books
curl -i -X POST -H "Content-Type: application/json" \
-H "Accept: application/json" \
-d '{name:"Functional JavaScript",'`
`'price:29.99,'`
`'authors:[{name: "Michael Fogus"}]}' \
http://localhost:8080/bookshop/books
curl -i -X POST -H "Content-Type: application/json" \
-H "Accept: application/json" \
-d '{name:"Introducing Elixir",'`
`'price:19.99,'`
`'authors:[{name: "Simon St. Laurent"}]}' \
http://localhost:8080/bookshop/books
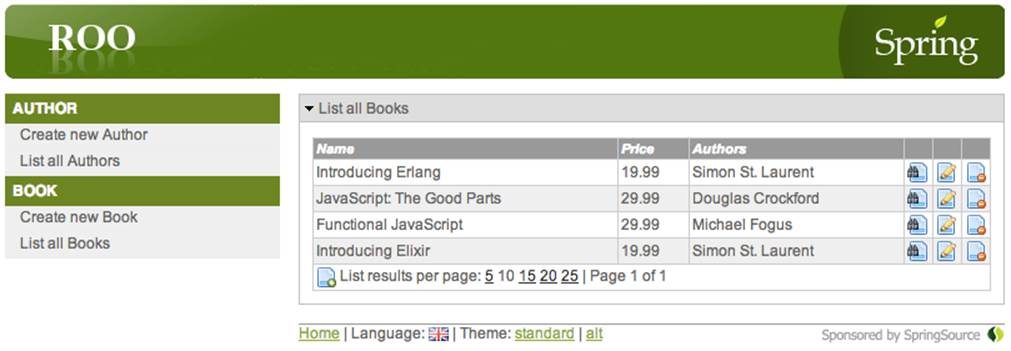
Figure 6-4. Roo web application book list
To retrieve the list of authors and books inserted:
curl http://localhost:8080/bookshop/authors
curl http://localhost:8080/bookshop/books
A single object in the array of results can be accessed by ID:
curl http://localhost:8080/bookshop/books/1
FORMAT JSON AT THE COMMAND LINE
There are a number of ways to format JSON returned at the command line. You can redirect the output to a file and open it with an editor that supports JSON formatting. There are also special purpose utilites (like jq) that can format JSON data piped to it. If you have Python installed, formatting is as simple as:
curl http://localhost:8080/bookshop/books | python -mjson.tool
With the web API in place, standard HTML pages can be created and used in place of (or in addition to) the jspx page created through the Roo scaffolding command. Create a file named /src/main/webapp/test.html and it will be available from http://localhost:8080/bookshop/test.html. The GET book listing calls can be accessed using jQuery using the getJSON method:
<html>
<head>
<title>Book List</title>
<script src="http://ajax.googleapis.com/ajax/libs/jquery/1.10.1/jquery.min.js">
</script>
</head>
<body>
<h3>Books</h3>
<ul class='booklist'></ul>
<script>
(function() {
$.getJSON('/bookshop/books', function(books) {
$.each(books, function(nil,book) {
$('.booklist').append('<li>' + book['name'] + '</li>');
});
});
})();
</script>
</body>
</html>
Roo is one of the most accessible tools available because of its interactive nature. If you want more extensive coverage on working with the framework, Getting Started with Roo (O’Reilly) is available as a free download, and Spring in Action (Manning Publications) provides additional insight.
Embedded Netty Server
While Jetty has been associated with the Eclipse Foundation, a project with some overlapping use cases emerged from the JBoss community. Netty is used to create optimized network applications (protocol servers and clients). Optimized network applications scale better than general purpose alternatives. The fact that Twitter leverages Netty to address performance concerns suggests something of its maturity and capacity for scaling.
A sample application using Netty is analagous to the one just demonstrated using Jetty in that it follows a similar basic pattern. Again, a class with a main method instantiates and starts the server and a handler class is defined to process incoming requests:
package com.saternos.embedded;
import io.netty.bootstrap.ServerBootstrap;
import io.netty.channel.socket.nio.*;
public class TestNettyHttpServer {
public static void main(String[] args) throws Exception {
ServerBootstrap bootstrap = new ServerBootstrap();
bootstrap.group(new NioEventLoopGroup(), new NioEventLoopGroup())
.channel(NioServerSocketChannel.class)
.localAddress(Integer.parseInt(args[0]))
.childHandler(new JsonServerInitializer());
System.out.println("Starting server on port: " + args[0]);
bootstrap.bind().sync().channel().closeFuture().sync();
}
}
The handler class extends ChannelInboundMessageHandlerAdapter, which allows the class to be included in the server’s pipeline. The messageReceived method has access to the request and creates the response:
package com.saternos.embedded;
import io.netty.buffer.Unpooled;
import io.netty.util.CharsetUtil;
import java.text.SimpleDateFormat;
import io.netty.channel.*;
import java.util.*;
import io.netty.handler.codec.http.*;
public class JsonHandler extends ChannelInboundMessageHandlerAdapter<HttpRequest> {
public void messageReceived(ChannelHandlerContext channelHandlerContext,
HttpRequest httpRequest) throws Exception {
StringBuffer buf = new StringBuffer();
buf.append("{\"testResponse\":\"Hello World\"}");
SimpleDateFormat dateFormatter = new SimpleDateFormat(
"EEE, dd MMM yyyy HH:mm:ss zzz",
Locale.US
);
dateFormatter.setTimeZone(TimeZone.getTimeZone("GMT"));
Calendar time = new GregorianCalendar();
HttpResponse response = new DefaultHttpResponse(HttpVersion.HTTP_1_1,
HttpResponseStatus.OK);
response.setHeader(HttpHeaders.Names.CONTENT_TYPE,
"application/json;charset=utf-8");
response.setHeader(HttpHeaders.Names.CONTENT_LENGTH, buf.length());
response.setHeader(HttpHeaders.Names.DATE,
dateFormatter.format(time.getTime()));
response.setHeader(HttpHeaders.Names.SERVER,
TestNettyHttpServer.class.getName() +
":io.netty:netty:4.0.0.Alpha8");
response.setContent(Unpooled.copiedBuffer(buf, CharsetUtil.UTF_8));
channelHandlerContext.write(response).addListener(
ChannelFutureListener.CLOSE);
}
}
A class that implements ChannelInitializer is also required to set up the pipeline.
The initializer’s initChannel method has a reference to the Channel interface, which is used to create and access a pipeline for the /SocketChannel. Pipelines transform or manipulate the values passed to them. The HttpRequestDecoder receives the raw bytes and uses them to construct HTTP-related objects, and the HttpChunkAggregator normalizes requests with a transfer encoding of chunked. The next two pipeline classes encode and chunk the response, which is then passed to the sample application’s specific handler class (where headers and the actual response are created):
package com.saternos.embedded;
import io.netty.channel.socket.SocketChannel;
import io.netty.handler.stream.ChunkedWriteHandler;
import io.netty.handler.codec.http.*;
import io.netty.channel.*;
public class JsonServerInitializer extends ChannelInitializer<SocketChannel> {
public void initChannel(SocketChannel socketChannel) throws Exception {
ChannelPipeline pipeline = socketChannel.pipeline();
pipeline.addLast("decoder", new HttpRequestDecoder());
pipeline.addLast("aggregator", new HttpChunkAggregator(65536));
pipeline.addLast("encoder", new HttpResponseEncoder());
pipeline.addLast("chunkedWriter", new ChunkedWriteHandler());
pipeline.addLast("handler", new JsonHandler());
}
}
Building and running the application results in a response similar to the preceding ones:
$ gradle build startServer
$ curl -i http://localhost:8000
HTTP/1.1 200 OK
Content-Type: application/json;charset=utf-8
Content-Length: 30
Date: Fri, 14 Jun 2013 14:02:57 GMT
Server: com.saternos.embedded.TestNettyHttpServer:io.netty:netty:4.0.0.Alpha8
{"testResponse":"Hello World"}
Netty is a relatively low-level, general-purpose network library. This provides a great deal of flexibility for creating optimized applications at the expense of the additional overhead of setting up applicable pipelines and handlers. The example is somewhat longer and more complex, but worth being aware of because Netty provides the foundation for several higher-level frameworks such as Play and Vert.x. Norman Maurer, a core developer of Netty, has written Netty in Action (Manning Publications), a book that goes into greater detail about the capabilities of this sophisticated framework.
Play Server
The Play Framework is a lightweight, stateless framework well suited for creating API servers. A play application can be generated with a few simple commands, and a routes file can be configured to indicate HTTP methods and paths that reference controller methods. Code can be written in Java or Scala, and the influence of the Scala community is apparent in many places such as the use of SBT and Scala-based templates. Play project changes are reflected immediately in a browser; no separate build step is required.
With Play installed, create a new play application by running play new, naming the application, and choosing the Java template:
$ play new play-server
_ _
_ __ | | __ _ _ _| |
| '_ \| |/ _' | || |_|
| __/|_|\____|\__ (_)
|_| |__/
play! 2.1.1 (using Java 1.7.0_21 and Scala 2.10.0), http://www.playframework.org
The new application will be created in /Users/cs/Desktop/tmp/play-server
What is the application name? [play-server]
>
Which template do you want to use for this new application?
1 - Create a simple Scala application
2 - Create a simple Java application
> 2
OK, application play-server is created.
Have fun!
This command generated an application structure similar to that of a Ruby on Rails application. Subsequent command and file modifications are in the context of the newly created directory:
cd play-server
In this example, an application will return JSON from a URL (/json). To define this API call, modify conf/routes and add the following line:
GET /json controllers.Application.json()
Finally, modify the Java controller code referenced in the routes file.
Note that this example departs from the previous practice of “Hello World” in a JSON string. Instead, an object is created and serialized as JSON in the response (using Jackson under the covers).
This process of creating an object and then serializing it to a target format in the server response is also used in JAX-RS (the JEE Java API for RESTful) web services:
package controllers;
import play.*;
import play.mvc.*;
import views.html.*;
import org.codehaus.jackson.JsonNode;
import play.libs.Json;
import org.codehaus.jackson.node.ObjectNode;
import org.codehaus.jackson.node.ArrayNode;
// pretty print
import org.codehaus.jackson.map.ObjectMapper;
public class Application extends Controller {
public static Result index() {
return ok(index.render("Your new application is ready."));
}
public static Result json() {
ObjectNode result = Json.newObject();
// How to nest a JSON object
ObjectNode child = Json.newObject();
child.put("color", "blue");
result.put("NestedObj",child);
// Adding Strings
result.put("status", "OK");
result.put("something", "else");
// Add Integers
result.put("int", 1);
// Add a JSON array
ArrayNode collection = result.putArray("coll");
collection.add(1);
collection.add(2);
collection.add(3);
collection.add(4);
// comment out this line -VVV- and uncomment the /* */ below to format the JSON
return ok(result);
/*
// To return json pretty-printed, need to render it as a formatted
// string and then explicitly set the response
// http://www.playframework.com/documentation/2.1.0/JavaResponse
//
//
ObjectMapper mapper = new ObjectMapper();
String s="";
try{
s = mapper.defaultPrettyPrintingWriter().writeValueAsString(result);
}catch(Exception e){}
return ok(s).as("application/json");
*/
}
}
The application’s internal server can be started from within the application directory:
$ play ~run
In the code listing above,
return ok(result);
can be removed and the lines that follow it can be uncommented. Refresh the browser to see the JSON change from unformatted to formatted output.
NO BROWSER REFRESH REQUIRED
With the use of a Chrome plug-in created by James Ward, even the browser refresh can be avoided. Instead, the browser refreshes whenever a file is saved. To accomplish this, install the Play Chrome plug-in and modify project/plugins.sbt and add the following line:
addSbtPlugin("com.jamesward" %% "play-auto-refresh" % "0.0.3")
Other Lightweight Server Solutions
These are by no means the only options available for building APIs. Dropwizard is a Java framework (similar in intention to Restlet) for developing HTTP/JSON web services. It is built on other “best of breed” technologies (Jetty for HTTP, Jackson for JSON, and Jersey for REST). Containerless and minimally embedded server solutions are somewhat novel to the Java community, but are taken for granted by programmers working with other languages.
JVM-Based Servers
Besides the options available for Java itself, the JVM can serve as a compilation target for languages other than Java itself. The support for additional languages on the JVM has grown with each release of Java. In fact, the play framework previously introduced supports Scala as its preferred language. If you are specifically interested in the expressive possibilities available through alternate JVM languages, Vert.x is a web server that allows you to create applications using JavaScript, CoffeeScript, Ruby, Python, Groovy, or Java.
A JVM language can be invoked from within a Java application, or a project can be assembled that invokes the Java class specified as the interpreter for the language. The following code excerpts show basic examples of how to create simple servers that run on the JVM.
Jython
If you have Python installed, you can launch a web server to serve files from your current local directory by running the following command:
$ python -m SimpleHTTPServer 8000
Jython is a JVM implementation of Python that can perform a similar task with a bit more effort. Create a build.gradle file with a task to invoke Jython and call a small Python script that will invoke the HTTP server:
apply plugin:'java'
repositories{mavenCentral()}
dependencies{compile 'org.python:jython-standalone:2.5.3'}
// Example running a Jython Server
task(startServer, dependsOn: 'classes', type: JavaExec) {
main = 'org.python.util.jython'
classpath = sourceSets.main.runtimeClasspath
args "http_server.py"
}
The http_server.py consists of navigation to the directory where files will be served and a bit of code to create and start the server:
import SimpleHTTPServer
import SocketServer
import os
os.chdir('root')
print "serving at port 8000"
SocketServer.TCPServer(("", 8000),
SimpleHTTPServer.SimpleHTTPRequestHandler).serve_forever()
Create a directory named root. Whatever files are placed in the root directory will be served by the SimpleHTTPServer. Those files with a .json extension will have a content type of application/json.
QUICKEST MOCK SERVER EVER
With this simple setup, client-side developers can begin work while working server-side code is not yet available. Mock JSON responses can be created in files within a directory structure that reflects the API paths. These JSON response files can also be used to essentially document the API and even serve as validation server-side unit tests.
Web Application Servers
There are of course full-scale web application server solutions for deploying production code developed in Java or in Python (using django-jython, for example) or Ruby (using warbler). Tomcat is a Servlet container and (available immediately in the Roo framework mentioned previously) and so can run any web application that can be deployed as a WAR. A project with a group of WARs that need to be packaged together in an EAR (or individual WARs that require certain JEE services) needs a full-fledged JEE application server like JBoss.
Development Usage
It is clear that the clear separation of client and server tiers provides various possibilities for client development using simple servers that are created quickly while server development progresses in parallel. At its most basic, an HTTP server could be created to return hardcoded JSON. With little more effort, the JSON could be stored on the file system in filenames that reflect the API URLs. If database access is required, Roo includes easy database integration using technologies that are also available in other Java-based projects. It is even possible to continually extend the server to include disparate datasources, application caching, and other such features that will allow it to serve as the basis of the production server. This type of development is not possible when developing monolithic applications that do not provide a clear partitioning of client and server applications.
Conclusion
The examples in this chapter highlight the progressive simplification of server-side development, which contrasts with the growing complexity of client-side code. Java developers entrenched in a view based on traditional Java packaging methodologies and application server deployment should be aware of the alternatives that better fit a client-server paradigm.
Creating a lightweight, specialized API or HTTP server is possible without a deep knowledge of network minutiae and low-level languages. Simple, lightweight server-side code and simplified deployment options emerged out of a necessity to create highly scalable solutions that are practical for large-scale deployments. The shift also has a profound effect on the day-to-day workflow for programmers. These effects, which are positive for the most part, are the subject of the next chapter.
[2] Formatting code for human consumption is challenging. This is because computers and people interpret whitespace and linebreaks differently—and the fact that this book appears in both paper and digital formats. In practice, the preceding curl commands are best executed at the command line using no line breaks and minimal whitespace. Unfortunately, this results in either invalid word-wrapping or text flowing outside of the margins of the page. Within a bash session, long commands can be broken up over multiple lines using a backslash (\) at the end of each line. We follow that convention throughout this book, but it does not work in every case. The preceding examples break up a JSON string into separate lines, and include backticks (`) that cause the spaces and intervening newline to be ignored. We take advantage of this quirk of bash for the benefit of folks who are copying the commands from digital versions of this book.
All materials on the site are licensed Creative Commons Attribution-Sharealike 3.0 Unported CC BY-SA 3.0 & GNU Free Documentation License (GFDL)
If you are the copyright holder of any material contained on our site and intend to remove it, please contact our site administrator for approval.
© 2016-2026 All site design rights belong to S.Y.A.