CORS in Action: Creating and consuming cross-origin APIs (2015)
Part 1. Introducing CORS
Chapter 2. Making CORS requests
This chapter covers
· Which browsers support CORS
· How to use the XMLHttpRequest object to make CORS requests
· How to use the XDomainRequest object in Internet Explorer 8 and 9
· How to load cross-origin images in a canvas element
· How to make CORS requests from jQuery
A CORS request consists of two sides: the client making the request, and the server receiving the request. On the client side, the developer writes JavaScript code to send the request to the server. The server responds to the request by setting special CORS-specific headers to indicate that the cross-origin request is allowed. Without both the client’s and the server’s participation, the CORS request will fail.
This chapter focuses on how to make CORS requests from JavaScript. It assumes you have an existing CORS-enabled API (such as the Flickr API, the GitHub API, or your own API) to make requests to (if you don’t have an existing CORS-enabled API, don’t worry. Part 2 looks at how to set one up). The chapter starts by defining what a cross-origin request is and which browsers support it. It then covers the main ways to make CORS requests, including the XMLHttpRequest and XDomainRequest objects. Next it looks at how the HTML5 <canvas> element uses CORS to load images. It ends with a look at jQuery support for CORS. The server-side details of CORS will be covered in chapter 3.
2.1. What is a cross-origin request?
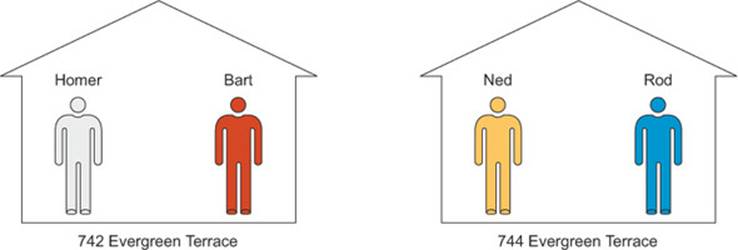
Before learning how to make a cross-origin request, let’s define what a cross-origin request is. Think of a website as a house, and each page on the website as an inhabitant of that house. Suppose there are houses located at 742 Evergreen Terrace and 744 Evergreen Terrace, and each house has two residents: Homer and Bart at 742 Evergreen Terrace, and Ned and Rod at 744 Evergreen Terrace (as shown in figure 2.1).
Figure 2.1. Two houses with two people in each. Each house represents a website, and the people in the house are web pages.
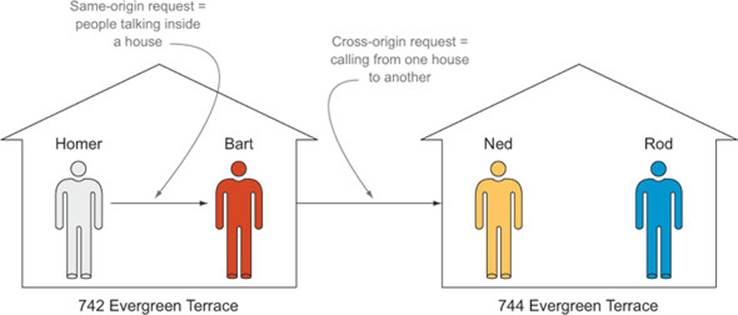
An HTTP request is a conversation between two people. When Homer talks to Bart, the conversation takes place solely within the confines of the house. This is called a same-origin request. If Homer calls Ned, the conversation crosses the boundaries of the house. This is called a cross-origin request. Figure 2.2 shows the distinction between a same-origin and a cross-origin request.
Figure 2.2. Illustrating the difference between a same-origin and a cross-origin request
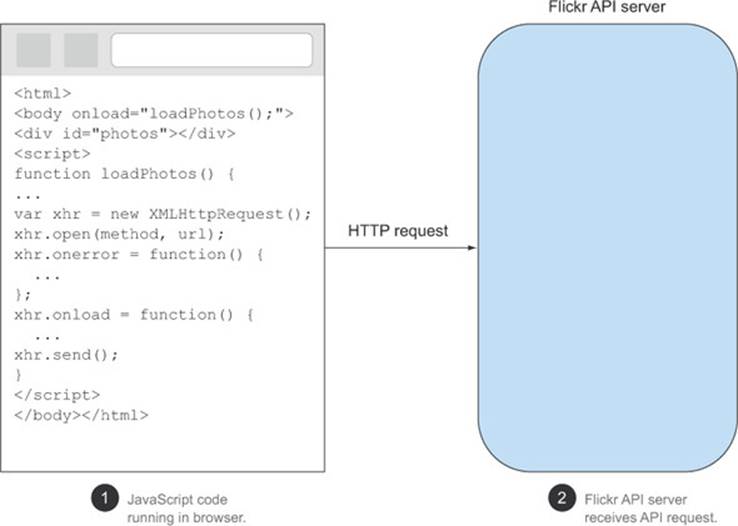
Now let’s apply this analogy to the Flickr example from chapter 1. In that example, there is JavaScript code running in the browser, which initiates a request to the Flickr API, as shown in figure 2.3. This request is a cross-origin request because the JavaScript code making the request and the API server receiving the request live on two different websites.
Figure 2.3. Making a request from the browser to the Flickr API
There are a lot of different pieces to making a successful cross-origin request. The client and the server must work together to ensure that the request succeeds. This chapter focuses on the first part of this process: how the client initiates a request to the server ![]() . Let’s start by taking a look at which browsers do and don’t support CORS.
. Let’s start by taking a look at which browsers do and don’t support CORS.
2.2. Browser support for CORS
Browser support for CORS can be divided into three tiers: full support, partial support, and no support. If you’re developing with CORS, it’s helpful to know which browsers your users are using, so you know which of these three tiers you need to focus on.
CORS is fully supported in the following desktop browsers:
· Chrome 3+
· Firefox 3.5+
· Safari 4+
· Internet Explorer 10+
· Opera 12+
In addition to desktop browsers, CORS is fully supported in most mobile browsers, including iOS 3.2+ and Android 2.1+. Mobile devices tend to have up-to-date software, so if you’re developing for mobile browsers, you can be comfortable knowing your users have CORS support.
Internet Explorer 8 and 9 support a limited version of CORS using something called the XDomainRequest object, which is limited to only certain types of CORS requests. If cross-origin requests in Internet Explorer 8 or Internet Explorer 9 are important to your application, you’ll want to learn about the limitations in XDomainRequest.
If the browser’s version is older than the ones mentioned here, it probably doesn’t support CORS. If you need to support cross-origin requests in an older browser, there are still options. As we’ll cover in appendix D, there are other mechanisms available for making cross-origin requests in older browsers. But you won’t be able to use the techniques described here.
Table 2.1 breaks down the landscape of CORS support in browsers. As of mid-2014, approximately 83% of the browsers out there have full support for CORS, and another 6% have partial support.
Table 2.1. CORS support in browsers
|
Tier |
CORS support |
Browsers |
|
1 |
Full CORS support |
Chrome 3+, Firefox 3.5+, Safari 4+, Internet Explorer 10+, Opera 12+ |
|
2 |
Partial CORS support |
Internet Explorer 8, Internet Explorer 9 |
|
3 |
No CORS support |
Chrome 2 and below, Firefox 3 and below, Safari 3 and below, Internet Explorer 7 and below, Opera 11 and below |
(Source: http://caniuse.com/#search=cors.)
The next two sections look at how to work with CORS in tier 1 and tier 2 browsers. Tier 1 browsers use the XMLHttpRequest object to make cross-origin requests, while tier 2 browsers use the XDomainRequest object. Let’s start by looking at the XMLHttpRequest object.
2.3. Using the XMLHttpRequest object
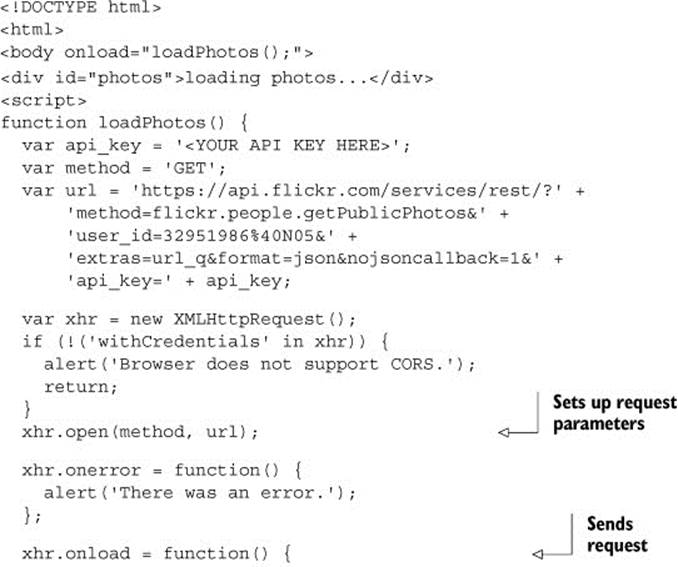
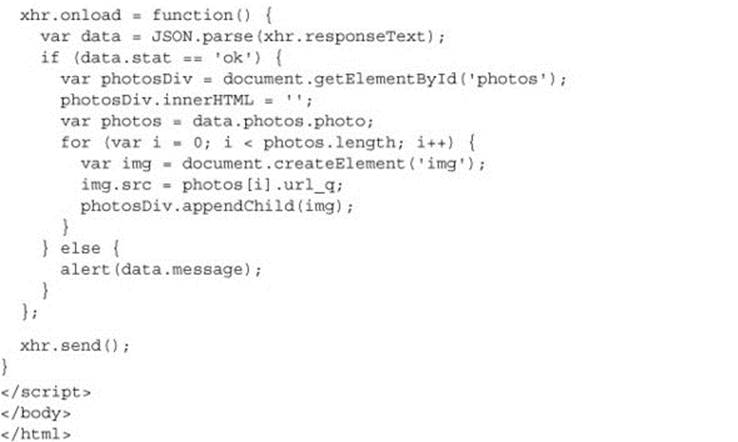
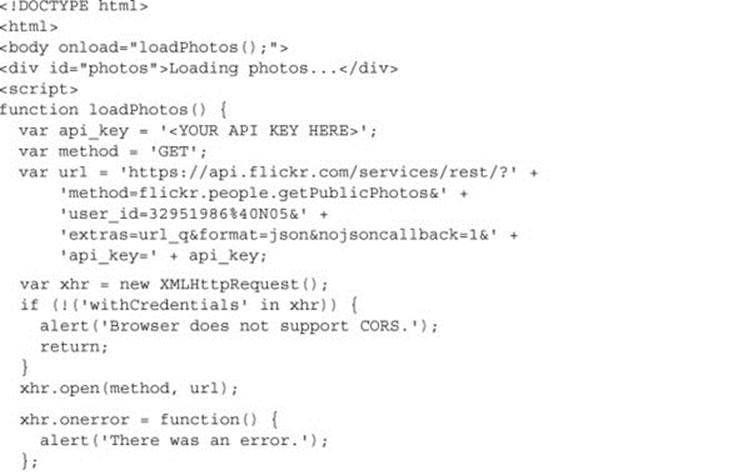
JavaScript code can make HTTP requests with the XMLHttpRequest object. Listing 1.1 showed you how the XMLHttpRequest object can be used for a CORS request to the Flickr API. The following listing shows the code fromlisting 1.1 and highlights the individual pieces of the request.
Listing 2.1. Making a CORS request to the Flickr API
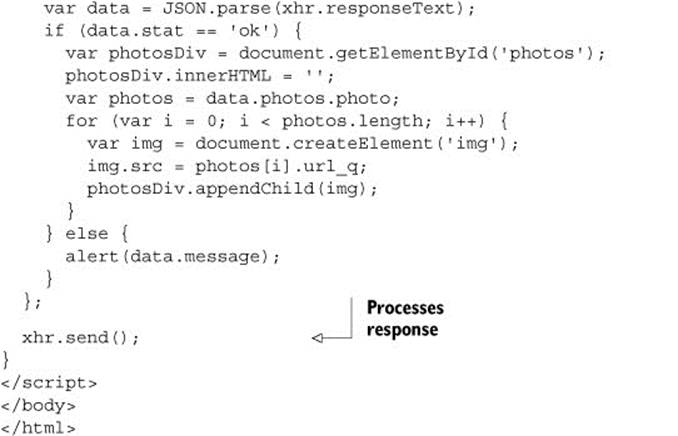
There are three parts to making an HTTP request:
· Sets up request parameters.
· Sends request.
· Processes response. (The code to process the response is defined before the request is actually sent, which is why xhr.onload comes before xhr.send.)
The rest of this section will examine how to use the XMLHttpRequest object during these three phases of the HTTP lifecycle. While the XMLHttpRequest object can be used to make either same-origin or cross-origin requests, this section will pay special attention to any CORS-specific behavior. Even if you have worked with the XMLHttpRequest object before, some of this information may still be new, because the XMLHttpRequest object underwent a revision around 2010. The latest version has new properties that help enable CORS. The older version of XMLHttpRequest works in older tier 3 browsers, but because it doesn’t support CORS, it isn’t covered here.
2.3.1. Sending an HTTP request
The first step in making an HTTP request is setting up a new XMLHttpRequest object. The following listing highlights the code that sets up the request.
Listing 2.2. Setting up an HTTP request to the Flickr API
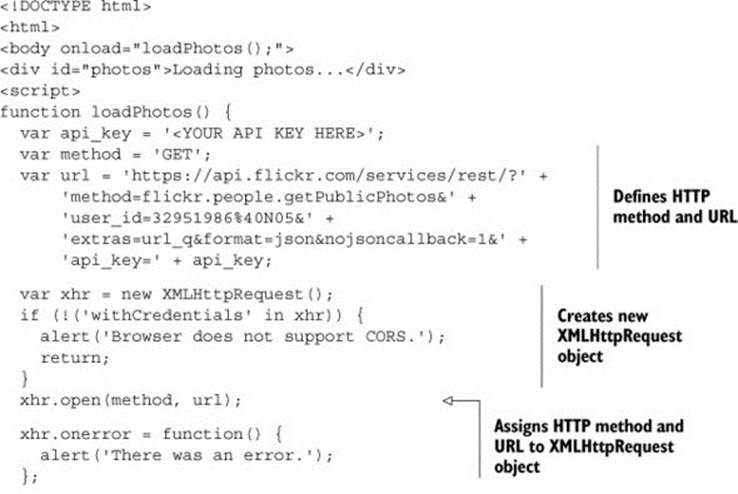
It starts by defining the HTTP method and URL to the API. In the case of a cross-origin request, the URL is the full URL to the resource. There is no other special information that needs to be set to delineate a request as cross-origin. The browser does the work of parsing the URL and determining if the request is a same-origin or a cross-origin request.
The code then creates a new XMLHttpRequest object, and verifies that it supports CORS by checking that the XMLHttpRequest object has a withCredentials property. The withCredentials property will be covered in more detail later in this chapter. For now, all you need to know is that if the XMLHttpRequest object has a withCredentials property, then it supports CORS.
The open method is called to set the values of the HTTP method and URL. The open method also does some basic validation to ensure that the HTTP method and URL are valid. For example, if the HTTP method contains a space, calling open will throw a syntax error.
Adding HTTP headers
The setRequestHeader method lets you add HTTP headers to the request. This method accepts a header key and header value, and includes the header on the request. The following code snippet, which should be included after the open method, shows an example of using the setRequestHeader method to set the X-Requested-With request header:
xhr.setRequestHeader('X-Requested-With', 'CORS in Action');
There are some headers that are set by the browser that can’t be set by the user (see the following sidebar for the complete list). As you’ll see in the next chapter, the browser sets an Origin header on cross-origin requests. If you try to override this header in your code, the browser will ignore your value. This is a security measure that helps prevent user code from overriding trusted header values. The server can trust these values because it knows the user hasn’t accidentally (or maliciously) tainted the value.
Setting request headers
Here is the list of headers that cannot be set by the setRequestHeader method: Accept-Charset, Accept-Encoding, Access-Control-Request-Headers, Access-Control-Request-Method, Connection, Content-Length, Cookie, Cookie2, Date, DNT, Expect, Host, Keep-Alive, Origin, Referer, TE, Trailer, Transfer-Encoding, Upgrade, User-Agent, Via, and any headers starting with ‘Proxy-’ or ‘Sec-’.
These headers have special meaning and can only be set by the browser. There is no error if the code tries to set the header. The value is just ignored.
The server has to give its permission for the client to include custom request headers on a cross-origin request. This behavior is unique to cross-origin requests; same-origin requests can include any custom request header. If the server doesn’t whitelist the request headers, the request will fail. We’ll dive into more details on how a server does this in chapter 4.
Making the request
Once the request is set up, calling the send method will send the HTTP request to the server, as shown in the following listing.
Listing 2.3. Calling the send method to initiate the HTTP request

If the HTTP request has a request body, the body can be passed in as a parameter to the send method as follows:
xhr.send('request body goes here');
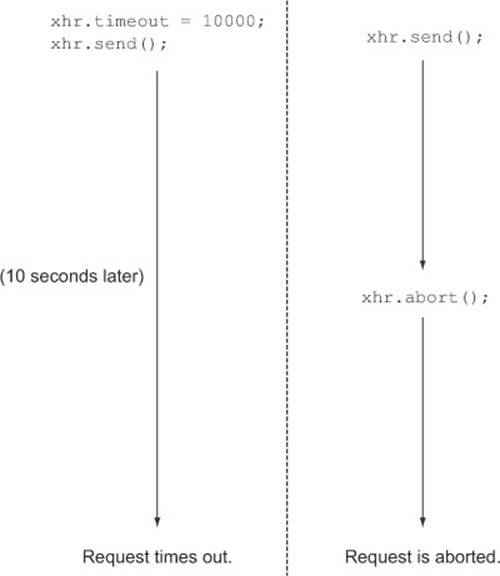
Once the send method is called, the HTTP request is sent to the server. Even though the request has been sent, there are still a couple of ways to cancel the request. First, the timeout property can be used to ensure that the request doesn’t exceed a certain number of milliseconds. Setting the timeout property to 10000 will kill the request after 10 seconds. The default value for the timeout property is 0, which means there is no timeout, and the request will continue until the server responds. Second, the client can manually kill the request by using the abort method. Calling the abort method will abort the request immediately. Figure 2.4 shows how to use the timeout property and the abort method.
Figure 2.4. Canceling a request that is still in progress using the timeout property and abort method
When the server receives a cross-origin request, it determines whether or not the request is allowed, and replies accordingly. Chapter 3 will cover how the server replies to cross-origin requests. But for now, let’s assume there is a successful HTTP response, and look at how to handle it.
2.3.2. Handling the HTTP response
The XMLHttpRequest object handles the server’s response through a set of events. Events are functions that are invoked at specific moments in the lifecycle of an HTTP request. Events aren’t unique to the XMLHttpRequestobject; when a user clicks a link on an HTML page, the browser fires a click event.
Asynchronous versus synchronous requests
By default, the XMLHttpRequest object makes asynchronous requests. This means that the send method makes the request in the background, and fires events when the status of the request changes. The XMLHttpRequest object can also make synchronous requests. In a synchronous request, the send method will wait until the response is received (or an error is encountered).
Client code can trigger a synchronous request by setting the third parameter to the open method to false. For example: xhr.open('GET', 'http://', false). Synchronous requests don’t fire any events. Instead the code waits until the request is finished. This can cause the entire page to become unresponsive until the request returns. In general, you should avoid synchronous requests and stick with the default asynchronous requests.
The functions that handle these events are called event handlers. Table 2.2 gives an overview of all event handlers supported by the XMLHttpRequest object.
Table 2.2. Event handlers exposed by the XMLHttpRequest object
|
Event handler |
Description |
|
onloadstart |
Fires when the request starts. |
|
onprogress |
Fires when sending and loading data. |
|
onabort |
Fires when the request has been aborted by calling the abort method. |
|
onerror |
Fires when the request has failed. |
|
onload |
Fires when the request has successfully completed. |
|
ontimeout |
Fires when the timeout has been exceeded (if the client code specified a timeout value). |
|
onloadend |
Fires when the request has completed, regardless of whether there was an error or not. |
|
onreadystatechange |
Legacy handler from the previous version of XMLHttpRequest; fires when legacy readyState property changes. It is superseded by other events and is only useful for non-tier 1 browsers. |
Figure 2.5 shows when these events are fired during the lifecycle of an HTTP request. Some events, such as onloadstart and onloadend, are always fired once per request. Others may be fired multiple times, such asonreadystatechange and onprogress. Some event handlers may not fire at all, depending on the status of the request; these include onload, onerror, ontimeout, and onabort.
Figure 2.5. Which event handlers fire during the course of an HTTP request

The user can assign a function to each of these event handers to process the particular event. If you need to always run some code at the end of the request (regardless of whether or not there was an error), you’d assign a method to the onloadend event handler. The code isn’t required to handle each of those events; if an event handler is unassigned, nothing happens when that event is fired. Let’s take a closer look at some of the more important event handlers.
Handling a successful response with the onload event handler
The onload event handler fires when the request is successful. In the Flickr example, the onload handler is responsible for displaying the photos on the page, as shown in the following listing.
Listing 2.4. Assigning a function to the XMLHttpRequest’s onload event handler
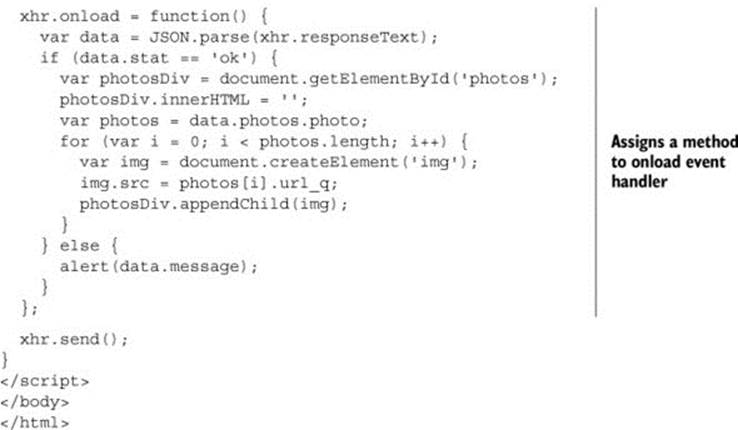
When processing the HTTP response, the code has access to various response variables, such as the HTTP status code, the HTTP status text, the response body, and the response HTTP headers. For example, the code in listing 2.4uses the responseText property to grab the body of the response. Table 2.3 gives an overview of the properties that are available on the response.
Table 2.3. Response properties on the XMLHttpRequest object
|
Response property |
Description |
|
status |
The HTTP status code (for example, 200 for a successful request). |
|
statusText |
The response string returned by the server (for example, OK for a successful request). |
|
response |
The body of the response, in the format defined by responseType. If the client indicated that the response type is json, the response will be a JSON object parsed from the response body. |
|
responseText |
The body of the response as a string. Can only be used if responseType was not set or was set as text. |
|
responseXML |
The body of the response as a DOM element (XML is here for historical reasons). Can only be used if responseType was not set or was set as document. |
The getResponseHeader and getAllResponseHeaders methods can be used to read the HTTP headers on the response. getResponseHeader returns the value of a given response header, while getAllResponseHeadersreturns all the response headers as a single string. There is one caveat to reading response headers on a cross-origin request. By default, CORS only allows the client code to read the following response headers:
· Cache-Control
· Content-Language
· Content-Type
· Expires
· Last-Modified
· Pragma
If the server sets any additional response headers that aren’t in this list, the client won’t be able to see them. But the server can also override this behavior by specifically indicating that these additional response headers should be visible to the client code. The details of how to do this are covered in chapter 5.
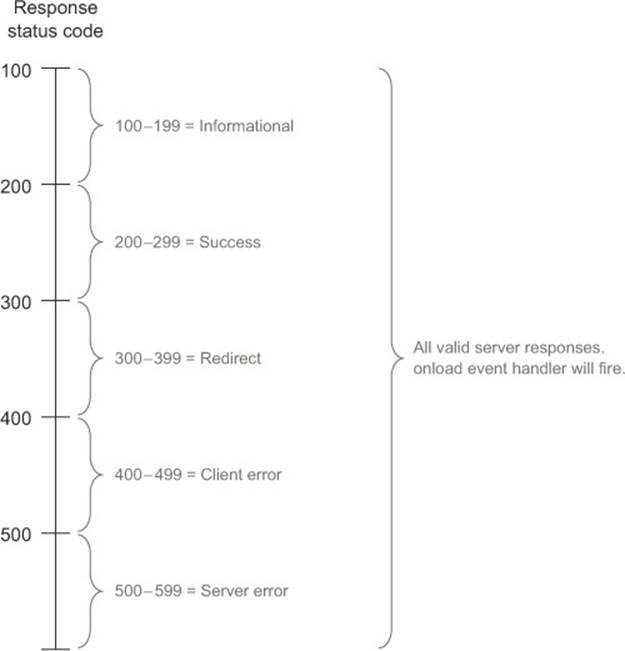
To understand when the onload handler fires, it’s important to distinguish a successful response from a successful response status code. HTTP responses have an associated status code. A successful response usually has a status code of 200, although any status code in the 200 range signals a success. Status codes in the 300 range signal that the request is being redirected, while status codes of 400 or above signal an error (the 400 range is reserved for client errors while the 500 range is reserved for server errors).
Regardless of the underlying response status code, if the response makes it back to the browser, the onload event handler will fire. So although a request may fail due to a file not found (status code 404) or an internal server error (status code 500), the onload event handler will still fire. Figure 2.6 shows the relationship between the response and the response status code.
Figure 2.6. Distinction between the response and response status code. The status code may have an error, but the onload event handler will still fire.
If the request fails for some other reason, the onerror event handler will fire. These are errors where the server doesn’t send a valid response to the browser, or the server doesn’t support CORS. The next section takes a look at how to use the onerror event handler.
Handling an error using the onerror handler
The onerror event handler will fire if there is an issue with the request. This can happen if, for example, the servers powering the Flickr API are down and not responding. But the onerror event is particularly relevant to CORS because it fires if the server rejects the CORS request. If the Flickr API didn’t support CORS, the onerror event handler would fire.
As we’ll cover in the next part of this book, the server has many reasons to reject a CORS request. The server may allow cross-origin GET and POST requests, but not PUT or DELETE requests. In this case, if a client attempts a PUTrequest, the onerror handler will fire instead of the onload handler.
Listing 2.5 shows how to add an onerror handler to the sample code. Note that while the onerror event signals that something went wrong with the cross-origin request, it doesn’t tell you what went wrong. The statusTextproperty will be empty, and the status will be 0. The code will only know that a request failed, and nothing more.
Listing 2.5. Handling a CORS error using the onerror event handler

If you’re curious to understand why a cross-origin request failed, some browsers (such as Chrome) will display the reason in the console log. This message will give more context to a human who is able to read the message, but there is no way to read this message from JavaScript. Chapter 7 will go into more detail on how to debug and fix a failing CORS request.
Other event handlers
Together, the onload and onerror event handlers will handle most of your needs. But the XMLHttpRequest object exposes a few more event handlers that you can hook into, as shown in table 2.4.
Table 2.4. XMLHttpRequest event handlers
|
Event handler |
Function |
|
onloadstart |
Fires when the request is successfully initiated asynchronously. |
|
onloadend |
Similar to onloadstart, onloadend always fires when the request ends. This event handler is useful if you want to execute some piece of code at the very end of the request, regardless of whether or not the request is successful. |
|
onabort |
Fires if the client aborts the request by calling the abort method. If onabort fires, the onload and onerror event handlers will not fire. |
|
ontimeout |
Fires if the code set a timeout value, and that timeout has been exceeded. If your code sets a timeout of 10,000 milliseconds (10 seconds), this event handler will fire if the response hasn’t been received after 10 seconds. If ontimeout fires, the onload and onerror event handlers will not fire. |
|
onprogress |
Monitors progress of a request or response. It’s most helpful in the context of uploading or downloading binary data, such as an image. If you’re uploading an image to a website, onprogress can be used to create a progress indicator showing how much of the image has been uploaded. |
|
onreadystatechange |
Fires when the request changes states. The XMLHttpRequest spec defines five states a request can be in: unset, opened, headers received, loading, and done. The value of the ready state is stored in the XMLHttpRequest object’s readyState property. For example, when a request goes from loading to done, its readyState changes from 3 to 4 (the numeric values for loading and done, respectively), and onreadystatechange fires. |
When the XMLHttpRequest spec was first devised, onreadystate was the only event handler available. Now that there are much finer-grained events available, you’re better off using them.
2.3.3. Including cookies on cross-origin requests
Many websites need a way of identifying the user visiting the page. If you check your email using Gmail, Gmail needs some way of knowing who you are so that it can load your emails.
Websites can identify users through user credentials, a general term for any bit of information that can identify a user. The most popular form of user credentials is the cookie. Servers will use cookies to store a unique ID that identifies the user. The browser then includes this cookie on every request to the server.
Note
Same-origin HTTP requests will always contain the cookie in the request. In contrast, cross-origin requests don’t include cookies by default.
Cookies can be included on cross-origin requests by setting the XMLHttpRequest’s withCredentials property to true. Setting the withCredentials property to true indicates that user credentials such as cookies, basic authentication information, or client-side Secure Sockets Layer (SSL) certificates should be included on cross-origin requests. The following code snippet shows an example of setting the withCredentials property to true:
xhr.withCredentials = true;
If you were to run this code in a web browser, it would fail because setting the withCredentials property to true isn’t enough to complete the request. The server must also indicate that it allows cookies for the request to succeed. Chapter 5 will delve deeper into how the server can enable cookies on requests.
Note
The withCredentials property doesn’t work with synchronous requests.
This section covered the basics of using the XMLHttpRequest object in the context of cross-origin requests. You can use the techniques from this section to make cross-origin requests to a CORS-enabled server. If you’d like to learn more about how the XMLHttpRequest object works, you can turn to Ajax in Practice by Dave Crane et al. (Manning, 2007), or go directly to the XMLHttpRequest spec at http://xhr.spec.whatwg.org/.
While the XMLHttpRequest object allows you to make cross-origin requests from most browsers, Internet Explorer 8 and Internet Explorer 9 support a limited set of cross-origin requests. These browsers use a different object, called XDomainRequest, to make these requests. The next section looks into how the XDomainRequest works and how it’s different from the XMLHttpRequest object.
2.4. XDomainRequest object in Internet Explorer 8 and 9
Internet Explorer 8 and Internet Explorer 9 support cross-origin requests, but in a different way. These browsers still have an XMLHttpRequest object for making same-origin requests, but they also have a differentXDomainRequest object specifically for making cross-origin requests. This XDomainRequest object is only relevant to Internet Explorer 8 and Internet Explorer 9. Internet Explorer 10 and above support the regularXMLHttpRequest object for both same-origin and cross-origin requests. If CORS support for Internet Explorer 8 and Internet Explorer 9 is important to you, you’ll want to learn the details of how the XDomainRequest object works.
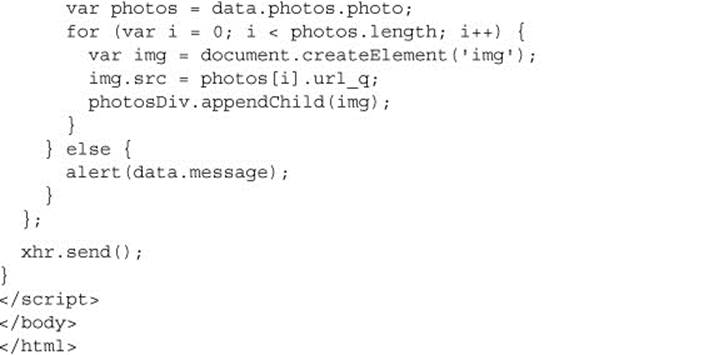
Listing 2.6 changes the Flickr API example to use the XDomainRequest object. The XDomainRequest object looks a lot like an XMLHttpRequest object. If you compare this listing to the original code, there is only a one-line difference when creating a new XDomainRequest object ![]() . Once you have a new XDomainRequest object, you can use it in the same way you use the XMLHttpRequest object. You can use the send method to send the request, and then use the onload and onerror event handlers to process the response.
. Once you have a new XDomainRequest object, you can use it in the same way you use the XMLHttpRequest object. You can use the send method to send the request, and then use the onload and onerror event handlers to process the response.
Listing 2.6. Using the XDomainRequest object to make a request to the Flickr API
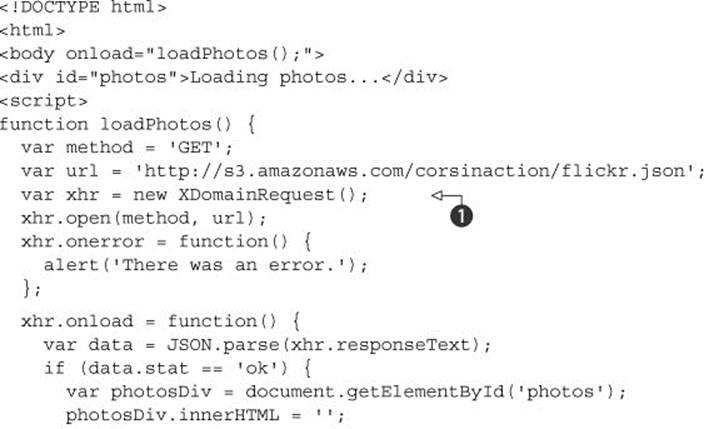
Note
You may have noticed that the request URL changed from a Flickr URL to an Amazon one. This is because the Flickr API only supports HTTPS, and the XDomainRequest object can’t make requests to HTTPS origins from non-HTTPS origins. The URL in listing 2.6 is a copy of the Flickr response that is served from an Amazon S3 server via HTTP. Additionally, since the XDomainRequest object does not support local files, you can find a version of this sample hosted at http://corsinaction.s3.amazonaws.com/flickr.html.
If you’re writing client-side JavaScript code to make cross-origin requests, it can be annoying to write two different sets of code for Internet Explorer 8 and Internet Explorer 9 and other browsers. Luckily, the following listing (which is from the blog at www.nczonline.net/blog/2010/05/25/cross-domain-ajax-with-cross-origin-resource-sharing/) provides a simple function for choosing the correct cross-origin request object.
Listing 2.7. Creating the correct CORS request object across browsers
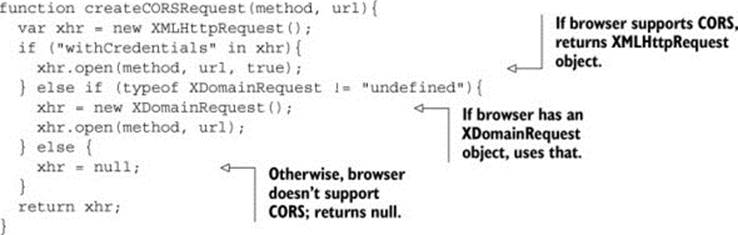
This code runs in all browsers, and does one of the following:
· If the browser has an XMLHttpRequest object and it supports CORS, it returns a new XMLHttpRequest object.
· If the browser supports XDomainRequest, it returns a new XDomainRequest object.
· If the browser doesn’t support either of those objects, it doesn’t support CORS. It returns null to indicate that CORS isn’t supported.
While the XDomainRequest object looks similar to its XMLHttpRequest object, there are many differences between the two. The next section takes a closer look at these differences.
2.4.1. Differences between XDomainRequest and XMLHttpRequest
Although the XDomainRequest and XMLHttpRequest objects let you make cross-origin requests, there are many differences between the two objects. The XDomainRequest object is very limited in the types of cross-origin requests it can make. Table 2.5 compares and contrasts the XMLHttpRequest object to the XDomainRequest object.
Table 2.5. Comparison of XMLHttpRequest and XDomainRequest
|
Supported feature |
XMLHttpRequest |
XDomainRequest |
|
HTTP methods |
All |
GET POST |
|
HTTP schemes |
All |
HTTP HTTPS |
|
Request content type |
All |
text/plain |
|
Synchronous requests |
Yes |
No |
|
Custom request headers |
Yes |
No |
|
User credentials (such as cookies) |
Yes |
No |
|
Event handlers |
onloadstart onload onerror onabort ontimeout onprogress onreadystatechange onloadend |
onload onerror ontimeout onprogress |
|
Response properties |
status statusText responseType response responseText responseXML getResponseHeader getAllResponseHeaders |
responseText contentType |
The reason for this difference is historical. Internet Explorer 8 was released in 2009, when the CORS spec was still young. The Internet Explorer developers wanted to ensure that cross-origin requests were done in a safe manner, so they limited how cross-origin requests could be made. As the CORS spec has evolved, the kinks have been worked out to the point where Internet Explorer 10 and above have support for all CORS functionality. But Internet Explorer 8 and Internet Explorer 9 represent a large proportion of the browsers still in use, so they can’t be ignored. Here is a look at how the XDomainRequest object is different from XMLHttpRequest.
GET and POST only
The XDomainRequest object can only make HTTP requests using GET or POST. Other HTTP methods such as HEAD, PUT, or DELETE aren’t allowed.
Limited scheme support
XDomainRequest only supports CORS from the http:// or https:// schemes. This means that opening a file on your computer won’t work, because this uses the file:// scheme. Furthermore, HTTP pages can only make CORS requests to other HTTP pages, and HTTPS pages can only make CORS requests to other HTTPS pages.
Content-Type text/plain only for requests
The XDomainRequest object can only make requests with the text/plain Content-Type. Content-Type identifies the data type of the HTTP body. It’s an HTTP header that can be present on both HTTP requests and HTTP responses. When visiting a web page, for example, the HTML file has a Content-Type of text/html, and a JPEG image has a Content-Type of image/jpeg. The Content-Type serves as a hint to browsers and servers about what data type to expect. If your server expects a different content type on requests, it will have to be modified to also allow the text/plain Content-Type.
Asynchronous requests only
The XDomainRequest object supports only asynchronous requests; there is no way to use it to make synchronous requests. But this is a feature that won’t be missed. The blocking nature of synchronous requests can lead to a frustrating user experience, because the user can’t interact with the page until the request completes.
No custom request headers
Earlier I showed how the XMLHttpRequest object uses the setRequestHeader method to include custom request headers on the request. The XDomainRequest object doesn’t have a setRequestHeader function, and doesn’t allow custom request headers on requests.
No cookies or user credentials
The XDomainRequest object never includes cookies or other user credentials in requests. Furthermore, there is no withCredentials property to override behavior. Cookies are the main mechanism for identifying visitors to a website, which means the XDomainRequest object is best suited for making requests to public data that doesn’t serve any user-specific information.
Fewer event handlers
The XDomainRequest object only has four event handlers: onload, onerror, onprogress, and ontimeout. These behave the same as their XMLHttpRequest counterparts. There is no onabort method, because there is no corresponding abort method to abort the request, and there aren’t onloadstart and onloadend methods to mark the beginning and end of the request.
HMLHttpRequest’s onloadend handler is useful for ensuring a piece of code always executes, regardless of whether the request was a success or a failure. For example, the onloadend handler could be used to hide a status message at the end of the request. If you need to execute a piece of code at the end of a request, be sure to put it in the onload, onerror, and ontimeout methods.
Less response information
Once the server sends an HTTP response, the XDomainRequest object only gives the JavaScript code access to the response body and response content type. There is no way to access the HTTP status code or status text, or any of the response headers.
The XMLHttpRequest and XDomainRequest objects allow HTTP requests to be made from JavaScript. But these aren’t the only way the browser uses CORS. The next section covers how the HTML5 <canvas> element uses CORS to load images.
2.5. Canvas and cross-origin images
HTTP requests from JavaScript are the most common way to use CORS, but they aren’t the only way. The HTML <canvas> element also relies on CORS when loading images from different origins. Canvas was introduced in HTML5 as a way to draw shapes and images from JavaScript. The following listing shows how to use JavaScript and a canvas to draw a solid rectangle. Figure 2.7 shows what this canvas looks like in the browser.
Figure 2.7. Example of drawing a rectangle on a canvas

Listing 2.8. Drawing a rectangle on a canvas
<canvas id="myCanvas"></canvas>
<script>
var myCanvas = document.getElementById('myCanvas');
var myContext = myCanvas.getContext('2d');
myContext.fillStyle = '#888';
myContext.fillRect(0,0,240,150);
</script>
In addition to drawing shapes, a canvas can also display images. These images can live either on the same server as the page, or on a different server. The canvas can display all images, regardless of whether or not the image comes from the same origin. The difference is that cross-origin images can taint the canvas.
Tainting a canvas means that data can no longer be extracted from the canvas. The <canvas> element exposes three methods for extracting data: toBlob, toDataURL, and getImageData. All three methods return the binary image data. When these methods are called on a canvas with a same-origin image, they work just fine. But when they are called on a canvas with a cross-origin image, the browser throws an error, as shown in figure 2.8.
Figure 2.8. The error when trying to extract data from a tainted canvas

To get around this error, the image must be labeled as “cross-origin.” This is as simple as setting the image’s crossOrigin attribute, as shown in the following listing.
Listing 2.9. Setting an image’s crossOrigin attribute
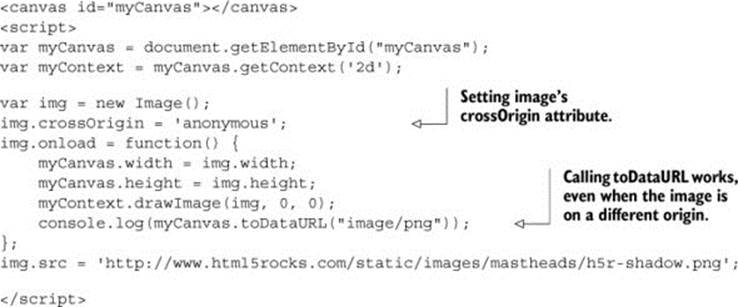
The crossOrigin attribute has two possible values: anonymous and user-credentials. If crossOrigin is set to user-credentials, any user credentials for that origin are included in the request. For example, if the origin has cookies, the cookies will be included with the image request. This is similar to setting the withCredentials property on the XMLHttpRequest object. Setting the crossOrigin attribute to anonymous will still make the request, but there won’t be any cookies attached to the request. It’s best to always use the anonymous value, unless you absolutely need the user’s cookies to load the image.
Once the image’s cross-origin property is set and the request is successful, the image can be manipulated in the same way as a same-origin image. That means that the toBlob, toDataURL, and getImageData methods will work on a canvas with a cross-origin image.
Note that the crossOrigin attribute alone isn’t enough to avoid tainting the canvas. As with most of the other CORS features we’ve covered in this chapter, the server must indicate that cross-origin access to the image is allowed. If the server doesn’t allow it, the image will still be displayed in the canvas, but none of the data extraction methods will work.
2.6. CORS requests from jQuery
JQuery is a popular JavaScript framework that powers many JavaScript apps. JQuery has a function named ajax for making HTTP requests. Under the hood, the ajax method uses the XMLHttpRequest object to make HTTP requests. The following listing modifies the Flickr API to use jQuery.
Listing 2.10. Using jQuery to make a cross-origin request
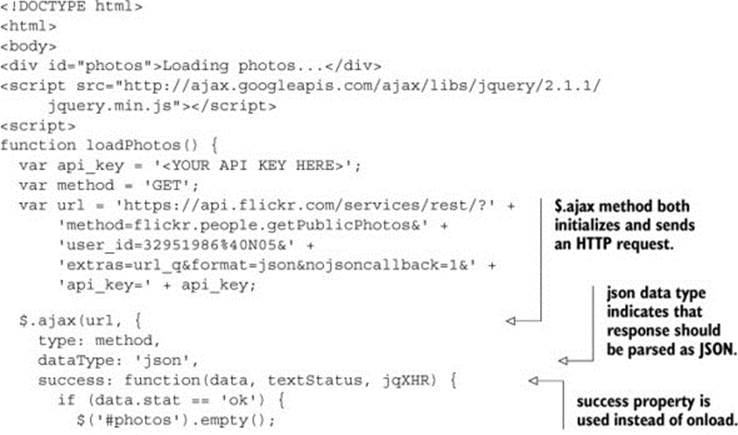
The jQuery version looks similar to the original example, but the syntax varies slightly. Instead of distinct open, send, and onload methods, all the functionality is contained within the ajax method, and the HTTP request is made immediately when the ajax method is called.
JQuery’s dataType property indicates that the response should be parsed as JSON. This saves the developer the additional step of using JSON.parse to parse the response text into a JSON object. The XMLHttpRequest object can do this as well by setting the responseType property to 'json'. As of this writing, the responseType property isn’t fully supported in all browsers. These are minor cosmetic differences; the functionality between the original sample and the jQuery version is the same.
While jQuery has full support for CORS, there are a few things to be aware of when using jQuery.
First, jQuery doesn’t support synchronous cross-origin requests.
Second, the ajax method only supports XMLHttpRequest, and doesn’t support XDomainRequest. This means if you’re using jQuery and need support for CORS in Internet Explorer 8 or Internet Explorer 9, you’ll need to write code to fall back on the XDomainRequest object, or use a jQuery plugin that supports XDomainRequests, such as the one at https://github.com/jaubourg/ajaxHooks/blob/master/src/xdr.js.
Third, if you need to set the withCredentials property, you’ll need to use the xhrFields property, as shown in the following code snippet. The xhrFields property lets you set arbitrary fields on the XMLHttpRequest object:
$.ajax(url, {
xhrFields: {
withCredentials: true
}
});
Fourth, jQuery doesn’t set the X-Requested-With request header on cross-origin requests. JQuery traditionally sets the X-Requested-With header on HTTP requests. This header is used by clients to indicate that a request is coming from an XMLHttpRequest object. The server receiving the request can look for the X-Requested-With header to determine where the request is coming from. JQuery always sets this header when making same-origin requests, but removes it from cross-origin requests. The reason is that setting custom request headers requires an additional server configuration step. Rather than force developers to make changes to their server, jQuery chose to drop this header. The following code snippet shows how to reenable the X-Requested-With header on cross-domain requests:
$.ajax(url, {
headers: {'X-Requested-With': 'XMLHttpRequest'}
});
Note that if you add this header, you’ll also need to update your server to allow this header on cross-origin requests. Chapter 4 shows how to add server-side support for this and other request headers.
2.7. Summary
This chapter explored ways to make cross-origin requests from the browser. Browsers can be divided into three tiers of CORS support:
· Tier 1—Browsers that fully support CORS
· Tier 2—Browsers that partially support CORS
· Tier 3—Browsers that don’t support CORS
The browsers in tier 1 all use the XMLHttpRequest object to make cross-origin requests, while the browsers in tier 2 (Internet Explorer 8 and Internet Explorer 9) use the XDomainRequest object. JQuery can also be used to make cross-origin requests in tier 1 browsers.
In addition to these objects, the browser also uses CORS when loading cross-origin images in the <canvas> element. By default, a cross-origin image will taint a canvas, which prevents data from being extracted from the canvas. Setting the image’s crossOrigin property to anonymous (or in some cases user-credentials) will allow data to be extracted.
This chapter gives you the foundation for issuing cross-origin requests from the browser. But it has glossed over the details of how the server responds to cross-origin requests. For a cross-origin request to succeed, the server must give its permission to make cross-origin requests. The next part will cover how to configure a server to support CORS. We’ll start by learning how to identify and respond to simple CORS requests.
All materials on the site are licensed Creative Commons Attribution-Sharealike 3.0 Unported CC BY-SA 3.0 & GNU Free Documentation License (GFDL)
If you are the copyright holder of any material contained on our site and intend to remove it, please contact our site administrator for approval.
© 2016-2026 All site design rights belong to S.Y.A.