CORS in Action: Creating and consuming cross-origin APIs (2015)
Part 2. CORS on the server
Part 1 looked at CORS from the perspective of a client making cross-origin requests. Part 2 examines CORS from the perspective of a server receiving a cross-origin request.
Chapter 3 takes a look at how to handle a simple CORS request. It begins by setting up a sample application that will be used throughout the rest of the book. Next, it covers the roles of that the client, the browser, and the server play in a cross-origin request. It then applies this knowledge back to the sample application, and shows how the server uses HTTP response headers to configure CORS behavior. In particular, chapter 3 introduces two key headers used by CORS: the Origin request header and the Access-Control-Allow-Origin response header.
Chapter 4 introduces the notion of a preflight request, which allows clients to ask permission before sending a cross-origin request. The preflight request ensures that servers aren’t caught off-guard by unexpected requests. The server can give permissions to allow certain HTTP methods (via the Access-Control-Allow-Methods response header) and certain HTTP request headers (via the Access-Control-Allow-Headers response header). Finally, the chapter covers the preflight cache, which allows preflight requests to be cached for a certain period of time.
Chapter 5 rounds out your understanding of CORS by covering two remaining features: including user credentials such as cookies on cross-origin requests, and giving the client permission to view certain response headers.
Chapter 6 takes the knowledge from the previous three chapters and turns it into practical guidance for your own CORS implementation. It starts by looking at the different ways you can allow access to your API, from opening up to the public or limiting it to a certain subset of origins. This chapter also looks at common security issues, such as how to protect your API against CSRF attacks, and how you can use OAuth2 to give third-party services access to your API. Next, it looks at how to improve performance by minimizing preflight requests. Finally, it examines how CORS requests interact with HTTP redirects.
Chapter 3. Handling CORS requests
This chapter covers
· How to set up the book’s sample application
· What a CORS request looks like from a server’s perspective
· What an origin is
· How to respond to CORS requests using the Access-Control-Allow-Origin header
Suppose you’re the owner of a blog that you programmed yourself. To keep the site scalable, you’ve separated the blog data from the HTML code by introducing an API. The blog page queries the API to load the blog posts, then displays those posts on the page.
As your site becomes more popular, some of your more tech-savvy readers ask if they can use your data to create JavaScript mashups, or embed some of your data on their site by creating a JavaScript widget. They can do this now by screen-scraping the data from your site, but they would be a lot happier if they could plug into the same API you use to load the data for the site.
You love your readers, and think this is a great idea. But when you share your API code with them, it doesn’t work. This is because the browser’s same-origin policy prevents the API request from running from anywhere but your own web application.
CORS offers a way around this restriction by letting your server specify which kinds of requests are allowed. CORS gives you control over who can access which pieces of your API.
This chapter will take a closer look at how to handle CORS requests from the server’s perspective. We’ll start by setting up sample code for your blogging app. I’ll then introduce the major players in CORS and you’ll learn how they interact. You’ll also learn about the basic building blocks of a CORS request and response.
3.1. Setting up the sample code
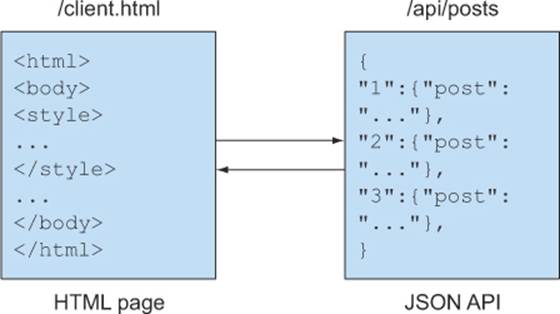
This section introduces the sample code that will be used throughout the rest of this book. You’ll add new functionality to it as you learn more about how CORS works. The sample you’ll be developing is a blogging app that displays a set of blog posts to the user. The app consists of a server that exposes two pieces of functionality:
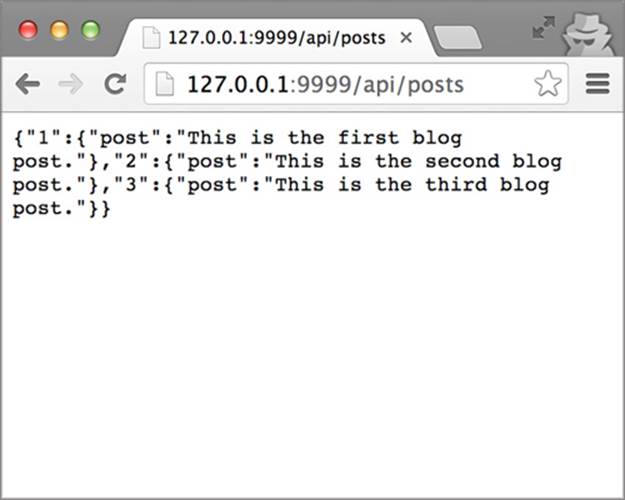
1. An API endpoint that returns all the blog posts in JSON format
2. An HTML page that queries the API for the posts and then displays them on the page
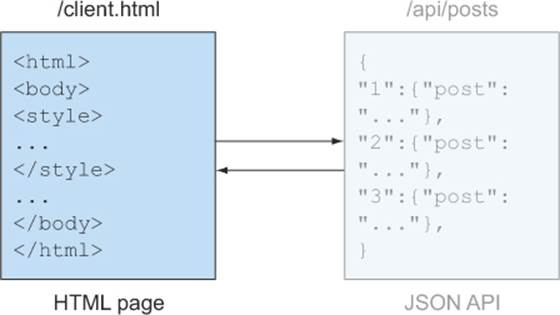
Figure 3.1 shows what the blogging app will look like once you’re done setting up the code in this section.
Figure 3.1. The sample blogging app consists of two parts: an API with blog data, and an HTML page to display the blog data.
Appendix B explains how to set up the prerequisites for this sample. If you haven’t already, take a moment to visit those requirements. After setting up the prerequisites, your development environment should have the following:
· Node.js
· Express
· A web browser that supports CORS
Once you’ve set up these prerequisites, you’re ready to write code.
3.1.1. Setting up the sample API
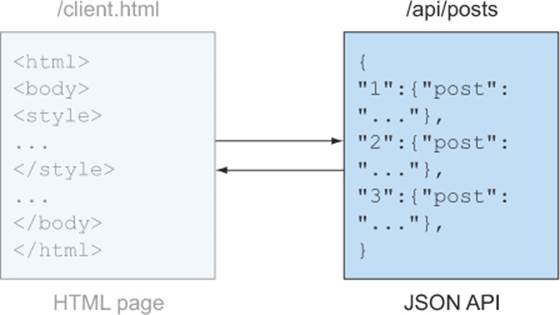
Let’s turn our attention to how to set up each piece of code. You’ll start by building the API portion of the server, as highlighted in figure 3.2.
Figure 3.2. The location of the API endpoint within the sample app
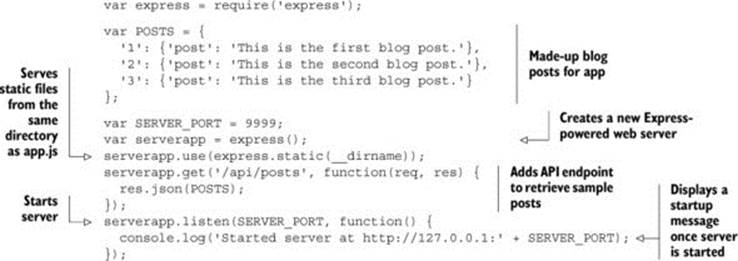
Add the JavaScript code in listing 3.1 to a file named app.js. This code creates a new server running on port 9999 of your computer. The code starts by creating a few blog posts (these are just made-up sample posts for the app; a real blog would load these posts from a database). It then creates a new Express web server and adds the express.static() middleware. The express.static() middleware configures the web server to read files from your computer and serve them through the web server (this will come into play in the next section, where you’ll add a client.html file).
Next, the code sets up the actual API. The API lives at the endpoint /api/posts. Requests to /api/posts will return a JSON object containing the sample blog posts. Now that the code has configured how the server behaves, it starts the server on port 9999. Finally, the code prints out a friendly startup message to verify that everything is working.
Listing 3.1. Sample server code
Note
If you are using Linux, you may have to invoke Node.js by typing nodejs rather than node.
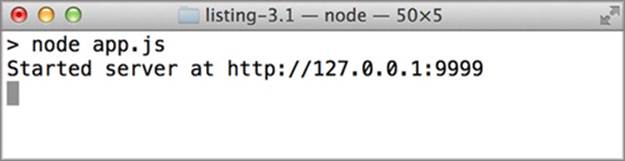
You can run the server by opening a terminal window, navigating to the directory where your code lives, and typing node app.js. You should see the output in figure 3.3. You can stop the server by pressing Ctrl-C. Every time you make changes to the code in app.js, you’ll need to stop and then start the server.
Figure 3.3. Output from running the API server
Here is an overview of how to perform these tasks:
· Stop the server. If the server is running, press Ctrl-C in the terminal window to stop it.
· Start the server. If the server isn’t running, type node app.js in the terminal window to start it.
· Restart the server. Stop the server, then start the server (that is, press Ctrl-C followed by typing node app.js).
You can verify that the server is working by visiting http://127.0.0.1:9999/api/posts in a browser. You should see a JSON response similar to figure 3.4. If you don’t see this response or you receive an error, review the preceding steps to make sure everything is in order.
Figure 3.4. The response from a working server
Now that you have a working API, let’s build the page that uses this API.
3.1.2. Setting up the sample client
With the API in place, you’re ready to add the client.html page that consumes the API, as highlighted in figure 3.5.
Figure 3.5. Location of the client web page within the sample app
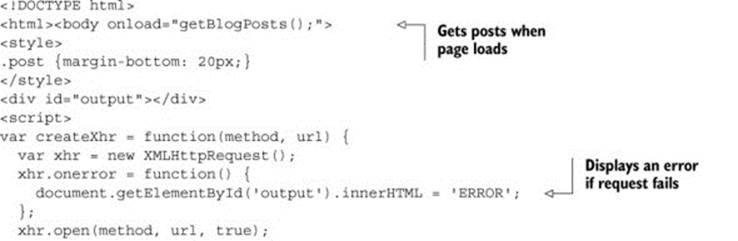
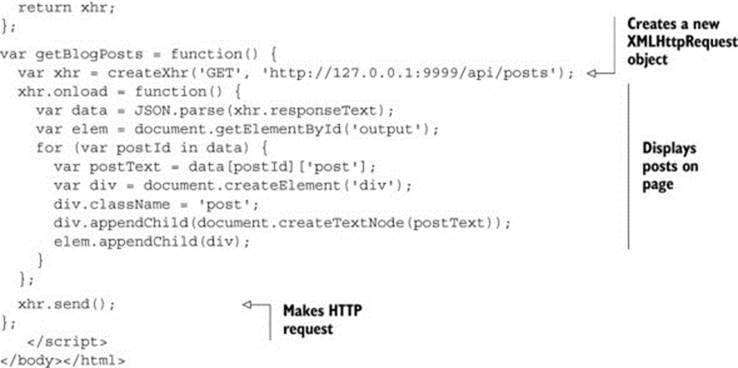
Copy the contents of listing 3.2 into a new file named client.html, and save it in the same directory as app.js. Client.html is the web page that reads the data from the API and displays it in the browser.
Chapter 2 covered the basics of how the client makes CORS requests, but here is a recap of the code in listing 3.2. The main functionality of client.html takes place in the getBlogPost function. The function starts by creating a newXMLHttpRequest object. XMLHttpRequest is the standard mechanism for making HTTP requests in JavaScript, and will be used to load the posts from the API. Next, the code defines an onload function that executes when the HTTP response is received. This particular function parses the blog posts into a JSON object, then displays the posts on the page. After the request behavior is configured, the actual request is sent to the server. The getBlogPostfunction is called when the page loads, so that the posts are automatically displayed when the user visits the page. If there is an error when making the HTTP request, the page displays the word 'ERROR' on the page to let you know that something is wrong.
Listing 3.2. Sample client code
When making changes to the app.js server code, you’ll need to reload the client.html page. This means clicking the browser’s Reload button, or pressing Ctrl-R (Cmd-R on Macs) in the browser. Reloading the page ensures that the client page picks up the latest changes made on the server.
3.1.3. Running the sample app
Now that the server and client code are ready, let’s fire up the sample app. Start the server by typing node app.js in the terminal window (or restart it if it’s already running). Because the server also serves the client.html page, the server must be running for the client.html page to load. (If you encounter “file not found” errors on client.html, be sure to first check that the server is running.) Next, switch over to your web browser and visit the page at http://127.0.0.1:9999/client.html. You should see the blog posts as shown in figure 3.6.
Figure 3.6. Client page with a successful request
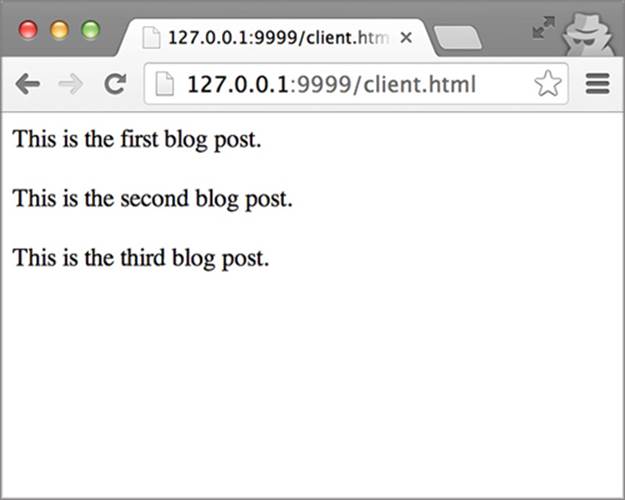
The client.html page displays the sample posts defined in app.js. To do this, the client.html page sends an HTTP request to /api/posts. You can view this HTTP request and response (or any errors) by using the browser’s JavaScript console. I’ll be using Chrome for the screenshots throughout this book. You can open Chrome’s JavaScript Console by pressing the keyboard shortcut Ctrl-Shift-J on Windows (Cmd-Option-J on Mac). You can also find it by navigating to the Tools > JavaScript Console menu option on Windows (or the View > Developer > JavaScript Console menu option on Mac). If you aren’t using Chrome, don’t worry. Most browsers have a built-in JavaScript Console that will give you the same information. Chapter 7 demonstrates how to open the JavaScript console in most major browsers.
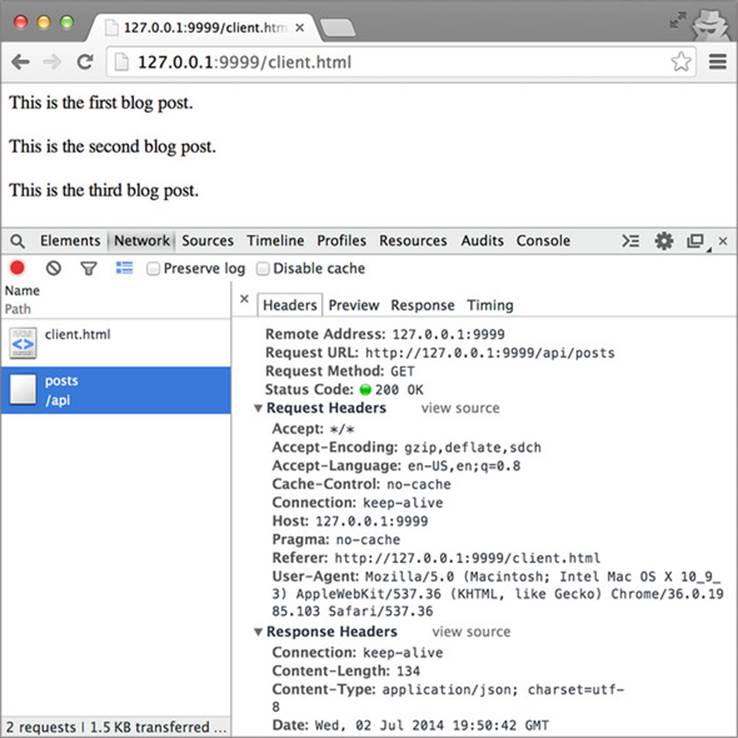
You can view the details of the HTTP request by opening the JavaScript console, clicking the Network tab, and refreshing the client.html page. You should see two HTTP requests in the Network tab: one for client.html, the other for /api/posts. If you click the /api/posts request, then the Headers tab, you can see all the details of the request and response, as shown in figure 3.7.
Figure 3.7. Viewing the HTTP request and response to the API
The remainder of this book will make incremental updates to this sample code to demonstrate how the features of CORS work. You’ll switch back and forth between the terminal and the browser depending on which part of the code we’re looking at. Now that the sample app is up and running, let’s introduce CORS to the mix.
3.2. Making a CORS request
The previous section created a sample app running on a single server at 127.0.0.1:9999. This sample app makes a same-origin HTTP request to load the blog data from the /api/posts endpoint. Now that the sample app is set up, let’s modify it to make a cross-origin request.
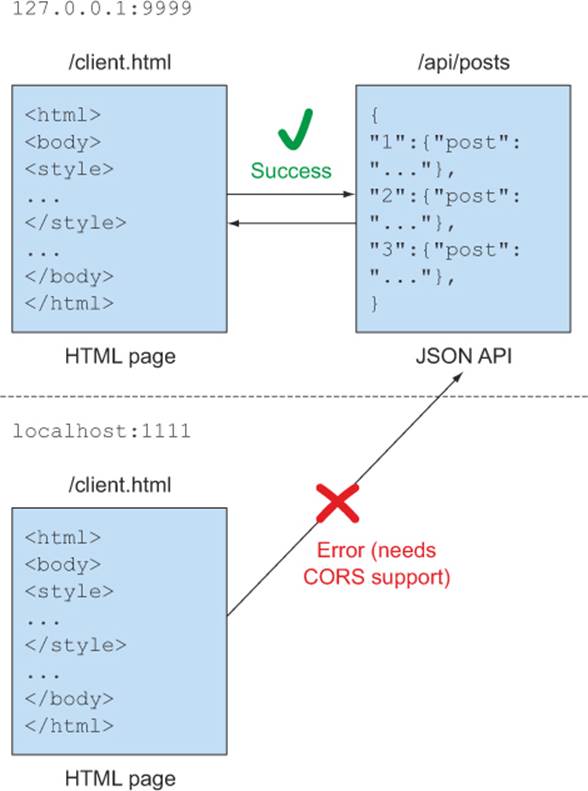
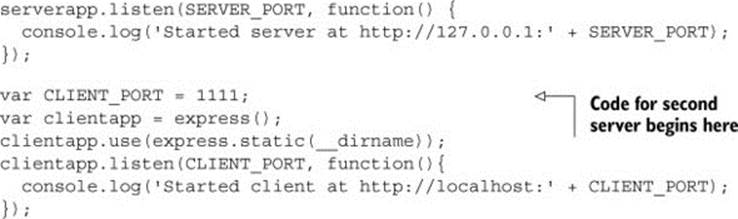
You can make a cross-origin request by introducing a new server that sends requests to the API on 127.0.0.1:9999. Listing 3.3 modifies app.js to introduce a second server running at localhost:1111. Requests from 127.0.0.1:9999 to localhost:1111 are cross-origin requests, because 127.0.0.1:9999 and localhost:1111 are different. Figure 3.8 shows what this new server configuration looks like.
Figure 3.8. Topology of sample app with new server
Listing 3.3. Update app.js to add a new server running on localhost:1111
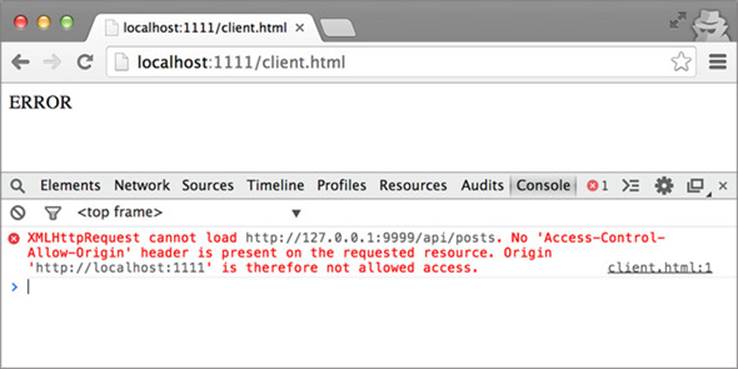
If you restart the server, then visit the page at http://localhost:1111/client.html, you’ll receive an error in the browser as well as the JavaScript console, as shown in figure 3.9. Contrast this to the page at http://127.0.0.1:9999/client.html, which still works. Both pages are using the same client.html code, so what’s the difference?
Figure 3.9. Error when making a cross-origin request
Note
If you are using Internet Explorer 10 or above, you need to add http://localhost to your Trusted Sites for the sample to work. You do this by navigating to Trusted Sites (located under Internet Options > Security > Trusted Sites > Sites) and adding http://localhost.
The difference is that the request from http://127.0.0.1:9999/client.html is a same-origin request, while the request from http://localhost:1111/client.html is a cross-origin request. The request from http://127.0.0.1:9999/client.html succeeds because the request comes from the same location as the server (127.0.0.1:9999). The request from http://localhost:1111/client.html fails because it crosses server boundaries, and you haven’t yet configured the server to accept these requests.
The rest of this chapter will work toward fixing that error. To do that, let’s first discuss what happens behind the scenes when you make a CORS request.
3.3. Anatomy of a CORS request
Think about what happens when you want to withdraw money from an ATM. You walk up to the machine, swipe your card, enter your PIN, and a few seconds later you walk away with money in your wallet. Figure 3.10 shows each of the players in this transaction.
Figure 3.10. A bank withdrawal consists of you, the ATM, and your bank account
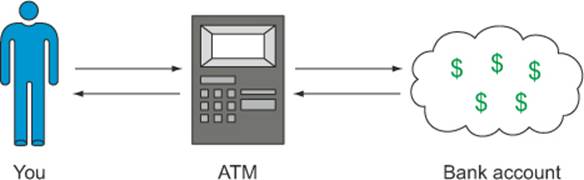
The ATM acts as a trusted intermediary between you and the bank by verifying each step of the transaction. It checks things like whether you entered the correct PIN, or whether your bank account has enough money. Imagine if instead of an ATM there was a stack of money and the bank trusted everyone to take the right amount. That bank wouldn’t be in business long!
Like this ATM transaction, a CORS request has its own group of players with similar functionality. The players in a CORS request are the client, the browser, and the server.
3.3.1. The players in a CORS request
The key players in a CORS request are the client, the browser, and the server. The client wants some piece of data from the server, such as a JSON API response or the contents of a web page. The browser acts as the trusted intermediary to verify that the client can access the data from the server. Table 3.1 shows how these players fit with the ATM analogy.
Table 3.1. A CORS request consists of the client, the browser, and the server
|
CORS player |
ATM analogy |
Description |
|
Client |
You |
Wants data from the server |
|
Browser |
ATM |
Manages the communication between the client and the server |
|
Server |
Bank account |
Serves the data the client wants |
Client
In the same way that you want money from your bank account, the client wants data from the server. The client is a snippet of JavaScript code running on a website, and it’s responsible for initiating the CORS request. It’s served from a particular domain and usually consists of an XMLHttpRequest to a remote server. The following code snippet highlights the portion from the sample’s client.html file that is responsible for making the CORS request:
var xhr = createXhr('GET', 'http://127.0.0.1:9999/api/posts');
xhr.onload = function() {
...
};
xhr.send();
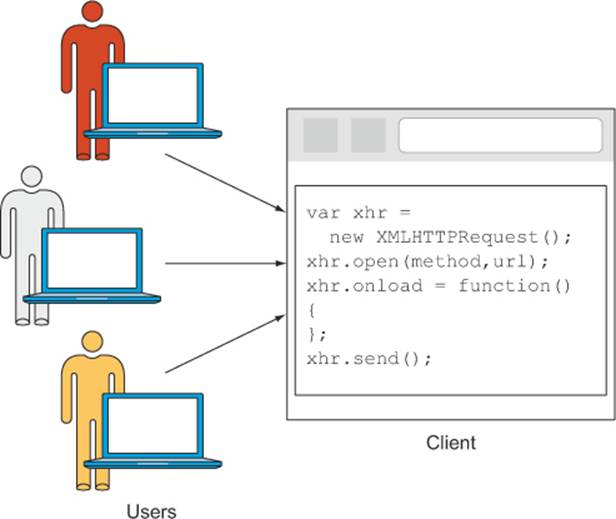
Client versus user
Sometimes the words client and user are used interchangeably, but they are different in the context of CORS. A user is a person visiting a website, while a client is the actual code served by that website. Multiple users can visit the same website and be served the same JavaScript client code, as shown in figure 3.11. For the purposes of understanding CORS, we’ll focus on the client and not on the user.
Figure 3.11. Multiple users interacting with a website’s client code
Browser
The client code runs inside a web browser. The CORS spec calls the web browser a user agent, but we’ll refer to it as the web browser. Just like the ATM, the browser is a trusted intermediary, and plays an active role in a CORS request in two ways:
· The browser adds additional information to the request so that the server can identify the client.
· The browser interprets the server’s response and decides whether to send the request to the client or to return an error.
If the browser didn’t do these things, a client could send any request to the server, and the protection introduced by the browser’s same-origin policy would be broken. The browser ensures that both the client and the server play by the rules of CORS.
Server
The server is the destination of the CORS request. It’s the bank account in the ATM analogy. The server stores the data that the client wants, and it has the final say as to whether the CORS request is allowed or not.
Now that you know who is involved in a CORS request, let’s take a look at how they all work together.
3.3.2. Lifecycle of a CORS request
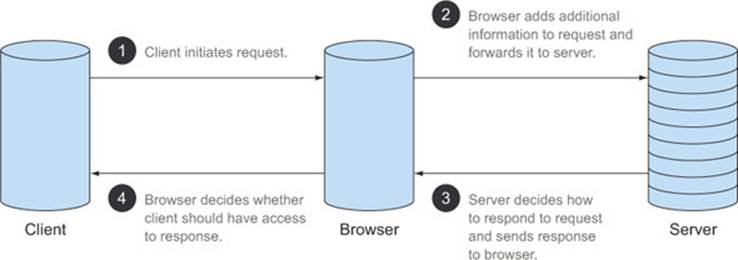
A full end-to-end CORS request flow is shown in figure 3.12. Although technically the client code runs inside the browser, figure 3.12 separates the client from the browser to make it easier to envision the flow. The steps in a CORS request, illustrated in the figure, are:
1. The client initiates the request.
2. The browser adds additional information to the request and forwards it to the server.
3. The server decides how to respond to the request, and sends the response to the browser.
4. The browser decides whether the client should have access to the response, and either passes the response to the client or returns an error.
Figure 3.12. Lifecycle of a CORS request
Like an ATM interacting with a bank account, the browser and the server “talk” to each other to determine whether the client can access the server’s data. A hypothetical conversation between the browser and the server might go something like figure 3.13.
Figure 3.13. Conversation between a browser and a server regarding CORS
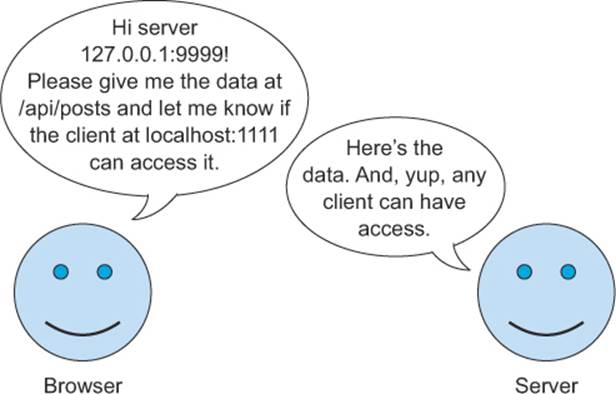
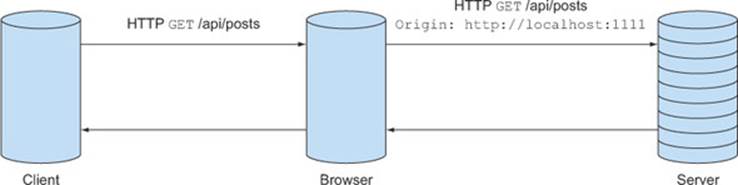
The browser and the server talk to each other through HTTP headers. HTTP headers carry the details of the CORS request, including whether or not the CORS request is allowed. Let’s take another look at the conversation in figure 3.13, this time mapped onto a set of HTTP requests and responses. The bolded items show how the parts of the conversation map to the HTTP headers.
|
Browser: Hi server 127.0.0.1:9999! Please give me the data at /api/posts and let me know if the client at localhost:1111 can access it. |
GET /api/posts HTTP/1.1 User-Agent: Chrome Host: 127.0.0.1:9999 Accept: */* Origin: http://localhost:1111 |
|
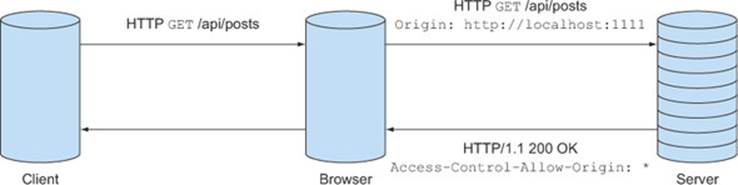
Server: Here is the data. And, yup, any client can have access. |
HTTP/1.1 200 OK Access-Control-Allow-Origin: * |
This conversation represents the simplest dialogue that can take place between a browser and a server during a CORS request. As you’ll see in subsequent chapters, this conversation grows richer and new headers are added based on the client’s needs.
CORS is built around many headers, but the two most important are:
· The Origin request header
· The Access-Control-Allow-Origin response header
These headers must be present on every successful CORS request. Without one or the other, the CORS request will fail. Let’s dig deeper into the vocabulary of these two headers.
3.4. Making a request with the Origin header
The Origin header is central to CORS. The client identifies itself to the server by using the Origin header. Think of it as the client’s calling card.
A CORS request must have an Origin header. There is no way around that. If there is no Origin header it isn’t CORS. With that in mind, let’s revisit the sample app and take a look at the actual Origin header.
3.4.1. Viewing the Origin header
The browser’s Network tab lets you view the HTTP headers included on the request, including the Origin header. View this header by opening the Network tab in the browser’s JavaScript console and reloading the page at http://localhost:1111/client.html.
After the page finishes loading, choose the request to /api/posts in the Network tab. This is the actual CORS request from localhost:1111 to the API server on 127.0.0.1:9999. On the right are the HTTP headers for the request (if there are no headers be sure the Headers tab is selected). You should see the Origin header in the list of headers, as shown in figure 3.14.
Figure 3.14. The Origin header on the HTTP request
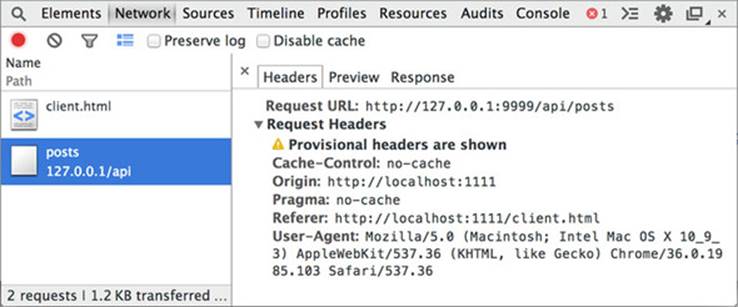
Notice how the console only shows the request headers, and no response headers. Because the CORS request is failing, the browser hides the response information from the console. Once the server is configured to support CORS, the response information will appear here as well.
Also notice that while the Origin header is present on the request, the code in client.html never added it to the request. The Origin header is silently added to the request by the browser. Next let’s take a look at what the Origin header is and how it appears in the request.
3.4.2. What is an origin?
The origin defines where the client resource lives. The origin for the page at http://localhost:1111/client.html is http://localhost:1111. In other words, the origin is everything in the URL up until the path. In more formal terms, the origin is the scheme, host, and port of a URL, as shown in figure 3.15.
Figure 3.15. The origin consists of the scheme, host, and port.
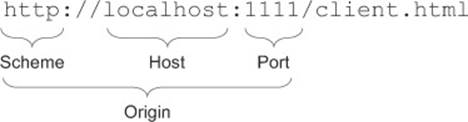
Table 3.2 shows the origins for various URLs (note that these are example URLs, and some won’t actually work in your browser).
Table 3.2. Origin values for various example URLs
|
URL |
Origin |
|
http://localhost:1111 |
http://localhost:1111 |
|
http://localhost:1111/client.html |
http://localhost:1111 |
|
https://localhost:1111/client.html |
https://localhost:1111 |
|
http://localhost/client.html |
http://localhost |
|
file:///Users/hossain/ch02/client.html |
null |
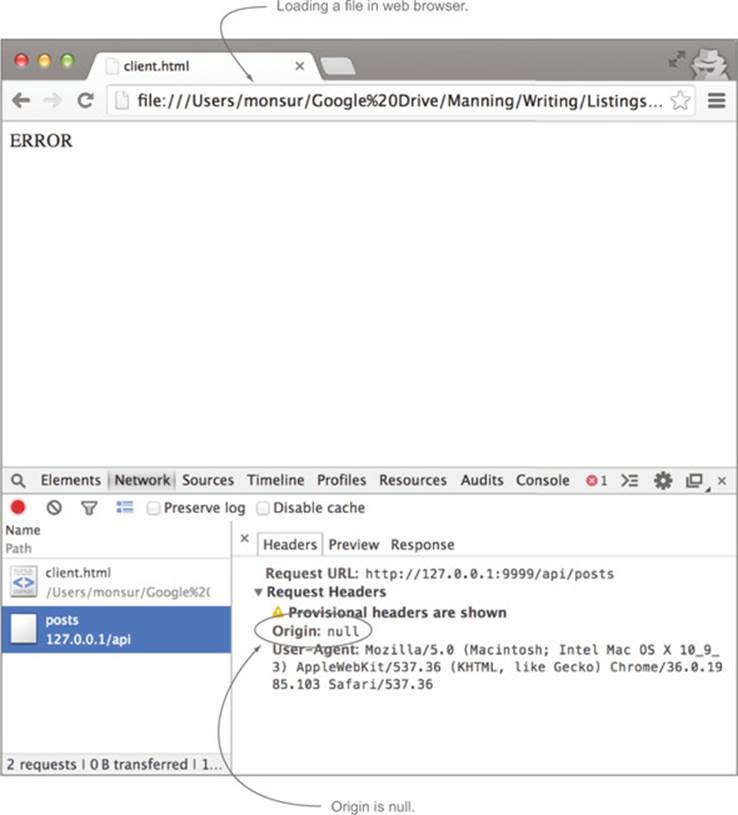
The string null can also be a valid value for the origin, even though it doesn’t follow the scheme/host/port pattern. Browsers use the value null when the origin of the client can’t be determined. An example of this is opening a file in your browser. The file exists on your local filesystem and isn’t loaded from a remote server. Therefore it doesn’t have an origin. You can see this in action by double-clicking the client.html file to open it in your browser. Looking in the Network tab, you’ll see the Origin header set to null, as shown in figure 3.16. It’s important to be aware of null origin values and respond to them appropriately. We’ll cover this in more detail in chapter 6.
Figure 3.16. Request with null origin
The term origin may be misleading in the context of CORS because it can be interpreted as the origin of the request. Origin has nothing to do with HTTP requests/responses in this case; it’s only a property of a URL. Any URL can have an origin. When an origin refers to the client making the request, we call it the client origin. When an origin refers to the URL receiving the request, we call it the server origin. Table 3.3 shows the client and server origins for the sample app.
Table 3.3. Client and server origins for the sample app
|
URL |
Origin |
|
|
Client |
http://localhost:1111/client.html |
http://localhost:1111 |
|
Server |
http://127.0.0.1:9999/api/posts |
http://127.0.0.1:9999 |
There isn’t anything inherently special about an origin. It’s merely what a browser uses to group content together. Servers use the origin to determine where a request is coming from. Browsers use the origin to define whether a request is same-origin or cross-origin, and exhibits different behavior for each.
Same-origin versus cross-origin requests
With the definition of origin in place, I can provide a more formal definition for same-origin and cross-origin requests. A request is a same-origin request when the client origin and the server origin are exactly the same. Otherwise the request is a cross-origin request.
This distinction between same-origin and cross-origin requests lies at the heart of CORS. When the client initiates the request, the browser extracts the server origin from the URL of the request. It then compares the server origin against the client origin to determine if the request is same-origin or cross-origin. Browsers allow clients to make same-origin requests without any restrictions. But if the request is cross-origin, the browser uses CORS to determine how to handle the request.
In the sample app, the origin of the page at http://127.0.0.1:9999/client.html is http://127.0.0.1:9999. This matches the origin of the API endpoint at http://127.0.0.1:9999/api/posts. Therefore the request is same-origin. On the other hand, the origin for the page at http://localhost:1111/client.html is http://localhost:1111, which doesn’t match the origin http://127.0.0.1:9999. Table 3.4 shows example requests along with whether they are same-origin requests.
Table 3.4. Same-origin versus cross-origin requests
|
Client origin |
Server origin |
Same-origin request |
|
http://127.0.0.1:9999 |
http://127.0.0.1:9999 |
Yes |
|
http://127.0.0.1:9999 |
https://127.0.0.1:9999 |
No (different schemes) |
|
http://localhost:1111 |
http://localhost:9999 |
No (different ports) |
|
http://localhost:9999/ |
http://127.0.0.1:9999 |
No (different hosts) |
The last example in Table 3.4 might come as a surprise. The IP address for localhost is traditionally 127.0.0.1, so you’d expect http://localhost:9999 and http://127.0.0.1:9999 to be the same origin. But remember that the origin comparison only compares the string values of the scheme, host, and port, and knows nothing about what host an IP address maps to. In this example, “localhost” and “127.0.0.1” are different strings, and therefore the request isn’t a same-origin request. Now that you know what an origin is, let’s look at how the browser sets the Origin header on requests.
3.4.3. Setting the Origin header
The browser adds the Origin header to the HTTP request before sending the request to the server. The browser is solely responsible for setting the Origin header. The Origin header is always present on cross-origin requests, and the client has no way of setting or overriding the value. This is a requirement from a security standpoint: if the client could change the Origin header, they could pretend to be someone they aren’t. Figure 3.17 shows how the browser adds the Origin header before sending the request to the server.
Figure 3.17. The browser adds the Origin header before sending the request to the server.
Same-origin requests may sometimes have an Origin header as well. Chrome and Safari include an Origin header on same-origin non-GET requests. In these cases, the Origin header has the same value as the server’s origin value. This is important to keep in mind. When identifying CORS requests, it’s not enough to check that the Origin header exists. You should also check that the origin value is different from your server’s origin value.
In this section you learned what an Origin header is, where you can find it, and how it can be used to identify a CORS request. Next, let’s update the server to respond to the CORS request by using the Access-Control-Allow-Origin response header.
3.5. Responding to a CORS request
Look back at the conversation between the browser and the server in figure 3.13. The Origin header got you to the first part of the conversation, where the browser identifies the client. Now let’s turn our attention to the second part of the conversation, where the server responds to the browser. The server does this by adding the Access-Control-Allow-Origin header to the response. Let’s take a look at how this header works.
3.5.1. The Access-Control-Allow-Origin header
The server uses the Access-Control-Allow-Origin response header to approve the request. This header must be present on every successful CORS response. It completes the conversation by saying “Yup, that client can have access.” If this header isn’t present, the CORS request will fail.
The Access-Control-Allow-Origin header is an additional response header layered onto the response. It shouldn’t affect any other response parameters. If the resource can’t be found and returns a 404 error, it should continue returning a 404, even with the Access-Control-Allow-Origin header. Figure 3.18 shows how a server can use the Access-Control-Allow-Origin header to respond to a CORS request.
Figure 3.18. Responding to a CORS request using the Access-Control-Allow-Origin header
The value of the Access-Control-Allow-Origin header can be either a wildcard or an origin value. The wildcard value says that clients from any origin can access the resource, while the origin value only gives access to a specific client. Here is an example of both header values.
Access-Control-Allow-Origin: *
Access-Control-Allow-Origin: http://localhost:1111
Let’s look at how to use these header values.
3.5.2. Access-Control-Allow-Origin with a wildcard (*) value
An Access-Control-Allow-Origin header with the value * indicates that any client can access this resource. In fact, the simplest way to add CORS support to a server is to add Access-Control-Allow-Origin: * to every response. Let’s modify the sample to do just that.
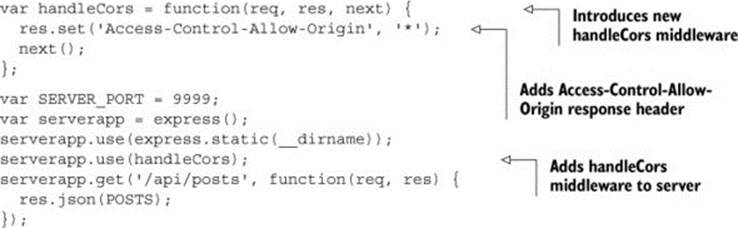
Listing 3.4 introduces a new piece of middleware to the server named handleCors. All CORS-related functionality will go in this middleware. The handleCors function adds an Access-Control-Allow-Origin header to the response, then calls next() to continue processing the request. (Calling next() is a standard pattern that all Express middleware components must follow to continue processing the request.) Finally, you attach the handleCorsmiddleware to the server processing pipeline.
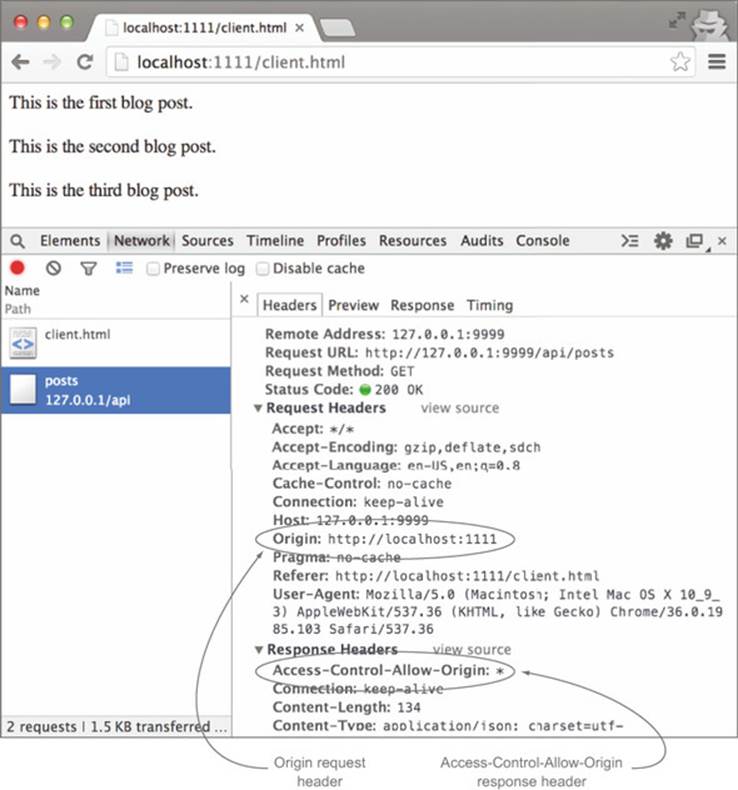
When you restart the server and reload the client at http://localhost:1111/client.html, you should see the blog posts loaded on the page. If you examine the request in the Network tab, you’ll now see both the HTTP request and response, with the Origin header in the request and the Access-Control-Allow-Origin header in the response, as shown in figure 3.19. Congratulations—with that one line of code, you’ve added CORS support to the server!
Figure 3.19. Adding wildcard CORS support to the server
Listing 3.4. Adding wildcard CORS support to the server
The wildcard value is ideal for situations where anyone can access the data, regardless of the client. A good example is the HTML5Rocks.com website. The website itself is a public resource, accessible from any browser, without any authentication. If you make a request to HTML5rocks.com and examine the response in the console, you’ll see the Access-Control-Allow-Origin header as shown in figure 3.20.
Figure 3.20. html5rocks.com always adds the Access-Control-Allow-Origin: * header to responses.
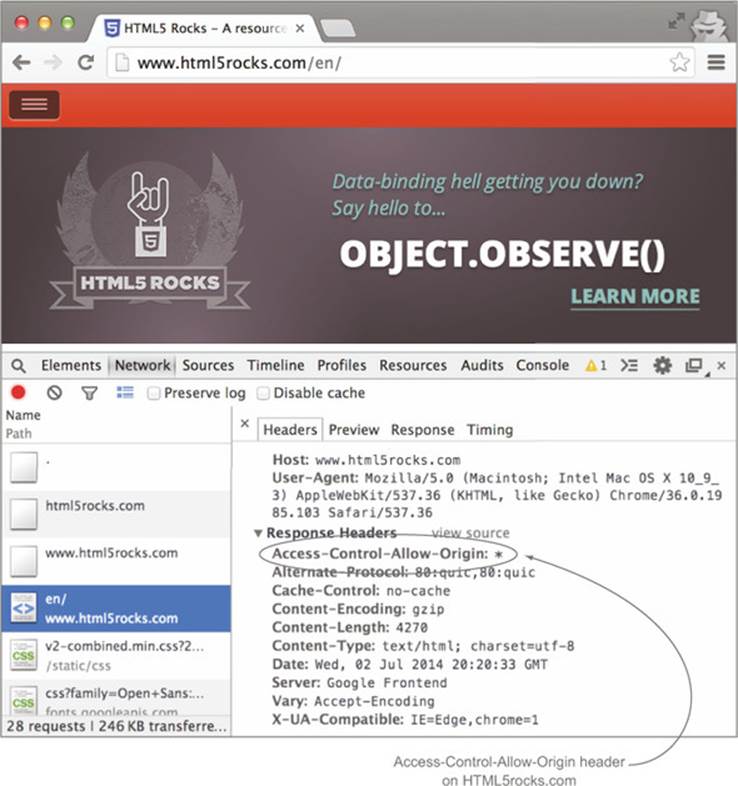
Note that although a resource has an Access-Control-Allow-Origin: * header, it doesn’t necessarily mean that it’s publicly accessible. There may be additional forms of authentication on the resource, as you’ll see in chapter 6.
The wildcard is just one way to respond to CORS requests. Now let’s look at using actual origin values in the Access-Control-Allow-Origin header.
3.5.3. Access-Control-Allow-Origin with an origin value
The Access-Control-Allow-Origin header can also have an actual origin as a value. For example:
Access-Control-Allow-Origin: http://localhost:1111
This header indicates that only clients from http://localhost:1111 can access the resource. Clients from other origins will be rejected.
Let’s modify the example to respond with an origin value rather than a wildcard. This is pretty easy to do; simply replace the * value with http://localhost:1111, like in the following code snippet.
var handleCors = function(req, res, next) {
res.set('Access-Control-Allow-Origin', 'http://localhost:1111');
next();
};
Restart the server and reload the client at http://localhost:1111/client.html; you should still see the blog posts, with a successful response in the console.
The Access-Control-Allow-Origin header can have only a single origin value. You cannot specify multiple origins in the same header. If your server supports clients from different origins, the Access-Control-Allow-Origin header will have to contain only the origin for the specific client making the request.
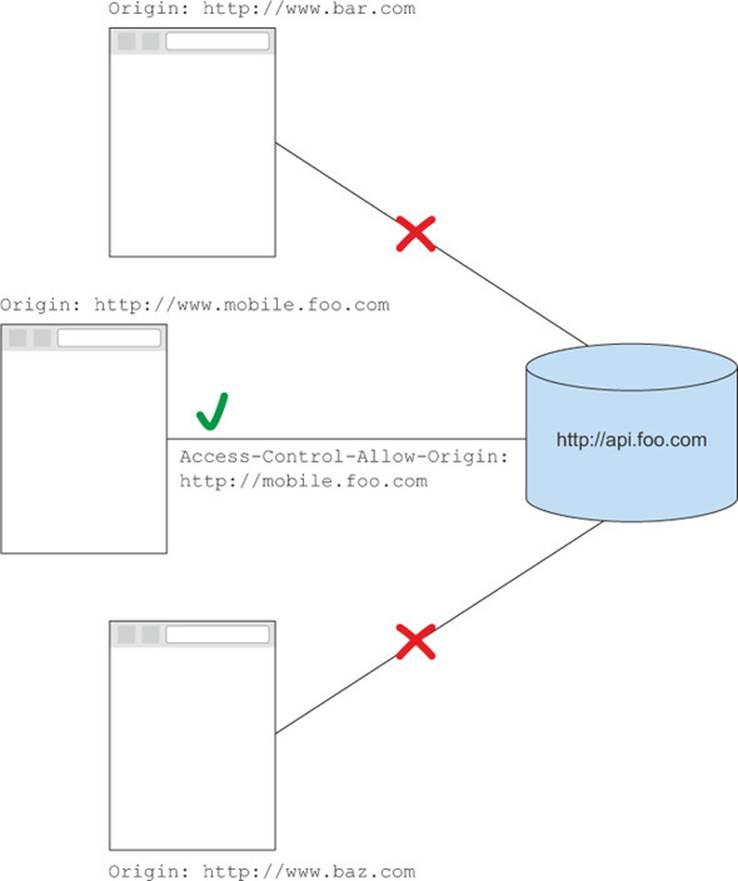
Using the origin value is useful when you have a subset of servers, and you only want to allow CORS requests from those servers. For example, a mobile app may host its app on http://mobile.foo.com, but store its private API onhttp://api.foo.com. In this case a header with Access-Control-Allow-Origin: http://mobile.foo.com could be used to limit CORS requests to the http://mobile.foo.com origin only, as shown in figure 3.21.
Figure 3.21. The Access-Control-Allow-Origin only allows access from http://mobile.foo.com.
You’ve learned of two ways to enable CORS on a server: using a wildcard value, or specifying a specific origin. But what if you want to prevent clients from certain locations from making CORS requests? The next section looks at how to reject CORS requests.
3.5.4. Rejecting CORS requests
So far we’ve covered what to do if you want to accept a CORS request. But what if you only want to allow CORS requests from certain origins and reject the others? CORS is strict in the sense that the Access-Control-Allow-Origin value must either be * or an exact match of the Origin header. Regular expressions or multiple origins aren’t allowed; the Access-Control-Allow-Origin can only grant permissions to one origin at a time. If the Access-Control-Allow-Origin isn’t * or an exact match of the Origin header, the browser rejects the request.
Table 3.5 summarizes the behavior for Origin and Access-Control-Allow-Origin header combinations. Rejecting a CORS request is as simple as:
Table 3.5. How the browser reacts to server responses
|
Client request |
Server response |
Browser behavior |
|
Origin: http://localhost:1111 |
None |
Error. No Access-Control-Allow-Origin header. |
|
Origin: http://localhost:1111 |
Access-Control-Allow-Origin: * |
Success. |
|
Origin: http://localhost:1111 |
Access-Control-Allow-Origin: http://localhost:1111 |
Success. |
|
Origin: http://localhost:1111 |
Access-Control-Allow-Origin: http://othersite.com |
Error. Access-Control-Allow-Origin header doesn’t match Origin header. |
· Sending an Access-Control-Allow-Origin header that doesn’t match the Origin header
· Removing the Access-Control-Allow-Origin header entirely
When you last modified the sample app, you updated the Access-Control-Allow-Origin header to only allow cross-origin requests from http://localhost:1111. Requests from any other origin will be rejected.
What does it mean for the browser to reject the request? It means that the browser doesn’t forward any of the response information to the client. The client only knows that an error occurred, but it doesn’t receive any additional information about what the error was. This can be frustrating when debugging CORS requests, because it’s hard to programmatically infer when a request fails due to CORS rather than some other reason. Chapter 7 delves more into how to debug failing CORS requests.
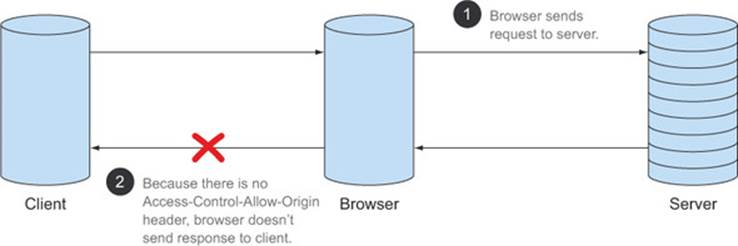
When the browser rejects the CORS request, it doesn’t send the response to the client. But the actual HTTP request is still made to the server, and the server still sends back an HTTP response. It may seem a little odd for the browser to make an HTTP request only to have it rejected. But this must be done because the browser has no way of knowing whether or not CORS is supported without first asking the server by making the request. Figure 3.22 shows the CORS flow when the server rejects the CORS request. The request is still sent to the server ![]() . When the browser notices that there is no Access-Control-Allow-Origin header (or the header doesn’t match the origin), it triggers an error on the client, and doesn’t forward the response details
. When the browser notices that there is no Access-Control-Allow-Origin header (or the header doesn’t match the origin), it triggers an error on the client, and doesn’t forward the response details ![]() .
.
Figure 3.22. CORS flow for a rejected CORS request
Note that this mechanism for rejecting CORS requests also protects servers that know nothing about CORS. Any server that was operational before CORS was introduced needs to be protected from unauthorized CORS requests. If a server knows nothing about CORS, but it receives a CORS request, the server’s response will not have an Access-Control-Allow-Origin header, and the request will be rejected. The CORS request will succeed only if the server explicitly opts-in to the request.
There are a number of strategies for accepting and rejecting CORS requests, depending on how open or closed you’d like your server to be. We cover these strategies in chapter 6.
3.6. Summary
This chapter provided an overview of how CORS works from the server’s perspective. I started by defining the players in a CORS request:
· The client, which initiates the cross-origin request
· The browser, which manages the communication between the client and the server
· The server, which serves data that the client wants
Next, I covered the HTTP headers needed for a basic CORS request:
· The browser sends the Origin header to indicate where a request is coming from.
· An origin is defined as the scheme, host, and port portion of a URL.
· The server responds with the Access-Control-Allow-Origin header if the request is valid.
Finally, you learned that the Access-Control-Allow-Origin header supports two values:
· Setting the Access-Control-Allow-Origin header to * allows cross-origin requests from any client.
· Setting the Access-Control-Allow-Origin header to a specific origin value only allows cross-origin requests from that specific client.
The techniques described in this chapter should give you a good understanding of how CORS works, and how to add simple CORS support to a server. But not all requests can be handled with only the Access-Control-Allow-Origin header. More complex HTTP requests, like PUT or DELETE, or requests with custom HTTP headers, will still fail. Any cross-origin request beyond the simplest request needs additional processing to succeed. We’ll cover these new processing techniques in the next chapter.