CORS in Action: Creating and consuming cross-origin APIs (2015)
Part 2. CORS on the server
Chapter 5. Cookies and response headers
This chapter covers
· Including cookies with requests
· Understanding how client and server settings interact to control cookie behavior
· Exposing response headers to clients
Chapter 4 introduced the concept of preflight requests. Preflight requests enable the browser to ask for the server’s permission before making requests with certain HTTP methods and headers. This permissions model puts the server in charge of how cross-origin requests behave.
In the same way, there are additional features that also require special permissions in CORS. The first is user credential support. By default, CORS doesn’t attach user credentials, such as cookies, on requests. The second is response headers support. The browser doesn’t reveal all response headers to the client code. If your server responds with an X-Powered-By response header, the JavaScript client code won’t be able to read its value without permission.
Luckily CORS has ways to support these features. As with all the other CORS features you’ve learned about, the server is in charge of enabling them, and it does so by using HTTP headers. This chapter will introduce two new response headers: Access-Control-Allow-Credentials, which indicates that cookies may be included with requests, and Access-Control-Expose-Headers, which indicates which response headers are visible to the client.
We’ll start by having you add a login page to the sample blogging app. The login page will include a cookie that needs to be validated in order to delete blog posts. Next, you’ll modify the sample to display a response header on the page. By setting the Access-Control-Allow-Credentials and Access-Control-Expose-Headers headers on the response, the sample app will enable support for each of these features.
5.1. Supporting cookies in CORS requests
The sample app has a pretty glaring security hole: anyone visiting the site can delete a blog post! The server code doesn’t verify whether the user deleting the post has permission to do so. Regardless of whether you’re the blog author or a casual reader, clicking the Delete link will delete a post. This is obviously something that needs to be fixed.
The app needs a way to identify the user, and the standard way of identifying a user on the web is to use cookies. Cookies are small bits of information exchanged between the server and the browser. For example, when a user logs in to Facebook, the Facebook server sets a cookie with a unique user ID. As the user browses the site, each request to the server contains the cookie. The server can read the cookie from the request and load user-specific data, such as the user’s timeline.
Note
The CORS spec uses the term user credentials to describe any bits of information the browser sets on a request to identify the user. This includes cookies, basic HTTP authentication, and client-side SSL. While the techniques described in this section apply to all of these types of user credentials, the text will focus only on cookies to keep things simple.
As you can see from this example, using cookies revolves around two actions: setting the cookie and reading it. A login page can be used to validate the user and set the appropriate cookie. Once the cookie is set, any user-specific activity should first read the cookie and validate the user. Let’s modify the sample app to support these two actions. We’ll start with the login page.
5.1.1. Setting cookies with a login page
The sample app currently only has one page, client.html, where users can view blog posts. In this section you’ll add a second page called login.html. This login page will collect the user’s username and password and set a cookie on his or her behalf.
Note
This code is only meant as an example. It’s not a best practice for implementing security for your own site.
Figure 5.1 shows how the login page integrates with the rest of the app. The login page lives on 127.0.0.1:9999, along with the API. Because the login page lives on 127.0.0.1:9999, the cookie will be set on that domain as well.
Figure 5.1. Topology of the sample app

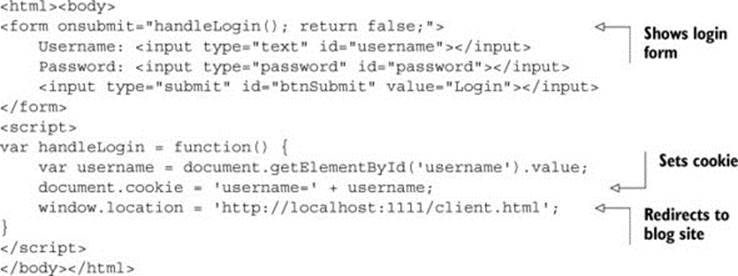
Listing 5.1 shows the code for the login page. Save this code to a file called login.html in the same directory as the sample app. The login page displays a form asking for the user’s username and password. When the user clicks Login, the page sets a cookie identifying the user, then redirects to the main blog at client.html. The value of the cookie is set to the username. (Of course, a real app should verify the username and password against a database, and set the cookie to an ID rather than the username.)
Listing 5.1. Adding a login page to the sample app
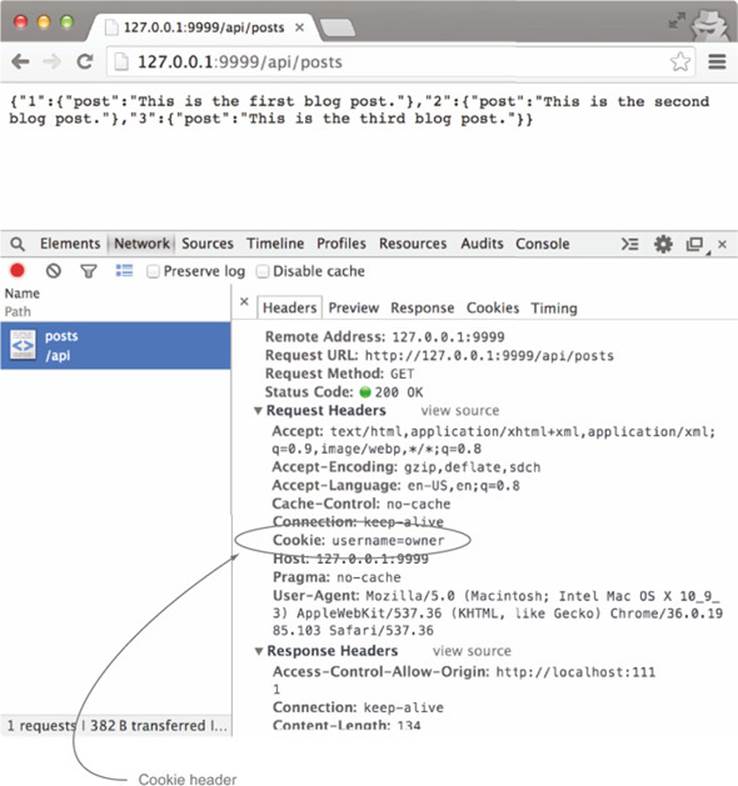
You can test the login page by restarting the server and visiting the page at http://127.0.0.1:9999/login.html. Enter owner as the username, any value for the password (because we aren’t validating the password, any password will do), and click the Login button. Once you’ve logged in, you can see the cookie being passed to the API by visiting http://127.0.0.1:9999/api/posts. If you view this request in the Network tab, you’ll see the Cookie header included as part of the request, as shown in figure 5.2.
Figure 5.2. Request headers for a request to the API
Now that the cookie is set, let’s turn our attention to reading the cookie on the server.
5.1.2. Reading the cookie on the server
Let’s update the server to delete the post only if the blog owner is making the request. Express provides a useful piece of middleware to manage cookies called cookie-parser. The cookie-parser middleware parses all of a site’s cookies into an easy-to-use JavaScript object. We’ll use cookie-parser to handle the minutiae of parsing cookies so that you can focus on CORS.
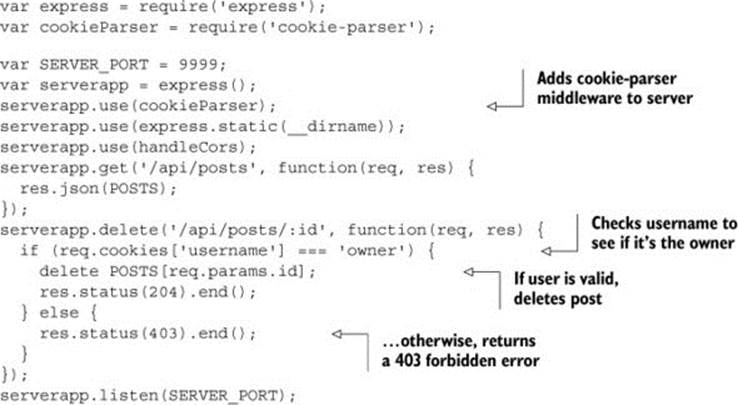
Listing 5.2 modifies the server code to only delete posts if the username is owner. First you’ll add the cookie-parser middleware to the server. When the server receives a delete request, the username is pulled from the cookie and compared against the string owner. If the values match, the post is deleted. Otherwise, the server returns a 403 error (indicating that a user doesn’t have permission to perform an action).
Listing 5.2. Modifying the server code to read the cookie
Note
You may also have to install the cookie-parser middleware for this sample to work. You can do so by running npm install cookie-parser.
With this code in place, restart the web server and visit http://127.0.0.1:9999/login.html. Enter the username owner and any password (remember you aren’t validating passwords because this is a sample), and click the Login button. Once you’re redirected to the blog, click a Delete link.
Note
The login page resides at 127.0.0.1:9999 and not localhost:1111. The login page from localhost:1111 will not set the correct cookie.
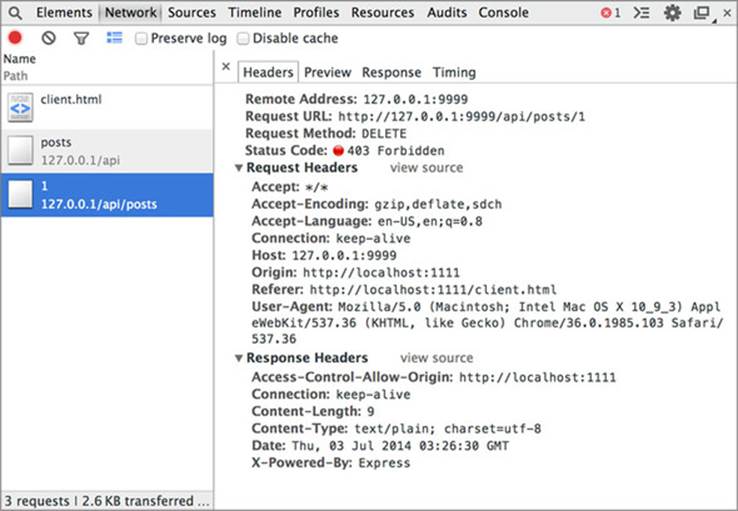
After clicking the Delete link, you’d expect the request to succeed. The previous section verified that cookies are included on API requests, but the sample will once again fail with the error shown in figure 5.3. Switching over to the Network tab as shown in figure 5.4 reveals that the cookie isn’t included in the request.
Figure 5.3. Server returns a 403 forbidden error when deleting a post
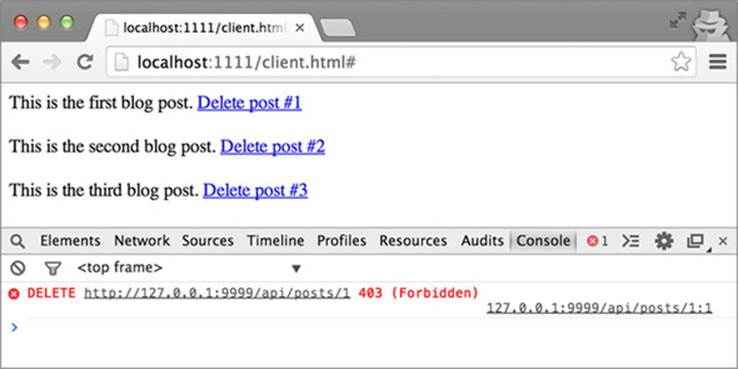
Figure 5.4. No Cookie header on the request
Where is the cookie you just set? This is once again a distinction between same-origin and cross-origin requests. Cookies are always included with same-origin requests, but they aren’t included on cross-origin requests by default. Because clicking the Delete link triggers a cross-origin request, the request goes through but the cookies don’t. Luckily CORS offers a solution for including cookies with requests.
5.1.3. Including cookies in CORS requests
Like all other CORS features, the server uses an HTTP response header to define cookie behavior. But unlike other CORS features, there is a client-side component to cookie support. Cookies will only work when both the client and the server are in agreement.
Server-side cookie support
The server indicates that it can receive cookies on CORS requests by setting the Access-Control-Allow-Credentials response header. Setting that header to true means that the server allows cookies on the CORS request.
If the request includes a preflight request, the Access-Control-Allow-Credentials header must be present on both the preflight and the actual request. But the cookie will only be sent on the actual request; the preflight request will never have a cookie.
The following listing modifies the server code to enable cookie support by adding the Access-Control-Allow-Credentials header.
Listing 5.3. Adding the Access-Control-Allow-Credentials header

But even with this server-side support, the delete request still fails. This is because the client needs to be configured to send cookies with the request. Let’s update the client to do that.
Client-side cookie support
In addition to setting a server-side response header, you have to set a property in the client’s JavaScript code to include the cookie with the request. Chapter 2 introduced the withCredentials property, which controls cookie behavior. The default value for this property is false, which indicates that cookies aren’t included on requests. Setting the withCredentials property to true includes cookies on cross-origin requests (this property has no effect on same-origin requests, which always include cookies). The following listing updates the client code to set the withCredentials property to true.
Listing 5.4. Setting withCredentials to true in the client code

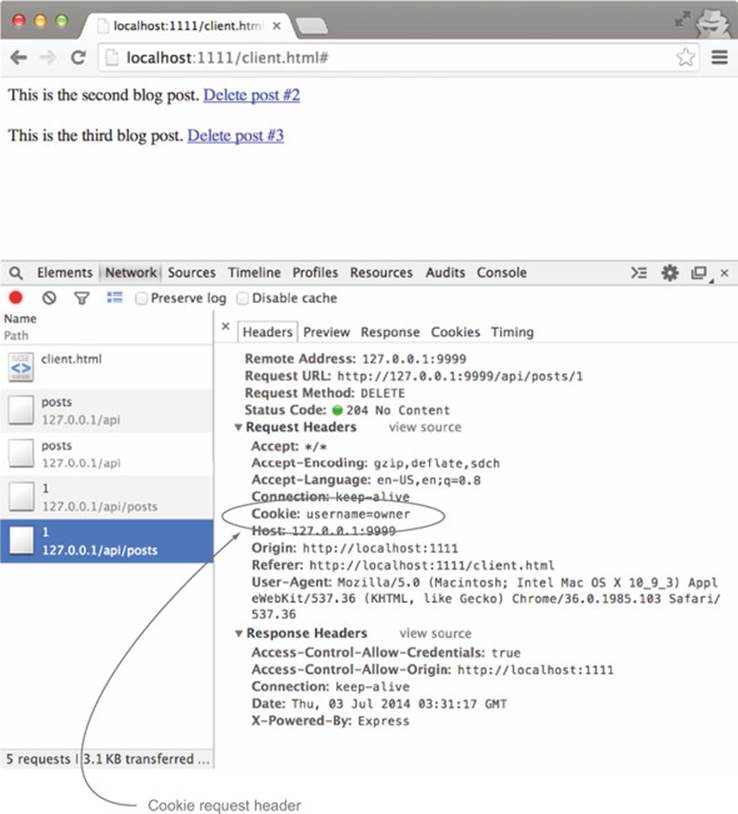
After these updates to the client code, you’re finally ready to process cookies on CORS requests! Reload the client.html page, and try clicking a Delete link. Figure 5.5 shows the page after the user clicks the Delete link. The cookie is now included with the request, and the post is deleted.
Figure 5.5. Cookie header is now included in the request
Having two different settings with two different Boolean values leads to four combinations for the withCredentials property and Access-Control-Allow-Credentials header. These combinations can get confusing, so the next section explores how a request behaves when these properties are set to different values.
Why do cookies need a client-side property?
Why do user credentials require a client-side component while all other CORS features don’t? The answer is, again, safety. Because user credentials are often used to perform sensitive actions (such as identify a user or update a user’s personal data), the CORS spec needs to be absolutely certain that credentials should be included in the request. Having the client opt-in along with the server adds another layer of caution when adding sensitive data such as user credentials.
5.1.4. How withCredentials and Access-Control-Allow-Credentials interact
Supporting user credentials requires that the withCredentials property work in tandem with the Access-Control-Allow-Credentials header. Each can either be set to true or false (or the property can’t be set at all, which is the same as setting it to false). This leads to four combinations of properties. This can get confusing, and it may not be clear what a particular combination means. Table 5.1 summarizes how the values interact.
Table 5.1. Behavior for various values of the withCredentials property and Access-Control-Allow-Credentials header
|
withCredentials |
Access-Control-Allow-Credentials |
Status |
Caveats |
|
false |
false |
Allowed |
Cookies aren’t included in the request |
|
true |
true |
Allowed |
Cookies are included in the request |
|
false |
true |
Allowed |
Cookies aren’t included in the request |
|
true |
false |
Rejected |
Invalid because cookies are sent on the request, but the server doesn’t allow them |
As you can see, only one combination leads to a rejection. But the other combinations lead to subtly different behavior, as indicated by the Caveats column in the table.
Let’s examine these four combinations in more detail in the following tables.
Table 5.2. Client code and server HTTP response when withCredentials and Access-Control-Allow-Credentials aren’t set
|
Client code |
Server HTTP response |
|
var xhr = new XMLHttpRequest(); xhr.open('GET', 'http://127.0.0.1:9999/api/posts'); xhr.send(); |
HTTP/1.1 200 OK Access-Control-Allow-Origin: http://localhost:1111 |
If withCredentials and Access-Control-Allow-Credentials aren’t set, cookies aren’t included on the request. You’ve seen how CORS requests behave when these properties aren’t set. All the examples from chapters 3 and 4behave this way. Because those examples didn’t set any cookies, withCredentials and Access-Control-Allow-Credentials weren’t necessary.
Table 5.3. Client code and server HTTP response when withCredentials and Access-Control-Allow-Credentials are both true
|
Client code |
Server HTTP response |
|
var xhr = new XMLHttpRequest(); xhr.open('GET', 'http://127.0.0.1:9999/api/posts'); xhr.withCredentials = true; xhr.send(); |
HTTP/1.1 200 OK Access-Control-Allow-Origin: http://localhost:1111 Access-Control-Allow-Credentials: true |
This section already covered what happens when both withCredentials and Access-Control-Allow-Credentials are true. There is really not much more to say here: if a cookie exists, it will be included with the CORS request. But things get a little more interesting for the next two cases, where one property is set and the other isn’t.
Table 5.4. Client code and server HTTP response when withCredentials isn’t set but Access-Control-Allow-Credentials is true
|
Client code |
Server HTTP response |
|
var xhr = new XMLHttpRequest(); xhr.open('GET', 'http://127.0.0.1:9999/api/posts'); xhr.send(); |
HTTP/1.1 200 OK Access-Control-Allow-Origin: http://localhost:1111 Access-Control-Allow-Credentials: true |
In this case, the server sets the Access-Control-Allow-Credentials header to true, even though the client doesn’t set the withCredentials property. Although the values of the two don’t match, the request still succeeds.
Here is how this combination works. When the server responds with an Access-Control-Allow-Credentials: true header, it’s saying that it’s okay to send cookies with the request. But because the withCredentialsproperty isn’t set, the CORS request doesn’t include the cookie. From the server’s perspective, the request looks like a normal CORS request without any cookies. The Access-Control-Allow-Credentials header isn’t saying that cookies must be included in the request. It’s merely suggesting that cookies can be included in the request. The client, armed with the withCredentials property, has the final say in whether or not cookies are included.
Setting withCredentials to true without an Access-Control-Allow-Credentials header is the only combination that returns an error (Table 5.5). Because with-Credentials is set to true, the cookies will be included with the request. But because Access-Control-Allow-Credentials isn’t set, the server declares that cookies aren’t allowed on the request. There is a conflict in expectations, and the request is rejected.
Table 5.5. Client code and server HTTP response when withCredentials is true but Access-Control-Allow-Credentials isn’t set
|
Client code |
Server HTTP response |
|
var xhr = new XMLHttpRequest(); xhr.open('GET', 'http://127.0.0.1:9999/api/posts'); xhr.withCredentials = true; xhr.send(); |
HTTP/1.1 200 OK Access-Control-Allow-Origin: http://localhost:1111 |
As you can see, there is a lot of subtlety involved when setting the values for the withCredentials and Access-Control-Allow-Credentials. As a rule, it’s best not to set these values unless you need the cookie on cross-origin requests. Requests without cookies are safer and easier to debug, because they don’t contain any user-specific information.
This section took a comprehensive look at the withCredentials property and Access-Control-Allow-Credentials header. But there are still a few more caveats to be aware of when using these settings, which we’ll cover next.
5.1.5. Caveats to cookie support
While the Access-Control-Allow-Credentials header allows cookies to be set on CORS requests, there are still a few caveats to how they are used.
Cookies on the client
JavaScript’s document.cookie property allows programmatic access to a site’s cookies. Using document.cookie, JavaScript code can read and write the value of a cookie, as shown in the following code snippet. You can print the value of the cookie to the console using
console.log(document.cookie);
and you can set the cookie value using
document.cookie = 'newcookie=1';
But the preceding code will not work with cross-origin cookies. The document.cookie property can’t read or write the value from another origin. Calling document.cookie from the client will return only the client’s own cookies, not the cross-origin cookies.
This is because cookies themselves have a same-origin policy similar to the same-origin policy for HTTP requests. Each cookie has a path and a domain, and only pages from that path and domain can read the cookie. So while the cookie is included in the CORS request, the browser still honors the cookie’s same-origin policy, and keeps the cookie hidden from client code.
Cookies when there is no preflight request
Based on the previous discussion, you may think that if a server doesn’t want cookies, all it needs to do is omit the Access-Control-Allow-Credentials header. However this isn’t quite true. Cookies may still be sent to the server in the case where the request doesn’t have a preflight. To understand why, look at how cookies behave with and without a preflight.
Figure 5.6 shows how cookie processing differs on a preflight request versus an actual request. Preflight requests never include the cookie. When the browser makes the preflight request, it doesn’t include the cookie in the preflight, even though the browser may have a cookie connected to that server. If the server rejects the request, the browser never sends the actual request with the cookie, and the cookie never reaches the server.
Figure 5.6. Differences in cookie behavior for requests with and without preflights. The preflight request will never include the cookie, but a request without a preflight might. This is true even if the server doesn’t include the Access-Control-Allow-Credentials header and the request is rejected (as indicated with the X).
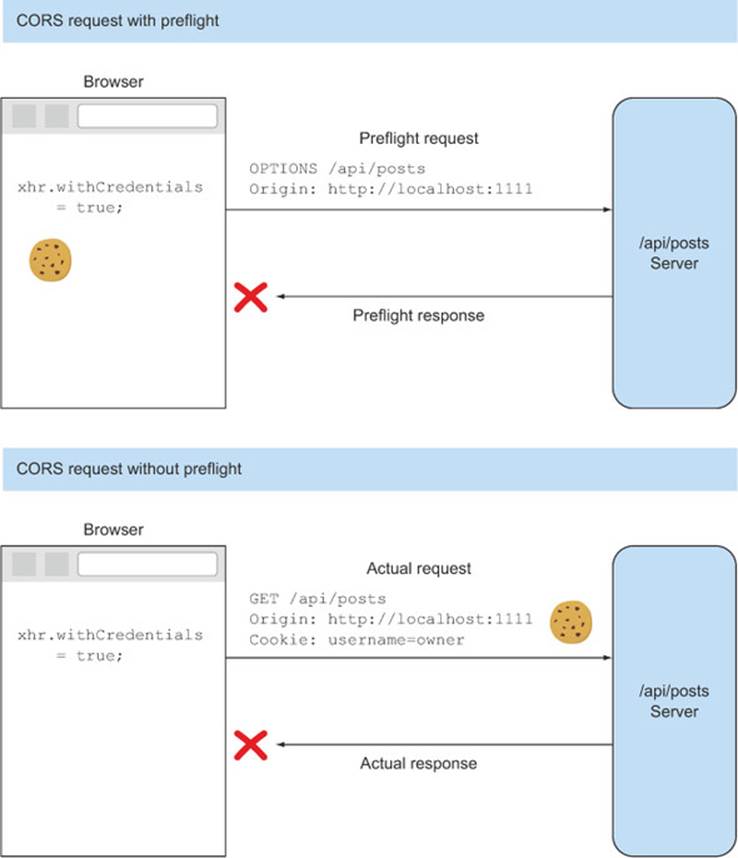
But things are different if there is no preflight. If the client has withCredentials set to true, and there isn’t a preflight, the cookie will be sent to the server. This is because the browser has no way of predicting what the value of the Access-Control-Allow-Credentials header will be before sending the actual request. When the browser sees that the Access-Control-Allow-Credentials header isn’t set, it will throw an error in the client. But because the client set the withCredentials property, the cookie was already sent to the server in the request.
So you can have situations where the server explicitly states that it doesn’t want cookies, but the browser sends them anyway. This may sound unintuitive and a bit scary, until you remember that this is already how requests behave, even without CORS. If a client makes a JSON-P request to a server, and the browser has a cookie for that server, the cookie will be included as part of the JSON-P request.
This behavior isn’t new to the web. There is a whole class of attacks that can arise from this request-plus-cookie combination called cross-site request forgery (CSRF), and CORS isn’t immune to them. Therefore, standard security precautions such as CSRF prevention should be used when making CORS requests. The next chapter will look at what CSRF is and how to prevent it.
User credentials and Access-Control-Allow-Origin
If the Access-Control-Allow-Credentials header is set to true, the * value can’t be used in the Access-Control-Allow-Origin header. Recall that the value * in the Access-Control-Allow-Origin header indicates that any origin can make a cross-origin request.
If the Access-Control-Allow-Credentials header is set to true, the server must provide an actual origin value in the Access-Control-Allow-Origin header. If the browser sees the header Access-Control-Allow-Origin: * used in conjunction with Access-Control-Allow-Credentials: true, it will reject the request. Table 5.6 compares the valid and invalid header combinations.
Table 5.6. Valid and invalid combinations for the Access-Control-Allow-Origin and Access-Control-Allow-Credentials headers
|
Valid |
Invalid |
|
Access-Control-Allow-Origin: http://localhost:1111 Access-Control-Allow-Credentials: true |
Access-Control-Allow-Origin: * Access-Control-Allow-Credentials: true |
Allowing cookies to be sent on all requests is insecure and can lead to CSRF vulnerabilities. The CORS spec authors wisely chose to avoid the security risk entirely by disallowing this header combination.
Setting the cookie from CORS
The rules described in this section also apply to setting the cookie from the server. If the withCredentials property and Access-Control-Allow-Credentials header are both true, the server can set a cookie on the client. This cookie still can’t be read from JavaScript code, but it will be included on subsequent requests to the server.
This section introduced a lot of new code to both the server and the client. Here is a recap:
1. The login.html page sets a cookie identifying the user.
2. The client sets the withCredentials property to indicate it would like to send cookies on CORS requests.
3. The server validates the user in the cookie before deleting a post.
4. The server sets the Access-Control-Allow-Credentials header to indicate that cookies are okay on CORS requests.
By including both a client- and server-side component, the developer has a lot of flexibility and control over when cookies are included in requests.
5.2. Exposing response headers to the client
All the CORS-specific headers introduced so far handle how an incoming request behaves. The Access-Control-Allow-Methods header specifies the valid request methods, while the Access-Control-Allow-Headers header specifies the valid request headers. Now we’ll turn our attention to the HTTP response behavior. Specifically, you’ll learn how client JavaScript code can access the response headers.
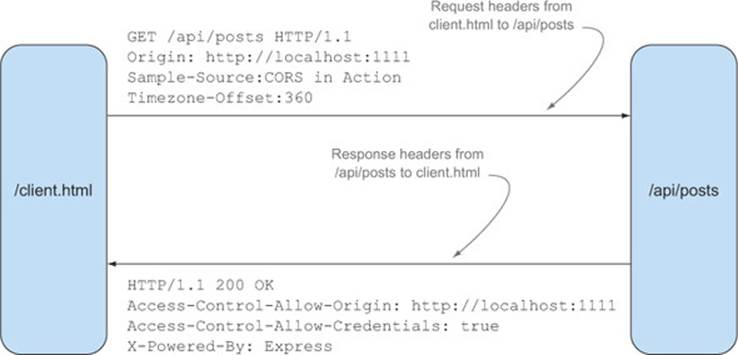
By now you may be discerning a pattern to how CORS works: for the client to do anything, the server must first give its permission. This behavior extends to the headers in the HTTP response. Response headers are the headers the server sends back to the client. Figure 5.7 shows a request from the sample’s client.html page to the API. The response headers are the headers from the API back to the client.
Figure 5.7. The distinction between request and response headers
The XMLHttpRequest object exposes two methods for reading the response headers: getResponseHeader and getAllResponseHeaders. Same-origin requests can use these methods to read headers from the response. But cross-origin requests have limitations on which response headers can be viewed by the client. By default, only a few response headers are visible to clients on cross-origin requests (these are called simple response headers; see the sidebar “Simple response headers” later in the chapter for more details). The server must give its permission to read any of the other response headers. Let’s modify the sample app to read one of these headers.
5.2.1. Reading a response header
The X-Powered-By header is often used by servers to highlight the underlying technology that powers the server. Values for this header could be ASP.NET (for a server running on ASP.NET) or PHP/5.2.4 (for a server running on PHP). By default, Express sets the X-Powered-By header to Express. Figure 5.8 shows where to find the X-Powered-By header in the API response.
Figure 5.8. X-Powered-By response header

Because the X-Powered-By header exists on every response, let’s display it in the sample app. The following listing reads the header using XMLHttpRequest’s get-ResponseHeader method. If the header exists, it’s displayed on the page.
Listing 5.5. Reading the X-Powered-By response header
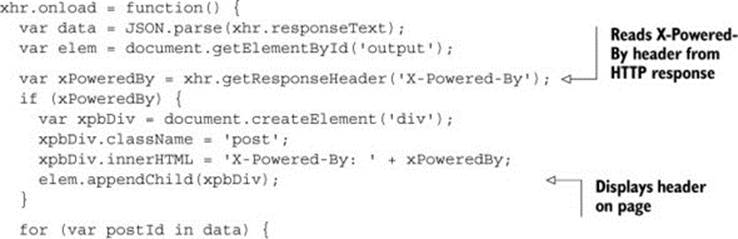
If you reload the page, you’d expect to see the X-Powered-By header displayed on the page. Since this is a cross-origin request, the header comes up empty. (Some browsers such as Chrome even display a helpful error message in the console log: Refused to get unsafe header "X-Powered-By"). So let’s update the server to give you access to that header.
5.2.2. Adding response header support
The server needs to specify that it’s okay for the client to read the X-Powered-By header. The server does this by using the Access-Control-Expose-Headers header. The Access-Control-Expose-Headers header contains a list of headers that the client code can read.
This shouldn’t be confused with the Access-Control-Allow-Headers header that was covered in chapter 4. While they are similar, there is no connection between the two. The Access-Control-Allow-Headers header is used by the preflight to indicate which headers are allowed on the request. The Access-Control-Expose-Headers header is used by the actual response to indicate which response headers are visible to the client.
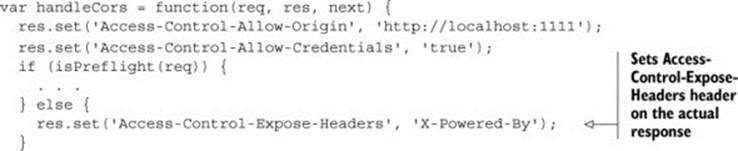
The following listing adds the Access-Control-Expose-Headers header to the server. Once this is included in the response, the X-Powered-By header will be visible to the getResponseHeader method.
Listing 5.6. Adding the Access-Control-Expose-Headers header
Note
The Access-Control-Expose-Headers header need only be included if the request isn’t a preflight request. This is because the header only takes effect on the actual request. It doesn’t hurt to put it on the preflight, but it doesn’t provide any benefit either.
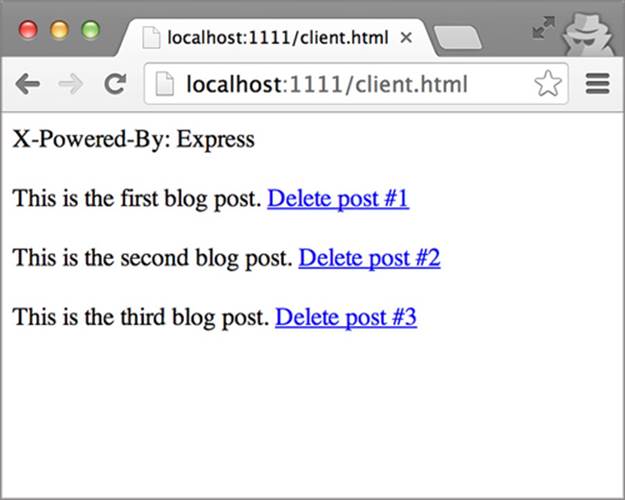
After making the changes in listing 5.6 and reloading the sample, the X-Powered-By header should be displayed on the page, as shown in figure 5.9.
Figure 5.9. Displaying the X-Powered-By response header on the page
Simple response headers
Not all response headers need the Access-Control-Expose-Headers header. Some response headers are always visible to the client, regardless of whether or not the Access-Control-Expose-Headers header is present. These headers are called simple response headers. There isn’t any documented reason why these specific headers are special; they are just the result of the evolution of the web over many years. The simple response headers are defined as:
· Cache-Control
· Content-Language
· Content-Type
· Expires
· Last-Modified
· Pragma
The server doesn’t need to do anything for the client to view these headers. The client can always read these response headers.
It may seem like overkill for the server to weigh in on response headers. After all, what harm can the X-Powered-By header do? But like the other CORS headers, the Access-Control-Expose-Headers header exists to protect the server’s data from unexpected access. Accessing response headers is a new capability introduced by CORS. Before CORS existed, clients had no way of reading the response headers. Because a server may depend on this behavior, CORS needs to be careful not to break this assumption. The Access-Control-Expose-Headers header ensures that the client code can only read the response headers intended by the server.
5.3. Summary
This chapter rounded out your understanding of CORS by introducing a few additional features:
· The Access-Control-Allow-Credentials header can be used in conjunction with XMLHttpRequest’s withCredentials property to include cookies on cross-origin requests.
· The Access-Control-Expose-Headers header can be used to expose response headers to the client.
These features are the tools in your CORS toolbox. But the tools alone aren’t enough; you also need to know how to use them. The flexibility offered in CORS means that there are a lot of ways of configuring a server, and there sometimes isn’t any clear guidance on which way is preferred. The next chapter offers guidance and best practices for using CORS on your own server.