Building Web Apps with Ember.js (2014)
Chapter 7. Persisting Data
Up until this point, in Chapter 4 through Chapter 6, we have built a relatively simple prototype Ember application. We have utilized most of Ember’s core functionality: router, routes, controllers, Handlebars templates, and views.
In this chapter, we are ready to begin preparing our Ember application for production. In doing so, we will explore Ember Data, the model class, remote persistence and RESTful web services, reusable components, and testing. There are many ways to skin this cat, but the approach that we prefer involves Ember App Kit.
So now you should follow along the commit history and companion code with a new repo.
In this repo, you will notice that functionality introduced in Chapter 4 through Chapter 6 will be included in one single commit.
Not Rolling Our Own Ajax
Given the high-level features that were laid out at the beginning of Chapter 4, the application persists the user’s interactions as activities, building a history of the search terms. We will begin with building client-side models and persisting the data to local storage. Later, we will migrate to a solution that persists the same data to a remote, RESTful data store.
In order to understand the problems we will solve with client persistence libraries, we need to first take a look at why we would want to get away from rolling our own Ajax calls.
After all, it is possible to just use jQuery to load JSON data from a server, then use those JSON objects as models, performing the serialization and deserilization manually.
Here is an example of basic creation of making a request to a remote server for data, instantiating it from an Ember object, and storing it in client-side memory. We actually do this in our application with the data from the EchoNest API. Let’s take a look at our songs search data.
First, we would create a basic Ember object:
RocknrollcallYeoman.Song = Em.Object.extend({
id: null,
enid: null,
title: null,
artist_name: null,
artist_id: null,
audio_md5: null,
audio_summary: null,
hotttnesss: null,
track: null,
types: null
});
Now, that we have the Em.Object, we can instantiate it and access its attributes through getters and setters:
var song = RocknrollcallYeoman.Song.create();
song.set('artist_name', 'Willie Nelson');
console.log(song.get('artist_name')); // Willie Nelson
Now, we can manually make a request for our data objects and push them to a results array:
var c = $.getJSON(
"http://developer.echonest.com/api/v4/song/search?api_key=<YOUR-API-KEY>
&format=json&results=10&bucket=id:7digital-US&bucket=audio_summary
&bucket=song_hotttnesss&bucket=tracks&bucket=song_type", {
title: term
});
var results = Em.A();
c.success(function(data) {
var entries = data.response.songs;
for (var i = 0; i < entries.length; i++) {
var entry = entries[i];
results.push(RocknrollcallYeoman.Song.create({
id: i + 1,
title: entry.title,
enid: entry.id,
type: 'song',
artist_id: (entry.artist_id) ? entry.artist_id : null,
artist_name: entry.artist_name,
hotttnesss: entry.song_hotttnesss,
audio_summary: entry.audio_summary
}));
}
});
return results;
At this point, we know we can instantiate new objects from our model, perform gets and sets on our object instances, and make requests across the network for new data.
But, at this point we may want to abstract the network call out to a findAll() method so that we aren’t repeating the same code over and over. In order to do this, we need to start with using reopenClass to define a class level method on our RocknrollcallYeoman.Song class. Now we can just call RocknrollcallYeoman.Song.findAll() to get our results:
RocknrollcallYeoman.Song.reopenClass({
findAll: function(term) {
var c = $.getJSON("http://developer.echonest.com/api/v4/song/search?
api_key=<YOUR-API-KEY>&format=json&results=10&bucket=id:7digital-US
&bucket=audio_summary&bucket=song_hotttnesss&bucket=tracks&
bucket=song_type", {
title: term
});
var results = Em.A();
c.success(function(data) {
var entries = data.response.songs;
for (var i = 0; i < entries.length; i++) {
var entry = entries[i];
results.push(RocknrollcallYeoman.Song.create({
id: i + 1,
title: entry.title,
enid: entry.id,
type: 'song',
artist_id: (entry.artist_id) ? entry.artist_id : null,
artist_name: entry.artist_name,
hotttnesss: entry.song_hotttnesss,
audio_summary: entry.audio_summary
}));
}
});
return results;
}
});
We could then do something similar to find a single record:
RocknrollcallYeoman.Song.reopenClass({
find: function(songId) {
var result = Ember.Object.create({});
$.getJSON('/<echonestUrl>' + songId, function(data) {
result.setProperties(data);
});
return result;
}
});
And, what if we want to handle errors? Well, fortunately jQuery’s getJSON() returns promises which helps us remove the need to manage success and error callback objects. But, as you will see later, we also can get the convenience of Promises out of libraries such as Ember Data.
And, what about setting up relationships between your models? Or handling other transport protocols like WebSocket?
The intention here is to help you understand that there is a lot to think about when you try to roll your own persistance solution and a ton of boilerplate code to write across all of your models.
There Must Be a Better Way
Later in this chapter, we will use Ember Data to perform a similar set of tasks. As you will begin to see, our code becomes drastically simplified by using a library that manages finding the model, making changes, handling errors, and communicating across the network to the remote persistance layer using multiple protocols.
Ember Client-Side Persistence Libraries
At the time of this writing, there are beginning to be more and more persistence solutions for Ember. Let’s take a look at the available solutions.
Ember Data
The offical, community solution. Currently, Ember Data ships as a separate library from Ember.js. It is intended to be included in core once it has matured. All of the examples provided in the companion source code use Ember Data.
Ember Model
Ember Model is a lightweight persistence solution by Eric Bryn that adds Ember primitives on top of $.ajax. However, it does not force you to use $.ajax. It provides a model class with some basic relationship methods, adapters, and a convienent API by using Promises.
Ember Restless
RESTless is another lightweight persistence solution that follows a similar API to Ember Data, making it easy to understand for those familiar with Ember Data. It is considered to be full-featured enough for applications with basic CRUD requirements and supports other protocols like WebSocket.
Ember Persistence Foundation
Another impressive solution is EPF. It is known to be stable and production ready. Its API is significantly different than the other solutions, following a concept of sessions to interact with the framework. It fully supports relationships and promises.
Although these solutions are worthy of further exploration, due to the limited scope of this book, our demo applicaiton, RocknRollCall, will focus on the official solution, Ember Data.
An Ember Data Deep Dive
As you have most likely already gathered, Ember Data is a client-side ORM library that provides four main facilities to your Ember application:
§ Loads data from a persistence layer
§ Maps the data to a set of client-side models (caches them to solve for poor network latency performance)
§ Updates the models
§ Saves and syncs the data with a persistence layer
Ember Data is architected very modularly, designed to accomodate various protocols and data formats. This means it will work with standard RESTful JSON backends and streaming APIs like WebSocket. For real-time applications, you can open a persistent socket that pushes changes to the Ember Data store as they occur remotely. And, as you will see later, it is also easy to configure an adapter to store data locally via HTML5 local storage.
This is accomplished through abstraction layers: models, adapters, serializers, and the store. More on those to come.
Setting Up the Router and Activity View for the Activity State
First, we need to add a new route to our router called activity:
RocknrollcallYeoman.Router.map(function() {
this.route('activity', {
path: 'activity'
});
this.resource('search-results', {
path: 'search/:term'
});
this.resource('artist', {
path: 'artist/:enid'
});
this.resource('song', {
path: 'song/:sid'
});
});
See the change in this commit.
Now, add a template named activity.hbs to the app/templates/ directory and the following each helper to iterate over the model:
<h4>Total Activity Records: {{model.length}}</h4>
<ul>
{{#each model}}
<li class="activity">{{this.id}}</li>
{{/each}}
</ul>
See the change in this commit.
Now, you may have noticed that this handlebars template doesn’t work. You’re right! We need to give it a route handler and a model.
Models
As you learned as early as Chapter 2 and again at the end of Chapter 5, every Ember route has an associated model. In most cases, the model hook, or method, is used to set up the plumbing between a particular model and a route. There are other ways, such as an argument to {{link-to}}, or by calling a route’s transitionTo() method. In our example, we will first use the most common scenario: navigating to the activities route and fetching records from Ember Data.
RocknrollcallYeoman.ActivityRoute = Ember.Route.extend({
model: function () {
return this.store.find('activity')
}
});
See the change in this commit.
Now that we have our route handler, we need to add a link-to helper in app/scripts/templates/application.hbs to point to our new activityRoute and activity template:
<li>{{#link-to 'activity'}}Activity{{/link-to}}</li>
See the change in this commit. At this point, when we click our link, we should see an error in the browser console:
Error while loading route: Error: No model was found for 'activity'
That is because we also need to also build our model. So let’s create a new file named activity.js and add it to the app/scripts/models directory.
Now, we can add in the necessary properties onto our model:
RocknrollcallYeoman.Activity = DS.Model.extend({
display_id: DS.attr('string'),
type: DS.attr('string'),
display_name: DS.attr('string'),
hotttnesss: DS.attr('number'),
timestamp: DS.attr()
});
See the change in this commit.
But wait a second. Now, we should see the error:
Assertion failed: Unable to find fixtures for model type RocknrollcallYeoman.
Activity
Well, fortunately Ember gives us an easy way to build our fixtures using JavaScript objects and attaching them to a built-in property, FIXTURES. We will get into more detail about Ember adapters, and specifically the Ember.FixtureAdapter, later in the chapter.
So, let’s add these to app/scripts/models/activity.js:
RocknrollcallYeoman.Activity = DS.Model.extend({
display_id: DS.attr('string'),
type: DS.attr('string'),
display_name: DS.attr('string'),
hotttnesss: DS.attr('number'),
timestamp: DS.attr()
});
RocknrollcallYeoman.Activity.FIXTURES = [{
id: 0,
display_id: "Activity1",
type: "song",
display_name: "On the Road Again",
hotttnesss: 54,
timestamp: "Fri Dec 06 2013 01:05:53 GMT-0600 (CST)"
}, {
id: 1,
display_id: "Activity2",
type: "artist",
display_name: "Willie Nelson",
hotttnesss: 99,
timestamp: "Fri Dec 06 2013 01:05:53 GMT-0600 (CST)"
}];
See the change in this commit.
NOTE
If you are interested in seeing a test-driven approach to these steps, the creation of model and tests is covered in detail in Chapter 10.
Later in this chapter, we will look at a solution for seeding Ember Data on application start. This helps development by providing content within the application, so the developer doesn’t have to hardcode any dynamic content.
But for now, let’s look at how the application will create data based on user interaction.
Persisting Records Based on User Interaction
We need a way to manage user interactions and changes to our application state. Actions were covered in detail in Chapter 4, so we won’t go into further detail here other than to show the specific implementation and as an example of how to create and store records with Ember Data.
As mentioned in Chapter 4, we need to declare our actions, viewedArtist and viewedSong, in the search-results.hbs template:
{{#if artistsIsChecked}}
{{#if artists.length}}
<h3>Artists</h3>
<ul class="search-results artists">
{{#each artists}}
<li><a {{action 'viewedArtist' this }}>{{name}}</a></li>
{{/each}}
</ul>
{{/if}}
{{/if}}
{{#if songsIsChecked}}
{{#if songs.length}}
<h3>Songs</h3>
<ul class="search-results songs">
{{#each songs}}
<li><a {{action 'viewedSong' this }}>"{{title}}," by
{{artist_name}}</a></li>
{{/each}}
</ul>
{{/if}}
{{/if}}
See the change in this commit.
But, we haven’t defined the actions in the SearchResultsController, so if we try to click and navigate to the detail view, we will receive the following error:
Uncaught Error: Nothing handled the action 'viewedArtist'. If you did handle the action, this error can be caused by returning true from an action handler in a controller, causing the action to bubble.
So, in the SearchResultsController we can define the actions that capture the clickable interaction, create a new Activity record, save this record, and then transition the user to the specific ArtistRoute or SongRoute by passing the ID of the object.
First, define an action:
actions: {
viewedSong: function(model) {
...
}
},
Then, create a new activity record:
actions: {
viewedSong: function(model) {
var date = Date.now();
var activity = this.store.createRecord('activity', {
display_id: model.enid,
type: model.type,
display_name: model.artist_name,
hotttnesss: model.hotttnesss,
timestamp: date
});
}
},
Then, save the activity record:
actions: {
viewedSong: function(model) {
var date = Date.now();
var activity = this.store.createRecord('activity', {
display_id: model.enid,
type: model.type,
display_name: model.artist_name,
hotttnesss: model.hotttnesss,
timestamp: date
});
activity.save();
}
},
See the change in this commit.
And, finally transition the user to the new application state:
actions: {
viewedSong: function(model) {
...
this.transitionToRoute('song', model.enid);
}
},
Here is the complete SearchResultsController definition of our actions:
actions: {
viewedArtist: function(model) {
var date = Date.now();
var activity = this.store.createRecord('activity', {
display_id: model.enid,
type: model.type,
display_name: model.name,
hotttnesss: model.hotttnesss,
timestamp: date
});
activity.save();
this.transitionToRoute('artist', model.enid);
},
viewedSong: function(model) {
var date = Date.now();
var activity = this.store.createRecord('activity', {
display_id: model.enid,
type: model.type,
display_name: model.artist_name,
hotttnesss: model.hotttnesss,
timestamp: date
});
activity.save();
this.transitionToRoute('song', model.enid);
}
},
See the change in this commit.
Although we don’t show an example currently within the RocknRollCall app, there is also a deleteRecord() method available:
var activity = store.find('activity', 1);
activity.deleteRecord();
activity.save()
When save is called, Ember Data automatically formulates a XHR following standard conventions and sends an HTTP DELETE to the URL: /activities/1. Here are the model.save() and XHRs endpoints by convention:
|
Find |
GET |
/activities/1 |
|
Find All |
GET |
/activities |
|
Update |
PUT |
/activities/1 |
|
Create |
POST |
/activities |
|
Delete |
DELETE |
/activities/1 |
We will revisit this in Chapter 8 as we begin to build our remote persistence solution.
Finally, we can also call destroyRecord(), which conveniently bundles the both deleteRecord() and save() together in one call:
var activity = store.find('activity', 2);
activity.destroyRecord();
Abstraction Layers: Store, Serializers, and Adapters
If you are paying close attention, you may have noticed that we introduced another new object without providing an explanation. Well, we did, and it was none other than the Ember Data store.
As I mentioned earlier, Ember Data provides a number of layers of abstraction; one of those abstractions is the store.
Ember Data Store
The Ember Data store is a local cache of all the records in your application. An instance of the store (DS.Store) is created during application initilization and is accessible by other objects within your application, such as controllers and routes. You can interact with the store through a number of methods, such as the find() that was used earlier:
var activity = store.find('activity', 1);
Some other methods that are available to the Ember Data store that we have found to be quite useful are filter(), all(), and getById().
.filter()
filter() returns a live RecordArray that is bound to updates to the store:
store.filter('activity', function(activity){
return activity.get('type', 'song');
});
.all()
all() is a filter that returns all the records of a given type. It is an alternative to find() for uses cases when you do not want your application to make a network request to your remote persistence store:
store.all('activity');
.getById()
Similar to all(), getById() is good for uses cases where you do not want your application to make a network request to your remote persistence store:
store.getById('activity',1);
For a complete API reference of the DS.Store, see Ember’s class information page.
Serializer
Another of Ember Data’s abstractions is the serializer, which handles the serialization and deserialization of records as they are pushed and pulled from external data sources, such as the remote EchoNest JSON API that we communicate with in our demo application, RockNRollCall. The serializer handles the data in three distinct ways:
§ Transforming attribute values
§ Normalizing property names
§ Serializing model’s relationships
Setting up a serializer for our all of our model types is as simple as declaring it on the ApplicationSerializer superclass:
RocknrollcallYeoman.ApplicationSerializer = DS.RESTSerializer.extend({
// ...
});
For more information on how to configure a Serializer to meet your needs, there is a good explanation in Ember Data’s TRANSITION.md file.
Per type serializer
Keep in mind, you can also designate a serializer on a per model type basis. So I can scope a serializer down to a specific model, without the logic impacting my other models, like so:
RocknrollcallYeoman.Activity = DS.Model.extend({
// ...
});
RocknrollcallYeoman.ActivitySerializer = DS.RESTSerializer.extend({
// ...
});
Adapters
Ember Data’s store can be configured to use different adapters. The FixtureAdapter and RESTAdapter are provided in core. There are other adapters written by the community, such as the LocalStorageAdapter by Ryan Florence. In our RockNRollCall application, we will explore both adapters. In Chapter 8, we will take a look at setting up a backend to work with the RESTAdapter.
FixtureAdapter
During early development and prototyping, it is beneficial to not have to stand up a server and API endpoints. The FixtureAdapter provides the ability to attach fixture data directly to your model class, which essentially stores the data in your browser’s memory as JavaScript objects. The FixtureAdapter was installed by default by the Yeoman application generator, and this is what we used earlier in this chapter. Once you have built your RESTful web service backend, you can switch to the RESTAdapter without having to update your application logic.
LocalStorageAdapter
The LocalStorageAdapter is an adapter, written by Ryan Florence, that interacts with the HTML5 localStorage object. HTML5 localStorage allows developers to store data locally within the user’s browser.
First, we need to install the new dependency using Bower. We’ll need to add ember-localstorage-adapter to bower.json:
{
"name": "rocknrollcall-yeoman",
"version": "0.0.0",
"dependencies": {
"ember": "1.3.2",
"handlebars": "1.2.1",
"ember-data": "1.0.0-beta.5",
"ember-localstorage-adapter": "latest",
"bootstrap-sass": "~3.0.0",
"d3": "latest"
},
"devDependencies": {
"ember-mocha-adapter": "0.1.2"
}
}
And then, run the install command:
$ bower install
We also need to make sure our newly installed script is loaded into the page (it should be loaded after Ember and Ember Data):
<script src="bower_components/jquery/jquery.js"></script>
<script src="bower_components/handlebars/handlebars.runtime.js"></script>
<script src="@@ember"></script>
<script src="@@ember_data"></script>
<script src="bower_components/ember-localstorage-adapter/localstorage_adapter
.js"></script>
See the change in this commit.
Now, one last configuration and we should be ready to store data in our browser’s LocalStorage. Open the app/scripts/store.js file and switch from the FixtureAdapter to the LocalStorageAdapter:
RocknrollcallYeoman.ApplicationAdapter = DS.LSAdapter.extend({
namespace: 'rocknrollcall'
});
See the change in this commit.
Here, we have only one model, Activity; but by convention, if we use ApplicationAdapter, all models are run through the adapter.
We do have the capability to create multiple adapters and scope them to models. To demonstrate that, let’s scope the adapter to handle only the activity data model:
RocknrollcallYeoman.ActivityAdapter = DS.LSAdapter.extend({
namespace: 'rocknrollcall'
});
See the change in this commit.
Seeding the DB with an application initializer
Application initializers are a hook point provided by Ember core that allow you to register blocks of code during your application’s intialization process.
All you need to do is provide a unique name in the name property and implement your code within the initialize method. In app/scripts/app.js, add
Ember.Application.initializer({
name: "myInitializer",
initialize: function(container, application) {
console.log('do something')
}
});
var RocknrollcallYeoman = Ember.Application.create({});
Some common use cases for using application initializers are for registering third-party DOM onReady events (although keep in mind, depending on your particular use case, there may be better ways to do this provided by the framework); injecting objects like currentUser provided by your authentication framework into controllers, routes, and views; accessing data cached in the DOM to improve initial load performance; or seeding an Ember Data store.
In order to have something to work with for our eventual data visualization that we will build in Chapter 9, we need to create some activity records by seeding the an Ember Data Store.
So, we can implement an initializer that interacts with our LocalStorageAdapter.
We start with manually clearing localStorage:
localStorage.clear();
And then getting access to the store from the container:
store = container.lookup('store:main');
Then we create objects with random values:
for (var i = 0; i < 300; i++) {
var id = 'ARNH6LU1187FB430FA';
var random_id = id.split('').sort(function() {
return 0.5 - Math.random()
}).join('');
var types = [
'song',
'artist'
];
var random_type = Math.floor(Math.random() * types.length);
var name = 'Willie Nelson';
var random_name = name.split('').sort(function() {
return 0.5 - Math.random()
}).join('');
var random_hotness = Math.floor(Math.random() * 100) + 1;
var random_timestamp = new Date(new Date(2013, 9, 30).getTime() +
Math.random() *
(new Date().getTime() - new Date(2013, 9, 30).getTime()));
};
And push them into the store using createRecord() and save():
activity = store.createRecord('activity', {
display_id: random_id,
type: types[random_type],
display_name: random_name,
hotttnesss: random_hotness,
timestamp: random_timestamp
});
activity.save();
And here is the finished product:
Ember.Application.initializer({
name: "DBseeds",
initialize: function(container, application) {
localStorage.clear();
store = container.lookup('store:main');
console.log('store: ', store);
for (var i = 0; i < 300; i++) {
var id = 'ARNH6LU1187FB430FA';
var random_id = id.split('').sort(function() {
return 0.5 - Math.random()
}).join('');
var types = [
'song',
'artist'
];
var random_type = Math.floor(Math.random() * types.length);
var name = 'Jesse Cravens';
var random_name = name.split('').sort(function() {
return 0.5 - Math.random()
}).join('');
var random_hotness = Math.floor(Math.random() * 100) + 1;
var random_timestamp = new Date(new Date(2013, 9, 30).getTime() +
Math.random() *
(new Date().getTime() - new Date(2013, 9, 30).getTime()));
activity = store.createRecord('activity', {
display_id: random_id,
type: types[random_type],
display_name: random_name,
hotttnesss: random_hotness,
timestamp: random_timestamp
});
activity.save();
};
console.log(store.find('activity')
.then(function(stuff) {
console.log('Total Activity Records: ' + stuff.toArray().length)
})
);
}
});
So, each time the application is intialized, or when we refresh the page, our client-side data store will be populated with random values.
Remember the Ember Inspector from Chapter 3? Let’s open up the Inspector in Google Chrome and view our records in the data store (Figure 7-1).
Nice! We should see 300 records.
See the change in this commit.
Wrapping Things Up
Now we should have a good understanding of the concepts and code necessary to set up for data persistence. In this chapter, we focused primarily on the client side with Ember Data and the LocalStorageAdapter. The Ember Data Store is configured to use the RESTAdapter by default.
In Chapter 8, we will get our backend juices flowing by taking a look at an API stub solution built into the Ember App Kit that uses Node.js and Express, along with some handy configurations to build out an API that uses the RESTAdapter.
Then, in the latter part of Chapter 8, we will build a RESTful JSON API using Rails 4 and Active Model Serializers.
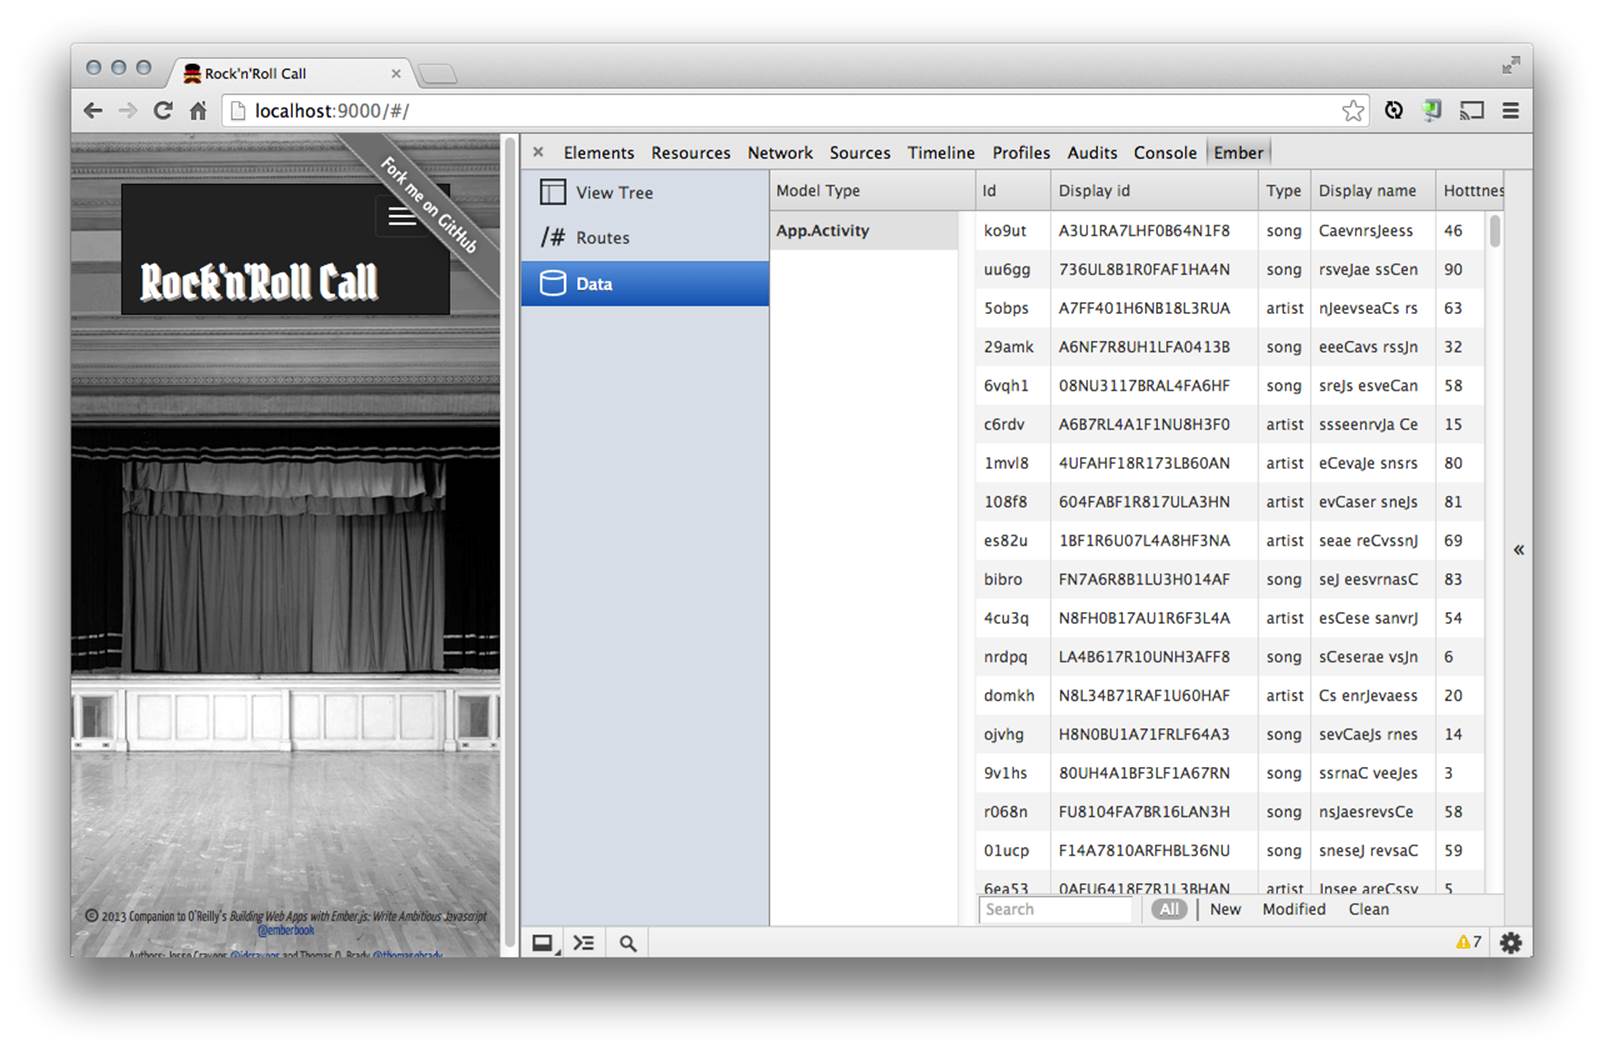
Figure 7-1. Ember Inspector: inspecting activity records with Chrome’s Inspector Extension
In both of these examples, we switch our RocknRollCall app’s adapter from the LocalStorageAdapter to the RESTAdapter. In doing so, we will experience firsthand one of the most powerful advantages to Ember Data’s modularized architecture. This, along with the power of a standardized format for our JSON, enabled by Rails and Active Model Serializers, is sure to increase our development efficiency.
In other words, these features are sure to have an impact on our project workflow, as our backend development team has been building out a remote persistence solution following the same data contracts used by the frontend engineers. We can develop in parallel. And, like flipping a switch, we can now persist our data remotely or locally without changing the majority of our code.
All materials on the site are licensed Creative Commons Attribution-Sharealike 3.0 Unported CC BY-SA 3.0 & GNU Free Documentation License (GFDL)
If you are the copyright holder of any material contained on our site and intend to remove it, please contact our site administrator for approval.
© 2016-2026 All site design rights belong to S.Y.A.