Building Web Apps with Ember.js (2014)
Chapter 8. Building an Ember Backend
Ember and Ember Data are entirely client-side JavaScript, so it is possible for them to interface with any backend. In fact, that is one of the most compelling aspects of Ember Data.
There are many useful examples on the Web of developers using anything from .NET MVC, Django, Sinatra, PHP, Grails, and many others to deliver JSON to their Ember application. Here are a few:
§ @toranb has an example RESTAdapter for Django.
§ Microsoft provides a template for building Ember apps with .NET.
§ The team at Travis uses Sinatra.
§ Ember Data is so flexible that you can also use other protocols, such as WebSocket, to push/pull data from remote data stores.
§ One great example is the work by the team at Firebase. They created a custom adapter for working with their hosted WebSocket backend.
All of this is made possible by Ember Data Adapters. By writing a custom adapter, an application can connect to any backend and any protocol accessible through a web browser.
In this chapter, we will look at building a few backends using some of today’s most common web app frameworks like Express.js and Ruby on Rails. We will introduce a few new solutions to address moving our backend from local storage to a remote database. We will also address having a “server-centric” web framework to deliver our single page.
RESTful Web Service APIs
In Chapter 7, we introduced Ember Data and the LocalStorageAdapter. Now, let’s begin to explore one of the core adapters provided by default, the RESTAdapter. Here we will begin to see how our Ember application can communicate across a network with RESTful web service APIs.
WHAT ARE RESTFUL WEB SERVICE APIS?
REST (REpresentational State Transfer), coined by Roy Fielding, refers to a stateless architecture for distributed networks. It is commonly used as a guide for a well designed backend that exposes resources as web services, most often on the Web and over HTTP.
If you’d like to learn more about RESTful web services, be sure to check out RESTful Web APIs by Leonard Richardson, Mike Amundsen, and Sam Ruby (O’Reilly, 2013).
Ember Data RESTAdapter
Up to this point, we have used Yeoman, which includes Yo, Grunt, and Bower, to manage our project. Our application has been completely browser based (including the persistence layer), so this solution has served us well.
Now we will introduce a new requirement to persist our data to a remote database. We also know we will want to introduce authentication in the future (out of scope for this book), so it is time to begin evaluating web-application frameworks, such as Ruby on Rails and Express.js.
We also want our Rails application to deliver our data in the JSON format and expose RESTful endpoints. In doing so, we will migrate from using the Ember Data LocalStorageAdapter to the Ember Data RESTAdapter.
EAK (Ember App Kit) API Stubs with Express
In our companion source code, we have also provided an example using the Ember App Kit, mentioned in Chapter 3 and also referenced in Chapter 10.
The creators of EAK have provided a very handy Node.js/Express.js application that provides stubs to your API web service calls. This give us the ability to use the RESTAdapter earlier in our project. The FixtureAdapter stores our fixtures in memory within the web browser, which is very helpful in early development and prototyping but not ideal in later development.
With EAK’s Express API Stubs, we can configure our application to start making requests across the network to a simple web server, making our application’s data calls much closer to those communicating with a real-world backend. So, let’s get set up.
To get started, we need to create a new directory and clone EAK into that directory:
$ mkdir rocknrollcall-eak
$ cd ..
Next, run the following:
$ git clone https://github.com/stefanpenner/ember-app-kit.git
And now, you should have a fully functioning, starting point for an Ember application using EAK.
To install dependencies and run the application using Grunt, follow the simple Getting Started documentation available in the README.md.
See the change in this commit.
First, open the manifest file, package.json, and ensure APIMethod is set to stub:
{
"name": "app-kit",
"namespace": "appkit",
"APIMethod": "stub",
...
Then, we can add an /activities route in api-stub/routes.js:
module.exports = function(server) {
// Create an API namespace, so that the root does not
// have to be repeated for each end point.
server.namespace("/api", function() {
// Return fixture data for "/api/activities"
server.get("/activities", function(req, res) {
var activities =
{
"activities": [{
id: 0,
display_id: "Activity1",
searchresults_type: "song",
display_name: "On the Road Again",
hotttnesss: 54,
timestamp: "Fri Dec 06 2013 01:05:53 GMT-0600 (CST)"
}, {
id: 1,
display_id: "Activity2",
searchresults_type: "artist",
RESTful Web Service APIs | 135
display_name: "Willie Nelson",
hotttnesss: 99,
timestamp: "Fri Dec 06 2013 01:05:53
GMT-0600 (CST)"
}]
};
res.send(activities);
});
});
};
See the change in this commit.
ES6 MODULE SYNTAX
If you have been following along, this is the ES6 Module syntax that was referred to in Chapter 3’s references to EAK and Ember CLI. Since we are using EAK in these examples, we benefit from the ES6 Module Transpiler in our build process, which compiles down to AMD (RequireJS) syntax.
You may notice the export default syntax in the following code snippets. This is how it works:
EAK uses a custom resolver to resolve dependencies using naming conventions in the names of the files—for example, in the application adapter definition in the next section, it creates a file named app/adapters/application.js and exports the following:
export default DS.RESTAdapter.extend({
namespace: 'api'
});
We get a module called adapters/application. Using the resolver, when Ember looks up the application adapter using this key, it will return this exported object as a module.
For more details on how the resolving dependencies works with the ES6 Module Transpiler and export default syntax, read more here: https://github.com/square/es6-module-transpiler#default-exports.
For more details on how the resolving dependencies works in EAK, read more here: http://iamstef.net/ember-app-kit/guides/using-modules.html.
For more details on how the resolving dependencies works in Ember CLI, read more here: http://iamstef.net/ember-cli/.
Finally, we need to change our application adpater to extend DS.RESTAdapter rather than DS.FixtureAdapter found in adapters/application.js. And while we are at it, let’s also add a namespace to match the Express route:
export default DS.RESTAdapter.extend({
namespace: 'api'
});
See the change in this commit.
As we have done in the beginning chapters, let’s replicate some of the work we have already done. If you were following along, this should make sense to you.
Create an Activity model in app/models/activity.js:
var Activity = DS.Model.extend({
display_id: DS.attr('string'),
type: DS.attr('string'),
display_name: DS.attr('string'),
hotttnesss: DS.attr('number'),
timestamp: DS.attr()
});
export default Activity;
See the change in this commit.
Now, we can update the router to include an activities resource:
var Router = Ember.Router.extend();
Router.map(function() {
this.route('component-test');
this.route('helper-test');
this.resource('activities');
});
export default Router;
And create an ActivityRoute in app/routes/activities.js:
export default Ember.Route.extend({
model: function() {
return this.get('store').find('activity');
}
});
See the change in this commit.
To finish this off, we should add a basic activities handlebars template to iterate over the data within our HTML. Let’s create:
<h4>Total Activity Records: {{model.length}}</h4>
<ul>
{{#each model}}
<li class="activity">{{this.id}}</li>
{{/each}}
</ul>
See the change in this commit.
Now, when the model() hook is called when transitioning into the /activities route, the store is “smart” enough to use the RESTAdapter, as shown in Figure 8-1.
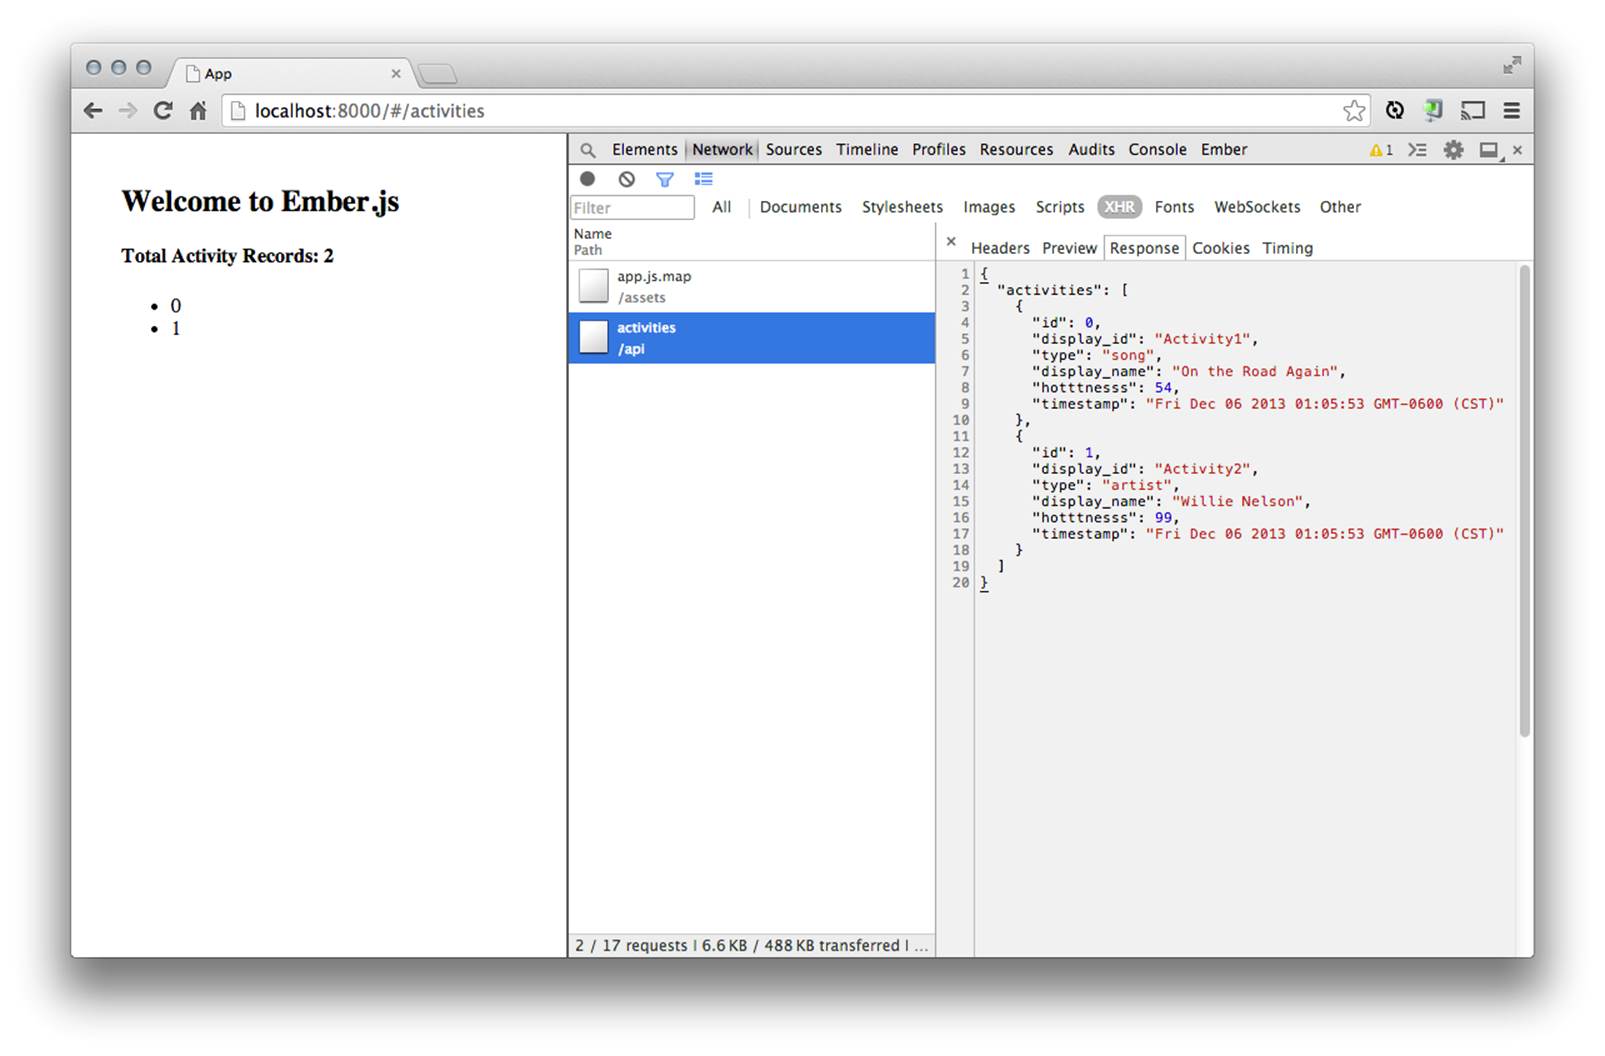
Figure 8-1. Activity data and the RESTAdapter
As mentioned in the Preface and alluded to throughout this text, as pro developers, we should be very interested in optimizing our workflow and finding efficiencies in our development process. Failing to point out aspects of Ember’s modularity and their impact on real-world projects, would be missing some of the most impressive aspects of Ember and Ember Data.
That being said, there are three important concepts to take notice of here: first, switching the adapter was as simple as extending from a different class; and perhaps even more importantly, the rest of our code did not change. Second, we have provided a fully functioning specification to our backend developers. In rapid-application-development world, this is far more valuable than a documented API or a formal data diagram. Finally, our backend developers are working in parallel, and once they have an API server set up, we can switch our Ember application to point to it instead by opening our manifest file, package.json, and setting APIMethod to proxy:
{
"name": "app-kit",
"namespace": "appkit",
"APIMethod": "proxy",
...
Then, we need to provide a URL to pass all the API calls to:
{
"name": "app-kit",
"namespace": "appkit",
"APIMethod": "proxy",
"proxyURL": "http://whatever.api:3232",
...
Well, there is a lot of “goodness” here. Now let’s take a look at what another popular web framework, Ruby on Rails, can offer us as an alternative.
Why Use Rails?
Let me first start off with the statement that there is no magical bullet in web application development. Framework choice is often based upon the experience of the development team and its appetite to risk trying something new versus reaping the efficiencies of coding in a framework in which it’s already familiar.
That being said, if Ruby or Rails are your things, there are a number of features that can make Ember and Ember data backend development easier:
§ Rails helps you manage your Ruby code, server-side MVC.
§ Active Record provides an ORM for interacting with your data.
§ Rails Asset Pipeline and the ember-rails gem help you manage your assets.
§ Active Model Serializers provide the REST API that the Ember Data RESTAdapter expects by default.
§ Testing is built-in.
Let’s take a closer look. In this section, we will accomplish two main goals:
§ Use Rails MVC to deliver a single page that contains our necessary Ember dependencies
§ Develop simple RESTful Web Services for our Activity model that can communicate with Ember Data.
Managing Dependencies with RVM (Ruby Version Manager) and Bundler
To keep our application’s dependencies in order, we need to use a couple of tools. This is a simple process that can save you hours in the long run.
To begin, we will need to install RVM (Ruby Version Manager). Fortunately, the RVM documentation is fantastic and available here: http://rvm.io/rvm/install.
Then, install and use Ruby 2.0:
$ rvm install 2.0.0-p353
$ rvm use 2.0.0-p353
Next, we create a gemset (think of a gemset as an isolated set of your Ruby dependencies):
$ rvm gemset create rocknrollcall-rails
and run the following:
$ rvm --ruby-version use 2.0.0-p353@rocknrollcall-rails
This generates two files:
§ .ruby-version
§ .ruby-gemset
These files automatically set your environment to these when you migrate to the root of the application directory. These configurations can be versioned; so when a new developer clones your repository, her RVM automatically reads from these properties.
Now, to double-check ourselves, let’s confirm that we are using the correct gemset. The following command should return the name that we just created (in our case, rocknrollcall-rails):
$ rvm gemset name
rocknrollcall-rails
Now we can install Bundler and run bundle:
$ gem install bundler
Installing Rails
It’s time now to install Ruby on Rails:
$ gem install rails
and verify the install:
$ rails -v
Generating the Initial Application
Let’s generate a basic Ruby on Rails application:
$ rails new rocknrollcall-rails
This should create the following directory structure:
$ ls
app/
bin/
config/
db/
lib/
log/
public/
test/
tmp/
vendor/
config.ru
Gemfile
Gemfile.lock
Rakefile
README.rdoc
Now you can start your application server:
$ cd rocknrollcall-rails
$ rails server
and visit localhost:3000. You should see your basic Rails application, as shown in Figure 8-2.
See the change in this commit.
Updating the Gemfile
If you open the current Gemfile, you will see that by default, you have quite a few gems being loaded. The following is all you will need, so you can remove the others:
source 'https://rubygems.org'
ruby '2.0.0'
# Bundle edge Rails instead: gem 'rails', github: 'rails/rails'
gem 'rails', '4.1.1'
# Use sqlite3 as the database for Active Record
gem 'sqlite3'
# Use Uglifier as compressor for JavaScript assets
gem 'uglifier', '>= 1.3.0'
# Use jquery as the JavaScript library
gem 'jquery-rails'
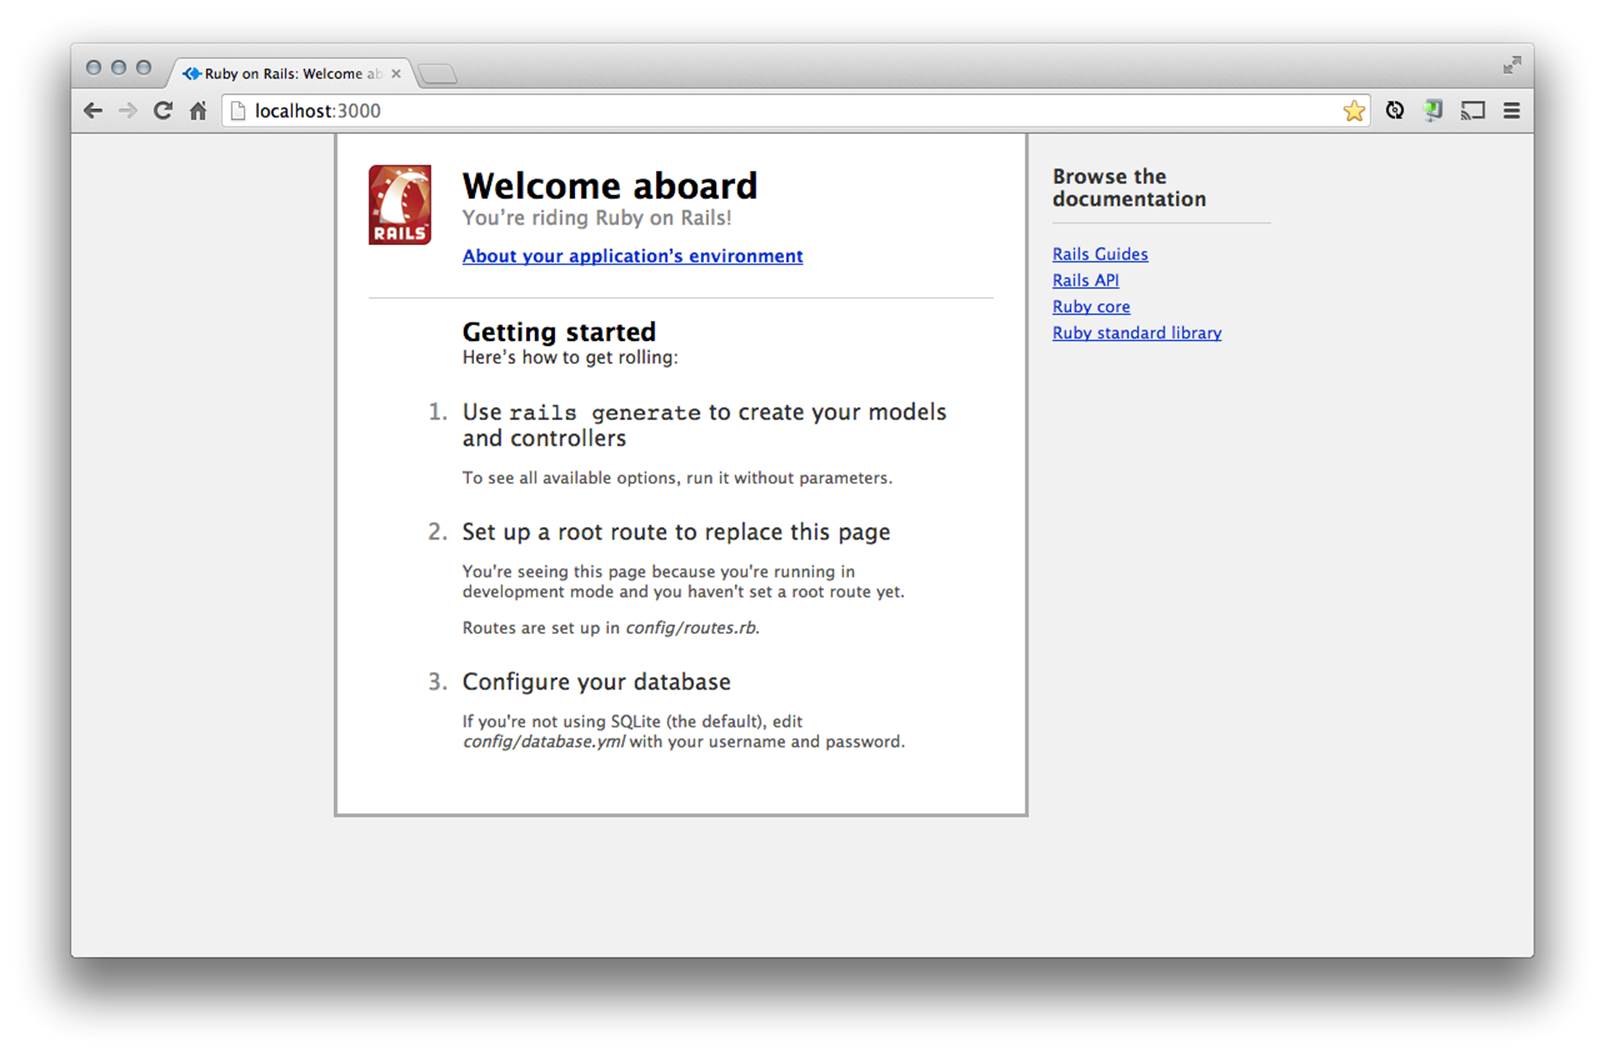
Figure 8-2. Basic Rails application
Now run bundle to install the right gems:
$ bundle update
See the change in this commit.
Removing TurboLinks
Be sure this was removed from our Gemfile in the previous section:
gem 'turbolinks'
TurboLinks is JavaScript that is included by default in Rails applications. TurboLinks scans your HTML on page load for links and sets up an event listener that intercepts the default action of each click event. The “page” is then fetched via XMLHttpRequest, replacing only the body of the page with the response. Then, it uses PushState to change to mimic a traditional URL.
This functionality is very redundant to the way in which the Ember router manages the state of your application. Therefore, we need to remove this functionality altogether.
Remove the following from application.js:
//= require turbolinks
And finally, remove "data-turbolinks-track" ⇒ true from application.html.erb:
<!DOCTYPE html>
<html>
<head>
<title>Rocknrollcall-Rails</title>
<%= stylesheet_link_tag "application", media: "all" %>
<%= javascript_include_tag "application" %>
<%= csrf_meta_tags %>
</head>
<body>
<%= yield %>
</body>
</html>
See the change in this commit.
Understanding Rails MVC and the Single-Page Application
For the purposes of this type of application, we’ll replace the contents of the default index.html file with our Ember app.
We won’t attempt to recreate the Rails Guides available from the Ruby on Rails community, so for a complete understanding of Ruby on Rails, the guides are great place to start.
For our needs, we will be using a very light implementation of Rails. Most of our application will exist in JavaScript, and the Rails server will provide our RESTful web services.
First, migrate to our new application directory:
$ cd rocknrollcall-rails
We can remove the default page, if it exists:
$ rm public/index.html
Removing public/index.html
In later versions of Rails, it is no longer necessary to remove public/index.html manually. The welcome page is now managed within the Rails gem: .rbenv/versions/2.0.0-p353/lib/ruby/gems/2.0.0/gems/railties-4.0.0/lib/rails/templates/rails/welcome/index.html.erb.
Now, it’s time to generate our first Rails controller. Rails controllers are very different than Ember controllers. In Rails, the controller receives the request, interacts with a model to read or write data, and syncs that data with a view to create HTML output. As described in Chapter 6, Ember controllers are different, as they exist primarily to store transient data (whether standalone or made up of data retrieved from models) or to decorate your models with display logic.
We will use Rails built-in generators to create one action, index, on our home controller. It is here, and also in the views, that you will begin to see the most difference between our modern, single-page web application and a traditional web application.
In a traditional architecture application, each controller would contain numerous actions returning an HTML page, most with web forms, for each action to be performed on the controller.
In the case of our modern web application, we will only need a single page. This is where the term single-page application comes from. Single-page application architecture actually employs dual MVC architecture, in that you have models, views, and controllers written in both the server-side language (in this case, Ruby) and also in JavaScript. As you will see, our MVC implementation will be light on the server, and most of our complexity will be managed in the client-side MVC:
$ rails generate controller home index
create app/controllers/home_controller.rb
route get "home/index"
invoke erb
create app/views/home
create app/views/home/index.html.erb
invoke test_unit
create test/controllers/home_controller_test.rb
invoke helper
create app/helpers/home_helper.rb
invoke test_unit
create test/helpers/home_helper_test.rb
The HomeController should now have an index action:
class HomeController < ApplicationController
def index
end
end
By convention, there is also an index.html.erb file located in views/home/:
<h1>Home#index</h1>
<p>Find me in app/views/home/index.html.erb</p>
See the change in this commit.
Now update your routes.rb file by setting the root to point to the index action on the StaticController:
Rocknrollcall::Application.routes.draw do
get "home/index"
root :to => 'home#index'
end
The index view for the application should now look like Figure 8-3.
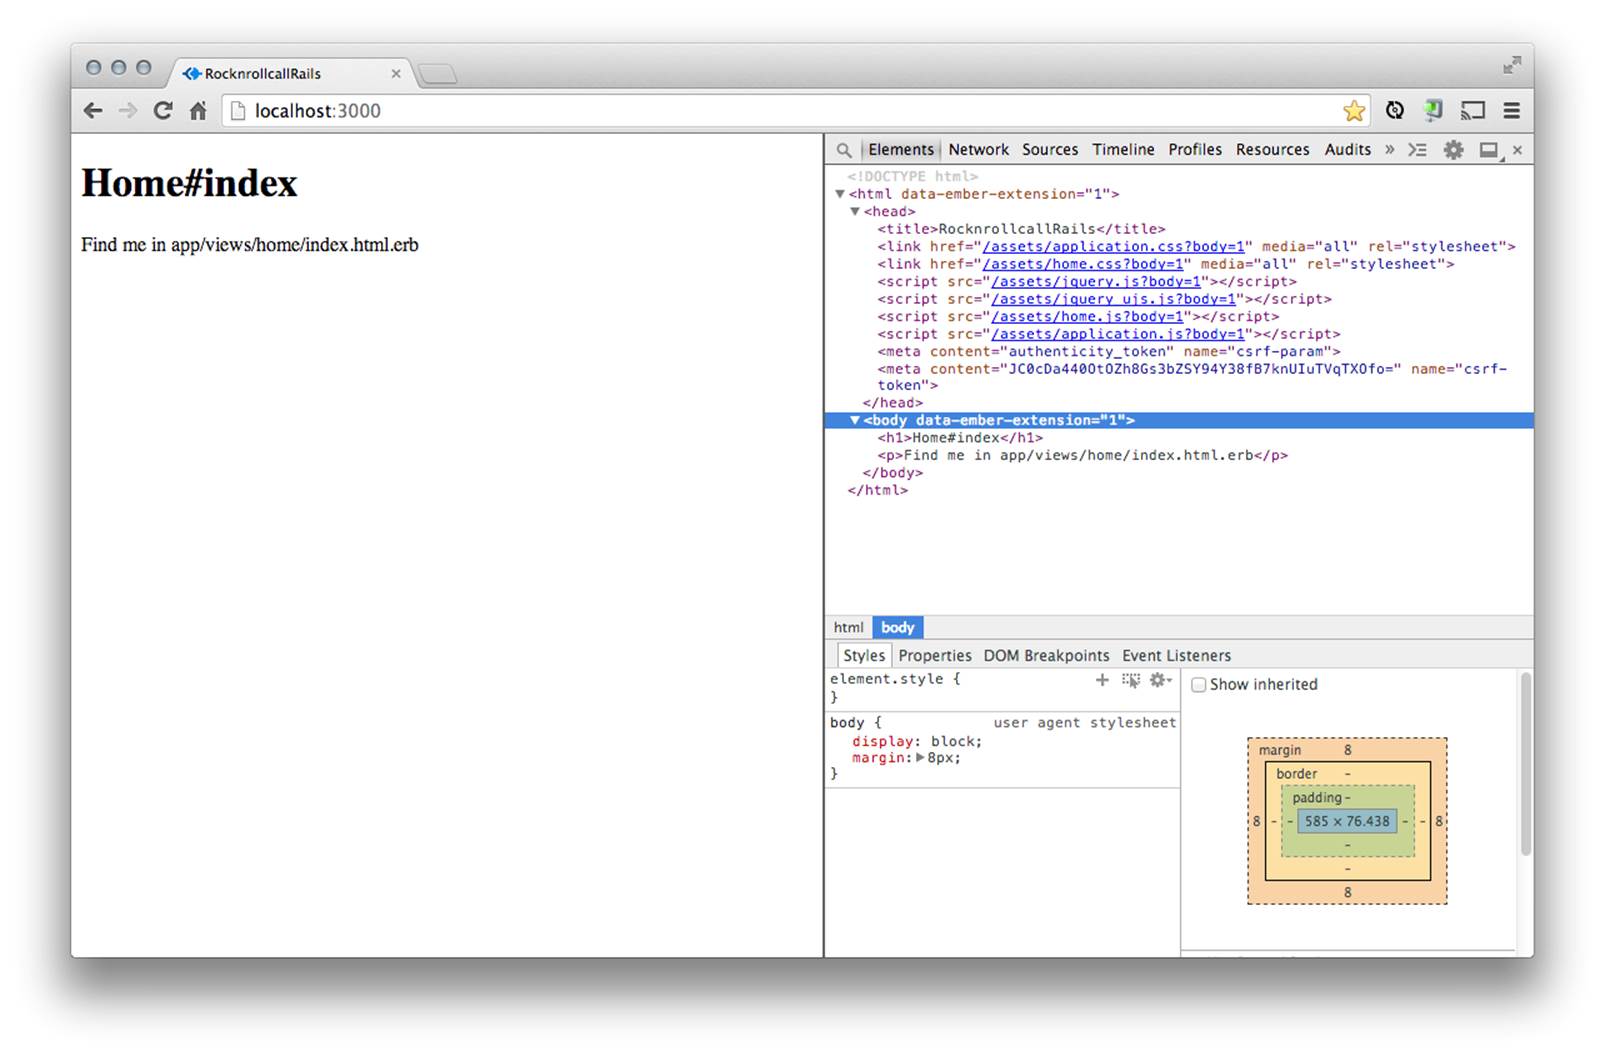
Figure 8-3. The home index view for our SPA
See the change in this commit.
Running Tests
For now, it is not important that you understand completely how Rails helps with managing tests. Ember testing will be discussed in more detail in Chapter 10.
What is important is that you get in the practice of running your test suites prior to committing your code. So, let’s do just that.
But first, you need to run the rake db migrations task to create your test database:
$ rake db:migrate
Then, run your tests:
$ rake test
Run options: --seed 15945
# Running tests:
Finished tests in 0.049580s, 20.1694 tests/s, 20.1694 assertions/s.
1 tests, 1 assertions, 0 failures, 0 errors, 0 skips
Adding Ember
Add the gem to your application Gemfile:
gem 'ember-rails'
gem 'ember-source', '1.0.0.rc6' # or the version you need
gem 'handlebars-source', '1.0.0.rc4' # or the version you need
Install the dependencies:
$ bundle install
See the change in this commit.
You should see a few new gems installed:
Installing active_model_serializers 0.8.1
Installing handlebars-source 1.0.0.rc4
Installing ember-source 1.0.0.rc6
Installing barber 0.4.2
Installing ember-data-source 0.14
Installing ember-rails 0.14.1
Then, in your environment files (i.e., development.rb, production.rb), configure the Ember variant (this is optional—if you don’t configure this, the version of Ember used defaults to development when the Rails environment is in development, and similarly for production):
config.ember.variant = :development # or :production
Finally, generate the Ember.js application structure. Ember.js apps are not required to follow an organized file structure. The follwing generator will create the necessary stubbed dependencies in app/assets/javascripts:
$ rails generate ember:bootstrap
insert app/assets/javascripts/application.js
create app/assets/javascripts/models
create app/assets/javascripts/models/.gitkeep
create app/assets/javascripts/controllers
create app/assets/javascripts/controllers/.gitkeep
create app/assets/javascripts/views
create app/assets/javascripts/views/.gitkeep
create app/assets/javascripts/routes
create app/assets/javascripts/routes/.gitkeep
create app/assets/javascripts/helpers
create app/assets/javascripts/helpers/.gitkeep
create app/assets/javascripts/components
create app/assets/javascripts/components/.gitkeep
create app/assets/javascripts/templates
create app/assets/javascripts/templates/.gitkeep
create app/assets/javascripts/templates/components
create app/assets/javascripts/templates/components/.gitkeep
create app/assets/javascripts/mixins
create app/assets/javascripts/mixins/.gitkeep
create app/assets/javascripts/rocknrollcall_rails.js
create app/assets/javascripts/router.js
create app/assets/javascripts/store.js
The generator will also add the necessary bootstrapping to app/assets/javascripts/application.js. By default, it uses the Rails application’s name and creates a rails_app_name.js file to set up application namespace and initial requires:
//= require handlebars
//= require ember
//= require ember-data
//= require_self
//= require rocknrollcall-rails
RocknRollCallRails = Ember.Application.create();
Now, you should see the necessary dependencies included in your web application, like Figure 8-4.
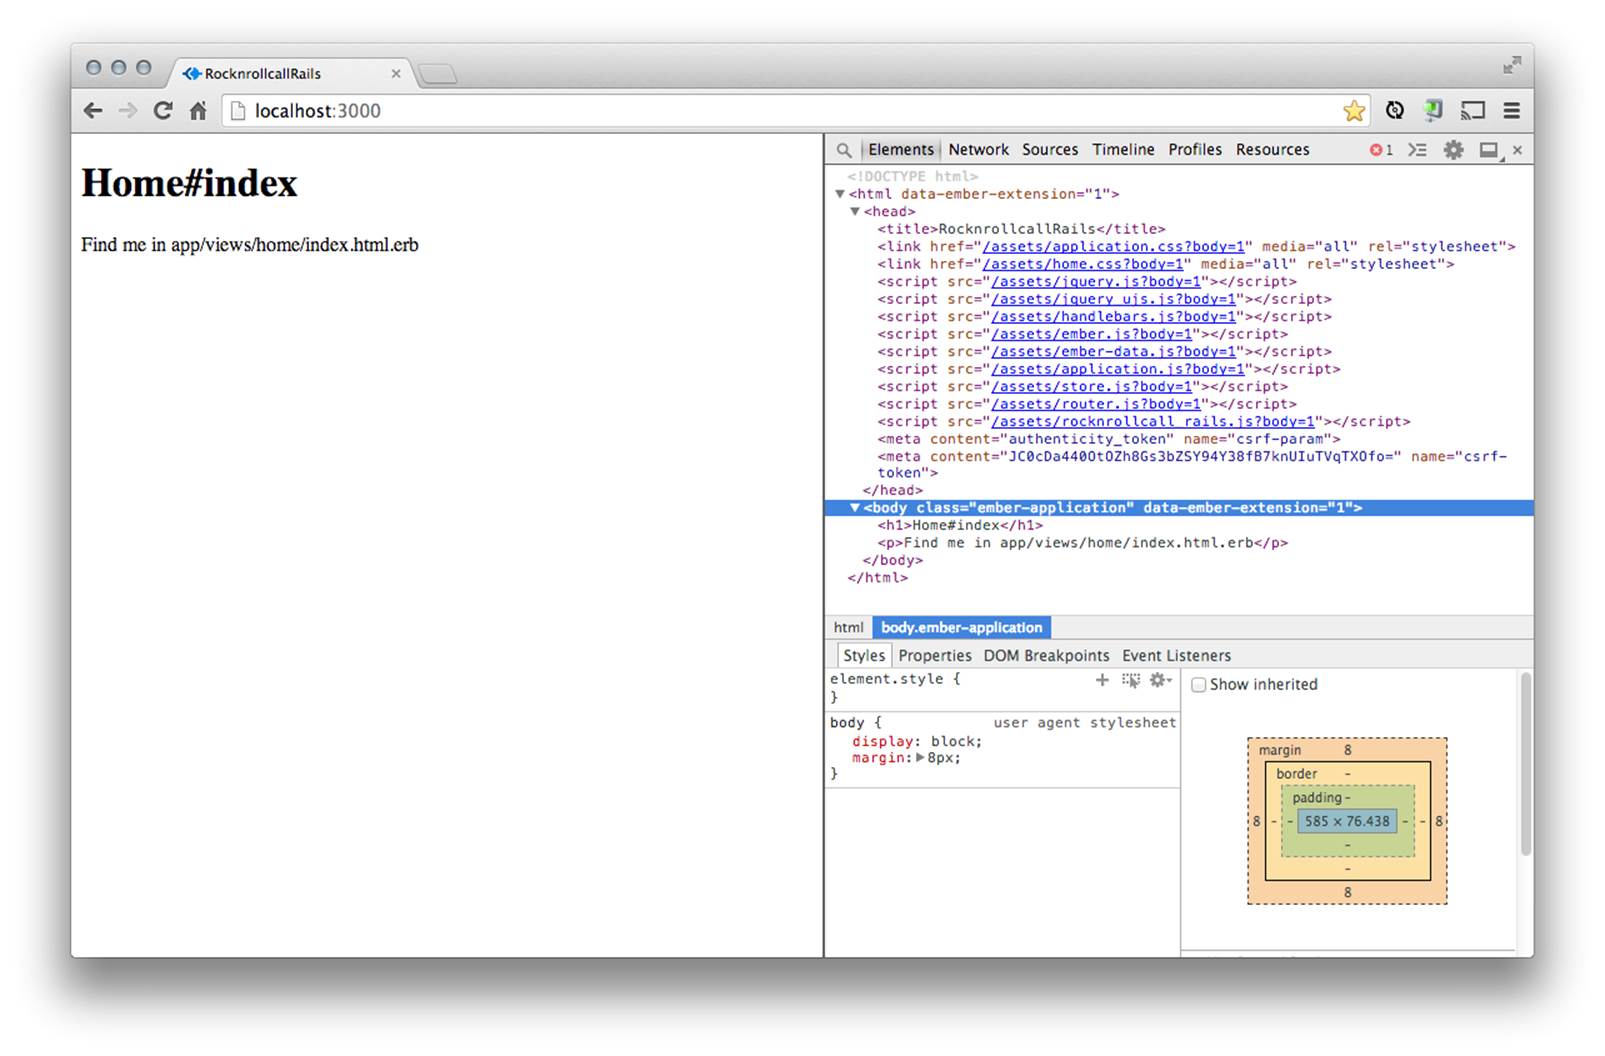
Figure 8-4. The home index view SPA with Ember included
Later, if you want to update to the latest builds of Ember and Ember Data, first kill your server. On both Windows and Mac OS X, press Ctrl+C. Then, run:
$ rails generate ember:install --head
Now, be sure to run the available tests:
$ rake test
Run options: --seed 22801
# Running tests:
Finished tests in 0.144108s, 6.9392 tests/s, 6.9392 assertions/s.
1 tests, 1 assertions, 0 failures, 0 errors, 0 skips
And finally, don’t forget to restart your server.
See the change in this commit.
jquery-rails Versions
At the time of this writing, you will receive the following error if you use the latest jquery-rails gem:
Assertion failed: Ember Views require jQuery 1.7, 1.8, 1.9, 1.10, or 2.0
gem "active_model_serializers"
To fix this, add in an earlier version of jquery-rails gem that uses jQuery 1.10:
# Use jquery as the JavaScript library
gem 'jquery-rails', "3.0.3"
$ bundle update
See the change in this commit.
Active Model Serializers
You may have noticed in your console output earlier, after running bundle update with the ember-rails gem, that the active_model_serializers gem was installed as a dependency:
Installing active_model_serializers 0.8.1
ActiveModel::Serializers make the formatting of our JSON API easier by helping us build JSON APIs through serializer objects. They not only provide some syntactical improvements but also a dedicated place to fully customize the JSON output.
More to come once we have a model, route, and controller set up.
Generating the Activity model and controller
First, we need to generate a new controller with an index action (later in our application development, it will be necessary to add the remaining actions necessary to create, update, and delete Activities, but for now we will only need to provide read-only services to Ember Data):
$ rails g controller Activities index
which generates the following file:
class ActivitiesController < ApplicationController
def index
end
end
And we can update it with a simple render command that requests JSON as the format and all of the Activity models records in the database:
class ActivitiesController < ApplicationController
def index
render json: Activity.all
end
end
See the change in this commit.
And, also generate the Activity model, by using the built-in scaffolding provided by Rails. In the following command, we can generate an Activity model and pass attributes along with their datatype. Rails will automatically add these attributes to the activities table in the database and map it back to the Activity model:
$ rails g model Activity display_id:string searchresults_type:string display_name:string
timestamp:datetime hotttnesss:decimal
See the change in this commit.
Now we need to run our database migrations. Database migrations provide an easy and consistent way to version your database schema over time.
Fortunately, the generate model command also created this migration for us—all we have to do is execute it!
class CreateActivities < ActiveRecord::Migration
def change
create_table :activities do |t|
t.string :display_id
t.string :searchresults_type
t.string :display_name
t.datetime :timestamp
t.integer :hotttnesss
t.timestamps
end
end
end
To execute it, we again use a rake task:
$ rake db:migrate
Finally, we have new tests that were generated for us. So, let’s run them and commit our changes:
$ rake test
Run options: --seed 21992
# Running tests:
........
Finished tests in 0.254310s, 31.4577 tests/s, 55.0509 assertions/s.
2 tests, 2 assertions, 0 failures, 0 errors, 0 skips
Generating and configuring our serializers
As mentioned earlier, now that we have an Actvity model and a Controller, we have enough to return JSON data our Ember client.
One thing you may have noticed is that type is a reserved word and really shouldn’t be used as a property on a model. Let’s change this to searchresults_type because this is actually an opportunity to demonstrate the kind of serializations you can do with our activity serializer.
Here, we need to make the key in the outputted JSON be different from its name in ActiveRecord, searchresults_type. To do so, we declare the attribute with a different name and redefine that method. Now, our Ember application can remain as is, utilizing the type attribute on the frontend.
First, let’s generate a serializer:
$ rails g serializer activity
See the change in this commit.
Then, configure it:
class ActivitySerializer < ActiveModel::Serializer
# look up searchresults_type on the model, but use type in the JSON
def type
object.searchresults_type
end
attributes :id, :display_id, :type, :display_name, :hotttnesss, :timestamp
end
See the change in this commit.
Updating the router
Now, we can tell our router that we have a resource available at the URL /activities. Like a lot of tasks, this is really simple in Ruby on Rails. Just open up config/routes.rb and change the declaration to call the index method on the activities controller:
get "activities/index"
to a resource declaration:
resources :activities
See the change in this commit.
Seeding data
Rails provides a simple way to seed our database with a few Activity objects. First, create some objects within db/seeds.rb:
Activity.create(
:display_id => 'Activity1',
:searchresults_type => 'song',
:display_name => "On the Road Again",
:timestamp => "Fri Dec 06 2013 01:05:53 GMT-0600 (CST)",
:hotttnesss => 54
)
Activity.create(
:display_id => 'Activity2',
:searchresults_type => 'artist',
:display_name => "Willie Nelson",
:timestamp => "Fri Dec 06 2013 01:05:53 GMT-0600 (CST)",
:hotttnesss => 99
)
And be sure to run the task to push the data into the database:
$ rake db:seed
Now, you should be able to start your server and access the data through a web service call to http://localhost:3000/activities:
$ rails server
See the change in this commit.
The results should look something like Figure 8-5.

Figure 8-5. Activities RESTful web service
Wrapping Things Up
In this chapter, we used two different web app frameworks to move our backend from local storage to a remote database using the Ember Data RESTAdapter and RESTful web service endpoints. By using Ember App Kit’s built-in Node.js/Express.js implementation, we were able to migrate to the RESTAdapter through configuration changes.
We also showed how to configure Ruby on Rails to deliver a single page and added active model serializers to format our JSON output.
All materials on the site are licensed Creative Commons Attribution-Sharealike 3.0 Unported CC BY-SA 3.0 & GNU Free Documentation License (GFDL)
If you are the copyright holder of any material contained on our site and intend to remove it, please contact our site administrator for approval.
© 2016-2026 All site design rights belong to S.Y.A.