JavaScript Application Design: A Build First Approach (2015)
Part 1. Build processes
Chapter 3. Mastering environments and the development workflow
This chapter covers
· Creating build distributions and workflows
· Setting up application environments
· Building secure environment configuration
· Automating first-time setup
· Using Grunt for continuous development
We spent the last chapter going over what to do and what not to do during builds. We covered build tasks and configured different targets in them. I also hinted at how your workflow differs according to whether you build your application for debug or release distributions; these differences in your build workflow, based on either debug or release goals of your target environment, are called build distributions.
Understanding the interaction between development, staging, and production environments and build distributions is vital to creating a build process that can be used regardless of environment, allowing you to develop your application in a setting loyal to what your end users will see, but that can still be debugged with ease. Additionally, this understanding will allow you to create middle-tier environments, which are instrumental to robust deployment mechanisms, which we’ll discuss in the next chapter.
In this chapter we’ll start off learning what we mean by environments and distributions, and I’ll propose a typical configuration that should suffice for most use cases, where you’ll have your
· Local development environment, used to improve the application on a daily basis
· Staging or testing environment, dedicated to making sure no issues would arise from deploying to production
· Production environment, which is the one customers have access to
Then we’ll look at different approaches to take when configuring an application under different contexts. You’ll learn how to automate the oftentimes tedious first-time setup, and then have fun setting up a continuous development workflow using Grunt. Let’s get started.
3.1. Application environments
In the previous chapter we talked a bit about environments, but we didn’t detail the options you have when it comes to setting up new ones or how they differ from one another.
The development environment is where you spend most of your time, working on a local web server, which is often configured in such a way to allow debugging, reading stack traces, and getting diagnostics more readily than other environments. The development environment is also the environment that’s closest to the developers and the source code they write. The application used in this environment is almost always built using the debug distribution, which is fancy talk for setting a flag that will allow you to turn on certain capabilities, such as debug symbols, increased logging (or logging verbosity), and so on.
The staging environment is where you make sure everything works correctly on a hosted environment and that you can deploy to production with confidence that nothing will break. In the production environment, you’ll almost always want to build for the release distribution, as that build flow will be designed to optimize your application and squeeze as many bytes as possible out of your static assets.
Now let’s look at how you can configure your build distribution for each of these environments, tuning the distribution’s output to meet your specific goals: either debug or release.
3.1.1. Configuring build distributions
To help understand build distributions, think of application building like working in a bakery. When you’re preparing the mixture for a cake, there’s a myriad of pans you might use to hold the batter. You can use a standard round cake pan, a square baking dish, a loaf pan, or whatever’s available to you. These pans are like tools in the development environment, which would be your kitchen. The ingredients are always the same: flour, butter, sugar, a pinch of salt, cocoa powder, eggs, and half a cup of buttermilk. The ingredients you use to build your cake are akin to assets in your application.
Furthermore, the ingredients are combined into a recipe that indicates how to mix them together: when, in what quantities, and how long you should store the mix in the fridge to get a good consistency before putting it in the oven at a well-defined temperature. Choosing different recipes can result in a spongier cake or a crustier one, the way choosing different distributions results in an application that’s easier to debug or performs better.
While you’re trying out different ways to put together your mixture, you might change the ingredients (your assets), and maybe even the recipe (your distribution), but you’ll still do the work in your kitchen (the development environment).
Eventually you get better at baking, and you attend competitions. You’re provided with professional tools in a different setting (a new environment), given guidelines, and expected to bake a cake with what you have. You might pick the ingredients yourself, you might choose to use syrup to give the cake a final touch, and you might want to cook the mixture for a little longer than you do in your own kitchen. These changes to the recipe are influenced by the environment you’re working in, as it may affect your decision on what recipe to use, but you can still use any recipe you want in any environment you see fit!
Note that build distributions are constrained to either debug or release, although you can have any number of different environments configured to use either of those distributions, as you deem necessary. Environments don’t have a one-to-one relationship with build distributions. You may have a preferred distribution for each environment, but that doesn’t mean the preference is set in stone. For instance, in your development environment you’ll typically use the debug distribution, as that yields more productivity in your day-to-day activities. However, you might want to occasionally try the release distribution in your development environment, to be sure it works as expected regardless of the environment, before deploying to production.
Determining which build distribution to use
It’s hardly possible for you to be ready to bake a cake in any kitchen: different ovens, pans, and skillets might not be the tools you’re comfortable with. Similarly, the build process doesn’t have much control over which environment it’s targeting. But you can determine the appropriate build distribution based on the purpose of the target environment; either
· Debugging purposes, where you aim to rapidly develop and debug your application
· Release purposes, where your goals are performance and uptime
These purposes determine your build distributions. In your development environment, you’ll use a distribution that’s better tuned to meet your development needs, and that mostly comes down to finding problems and resolving them. This is the debug distribution. Later in the chapter, you’ll look at ways to improve the flow to go beyond simple debugging, also enabling true continuous development that runs specific build tasks whenever the code that involves a task changes.
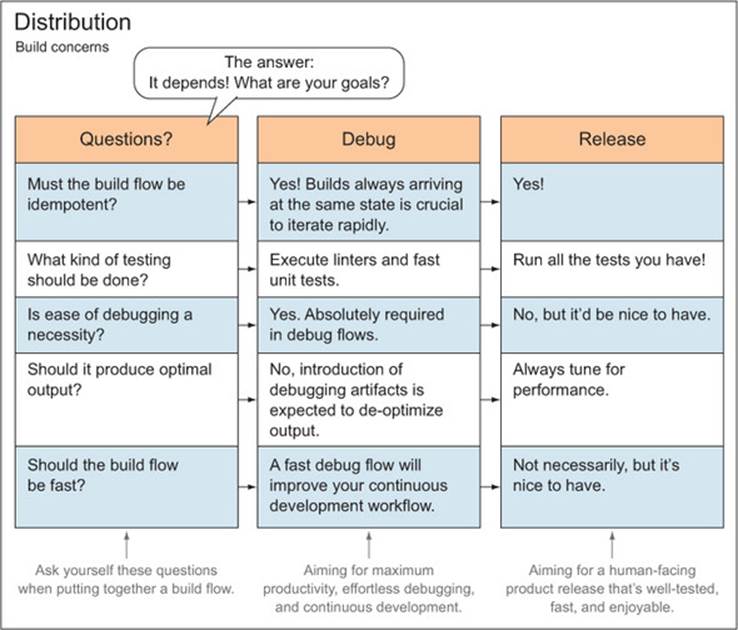
Figure 3.1 displays how build distributions answer questions about the type of goals you want to accomplish, using configuration to define a build flow.
Figure 3.1. Build distributions and how they define your build flow to fulfill specific goals
Build distributions for Production environments
On the farthest end of the spectrum, far from the development environment, you have the production environment. Returning to our baking analogy, in this case, you’ll aim for high-end, quality cakes that paying customers love, and that can only be baked by using the best recipes you have. Production is the environment that ultimately serves the application to real end users, manipulating data they provide.
This is in contrast to the development environment, where you should use mostly fake dummy data, although similar in appearance to real customer data. Production environments will rarely be built with a distribution other than release. This distribution usually regards performance as the most important factor, and as you saw in chapter 2, that might mean minifying and bundling static assets, producing spritesheets out of your icons, and optimizing your images, but we’ll cover those topics in chapter 4. Although the production environment shouldn’t use debug builds, you should definitely make sure the release build process works in your development environment.
Build Distributions for Staging Environments
In between development and production, you might have a staging environment; its goal would be to replicate, as much as possible, the configuration used in production (although not affecting user data or interacting with services used in production). The staging environment will commonly be hosted somewhere other than on a local machine. Think of this as working as a baker: you might want to bake cakes that hold up to a certain quality, regardless of the kitchen you’re working in.
A staging environment might involve working somewhere other than your own kitchen, but it wouldn’t be in a restaurant’s kitchen, either. Maybe you want to bake a treat for a friend, so you use her kitchen instead. Staging environments attempt to bring production and development to a middle ground, meaning they try to stay as close to both environments as possible. For this purpose they might periodically get a curated version of the production database (by curated I mean sensitive data, such as credit cards or passwords, must be stripped off or blanked). You’ll pick a distribution for this environment based on what you’re testing, but you’ll generally default to release, because that’s closer to the production environment.
The real purpose of having a staging environment is to allow for quality assurance (QA) engineers, product owners, and others to test the application before it goes live to production. Given that staging is basically the same as production, except it’s inaccessible to end users, your team can quickly identify issues in the upcoming release without compromising the production environment, and with certainty that it’ll work as expected on a hosted environment.
Let’s swim in code for a moment and consider how you can use distributions to approach build configuration so your build tasks adequately portray which build flow (debug or release) they belong to.
Distributions in Grunt Tasks
In chapter 2 we went over a few build tasks and their configurations, but they were mostly standalone and not part of a flow. With build distributions, you’ll improve your build process by assigning each task the intent of using it in a given build flow. Are you aiming for debugging quality or smaller file sizes and fewer HTTP requests? Well, if you start using naming conventions in your Grunt tasks and aliases, the answer will become much easier for you to deduce.
As a general rule, I propose you call your build targets debug or release based on what distribution the task target is geared toward. General purpose tasks such as JSHint don’t need to abide by this convention, and you can still call your targets names such as jshint:client,jshint:server, and jshint:support. You could use the support target for the remainder of the code base, which isn’t server- or client-related, but mostly build- or deploy-related.
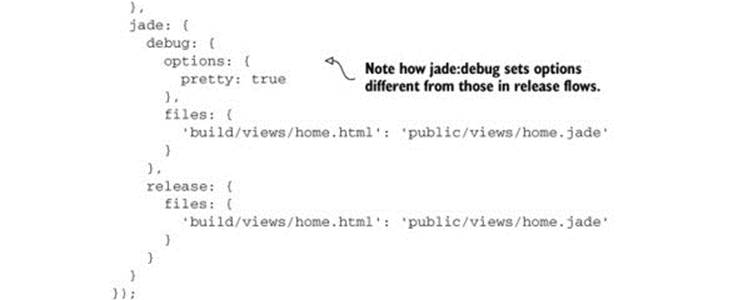
Considering this convention, you may see yourself having a series of tasks such as jade:debug and less:debug, which you could then bundle together in a build:debug alias. The same could apply to release, clearly separating your build flows in code as well as in your thinking. The following listing (sample 03/01_distribution-config) shows what this would be like in code.
Listing 3.1. Distributed build configuration
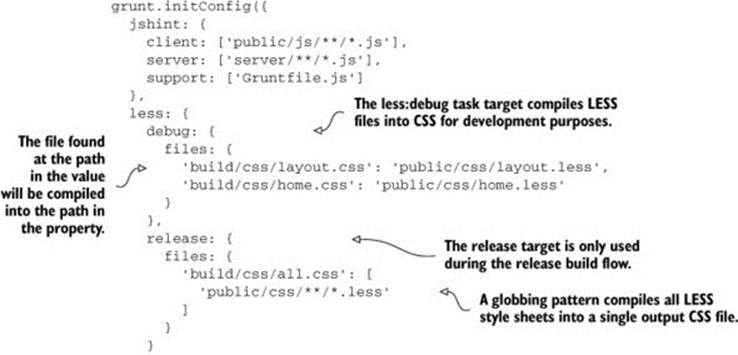
Using this kind of separation, it’s easy to create aliases to build the application for either distribution. Here are a couple of sample aliases:
grunt.registerTask('build:debug', ['jshint', 'less:debug', 'jade:debug']);
grunt.registerTask('build:release', ['jshint', 'less:release',
'jade:release']);
You can look for the fully working code listing example in the accompanying source code repository. Remember, these are organized by chapter, so look for the 01_distribution-config folder under chapter 3.
This provides an excellent base for you to build on. You can keep iterating on each of these flows, possibly reusing tasks, such as jshint in this example, adding more tasks to both distributions or maybe to one of them in case it only applies to one flow. For example, you’ll want to keep tasks such as updating the change log in the release flow, because the product to be released might change across debug builds, and you need to accompany your deployment with documentation about all the changes introduced. We’ll come back to the topic, looking at debug distribution-specific tasks later in the chapter. Release-specific tasks are analyzed in chapter 4.
You’ve now learned what build distributions are and how they define the different flows created when putting together a build process; let’s turn our attention to the application configuration within each environment, or what I call environment-level configuration.
3.1.2. Environment-level configuration
Environment configuration is separate from build distributions, and the distinction is clear: build distributions determine how your application should be built. They shouldn’t bear any weight in the application itself, but only affect the build process, or more concretely, the build flow you follow. Environment configuration, in contrast, is environment-specific.
Environment-level configuration: what does it include?
Moving forward, whenever I mention configuration in this chapter, I’m referring to environment-level configuration, unless otherwise noted. By environment-level configuration I mean values such as
· Database connection strings
· API authentication credentials
· Session encryption secrets
· The port your web server listens on for HTTP requests
These kinds of configuration values tend to contain mostly sensitive data. I strongly discourage merrily packaging these kinds of secrets in plain text along with the rest of your code base. Developers shouldn’t have direct access to services, such as your database, and therefore access to user data. It also becomes an attack vector: gaining access to your code repository translates into gaining access into your databases or API secrets, and most frighteningly, accessing your customer’s data.
In this respect, an excellent rule of thumb is to develop your applications as if you were developing open source software. You wouldn’t push sensitive API keys and database connection strings into your publicly available open source repositories, would you?
Figure 3.2 depicts how your application combines build distribution output and environment configuration to serve an application.
Figure 3.2. Environment-level configuration—environments, configuration, and distributions, coming together in an application. Environment configuration consists of secret credentials and any other configuration that might change across environments.
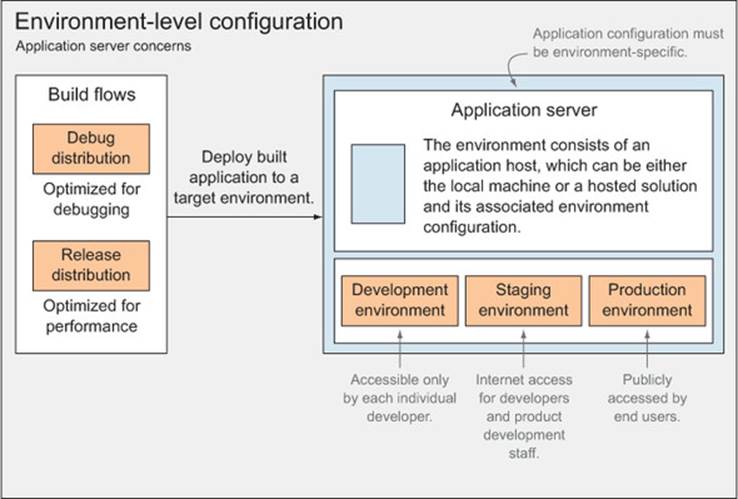
Build flows
As you can see on the left of the figure, the debug and release distributions only affect the build itself, while environment configuration will affect the application directly, after a build is executed, for either debug or release.
Environment-level Configuration
Application configuration must be environment-specific. These environment variables are not to be confused with build distributions, which only affect the build process itself. Application configuration refers to small (and often sensitive) snippets of data such as database connection strings, API keys, encryption secrets, logging verbosity level, and so on.
Although distributions generally don’t contain sensitive data, environment-level configuration often does. For example, an environment’s configuration might have access credentials to a database instance, an API service such as Twitter’s REST API, or maybe a username and a password used to send out emails through IMAP.
But not all environment configuration is sensitive or poses a security threat if leaked. For instance, the application’s listening port and the logging verbosity level, which determine how verbose your logger should be, are both environment-specific, but they’re not sensitive information in the slightest. That being said, you don’t have any reason to treat “safe” configuration differently from sensitive configuration, except that you might include configuration defaults with safe variables, such as the application’s listening port. You should never do that with sensitive data.
You’ll focus on the development environment for now, and move on to staging and production environments in the following chapter.
3.1.3. What’s so special about development?
What’s so different about local development in comparison with other environments? Well, much, and ideally, not so much. The two most remarkable differences are that this is the environment where you’ll spend most of your time, and it doesn’t matter if something stops working; you can always fix it, and nobody else is going to notice it. In contrast, you should spend little time in production, because that probably translates into people not using your product, and if something stops working, that won’t be good, either. We’ll go over measures to mitigate and monitor for problems in release-grade environments in the next chapter.
The Build First approach carries a slew of benefits when it comes to the development environment, and that’s the meat of this chapter. We’ll talk about tools and mechanisms that are famously helpful during development. Let’s save the fun for last; we need to talk about configuration first. We’ll go over your options when it comes to managing, reading, and storing the sensitive data of your environment-level configuration in a sensible way, so as not to expose your secrets to potential intruders.
3.2. Configuring environments
Until now, you’ve established that committing sensitive configuration to your repositories in plain text poses a security risk. In this section we’ll cover how to manage configuration from different sources, such as a file, the database, or application memory. At the same time, you’ll explore different approaches for protecting your configuration data. Please note that the information I’m about to give you isn’t limited to Node.js. I picked that platform because I needed to give you a concrete example of how to configure your environment-level variables, and because this is a JavaScript book. That being said, the environment configuration approaches we’ll discuss can be applied to applications running on any server-side platform you like.
Environment-specific variables
Environment configuration is changing any variable that could change depending on the environment you run your application in. For example, you might need variables with credentials so you can send emails, and you might want to allow an option to send all emails to a catch-all account for debug environments. API keys to services you consume usually change on a per-environment basis, too. Environment configuration is the place where you should keep all of these settings and credentials so you can adjust them for each environment.
More often than I’d like to admit, I’ve worked on projects that shamefully broke this configuration principle and contained configuration for all of their environments directly in their repository. Development, staging, production—they all were fair game. Configuration for each of these was maintained in a separate file, and something such as a string that contains “development” governed which of those files was used. This is bad because of a number of problems:
· First, I can’t stress enough the importance of not packing credentials to your live environments directly in your repositories. That’s exactly the kind of thing that belongs in environment-level configuration.
· Second, you shouldn’t have to repeat configuration values for each environment you have, effectively maintaining the same value in multiple different files; this would be WET code. It doesn’t scale well when you want to add new environments or configuration values to your application.
I’ve also participated in endeavors where configuration was tediously manual: you’d get a brand new code base, ask around for a few credentials to get started, and type them into a single configuration file. If you had to deploy, then you’d manually change those same values again to whatever configuration that satisfied the environment you were deploying to. In the previous case, at least you didn’t have to change configuration around to get your application to work any time you changed environments. You’d change a magic string, setting it to something such as “staging,” and it’d work.
How can you go with that approach without sharing everything with everyone? You might think that’s not a big deal; it’s not as if you’re going to open source your project overnight. But if you’re thinking like that, you’re missing the point entirely. It’s not good practice to give everyone access to potentially sensitive information about your production environment. And there’s no reason to—that configuration belongs with that environment, nowhere else.
Open source software
Experimenting in open source projects, something I vigorously encourage you to try, helped me vastly improve over time the techniques and measures I take to protect sensitive data. I started thinking in a “what if a stranger downloaded my code?” kind of way, and it opened my eyes as to what was fine, and what wasn’t, when it came to pushing code to my repositories.
Let’s start our discussion of configuring environments by talking about waterfall configuration, and then we’ll cover different methods you can use to protect it, namely, encryption and environment variables.
3.2.1. Storing configuration in a waterfall
Waterfall is a method for storing your configuration. It’s as simple as picking a priority that determines the order of importance of these stores as you merge them together. Waterfall is useful because it helps your configuration to be divided in different places but still be part of a whole. A few places exist where you can define your configuration; for example
· Plain text directly in your code base, only meant for data that doesn’t violate your security
· In encrypted files; it’s meant to distribute configuration securely.
· At the machine level, setting operating system environment variables
· Passing command-line arguments to your application at the process level
Keep in mind, you’re configuring the environment, regardless of the level at which you do it; thus, all configuration sources must always be accessed from a single point in your application. This configuration root service should be careful to determine which source is most important when providing a requested value. In the list above, I ordered a few potential configuration sources from lowest to highest priority. For example, a command-line argument setting the port number will overwrite the port number stored in a plain text file within the repository.
Clearly these aren’t the only places where we can store configuration, but they provide a great starting point for any application. I know I’ve severely thrashed plain text, but it’s okay to have a plain JSON file to set up absolute basics, such as the environment name and the port number. Let’s call this one defaults.json:
{
"NODE_ENV": "development",
"PORT": 80
}
This is perfectly reasonable as far as plain text goes. I also encourage keeping a second plain text file, which you might call user.json, to keep personal configuration you might want to use, but not necessarily commit to modifying the defaults. The user.json file is also useful if you need to quickly test with a different configuration:
{
"PORT": 3000
}
As long as it’s encrypted, sensitive configuration can be checked into source control. I advocate using this kind of configuration to share environment defaults among your developers. The reasoning is that instead of having to redistribute a JSON file every time the defaults change, you distribute the key to decrypt the secure file once, and whenever a change is made it’s checked into source control, and the developers can decrypt it using the key they already had.
I should mention that to maximize security, different private keys should be used for each encrypted configuration file. This is particularly important when dealing with one file per environment, because a breach would be chaotic for every environment; in addition, it’ll be easier to change the keys if they’re only used in one place.
You have a few different ways to safely distribute configuration among your environments; we’ll go over a couple of them next. The first one is through encryption, and we’ll go over the process of safely encrypting your configuration files using a concrete example. The second alternative is not to distribute environment configuration files with your code base, but rather to store the configuration solely in the target environment. Let’s start with security through encryption.
3.2.2. Using encryption to harden environment configuration security
To securely transmit configuration within your code base, you need to take a few security measures. First and foremost, you shouldn’t commit decrypted configuration files to source control, as this would defeat the entire purpose of encryption. The same holds true for encryption keys: you should keep these somewhere safe, preferably off the cloud altogether—maybe on a USB pen drive. What you should share in your repositories are the encrypted versions of these files and simple command-line tools to decrypt or update their encrypted counterparts. Figure 3.3 describes this flow.
Figure 3.3. Configuration encryption and decryption flows using private RSA keys
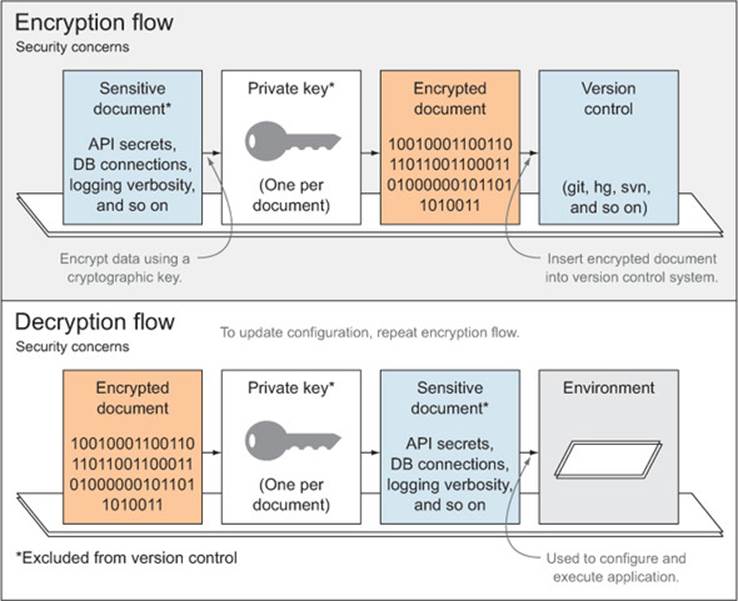
To this purpose, you can set up a couple of folders. For example, use env/private, where you’ll keep the unsecured data that’s been decrypted, and env/secure to store the encrypted files. Because the env/private folder contains sensitive data, it shouldn’t be committed to source control systems. Rather, you’re going to distribute an encryption key by another means; for example, physically giving it to the interested parties. Then the repository will contain tools (Grunt tasks in your case) to encrypt and decrypt each particular file using its corresponding RSA (an encryption algorithm) key. You’ll use three different Grunt tasks for encryption purposes. The first one will generate the private key; the other two will encrypt and decrypt your configuration using that private key.
RSA encryption example
I wrote a fully working example that’s available in the accompanying source code listings, named 02_rsa-config-encryption,[a] under ch03. In that example, you’ll use the grunt-pemcrypt package I wrote, which facilitates the tasks required to deal with encryption and decryption of secure configuration files. We won’t deviate into the code itself, because it’s fairly straightforward to follow and properly documented.
a The code example is available online at http://bevacqua.io/bf/secure-config.
To recap RSA encryption
· Create a private key; don’t share it with anyone.
· Use it to encrypt your sensitive files.
· Transmit the encrypted file with your code base.
· When you need to update the secure file, update the plain one and encrypt it again.
· When someone else copies your code base, they can’t access the encrypted configuration unless you give them the key.
In the next section, let’s look at the pros and cons of taking the alternative route: not encrypting your environment-level configuration but also not distributing it (and your sensitive secrets with it) together with the rest of your application’s code repository.
3.2.3. Setting environment-level configuration at the OS level
When it comes to release environments (staging, production, and anything in between) you might want to configure sensitive values in the environment directly and keep them off your code base. Keeping your configuration off the code base enables you to change it without the need for a full redeployment. Using system-level environment variables is a great way to do that.
This is something I picked up from working with cloud-based hosting solutions (such as Heroku), and it’s convenient to set up. An added benefit of using environment variables is that you don’t need to touch the code base to change its behavior. The downside is that, similar to your previous approach, you don’t have access to most of the configuration when you clone the repository for the first time. An exception to that downside is any unprotected defaults you might have, such as the development environment listen port. That downside, however, is also the goal of taking this route: being unable to deploy a newly cloned repository as is to one of the production environments.
The difference between encrypted file stores and environment-level configuration is that it’s more secure not to share anything with your code base at all, even if it’s encrypted. But the downside of going the environment variables route is that you still need to get the configuration there.
In the next chapter, I’ll introduce Heroku, a cloud hosting Platform as a Service (PaaS) provider, which enables hosting of web applications in the cloud as easily as doing a git push. Heroku uses environment variables for your environment configuration, and they thoroughly documented their philosophy (on web application building, architecture, and scaling) and published it on a website called 12factor.net[1] that everyone should read.
1 12 Factor is an excellent guide to robust application development. Check it out at http://bevacqua.io/bf/12factor.
For local development, you’ll still use a JSON file that doesn’t get committed to source control, and it contains what you would’ve put in the secure JSON file in the previous section. The following is a sample environment JSON file:
{
"NODE_ENV": "development",
"PORT": 8080,
"SOME_API_SECRET": "zE1nMDDqkzDbSDX4fS5acCpllk0W9",
"SOME_API_KEY": "IYOxBMFi34Rkzce7kY4h0GqI"
}
If you want to provision new contributors to your project with a copy of the environment file you use locally, consider going the encryption approach for that one file (the development configuration), and taking the environment variables approach for hosted environments (those that aren’t local to your development machine) to maximize security.
For hosted solutions (such as staging or production), a different approach takes place. Heroku provides a command-line interface that makes it easy to set environment variables.[2] With the example below, you could set the environment to staging so your code can tune the experience to that environment—increased logging, for example, but mostly the same as production:
2 Learn more about configuring your Node.js environments with Heroku at http://bevacqua.io/bf/heroku-cli.
heroku config:add NODE_ENV=staging
The command line should have the last say on what values go where, making it easy to enable small modifications to your environment, such as setting a port or the execution mode (debug or release). Here’s an example of an override that changes the port and the environment:
NODE_ENV=production PORT=3000 node app.js–
Last, let’s go over how you could pull together all the different sources of configuration (environment variables, text files, and command-line arguments) in a way that makes sense.
3.2.4. Merging configuration as a waterfall in code
You’re ready to glue all this together into pieces of JavaScript. Considering how lazy we are, let’s not write much code to accomplish this.
There’s an npm module called nconf that deals with merging configuration sources together, regardless of what you’re using: JSON files, JavaScript objects, environment variables, process arguments, and so on. The following code is an example (labeled ch03/03_merging-config in the samples) of how you could configure nconf to use the plain JSON files from section 3.2.2. Note that while the configuration source order in the code listing might seem counterintuitive, nconf prioritizes configuration on a “first-come first-served” basis:
var nconf = require('nconf');
nconf.argv();
nconf.env();
nconf.file('dev', 'development.json');
module.exports = nconf.get.bind(nconf);
After you set up this module, you can use it to get configuration values from any of those stores, in order of appearance:
· First, nconf.argv() prioritizes command-line arguments above everything else, as it’s the first source we’ve added. For instance, executing the application with node app --PORT 80 means that the PORT variable will be assigned that value, regardless of configuration from other sources.
· The nconf.env() line tells nconf to source configuration from the environment as well. For instance, executing PORT=80 node app will set the port to 80, while PORT=80 node app --PORT 3000 will set the port to 3000, because command-line arguments have more priority than environment variables.
· Last, the nconf.file() line sources a JSON file to pull the least important values: these will be overridden by both environment variables and command-line arguments! If you provide a command-line argument such as --PORT 80, it won’t matter that you had "PORT": 3000 in your development JSON file; you’ll still use port 80. Again, you’ll find a complete example in the accompanying source code, also detailing how to use nconf when going the Heroku route. This will prove useful in the following chapter, so I’d advise you to read this chapter to the end and then get up to speed with the code samples if you haven’t gone through them yet.
Now that you know how to properly configure builds and environments, we’ll head on to the last couple of sections. Before getting to continuous development, let me emphasize a couple of best practices when it comes to setting up environments for the first time.
3.3. Automating tedious first-time setup tasks
When setting up your environment for the first time, you’ve got to think about what you’re doing, and you need to automate anything that’s plausible to automate. The reason: if you don’t automate, it’ll translate directly into more work for newcomers. Another reason for preemptively automating these tasks is purely that you can.
In the beginning, it’s simple to automate the little stuff one bit at a time. Yet, as the project develops, it becomes daunting and implausible to do so. Your coworkers might be against doing so at this point, and yet setting up a working environment might take you as long as a week. I had this happen to me on a ridiculously huge project I worked on in the past, and management was okay with that. Setting up a local development environment involved
· Reading through a daunting series of poorly written wiki articles
· Installing dependencies by hand
· Applying schema updates by hand
· Applying those updates every morning by hand after getting the latest code
· Installing audio codecs and even proprietary software, such as a specific version of Windows Media Player
After a week all I had to show for it was a “kind-of-working” environment. Three weeks after that I landed another job, because I couldn’t bear the manual, laborious work in that project. The driving issue behind this problem is that changing the way an application is built is hard, and not having a straightforward and automated process to set up new environments can become extremely costly down the line, and so cumbersome to change, in fact, that you wouldn’t want to bother doing it. The frustration I felt during that experience is one of the root motivators that drove me to Build First, the build-oriented approach I’m pile-driving in this book.
In chapter 2 we covered how to automate our build process, and you even learned how you could automatically create, provision, and update a MySQL database instance (found at ch02/10_mysql-tasks in the samples).[3] Setting up database seeding is complex, as you saw in the sample code, but it can also be rewarding: not having to provide new collaborators with anything other than the code repository, and a few instructions asking them to execute a Grunt task.
3 The database provisioning task examples can be found at http://bevacqua.io/bf/db-tasks.
We’ve discussed at great length the measures you can take when it comes to configuration, and in that regard all you need to do when setting up a new development environment is get the decryption key (stored somewhere safe) and run a Grunt task. First-time setup shouldn’t involve more manual labor than getting your environment configuration in place; it should be that easy.
Okay, you’ve taken care of all the environments, distributions, configuring, and automating, including the tedious first-time set up. It’s time for the fun I promised at the beginning of the chapter! Continuous development is up next!
3.4. Working in continuous development
Continuous development is the ability to work uninterruptedly in your code base, and by interruptions I don’t mean pesky project managers asking what you’re up to or coworkers asking for help with a bug they can’t seem to track down. When I say interruptions, I mean the repetitive stuff that slowly pecks away at your work day, such as re-executing node every time your application changes. Even now, with your fancy new build process in place, do you have to run it yourself every time files change? No way! You don’t have time for all that. You’ll use yet another task to do that.
Then there’s the smaller stuff, like saving your changes and refreshing your browser. You’ll get rid of that too, by letting the tools do that. Repetitive routines don’t carry much prestige in Build First systems. Let’s see how much you can automate away from your workflow. This isn’t to prove you can automate anything; the benefit instead lies in that you can spend more time doing what matters: thinking and tinkering with code.
The first step you’re going to take in this direction is investing in a good watch (in the figurative sense—using a watch task in your favorite task runner), which will allow you to have the build process restart itself whenever you save changes to your files.
3.4.1. Waste no time, use a watch!
If you’re like me, you hit save or change tabs every few seconds. You can’t afford to run a full build every time you change a comment or a comma; that would be a tremendous waste of your time. Yet many people do this, because they haven’t found a better way to go about it yet. You’re reading this, so you’re one step ahead. Kudos.
One of Grunt’s most useful plugins is, undoubtedly, grunt-contrib-watch. This plugin will watch your file system for changes to your code and run the tasks affected by those code changes. Whenever a file change affects one of your build tasks, you should execute that task again. This is one of the pillars of continuous development, because you won’t have to do anything; the build process will run itself as needed. Let’s look at a quick example:
watch: {
rebuild: {
tasks: ['build:debug'],
files: ['public/**/*']
}
}
With this example, called 04_watch-task, and found under ch03 in the code samples, you can run the build process again entirely whenever any file changes or is created in your public folder. Now you won’t ever have to worry about constantly running the build; it can run itself!
But even this approach isn’t the most efficient way to do it, because this will run all your build tasks, even the ones unaffected by the changed file. For example, it won’t matter if you edit a LESS file; any JavaScript-related tasks such as jshint will also run, because they’re part of the build, too. To correct that behavior, you should break down watch into many targets: one for each build task that can be affected by file changes. The following listing is a brief demonstration of what I’m talking about.
Listing 3.2. Breaking down watch into multiple targets
watch: {
less: {
tasks: ['less:debug'],
files: ['public/css/**/*.less']
},
lint_client: {
tasks: ['jshint:client'],
files: ['public/js/**/*.js']
},
lint_server: {
tasks: ['jshint:server'],
files: ['srv/**/*.js']
}
}
Breaking down your watch like this might seem tedious, but it will be well worth it. It will speed up your continuous development flow, because you’re getting into a mode where what you build is what changed, rather than blindly rebuilding everything, every time. You can find the fully working sample in the code listings, labeled as ch03/05_better-watch-closely.[4]
4 You can find the code sample online at http://bevacqua.io/bf/watch-out.
Watching for such changes in your build is great, but what if you could expand on that, watching for changes to your Node application? Well, it turns out you can and should do that. Gather round, and let’s talk about nodemon.
3.4.2. Monitoring for changes to the Node app
In the continuous development field, you try as hard as possible not to repeat anything incessantly, and to stay DRY instead of WET. You just saw how beneficial that could be—not having to run the build every time something changes. Now you’ll take the same shortcut for Node.
Think of the nodemon command as using the node command, except it will monitor for changes and restart your application, running node again so you don’t have to. To install it, use npm, with the -g modifier, so that it’s installed globally, making it readily accessible from the command line:
npm install -g nodemon
Now you can run nodemon app.js, instead of node app.js. By default, nodemon monitors *.js files, but you might want to restrict that even further. In these cases, you can provide it with a .nodemonignore file, which works much like .gitignore, and lets you ignore files you don’t want nodemon to monitor. Here’s an example
# package control
./node_modules/*
# build artifacts
./bin/*
# ignore client-side js
./src/client/*
# ignore tests
./test/*
Running grunt watch and using another terminal to run nodemon app.js is admittedly a tad faster than running both together through Grunt, due to the overhead Grunt adds. However, it’s convenient enough to run a single command, not having to spin up two terminal windows, that it might cancel out the extra overhead introduced. Generally speaking, there’s a tradeoff of speed (running them separately) versus convenience (running them both under Grunt). Personally, I prefer the convenience of not having to execute an additional command separately.
Next, we’ll examine how to integrate nodemon into Grunt.
Combining watch and nodemon
There’s a problem you need to resolve before you can integrate nodemon into Grunt, and that is that both nodemon and watch are blocking tasks: these tasks never end; they sit and watch for changes to your code. Grunt runs tasks sequentially, waiting for a task to end before you can run another one. But if neither of them end, the other one can’t start!
To get around this you could use grunt-concurrent, which will spawn a new process for each task you provide, and turn you into a happier nerd. Running nodemon through Grunt can be easily achieved using grunt-nodemon. The following listing is an example.
Listing 3.3. Using nodemon from Grunt
nodemon: {
dev: {
script: 'app.js'
}
},
concurrent: {
dev: {
tasks: ['nodemon', 'watch']
}
}
This example is also in the accompanying source code listings, named 06_nodemon (under chapter 3.) In this chapter, you’ve improved the sequence of events because your changes get saved, but you’re still doing the saving!
Let’s have a quick word about saving changes.
3.4.3. A text editor that cares
Picking the right editor is key to your day-to-day work productivity, and productivity translates into happiness. Take your time to learn the ins and outs of your editor of choice. You might feel nerdy the first time you find yourself watching a YouTube video about a text editor’s shortcuts, but it will be time well spent. You spend most of the day using code editing tools, so you might as well learn how to exploit the features those editors provide.
Luckily, most editors now provide a mechanism to get them to auto-save your changes. It feels kind of weird at first, but as you get used to it, you’ll fall in love and never look back. Personally, I like Sublime Text, the editor I typed these words with, and the one I use for most of my writing. If you’re on a Mac, TextMate seems like a viable option. Other options include WebStorm, which is an IDE specifically tailored for web development, and then there’s vim, for those who dare learn to use its complex, shortcut-intensive user interface.
All the editors I mentioned are capable of auto-saving; if the editor you’re using isn’t, I strongly suggest you switch to one that is. You’ll be uncomfortable at first, but you’ll quickly start writing me thank-you notes after using your new text editor.
Let’s wrap up with talk about the LiveReload technology for browser reloading, and how you can benefit from it.
3.4.4. Browser refresh is so Y2K
LiveReload is a technology that understands you can’t waste precious time refreshing your browser whenever something changes. It exploits web sockets, a real-time communication technology that’s available in browsers (and which is awesome). Through its use of web sockets, LiveReload can decide whether it needs to apply small changes to your CSS, for example, or perform a full page reload when the HTML changes.
Enabling it is fairly easy, enough so that we don’t have any excuse not to do it at this point. It comes bundled with grunt-contrib-watch, so setting it up is as easy as adding a watch target, as shown in the following listing.
Listing 3.4. Enabling LiveReload
watch: {
livereload: {
options: {
livereload: true
},
files: [
'public/**/*.{css,js}',
'views/**/*.html'
]
}
}
Next, you’ll need to install the browser extension and enable it. Now you won’t ever again need to refresh your browser by yourself while debugging your applications. There’s also a readily available example[5] for you to look at (labeled ch03/07_livereload in the code samples), filled with all the necessary setup instructions, but it’s straightforward to get up and running.
5 See LiveReload in action using this code sample at http://bevacqua.io/bf/livereload.
3.5. Summary
You made it through the environments and development workflow crash course! Here’s a quick recap of the teachings in this chapter:
· The debug and release distributions affect your build flow in different ways; debug aims for bug catching and continuous development, while release aims for monitoring and speed optimizations, as you’ll see in the next chapter.
· Your application should be configured so that secrets don’t make their way to the source code, and also provide enough flexibility to configure it based on the environment you’re running.
· We’ve covered continuous development and how you can benefit from using a watch task that rebuilds your application and nodemon to restart it after changes, as well as the importance of picking the right tool for text editing.
In the following chapter we’ll cover in more detail the performance optimizations that you can consider for release builds, what continuous integration is and how to use it to your advantage, how you should monitor analytics in your application, and finally, how to deploy your application to hosted environments such as staging and production.