JavaScript Application Design: A Build First Approach (2015)
Part 1. Build processes
Chapter 2. Composing build tasks and flows
This chapter covers
· Understanding what should happen in a build
· Learning about key build tasks
· Using Grunt to run key tasks
· Configuring a build flow using Grunt
· Creating your own Grunt tasks
In the previous chapter you got a quick overview of what the Build First approach looks like, and you glanced at a lint task. In this chapter, we’ll go over common build tasks and a few more advanced ones. I’ll uncover the use cases and reasoning behind each of them, and we’ll look at how to implement them in Grunt. Learning the theory might sound dull, but it’s particularly important if you use a task runner other than Grunt, as I’m sure you will eventually.
Grunt is a configuration-driven build tool that helps set up complex tasks easily—if you know what you’re doing. Using Grunt, you’ll compose workflows, such as those I described in chapter 1, which could be tuned for development productivity or optimized for releases. Similarly, Grunt helps with deployment procedures, which you’ll analyze in chapter 4.
This chapter focuses on build tasks rather than trying to teach you everything about Grunt. You can always learn to use a new tool, as long as you understand the concepts underlying its goals, but you can’t learn to use other tools properly if you don’t understand those underlying concepts. If you want a deeper understanding of Grunt itself, check out appendix B. Reading that appendix isn’t instrumental to understanding this chapter; however, it does define the Grunt features you’ll use throughout part 1.
We’ll begin this chapter with a quick introduction to Grunt and its core concepts; then you’ll spend the rest of the chapter learning about build tasks and using a few different tools. We’ll look at preprocessing (per Manning MOS) tasks such as compiling code into another language, postprocessing (per Manning MOS) tasks such as asset minification and image spriting, and code integrity tasks such as running JavaScript unit tests and linting CSS code. Then you’ll learn how to write your own build tasks in Grunt, and you’ll look at a case study on writing your own set of database schema update tasks, complete with rollbacks!
Let’s get started!
2.1. Introducing Grunt
Grunt[1] is a task runner that helps you execute commands, run JavaScript code, and configure different tasks with the configuration written entirely in JavaScript. Grunt borrows its build concepts from Ant, and allows you to define your flows using JavaScript.
1 Learn more about Grunt at http://bevacqua.io/bf/grunt. You should also take a look at appendix B.
Figure 2.1 dissects Grunt at a high level, showing how it can be configured and what the key players are in defining a build task.
Figure 2.1. Grunt at a glance: tasks and targets are combined in configuration.
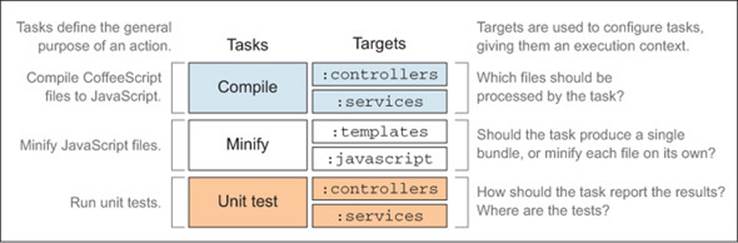
· Tasks perform an action.
· Targets help define a context for those tasks.
· Task configuration allows you to determine options for a particular task-target combination.
Grunt tasks are configured in JavaScript and most of the configuring can be done by passing an object to the grunt.initConfig method, describing the files affected by the task, and passing in a few options to tweak the behavior for a particular task target.
In the case of a unit testing task, you might have a target that runs only a few tests for local development, or you may want to execute all the tests you have before a production release.
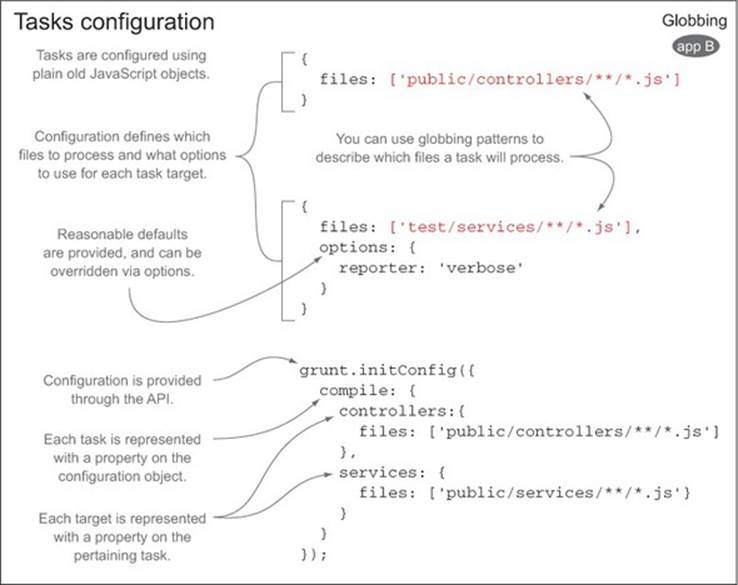
Figure 2.2 illustrates what task configuration looks like in JavaScript code, detailing the grunt.initConfig method and its conventions. Wildcards can be used when enumerating files, and using these patterns is called globbing; we’ll examine globbing in detail in section 2.2.2.
Figure 2.2. Grunt task configuration in code explained. Each task and task target is configured individually.
Tasks can be imported from plugins, which are Node modules (well-designed and self-contained pieces of code) containing one or more Grunt tasks. You only need to figure out what configuration to apply to them, and that’s it; the task itself is handled by the plugin. You’ll use plugins heavily throughout this chapter.[2]
2 You can search for Grunt plugins online at http://gruntjs.com/plugins.
You can also create your own tasks, as you’ll investigate in sections 2.4 and 2.5. Grunt comes with a CLI (command-line interface) named grunt, which provides a simple interface to execute build tasks straight from the command line. Let’s install that.
2.1.1. Installing Grunt
You should already have npm, the package manager that comes with Node, from the JSHint lint tool installation in Chapter 1. Getting started with Grunt is simple. Type the following into your terminal, and it will install the grunt[3] CLI for you:
3 Learn more about Grunt at http://bevacqua.io/bf/grunt.
npm install -g grunt-cli
The -g flag indicates the package should be installed globally; that lets you execute grunt in your terminal, regardless of the current working directory.
Find the accompanying annotated samples
Check out the full working example in the accompanying source code. You’ll find it in the 01_intro-to-grunt folder, under the ch02 directory. The rest of the samples for this chapter can also be found in the ch02 directory. Most of them contain code annotations that can help you understand the sample if you’re struggling with it.
You’ll need to take one additional step, which is creating a package.json manifest file. These files describe Node projects. They indicate a list of packages the project depends upon, as well as metadata such as the project name, version, description, and homepage. For Grunt to work in your project, you need to add it as a development dependency in your package.json. It should be a development dependency because you won’t use Grunt anywhere other than your local development environment. You can create a bare minimum package.json file containing the following JSON code, and you should place it in your project root directory:
{}
That’ll be enough. Node Package Manager (npm) can add the dependency to your package.json as long as the file exists and it contains a valid JSON object, even if it’s an empty {} object.
Installing Grunt Locally
Next up, you need to install the grunt package. This time, the -g modifier won’t do any good, because it needs to be a local install, not a global one[4]—that’s why you created the package.json file. Use the --save-dev modifier instead, to indicate the module is a development dependency.
4 Grunt requires you to make a local install for the Grunt package and any task plugins. This keeps your code working across different machines, because you can’t include global packages in your package.json manifest.
The command looks like this: npm install --save-dev grunt. After npm completes the installation, your package.json manifest will look like the following code:
{
"devDependencies": {
"grunt": "~0.4.1"
}
In addition, the Grunt module will be installed to a node_modules directory inside your project. This directory will contain all the modules you’ll use as part of your Grunt setup, and they’ll be declared in the package manifest as well.
Creating a Gruntfile.js
The last step is creating a Gruntfile.js file. Grunt uses this file to load any tasks that are available and configure them with any parameters you need. The following code shows the bare minimum Gruntfile.js module:
module.exports = function (grunt) {
grunt.registerTask('default', []); // register a default task alias
};
Please note a few things about that innocent-looking file. Grunt files are Node modules that subscribe to the CommonJS Modules spec,[5] so the code you write in each file isn’t immediately accessible to others. The local module object is the implicit object, rather than a global object likewindow in the browser. When you import other modules, all you get is the public interface exposed in module.exports.
5 Read the Common.JS module specification at http://bevacqua.io/bf/commonjs.
Node modules
You can learn more about Common.JS, the spec behind Node.js modules, in appendix A, which covers these modules. It will also be discussed in chapter 5, when we talk about modularity. Appendix B expands on appendix A, reinforcing your understanding of Grunt.
The grunt.registerTask line, in the previous code snippet, tells Grunt to define a default task that will be executed when you run grunt in the command line without any arguments. The array indicates a task alias, which will run all the tasks named in the array, if there are any. For instance, ['lint', 'build'] would run the lint task and then run the build task.
Running the grunt command at this point won’t achieve anything, because the only task you’ve registered is an empty task alias. You must be eager to set up your first Grunt task, so let’s do that.
2.1.2. Setting up your first Grunt task
The first step in setting up a Grunt task is installing a plugin that does what you need; then you add configuration to the code, and you’re set up to run the task.
Grunt plugins are usually distributed as npm modules, which are pieces of JavaScript code someone published so you can use them. We’ll start by installing the JSHint plugin for Grunt, which will allow you to run JSHint using Grunt. Note that the jshint CLI tool you installed in chapter 1is completely unnecessary here; the Grunt plugin contains everything you need to run the task without the jshint CLI. The command shown below will fetch the JSHint Grunt plugin from the npm registry, install it to the node_modules directory, and add it to your package.json file as a development dependency:
npm install --save-dev grunt-contrib-jshint
Next you need to tweak your Gruntfile, telling Grunt to lint the Gruntfile itself, because it’s JavaScript. You also need to tell it to load the JSHint plugin package, which contains the task that sets up the linting, and update your default task, so you can lint your code using grunt in your command line. The following listing (named ch02/01_intro-to-grunt in the code samples) shows how you can configure your Gruntfile.
Listing 2.1. Example Gruntfile.js
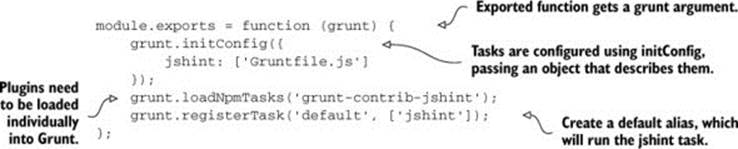
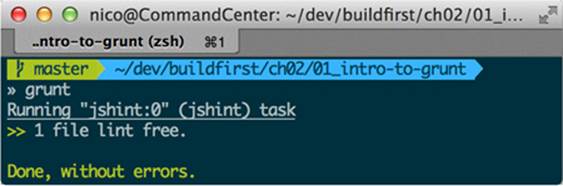
Whenever you install a package, you’ll need to load it in the Gruntfile, using grunt.loadNpmTasks, as in listing 2.1. It’ll load the tasks in the package so you can configure and execute them. Then you need to configure the tasks, which can be done by passing an object togrunt.initConfig. Each task plugin you use needs configuration, and I’ll teach you how to configure each one as we go through them. Lastly, I’ve updated the default alias to run the jshint task. The default alias defines what tasks are executed when grunt is executed without task arguments. Here’s a screenshot of the output.
Figure 2.3. Our first Grunt task and its output. Our code is lint-free, meaning it doesn’t contain any syntax errors.
2.1.3. Using Grunt to manage the build process
You’re pretty much in the same position as you were at the end of chapter 1, where you could lint your JavaScript, except that you’re not. Grunt will help you put together the full-blown build process that’s at the heart of the Build First philosophy. With relative ease, you can focus on different tasks, depending on whether you’re building for local development or diagnostics, or building the end product humans will ultimately consume. Let’s examine a few properties found in build tasks.
The lint task you set up will serve as the basis for a much more powerful build, as you expand your understanding throughout part 1 of the book. This task innocently shows off one of the fundamental properties of build tasks: in the vast majority of cases, they’ll be idempotent—repeated execution of a task shouldn’t produce different results. In the case of the lint task, that might mean getting the same warnings every time, as long as you don’t change the source code. More often than not, build tasks are a function of one or many provided input files. The idempotence property, when paired with the fact that you shouldn’t perform any operations by hand, translates into more consistent results.
Creating Workflows and Continuous Development
Tasks in your build are meant to follow a clearly defined set of steps to achieve a specific goal, such as preparing a release build. This is called a workflow, as mentioned in chapter 1. Certain tasks may be optional for a particular workflow, while others might be instrumental. For instance, you have no incentive to optimize images, so they become smaller when working in your local development environment. Because it won’t yield any noticeable performance gains, it’s perfectly fine to skip that task in that case. Regardless of whether your workflow is meant for development or release, you’ll probably want to make sure to look out for issues with a lint task.
Figure 2.4 will help you understand the development, release, and deployment pieces involved in a build process: how they relate to each other, and how they come together when composing different workflows.
Figure 2.4. Separation of concerns across build and deployment flows
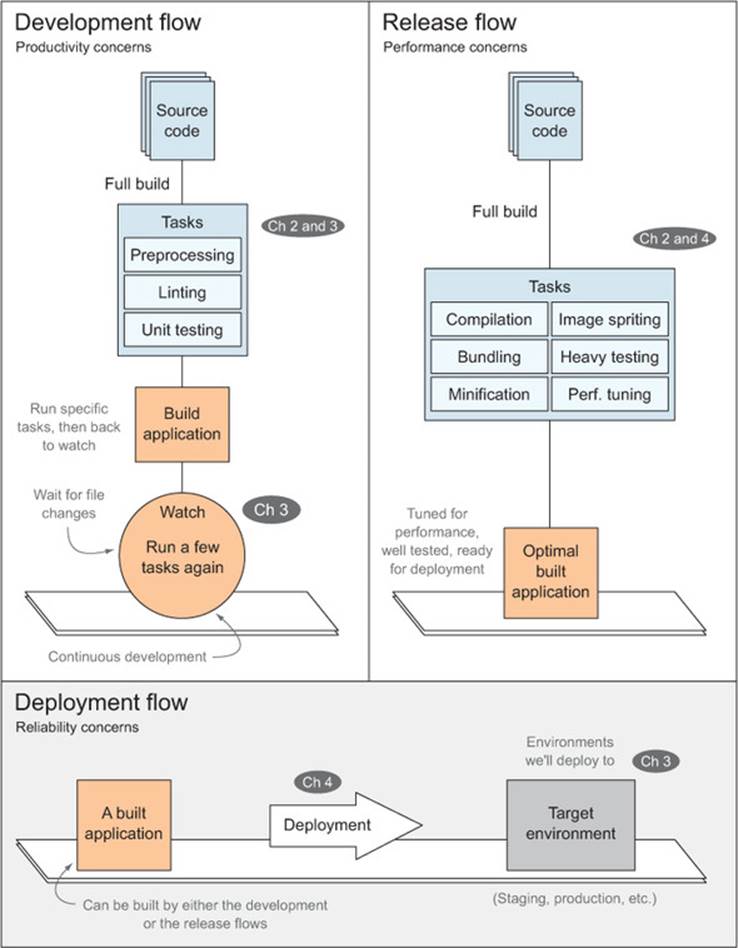
Development flow
With only a glance at the top row of the figure, you can already see that productivity and watching for changes are the key aspects of a development flow, while they’re completely unnecessary during the release flow, and perhaps even an obstacle. You may also notice that both flows produce a built application, although the one built during development is geared towards continuous development, as we’ll examine in depth in chapter 3.
Release flow
In the release flow, we’re concerned with performance optimization and building a well-tested application overall. Here we’ll run a slightly modified version of the development flow, where reducing the byte size of our application is at a premium.
Deployment flow
The deployment flow doesn’t build the application at all. Instead, it reuses the build distribution prepared in one of the other two flows, and delivers it to a hosting environment. You’ll learn all about the deployment flow in chapter 4.
Any reasonable build flow needs to be automated every step of the way; otherwise you won’t meet the goal of increasing productivity and reducing error proclivity. During development, you should switch between your text editor and your browser, without having to execute a build by yourself. This is called continuous development, because the friction introduced by going into the shell and typing something to compile your application is removed. You’ll learn how to accomplish this using file watches and other mechanisms in chapter 3. Deploying the application should be separate from the build flow, but it should also be automated; this enables you to build and deploy the application in a single step. Similarly, serving your application should be strictly separate from the build process.
In the next section, we’ll dive head first into build tasks using Grunt. Namely, we’ll start with preprocessing tasks such as taking LESS, a language that can be compiled into CSS, and postprocessing tasks, such as bundling and minifying, which help you optimize and fine-tune for releases.
2.2. Preprocessing and static asset optimization
Whenever we talk about building a web application, we need to talk about preprocessing. Often, you’ll find yourself using languages that aren’t natively supported by internet browsers because they help you wrap away repetitive work by providing features not available to plain CSS (such as vendor prefixing), HTML, or JavaScript.
The point here isn’t for you to learn LESS, a CSS preprocessor introduced in the following section, or even to learn CSS. Great resources are tailored to teach you that. The point is to make you aware of the glaring benefits of resorting to preprocessing languages. Preprocessing isn’t about CSS. Preprocessors help transform source code in a language into various target languages. For instance, the more powerful and expressive LESS language can be transformed into native CSS at build time. Reasons to use preprocessors may vary, but they can be categorized as more productivity, less repetition, or having a more pleasant syntax.
Postprocessing tasks such as minification and bundling are mostly meant to optimize a build for release purposes, but they’re related to preprocessing closely enough that they all belong in the same conversation. We’ll go over preprocessing, using LESS, and then we’ll dabble with globbing, a file path pattern-matching mechanism used in Grunt, before we move on to bundling and minification, which will tune your application’s performance for adequate human consumption.
By the end of the section you’ll have a much clearer picture of how assets can be preprocessed by using a different, more suitable language, and how they can be postprocessed, improving the performance to make the experience easier on humans.
2.2.1. Discussing preprocessing
Language preprocessors are fairly common in web development nowadays. Unless you’ve been living under a rock for the last decade, you probably understand that preprocessors help you write cleaner code, as you first learned with lint in chapter 1, but require extra work to become useful. Plainly put, when you write code in a language that translates into another one, preprocessing is the translation step.
You might not want to write code in the target language for several reasons: maybe it’s too repetitive, too error-prone, or you just don’t like that language. That’s where these higher-level languages, tuned to keeping your code concise and simple, come into play. Writing code in one of these higher-level languages comes at a price, though: browsers don’t understand them. Therefore, one of the most common build tasks you’ll encounter in front-end development is compiling that code down into something a browser understands, namely JavaScript and CSS styles.
Sometimes, preprocessors also offer practical benefits over the “native” languages of the web (HTML, CSS, and JavaScript). For example, several CSS preprocessors provide the necessary tools so you don’t need to target each browser. By removing these browser inconsistencies, preprocessing languages increase your productivity and make it less tedious to do your job.
LESS is more
Take LESS, for example. LESS is a powerful language that allows you to write code using a variant on CSS that follows the DRY (Don’t Repeat Yourself) principle of application design, because it helps you write code that’s less repetitive. In plain CSS, you often end up repeating yourself again and again, writing the same value for all the different vendor prefixes out there to maximize browser support of a style rule you want to apply.
To illustrate the point, take the border-radius CSS property, used whenever you want to style an element with rounded borders. The following listing is how you might write them using plain CSS.
Listing 2.2. Rounded borders in plain CSS
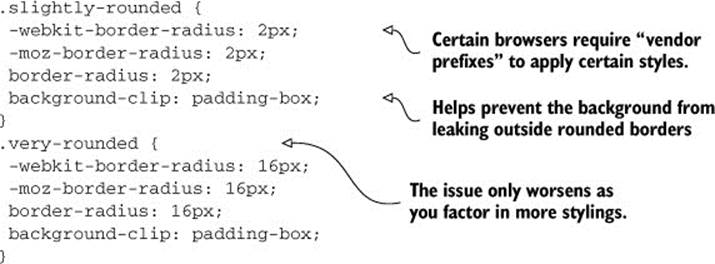
That might be fine for a one-time rule, but for properties such as border-radius, it quickly becomes unacceptable to write such plain CSS, because this scenario occurs too often. LESS allows you to code in a way that’s easier to write, read, and maintain. In this use case, you can set up a.border-radius reusable function, and the code becomes something like the following listing.
Listing 2.3. Rounded borders using LESS
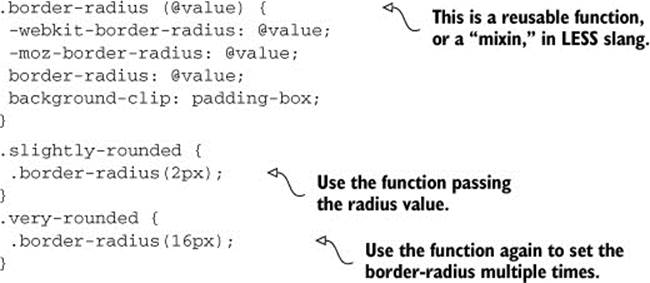
LESS and similar tools boost your productivity by allowing you to reuse snippets of CSS code.
LESS DRY is better than more WET
As soon as you need to use the border-radius property in more than one place, you’ll reap the benefits of not writing everything twice (WET). By following the DRY principle, you avoid listing all four properties any time you need to specify a border. Instead, you can declare a border by reusing the .border-radius LESS mixin.
Preprocessing plays a key role in a lean development workflow: now you don’t have to use all the vendor prefixes everywhere you want to use this rule, and you can update the prefixes in a single place, making your code more maintainable. LESS enables you to take this even further, if you want to cleanly separate static rules from the variables that affect them. Without LESS, a typical CSS design style sheet excerpt might look like the following code:
a {
background-color: #FFC;
}
blockquote {
background-color: #333;
color: #FFC;
}
LESS allows you to use variables so you don’t have to copy and paste colors everywhere. Properly naming these variables also helps you to easily identify the colors by scanning the style sheet.
Using LESS variables
Using LESS, you could set up variables for the colors and avoid potential mistakes such as updating a color in one place but forgetting to update other occurrences. This also enables you to keep colors and other variable elements of your design together. The following code shows how it might look using LESS:
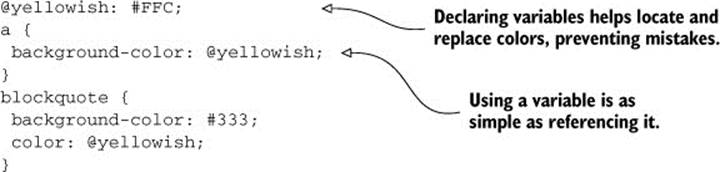
This way you can keep your code DRY, as I mentioned at the beginning of section 2.2. Following the Don’t Repeat Yourself principle here is particularly useful because you avoid copying and pasting color codes, and that saves you the potential trouble of mistyping one. In addition, languages such as LESS (SASS, Stylus, and so on) provide functions to derive other colors, such as a darker green, a more transparent white, and other amusing color math.
Now, let’s turn our attention to compiling the LESS code into CSS within a Grunt task.
2.2.2. Doing LESS
As we discussed earlier in the chapter, Grunt tasks consist of two different components—the task and the configuration:
· The task itself is the single most important component: this is the code that will be executed by Grunt when you run a build, and generally you can find a plugin that does what you need.
· The configuration is an object you can pass to grunt.initConfig. Almost every Grunt task needs configuration.
As you progress through the rest of this chapter, you’ll see how to set up the configuration in each case. To compile LESS files with Grunt so you can serve CSS directly, you’re going to use the grunt-contrib-less package. Remember when you installed the JSHint plugin? Same thing here! Only the package name changes, because you’re going to use a different plugin now. To install it, run the following in your terminal:
npm install grunt-contrib-less --save-dev
This plugin provides a task named less, and you can load it in your Gruntfile.js like so:
grunt.loadNpmTasks('grunt-contrib-less');
From now on, I’ll omit the npm install and grunt.loadNpmTasks bits in the examples, for brevity. You still need to run npm install to fetch the packages and load the plugins in your Gruntfiles! In any case, you can look for the full examples for each case in the accompanying source code files.
Setting up the build task is straightforward: you specify the output filename and provide it with the path to the source used to generate your CSS file. This example can be found as ch02/02_less-task in the code samples.
grunt.initConfig({
less: {
compile: {
files: {
'build/css/compiled.css': 'public/css/layout.less'
}
}
}
});
The last piece of the puzzle for executing a task is invoking grunt from the command line. In this case, grunt less in your terminal should do the trick. Explicitly declaring a target is usually recommended. In this case, you could do that by typing grunt less:compile. If you don’t provide a target name, all targets get executed.
Consistency in grunt configuration
Before we go any further, I want to mention a nicety you’ll enjoy as part of using Grunt. Task configuration patterns don’t vary all that much when jumping from task to task, particularly when using tasks supported by the Grunt team itself. Even those you might find on npm are pretty consistent with each other, as far as configuration goes. As you’ll learn throughout the chapter, the different tasks I’ll show you are configured similarly, even if they provide a wide array of operations in a versatile way.
Running the less:compile build target in Grunt will now compile layout.less into compiled.css. You could also declare an array of input files, rather than using only one. This will result in a bundled file, which will contain the CSS for all of the LESS input files. We’ll cover bundling in full later on; bear with me. The following listing is an example.
Listing 2.4. Declaring an array of input files
grunt.initConfig({
less: {
compile: {
files: {
'build/css/compiled.css': [
'public/css/layout.less',
'public/css/components.less',
'public/css/views/foo.less',
'public/css/views/bar.less'
]
}
}
}
});
Listing each file individually is okay, but you could also use a pattern language called globbing and avoid enumerating hundreds of files, as I’ll explain next.
Mastering globbing patterns
You could further improve the configuration shown in the previous code with a nice perk of using Grunt that’s called globbing. Globbing[6] is a file path matching mechanism that will help you include or exclude files using file path patterns. It’s particularly useful because you don’t have to maintain a list of all the files in your assets folder, which helps you avoid common mistakes such as forgetting to add a new style sheet to the list.
6 The Grunt website has valuable insight into how globbing works. Go to http://bevacqua.io/bf/globbing.
Globbing might also come in handy if you want to exclude individual files from a build task, such as those provided by a third party. The following code shows a few globbing patterns you might find useful:
[
'public/*.less',
'public/**/*.less',
'!public/vendor/**/*.less'
]
Note the following about the previous code:
· The first pattern will match any file with a LESS extension in the public folder.
· The second pattern does much the same, except that it matches files that might be in subfolders of public of any nesting level thanks to the special ** pattern.
· As you might’ve guessed, the last pattern works the same way as the second one does, except that the ! at the beginning indicates that matched files should be excluded from the results.
Globbing patterns work in the order they’re presented, and they can be mixed with regular file paths too. Globbing patterns will result in arrays containing the path for all matching files.
Taking globbing patterns into consideration, our latest less:compile configuration might be refactored a little further, becoming a simplified version:
grunt.initConfig({
less: {
compile: {
files: {
'build/css/compiled.css': 'public/css/**/*.less'
}
}
}
});
Before moving on, let me remind you that in this particular case less is the build task and compile is a build target for that task, which offers configuration specific to that target. You could easily provide different targets for the less task by adding other properties to the less object, like you did in the compile task target in the configuration you’re handing over to initConfig. For instance, you could have a compile_mobile target which would create the CSS assets targeting mobile devices, and a compile_desktop target that would compile assets targeting desktop browsers.
It should be noted that as a side effect of using a globbing pattern to compile LESS using this task, your CSS will be bundled into a single file, regardless of how many files are used in the source code. So, let’s look into asset bundling now, a postprocessing task that will help you improve a site’s performance by reducing the amount of HTTP requests against it.
2.2.3. Bundling static assets
I’ve hinted at what bundling accomplishes, and you might’ve heard about it before embarking on this enlightening adventure of ours. It’s okay if you’ve never heard of bundling before; it’s not a hard concept to wrap your head around.
Asset bundling is a fancy name for putting everything together before you hand it over to your clients. It’s like the difference between going to the store for a single grocery item and coming back home, only to go back to the grocery store to get another item on the list again and again, and going to the grocery store once and buying all of your groceries at one time.
Handing over everything in a single HTTP response reduces transactional network costs and benefits everyone. The payload might become larger, but it saves clients many unnecessary network trips to your server, which incur associated networking costs such as latency, the TCP and TLS handshakes, and so on. If you’d like to learn more about the underlying internet protocols (TCP, TLS, UDP, HTTP, and so on), I highly recommend High Performance Browser Networking by Ilya Grigorik (O’Reilly Media, 2013).
In so many words, then, asset bundling consists of literally appending each of your files at the end of the previous one. In this way, you might bundle together all of your CSS or all of your JavaScript. Fewer HTTP requests yields better performance, and that’s reason enough to warrant a static asset bundling build step. Figure 2.5 examines the interaction between a human and a site that uses a bundle, and one that doesn’t, and how each affects network connections.
Figure 2.5. Reducing the number of HTTP requests with asset bundling
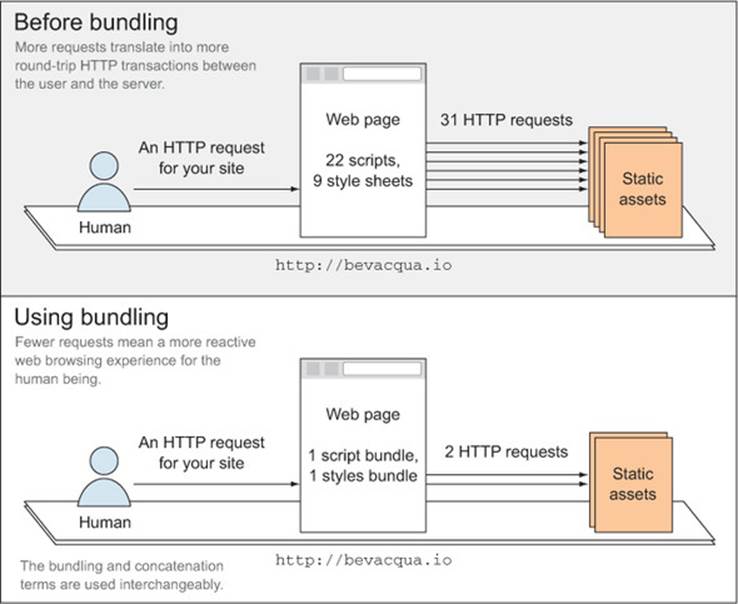
As shown in the figure, before bundling the browser has to make many more HTTP requests to fetch a site’s resources, while after bundling only a single request suffices to fetch every bundle (containing the many different files that make up your application’s logic).
Many preprocessors include the option to bundle your assets together in a single file, and you already experienced that in the demonstration of less:compile, where you bundled many assets into one.
Bundling in the wild
Using the grunt-contrib-concat package, you can easily set up build targets to put together any number of files using the globbing patterns I described previously, and in a fashion that you might already be comfortable with. Throughout the book, the terms concatenation and bundling are used interchangeably. The following listing (listed as ch02/03_bundle-task in the accompanying code samples) describes how to configure the concat task.
Listing 2.5. Configuring the concatenation task

Unsurprisingly, the concat:js task will take all the files in the public/js folder (and its subfolders, recursively) and bundle them together, writing the results to build/js/bundle.js, as indicated. The transition from one task to another is so natural that sometimes you won’t believe how easy it is.
One more thing to keep in mind when dealing with static assets during builds is minification. Let’s move onto that topic.
2.2.4. Static asset minification
Minification resembles concatenation in that it ultimately attempts to reduce the strain on network connections, but it applies a different approach. Rather than mashing all the files together, minifying consists of removing white space, shortening variable names, and optimizing the syntax tree of your code to produce a file which, while functionally equivalent to what you wrote, will be significantly smaller in file size at the cost of becoming nearly unreadable. This shrinking caters to your goal of improving performance, as explained in figure 2.6.
Figure 2.6. Reducing HTTP response length with asset minification
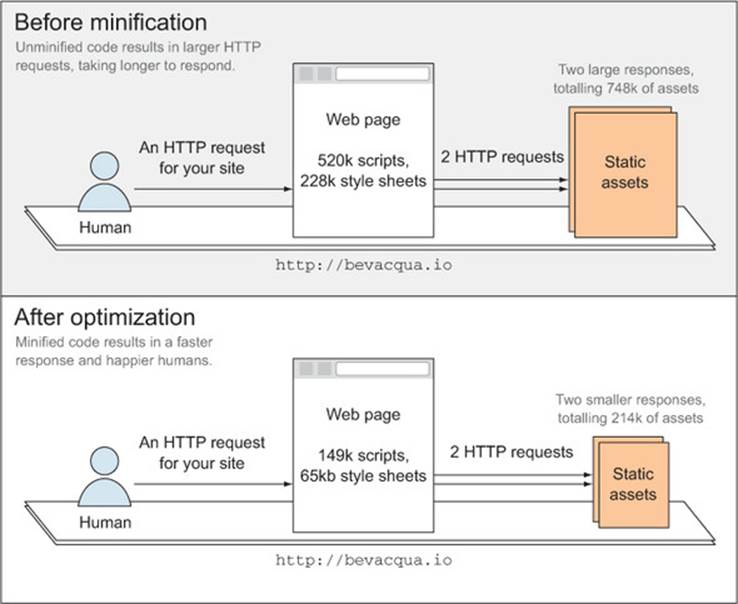
As you can see in the figure, the minified version of your static assets is much smaller, resulting in faster downloads. When combined with GZip[7] compression on your server-side platform of choice, the minified bundle becomes drastically smaller than the source code.
7 Visit http://bevacqua.io/bf/gzip for more information on enabling GZip compression on your favorite back-end server.
The obfuscation side effect might make you feel like it’s “safe enough” for you to put anything in your JavaScript code, since it will become harder to read, but it won’t matter how much you obfuscate your client-side code; people can always decode what you’re doing in it if they try hard enough. The corollary is to never trust clients and always put sensitive code in your back end instead.
Bundling can be combined with minification, as they’re completely orthogonal (meaning they don’t run into each other). One puts files together and the other reduces each file’s footprint, but these tasks play well together because they don’t overlap in functionality.
Bundling and minification can also be performed in either order, and the result will be pretty much the same: a single, compressed file best suited for release and hardly useful to your development efforts. While minification and bundling are undoubtedly important for your human-facing application, they get in the way of the productive, continuous development approach we strive for in our daily development flow, because they make debugging harder. That’s why it’s important you keep these tasks clearly separated in your build process, so that you can execute them in the appropriate environment without hindering your development productivity.
Reviewing an asset minification example
Let’s get into an asset minification example (labeled ch02/04_minify-task in the samples), which you could then serve to real humans. Many asset minification options exist. In your example, you’ll use the grunt-contrib-uglify package meant to minify JavaScript files. After installing it from npm and loading the plugin, you can set it up as shown in the following listing.
Listing 2.6. Asset minification configuration

That setup will help minify cobra.js, doing grunt uglify:cobra. What if you want to minify what you bundled together in the previous step, further improving the performance of your application? That’s a matter of taking the concatenated file created in listing 2.6 and minifying it, as shown in the following listing (labeled ch02/05_bundle-then-minify in the samples).
Listing 2.7. Asset minification after bundling

Putting those two steps together is a matter of running both tasks in sequence. For that purpose, you might use the grunt command grunt concat:js uglify:bundle, but this also might be an ideal scenario in which to introduce task aliases.
A task alias is a group of any number of tasks that are often executed as part of the same step and that are related to each other. Tasks in an alias should preferably depend on each other to produce a more meaningful output, as this would make them easier to follow and more semantic. Task aliases are also great for declaring workflows.
In Grunt, you can set up task aliases easily in one line, as I’ll demonstrate below. You can also provide an optional description argument; this will be displayed when executing grunt –-help, but it’s mostly helpful for describing why that alias was put together, for developers browsing your code:
grunt.registerTask('js', 'Concatenate and minify static JavaScript assets',
['concat:js', 'uglify:bundle']);
Now you can treat assets as any other Grunt task, and grunt assets will perform both concatenation and minification.
I have a bonus task you can implement on your static asset during builds to improve your application’s performance. It’s similar in spirit to bundling, but it covers images. This operation results in sprite maps and is a concept that’s been around for far longer than minifying or concatenation.
2.2.5. Implementing image sprites
Sprites consist of taking many images and building a large file that contains all of them. Instead of referencing each individual file, you use the background-position, width, and height CSS properties to choose the image you want from the sprite. Think of image sprites as asset bundling but for images.
Spriting is a technique that originated in game development many years ago, and it’s still used today. Many graphics get crammed into a single image, significantly improving the performance of games. In the web realm, spriting is most useful for iconography or any kind of small images.
Maintaining the spritesheet and the CSS that goes with it by yourself is work. Particularly if you’re cutting and pasting, keeping your icons and the spritesheet in sync is tedious. That’s where Grunt comes in as the knight in shining armor, ready to save the day. When it comes to setting up image sprites, npm has options ready for you to start automating your CSS spritesheet generation processes. For the purposes of this self-contained example, I’ll refer to the grunt-spritesmith Grunt plugin. If you have issues installing the plugin, refer to the code samples for troubleshooting. Its configuration is similar to what you’re already accustomed to:
grunt.initConfig({
sprite: {
icons: {
src: 'public/img/icons/*.png',
destImg: 'build/img/icons.png',
destCSS: 'build/css/icons.css'
}
}
});
By now, you can safely assume that the src property takes any kind of glob patterns. The destImg and destCSS properties will map to the files where your spritesheet will be generated, along with the CSS file that should be used to render the sprited images in your HTML. Once you have both the CSS and your newly created spritesheet, you can add icons to your site simply by creating HTML elements and assigning the different sprite CSS classes to those elements. CSS is used to “crop” different parts of the image, effectively taking only the relevant portion of the image used for the desired icon.
Perceived performance on the web
I can’t stress enough how important a role asset bundling, minification, and even spriting play when it comes to release builds. Images typically make up most of the footprint for web applications today. Reducing the number of requests to your server using these techniques provides you with an immediate performance boost that doesn’t require more expensive hardware. A similar case can be made for reducing the byte size of the responses by minifying and/or compressing them.
Speed matters
Speed is a fundamental, defining factor of the web. Responsiveness, or at least perceived responsiveness, has a tremendous impact on the user experience (UX). Perceived responsiveness is now more important than ever; this is what the user perceives as speed, even though technically it might take even longer to fulfill a request. As long as you display immediate feedback for their actions, users will perceive your application as “faster.” This is what you see every day on Facebook or Twitter when you submit a new post, and it’s immediately added to the list, even though its data is still being sent to their servers.
Numerous experiments have demonstrated how important it is to provide swift and reliable services. Two experiments in particular, performed by Google and Amazon, respectively, come to mind.
In 2006, Marissa Mayer was Google’s vice president for UX. She ran an experiment after collecting feedback from a group of users who wanted to see more results per page in their searches. The experiment increased the number to 30 search results per page. Traffic and revenue from customers in the experimental group who got more results per page dropped by 20%.
Marissa explained that they found an uncontrolled variable. The page with 10 results took .4 seconds to generate. The page with 30 results took .9 seconds. Half a second delay caused a 20% drop in traffic. Half a second delay killed user satisfaction.[8]
8 You can find a detailed article about the subject here: http://bevacqua.io/bf/speed-matters.
Amazon conducted a similar experiment, progressively delaying their website’s responsiveness on purpose during split tests. Even the slightest delay resulted in significant drops in sales.
Judging perceived responsiveness vs. actual speed
On the opposite end of the spectrum, we meet perceived speed. You can increase perceived speed by providing instant feedback (as if the action was successful) to user interaction, even when the task itself might take a few seconds to process. This kind of fast-forwarding is always well received by humans.
Now that we’ve talked about speeding up network access to your assets, and the build tasks relevant to compiling these assets, as well as the performance implications of different approaches and techniques, let’s slow down for a minute and start talking code quality. Until now, we’ve paid only a little attention to the quality of your code, so let’s turn to the kind of tasks you should perform in that regard. You have a good idea what preprocessing and post-processing tasks are, how they work, and how to apply them.
We first talked about code quality in chapter 1, when you integrated lint into your build. Cleaning up after yourself is important if you want to preserve the idempotence property. Similarly, linting your code and running tests are paramount for keeping your code quality standards high.
Now, let’s go a little deeper and find out how to better integrate these tasks into a real build process.
2.3. Setting up code integrity
Keep in mind a few tasks when it comes to code integrity:
· First and foremost, we should talk about cleaning up after ourselves. Whenever our builds start, they should clean up the build artifacts they generate. This helps us achieve idempotency, where executing a build many times always results in the same output.
· We’ll go over lint again, adding to what we explored near the end of chapter 1, making sure that our code doesn’t contain any syntax errors whenever we run a build.
· We’ll talk briefly about setting up a test runner so that you can automate code tests, which we’ll go over in future chapters.
2.3.1. Cleaning up your working directory
After you’re done with a build, your working directory will generally be in a dirty state, because you’ll have generated content that’s not part of your source code. You want to make sure your working directory is always in the same state whenever you run a build, so you get the same results every time. To ensure this, it’s generally good practice to clean up generated files before running any other tasks.
Working directory
Working directory is fancy talk for the root directory for your code base during development. It’s often best to use a subdirectory to aggregate the compiled results of your builds, such as a directory named build. This helps you keep your source code cleanly separated from build artifacts.
After your release, your servers will use the results of your build, and you shouldn’t change its output except by performing another release. Running build tasks after the deployment is complete would be as bad as manually executing those tasks, as you’d reintroduce the human factor. As a general rule, if something doesn’t feel clean, it probably isn’t clean enough and should be revised.
Isolating build output
While we’re on the topic of code integrity, I believe it’s important to highlight something that you might’ve noticed from the examples I’ve presented so far. I strongly recommend you follow the practice of strictly separating build-generated content from source code. It’s sufficient to put generated content in a build directory. Benefits include the ability to remove generated content without hesitation, the ability to easily ignore the folder with globbing patterns, browsing generated content in one place, and perhaps even more importantly, making sure you don’t accidentally delete source code.
Tasks that generate content but clean up preexisting build artifacts whenever they’re run are happily idempotent: running them infinite times doesn’t affect their behavior; the result is always the same. The cleanup step is a required property for build tasks to become idempotent, granting them the consistency of always producing the same output. That being said, let’s see what the cleanup task configuration might look like in Grunt. You’ll use the grunt-contrib-clean package, which provides a clean task you can use. This task (available as ch02/07_clean-task in the samples) is as simple as it gets: you provide target names, and then you can remove specific files or entire folders that you specify using a globbing pattern. See the following code for an example:
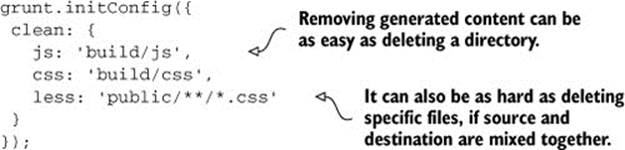
The first two, build/js and build/css, show how simple it can be to pick generated content and remove it, as long as it’s clearly separated from source code. On the other hand, the third example shows how messy it becomes when the source code lives in the same directory as the build-generated content. Furthermore, if you isolate your generated content to one folder, then you could easily exclude that folder from your version control system more conveniently.
2.3.2. Lint, lint, lint!
We already went over the benefits of linting in the previous chapter, but let’s look at the configuration for your lint task again. Keep in mind you were using the grunt-contrib-jshint package here. You can configure it as shown in the following code (sample ch02/08_lint-task):
grunt.initConfig({
jshint: {
client: [
'public/js/**/*.js',
'!public/js/vendor'
]
}
});
It’s important to consider third-party (someone else’s) code as outside of our efforts’ reach. You wouldn’t unit test third-party code. Similarly, it’s not your job to lint their code, either. If you weren’t putting generated content in a separate folder, you’d also have to exclude it from your JSHint profile. That’s yet another benefit of strictly separating build artifacts from the general population (your source files).
Lint is often considered the first line of defense when it comes to maintaining a reasonable level of code quality in JavaScript. You should still write unit tests on top of what lint is capable of for reasons I’ll explain below, and you guessed it, there’s a task for that.
2.3.3. Automating unit testing
One of the most important steps to automate during build is unit testing. Unit tests make sure the individual components in your code base work appropriately. A popular flow for developing an application that’s well tested is the following:
· Write tests for something you want to implement (or change).
· Run those tests and see them fail.
· Implement your changes to the code.
· Run the tests again.
If a test failed, keep coding until all tests pass, and finally go back to write new tests. This process is called Test-Driven Development (TDD). We’ll go deeper into unit testing in chapter 8. This is a topic that warrants a more dedicated section, so we’ll postpone the discussion of setting up the Grunt task to run unit tests.
The key takeaway for now is that unit tests must be automated. Tests that aren’t run often are nearly useless, so the build process should trigger them before deploys and probably during your local builds, too. Taking that into account, you’ll also want your unit tests to run as quickly as possible, so they don’t cripple the performance of your builds. A commonly cited principle is “Test early; test often.”
Note
The different packages we’ve seen so far only expose a single Grunt task you can use, but that’s not a constraint Grunt itself imposes. You can include as many custom tasks in your packages as you deem necessary. This is usually done by package authors on purpose. npm packages are commonly modular in their design, because they’re designed to do exactly one thing extremely well.
You’ve spent most of this chapter learning how to use build tasks that other people wrote. Let’s turn our attention to writing your own build tasks, which comes in handy whenever the existing task plugins you find on npm don’t satisfy your needs.
2.4. Writing your first build task
Even though Grunt has an active community around it that provides many high-quality npm modules, you’ll certainly come across the need to write your own tasks. Let’s go over how that process looks, using an example. We’ve covered tasks loaded from npm and setting up task aliases. The simplest way to create a task is using the grunt.registerTask method. Indeed, that’s the same method you used to register aliases in section 2.2.4 when we looked at minification, but instead of passing in a list of tasks that compose your task, you’ll pass in a function instead.
The following listing (which can be found as ch02/09_timestamp-task in the samples) shows how to create a simple build task that creates a file with a timestamp, which you could then use as a unique identifier somewhere else in the application.
Listing 2.8. A time-stamping task
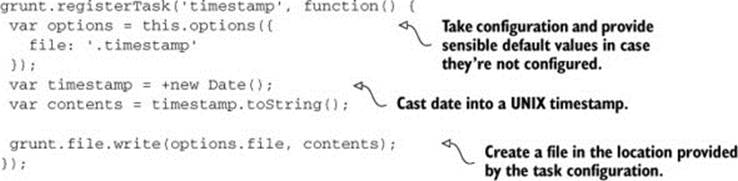
By default, the timestamp will be created in a file named .timestamp; however, because you’re using this.options, users can change that to use another file name by providing one when configuring the task, as shown in the following code:
grunt.initConfig({
timestamp: {
options: {
file: 'your/file/path'
}
}
});
In essence, this is the only requirement to write custom build tasks. Grunt has an extensive API that abstracts away common functionality, enabling you to easily address configuration, perform I/O operations, execute tasks, and perform tasks asynchronously. Luckily, the API is well documented, so check it out on their website.[9]
9 You can find Grunt’s documentation at http://bevacqua.io/bf/grunt.
For an all-encompassing analysis of Grunt, head to appendix B. The timestamp task was mightily trivial. Let’s look at a real Grunt task you might want to implement.
2.5. Case study: database tasks
As you’ve seen, developing your own build tasks isn’t that complicated; however, it’s important to identify whether a task has already been developed for your task runner of choice (Grunt in our case) before setting out to reinvent the wheel all by yourself! Most task runners offer some sort of search engine for plugins, so be sure to look online before sitting down to write your own tasks. Now, let’s look at the case of database schema updates and how you can help automate them in a build. There aren’t many plugins out there that do this specific sort of thing, so we’re better off developing our own.
Database case study code
Note that the code for this particular case hasn’t been included in the text of the book. Instead, you’ll find a fully working example in the accompanying code listings, labeled ch02/10_mysql-tasks.[a]
a The code sample for the database tasks can be found online at http://bevacqua.io/bf/db-tasks.
Before you look at the code, read this section in the book to find out what the code is, what it does, and why.
Database migrations are one of those tasks that are complicated to set up, but after you have, you’ll wonder how you managed to keep applications together without the automated process.
The general concept is that you start with the original database schema designed for the application. As time goes by, you’ll probably make adjustments to the schema: maybe you’ll add a table, remove unnecessary fields, change constraints, and so on.
These schema updates are more often than not shamelessly done by hand, typically using the excuse that they’re too sensitive to automate. We do them by hand and waste tons of time. It’s easy to make mistakes in the process, wasting even more time. Needless to say, this becomes unbearable in larger development teams.
Two-way schema changes
I propose that an automated set of tasks should gracefully handle migrations in both directions: upgrade and rollback. If you build them carefully enough, you can even integrate them into an automated process. The line of thinking is you should apply these schema changes only within these tasks, and never directly on the database. When you adopt that line of thinking, consider two additional tasks: creating the database from the ground up, and seeding it with data to aid in your development workflow. These tasks would allow you to manage your database directly from the command line, easily creating new instances, changing the schema, populating with data, and rolling back changes.
Figure 2.7 summarizes these steps, consolidating them as Grunt tasks, and also explains how they could interact with a given database.
Figure 2.7. Interaction of proposed tasks with a database instance
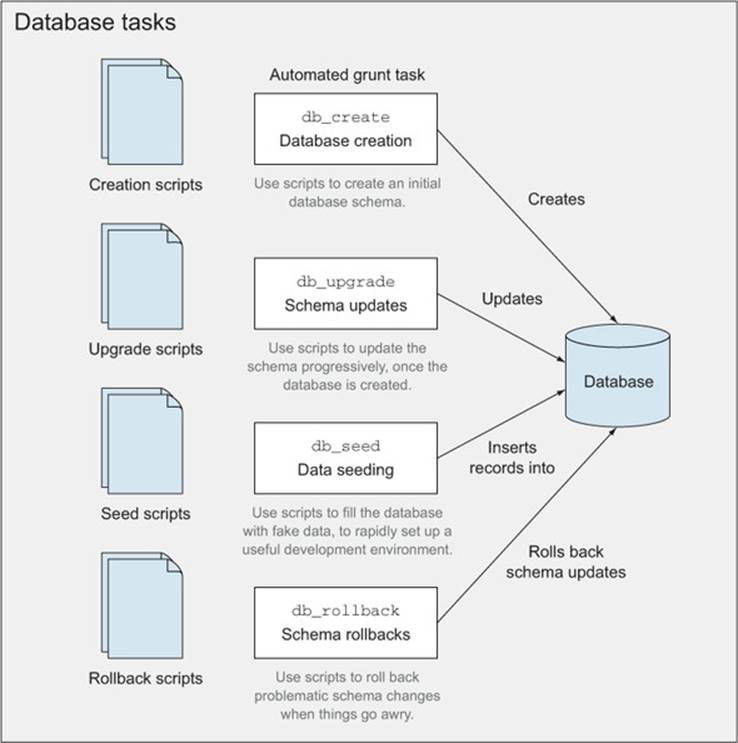
Taking a close look at the figure, you’ll notice there’s a flow to it:
· Create the database once.
· Run schema update scripts whenever new ones come out.
· Seed your development database once.
· Run rollback scripts as an extra layer of security in case something goes wrong.
Using db_create, you can create a database instance, and that’s it. It shouldn’t recreate the database if it already exists, to avoid errors. It won’t write anything to the schema yet: tables, views, procedures, and such, are part of the next step.
The db_upgrade task will run the upgrade scripts that haven’t yet been executed. You’ll want to check the accompanying source code for this chapter to learn how it works.[10] In simple terms, you create a table where you can keep track of the upgrade scripts that were applied; then you check if unapplied scripts exist and execute those, updating your tracking records as you go along.
10 The code sample for the database tasks can be found online at http://bevacqua.io/bf/db-tasks.
Having a backup plan
When things go awry, db_rollback will take the last upgrade script applied and execute its downgrade counterpart. It then updates the tracking table by deleting the last record, so that you can effectively go back and forth in your schema with upgrades and rollbacks, by using these two tasks. Keep in mind that while db_upgrade executes all of the unapplied upgrade scripts, db_rollback only downgrades the last one that’s still applied.
Last, the db_seed task is used to insert records you can play with in your development environment. This one will be crucial in making it dead simple to set up new developers with a working environment by running Grunt tasks exclusively. These tasks would look something like those infigure 2.7.
At this point, you should be comfortable enough to go through the fully documented code listing for database tasks (which is ch02/10_mysql-tasks in the samples), and get a sense of how it could be implemented.[11]
11 You can dig through the Chapter 2 code samples, and look for the one named 10_mysql-tasks.
In upcoming chapters, you’ll see different ways of configuring tasks such as this one to avoid relying on a configuration file directly. Rather, you’ll learn how to use environment variables and encrypted JSON configuration files to store your environment configuration.
2.6. Summary
You’ve learned a lot about build tasks! Let’s go over a quick recap:
· A build process should facilitate everything that’s needed to produce a fully configured environment that’s ready and can do its job.
· The different tasks in a build are clearly separated, and similar tasks are grouped together under task targets.
· Primary tasks that comprise a build include static asset compilation and optimization, linting, and running unit tests.
· You’ve learned how to write your own build tasks and studied how to approach the automated database schema updates.
Armed with the knowledge you’ve garnered, we’ll switch gears in the two upcoming chapters and expand your understanding of how to target different environments, namely local development and release servers, and you’ll learn best practices that you can apply to maximize productivity and performance.