Pragmatic Bookshelf Publishing Automate with Grunt, The Build Tool for JavaScript (2014)
Chapter 3. One Task, Many Outputs
So far we’ve looked at simple tasks, but sometimes it’s handy to be able to define a single task that does many things at once. For example, let’s say you were creating next week’s new JavaScript framework and you wanted to create a full version and a micro version that includes only the basics. Using Grunt’s multitasks, you can create a single task definition that iterates over a collection of targets and executes code against those targets with ease.
So what’s a target? You could think of a target as a configuration group for a task. You set up a configuration block that specifies the target and the associated data:
|
|
concat: { |
|
|
basic: { |
|
|
src: ['src/awsome.js'], |
|
|
dest: 'dist/awesome.js', |
|
|
}, |
|
|
full: { |
|
|
src: ['src/awesome.js', 'src/plugins/editor', 'src/plugins/hl.js'], |
|
|
dest: 'dist/awesome-full.js', |
|
|
}, |
|
|
}, |
The task then executes its code against all the targets you specify, using the data to determine what the task should do. Many Grunt plug-ins are implemented as multitasks.
In this chapter, we’ll explore how multitasks work by working first with targets and data, and then with files.
Introducing Multitasks
Multitasks work by combining a task definition and a block of configuration that defines the targets. Unlike regular tasks, Grunt’s multitasks automatically look for a configuration section that matches the name of the task. So let’s create a simple configuration that explores how multitasks work.
We’ll use Node.js and the Open Weather API to grab the current temperature of some zip codes. We’ll configure the zip codes as targets and we’ll write a task to fetch the data for the temperatures.
First, create a new folder and a package.json file:
|
|
$ mkdir weather |
|
|
$ cd weather |
|
|
$ npm init |
When prompted for values, use the defaults for everything.
Next, install Grunt as a dependency:
|
|
$ npm install grunt --save-dev |
Then create a new Gruntfile like you’ve done in previous chapters:
|
multitasks/weather/Gruntfile.js |
|
|
|
module.exports = function(grunt){ |
|
|
} |
Now, our plan is to use a multitask and some zip codes as targets. To do this, we define the configuration section using grunt.initConfig, and then we specify the targets and some associated zip code for each target:
|
multitasks/weather/Gruntfile.js |
|
|
|
grunt.config.init({ |
|
|
weather: { |
|
|
home: 60623, |
|
|
work: 60622 |
|
|
} |
|
|
}); |
Now we can declare our task:
|
multitasks/weather/Gruntfile.js |
|
|
|
grunt.registerMultiTask('weather', 'Fetches weather', function() { |
|
|
}); |
The task’s name has to match the configuration section for multitasks. When we run the task, it will automatically look for that configuration block.
Now we need to set up some variables. Inside a Grunt multitask we can access the target with this.target and we can access the data associated with that target with this.data.
|
multitasks/weather/Gruntfile.js |
|
|
|
var done, http, location, request, requestOptions, zipCode; |
|
|
|
|
|
location = this.target; |
|
|
zipCode = this.data; |
The location name is the target, and the zip code is the data.
To make the actual request, we’ll use Node’s built-in http module. This module provides a request method that takes an options object containing information about the type of request, the host, the port, and the path. We configure that like this:
|
multitasks/weather/Gruntfile.js |
|
|
|
requestOptions = { |
|
|
host: 'api.openweathermap.org', |
|
|
path: '/data/2.5/weather?units=imperial&q=' + zipCode, |
|
|
port: 80, |
|
|
method: 'GET' |
|
|
} |
All that’s left to do is make the request and parse the results. When we make the request, we’ll get the data back in chunks, which we’ll concatenate together. Then when we’ve gotten all the chunks, we’ll join them together, parse the response as JSON data, and display the temperature.
|
multitasks/weather/Gruntfile.js |
|
|
Line 1 |
http = require('http'); |
|
- |
|
|
- |
done = this.async(); |
|
- |
|
|
5 |
request = http.request(requestOptions, function(response) { |
|
- |
var buffer = []; |
|
- |
|
|
- |
response.on('data', function(data){ |
|
- |
buffer.push(data); |
|
10 |
}); |
|
- |
|
|
- |
response.on('end', function(){ |
|
- |
var weather = JSON.parse(buffer.join()); |
|
- |
console.log(location + ' : ' + weather.main.temp + ' degrees'); |
|
15 |
|
|
- |
done(); |
|
- |
|
|
- |
}); |
|
- |
}); |
|
20 |
|
|
- |
request.end(); |
Take a look at line 3. This line is incredibly important. Node’s http module is asynchronous, so when we make a request for the weather data, Node doesn’t wait for the response. Instead, it invokes the callback once the data gets back. Grunt, however, doesn’t wait around. It’ll finish the task run before we get our response.
Grunt has a workaround for this, though. We use this.async to tell Grunt that this task is asynchronous, and that it should wait until we tell it we’re done. So, on line 3 we create a variable called done by calling this.async. Then on line 16, once we’ve parsed the response, we invoke done as a function, which tells Grunt we’re all done. It’s kind of a strange pattern, but it works really well.
When we run this task, we get our weather report. This book was written in the middle of a very cold winter, so what you’re seeing are real Fahrenheit temperatures for the Chicago area:
|
|
$ grunt weather |
|
|
Running "weather:home" (weather) task |
|
|
home : 1.72 degrees |
|
|
|
|
|
Running "weather:work" (weather) task |
|
|
work : 1.85 degrees |
|
|
|
|
|
Done, without errors. |
If we added a new target and zip code, we’d get a third response. Multitasks make it very easy to configure a single task to handle multiple outputs.
Now let’s look at something a little more practical: file concatenation.
Multitasks and Files
One of the most common uses for multitasks is in creating distribution packages for JavaScript libraries. To demonstrate, let’s take the AngularJS library and create our own custom versions. We’ll create one version that includes just AngularJS and the angular-resource library, and then a second version that also includes the jQuery library.
First, create a new folder called angular and then create a new package.json file in that folder using npm init:
|
|
$ mkdir angular |
|
|
$ cd angular |
|
|
$ npm init |
For the settings, use the defaults. Or you could create your own package.json file that looks like this:
|
|
{ |
|
|
"name": "AngularCustom", |
|
|
"version": "0.0.1", |
|
|
"description": "", |
|
|
"devDependencies": { |
|
|
"grunt": "~0.4.4" |
|
|
} |
|
|
} |
Then install Grunt as a project dependency with npm like we’ve done previously:
|
|
$ npm install grunt --save-dev |
Then we need to create the Gruntfile itself, using the same skeleton we’ve used before:
|
multitasks/angular/Gruntfile.js |
|
|
|
module.exports = function(grunt){ |
|
|
} |
Next we need AngularJS and jQuery. We could download those from the Web, but there’s a quicker way.
Fetching Client-Side Libraries with Bower
Bower is a package manager for client-side libraries, and it’s a great way to quickly grab the libraries our project needs. Bower downloads any libraries we specify into a bower_components folder in our project. First, we’ll install Bower globally:
|
|
$ npm install -g bower |
Bower uses the Git version-control system to fetch libraries, so you’ll need to install the Git command-line client on your computer. You can get installers for your operating system at the Git website.[5] And if you’re on Windows, you’ll need to install Git so that it runs from your Windows Command Prompt, not the default “Bash shell” option. See the Bower website for instructions on this.[6]
In addition, if you just installed Git, you may need to close and reopen your Terminal window before you can use it.
But once Bower’s all set up, we can use it to fetch Angular and the other libraries, like this:
|
|
$ bower install angular |
|
|
$ bower install angular-resource |
|
|
$ bower install jquery |
Now, if you look under the bower_components folder, you’ll see folders for angular, angular-resource, and jquery, with the appropriate JavaScript libraries in each folder. That’s a lot easier than finding, downloading, unzipping, and moving a bunch of files around, isn’t it?
Because we didn’t specify any version info, Bower just grabs the latest version it knows about, and that’s good enough for this demonstration.
One last thing before we move on; Bower is great about fetching remote libraries, but the authors of these libraries don’t always use the same folder structure or naming scheme. For example, jQuery puts the library we need in a dist folder, while other libraries might place the files in a libfolder. Other libraries might require us to do some manual steps to produce a library we can include in our web application. So, when you use Bower inspect the files it downloads carefully to find what you’re looking for.
Configuring Targets
We’re going to have one task with two targets. Our first target will include only AngularJS and the angular-resource library. Our other target, which we’ll call angularWithJquery, will also include jQuery. The following diagram illustrates exactly how this will work.
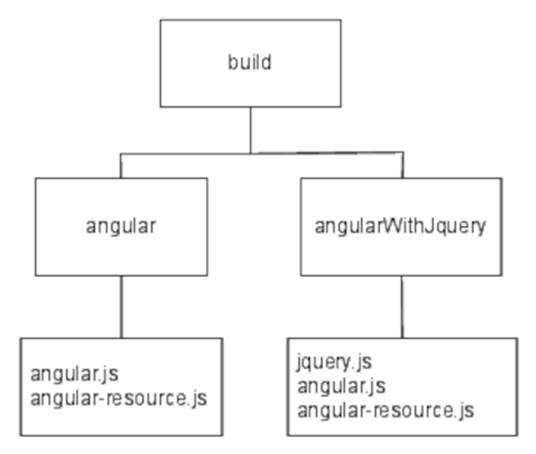
Figure 1. Our build task and its targets
When we run the build task, the individual targets will be created using the source files we specify.
So, using grunt.initConfig, let’s create the configuration for our build task. We specify the targets and their respective sources and destinations:
|
multitasks/angular/Gruntfile.js |
|
|
|
grunt.config.init({ |
|
|
build: { |
|
|
angular: { |
|
|
src: ['bower_components/angular/angular.js', |
|
|
'bower_components/angular-resource/angular-resource.js'], |
|
|
dest: 'dist/angular.js' |
|
|
}, |
|
|
angularWithjQuery: { |
|
|
src: ['bower_components/jquery/dist/jquery.js', |
|
|
'bower_components/angular/angular.js', |
|
|
'bower_components/angular-resource/angular-resource.js'], |
|
|
dest: 'dist/jquery-angular.js' |
|
|
} |
|
|
} |
|
|
}); |
We’re specifying the source as an array of files, and the destination as a string. To write the task, we’ll just have to iterate over the source files, join them together, and write out the destination file. Many common Grunt plug-ins use this approach, as Grunt favors configuration over coding.
But since we’re writing our own multitask, we’ll have to do some coding. Let’s see how Grunt makes it easy for us to work with multiple targets and files.
Writing the Task
You’ve already seen how a multitask works. We can access the targets as an array. We iterate over the targets and grab the sources, read the contents of each file, and create a new file using the destination. The whole thing looks like this:
|
multitasks/angular/Gruntfile.js |
|
|
Line 1 |
grunt.registerMultiTask('build', 'Concatenate files.', function() { |
|
2 |
var output = ''; |
|
3 |
this.files.forEach(function(filegroup) { |
|
4 |
sources = filegroup.src.map(function(file){ |
|
5 |
return(grunt.file.read(file)); |
|
6 |
}); |
|
7 |
output = sources.join(';'); |
|
8 |
grunt.file.write(filegroup.dest, output); |
|
9 |
}); |
|
10 |
}); |
On line 3 we iterate over the various targets. In a multitask, we use the files property to access the configured targets and their associated source and destination paths. This is cool because we don’t have to worry about how the task was configured, as Grunt allows for several methods of configuring targets and destinations. All we have to do is iterate over the files array in our task.
On line 4 we use JavaScript’s map function on the source files, using the src property. This is a quick way to iterate over all of the source files, read their contents, and store them in a new array, and is a lot more appropriate than using a standard for loop and concatenating strings.
Since we’ve stored all the file contents in an array, we can join them together using join and then write the output file to disk.
This code is very similar to the code used by the more “official” grunt-contrib-concat plug-in, but our version doesn’t handle missing source files gracefully. So why did we build our own? Because now you have a good understanding of how Grunt can work with groups of files. When the next new JavaScript or CSS preprocessor comes out, you’ll be able to write your own tasks to process your files. However, you can use Grunt’s grunt.file.exists to check for a file before reading it in.
At this point, we can run
|
|
$ grunt build |
and we’ll have a new dist folder with the two versions of our library. Best of all, we can run the targets independently by specifying them directly with grunt build:angular or grunt build:angularWithJquery.
What’s Next?
Multitasks are incredibly important in Grunt. Many plug-ins are built around multitasks and they rely on a configuration similar to what we’ve used in this chapter. The concept of targets in Grunt is similar to how it works in Make and other build tools, and so you can use this approach for more than just concatenation of files. Before moving on, spend some time exploring the following:
· Modify the concatenation task we built so that it checks for the existence of source files and stops the task. You can use the filter method on the filegroup.src array to silently remove missing files or display a warning message, but instead see if you can stop this and any subsequent tasks from firing.
· Right now, when our task concatenates files, it places a semicolon character between files. By using a configuration variable, allow users to specify the character used here.
Now that you understand more about multitasks and configuration, let’s put several existing Grunt plug-ins together and configure them to make a modern web application’s development process pain-free.
Footnotes
|
[5] |
http://git-scm.com/downloads |
|
[6] |
http://bower.io/ |