Pragmatic Bookshelf Publishing Automate with Grunt, The Build Tool for JavaScript (2014)
Chapter 4. Build a Workflow
Modern web apps, especially ones with plentiful client-side code, have a lot of resources and dependencies. Grunt makes wrangling those much easier.
In this chapter we’ll create a simple Markdown editor with a live preview. The end result will look like the following figure.
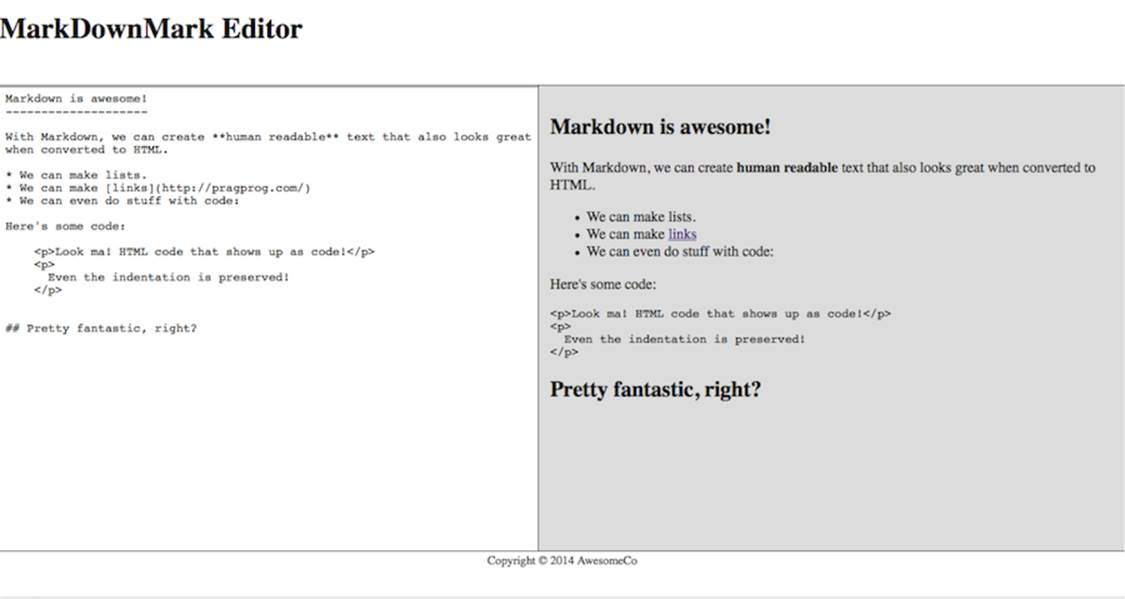
Figure 2. Our Markdown editor
We’ll lean heavily on several technologies to make this work. We’ll use the Angular web framework to build the app, and we’ll use markdown.js to do the actual Markdown conversion. To make things more interesting, we’ll use Sass, a CSS preprocessor, and we’ll use CoffeeScript instead of JavaScript.
The focus of this exercise is to show how to use Grunt as a build tool for an application, and by using Angular, CoffeeScript, and Sass, we can explore how easy Grunt makes it to compile, combine, and minify assets while we work on the application. Even if you’ve never used Angular, Sass, or CoffeeScript before, you should have no problem following along.
To pull this off we’ll build up a Gruntfile that does the following:
1. Converts all of the CoffeeScript files into JavaScript and puts the resulting JavaScript in a temporary folder
2. Concatenates Angular and the Markdown library we’re using with the application logic we just converted from CoffeeScript to make a single app.js file
3. Minifies that app.js file, storing it in assets/app.js, which is where our web page will look for it
4. Adds support for Sass, the CSS preprocessor, by adding a file watcher and then doing a compilation similar to what we did with CoffeeScript
5. Sets things up so that any time we change a CoffeeScript or Sass file, the whole build process gets kicked off
6. Configures Grunt to reload our web browser when we make changes to any of our application files
We won’t be writing these Grunt tasks ourselves. Instead we’ll rely on several Grunt plug-ins to do all the heavy lifting. We’ll just need to configure the plug-ins to work together.
Let’s get started!
Creating the App
First, create a folder called markdown, and inside of that folder create folders for the CoffeeScript files, the Sass files, and the assets folder, which is where our finalized JavaScript and CSS files will go.
|
|
$ mkdir markdown |
|
|
$ cd markdown |
|
|
$ mkdir coffeescript |
|
|
$ mkdir sass |
|
|
$ mkdir assets |
Next, we’ll need the Angular framework, the Markdown.js library for converting Markdown code to HTML, and the angular-sanitize library so we can push raw HTML back into the interface.[7][8][9] Without the sanitation library, Angular won’t let us use the output from the Markdown converter.
To get those libraries, we’ll use Bower like we did in Fetching Client-Side Libraries with Bower. Run the following commands:
|
|
$ bower install angular |
|
|
$ bower install angular-sanitize |
|
|
$ bower install markdown#0.6.0-beta1 |
We need to build the client-side version of the Markdown library so we can use it in our web application, and we can do that easily thanks to a Grunt task distributed with the library. Execute the following commands:
|
|
$ cd bower_components/markdown |
|
|
$ npm install |
|
|
$ cd ../../ |
Running the npm install command inside of the project installs the projects’ dependencies and then runs a Grunt task that builds the distributions for the project. The JavaScript file we need is now located in the bower_components/markdown/dist folder.
If you’re unable to download the libraries using Bower, you can find everything you need in the workflows folder of the book’s downloadable source code, along with this completed project.
Now let’s look at the application code itself.
The App Logic
Here’s how the user interface works: There’s a single <textarea> field on the page, and we’re using Angular to watch that field for changes. When data in that field changes, the updatePreview method gets called. This method will use a simple service in Angular to convert the input to HTML. The results get placed back on the page in the update area.
All of the application’s logic will be stored in several separate CoffeeScript files, which will make it easy for us to find things later on. We’re using CoffeeScript for our application logic, and CoffeeScript: Accelerated JavaScript Development [Bur11] does a great job of covering how CoffeeScript works. However, the code we’re using should be easy enough to understand.
Our Angular app uses a basic module called MarkdownEditor, and we define that in coffeescript/app.coffee like this:
|
workflow/markdown/coffeescript/app.coffee |
|
|
|
@MarkdownEditor = angular.module("markdownEditor", []) |
Next, we define the controller that is bound to the HTML page. This controller is what makes it possible to get the data from the page and push the results back to the page:
|
workflow/markdown/coffeescript/controllers/main_controller.coffee |
|
|
|
# The controller |
|
|
@MarkdownEditor.controller "MainCtrl", ['$scope','$sce', 'MarkdownConverter', |
|
|
($scope, $sce, MarkdownConverter) -> |
|
|
$scope.updatePreview = -> |
|
|
converted = MarkdownConverter.convert($scope.input) |
|
|
$scope.output = $sce.trustAsHtml(converted) |
|
|
] |
This controller uses a service called MarkdownConverter, which we define in coffeescript/factories/markdown_converter.coffee:
|
workflow/markdown/coffeescript/factories/markdown_converter.coffee |
|
|
|
@MarkdownEditor.factory "MarkdownConverter", -> |
|
|
|
|
|
convert: (input) -> |
|
|
markdown.toHTML input |
This service uses the markdown.js library to do the conversion. Although this code is fairly trivial, the markdown.js library can do additional transformations, and if we wanted to do those transformations, encapsulating them in this factory would keep our code clean and separated.
That takes care of the program logic. Thanks to Angular, there wasn’t much to do.
Creating the Interface
The logic is in place, so now we can connect it to our interface, which is just a simple HTML page with a text area and an output region. Create the file index.html with the following code:
|
workflow/markdown/index.html |
|
|
Line 1 |
<!DOCTYPE html> |
|
- |
<html lang="en-US"> |
|
- |
<head> |
|
- |
<meta charset="utf-8"> |
|
5 |
<title>Markdown Editor</title> |
|
- |
<link rel="stylesheet" href="assets/app.css"> |
|
- |
</head> |
|
- |
<body ng-app="markdownEditor"> |
|
- |
<header class="masthead"> |
|
10 |
<h1>MarkDownMark Editor</h1> |
|
- |
</header> |
|
- |
|
|
- |
<div class="content" ng-controller="MainCtrl"> |
|
- |
<section class="editor"> |
|
15 |
<textarea class="input" |
|
- |
ng-model="input" |
|
- |
ng-change="updatePreview()"> |
|
- |
</textarea> |
|
- |
</section> |
|
20 |
|
|
- |
<section id="output" class="preview" ng-bind-html="output"></section> |
|
- |
|
|
- |
</div> |
|
- |
|
|
25 |
<footer> |
|
- |
<small>Copyright © 2014 AwesomeCo</small> |
|
- |
</footer> |
|
- |
|
|
- |
<script src="assets/app.js"></script> |
|
30 |
|
|
- |
</body> |
|
- |
</html> |
Notice the <body> tag. The ng-app attribute is an Angular directive that specifies the module we’re using. Then on line 13 we wire up the controller we want to use with the ng-controller attribute. Everything inside of this element is scoped to the controller. So the controller’s methods are visible to the view, and the fields we bind using ng-model or ng-click are visible to the controller.
This page loads a single app.js file at the bottom. To keep our app easy to develop, we’ve kept its components in separate files. We’ll use Grunt to merge them all together next.
Wrangling the JavaScript
Our index.html file is looking for a file called assets/app.js, but all we have are several separate CoffeeScript files. Using Grunt, we’ll compile those CoffeeScript files into a single JavaScript file, then combine that file with the Angular and Markdown libraries, creating a single file we can bring into our document. And to ensure that the file downloads even faster, we’ll minify it, which will remove whitespace and rename variables and functions to reduce the overall file size considerably.
Compiling CoffeeScript
Let’s set up a basic package.json and Gruntfile for our app. First, create package.json with the following contents:
|
|
{ |
|
|
"name": "MarkdownEditor", |
|
|
"version": "0.0.1", |
|
|
"description": "A simple markdown editing app", |
|
|
"main": "index.html", |
|
|
"author": "Max Power", |
|
|
} |
Next, create the Gruntfile.js file in the root of the application with the usual skeleton:
|
workflow/markdown/Gruntfile.js |
|
|
|
module.exports = function(grunt){ |
|
|
}; |
With those in place, we can install grunt and the grunt-contrib-coffee plug-in with npm:
|
|
$ npm install grunt --save-dev |
|
|
$ npm install grunt-contrib-coffee --save-dev |
And now we can configure the CoffeeScript plug-in to build the JavaScript files our browsers crave.
Chunked Configuration
So far we’ve used Grunt’s initConfig function to set up configuration variables. But we’re going to create a somewhat complex Gruntfile that might be hard to follow after awhile. Grunt offers a more modular way for us to define configurations with its config function. This lets us define our configuration in manageable pieces. Add this to the Gruntfile:
|
workflow/markdown/Gruntfile.js |
|
|
|
grunt.loadNpmTasks('grunt-contrib-coffee'); |
|
|
grunt.config('coffee', { |
|
|
app: { |
|
|
options: { |
|
|
bare: false |
|
|
}, |
|
|
files: { |
|
|
'tmp/compiled.js': ['coffeescript/app.coffee', |
|
|
'coffeescript/factories/*.coffee', |
|
|
'coffeescript/controllers/*.coffee'] |
|
|
} |
|
|
} |
|
|
}); |
As you might be able to guess, the loadNpmModule loads a Grunt plug-in. Once we load the plug-in, we can configure it.
The CoffeeScript plug-in is designed as a multitask, so we’ll have to specify targets even though we’ll have only a single one. We’ll call our target app and then specify the files. The files key uses a simple JavaScript object, where we specify the destination file as the key, and then an array of source files as the value.
In some cases, you might be able to get away with just specifying coffeescript/**/*.coffee as the source, which would take all of the CoffeeScript files found within the coffeescript folder. But by being a little more specific, we can ensure that things are included in the right order.
In the Terminal, run the command grunt coffee, and you’ll see the output:
|
|
$ grunt coffee |
|
|
Running "coffee:app" (coffee) task |
|
|
|
|
|
Done, without errors. |
Now, provided that we didn’t make any typos in our CoffeeScript files, we’ll see a new folder, called tmp in our project. It contains a new file called compiled.js that holds the compiled version of our CoffeeScript files. The separate files were stitched together into compiled.js. We’re not done with this file, though.
Concatenating JavaScript
The CoffeeScript compilation task put all of our application files into a single file when it converted them. But we’re going to bundle up the Angular libraries along with our own code to create a single JavaScript file.
We wrote our own simple task to do concatenation back in Chapter 3, One Task, Many Outputs, but this time we’ll use the grunt-contrib-concat plug-in instead, as it’s more flexible than what we wrote. To install it use npm as follows:
|
|
$ npm install grunt-contrib-concat --save-dev |
Once the plug-in is installed, we require it in our configuration file and configure it the same way we did with the CoffeeScript plug-in.
|
workflow/markdown/Gruntfile.js |
|
|
|
grunt.loadNpmTasks('grunt-contrib-concat'); |
|
|
grunt.config('concat', { |
|
|
scripts: { |
|
|
src: ['bower_components/angular/angular.js', |
|
|
'bower_components/angular-sanitize/angular-sanitize.js', |
|
|
'bower_components/markdown/dist/markdown.js', |
|
|
'tmp/compiled.js'], |
|
|
dest: 'tmp/app.js' |
|
|
} |
|
|
}); |
We pull in the required libraries from the components folders, along with the file generated by our CoffeeScript code. We place the output back in the tmp folder because we’re not quite done with it yet.
Let’s run the task:
|
|
$ grunt concat |
|
|
Running "concat:scripts" (concat) task |
|
|
File "tmp/app.js" created. |
|
|
|
|
|
Done, without errors. |
We’re almost finished with the JavaScript side of things. However, the JavaScript file we just created is quite large. Let’s shrink it down.
Minifying JavaScript
To make our JavaScript download faster, we’re going to minify it. This process removes comments, whitespace, and line breaks, and even obfuscates code by shortening variable names. We’ll use the Uglify utility to do this by way of the grunt-contrib-uglify plug-in.
First, we install the plug-in:
|
|
$ npm install grunt-contrib-uglify --save-dev |
By now you can probably guess how we’ll configure this. One of the nice things about Grunt plug-ins is they share a level of consistency. In the Gruntfile, load the plug-in and then add the configuration section, placing the output in the assets folder, which is where our index.html file looks for the JavaScript file.
|
workflow/markdown/Gruntfile.js |
|
|
|
grunt.loadNpmTasks('grunt-contrib-uglify'); |
|
|
grunt.config('uglify', { |
|
|
scripts: { |
|
|
files: { |
|
|
'assets/app.js' : 'tmp/app.js' |
|
|
} |
|
|
} |
|
|
}); |
And that takes care of the JavaScript! Test it out by running the following:
|
|
$ grunt uglify |
|
|
Running "uglify:scripts" (uglify) task |
|
|
File assets/app.js created: 816.58 kB → 128.81 kB |
|
|
|
|
|
Done, without errors. |
The task’s output shows us that by uglifying the content, we’ve turned more than 800 KB of JavaScript code into only 128 KB. That’s going to make the application download a lot faster, and illustrates why this minification process has become part of a modern workflow.
And that’s it for the JavaScript code.
Adding Some Style
Our application would look a lot better with some styling. Writing pure CSS is incredibly limiting, though. Using a CSS preprocessor improves things greatly. With a preprocessor, you can produce CSS using variables, loops, functions, and intelligent selector inheritance. Like CoffeeScript, you run Sass files through a processor that generates regular, well-formatted CSS files for use in the browser. There are a lot of preprocessors out there, but Sass is one of the most advanced.[10] Covering Sass in detail is out of scope for this book, but if you want to know more, look atPragmatic Guide to Sass [CC11]. For this exercise, we’ll just place some prewritten code in the project so we can set up our Grunt tasks.
To use Sass, you need to have the Ruby programming language installed. On OS X, you already have what you need. On Windows you can download an installer for Ruby called RubyInstaller.[11] Install that using the defaults, and you’re ready to go. On Linux you can install Ruby using your package manager.
With Ruby installed, you can execute this command:
|
|
$ gem install sass |
The gem command is like npm but for Ruby libraries.
Creating Styles with Sass
Using Sass, we can easily break up our styles into separate files, making things easy to organize. And, like CoffeeScript, Sass can stitch these files together automatically if we structure them properly.
Let’s define the site’s layout so it looks like the interface in Figure 2, Our Markdown editor, with a header, a footer, and a middle region split into two panes. Our editor will be on the left and the live preview will be on the right.
To pull this off we’ll use some absolute positioning. Using Sass, we can define mixins, reusable named chunks of code we can “mix in” to our CSS rules. In the file sass/_layout.scss add the following code:
|
workflow/markdown/sass/_layout.scss |
|
|
|
@mixin row{ |
|
|
box-sizing: border-box; |
|
|
overflow: hidden; |
|
|
position: absolute; |
|
|
left: 0; |
|
|
right: 0; |
|
|
} |
|
|
|
|
|
@mixin col{ |
|
|
overflow: hidden; |
|
|
position: absolute; |
|
|
top: 0; |
|
|
bottom: 0; |
|
|
} |
In this file we’re defining two mixins; one for rows and one for columns. We’ll use them in our main stylesheet next. The filename starts with an underscore because it’s a “partial” file, which is meant to be pulled into another Sass file. Grunt’s Sass task will skip any file with an underscore when it converts our files.
To use this partial, we create the file sass/style.scss and add this to the top:
|
workflow/markdown/sass/style.scss |
|
|
|
@import 'layout'; |
This merges the contents of _layout.scss into this file. We can now use those mixins we defined.
One of Sass’s best features is the ability to use variables for things like colors. Let’s define two variables for colors in this stylesheet:
|
|
$backgroundColor: #DDD; |
|
|
$borderColor: #000; |
Variables in Sass start with a dollar sign, and we use a colon instead of the equals sign to assign the value to the variable.
Beneath the variables, add the code to define the header, footer, and middle section of the interface. We want the header and footer to be 100% wide, and we want the editor and the preview pane to sit side by side. First, we divide the page into three horizontal rows that stretch the full width of the page:
|
Line 1 |
body{ margin: 0; } |
|
- |
|
|
- |
header{ |
|
- |
@include row; |
|
5 |
height: 100px; |
|
- |
} |
|
- |
|
|
- |
.content{ |
|
- |
@include row; |
|
10 |
overflow-y: auto; |
|
- |
top: 100px; |
|
- |
bottom: 50px; |
|
- |
} |
|
- |
|
|
15 |
footer{ |
|
- |
@include row; |
|
- |
bottom: 0; |
|
- |
height: 50px; |
|
- |
text-align: center; |
|
20 |
} |
On line 4 we make a call to our row mixin, which brings the properties of that mixin into the CSS rule. This way we don’t have to repeat style rules manually, and we also don’t have to add classes like row or col to our HTML code.
Next we align the preview pane and the editor pane:
|
Line 1 |
.editor, .preview{ |
|
- |
@include col; |
|
- |
width: 50%; |
|
- |
background-color: $backgroundColor; |
|
5 |
border: 1px solid $borderColor; |
|
- |
} |
|
- |
|
|
- |
textarea.input{ |
|
- |
height: 100%; |
|
10 |
padding: 1%; |
|
- |
width: 100%; |
|
- |
} |
|
- |
|
|
- |
.preview{ |
|
15 |
padding: 1%; |
|
- |
right: 0; |
|
- |
} |
On line 2 we apply the col mixin to the editor and the preview pane and set the width for both to 50%. Then, on line 4 and the line that follows, we use the Sass variables for the values of our colors instead of hard-coding the values like we would with normal CSS. Finally, we style the text box and the preview pane.
This takes care of the code for the interface, but our interface won’t look any different yet because we’ve written this code with a CSS preprocessor. Let’s get Grunt to turn this Sass into CSS so our browser can actually use it.
Adding Sass to Grunt
By this point you can probably guess how this will work. There’s a plug-in called grunt-contrib-sass that we have to install and configure. So, install the plug-in with npm:
|
|
$ npm install grunt-contrib-sass --save-dev |
Then add the following configuration to the Gruntfile:
|
workflow/markdown/Gruntfile.js |
|
|
|
grunt.loadNpmTasks('grunt-contrib-sass'); |
|
|
grunt.config('sass', { |
|
|
app: { |
|
|
files: { |
|
|
'tmp/app.css': ['sass/style.scss'] |
|
|
} |
|
|
} |
|
|
}); |
Notice that we only need to convert the sass/style.scss file. The partial file gets included in that file. However, if we specified the partial, or we used a wildcard pattern like sass/*.scss, the Sass plug-in is smart enough to ignore any files with underscores.
Notice that we placed the output file in the tmp folder. We’re not quite done with the stylesheet yet.
Minifying Our CSS
We’ve minified the JavaScript code in our app, and now we’ll do the same with our CSS. We’ll use the grunt-contrib-cssmin plug-in to do this, and the configuration for this is very easy. First, install the plug-in as a dependency:
|
|
$ npm install grunt-contrib-cssmin --save-dev |
Then, configure it almost exactly like the uglify task for JavaScript, by reading in the tmp/app.css file that the Sass task created and placing the minified version in the assets/ folder:
|
workflow/markdown/Gruntfile.js |
|
|
|
grunt.loadNpmTasks('grunt-contrib-cssmin'); |
|
|
grunt.config('cssmin', { |
|
|
app: { |
|
|
files: { |
|
|
'assets/app.css': ['tmp/app.css'] |
|
|
} |
|
|
} |
|
|
}); |
Now let’s run the cssmin task to generate the assets/app.css file that our interface wants:
|
|
$ grunt sass cssmin |
|
|
Running "cssmin:app" (cssmin) task |
|
|
File assets/app.css created: 1 kB → 537 B |
|
|
Done, without errors. |
The task runs perfectly, cutting our file size nearly in half. And now we have all the components of our workflow, as well as a completely working application that you should be able to view by opening index.html in your browser.
But wow, what a lot of steps. Let’s simplify this whole process with a build task that runs all of the steps.
Simplifying the Build
In Chapter 1, The Very Basics, you learned how to make a task that calls other tasks. Let’s do the same thing here. We want one task that, when called, invokes the tasks to build the JavaScript files and the CSS files. Let’s add a build task to our Gruntfile:
|
workflow/markdown/Gruntfile.js |
|
|
|
grunt.registerTask('build', "Builds the application.", |
|
|
['coffee', 'concat:scripts', 'sass', 'cssmin', 'uglify' ]); |
When we execute this build task, the whole process runs.
|
|
$ grunt build |
|
|
Running "coffee:app" (coffee) task |
|
|
|
|
|
Running "concat:scripts" (concat) task |
|
|
File "tmp/app.js" created. |
|
|
|
|
|
Running "sass:app" (sass) task |
|
|
File tmp/app.css created. |
|
|
Running "cssmin:app" (cssmin) task |
|
|
File assets/app.css created. |
|
|
|
|
|
Running "uglify:scripts" (uglify) task |
|
|
File assets/app.js created. |
|
|
|
|
|
Done, without errors. |
And that is ridiculously cool. A single command builds our application, letting us take advantage of powerful preprocessors and minification tools. But we can do better than this.
Watching Files for Changes
We’ve set up a ton of tasks so far, but every time we make a change to a file we have to run Grunt manually. And we really should never have to do anything manually when it comes to task management. Let’s use the grunt-contrib-watch plug-in to watch files for changes and run the appropriate tasks.
Install the plug-in first:
|
|
$ npm install grunt-contrib-watch --save-dev |
To configure this plug-in, we specify a target, the files to watch, and the Grunt tasks that should run when those files change. For our JavaScript files, we’ll actually want to watch the CoffeeScript files for changes. When those files change, we’ll need to run the coffee, concat, and uglify tasks. Then we’ll want to watch the CSS files for changes and run the sass and cssmin tasks. So first, let’s set up the configuration to watch the JavaScript files:
|
workflow/markdown/Gruntfile.js |
|
|
|
grunt.loadNpmTasks('grunt-contrib-watch'); |
|
|
|
|
|
grunt.config('watch', { |
|
|
scripts: { |
|
|
files: ['coffeescripts/**/*.coffee'], |
|
|
tasks: ['coffee', 'concat:scripts', 'uglify'], |
|
|
|
|
|
options: { |
|
|
spawn: false |
|
|
} |
|
|
}, |
|
|
}); |
And then, inside of that configuration block, we’ll add another target for the Sass files:
|
workflow/markdown/Gruntfile.js |
|
|
|
styles: { |
|
|
files: ['sass/**/*.scss'], |
|
|
tasks: ['sass', 'cssmin'], |
|
|
options: { |
|
|
spawn: false |
|
|
} |
|
|
}, |
To use this, we employ the grunt watch command. Unlike other tasks, Grunt doesn’t return to the command line. Instead, it stays running in a loop, watching files for changes. Open one of the Sass files or the CoffeeScript files, make a change, save the file, and watch the changes happen.
To stop watching, press Ctrl-C.
Refreshing the Browser Automatically
The grunt-contrib-watch plug-in has built-in support for LiveReload, an amazing tool that can automatically reload web pages and CSS documents in the browser whenever files change. This is incredibly useful for any web developer, so let’s configure it.
All we have to do is add a few additional options to the configuration section for the grunt-contrib-watch plug-in. First, we’ll configure it to watch for changes to the index.html file. We won’t need to run any tasks when that file changes. And then we’ll include the option to enable LiveReload support.
|
workflow/markdown/Gruntfile.js |
|
|
|
interface: { |
|
|
files: ['index.html'] |
|
|
}, |
|
|
options: { |
|
|
livereload: true |
|
|
} |
To see this in action, you’ll need to download the extension for your web browser. You can get extensions for Chrome, Firefox, and Safari from the LiveReload website.[12] Install the plug-in, then fire up grunt-watch in your Terminal and activate the plug-in. Then change something in the HTML or the CSS and see the page update after you save the file.
LiveReload is one of the most powerful tools a modern web developer has. Being able to see the changes live without having to refresh the page manually dramatically speeds up the development process, especially when you’re modifying a site’s design. Since Grunt makes this so easy to set up, you should make it part of your workflow immediately.
What’s Next?
That was quite a trek, but as a result we have a simple, structured, and easy-to-follow configuration file for our application’s build process. We can use this as we develop new features for our app, and even to prepare the application for production. Your applications don’t have to use CoffeeScript or Sass (although I strongly suggest using a CSS preprocessor instead of writing CSS by hand), but grunt-contrib-concat and grunt-contrib-watch will hopefully find their way into your next project’s workflow. But don’t move on to the next chapter just yet; try these first:
· Investigate other plug-ins for your workflow, such as grunt-contrib-jshint, which checks your JavaScript files for errors, or grunt-contrib-imagemin, which can automatically compress images.[13][14]
· Use the preprocess option for scripts in the package.json file to call the grunt build task whenever you run npm install. This will make it easy for someone who works on your app to get started with it.
· Investigate Yeoman,[15] a tool that incorporates project creation with Grunt and gives you a workflow like this automatically, with generators for specific projects.
We’ve integrated a ton of cool plug-ins, but now let’s look into what makes up a Grunt plug-in as we create our own. Go on—turn the page!
Footnotes
|
[7] |
http://code.angularjs.org/1.2.10/angular.js |
|
[8] |
https://github.com/evilstreak/markdown-js/releases |
|
[9] |
http://code.angularjs.org/1.2.10/angular-sanitize.js |
|
[10] |
http://sass-lang.org |
|
[11] |
http://rubyinstaller.org/ |
|
[12] |
http://feedback.livereload.com/knowledgebase/articles/86242-how-do-i-install-and-use-the-browser-extensions- |
|
[13] |
https://www.npmjs.org/package/grunt-contrib-jshint |
|
[14] |
https://www.npmjs.org/package/grunt-contrib-imagemin |
|
[15] |
http://yeoman.io |
All materials on the site are licensed Creative Commons Attribution-Sharealike 3.0 Unported CC BY-SA 3.0 & GNU Free Documentation License (GFDL)
If you are the copyright holder of any material contained on our site and intend to remove it, please contact our site administrator for approval.
© 2016-2026 All site design rights belong to S.Y.A.