Head First JavaScript Programming (2014)
Chapter 13. Using Prototypes: Extra strength objects

Learning how to create objects was just the beginning. It’s time to put some muscle on our objects. We need more ways to create relationships between objects and to share code among them. And, we need ways to extend and enhance existing objects. In other words, we need more tools. In this chapter, you’re going to see that JavaScript has a very powerful object model, but one that is a bit different than the status quo object-oriented language. Rather than the typical class-based object-oriented system, JavaScript instead opts for a more powerful prototype model, where objects can inherit and extend the behavior of other objects. What is that good for? You’ll see soon enough. Let’s get started...

If you’re used to Java, C++, or any language based on classical object-oriented programming let’s have a quick chat.
And if you aren’t... what, you got a date? Take a seat, and go along for the ride—you might just learn something as well.
We’ll give it to you straight: JavaScript doesn’t have a classical object-oriented model, where you create objects from classes. In fact, JavaScript doesn’t have classes at all. In JavaScript, objects inherit behavior from other objects, which we call prototypal inheritance, or inheritance based on prototypes.
NOTE
This may change in the future: the next version of JavaScript may add classes. So keep an eye out on wickedlysmart.com/hfjs for the latest on this.
JavaScript gets a lot of groans (and confused looks) from those trained in object-oriented programming, but know this: prototype-based languages are more general than classical object oriented ones. They’re more flexible, efficient and expressive. So expressive that if you wanted to, you could use JavaScript to implement classical inheritance.
NOTE
Left to the reader as an exercise.
So, if you are trained in the art of classical object-oriented programming, sit back, relax, open your mind and be ready for something a little different. And if you have no idea what we’re talking about when we say “classical object-oriented programming,” that just means you’re starting fresh, which is often a very good thing.
Hey, before we get started, we’ve got a better way to diagram our objects
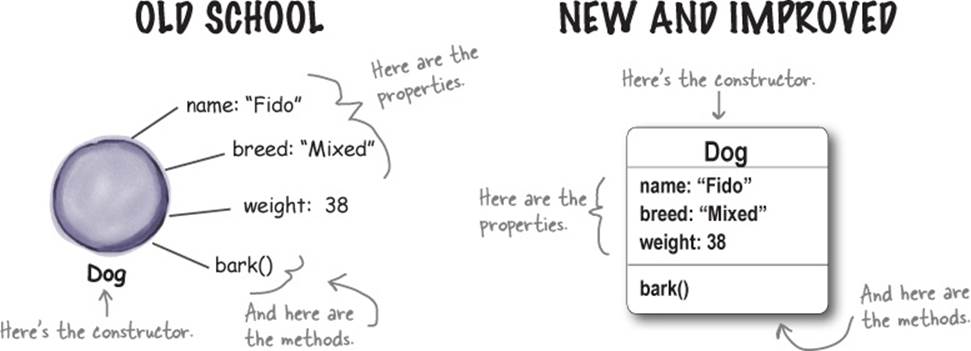
The object diagrams we’ve been using are cute and all that, but this is the serious objects chapter, so we’re going to get more serious about our object diagrams. Actually, we really like the old ones, but the object diagrams in this chapter get complicated enough we just can’t squeeze everything we need to into them.
So, without further ado, let us present the new format:
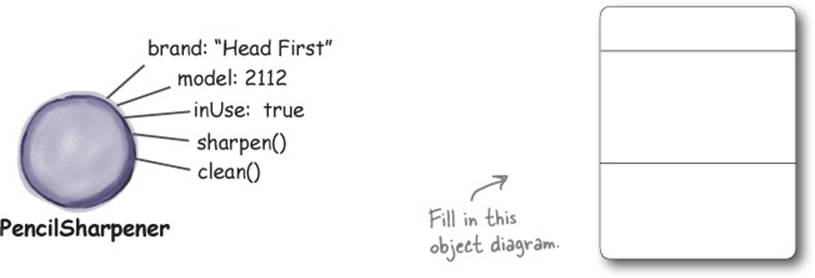
SHARPEN YOUR PENCIL
Do a little practice just to make sure you’ve got the new format down. Take the object below and redo it in the new and improved object diagram.
Revisiting object constructors: we’re reusing code, but are we being efficient?
Remember the Dog constructor we created in the last chapter? Let’s take another quick look and review what we’re getting out of using the constructor:
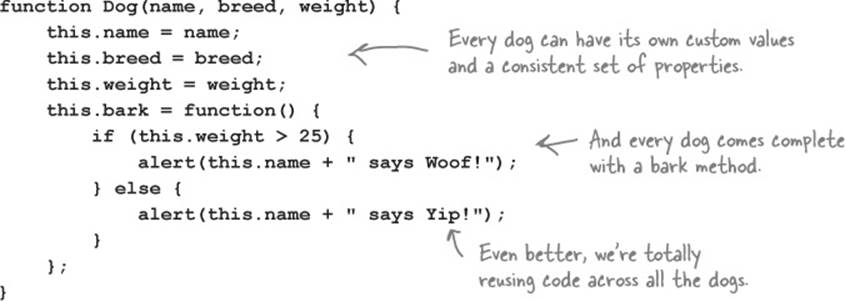
So by using the constructor we get a nice, consistent dog object that we can customize to our liking, and, we also can leverage the methods that are defined in it (in this case there’s only one, bark). Further, every dog gets the same code from the constructor, saving us lots of code headaches if things change in the future. That’s all great, but let’s look at what happens at runtime when we evaluate the code below:
var fido = new Dog("Fido", "Mixed", 38);
var fluffy = new Dog("Fluffy", "Poodle", 30);
var spot = new Dog("Spot", "Chihuahua", 10);
This code causes three dog objects to be created. Let’s use our new object diagrams to see what that looks like:
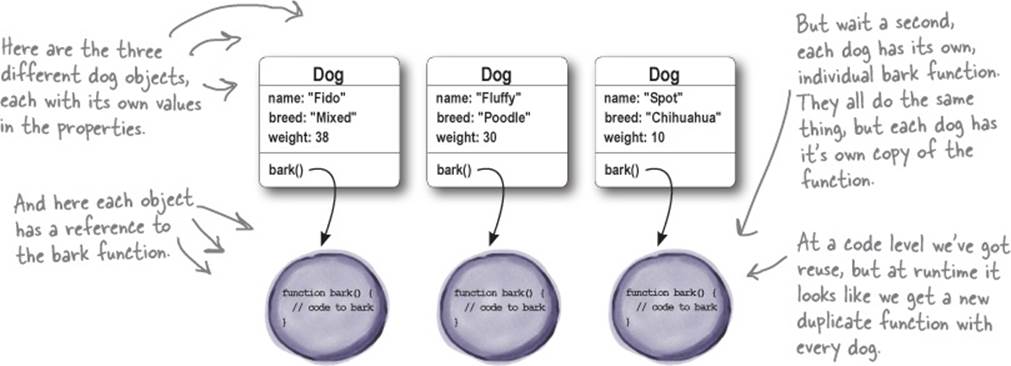
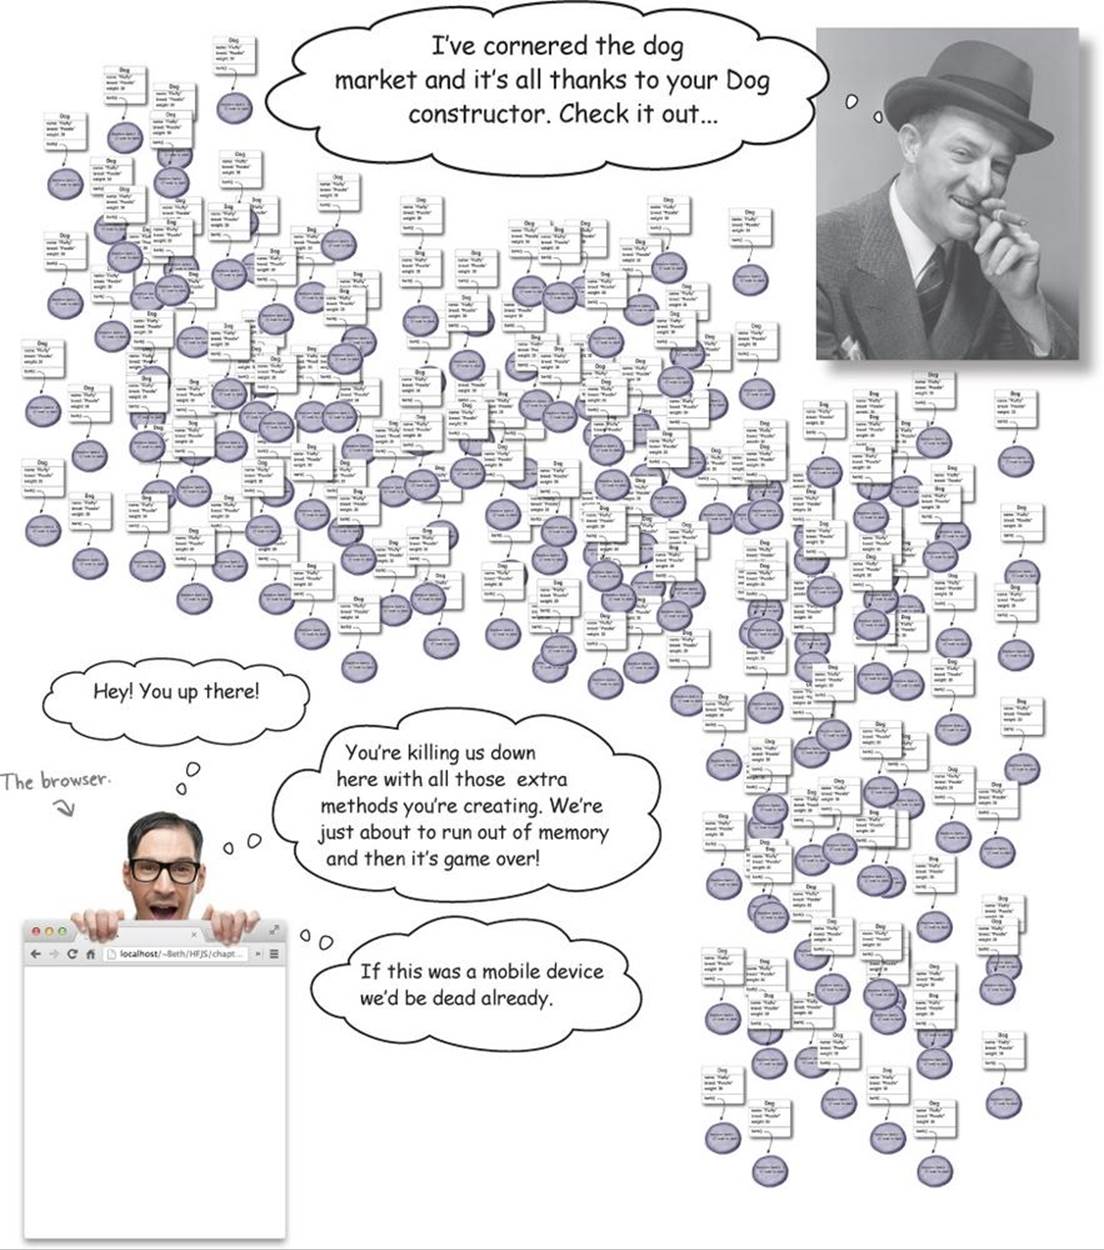
Is duplicating methods really a problem?
Actually, it is. In general we don’t want a new set of methods being created every time you instantiate an object with a constructor. Doing so hurts the performance of your application and impacts resources on your computer, which can be a big deal, particularly on mobile devices. And, as you’re going to see, there are more flexible and powerful ways to craft your JavaScript objects.
Let’s take a step back and think about one of the main reasons we used constructors in the first place: we were trying to reuse behavior. For instance, remember that we had a bunch of dog objects and we wanted all those objects to use the same bark method. By using a constructor we achieved this at a code level by placing the bark method in one place—inside the Dog constructor—and so we reused the same bark code each time we instantiated an object. But, our solution doesn’t look as promising at runtime because every dog instance is getting its own copy of thebark method.
NOTE
Typically when we talk about an object’s “behavior” we’re referring to the set of methods it supports.
Now the reason we’re running into this problem is because we aren’t taking full advantage of JavaScript’s object model, which is based on the idea of prototypes. In this model, we can create objects that are extensions of other objects—that is, of prototype objects.
To demonstrate prototypes, hmm... if only we had a dog prototype around that we could work from...
What are prototypes?
JavaScript objects can inherit properties and behavior from other objects. More specifically, JavaScript uses what is known as prototypal inheritance, and the object you’re inheriting behavior from is called the prototype. The whole point of this scheme is to inherit and reuse existing properties (including methods), while extending those properties in your brand new object. That’s all quite abstract so let’s work through an example.
NOTE
When an object inherits from another, it gains access to all its methods and properties.
We’ll start with a prototype for a dog object. Here’s what it might look like:
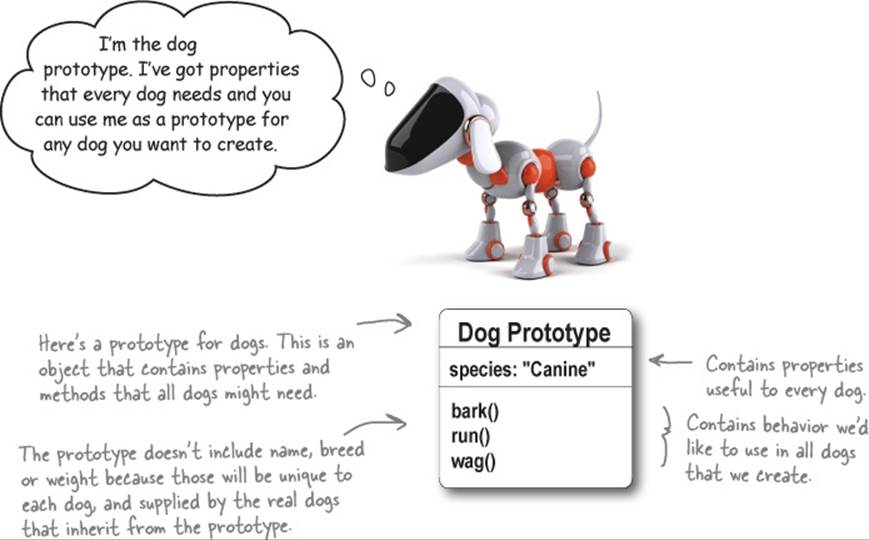
So now that we have a good dog prototype, we can create dog objects that inherit properties from that prototype. Our dog objects will also extend the prototype properties with dog-specific properties or behaviors. For example, we know we’ll be adding a name, breed and weight to each dog.
You’ll see that if any of these dogs needs to bark, run or wag their tails, they can rely on the prototype for those behaviors, because they inherit them from the prototype. So, let’s create a few dog objects so you can see how this all works.
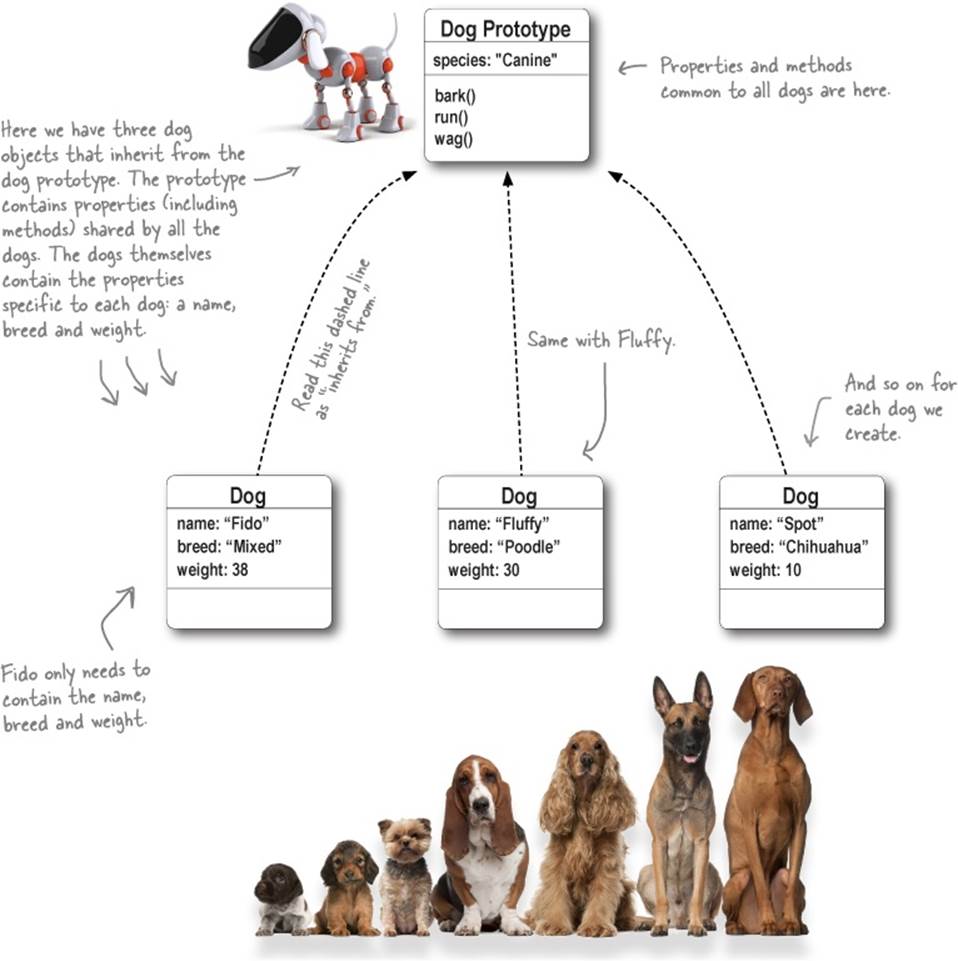
Inheriting from a prototype
First, we need to create object diagrams for the Fido, Fluffy and Spot dog objects and have them inherit from the new dog prototype. We’ll show inheritance by drawing a set of dashed lines from the dog instances to the prototype. And remember, we put only the methods and properties that are common to all dogs in the dog prototype, because all the dogs will inherit them. All the properties specific to an actual dog, like the dog’s name, go into the dog instances, because they are different for each dog.
How inheritance works
How do we make dogs bark if the bark method isn’t in the individual dog instances, but rather is in the prototype? That’s where inheritance comes in. When you call a method on an object instance, and that method isn’t found in the instance, you check the prototype for that method. Here’s how.
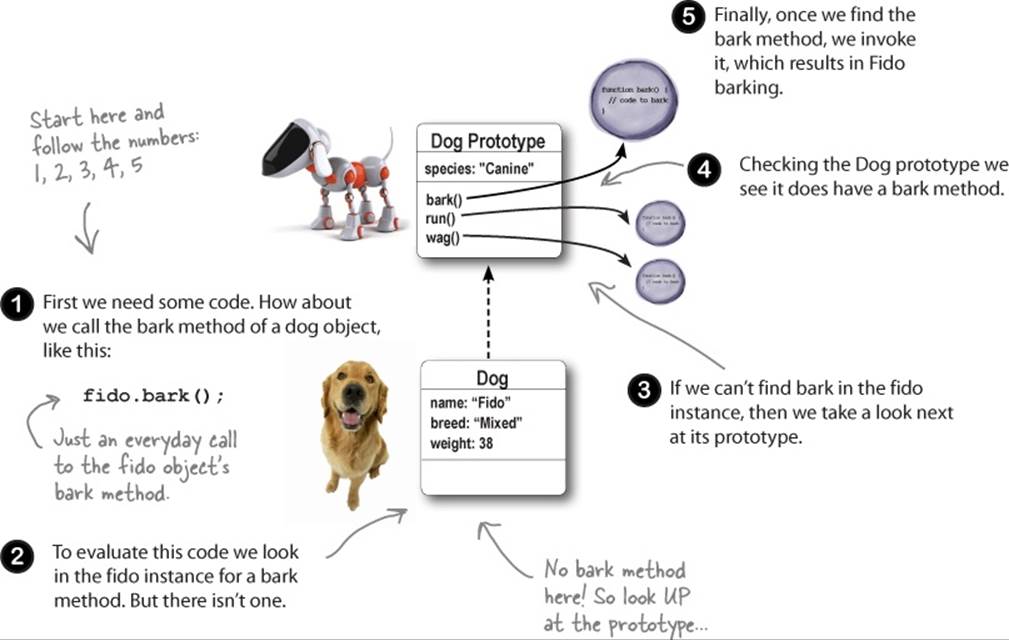
Properties work the same way. If we write code that needs fido.name, the value will come from the fido object. But if we want the value of fido.species, we first check the fido object, but when it isn’t found there, we check the dog prototype (and find it).
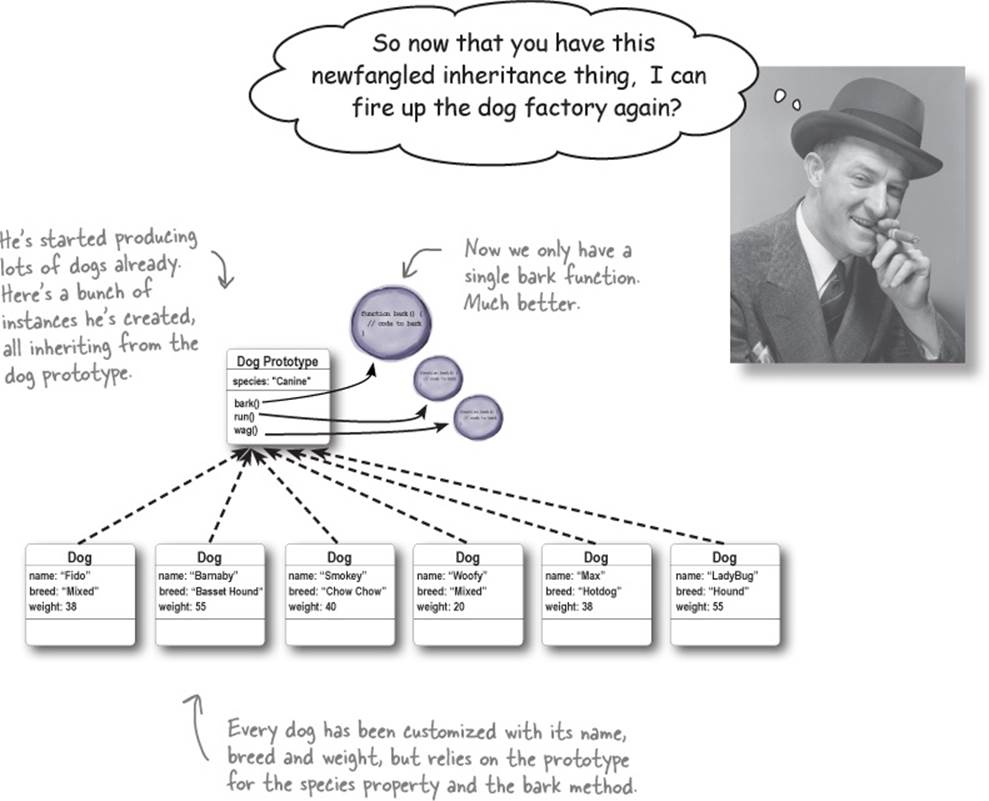
Now that you understand how to use inheritance we can create a large number of dogs. All the dogs can all still bark, but now they’re relying on the dog prototype object to supply that bark method. We have code reuse, not just by having our code written in one place, but by having all dog instances use the same bark method at runtime, which means we aren’t causing lots of runtime overhead.
You’re going to see that by using prototypes, you’ll be able to quickly assemble objects that reuse code, and that can be extended with new behavior and properties.
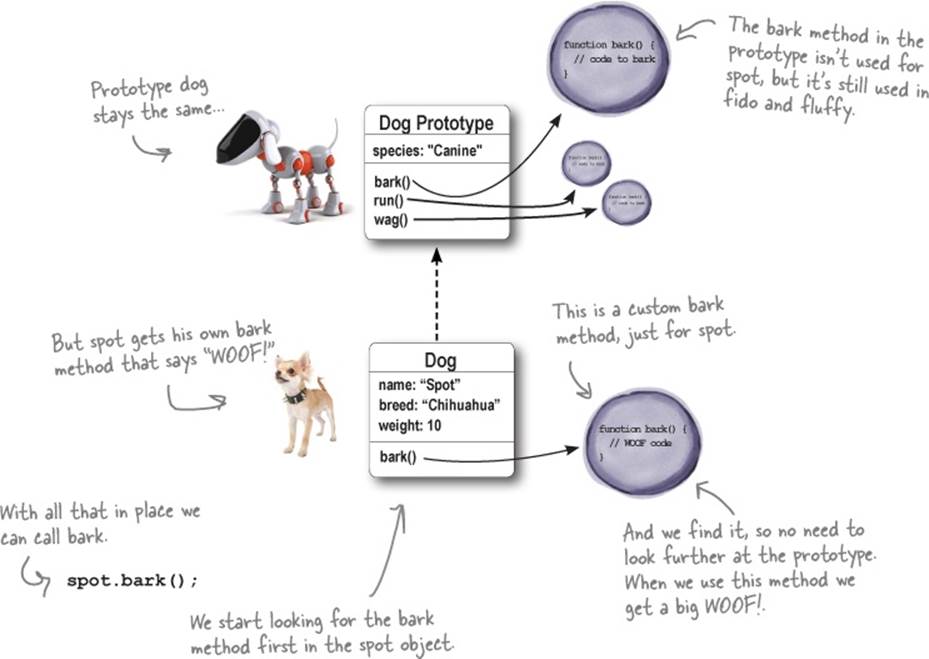
Overriding the prototype
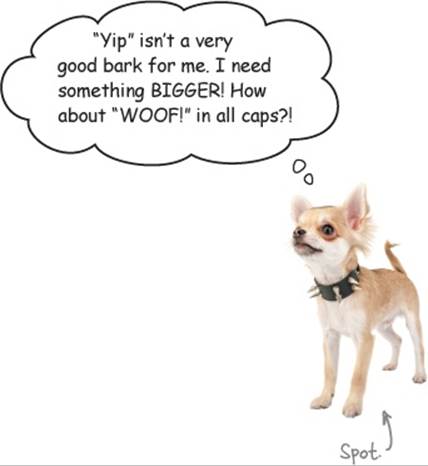
Just because you inherit something from the prototype doesn’t mean you’re stuck with it. We can always override properties and methods by supplying them in the object instance. That works because JavaScript always looks in the object instance—that is, the specific dog object—for a property before it looks in the prototype. So, if you want to use a custom bark method for spot, all you have to do is put that custom bark method in the spot object. Once you do that, when JavaScript looks for the bark method to invoke, it will find the method in spot, and won’t bother looking in the prototype.
Let’s see what it looks like when we override Spot’s bark method to give him the ability to have a big “WOOF” bark.
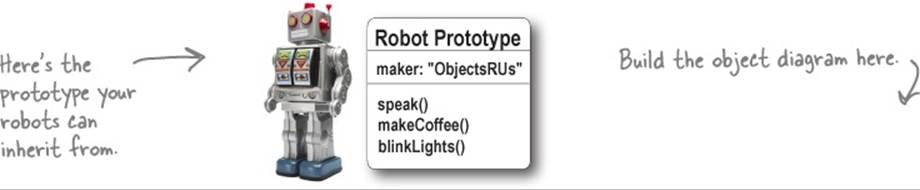
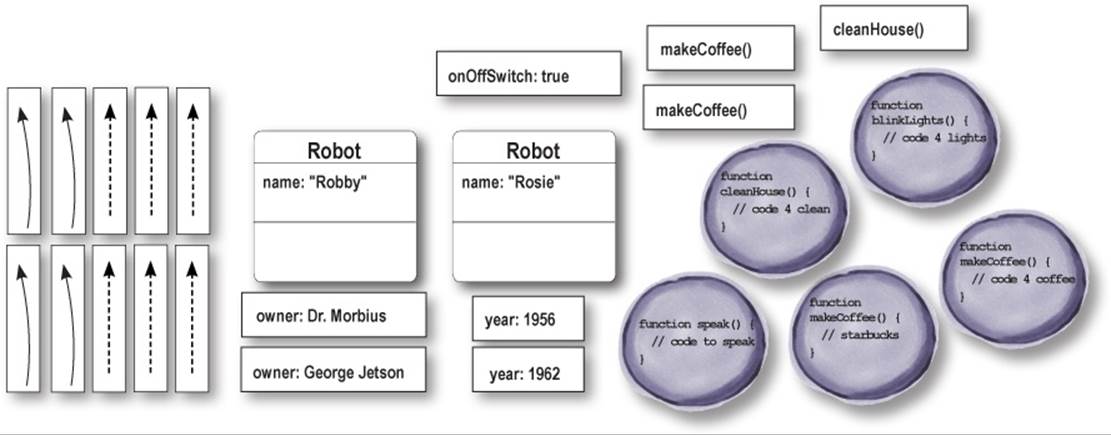
CODE MAGNETS
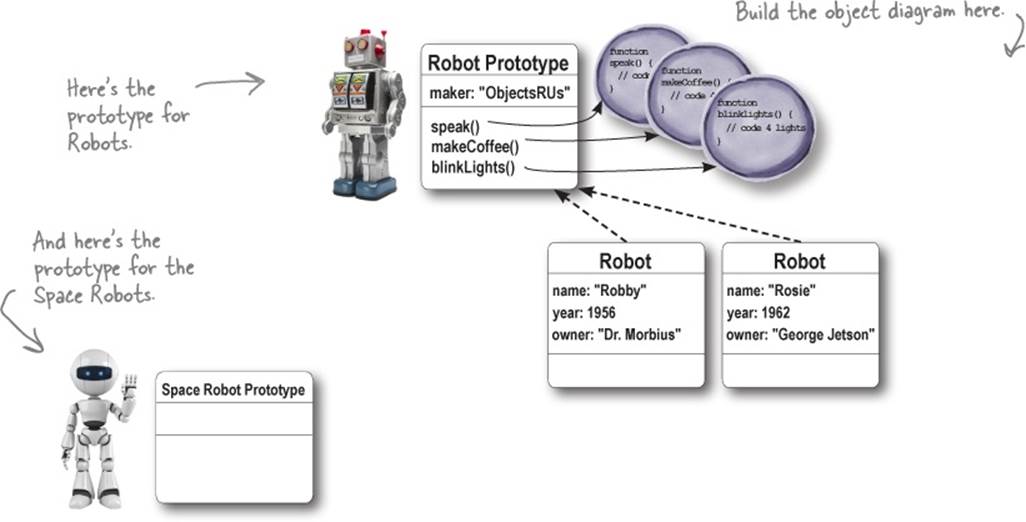
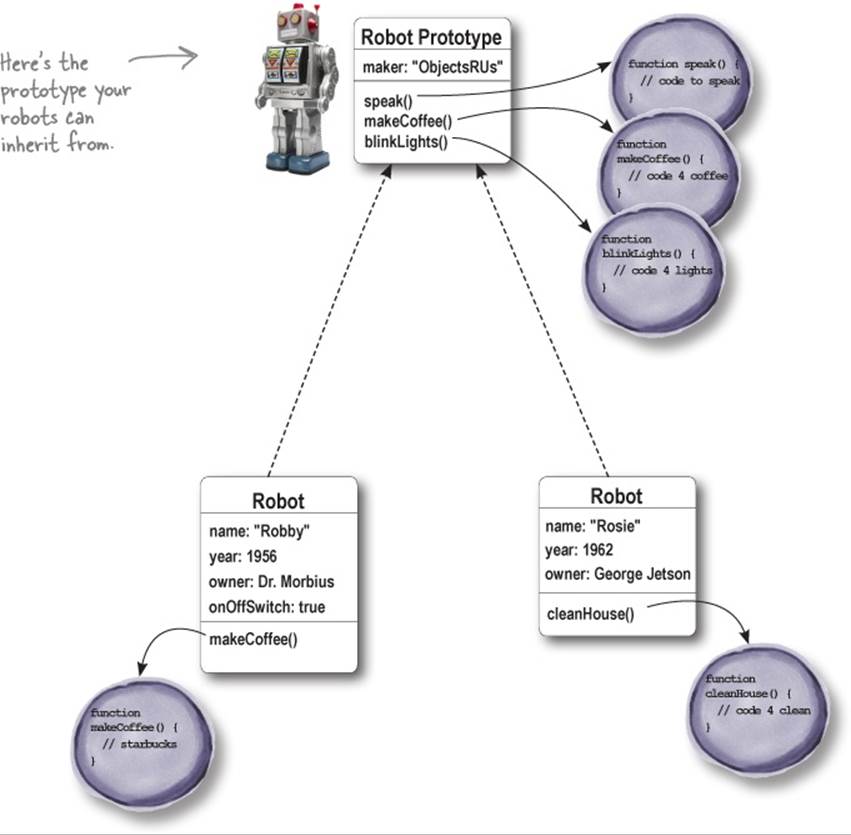
We had an object diagram on the fridge, and then someone came and messed it up. Can you help put it back together? To reassemble it, we need two instances of the robot prototype. One is Robby, created in 1956, owned by Dr. Morbius, has an on/off switch and runs to Starbucks for coffee. We’ve also got Rosie, created in 1962, who cleans house and is owned by George Jetson. Good luck (oh, and there might be some extra magnets below)!
So where do you get a prototype?
We’ve talked a lot about the dog prototype, and at this point, you’re probably ready to see an example that uses code rather than diagrams. So, how do we create or get a hold of a dog prototype? Well, it turns out, you’ve actually had one all along. You just didn’t know it.
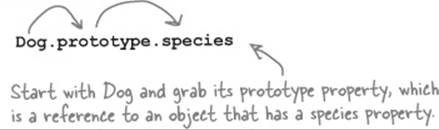
And here’s how you access it in code:

Now, if you take this prototype property...
Don’t look at the man behind the curtain! Just kidding; you’re right. We were trying to gloss over that point (and we really still intend to, for now). Here’s the short story: functions are objects in JavaScript. In fact, in JavaScript just about everything is an object underneath, even arrays if you haven’t figured that one out yet.
But, for now, we don’t want to get sidetracked on this. Just know that functions, in addition to doing everything you already know they can do, can also have properties, and in this case, the constructor always has a prototype property. More on functions and other things that are objects later, we promise.
How to set up the prototype
As we were saying, you can access the prototype object through the Dog constructor’s prototype property. But what properties and methods are in the prototype object? Well, until you set it up yourself, not much. In other words it’s your job to add properties and methods to the prototype. We typically do that before we start using the constructor.
So, let’s set up the dog prototype. First we need a constructor to work from, so let’s look at our object diagram to see how to make that:
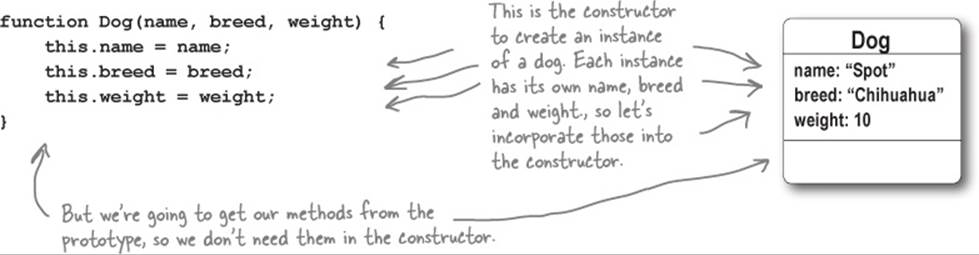
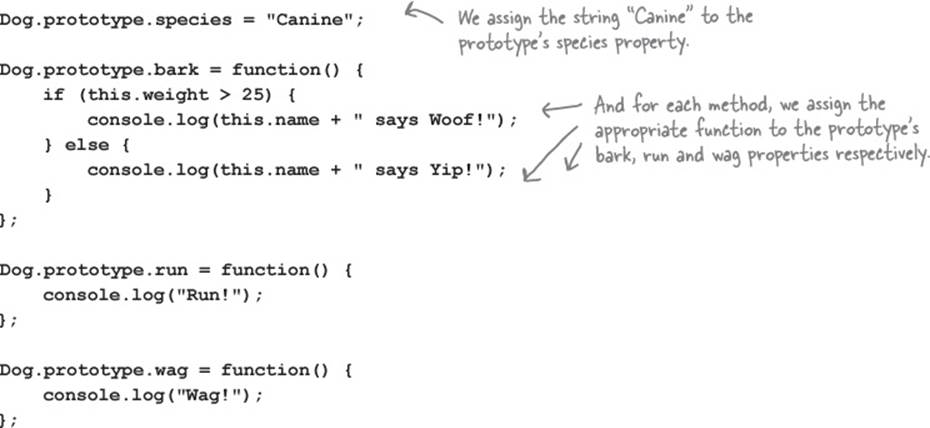
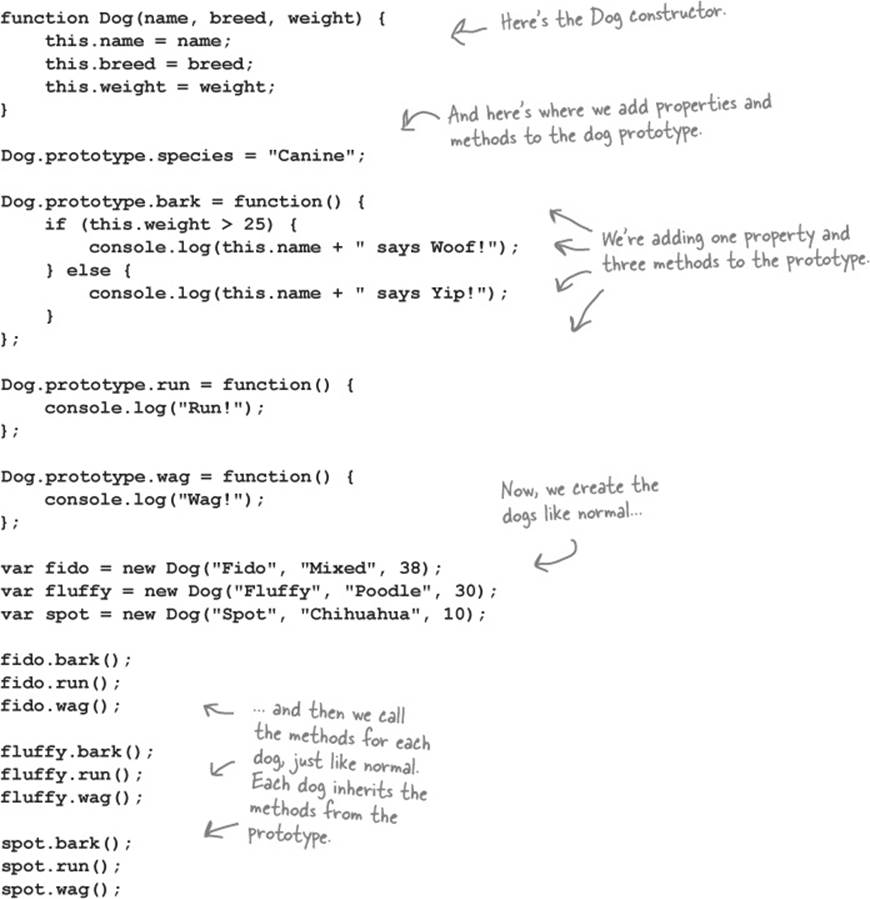
Okay, now that we have a constructor, let’s set up our dog prototype. We want it to have the species property and the bark, run and wag methods. Here’s how we do that:
SERIOUS CODING
Don’t forget about chaining:
Test drive the prototype with some dogs 
Go ahead and get this code typed into a file (“dog.html”) and loaded into your browser for testing. We’ve reproduced all the code after the changes we made on the previous page, and added a bit of testing code. Make sure all your dogs bark, run and wag like they should.
JAVASCRIPT CONSOLE
But wait a second, didn’t Spot want his bark to be WOOF!?
Fido says Woof!
Run!
Wag!
Fluffy says Woof!
Run!
Wag!
Spot says Yip!
Run!
Wag!
Each dog is barking, running and wagging. Good.
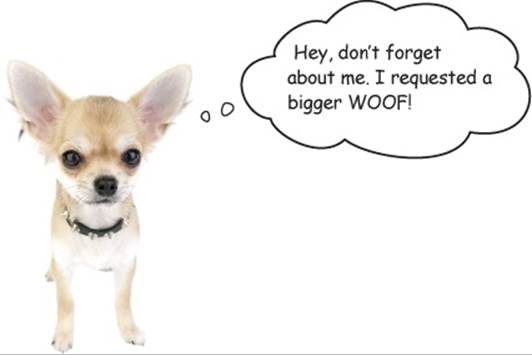
Give Spot his WOOF! in code
Don’t worry, we didn’t forget about Spot. Spot requested a bigger WOOF! so we need to override the prototype to give him his own custom bark method. Let’s update the code:
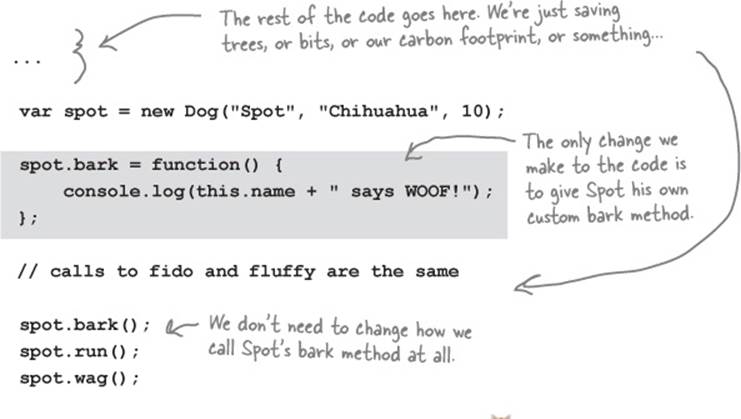
Test drive the custom bark method 
Add the new code above and take it for a quick test drive...
JAVASCRIPT CONSOLE
Fido says Woof!
Run!
Wag!
Fluffy says Woof!
Run!
Wag!
Spot says WOOF!
Run!
Wag!
Spot gets the WOOF! he wanted.
EXERCISE
Remember our object diagram for the Robby and Rosie robots? We’re going to implement that now. We’ve already written a Robot constructor for you along with some test code. Your job is to set up the robot prototype and to implement the two robots. Make sure you run them through the test code.
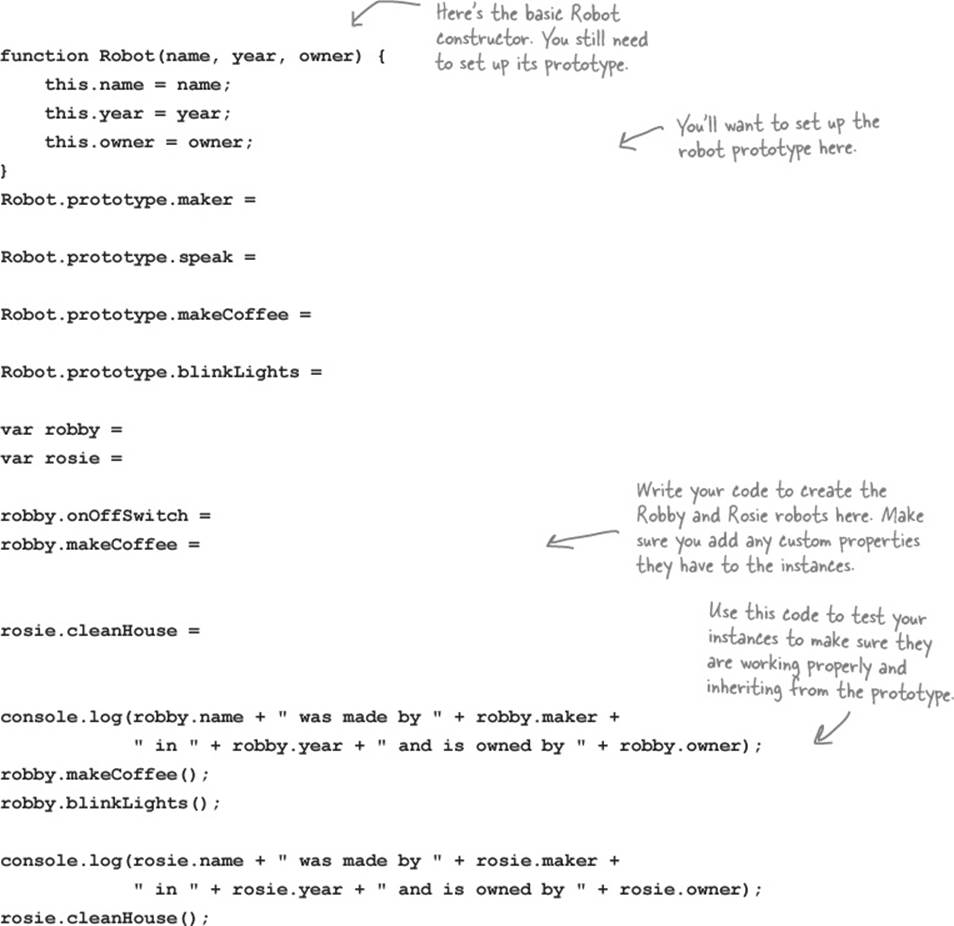
Good question. When we didn’t have prototypes this was easy because we know this gets set to the object whose method was called. When we are calling the bark method in the prototype, you might think that this is now set to the prototype object. Well, that’s not how it works.
When you call an object’s method, this is set to the object whose method was called. If the method is not found in that object, and is found in the prototype, that doesn’t change the value of this. this always refers to the original object—that is, the object whose method was called—even if the method is in the prototype. So, if we find the bark method in the prototype, then we call the method, with this set to the original dog object, giving us the result we want, like “Fluffy says Woof!”.
Teaching  a new trick
It’s time to teach our dogs a new trick. That’s right we said “dogs” plural, not dog. You see, now that we have a prototype, if we add any methods to that prototype, even after we’ve already created dog objects, all dogs inheriting from the prototype immediately and automatically get this new behavior.
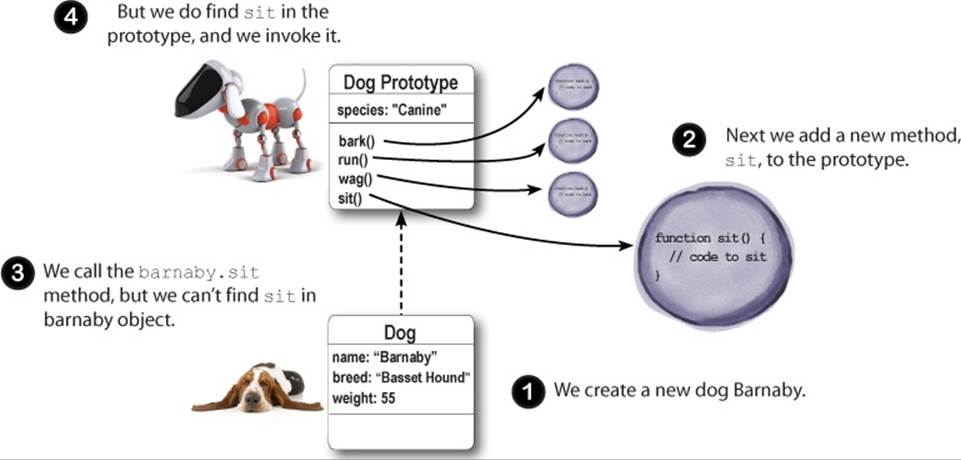
Let’s say we want to teach all our dogs to sit. What we do is add a method to the prototype for sitting.

We’ll give this a try with Barnaby:

A CLOSER LOOK

Let’s take a closer look at how this works. Make sure you follow the sequence 1, 2, 3, 4.
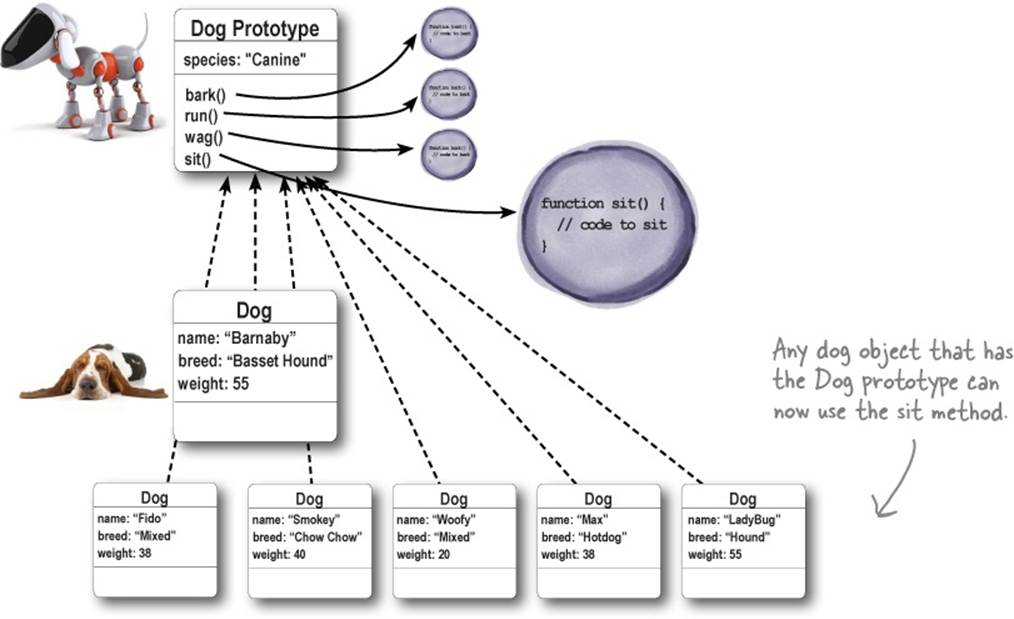
Prototypes are dynamic
We’re glad to see Barnaby can now sit. But it turns out that now all our dogs can sit, because once you add a method to a prototype, any objects that inherit from that prototype can make use of that method:
NOTE
This works for properties too, of course.
THERE ARE NO DUMB QUESTIONS
|
Q: |
Q: So when I add a new method or property to a prototype, all the object instances that inherit from it immediately see it? |
|
A: |
A: If by “see it” you mean that they inherit that method or property, you are correct. Notice that this gives you a way to extend or change the behavior of all your instances at runtime by simply changing their prototype. |
|
Q: |
Q: I see how adding a new property to a prototype makes that property available to all the objects that inherit from the prototype. What if I change an existing property in the prototype; does that affect those objects in the same way? Like if I change the property species to “Feline” instead of “Canine”, does that mean all existing dogs are now “Feline” species? |
|
A: |
A: Yes. If you change any property in the prototype, it affects all the objects that inherit from that prototype, unless that object has overridden that property. |
EXERCISE
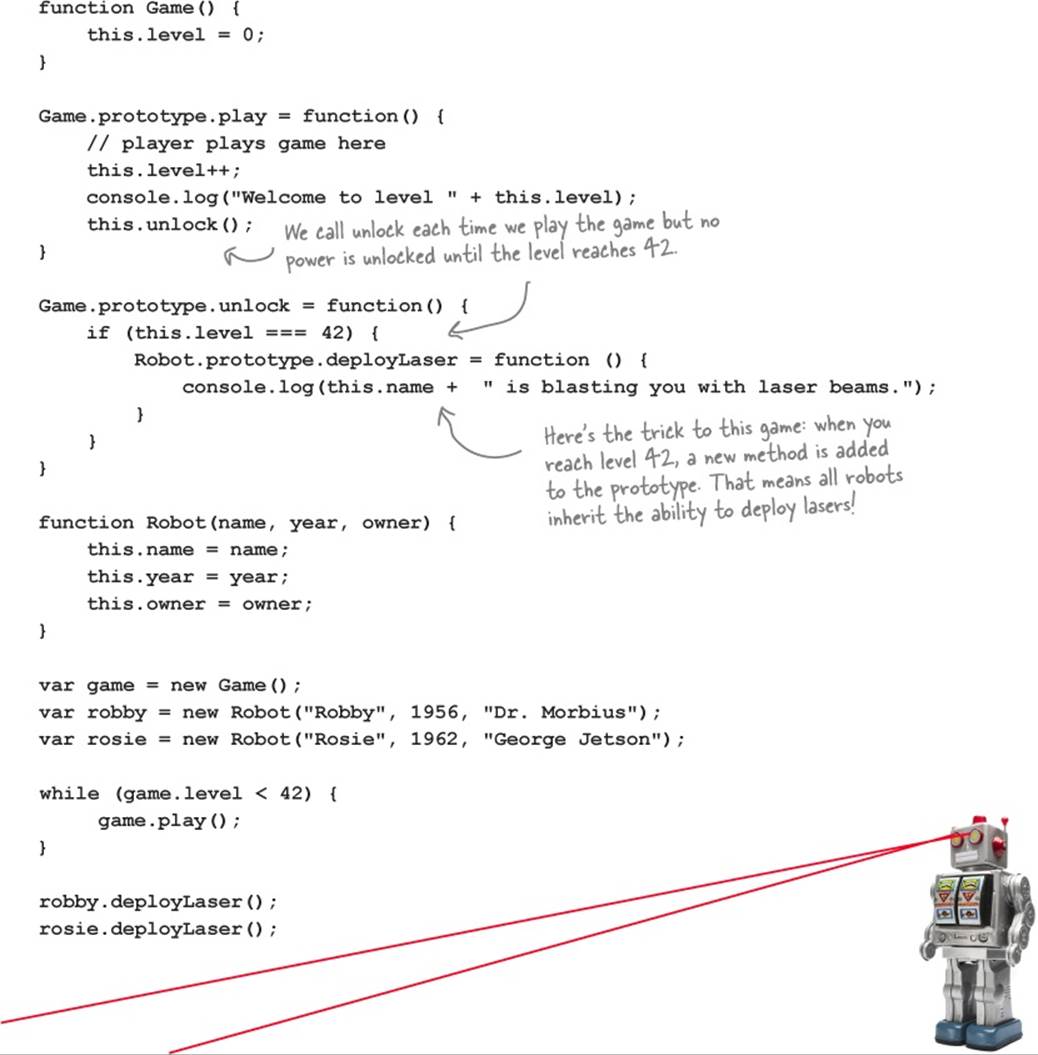
Robby and Rosie are being used in a Robot game. You’ll find the code for them below. In this game, whenever a player reaches level 42, a new robot capability is unlocked: the laser beam capability. Finish the code below so that at level 42 both Robby and Rosie get their laser beams. Check your answer at the end of the chapter before you go on.
function Game() {
this.level = 0;
}
Game.prototype.play = function() {
// player plays game here
this.level++;
console.log("Welcome to level " + this.level);
this.unlock();
}
Game.prototype.unlock = function() {
}
function Robot(name, year, owner) {
this.name = name;
this.year = year;
this.owner = owner;
}
var game = new Game();
var robby = new Robot("Robby", 1956, "Dr. Morbius");
var rosie = new Robot("Rosie", 1962, "George Jetson");
while (game.level < 42) {
game.play();
}
robby.deployLaser();
rosie.deployLaser();
JAVASCRIPT CONSOLE
Welcome to level 1
Welcome to level 2
Welcome to level 3
...
Welcome to level 41
Welcome to level 42
Rosie is blasting you with
laser beams.
A sample of our output. When you finish your code, give it a play and see which robot wins and gets to blast its laser beams!

A more interesting implementation of the sit method
Let’s make the sit method a little more interesting: dogs will start in a state of not sitting (in other words, standing up). So, when sit is called, if a dog isn’t sitting, we’ll make him sit. Otherwise, we’ll let the user know he’s already sitting. To do this we’re going to need an extra property,sitting, to keep track of whether the dog is sitting or not. Let’s write the code:
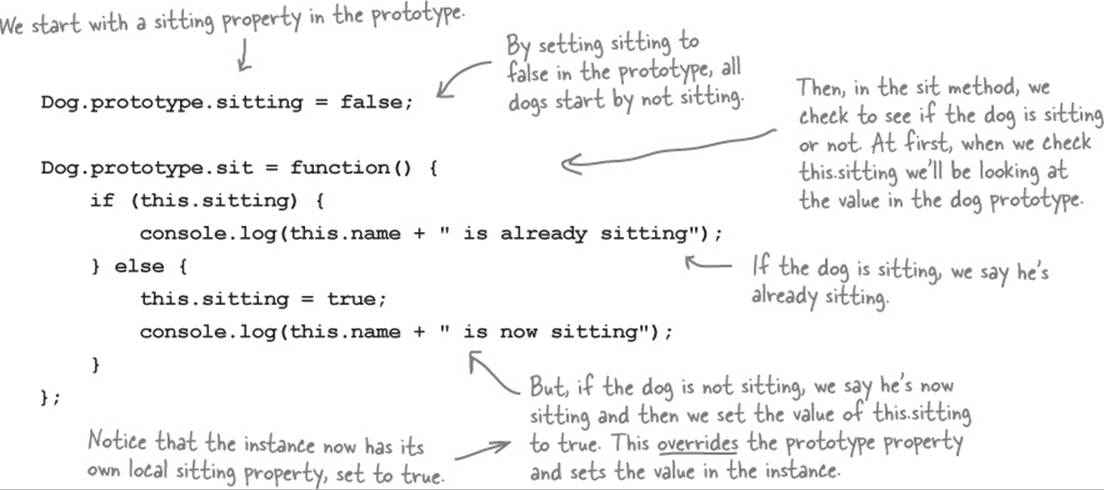
The interesting thing about this code is that when a dog instance starts out life, it inherits a default value of false for sitting. But, as soon as the sit method is called, the dog instance adds its own value for sitting, which results in a property being created in the instance. This overrides the inherited sitting property in the prototype. This gives us a way to have a default for all dogs, and then to specialize each dog if we need to.
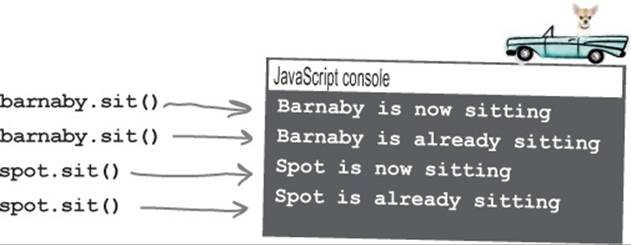
Test drive the new sit method
Let’s give this a try for real. Go ahead and update your code, adding the new property and implementation of sit. Now when we test drive this code, you can see that we can make barnaby sit, and then make spot sit, and each dog keeps track of whether it is sitting separately:
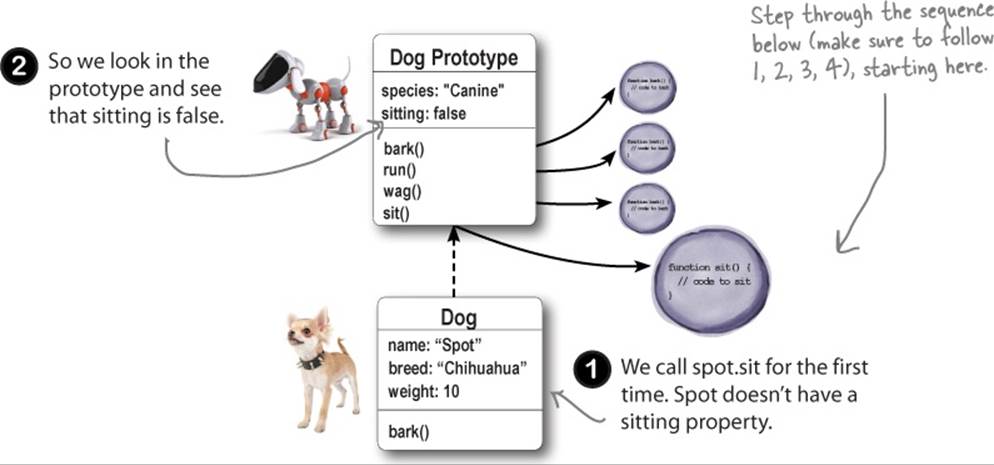
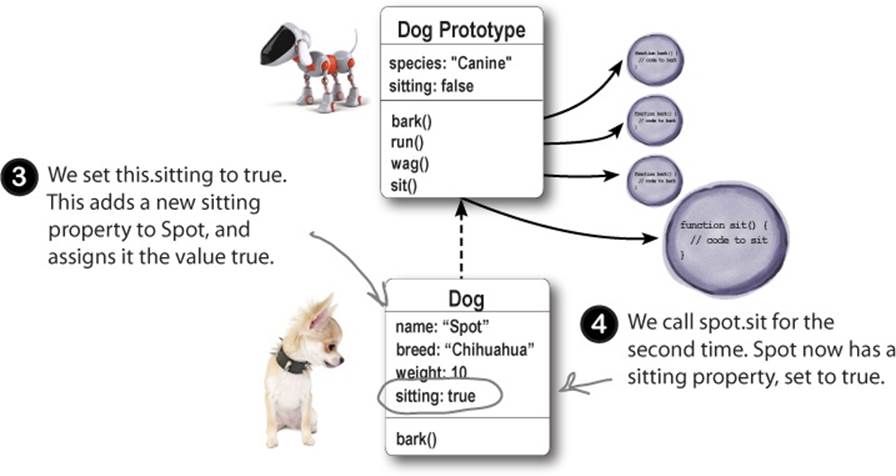
One more time: how the sitting property works
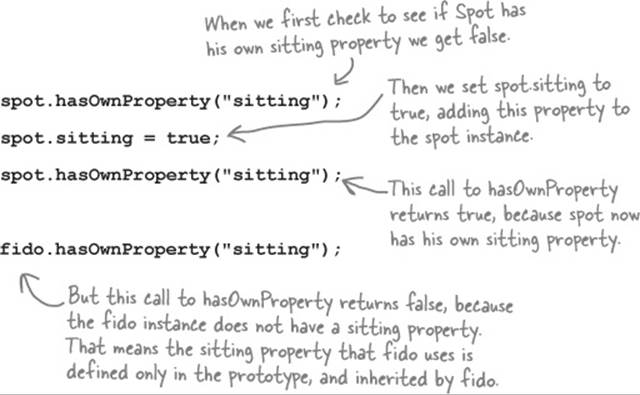
Let’s make sure we’ve got this down, because if you go too fast on this implementation you might miss the key details. Here’s the key: the first time we get the value of sitting, we’re getting it from the prototype. But then when we set sitting to true, that happens in the object instance, not the prototype. And after that property has been added to the object instance, every subsequent time we get the value of sitting, we’re getting it from the object instance because it is overriding the value in the prototype. Let’s step through it one more time:
Yes, there is. You can use the hasOwnProperty method that every object has. The hasOwnProperty method returns true if a property is defined in an object instance. If it’s not, but you can access that property, then you can assume the property must be defined in the object’s prototype.
Let’s try it on fido and spot. First, we know that the species property is implemented only in the dog prototype, and neither spot nor fido has overridden this property. So if we call the hasOwnProperty method and pass in the property name, “species”, as a string, we get back false for both:

Now let’s try it for the sitting property. We know that the sitting property is defined in the prototype and initialized to false. So we assign the value true to spot.sitting, which overrides the sitting property in the prototype and defines sitting in the spot instance. Then we’ll ask both spot and fido if they have their own sitting property defined:
EXERCISE
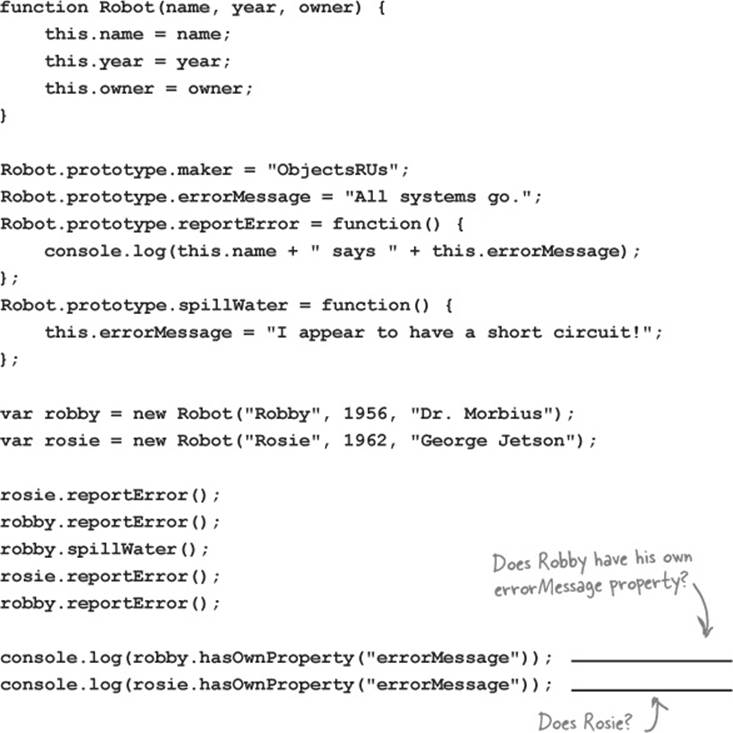
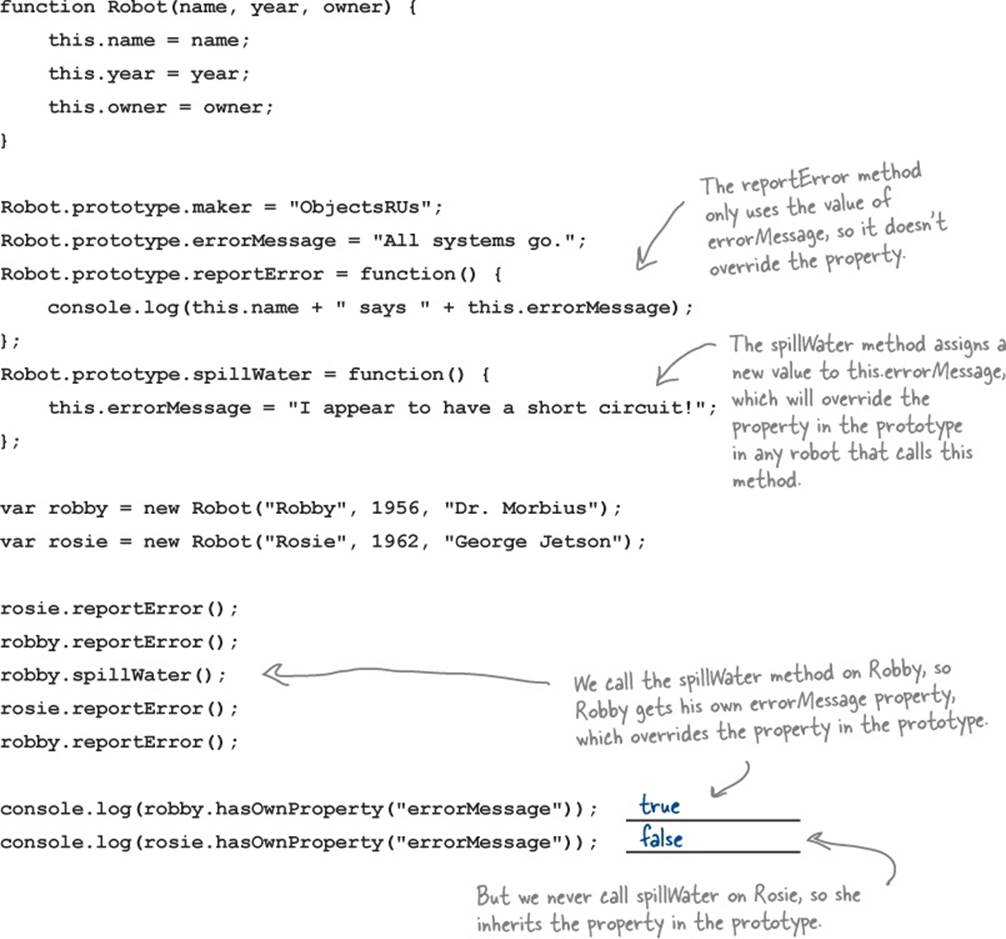
We’ve added a new capability to our robots, Robby and Rosie: they can now report when they have an error through the reportError method. Trace the code below, paying particular attention to where this method gets its error information, and to whether it’s coming from the prototype of the robot instance.
Below give the output of this code:
BEST DOG IN SHOW
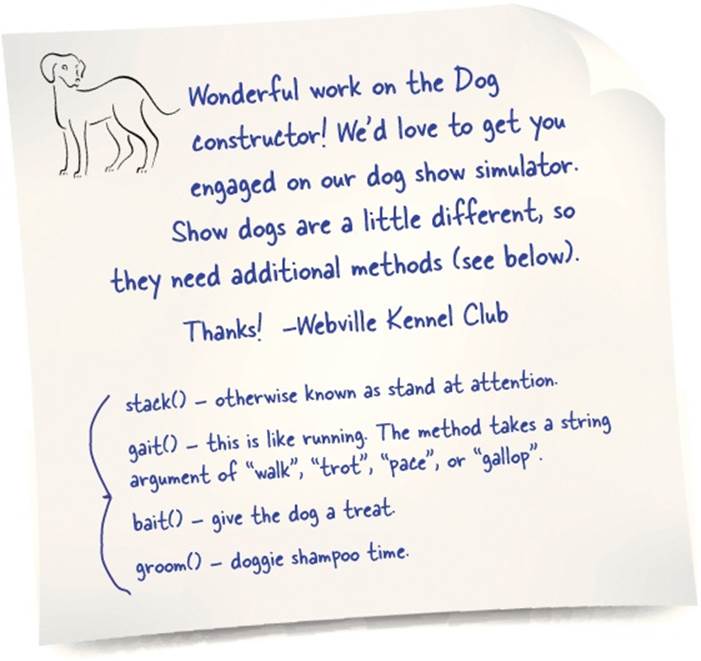
All your hard work in this chapter has already paid off. The Webville Kennel Club saw your work on the dog objects and they immediately knew they’d found the right person to implement their dog show simulator. The only thing is they need you to update the Dog constructor to make show dogs. After all, show dogs aren’t ordinary dogs—they don’t just run, they gait. They don’t go through the trash, they show a tendency towards scent articles; they don’t beg for treats, they show a desire for bait.
More specifically, here’s what they’re looking for:
How to approach the design of the show dogs
So how are we going to design this? Clearly we’d like to make use of our existing dog code. After all, that’s why Webville Kennel came to us in the first place. But how? Let’s get some thoughts on the ways we could approach this:


Joe: More than one prototype? What does that even mean?
Judy: Think about it like your own inheritance.
Joe: What inheritance? If I had an inheritance I wouldn’t be working here! Just kidding...
Judy: Well, you don’t just inherit qualities from your parents, right? You inherit a little from your grandparents and your great-grandparents and so on.
Joe: Yeah, got that.
Judy: Well, with JavaScript you can set up a chain of prototypes that your object inherits from.
Frank: An example might help.
Judy: Say you have a bird prototype that knows how to do all things most birds do, like fly.
Frank: Easy enough, that’s like our dog prototype.
Judy: Now say you need to implement a whole set of ducks—mallards, red-headed ducks...
Frank: ...don’t forget the black-bellied-whistling duck.
Judy: Why, thank you Frank.
Frank: No problem. I was just reading about all those ducks in that Head First Design Patterns book.
Judy: Okay, but ducks are a different kind of bird. They swim, and we don’t want to put that into the bird prototype. But with JavaScript we can create a duck prototype that inherits from the bird prototype.
Joe: So let me see if I have this right. We’d have a Duck constuctor that points to a duck prototype. But that prototype—that is the duck prototype—would itself point to the bird prototype?
Frank: Whoa, shift back into first gear.
Judy: Think of it like this, Frank. Say you create a duck and you call its fly method. What happens if you look in the duck and there’s no such method? You look in the duck prototype, still no fly method. So you look at the prototype the duck inherits from, bird, and you find fly there.
Joe: And, if we call swim, then we look in the duck instance, nothing there. We look in the duck prototype, and we find it.
Judy: Right... so we’re not just reusing the behavior of the duck prototype, we’re following a chain up to the bird prototype, when necessary, to use that as well.
Joe: That sounds perfect for extending our dog prototype into a show dog. Let see what we can do with this.
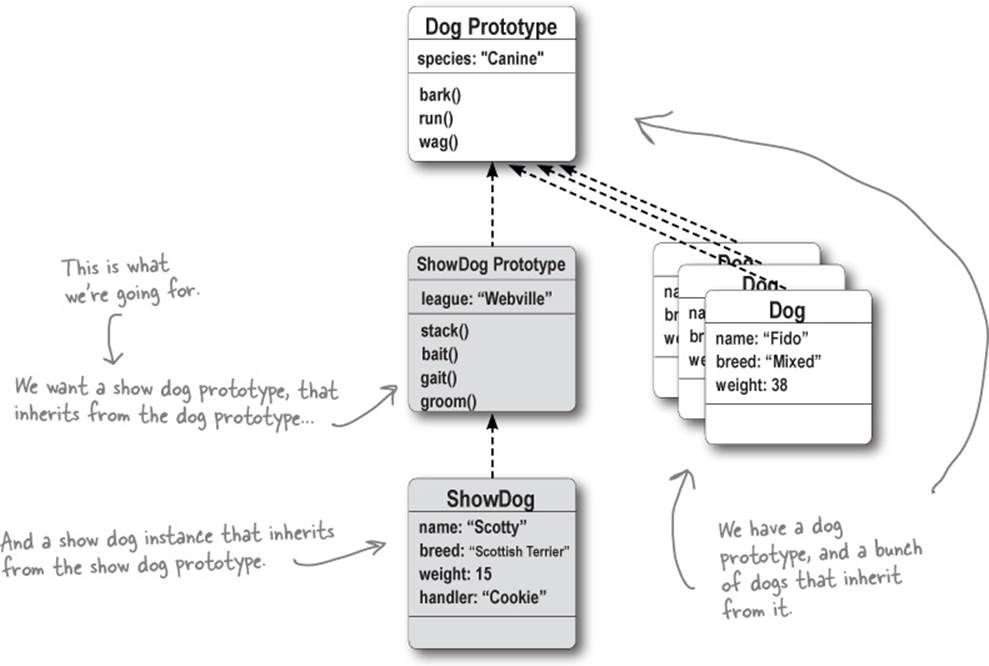
Setting up a chain of prototypes
Let’s start thinking in terms of a chain of prototypes. Rather than having an instance that inherits properties from just one prototype, there might be a chain of one or more prototypes your instance can inherit from. It’s not that big a logical step from the way we’ve been thinking about this already.
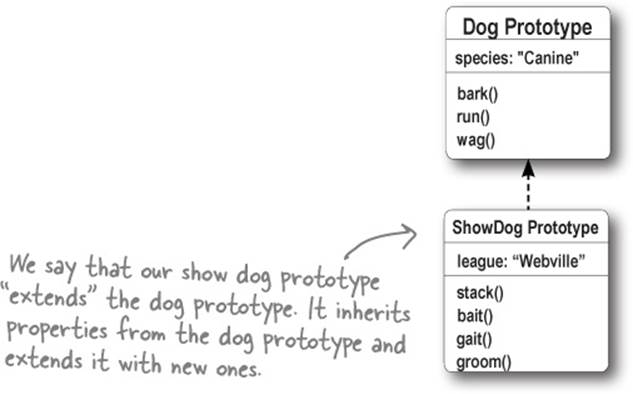
Let’s say we want a show dog prototype for our show dogs, and we want that prototype to rely on our original dog prototype for the bark, run, and wag methods. Let’s set that up to get a feel for how it all works together:
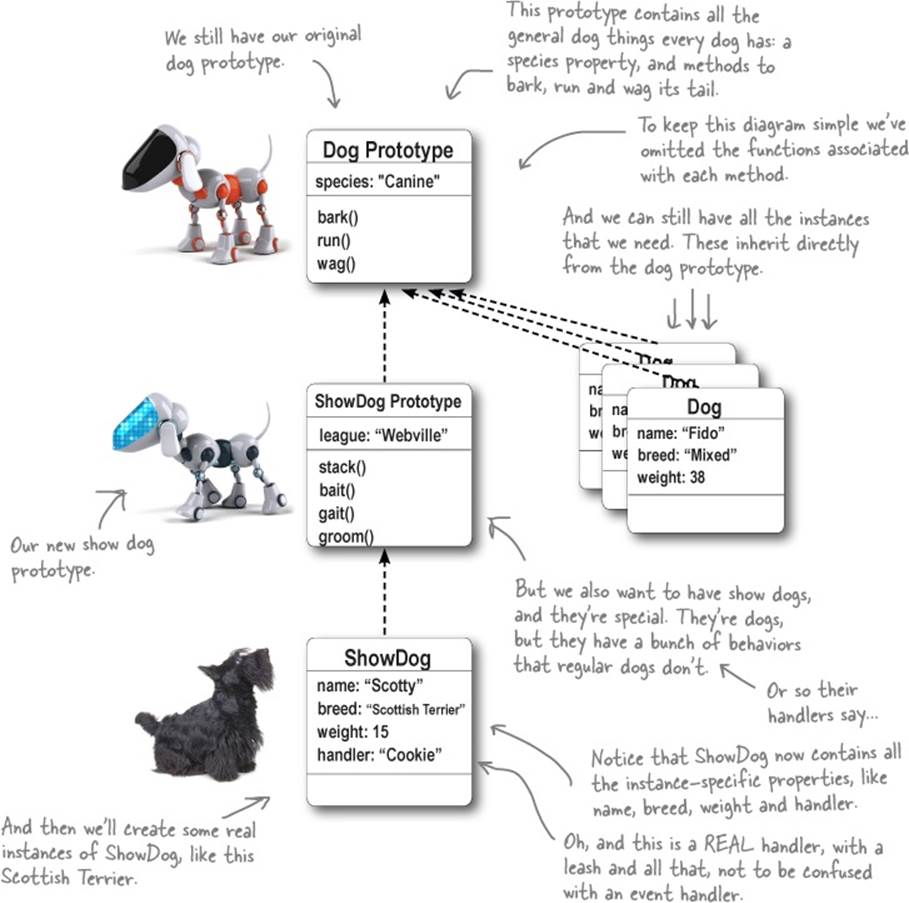
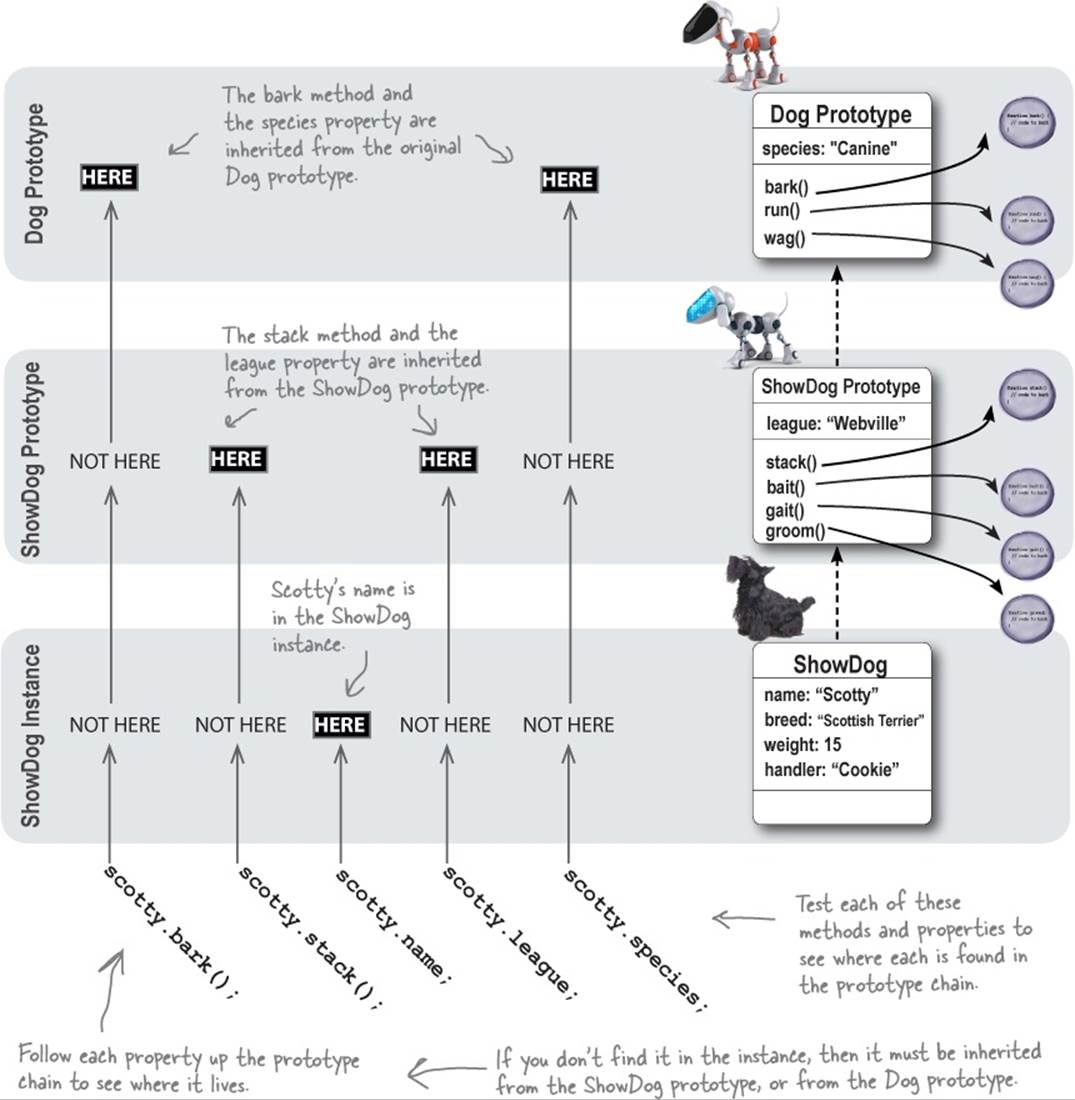
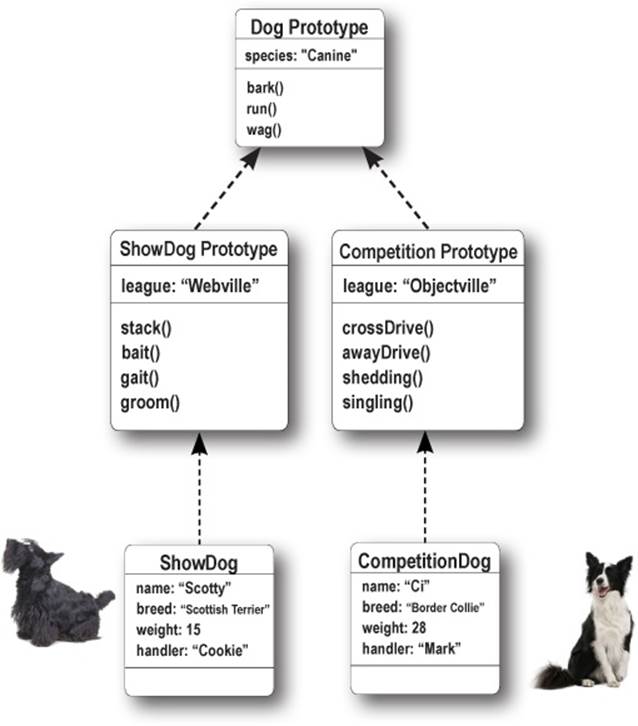
How inheritance works in a prototype chain
We’ve set up the prototype chain for the show dogs, so let’s see how inheritance works in this context. Check out the properties and methods at the bottom of the page, and then trace them up the prototype chain to the object where they are defined.
CODE MAGNETS
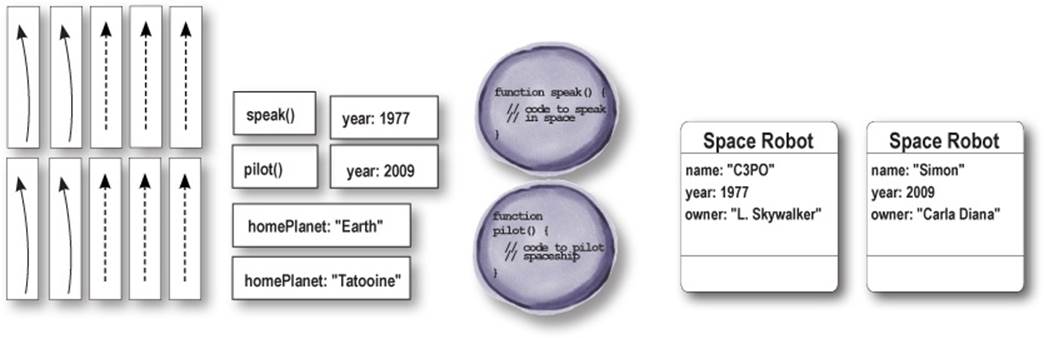
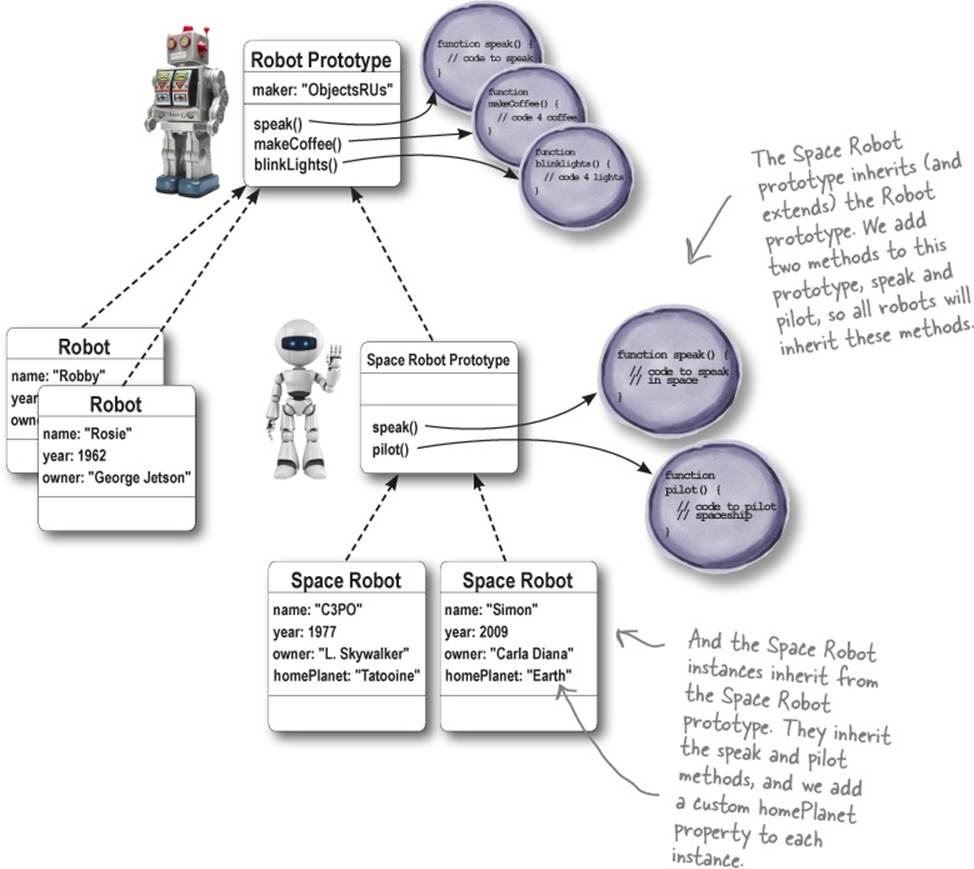
We had another object diagram on the fridge, and then someone came and messed it up. Again!! Can you help put it back together? To reassemble it we need a new line of Space Robots that inherit properties from Robots. These new Space Robots override the Robot’s speaking functionality, and extend Robots with piloting functionality and a new property, homePlanet. Good luck (there might be some extra magnets below)!
Creating the show dog prototype
When we created the dog prototype we didn’t have to do anything—there was already an empty object supplied by the Dog constructor’s prototype property. So we took that and added the properties and methods we wanted our dog instances to inherit.
But with the show dog prototype we have more work to do because we need a prototype object that inherits from another prototype (the dog prototype). To do that we’re going to have to create an object that inherits from the dog prototype and then explicitly wire things up ourselves.
Right now we have a dog prototype and a bunch of dog instances that inherit from that prototype. And what we want is a show dog prototype (that inherits from dog prototype), and a bunch of show dog instances that inherit from the show dog prototype.
Setting this up will take a few steps, so we’ll take it one at a time.
First, we need an object that inherits from the dog prototype
We’ve established that the show dog prototype is an object that inherits from the dog prototype. But, what’s the best way to create an object that inherits from the dog prototype? Well, it’s something you’ve already been doing as you’ve created instances of dog. Remember? Like this:
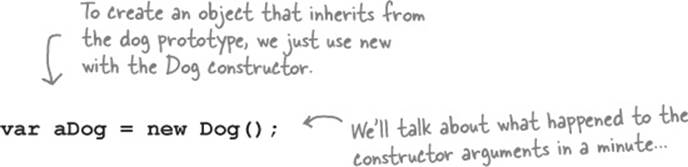
So this code creates an object that inherits from the dog prototype. We know this because it’s exactly the same as how we created all our dog instances, except this time, we didn’t supply any arguments to the constructor. That’s because at the moment, we don’t care about the specifics of the dog; we just need the dog to inherit from the dog prototype.
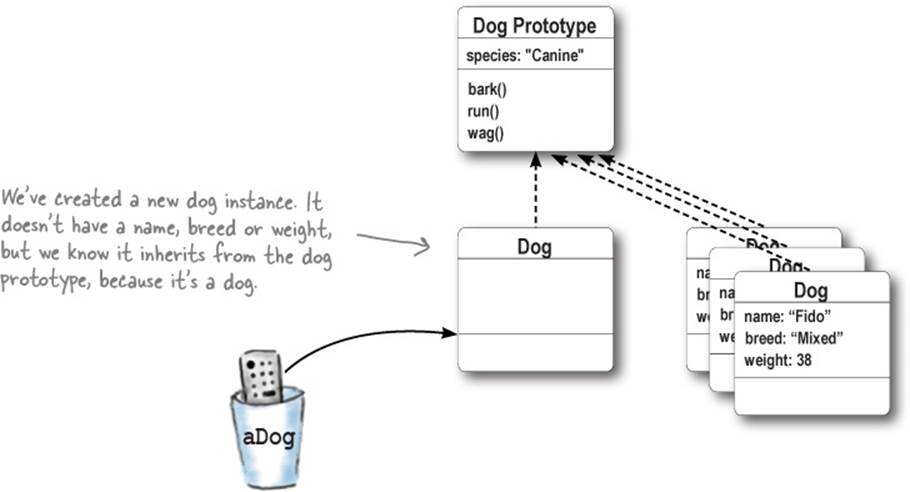
Now, what we really need is a show dog prototype. Like our dog instance, that’s just an object that inherits from the dog prototype. So let’s see how we can use our empty dog instance to make the show dog prototype we need.
Next, turning our dog instance into a show dog prototype
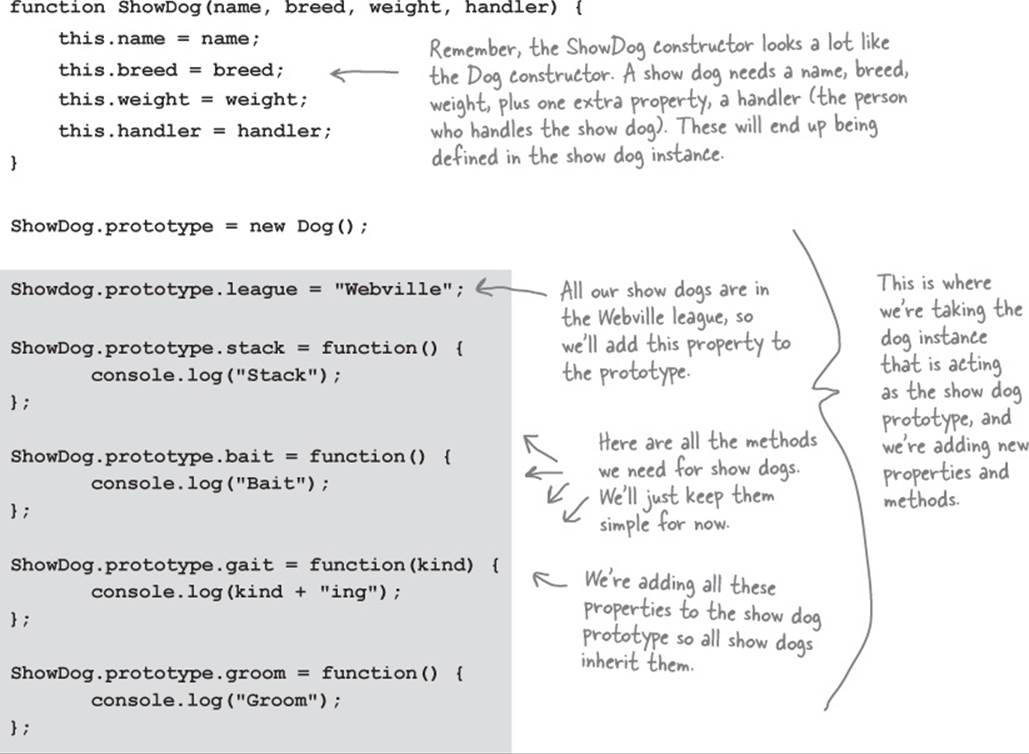
Okay, so we have a dog instance, but how do we make that our show dog prototype object? We do this by assigning the dog instance to the prototype property of our ShowDog constructor. Oh wait; we don’t have a ShowDog constructor yet... so let’s make one:
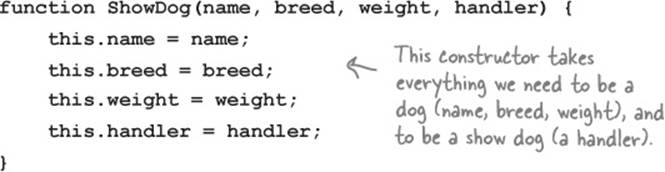
Now that we have a constructor, we can set its prototype property to a new dog instance:

So, let’s think about where we are: we have a ShowDog constructor, with which we can make show dog instances, and we now have a show dog prototype, which is a dog instance.
Let’s make sure our object diagram accurately reflects the roles these objects are playing by changing the label “Dog” to “ShowDog Prototype”. But keep in mind, the show dog prototype is still a dog instance.
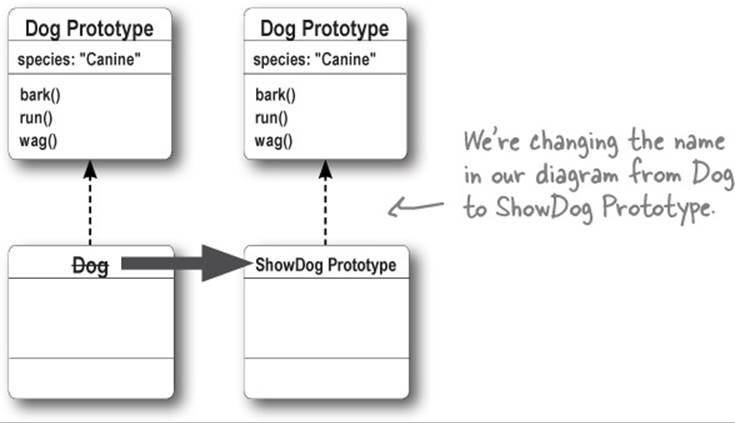
Now that we’ve got a ShowDog constructor and we’ve set up the show dog prototype object, we need to go back and fill in some details. We’ll take a closer look at the constructor, and we’ve also got some properties and methods to add to the prototype so our show dogs have the additional show dog behavior we want them to have.
Now it’s time to fill in the prototype
We’ve got the show dog prototype set up (which at the moment is just an empty instance of dog). Now, it’s time to fill it with properties and behaviors that will make it look more like a show dog prototype.
Here are some properties and methods that are specific to show dogs we can add:
With these additions our show dog prototype is starting to look like a show dog. Let’s update our object diagram again, and then it’s probably time to do a big test run of the show dogs. We’re guessing Webville Kennel is going to be pretty excited to see these in action.
Creating a show dog instance
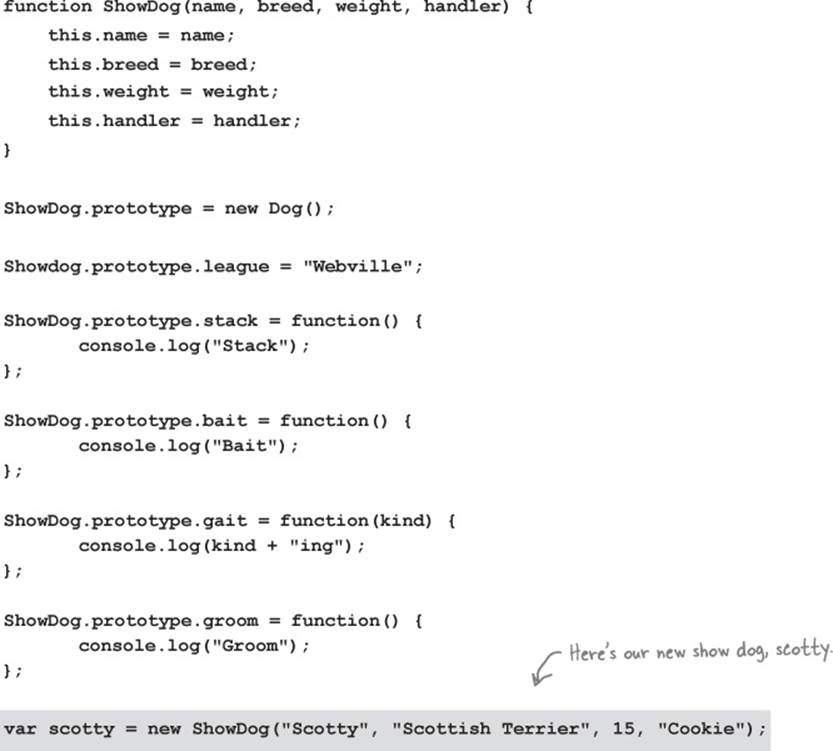
Now we just have one more thing to do: create an instance of ShowDog. This instance will inherit show dog properties and methods from our show dog prototype, and because our show dog prototype is an instance of Dog, the show dog will also inherit all its doggy behavior and properties from the dog prototype, so he’ll be able to bark and run and wag with the rest of the dogs.
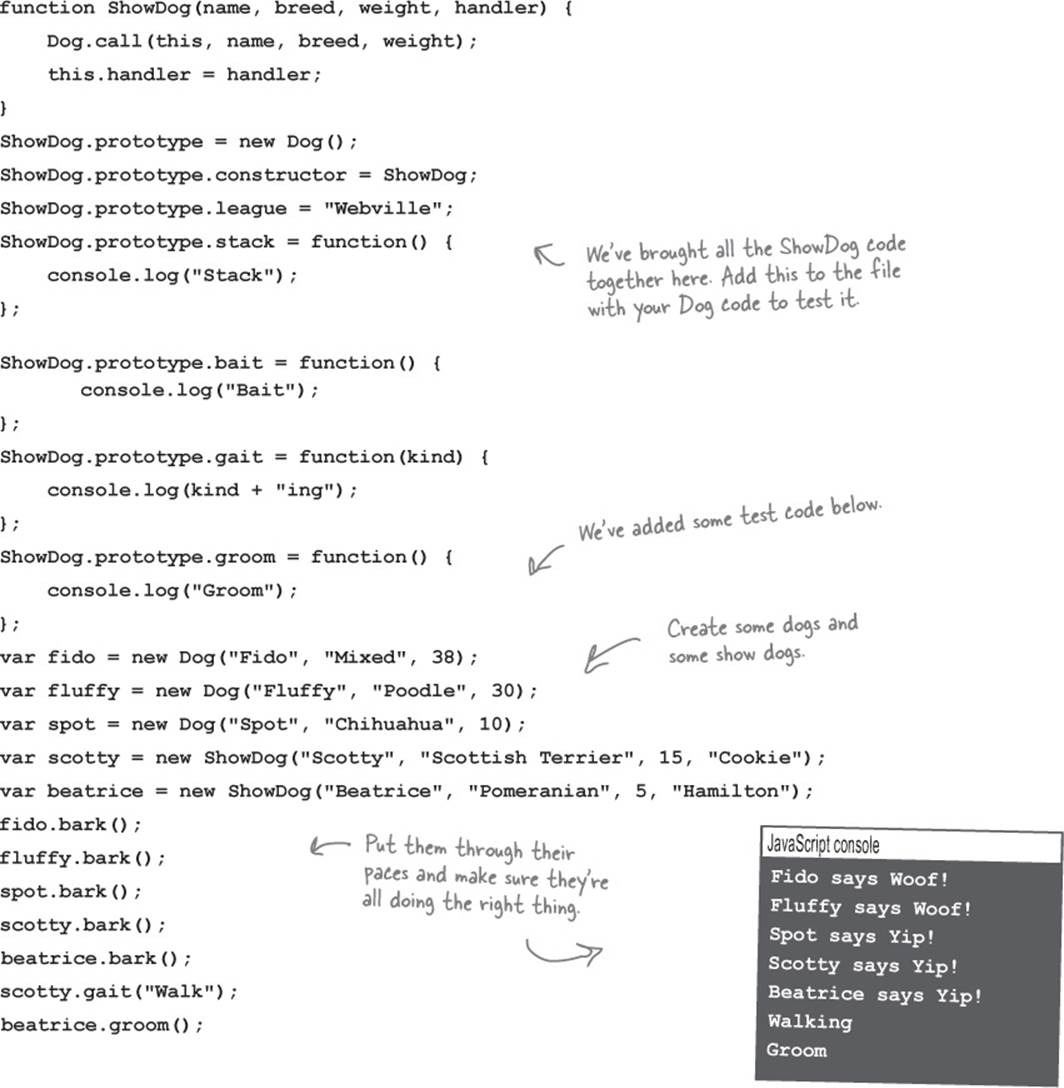
Here’s all the code so far, and the code to create the instance:

Test drive the show dog ![]()
Take all your the code on the previous page, and add to it the quality assurance code below, just to give scotty a good testing. Hey, and while you’re at it, add a few dogs of your own and test them:
scotty.stack();
scotty.bark();
console.log(scotty.league);
console.log(scotty.species);
JAVASCRIPT CONSOLE
Stack
Scotty says Yip!
Webville
Canine
Here’s what we got.
EXERCISE
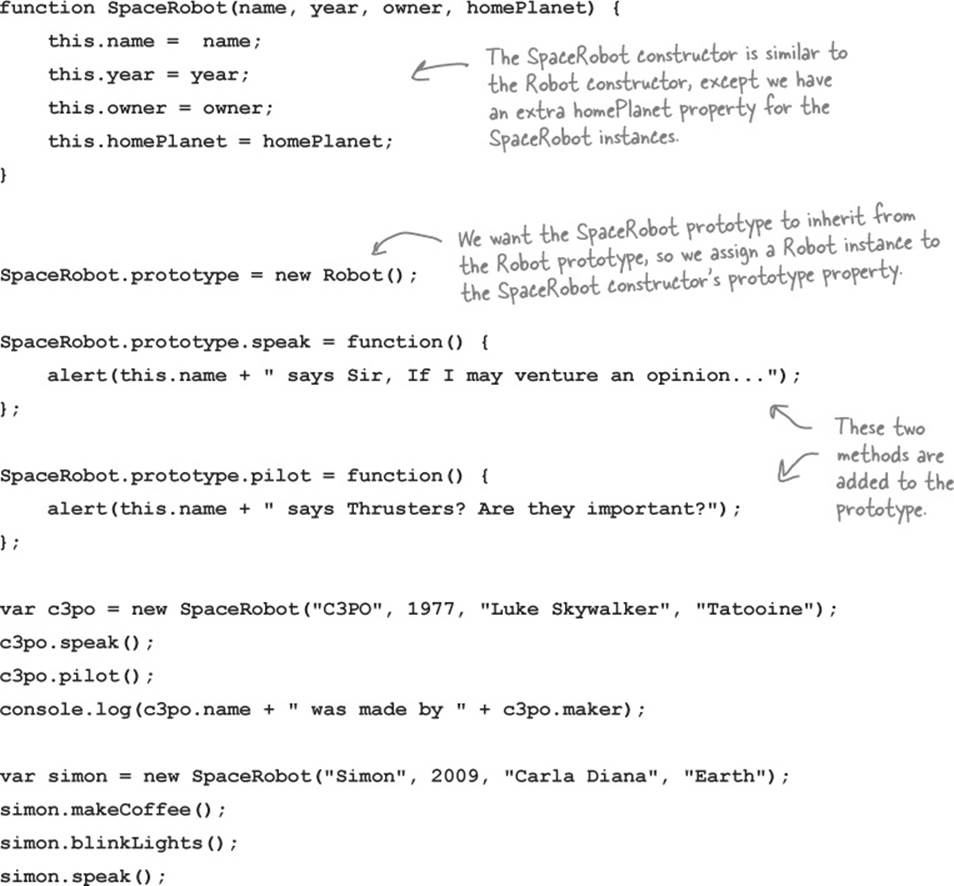
Your turn. Add a SpaceRobot line of robots to the ObjectsRUs line of robots. These robots should of course be able to do everything that robots can do, plus some extra behavior for space robots. We’ve started the code below, so finish it up and then test it. Check your answer at the end of the chapter before moving on.
function SpaceRobot(name, year, owner, homePlanet) {
}
SpaceRobot.prototype = new ____________;
___________________.speak = function() {
alert(this.name + " says Sir, If I may venture an opinion...");
};
___________________.pilot = function() {
alert(this.name + " says Thrusters? Are they important?");
};
var c3po = new SpaceRobot("C3PO", 1977, "Luke Skywalker", "Tatooine");
c3po.speak();
c3po.pilot();
console.log(c3po.name + " was made by " + c3po.maker);
var simon = new SpaceRobot("Simon", 2009, "Carla Diana", "Earth");
simon.makeCoffee();
simon.blinkLights();
simon.speak();
EXERCISE
Let’s take a closer look at all these dogs we’re creating. We’ve tested Fido before and we know he’s truly a dog. But let’s see if he’s a show dog as well (we don’t think he should be). And what about Scotty? We figure he should be a show dog for sure, but is he a dog too? We’re not sure. And we’ll test Fido and Scotty’s constructors while we’re at it...

Examining the exercise results
Here’s the output from that last test run:

Let’s think about these results for a minute. First, Fido is apparently just a dog and not a show dog—actually, that is totally what we thought would happen; after all, Fido was created with the Dog constructor, which has nothing to do with show dogs.
JAVASCRIPT CONSOLE
Fido is a Dog
Scotty is a Dog
Scotty is a ShowDog
Fido constructor is function Dog...
Scotty constructor is function Dog...
Next, Scotty is a dog and a show dog. That makes sense too, but how did this happen? Well, instanceof doesn’t just look at what kind of object you are, it also takes into account all the objects you inherit from. So, Scotty was created as a show dog, but a show dog inherits from a dog, so Scotty is a dog too.
JAVASCRIPT CONSOLE
Fido is a Dog
Scotty is a Dog
Scotty is a ShowDog
Fido constructor is function Dog...
Scotty constructor is function Dog...
Next up, Fido has a Dog constuctor, and that makes sense, because that is how we created him.
JAVASCRIPT CONSOLE
Fido is a Dog
Scotty is a Dog
Scotty is a ShowDog
Fido constructor is function Dog...
Scotty constructor is function Dog...
And finally, Scotty has a Dog constructor too. That doesn’t make sense, because Scotty was created by the ShowDog constructor. What’s going on here? Well, first let’s think about where this constructor comes from: we’re looking at the scotty.constructor property, and this is something we’ve never setup. So we must be inheriting it from the dog prototype (again, because we haven’t explicitly set it up for a show dog).
JAVASCRIPT CONSOLE
Fido is a Dog
Scotty is a Dog
Scotty is a ShowDog
Fido constructor is function Dog...
Scotty constructor is function Dog...
So why is this happening? Honestly, it’s a loose end that we need to cleanup. You see, if we don’t take care of setting the show dog prototype’s constructor property, no one else will. Now, keep in mind everything is working fine without it; but not setting it could lead to confusion if you or someone else tries to use scotty.constructor expecting to get show dog.
But don’t worry, we’ll fix it.
A final cleanup of show dogs
Our code is just about ready to ship to Webville Kennel, but we need to make one final pass to polish it. There are two small issues to clean up.

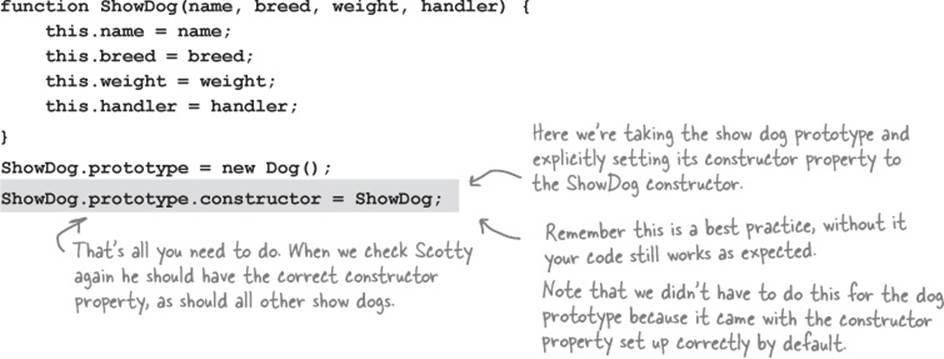
The first, we’ve already seen: that instances of ShowDog don’t have their constructor property set correctly. They’re inheriting the Dog constructor property. Now, just to be clear, all our code works fine as is, but setting the right constructor on our objects is a best practice, and some day another developer may end up with your code and be confused when they examine a show dog object.
To fix the constructor property, we need to make sure it is set up correctly in the show dog prototype. That way, when a show dog is constructed it will inherit the right constructor property. Here’s how we do that:
EXERCISE
Quickly rerun the tests from the previous exercise and make sure your Scotty show dog instance has the correct constructor.
JAVASCRIPT CONSOLE
Fido is a Dog
Scotty is a Dog
Scotty is a ShowDog
Fido constructor is function Dog...
Scotty constructor is function ShowDog...
Here’s what we got. Note that Scotty’s constructor is now ShowDog.
A little more cleanup
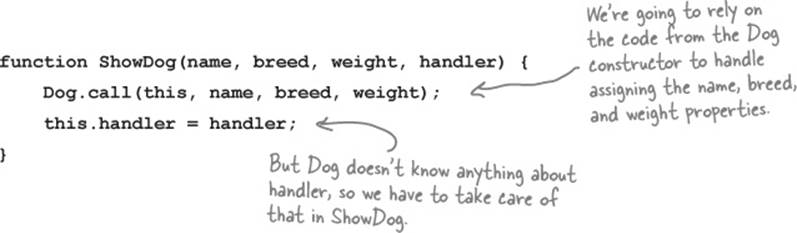
There’s another place we could use some cleanup: in the ShowDog constructor code. Let’s look again at the constructor:
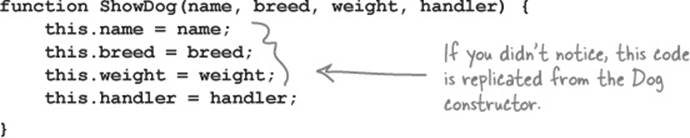
As you’ve seen in this book, anytime we see duplicated code, the warning bells go off. In this case, the Dog constructor already knows how to do this work, so why not let the constructor do it? Further, while our example has simple code, at times constructors can have complex code to compute initial values for properties, and we don’t want to start reproducing code everytime we create a new constructor that inherits from another prototype. So let’s fix this. We’ll rewrite the code first, and step you through it:
NOTE
This idea of eliminating duplicate code even has an acronym: DRY. “Don’t Repeat Yourself” as all the cool coders say.
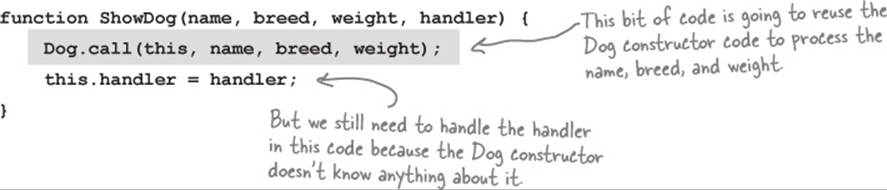
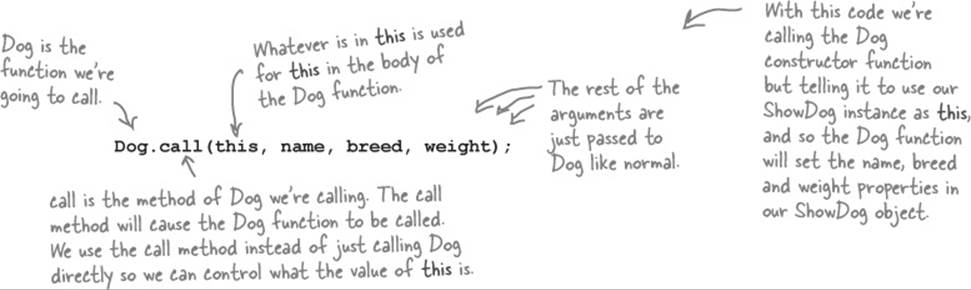
As you can see we’ve replaced the redundant code in the ShowDog constructor with a call to a method named Dog.call. Here’s how it works: call is a builtin method that you can use on any function (and remember Dog is a function). Dog.call invokes the Dog function and passes it the object to use as this, along with all the arguments for the Dog function. Let’s break this down:
Stepping through Dog.call
Using Dog.call to call Dog is a bit tricky to wrap your head around so we’ll walk through it again, starting with the reworked code.
Here’s how to think about how this works. First, we call ShowDog with the new operator. Remember that the new operator makes a new, empty object, and assigns it to the variable this in the body of ShowDog.
var scotty = new ShowDog("Scotty", "Scottish Terrier", 15, "Cookie");
Then, we execute the body of the ShowDog constructor function. The first thing we do is call Dog, using the call method. That calls Dog, passing in this, and the name, breed, and weight parameters as arguments.
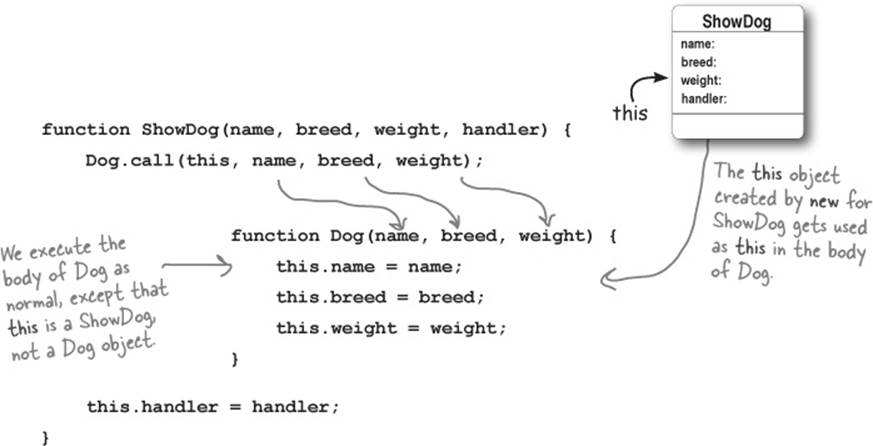
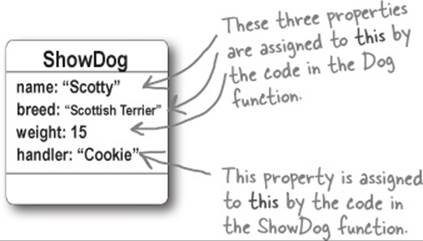
Once the Dog function completes (and remember, it is not going to return anything because we didn’t call it with new), we complete the code in ShowDog, assigning the value of the parameter handler to the this.handler property. Then, because we used new to call ShowDog, an instance of ShowDog is returned, complete with its name, breed, weight, and handler.
The final test drive ![]()
Well done, you’ve created a fantastic design that we’re sure Webville Kennel is going to love. Take all your dogs for one final test run so they can show off all their doggy capabilities.
THERE ARE NO DUMB QUESTIONS
|
Q: |
Q: When we made the dog instance we used for the show dog prototype, we called the Dog constructor with no arguments. Why? |
|
A: |
A: Because all we need from that dog instance is the fact that it inherits from the dog prototype. That dog instance isn’t a specific dog (like Fido or Fluffy); it’s simply a generic dog instance that inherits from the dog prototype. Also, all the dogs that inherit from the show dog prototype define their own name, breed, and weight. So even if that dog instance did have values for those properties, we’d never see them because the show dog instances will always override them. |
|
Q: |
Q: So what happens to those properties in the dog instance we use for the show dog prototype? |
|
A: |
A: They never get assigned values, so they are all undefined. |
|
Q: |
Q: If we never set the ShowDog’s prototype property to a dog instance, what happens? |
|
A: |
A: Your show dogs will work fine, but they won’t inherit any behavior from the dog prototype. That means they won’t be able to bark, run, or wag, nor will they have the “Canine” species property. Give it a try yourself. Comment out the line of code where we set ShowDog.prototype to new Dog() and then try making Scotty bark. What happens? |
|
Q: |
Q: Could I create an object literal and use that as the prototype? |
|
A: |
A: Yes. You can use any object as the prototype for ShowDog. Of course, if you do that, your show dogs won’t inherit anything from the dog prototype. They’ll inherit the properties and methods you put in your object literal instead. |
|
Q: |
Q: I accidentally put the line of code to assign ShowDog.prototype to the instance of dog below where I created my scotty instance, and my code didn’t work. Why? |
|
A: |
A: Because when you create scotty (an instance of ShowDog), it gets the prototype that’s assigned to ShowDog.prototype at the time when you create it. So if you don’t assign the dog instance object to the prototype until after you create scotty, then scotty will have a different object as its prototype (the object you get by default with the ShowDog constructor). And that object doesn’t have any of the Dog prototype’s properties. You should assign the show dog prototype first thing after you create the constructor, but before you add anything to the prototype, or create any instances of ShowDog. |
|
Q: |
Q: If I change a property in the dog prototype, like changing species from “Canine” to “Feline”, will that affect the show dogs I’ve created? |
|
A: |
A: Yes, anything you change in the prototype will affect any instances that inherit from that prototype in the chain, no matter how many links you have in your chain. |
|
Q: |
Q: Is there a limit to how long my prototype chains can be? |
|
A: |
A: Theoretically, no, but in practice, maybe. The longer your prototype chain, the more work it is to resolve a method or property. That said, runtime systems are often quite good at optimizing these lookups. In general, you’re not going to need designs that require that many levels of inheritance. If you do, you’ll probably want to take another look at your design. |
|
Q: |
Q: What if I have another category of dogs, like competition dogs. Can I create a competition dog prototype that inherits from the same dog prototype as the show dog prototype does? |
|
A: |
A: Yes, you can. You’ll need to create a separate dog instance to act as your competition dog prototype, but once you’ve done that you’ll be good to go. Just follow the same steps we used here to create the show dog prototype.
|
The chain doesn’t end at dog
You’ve already seen a couple of prototype chains—we have the original dog prototype that our dog objects inherit from, and we have the more specialized show dog instances that inherit first from the show dog prototype, and the dog prototype.
But in both cases, is dog the end of the chain? Actually it isn’t, because dog has its own prototype, Object.
In fact, every prototype chain you ever create will end in Object. That’s because the default prototype for any instance you create (assuming you don’t change it) is Object.
What is Object?
Think of Object like the primordial object. It’s the object that all objects initially inherit from. And Object implements a few key methods that are a core part of the JavaScript object system. Many of these you won’t use on a daily basis, but there are some methods you’ll see commonly used.
One of those you’ve already seen in this chapter: hasOwnProperty, which is inherited by every object (again, because every object ultimately inherits from Object). Remember, hasOwnProperty is the method we used earlier to determine if a property is in an object instance or in one of its prototypes.
Another method inherited from Object is the toString method, which is commonly overridden by instances. This method returns a String representation of any object. We’ll see in a bit how we can override this method to provide a more accurate description of our own objects.
Object as a prototype
So whether you realized it or not, every object you’ve ever created has had a prototype, and it’s been Object. You can set an object’s prototype to another kind of object, like we did with the show dog prototype, but ultimately, all prototype chains eventually lead to Object.

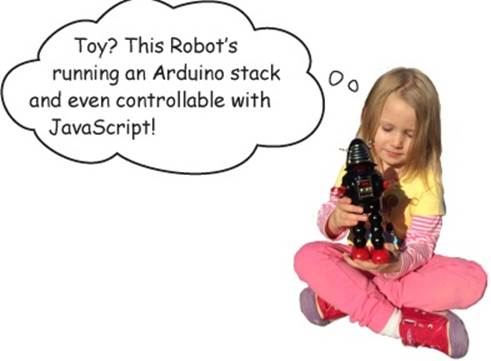
Using inheritance to your advantage... by overriding built-in behavior
If you’re inheriting from a built-in object you can override methods in those objects. One common example is the toString method of Object. All objects inherit from Object, so all objects can use the toString method to get a simple string representation of any object. For instance, you might use it with console.log to display your object in the console:
function Robot(name, year, owner) {
this.name = name;
this.year = year;
this.owner = owner;
}
var toy = new Robot("Toy", 2013, "Avary");
console.log(toy.toString());
JAVASCRIPT CONSOLE
[Object object]
The toString method we’re inheriting from Object doesn’t do a very good job.
JAVASCRIPT CONSOLE
Toy Robot belonging to Avary
Much better! Now we’re using our own toString method.
As you can see, the toString method doesn’t do a very good job of converting the toy robot into a string. So we can override the toString method and write one that creates a string specifically for Robot objects:
function Robot(name, year, owner) {
// same code here
}
Robot.prototype.toString = function() {
return this.name + " Robot belonging to " + this.owner;
};
var toy = new Robot("Toy", 2013, "Avary");
console.log(toy.toString());
Notice that the toString method can be invoked even if you’re not calling it directly yourself. For instance, if you use the + operator to concatenate a string and an object, JavaScript will use the toString method to convert your object to a string before concatenating it with the other string.

DANGER ZONE

Once you start overriding properties and methods, it’s easy to get a little carried away. It’s especially important to be careful when overriding properties and methods in built-in objects, because you don’t want to change the behavior of other code that might rely on these properties to do certain things.
So if you’re thinking of overriding properties in Object, read this Safety Guide first. Otherwise, you might end up blowing up your code in unexpected ways. (Translation: you’ll have bugs that are really hard to track down.)
DO NOT OVERRIDE
The constructor property points to the constructor function connected to the prototype.
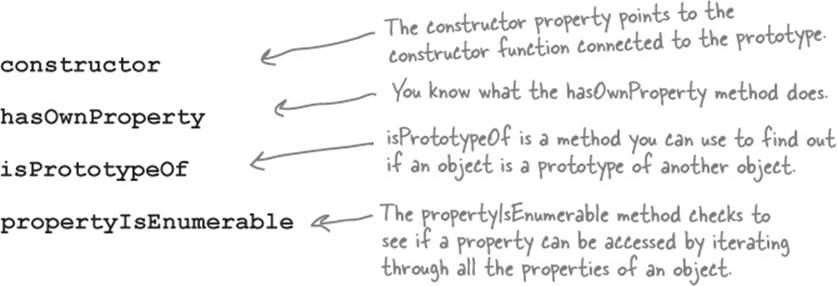
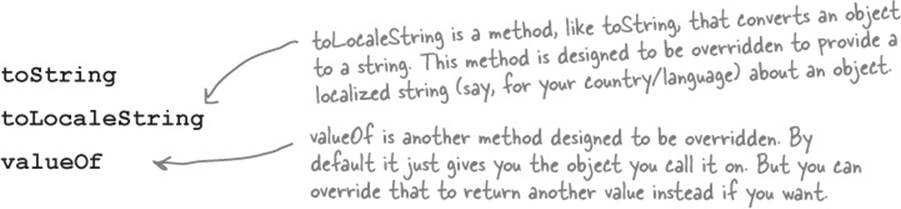
OKAY TO OVERRIDE
Here are the properties in Object that you can override now that you know your way around prototypes, and know how to override safely:
Using inheritance to your advantage... by extending a built-in object
You already know that by adding methods to a prototype, you can add new functionality to all instances of that prototype. This applies not only to your own objects, but also to built-in objects.
NOTE
Remember that while we usually think of strings as primitive types, they also have an object form. JavaScript takes care of converting a string to an object whenever necessary.
Take the String object for instance—you’ve used String methods like substring in your code, but what if you want to add your own method so that any instance of String could make use of it? We can use the same technique of extending objects through the prototype on Strings too.
Let’s say we want to extend the String prototype with a method, cliche, that returns true if the string contains a known cliché. Here’s how we’d do that:
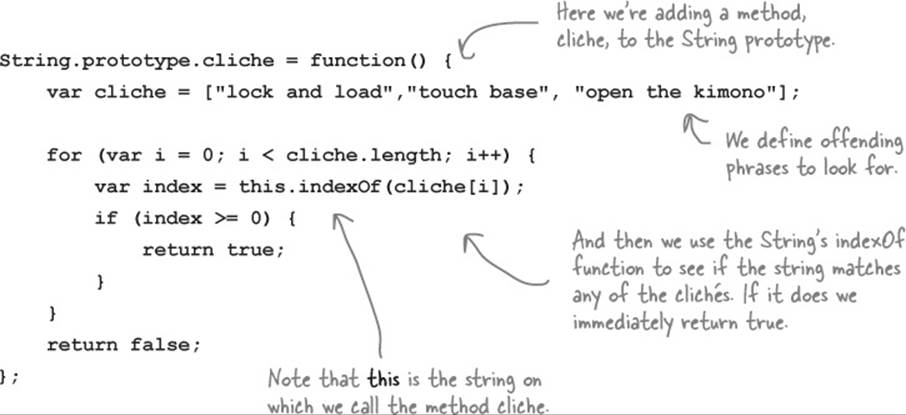
Now let’s write some code to test the method:

Test driving the cliché machine 
Get the code into a HTML file, open your browser and load it up. Check your console and you should see this output:
JAVASCRIPT CONSOLE
CLICHE ALERT: Let's touch base in the morning and see where we are
CLICHE ALERT: We don't want to open the kimono, we just want to inform them.
Works great. If only we could convince Corporate America to install this code!
WATCH IT!
Be careful when you extend built-in objects like String with your own methods.
Make sure the name you choose for your method doesn’t conflict with an existing method in the object. And if you link to other code, be aware of other custom extensions that code may have (and again, watch for name clashes). And finally, some built-in objects aren’t designed to be extended (like Array). So do your homework before you start adding methods to built-in objects.
EXERCISE
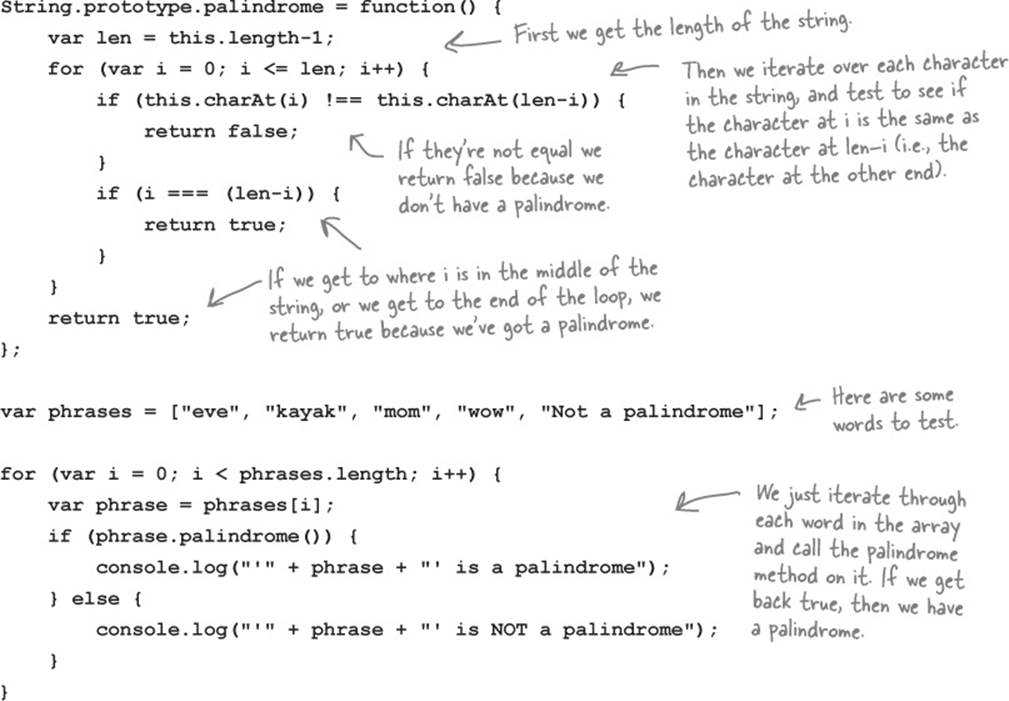
Your turn. Write a method, palindrome, that returns true if a string reads the same forwards and backwards. (Just one word, don’t worry about palindrome phrases.) Add the method to the String.prototype and test. Check your answer at the end of the chapter.
Grand Unified Theory of 
Congratulations. You’ve taken on the task of learning an entirely new programming language (maybe your first language) and you’ve done it. Assuming you’ve made it this far, you now know more JavaScript than pretty much everyone.
NOTE
We’re using the logic that about 5.9 billion people don’t know JavaScript at all, and so those who do are pretty much a rounding error, which means you know more JavaScript than just about anyone.
More seriously, if you’ve made it this far in the book, you are well on your way to becoming a JavaScript expert. Now all you need is more experience designing and coding web applications (or any kind of JavaScript application for that matter).
Better living through objects
When you’re learning a complex topic like JavaScript, it’s hard to see the forest for the trees. But, once you understand most of JavaScript, it’s easier to step back and check out the forest.
When you’re learning JavaScript, you learn about pieces of it at a time: you learn about primitives (that can, at any moment, be used like an object), arrays (which kinda act like objects at times), functions (which, oddly, have properties and methods like objects), constructors (which feel like part function, part object) and well... objects themselves. It all seems rather complex.
Well, with the knowledge you have now, you can sit back, relax, take a cleansing breath, and meditate on the mantra “everything is an object.”
Because you see, everything is an object—oh, sure we have a few primitives, like booleans, numbers and strings, but we already know that we can treat those as objects anytime we need to. We have some built-in types too, like Date, Math and RegEx, but those are just objects too. Even arrays are objects, and as you saw, the only reason they look different is because JavaScript provides some nice “syntactic sugar” we can use to make creating and accessing objects easier. And of course we have objects themselves, with the simplicity of object literals and the power of the prototypal object system.

But what about functions? Are they really objects? Let’s find out:
function meditate() {
console.log("Everything is an object...");
}
alert(meditate instanceof Object);
So it’s true: functions are just objects. But, really, this shouldn’t be a big surprise at this point. After all we can assign functions to variables (like objects), pass them as arguments (like objects), return them from functions (like objects), and we’ve even seen they have properties, like this one:
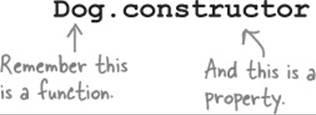
And there’s nothing stopping you from adding your own properties to a function should that come in handy. And, by the way, just to bring it all full circle, have you considered that a method is just a property in an object that is set to an anonymous function expression?
Putting it all together
A lot of JavaScript’s power and flexibility comes from the interplay between how we use functions and objects, and the fact that we can treat them as first class values. If you think about the powerful programming concepts we’ve studied—constructors, closures, creating objects with behavior that we can reuse and extend, parameterizing the behavior of functions, and so on—all these techniques have relied on your understanding of advanced objects and functions.
Well, now you’re in a position to take this all even further...
What’s next?
Now that you’ve got all the fundamentals down, it’s time to take it all further. Now you’re ready to really put your experience to use with the browser and its programming interfaces. You can do that by picking up Head First HTML5 Programming, which will take you through how to add geolocation, canvas drawing capabilities, local storage, web workers and more into your applications. But before you put this book down, be sure to read the appendix for a great list of other topics to explore.

BULLET POINTS
§ JavaScript’s object system uses prototypal inheritance.
§ When you create an instance of an object from a constructor, the instance has its own customized properties and a copy of the methods in the constructor.
§ If you add properties to a constructor’s prototype, all instances created from that constructor inherit those properties.
§ Putting properties in a prototype can reduce runtime code duplication in objects.
§ To override properties in the prototype, simply add the property to an instance.
§ A constructor function comes with a default prototype that you can access with the function’s prototype property.
§ You can assign your own object to the prototype property of a constructor function.
§ If you use your own prototype object, make sure you set the constructor function correctly to the constructor property for consistency.
§ If you add properties to a prototype after you’ve created instances that inherit from it, all the instances will immediately inherit the new properties.
§ Use the hasOwnProperty method on an instance to find out if a property is defined in the instance.
§ The method call can be used to invoke a function and specify the object to be used as this in the body of the function.
§ Object is the object that all prototypes and instances ultimately inherit from.
§ Object has properties and methods that all objects inherit, like toString and hasOwnProperty.
§ You can override or add properties to builtin objects like Object and String, but take care when doing so as your changes can have far-ranging effects.
§ In JavaScript, almost everything is an object, including functions, arrays, many built-in objects, and all the custom objects you make yourself.
CODE MAGNETS SOLUTION
We had an object diagram on the fridge, and then someone came and messed it up. Can you help put it back together? To reassemble it, we need two instances of the robot prototype. One is Robby, created in 1956, owned by Dr. Morbius, has an on/off switch and runs to Starbucks for coffee. We’ve also got Rosie, created in 1962, who cleans house and is owned by George Jetson. Good luck (oh, and there might be some extra magnets below)!
Here’s our solution:
EXERCISE SOLUTION
Remember our object diagram for the Robby and Rosie robots? We’re going to implement that now. We’ve already written a Robot constructor for you along with some test code. Your job is to set up the robot prototype and to implement the two robots. Make sure you run them through the test code. Here’s our solution.
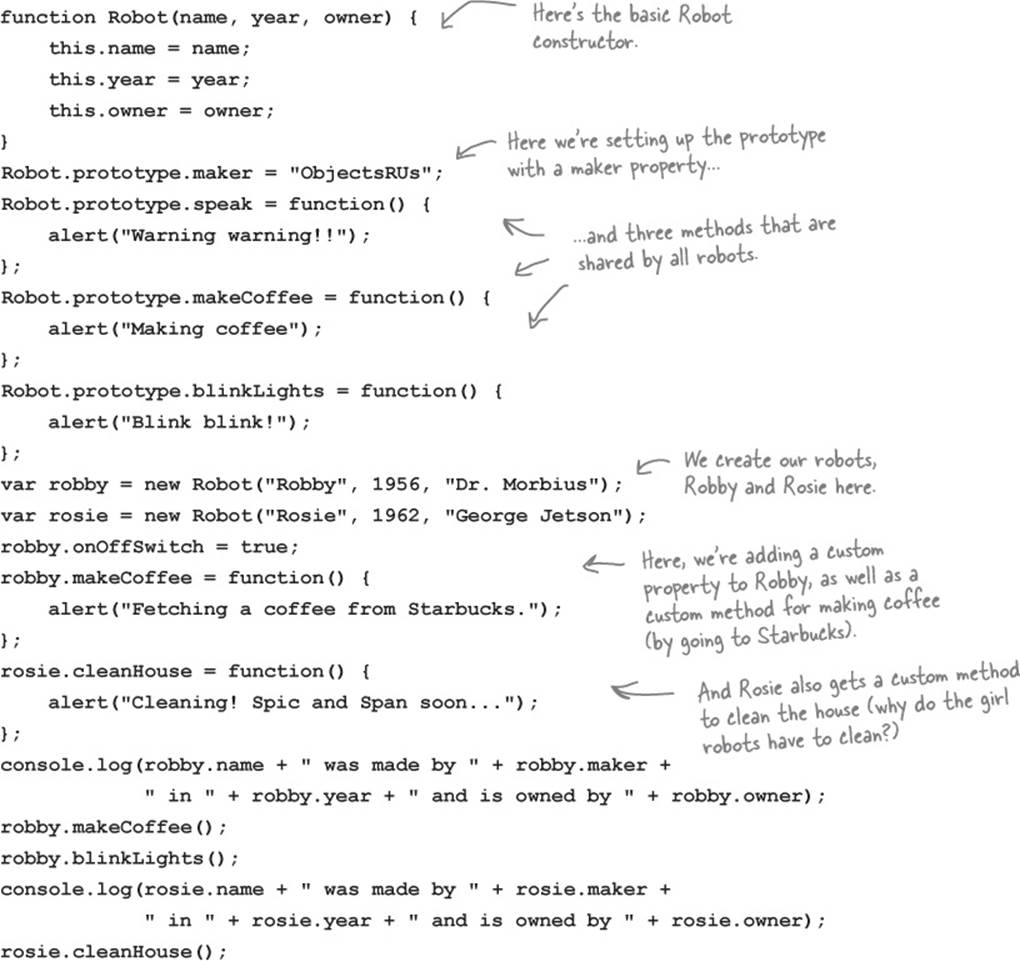
JAVASCRIPT CONSOLE
Robby was made by ObjectsRUs in 1956 and is owned by Dr. Morbius
Rosie was made by ObjectsRUs in 1962 and is owned by George Jetson
Here’s our output (plus some alerts we’re not showing).
EXERCISE SOLUTION
Robby and Rosie are being used in a Robot game. You’ll find the code for them below. In this game, whenever a player reaches level 42, a new robot capability is unlocked: the laser beam capability. Finish the code below so that at level 42 both Robby and Rosie get their laser beams. Here’s our solution.
JAVASCRIPT CONSOLE
Welcome to level 1
Welcome to level 2
Welcome to level 3
...
Welcome to level 41
Welcome to level 42
Rosie is blasting you with laser beams.
A sample of our output. When you finish your code, give it a play and see which robot wins and gets to blast its laser beams!
EXERCISE SOLUTION
We’ve added a new capability to our robots, Robby and Rosie: they can now report when they have an error through the reportError method. Trace the code below, paying particular attention to where this method gets its error information, and to whether it’s coming from the prototype of the robot instance.
Here’s our solution.
CODE MAGNETS SOLUTION
We had another object diagram on the fridge, and then someone came and messed it up. Again!! Can you help put it back together? To reassemble it we need a new line of Space Robots that inherit properties from Robots. These new Space Robots override the Robot’s speaking functionality, and extend Robots with piloting functionality and a new property, homePlanet. Here’s our solution.
EXERCISE SOLUTION
Your turn. Add a SpaceRobot line of robots to the ObjectsRUs line of robots. These robots should of course be able to do everything that robots can do, plus some extra behavior for space robots. We’ve started the code below, so finish it up and then test it. Here’s our solution.
JAVASCRIPT CONSOLE
C3PO was made by ObjectsRUs
Here’s our output (plus some alerts we’re not showing).
EXERCISE SOLUTION
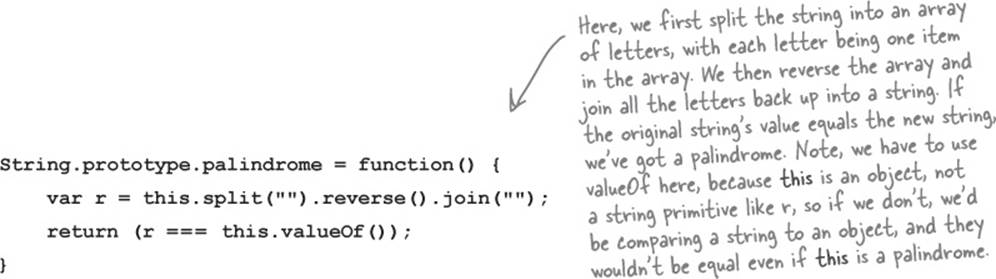
Your turn. Write a method, palindrome, that returns true if a string reads the same forward and backward. Add the method to the String.prototype and test. Here’s our solution (for one word palindromes only).
SUPER ADVANCED SOLUTION
Congratulations!
You made it to the end.
Of course, there’s still an appendix.
And the index.
And the colophon.
And then there’s the website...
There’s no escape, really.
All materials on the site are licensed Creative Commons Attribution-Sharealike 3.0 Unported CC BY-SA 3.0 & GNU Free Documentation License (GFDL)
If you are the copyright holder of any material contained on our site and intend to remove it, please contact our site administrator for approval.
© 2016-2026 All site design rights belong to S.Y.A.