Java SE 8 for the Really Impatient (2014)
Chapter 4. JavaFX
Topics in This Chapter
![]() 4.1 A Brief History of Java GUI Programming
4.1 A Brief History of Java GUI Programming
![]() 4.2 Hello, JavaFX!
4.2 Hello, JavaFX!
![]() 4.3 Event Handling
4.3 Event Handling
![]() 4.4 JavaFX Properties
4.4 JavaFX Properties
![]() 4.5 Bindings
4.5 Bindings
![]() 4.6 Layout
4.6 Layout
![]() 4.7 FXML
4.7 FXML
![]() 4.8 CSS
4.8 CSS
![]() 4.9 Animations and Special Effects
4.9 Animations and Special Effects
![]() 4.10 Fancy Controls
4.10 Fancy Controls
![]() Exercises
Exercises
JavaFX is the recommended user interface toolkit for writing rich client applications with Java. JavaFX is now bundled with all supported versions of Oracle’s Java platform. In this chapter, you will learn the basics of JavaFX development. If you develop rich client user interface platforms, you will see how to transition from Swing to JavaFX. If you don’t, skim over the chapter anyway so you can understand the sample applications we use elsewhere when it is convenient to illustrate a concept with a graphical program.
The key points of this chapter are:
• A scene graph is made up of nodes which may contain other nodes.
• A scene is displayed on a stage (a top-level window, the surface of an applet, or the full screen).
• Some controls (such as buttons) emit events, but most JavaFX events come from property changes.
• JavaFX properties emit change and invalidation events.
• When you bind a property to another, it is updated when the other one changes.
• JavaFX uses layout panes that work similar to layout managers in Swing.
• You can specify layout with the FXML markup language.
• You can use CSS to change the visual appearance of your application.
• It is easy to implement animations and special effects.
• JavaFX provides some advanced controls out of the box, such as charts, an embedded WebKit browser, and a media player.
4.1. A Brief History of Java GUI Programming
When Java was born, the Internet was in its infancy and personal computers were on every desktop. Business applications were implemented with “fat clients”—programs with lots of buttons and sliders and text fields that communicated with a server. This was considered a lot nicer than the “dumb terminal” applications from an even earlier era. Java 1.0 included the AWT, a toolkit for graphical user interfaces, that had the distinction of being cross-platform. The idea was to serve up the fat clients over the nascent Web, eliminating the cost of managing and updating the applications on every desktop.
The AWT had a noble idea: provide a common programming interface for the native buttons, sliders, text fields, and so on of various operating systems. But it didn’t work very well. There were subtle differences in the functionality of the user interface widgets in each operating system, and what should have been “write once, run anywhere” turned into “write many times, debug everywhere.”
Next came Swing. The central idea behind Swing was not to use the native widgets, but to paint its own. That way, the user interface would look and feel the same on every platform. Or, if users preferred, they could ask for the native look and feel of their platform, and the Swing widgets would be painted to match the native ones. Of course, all that painting was slow, and users complained. After a while, computers got faster, and users complained that Swing was ugly—indeed, it had fallen behind the native widgets that had been spruced up with animations and fancy effects. More ominously, Flash was increasingly used to create user interfaces with even flashier effects that didn’t use the native controls at all.
In 2007, Sun Microsystems introduced a new technology, called JavaFX, as a competitor to Flash. It ran on the Java VM but had its own programming language, called JavaFX Script. The language was optimized for programming animations and fancy effects. Programmers complained about the need to learn a new language, and they stayed away in droves. In 2011, Oracle released a new version, JavaFX 2.0, that had a Java API and no longer needed a separate programming language. As of Java 7 update 6, JavaFX 2.2 has been bundled with the JDK and JRE. Since it wouldn’t be a true part of Java if it didn’t have crazy jumps in version numbers, the version accompanying Java 8 is called JavaFX 8.
Of course, Flash is now a bad memory, and most user interfaces live in a browser or a mobile device. Still, there are situations where a “fat client” on a desktop makes users more productive. Also, Java now runs on ARM processors, and there are embedded systems that need user interfaces, such as kiosks and in-car displays. JavaFX is what Oracle wants us to use for those applications. Why didn’t Oracle just put the good parts of JavaFX into Swing? Swing would have to be redesigned from the ground up to run efficiently on modern graphics hardware. Oracle decided that it wasn’t worth the trouble and declared that Swing will not be further developed.
In this chapter, we go over the basics of writing user interfaces in JavaFX, focusing on boring business applications with buttons, sliders, and text fields, not the flashy effects that were the original motivation behind JavaFX.
4.2. Hello, JavaFX!
Let’s start with a simple program that shows a message (see Figure 4–1). Like in Swing, use a label:
Label message = new Label("Hello, JavaFX!");

Figure 4–1 The “Hello, World” program for JavaFX
![]() NOTE
NOTE
Note that there are no unsightly J prefixes. In Swing, the equivalent control was called JLabel to distinguish it from the AWT Label.
We increase the font size:
message.setFont(new Font(100));
This Font constructor makes a font object representing the default font at 100 points.
In JavaFX, you put everything you want to show onto a scene. There, you can decorate and animate your “actors”—that is, your controls and shapes. In our program, we won’t do any decorating or animating, but we still need the scene. And the scene must reside in a stage. That is a top-level window if the program runs on a desktop, or a rectangular area if it runs as an applet. The stage is passed as a parameter to the start method that you must override in a subclass of the Application class.
public class HelloWorld extends Application {
public void start(Stage stage) {
Label message = new Label("Hello, JavaFX!");
message.setFont(new Font(100));
stage.setScene(new Scene(message));
stage.setTitle("Hello");
stage.show();
}
}
![]() NOTE
NOTE
As you see from this example, no main method is required to launch a JavaFX application. In previous versions of JavaFX, you were required to include a main method of the form
public class MyApp extends Application {
public static void main(String[] args) {
launch(args);
}
...
}
4.3. Event Handling
Graphical user interfaces are event driven. Users click on buttons, adjust sliders, and so on. As they carry out these actions, the UI reacts and updates itself.
As in Swing, you add an event handler to a button so you can be notified when it is clicked. Lambda expressions make this very simple:
Button red = new Button("Red");
red.setOnAction(event -> message.setTextFill(Color.RED));
When the button is clicked, the lambda is called. In this case, it sets the text color to red.
However, with most JavaFX controls, event handling is different. Consider a slider, as shown in Figure 4–2. When the slider is adjusted, its value changes. However, you shouldn’t listen to the low-level events that the slider emits to indicate those changes. Instead, the slider has a JavaFXproperty called value, and the property emits events when it changes. We will discuss properties in detail in the next section, but here is how you can listen to the property’s events and adjust the font size of the message:
slider.valueProperty().addListener(property
-> message.setFont(new Font(slider.getValue())));
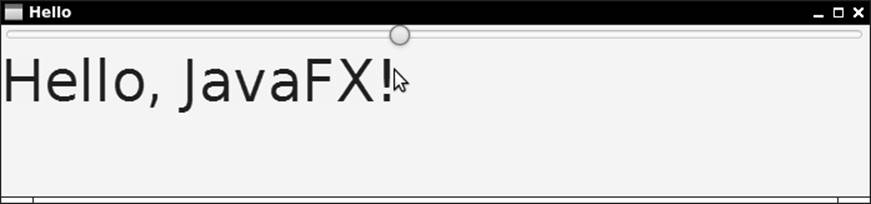
Figure 4–2 Processing slider events
Listening to properties is very common in JavaFX. For example, if you want to change a part of the user interface as a user enters text into a text field, add a listener to the text property.
![]() NOTE
NOTE
Buttons are special. Clicking a button doesn’t change one of its properties.
4.4. JavaFX Properties
A property is an attribute of a class that you can read or write. Commonly, the property is backed by a field, and the property getter and setter simply read and write that field. But the getter and setter can also take other actions, such as reading values from a database or sending out change notifications. In many programming languages, there is convenient syntax for invoking property getters and setters. Typically, using the property on the right-hand side of an assignments calls the getter, and using it on the left-hand side calls the setter.
value = obj.property;
// In many languages (but not Java), this calls the property getter
obj.property = value; // And this calls the property setter
Sadly, Java does not have such syntax. But it has supported properties by convention since Java 1.1. The JavaBeans specification states that a property should be inferred from a getter/setter pair. For example, a class with methods String getText() and void setText(String newValue) is deemed to have a text property. The Introspector and BeanInfo classes in the java.beans package let you enumerate all properties of a class.
The JavaBeans specification also defines bound properties, where objects emit property change events when the setters are invoked. JavaFX does not make use of this part of the specification. Instead, a JavaFX property has a third method, besides the getter and setter, that returns an object implementing the Property interface. For example, a JavaFX text property has a method Property<String> textProperty(). You can attach a listener to the property object. That’s different from old-fashioned JavaBeans. In JavaFX, the property object, not the bean, sends out notifications. There is a good reason for this change. Implementing bound JavaBeans properties required boilerplate code to add, remove, and fire listeners; in JavaFX it’s much simpler because there are library classes that do all that work.
Let’s see how we can implement a property text in a class Greeting. Here is the simplest way to do that:
public class Greeting {
private StringProperty text = new SimpleStringProperty("");
public final StringProperty textProperty() { return text; }
public final void setText(String newValue) { text.set(newValue); }
public final String getText() { return text.get(); }
}
The StringProperty class wraps a string. It has methods for getting and setting the wrapped value and for managing listeners. As you can see, implementing a JavaFX property requires some boilerplate code, and there is unfortunately no way in Java to generate the code automatically. But at least you won’t have to worry about managing listeners.
It is not a requirement to declare property getters and setters as final, but the JavaFX designers recommend it.
![]() NOTE
NOTE
With this pattern, a property object is needed for each property, whether anyone listens to it or not. Exercise 2 explores a useful optimization for the pattern, creating the property objects lazily.
In the preceding example, we defined a StringProperty. For a primitive type property, use one of IntegerProperty, LongProperty, DoubleProperty, FloatProperty, or BooleanProperty. There are also ListProperty, MapProperty, and SetPropertyclasses. For everything else, use an ObjectProperty<T>. All these are abstract classes with concrete subclasses SimpleIntegerProperty, SimpleObjectProperty<T>, and so on.
![]() NOTE
NOTE
If all you care about is managing listeners, your property methods can return objects of type ObjectProperty<T>, or even the Property<T> interface. The more specialized classes are useful to make computations with the properties, as explained in Section 4.5, “Bindings,” on page 75.
![]() NOTE
NOTE
The property classes have methods getValue and setValue in addition to the get and set methods. In the StringProperty class, get is identical to getValue, and set to setValue. But for primitive types, they are different. For example, in anIntegerProperty, getValue returns an Integer, and get returns an int. Generally, use get and set unless you write generic code that needs to work with properties of any type.
There are two kinds of listeners that can be attached to a property. A ChangeListener is notified when the property value has changed, and an InvalidationListener is called when the property value may have changed. The distinction matters if a property is evaluated lazily. As you will see in the next section, some properties are computed from others, and the computation is only done when necessary. The ChangeListener callback tells you the old and new value, which means it has to compute the new value. The InvalidationListener doesn’t compute the new value, but that means you might get a callback when the value hasn’t actually changed.
In most situations, that difference is immaterial. It doesn’t matter much whether you get the new value as a callback parameter or from the property. And usually, it is not worth worrying about computed properties that happen to stay unchanged even though one of their inputs changed. In the preceding section, I used an InvalidationListener because it made the code simpler.
 CAUTION
It is a bit tricky to use the ChangeListener interface for numeric properties. One would like to call
slider.valueProperty().addListener((property, oldValue, newValue)
-> message.setFont(new Font(newValue)));
But that does not work. DoubleProperty implements Property<Number> and not Property<Double>. Therefore, the type for oldValue and newValue is Number and not Double, so you have to manually unbox:
slider.valueProperty().addListener((property, oldValue, newValue)
-> message.setFont(new Font(newValue.doubleValue())));
4.5. Bindings
The raison d’être for JavaFX properties is the notion of binding: automatically updating one property when another one changes. Consider, for example, the application in Figure 4–3. When the user edits the top address, the bottom one is updated as well.
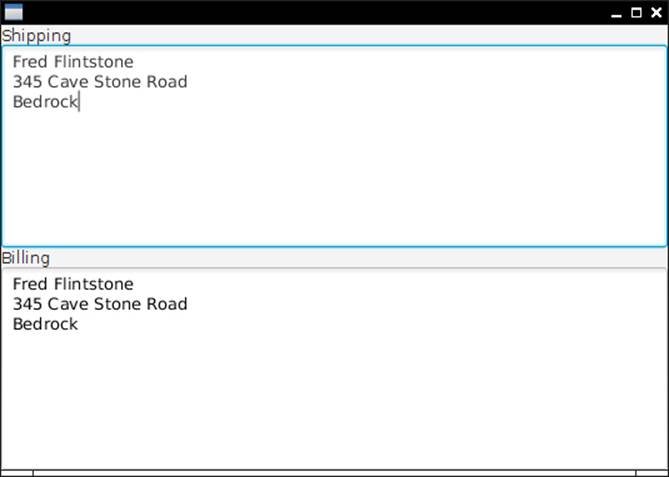
Figure 4–3 The bound text property updates automatically.
This is achieved by binding one property to the other:
billing.textProperty().bind(shipping.textProperty());
Under the hood, a change listener is added to the text property of shipping that sets the text property of billing.
You can also call
billing.textProperty().bindBidirectional(shipping.textProperty());
If either of the properties changes, the other is updated.
To undo a binding, call unbind or unbindBidirectional.
The binding mechanism solves a common problem in user interface programming. For example, consider a date field and a calendar picker. When the user picks a date from the calendar, the date field should be automatically updated, as should be the date property of the model.
Of course, in many situations, one property depends on another, but the relationship is more complex. Consider Figure 4–4. We always want the circle centered in the scene. That is, its centerX property should be one half of the width property of the scene.
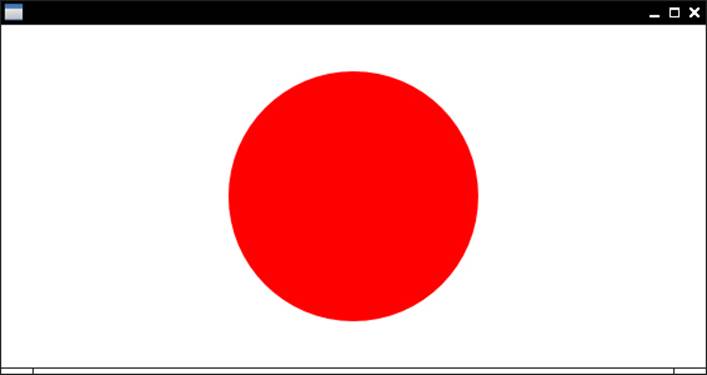
Figure 4–4 The center of this circle is bound to half the width and height of the scene.
To achieve this, we need to produce a computed property. The Bindings class has static methods for this purpose. For example, Bindings.divide(scene.widthProperty(), 2) is a property whose value is one half of the scene width. When the scene width changes, so does that property. All that remains is to bind that computed property to the circle’s centerX property:
circle.centerXProperty().bind(Bindings.divide(scene.widthProperty(), 2));
![]() NOTE
NOTE
Alternatively, you can call scene.widthProperty().divide(2). With more complex expressions, the static Bindings methods seems a bit easier to read, particularly if you use
import static javafx.beans.binding.Bindings.*;
and write divide(scene.widthProperty(), 2).
Here is a more realistic example. We want to disable the Smaller and Larger buttons when the gauge is too small or large (Figure 4–5).
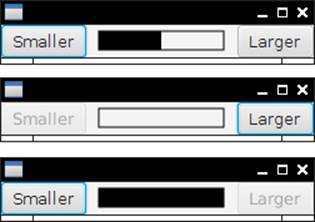
Figure 4–5 When the gauge reaches either end, a button is disabled.
smaller.disableProperty().bind(Bindings.lessThanOrEqual(gauge.widthProperty(), 0));
larger.disableProperty().bind(Bindings.greaterThanOrEqual(gauge.widthProperty(), 100));
When the width is ≤ 0, the Smaller button is disabled. When the width is ≥ 100, the Larger button is disabled.
Table 4–1 lists all operators that the Bindings class provides. One or both of the arguments implement the Observable interface or one of its subinterfaces. The Observable interface provides methods for adding and removing an InvalidationListener. TheObservableValue interface adds ChangeListener management and a getValue method. Its subinterfaces provide methods to get the value in the appropriate type. For example, the get method of ObservableStringValue returns a String and the get method ofObservableIntegerValue returns an int. The return types of the methods of the Bindings are subinterfaces of the Binding interface, itself a subinterface of the Observable interface. A Binding knows about all properties on which it depends.
Table 4–1 Operators Supplied by the Bindings Class
In practice, you don’t need to worry about all of these interfaces. You combine properties and you get something that you can bind to another property.
Building up a computed property with the methods of the Bindings class can get quite baroque. There is another approach for producing computed bindings that you may find easier. Simply put the expression that you want to have computed into a lambda, and supply a list of dependent properties. When any of the properties changes, the lambda is recomputed. For example,
larger.disableProperty().bind(
createBooleanBinding(
() -> gauge.getWidth() >= 100, // This expression is computed...
gauge.widthProperty())); // ...when this property changes
Exercise 5 suggests a slightly more elegant way of lazily evaluating bindings with lambda expressions.
![]() NOTE
NOTE
In the JavaFX Script language, the compiler analyzed binding expressions and automatically figured out the dependent properties. You just declared disable bind gauge.width >= 100, and the compiler attached a listener to the gauge.width property. Of course, in Java, the programmer needs to supply this information.
4.6. Layout
When a graphical user interface contains multiple controls, they need to be arranged on the screen in a functional and attractive way. One way to obtain a layout is with a design tool. The tool’s user, often a graphics designer, drags images of the controls onto a design view and arranges, resizes, and configures them. However, this approach can be problematic when the sizes of the elements change, for example, because labels have different lengths in international versions of a program.
Alternatively, the layout can be achieved programmatically, by writing code in a setup method that adds the user interface controls to specific positions. That is what was done in Swing, using layout manager objects.
Another approach is to specify the layout in a declarative language. For example, web pages are laid out with HTML and CSS. Similarly, Android has an XML language for specifying layouts.
JavaFX supports all three approaches. The JavaFX SceneBuilder is a visual GUI builder. You can download it from www.oracle.com/technetwork/java/javafx/overview. Figure 4–6 shows a screenshot.
Figure 4–6 The JavaFX SceneBuilder
We won’t discuss the SceneBuilder program further. When you understand the concepts of this section, you will find it straightforward to use.
Programmatic layout is very similar to Swing. However, instead of layout managers that are added to arbitrary panels, one uses panes—containers with a layout policy. For example, a BorderPane has five areas: North, West, South, East, and Center. Here we place a button into each:
BorderPane pane = new BorderPane();
pane.setTop(new Button("Top"));
pane.setLeft(new Button("Left"));
pane.setCenter(new Button("Center"));
pane.setRight(new Button("Right"));
pane.setBottom(new Button("Bottom"));
stage.setScene(new Scene(pane));
Figure 4–7 shows the result.
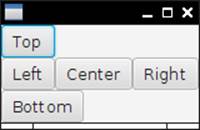
Figure 4–7 The BorderPane layout
![]() NOTE
NOTE
With the Swing BorderLayout, buttons were expanded to fill each region of the layout. In JavaFX, a button does not expand past its natural size.
Now suppose you want more than one button in the South area. Use an HBox (see Figure 4–8):
HBox box = new HBox(10); // ten pixels between controls
box.getChildren().addAll(yesButton, noButton, maybeButton);
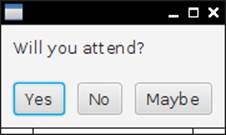
Figure 4–8 Laying out buttons with an HBox
Of course, there is a VBox for laying out controls vertically. The layout in Figure 4–8 was achieved like this:
VBox pane = new VBox(10);
pane.getChildren().addAll(question, buttons);
pane.setPadding(new Insets(10));
Note the padding property. Without it, the label and the buttons would touch the window border.
CAUTION
In JavaFX, dimensions are specified in pixels. In our example, we use ten pixels for the box spacing and padding. This is not really appropriate nowadays, when pixel densities can vay widely. One way to overcome this is to compute dimensions in rem, as you would do in CSS3. (A rem or “root em” is the height of the default font of the document root.)
final double rem = new Text("").getLayoutBounds().getHeight();
pane.setPadding(new Insets(0.8 * rem));
There is only so much you can achieve with horizontal and vertical boxes. Just as Swing had the GridBagLayout as “the mother of all layout managers,” JavaFX has the GridPane. Think of a GridPane as an equivalent of an HTML table. You can set the horizontal and vertical alignment of all cells. If desired, cells can span multiple rows and columns. Consider the login dialog in Figure 4–9.
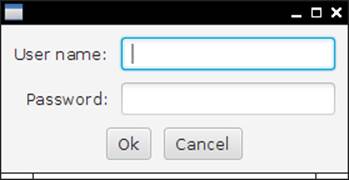
Figure 4–9 A GridPane can arrange the controls for this login dialog.
Note the following:
• The labels “User name:” and “Password:” are right aligned.
• The buttons are in an HBox that spans two rows.
When you add a child to a GridPane, specify its column and row index (in that order; think x- and y-coordinates).
pane.add(usernameLabel, 0, 0);
pane.add(username, 1, 0);
pane.add(passwordLabel, 0, 1);
pane.add(password, 1, 1);
If a child spans multiple columns or rows, specify the spans after the positions. For example, the button panel spans two columns and one row:
pane.add(buttons, 0, 2, 2, 1);
If you want a child to span all remaining rows or columns, you can use GridPane.REMAINING.
To set the horizontal alignment of a child, use the static setHalignment method, and pass the child reference and a constant LEFT, CENTER, or RIGHT from the HPos enumeration.
GridPane.setHalignment(usernameLabel, HPos.RIGHT);
Similarly, for vertical alignment, call setValignment and use TOP, CENTER, or BOTTOM from the VPos enumeration.
![]() NOTE
NOTE
These static calls look rather inelegant in Java code, but they make sense in the FXML markup language—see the next section.
CAUTION
Do not center the HBox with the buttons inside the grid. That box has expanded to the full horizontal size, and centering will not change its position. Instead, tell the HBox to center its contents:
buttons.setAlignment(Pos.CENTER);
You will also want to provide some spacing around the rows and columns and some padding around the table:
pane.setHgap(0.8 * em);
pane.setVgap(0.8 * em);
pane.setPadding(new Insets(0.8 * em));
![]() TIP
TIP
For debugging, it can be useful to see the cell boundaries (see Figure 4–10). Call
pane.setGridLinesVisible(true);
If you want to see the borders of an individual child (for example, to see whether it has grown to fill the entire cell), set its border. This is most easily done with CSS:
buttons.setStyle("-fx-border-color: red;");
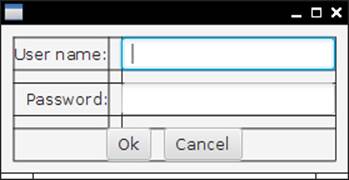
Figure 4–10 Use visible grid lines when debugging a GridPane.
These layout panes should suffice for the majority of applications. Table 4–2 shows all layouts that come with JavaFX.
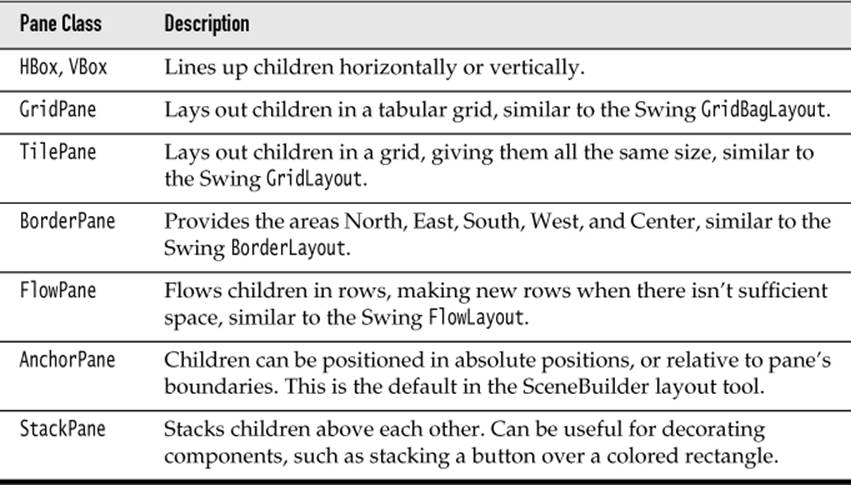
Table 4–2 JavaFX Layouts
![]() NOTE
NOTE
In this section, we built up user interfaces by manually nesting panes and controls. JavaFX Script had a “builder” syntax for describing such nested structures (called the “scene graph”). JavaFX 2 used builder classes to imitate that syntax. Here is how to build up the login dialog:
GridPane pane = GridPaneBuilder.create()
.hgap(10)
.vgap(10)
.padding(new Insets(10))
.children(
usernameLabel = LabelBuilder.create()
.text("User name:")
.build(),
passwordLabel = LabelBuilder.create()
.text("Password:")
.build(),
username = TextFieldBuilder.create().build(),
password = PasswordFieldBuilder.create().build(),
buttons = HBoxBuilder.create()
.spacing(10)
.alignment(Pos.CENTER)
.children(
okButton = ButtonBuilder.create()
.text("Ok")
.build(),
cancelButton = ButtonBuilder.create()
.text("Cancel")
.build())
.build())
.build();
That’s amazingly verbose, and it’s not even the full story—one still needed to specify the grid constraints. Builders have been deprecated in JavaFX 8, not because they are so verbose, but because of an implementation issue. To save code, builders have an inheritance tree that parallels the inheritance of the corresponding nodes. For example, GridPaneBuilder extends PaneBuilder because GridPane extends Pane. But now you have a problem. What should PaneBuilder.children return? If it only returns a PaneBuilder, then the user has to be very careful to first configure the subclass properties, then the superclass properties. The JavaFX designers tried to solve this problem with generics. The methods of a PaneBuilder<B> return a B, so that a GridPaneBuilder can extendPaneBuilder<GridPaneBuilder>. Wait, that can’t work—GridPaneBuilder is itself generic, so that would have to be a GridPaneBuilder<GridPaneBuilder>, or really a GridPaneBuilder<GridPaneBuilder<something>>. This circularity was overcome with some tricks, but those tricks are unsound, and they won’t work in future versions of Java. Thus, builders were withdrawn.
If you like builders, you can use Scala or Groovy and their JavaFX bindings (https://code.google.com/p/scalafx, http://groovyfx.org).
4.7. FXML
The markup language that JavaFX uses to describe layouts is called FXML. I discuss it in some detail because the concepts are interesting beyond the needs of JavaFX, and the implementation is fairly general.
Here is the FXML markup for the login dialog of the preceding section:
<?xml version="1.0" encoding="UTF-8"?>
<?import java.lang.*?>
<?import java.util.*?>
<?import javafx.scene.control.*?>
<?import javafx.scene.layout.*?>
<GridPane hgap="10" vgap="10">
<padding>
<Insets top="10" right="10" bottom="10" left="10"/>
</padding>
<children>
<Label text="User name:" GridPane.columnIndex="0" GridPane.rowIndex="0"
GridPane.halignment="RIGHT" />
<Label text="Password: " GridPane.columnIndex="0" GridPane.rowIndex="1"
GridPane.halignment="RIGHT" />
<TextField GridPane.columnIndex="1" GridPane.rowIndex="0"/>
<PasswordField GridPane.columnIndex="1" GridPane.rowIndex="1" />
<HBox GridPane.columnIndex="0" GridPane.rowIndex="2"
GridPane.columnSpan="2" alignment="CENTER" spacing="10">
<children>
<Button text="Ok" />
<Button text="Cancel" />
</children>
</HBox>
</children>
</GridPane>
Have a closer look at the FXML file. Note the “processing instructions” <?import ...?> for importing Java packages. (In general, XML processing instructions are an “escape hatch” for application-specific processing of XML documents.)
Now look at the structure of the document. First off, the nesting of the GridPane, the labels and text fields, the HBox and its button children reflects the nesting that we built up with Java code in the preceding section.
Most of the attributes correspond to property setters. For example,
<GridPane hgap="10" vgap="10">
means "construct a GridPane and then set the hgap and vgap properties."
When an attribute starts with a class name and a static method, that method is invoked. For example,
<TextField GridPane.columnIndex="1" GridPane.rowIndex="0"/>
means that the static methods GridPane.setColumnIndex(thisTextField, 1) and GridPane.setRowIndex(thisTextField, 0) will be called.
![]() NOTE
NOTE
Generally, an FXML element is constructed with its default constructor and then customized by calling property setters or static methods, in the spirit of the JavaBeans specification. There are a few exceptions that we will consider later.
When a property value is too complex to express as a string, one uses nested elements instead of attributes. Consider, for example,
<GridPane hgap="10" vgap="10">
<padding>
<Insets top="10" right="10" bottom="10" left="10"/>
</padding>
...
The padding property has type Insets, and the Insets object is constructed with an <Insets ...> child element that specifies how to set its properties.
Finally, there is a special rule for list properties. For example, children is a list property, and calling
<HBox ...>
<children>
<Button text="Ok" />
<Button text="Cancel" />
</children>
</HBox>
adds the buttons to the list returned by getChildren.
You can write FXML files by hand, or you can use the SceneBuilder program that I mentioned in the preceding section. Once you have such a file, load it like this:
public void start(Stage stage) {
try {
Parent root = FXMLLoader.load(getClass().getResource("dialog.fxml"));
stage.setScene(new Scene(root));
stage.show();
} catch (IOException ex) {
ex.printStackTrace();
System.exit(0);
}
}
Of course, this is not yet useful by itself. The user interface is displayed, but the program cannot access the values that the user provides. One way of establishing a connection between the controls and the program is to use id attributes, as you would in JavaScript. Provide the id attributes in the FXML file:
<TextField id="username" GridPane.columnIndex="1" GridPane.rowIndex="0"/>
In the program, look up the control:
TextField username = (TextField) root.lookup("#username");
But there is a better way. You can use the @FXML annotation to “inject” the control objects into a controller class. The controller class must implement the Initializable interface. In the controller’s initialize method, you wire up the binders and event handlers. Any class can be the controller, even the FX application itself.
For example, here is a controller for our login dialog:
public class LoginDialogController implements Initializable {
@FXML private TextField username;
@FXML private PasswordField password;
@FXML private Button okButton;
public void initialize(URL url, ResourceBundle rb) {
okButton.disableProperty().bind(
Bindings.createBooleanBinding(
() -> username.getText().length() == 0
|| password.getText().length() == 0,
username.textProperty(),
password.textProperty()));
okButton.setOnAction(event ->
System.out.println("Verifying " + username.getText()
+ ":" + password.getText()));
}
In the FXML file, provide the names of the controller’s instance variables to the corresponding control elements in the FXML file, using the fx:id (not id) attribute:
<TextField fx:id="username" GridPane.columnIndex="1" GridPane.rowIndex="0"/>
<PasswordField fx:id="password" GridPane.columnIndex="1" GridPane.rowIndex="1" />
<Button fx:id="okButton" text="Ok" />
In the root element, you also need to declare the controller class, using the fx:controller attribute:
<GridPane xmlns:fx="http://javafx.com/fxml" hgap="10" vgap="10"
fx:controller="LoginDialogController">
Note the namespace attribute to introduce the FXML namespace.
![]() NOTE
NOTE
If your controller doesn’t have a default constructor (perhaps, because it is being initialized with a reference to a business service), you can set it programmatically:
FXMLLoader loader = new FXMLLoader(getClass().getResource(...));
loader.setController(new Controller(service));
Parent root = (Parent) loader.load();
CAUTION
If you set the controller programmatically, really use the code from the preceding note. The following code will compile, but it will invoke the static FXMLLoader.load method, ignoring the constructed loader:
FXMLLoader loader = new FXMLLoader();
loader.setController(...);
Parent root = (Parent) loader.load(getClass().getResource(...));
// Error—calls static method
When the FXML file is loaded, the scene graph is constructed, and references to the named control objects are injected into the annotated fields of the controller object. Then its initialize method is called.
It is even possible do much of the initialization in the FXML file. You can define simple bindings, and you can set annotated controller methods as event listeners. The syntax is documented at http://docs.oracle.com/javafx/2/api/javafx/fxml/doc-files/introduction_to_fxml.html. However, let’s not dwell on these features. It seems better to separate the visual design from the program behavior, so that a user interface designer can produce the design and a programmer can implement the behavior.
![]() NOTE
NOTE
It is also possible to add scripts in JavaScript or another scripting language to an FXML file. We will discuss this briefly in Chapter 7.
4.8. CSS
JavaFX lets you change the visual appearance of the user interface with CSS, which is usually more convenient than supplying FXML attributes or calling Java methods.
You can load a CSS style sheet programmatically and have it applied to a scene graph:
Scene scene = new Scene(pane);
scene.getStylesheets().add("scene.css");
In the style sheet, you can reference any controls that have an ID. For example, here is how you can control the appearance of a GridPane. In the code, set the ID:
GridPane pane = new GridPane();
pane.setId("pane");
Don’t set any padding or spacing in the code. Instead, use CSS.
#pane {
-fx-padding: 0.5em;
-fx-hgap: 0.5em;
-fx-vgap: 0.5em;
-fx-background-image: url("metal.jpg")
}
Unfortunately, you can’t use the familiar CSS attributes but need to know FX-specific attributes that start with -fx-. The attribute names are formed by changing the property names to lowercase and using hyphens instead of camel case. For example, the textAlignment property turns into -fx-text-alignment. You can find all supported attributes in the JavaFX CSS reference at http://docs.oracle.com/javafx/2/api/javafx/scene/doc-files/cssref.html.
Using CSS is nicer than cluttering up the code with layout minutiae. Moreover, you can easily use resolution-independent em units. Of course CSS can be used both for good and for evil (see Figure 4–11), and I hope you will resist the temptation to apply gratuitous background textures to your login dialogs.
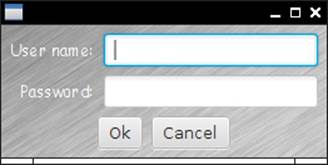
Figure 4–11 Using CSS to style a user interface
Instead of styling by individual IDs, you can use style classes. Add the class to the node object:
HBox buttons = new HBox();
buttons.getStyleClass().add("buttonrow");
Then style it, using the CSS class notation:
.buttonrow {
-fx-spacing: 0.5em;
}
Every JavaFX control and shape class belongs to a CSS class whose name is the decapitalized Java class name. For example, all Label nodes have class label. Here is how you can change the font for all labels to Comic Sans:
.label {
-fx-font-family: "Comic Sans MS";
}
But please don’t.
You can also use CSS with FXML layouts. Attach the stylesheet to the root pane:
<GridPane id="pane" stylesheets="scene.css">
Supply id or styleClass attributes in the FXML code. For example,
<HBox styleClass="buttonrow">
Then you can specify most styling in CSS, and use FXML only for layout. Unfortunately, you can’t completely remove all styling from the FXML. For example, there is currently no way to specify grid cell alignment in CSS.
![]() NOTE
NOTE
You can also apply a CSS style programmatically, such as
buttons.setStyle("-fx-border-color: red;");
That can be handy for debugging, but in general, it seems better to use an external stylesheet.
4.9. Animations and Special Effects
When JavaFX was born, special effects were all the rage, and JavaFX makes it easy to produce shadows, blurs, and movement. You will find dozens of pretty demos on the Web with swirling bubbles moving aimlessly, text jumping nervously, and so on. I thought you’d enjoy some useful tips on how to bring these animations to the world of business applications. Figure 4–12 shows an application where the Yes button increases in size while the No button fades into the background and the Maybe button rotates.
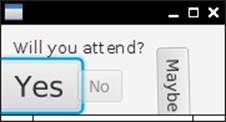
Figure 4–12 Buttons that grow, fade, and turn
JavaFX defines a number of transitions that, over a period of time, vary a property of a node. Here is how you grow a node by 50% in both x and y directions over three seconds:
ScaleTransition st = new ScaleTransition(Duration.millis(3000));
st.setByX(1.5);
st.setByY(1.5);
st.setNode(yesButton);
st.play();
The node can be any node in a scene graph, such as a circle in an animation of soap bubbles or the ever more enticing Yes button in our example.
As set up, the transition will end when its goal is met. You can cycle it indefinitely like this:
st.setCycleCount(Animation.INDEFINITE);
st.setAutoReverse(true);
Now the node will get bigger, then smaller, then bigger again, and so on.
The FadeTransition changes the opacity of a node. Here is how the No button fades into the background:
FadeTransition ft = new FadeTransition(Duration.millis(3000));
ft.setFromValue(1.0);
ft.setToValue(0);
ft.setNode(noButton);
ft.play();
All JavaFX nodes can be rotated around their center. The RotateTransition changes the node’s rotate property. The following code animates the rotation of the Maybe button:
RotateTransition rt = new RotateTransition(Duration.millis(3000));
rt.setByAngle(180);
rt.setCycleCount(Animation.INDEFINITE);
rt.setAutoReverse(true);
rt.setNode(maybeButton);
rt.play();
You can compose transitions with the ParallelTransition and SequentialTransition combinators, performing them in parallel or one after the other. If you need to animate multiple nodes, you can place them into a Group node and animate that. When you need to create this kind of behavior, the JavaFX classes are a joy to work with.
Special effects are also very easy to do. If you need a drop shadow for a spiffy caption, make a DropShadow effect and set it as the effect property of a node. Figure 4–13 shows the result with a Text node. Here is the code:
DropShadow dropShadow = new DropShadow();
dropShadow.setRadius(5.0);
dropShadow.setOffsetX(3.0);
dropShadow.setOffsetY(3.0);
dropShadow.setColor(Color.GRAY);
Text text = new Text();
text.setFill(Color.RED);
text.setText("Drop shadow");
text.setFont(Font.font("sans", FontWeight.BOLD, 40));
text.setEffect(dropShadow);

Figure 4–13 JavaFX effects
To set a glow or a blur effect is just as simple:
text2.setEffect(new Glow(0.8));
text3.setEffect(new GaussianBlur());
Admittedly, the glow effect looks a bit cheesy and the blur effect doesn’t seem to have many applications in the world of business, but it is impressive how easy it is to produce these effects.
4.10. Fancy Controls
Of course, JavaFX has combo boxes, tab panes, trees, and tables, just like Swing does, as well as a few user interface controls that Swing never got, such as a date picker and an accordion. It would take an entire book to describe these in detail. In this section, I want to dispel any remaining Swing nostalgia by showing you three fancy controls that are far beyond what Swing had to offer.
Figure 4–14 shows one of many charts that you can make with JavaFX, out of the box, without having to install any third-party libraries.

Figure 4–14 A JavaFX pie chart
And it’s easy as pie:
ObservableList<PieChart.Data> pieChartData =
FXCollections.observableArrayList(
new PieChart.Data("Asia", 4298723000.0),
new PieChart.Data("North America", 355361000.0),
new PieChart.Data("South America", 616644000.0),
new PieChart.Data("Europe", 742452000.0),
new PieChart.Data("Africa", 1110635000.0),
new PieChart.Data("Oceania", 38304000.0));
final PieChart chart = new PieChart(pieChartData);
chart.setTitle("Population of the Continents");
Altogether, there are half a dozen chart types that you can use and customize. See http://docs.oracle.com/javafx/2/charts/chart-overview.htm for more information.
In Swing, you could show HTML in a JEditorPane, but the rendering was poor for most real-world HTML. That’s understandable—implementing a browser is hard work. In fact, it is so hard that most browsers are built on top of the open source WebKit engine. JavaFX does the same. AWebView displays an embedded native WebKit window (see Figure 4–15).

Figure 4–15 Browsing the Web
Here is the code to show a web page:
String location = "http://horstmann.com";
WebView browser = new WebView();
WebEngine engine = browser.getEngine();
engine.load(location);
The browser is live—you can click on links in the usual way. JavaScript works as well. However, if you want to display status line or popup messages from JavaScript, you need to install notification handlers and implement your own status line and popups.
![]() NOTE
NOTE
WebView does not support any plugins, so you cannot use it to show Flash animations or PDF documents. It also doesn’t show applets.
Prior to JavaFX, media playback was pitiful in Java. A Java Media Framework was available as an optional download, but it did not get much love from the developers. Of course, implementing audio and video playback is even harder than writing a browser. Therefore, JavaFX leverages an existing toolkit, the open source GStreamer framework.
To play a video, construct a Media object from an URL string, construct a MediaPlayer to play it, and a MediaView to show the player:
Path path = Paths.get("moonlanding.mp4");
String location = path.toUri().toString();
Media media = new Media(location);
MediaPlayer player = new MediaPlayer(media);
player.setAutoPlay(true);
MediaView view = new MediaView(player);
view.setOnError(e -> System.out.println(e));
As you can see in Figure 4–16, the video is played—but, unfortunately, there are no video controls. You can add your own (see http://docs.oracle.com/javafx/2/media/playercontrol.htm, but it would have been nice to supply a default set of controls.
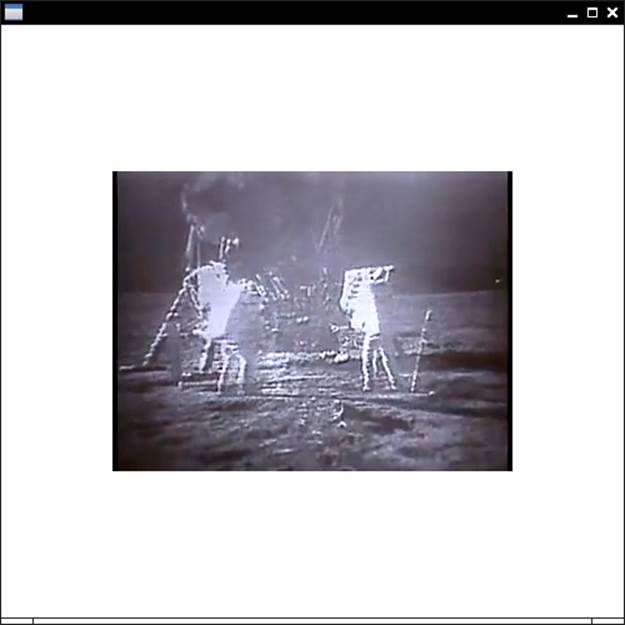
Figure 4–16 Playing a video
![]() NOTE
NOTE
Ever so often, GStreamer can’t handle a particular video file. The error handler in the code sample displays GStreamer messages so that you can diagnose playback problems.
That brings us to the end of this quick tour through JavaFX. JavaFX is the future of desktop Java. It has a few rough edges, mostly due to a hurried transformation from the original scripting language. But it is certainly no harder to use than Swing, and it has many more useful and attractive controls than Swing ever had.
Exercises
1. Write a program with a text field and a label. As with the Hello, JavaFX program, the label should have the string Hello, FX in a 100 point font. Initialize the text field with the same string. Update the label as the user edits the text field.
2. Consider a class with many JavaFX properties, such as a chart or table. Chances are that in a particular application, most properties never have listeners attached to them. It is therefore wasteful to have a property object per property. Show how the property can be set up on demand, first using a regular field for storing the property value, and then using a property object only when the xxxProperty() method is called for the first time.
3. Consider a class with many JavaFX properties, most of which are never changed from a default. Show how the property can be set up on demand, when it is set to a nondefault value or when the xxxProperty() method is called for the first time.
4. Enhance the program in Section 4.5, “Bindings,” on page 75 so that the circle stays centered and always touches at least two of the sides of the scene.
5. Write methods
public static <T, R> ObservableValue<R> observe(
Function<T, R> f, ObservableValue<T> t)
public static <T, U, R> ObservableValue<R> observe(
BiFunction<T, U, R> f, ObservableValue<T> t, ObservableValue<U> u)
that return observable values whose getValue method returns the value of the lambda expression, and whose invalidation and change listeners are fired when any of the inputs become invalid or change. For example,
larger.disableProperty().bind(observe(
t -> t >= 100, gauge.widthProperty()));
6. Center the top and bottom buttons in Figure 4–7.
7. Find out how to set the border of a control without using CSS.
8. Since there is no JavaFX-specific knowledge in parsing FXML files, come up with an example where you load an object that has nothing to do with JavaFX, with some nested objects, and set the properties in FXML syntax. Extra credit if you use injection.
9. Animate a circle, representing a planet, so it travels along an elliptical orbit. Use a PathTransition.
10. Using the web viewer, implement a browser with a URL bar and a back button. Hint: WebEngine.getHistory().