Core Java for the Impatient (2013)
Chapter 9. Processing Input and Output
Topics in This Chapter
![]() 9.1 Input/Output Streams, Readers, and Writers
9.1 Input/Output Streams, Readers, and Writers
![]() 9.2 Paths, Files, and Directories
9.2 Paths, Files, and Directories
![]() 9.3 URL Connections
9.3 URL Connections
![]() 9.4 Regular Expressions
9.4 Regular Expressions
![]() 9.5 Serialization
9.5 Serialization
![]() Exercises
Exercises
In this chapter, you will learn how to work with files, directories, and web pages, and how to read and write data in binary and text format. You will also find a discussion of regular expressions, which can be useful for processing input. (I couldn’t think of a better place to handle that topic, and apparently neither could the Java developers—when the regular expression API specification was proposed, it was attached to the specification request for “new I/O” features.) Finally, this chapter shows you the object serialization mechanism that lets you store objects as easily as you can store text or numeric data.
The key points of this chapter are:
1. Input streams are a source of bytes, and output streams are a destination for bytes.
2. Use readers and writers for processing characters. Be sure to specify a character encoding.
3. The Files class has convenience methods for reading all bytes or lines of a file.
4. The DataInput and DataOutput interfaces have methods for writing numbers in binary format.
5. Use a RandomAccessFile or a memory-mapped file for random access.
6. A Path is an absolute or relative sequence of path components in a file system. Paths can be combined (or “resolved”).
7. Use the methods of the Files class to copy, move, or delete files and to recursively walk through a directory tree.
8. To read or update a ZIP file, use a ZIP file system.
9. You can read the contents of a web page with the URL class. To read metadata or write data, use the URLConnection class.
10. With the Pattern and Matcher classes, you can find all matches of a regular expression in a string, as well as the captured groups for each match.
11. The serialization mechanism can save and restore any object implementing the Serializable interface, provided its instance variables are also serializable.
9.1 Input/Output Streams, Readers, and Writers
In the Java API, a source from which one can read bytes is called an input stream. The bytes can come from a file, a network connection, or an array in memory. (These streams are unrelated to the streams of Chapter 8.) Similarly, a destination for bytes is an output stream. In contrast, readers and writers consume and produce sequences of characters. In the following sections, you will learn how to read and write bytes and characters.
9.1.1 Obtaining Streams
The easiest way to obtain a stream from a file is with the static methods
Click here to view code image
InputStream in = Files.newInputStream(path);
OutputStream out = Files.newOutputStream(path);
Here, path is an instance of the Path class that is covered in Section 9.2.1, “Paths,” on p. 284. It describes a path in a file system.
If you have a URL, you can read its contents from the input stream returned by the openStream method of the URL class:
Click here to view code image
URL url = new URL("http://horstmann.com/index.html");
InputStream in = url.openStream();
Section 9.3, “URL Connections,” on p. 292 shows how to write to a URL.
The ByteArrayInputStream class lets you read from an array of bytes.
Click here to view code image
byte[] bytes = ...;
InputStream in = new ByteArrayInputStream(bytes);
Conversely, to send output to a byte array, use a ByteArrayOutputStream:
Click here to view code image
ByteArrayOutputStream out = new ByteArrayOutputStream();
Write to out
byte[] bytes = out.toByteArray();
9.1.2 Reading Bytes
The InputStream class has a method to read a single byte:
InputStream in = ...;
int b = in.read();
This method either returns the byte as an integer between 0 and 255, or returns -1 if the end of input has been reached.
![]() Caution
Caution
The Java byte type has values between -128 and 127. You can cast the returned value into a byte after you have checked that it is not -1.
More commonly, you will want to read the bytes in bulk. There are two methods for placing bytes from an input stream into an array. Both methods read until either the array or the specified range is filled, or no further input is available, and return the actual number of bytes read. If no input was available at all, the methods return -1.
Click here to view code image
byte[] bytes = ...;
actualBytesRead = in.read(bytes);
actualBytesRead = in.read(bytes, start, length);
The Java library has no method to read all bytes from an input stream. Here is one way to do this:
Click here to view code image
public static byte[] readAllBytes(InputStream in) throws IOException {
ByteArrayOutputStream out = new ByteArrayOutputStream();
copy(in, out);
out.close();
return out.toByteArray();
}
See the next section for the copy helper method.
![]() Tip
Tip
If you want to read all bytes from a file, call the convenience method
Click here to view code image
byte[] bytes = Files.readAllBytes(path);
9.1.3 Writing Bytes
The write methods of an OutputStream can write individual bytes and byte arrays.
Click here to view code image
OutputStream out = ...;
int b = ...;
out.write(b);
byte[] bytes = ...;
out.write(bytes);
out.write(bytes, start, length);
When you are done writing a stream, you must close it in order to commit any buffered output. This is best done with a try-with-resources statement:
Click here to view code image
try (OutputStream out = ...) {
out.write(bytes);
}
If you need to copy an input stream to an output stream, use this helper method:
Click here to view code image
public static void copy(InputStream in, OutputStream out) throws IOException {
final int BLOCKSIZE = 1024;
byte[] bytes = new byte[BLOCKSIZE];
int len;
while ((len = in.read(bytes)) != -1) out.write(bytes, 0, len);
}
To save an InputStream to a file, call
Click here to view code image
Files.copy(in, path, StandardCopyOption.REPLACE_EXISTING);
9.1.4 Character Encodings
Input and output streams are for sequences of bytes, but in many cases you will work with text—that, is, sequences of characters. It then matters how characters are encoded into bytes.
Java uses the Unicode standard for characters. Each character or “code point” has a 21-bit integer number. There are different character encodings—methods for packaging those 21-bit numbers into bytes.
The most common encoding is UTF-8, which encodes each Unicode code point into a sequence of one to four bytes (see Table 9–1). UTF-8 has the advantage that the characters of the traditional ASCII character set, which contains all characters used in English, only take up one byte each.
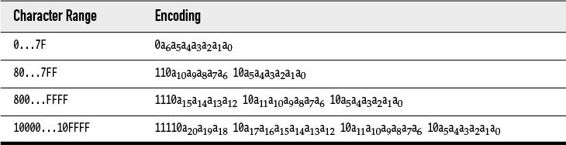
Table 9–1 UTF-8 Encoding
Another common encoding is UTF-16, which encodes each Unicode code point into one or two 16-bit values (see Table 9–2). This is the encoding used in Java strings. Actually, there are two forms of UTF-16, called “big-endian” and “little-endian.” Consider the 16-bit value 0x2122. In big-endian format, the more significant byte comes first: 0x21 followed by 0x22. In little-endian format, it is the other way around: 0x22 0x21. To indicate which of the two is used, a file can start with the “byte order mark,” the 16-bit quantity 0xFEFF. A reader can use this value to determine the byte order and discard it.

Table 9–2 UTF-16 Encoding
![]() Caution
Caution
Some programs, including Microsoft Notepad, add a byte order mark at the beginning of UTF-8 encoded files. Clearly, this is unnecessary since there are no byte ordering issues in UTF-8. But the Unicode standard allows it, and even suggests that it’s a pretty good idea since it leaves little doubt about the encoding. It is supposed to be removed when reading a UTF-8 encoded file. Sadly, Java does not do that, and bug reports against this issue are closed as “will not fix.” Your best bet is to strip out any leading \uFEFF that you find in your input.
In addition to the UTF encodings, there are partial encodings that cover a character range suitable for a given user population. For example, ISO 8859-1 is a one-byte code that includes accented characters used in Western European languages. Shift-JIS is a variable-length code for Japanese characters. A large number of these encodings are still in widespread use.
There is no reliable way to automatically detect the character encoding from a stream of bytes. Some API methods let you use the “default charset”—the character encoding that is preferred by the operating system of the computer. Is that the same encoding that is used by your source of bytes? These bytes may well originate from a different part of the world. Therefore, you should always explicitly specify the encoding. For example, when reading a web page, check the Content-Type header.
![]() Note
Note
The platform encoding is returned by the static method Charset.defaultCharset. The static method Charset.availableCharsets returns all available Charset instances, as a map from canonical names to Charset objects.
![]() Caution
Caution
The Oracle implementation has a system property file.encoding for overriding the platform default. This is not an officially supported property, and it is not consistently followed by all parts of Oracle’s implementation of the Java library. You should not set it.
The StandardCharsets class has static variables of type Charset for the character encodings that every Java virtual machine must support:
StandardCharsets.UTF_8
StandardCharsets.UTF_16
StandardCharsets.UTF_16BE
StandardCharsets.UTF_16LE
StandardCharsets.ISO_8859_1
StandardCharsets.US_ASCII
To obtain the Charset for another encoding, use the static forName method:
Click here to view code image
Charset shiftJIS = Charset.forName("Shift-JIS");
Use the Charset object when reading or writing text. For example, you can turn an array of bytes into a string as
Click here to view code image
String str = new String(bytes, StandardCharsets.UTF_8);
![]() Tip
Tip
Some methods allow you to specify a character encoding with a Charset object or a string. Choose the StandardCharsets constants, so you don’t have to worry about the correct spelling. For example, new String(bytes, "UTF 8") is not acceptable and will cause a runtime error.
![]() Caution
Caution
Some methods (such as the String(byte[]) constructor) use the default platform encoding if you don’t specify any; others (such as Files.readAllLines) use UTF-8.
9.1.5 Text Input
To read text input, use a Reader. You can obtain a Reader from any input stream with the InputStreamReader adapter:
Click here to view code image
InputStream inStream = ...;
Reader in = new InputStreamReader(inStream, charset);
If you want to process the input one UTF-16 code unit at a time, you can call the read method:
int ch = in.read();
The method returns a code unit between 0 and 65536, or -1 at the end of input.
That is not very convenient. Here are several alternatives.
With a short text file, you can read it into a string like this:
Click here to view code image
String content = new String(Files.readAllBytes(path), charset);
But if you want the file as a sequence of lines, call
Click here to view code image
List<String> lines = Files.readAllLines(path, charset);
Or better, process them lazily as a Stream:
Click here to view code image
try (Stream<String> lines = Files.lines(path, charset)) {
...
}
![]() Note
Note
If an IOException occurs as the stream fetches the lines, that exception is wrapped into an UncheckedIOException which is thrown out of the stream operation. (This subterfuge is necessary because stream operations are not declared to throw any checked exceptions.)
To read numbers or words from a file, use a Scanner, as you have seen in Chapter 1. For example,
Click here to view code image
Scanner in = new Scanner(path, "UTF-8");
while (in.hasNextDouble()) {
double value = in.nextDouble();
...
}
![]() Tip
Tip
To read alphabetic words, set the scanner’s delimiter to a regular expression that is the complement of what you want to accept as a token. For example, after calling
in.useDelimiter("\\PL+");
the scanner reads in letters since any sequence of nonletters is a delimiter. See Section 9.4.1, “The Regular Expression Syntax,” on p. 293 for the regular expression syntax.
If your input does not come from a file, wrap the InputStream into a BufferedReader:
Click here to view code image
try (BufferedReader reader
= new BufferedReader(new InputStreamReader(url.openStream()))) {
Stream<String> lines = reader.lines();
...
}
A BufferedReader reads input in chunks for efficiency. (Oddly, this is not an option for basic readers.) It has methods readLine to read a single line and lines to yield a stream of lines.
If a method asks for a Reader and you want it to read from a file, call Files.newBufferedReader(path, charset).
9.1.6 Text Output
To write text, use a Writer. With the write method, you can write strings. You can turn any output stream into a Writer:
Click here to view code image
OutputStream outStream = ...;
Writer out = new OutputStreamWriter(outStream, charset);
out.write(str);
To get a writer for a file, use
Click here to view code image
Writer out = Files.newBufferedWriter(path, charset);
It is more convenient to use a PrintWriter, which has the print, println, and printf that you have always used with System.out. Using those methods, you can print numbers and use formatted output.
If you write to a file, construct a PrintWriter like this:
Click here to view code image
PrintWriter out = new PrintWriter(Files.newBufferedWriter(path, charset));
If you write to another stream, use
Click here to view code image
PrintWriter out = new PrintWriter(outStream, "UTF-8");
Note that this PrintWriter constructor requires a string for the character encoding, not a Charset object.
![]() Note
Note
System.out is an instance of PrintStream, not PrintWriter. This is a relic from the earliest days of Java. However, the print, println, and printf methods work the same way for the PrintStream and PrintWriter classes, using a character encoding for turning characters into bytes.
If you already have the text to write in a string, call
Click here to view code image
String content = ...;
Files.write(path, content.getBytes(charset));
or
Click here to view code image
Files.write(path, lines, charset);
Here, lines can be a Collection<String>, or even more generally, an Iterable<? extends CharSequence>.
To append to a file, use
Click here to view code image
Files.write(path, content.getBytes(charset), StandardOpenOption.APPEND);
Files.write(path, lines, charset, StandardOpenOption.APPEND);
![]() Caution
Caution
When writing text with a partial character set such as ISO 8859-1, any unmappable characters are silently changed to a “replacement”—in most cases, either the ? character or the Unicode replacement character U+FFFD.
Sometimes, a library method wants a Writer to write output. If you want to capture that output in a string, hand it a StringWriter. Or, if it wants a PrintWriter, wrap the StringWriter like this:
Click here to view code image
StringWriter writer = new StringWriter();
throwable.printStackTrace(new PrintWriter(writer));
String stackTrace = writer.toString();
9.1.7 Reading and Writing Binary Data
The DataInput interface declares the following methods for reading number, a character, a boolean value, or a string in binary format:
byte readByte()
int readUnsignedByte()
char readChar()
short readShort()
int readUnsignedShort()
int readInt()
long readLong()
float readFloat()
double readDouble()
void readFully(byte[] b)
The DataOutput interface declares corresponding write methods.
![]() Note
Note
These methods read and write numbers in big-endian format.
![]() Caution
Caution
There are also readUTF/writeUTF methods that use a “modified UTF-8” format. These methods are not compatible with regular UTF-8, and are only useful for JVM internals.
The advantage of binary I/O is that it is fixed width and efficient. For example, writeInt always writes an integer as a big-endian 4-byte binary quantity regardless of the number of digits. The space needed is the same for each value of a given type, which speeds up random access. Also, reading binary data is faster than parsing text. The main drawback is that the resulting files cannot be easily inspected in a text editor.
You can use the DataInputStream and DataOutputStream adapters with any stream. For example,
Click here to view code image
DataInput in = new DataInputStream(Files.newInputStream(path));
DataOutput out = new DataOutputStream(Files.newOutputStream(path));
9.1.8 Random-Access Files
The RandomAccessFile class lets you read or write data anywhere in a file. You can open a random-access file either for reading only or for both reading and writing; specify the option by using the string "r" (for read access) or "rw" (for read/write access) as the second argument in the constructor. For example,
Click here to view code image
RandomAccessFile file = new RandomAccessFile(path.toString(), "rw");
A random-access file has a file pointer that indicates the position of the next byte to be read or written. The seek method sets the file pointer to an arbitrary byte position within the file. The argument to seek is a long integer between zero and the length of the file (which you can obtain with the length method). The getFilePointer method returns the current position of the file pointer.
The RandomAccessFile class implements both the DataInput and DataOutput interfaces. To read and write numbers from a random-access file, use methods such as readInt/writeInt that you saw in the preceding section. For example,
Click here to view code image
int value = file.readInt();
file.seek(file.getFilePointer() - 4);
file.writeInt(value + 1);
9.1.9 Memory-Mapped Files
Memory-mapped files provide another, very efficient approach for random access that works well for very large files. However, the API for data access is completely different from that of input/output streams. First, get a channel to the file:
Click here to view code image
FileChannel channel = FileChannel.open(path,
StandardOpenOption.READ, StandardOpenOption.WRITE)
Then, map an area of the file (or, if it is not too large, the entire file) into memory:
Click here to view code image
ByteBuffer buffer = channel.map(FileChannel.MapMode.READ_WRITE,
0, channel.size());
Use methods get, getInt, getDouble, and so on to read values, and the equivalent put methods to write values.
Click here to view code image
int offset = ...;
int value = buffer.getInt(offset);
buffer.put(offset, value + 1);
At some point, and certainly when the channel is closed, these changes are written back to the file.
![]() Note
Note
By default, the methods for reading and writing numbers use big-endian byte order. You can change the byte order with the command
Click here to view code image
buffer.order(ByteOrder.LITTLE_ENDIAN);
9.1.10 File Locking
When multiple simultaneously executing programs modify the same file, they need to communicate in some way, or the file can easily become damaged. File locks can solve this problem.
Suppose your application saves a configuration file with user preferences. If a user invokes two instances of the application, it could happen that both of them want to write the configuration file at the same time. In that situation, the first instance should lock the file. When the second instance finds the file locked, it can decide to wait until the file is unlocked or simply skip the writing process. To lock a file, call either the lock or tryLock methods of the FileChannel class.
Click here to view code image
FileChannel = FileChannel.open(path);
FileLock lock = channel.lock();
or
Click here to view code image
FileLock lock = channel.tryLock();
The first call blocks until the lock becomes available. The second call returns immediately, either with the lock or with null if the lock is not available. The file remains locked until the lock or the channel is closed. It is best to use a try-with-resources statement:
Click here to view code image
try (FileLock lock = channel.lock()) {
...
}
9.2 Paths, Files, and Directories
You have already seen Path objects for specifying file paths. In the following sections, you will see how to manipulate these objects and how to work with files and directories.
9.2.1 Paths
A Path is a sequence of directory names, optionally followed by a file name. The first component of a path may be a root component, such as / or C:\. The permissible root components depend on the file system. A path that starts with a root component is absolute. Otherwise, it is relative. For example, here we construct an absolute and a relative path. For the absolute path, we assume we are running on a Unix-like file system.
Click here to view code image
Path absolute = Paths.get("/", "home", "cay");
Path relative = Paths.get("myapp", "conf", "user.properties");
The static Paths.get method receives one or more strings, which it joins with the path separator of the default file system (/ for a Unix-like file system, \ for Windows). It then parses the result, throwing an InvalidPathException if the result is not a valid path in the given file system. The result is a Path object.
You can also provide a string with separators to the Paths.get method:
Click here to view code image
Path homeDirectory = Paths.get("/home/cay");
![]() Note
Note
A Path object does not have to correspond to a file that actually exists. It is merely an abstract sequence of names. To create a file, first make a path, then call a method to create the corresponding file—see Section 9.2.2, “Creating Files and Directories,” on p. 286.
It is very common to combine or “resolve” paths. The call p.resolve(q) returns a path according to these rules:
• If q is absolute, then the result is q.
• Otherwise, the result is “p then q,” according to the rules of the file system.
For example, suppose your application needs to find its configuration file relative to the home directory. Here is how you can combine the paths:
Click here to view code image
Path workPath = homeDirectory.resolve("myapp/work");
// Same as homeDirectory.resolve(Paths.get("myapp/work"));
There is a convenience method resolveSibling that resolves against a path’s parent, yielding a sibling path. For example, if workPath is /home/cay/myapp/work, the call
Click here to view code image
Path tempPath = workPath.resolveSibling("temp");
yields /home/cay/myapp/temp.
The opposite of resolve is relativize. The call p.relativize(r) yields the path q which, when resolved with p, yields r. For example,
Click here to view code image
Paths.get("/home/cay").relativize(Paths.get("/home/fred/myapp"))
yields ../fred/myapp, assuming we have a file system that uses .. to denote the parent directory.
The normalize method removes any redundant . and .. components (or whatever the file system may deem redundant). For example, normalizing the path /home/cay/../fred/./myapp yields /home/fred/myapp.
The toAbsolutePath method yields the absolute path of a given path. If the path is not already absolute, it is resolved against the “user directory”—that is, the directory from which the JVM was invoked. For example, if you launched a program from /home/cay/myapp, then Paths.get("config").toAbsolutePath() returns /home/cay/myapp/config.
The Path interface has methods for taking paths apart and combining them with other paths. This code sample shows some of the most useful ones:
Click here to view code image
Path p = Paths.get("/home", "cay", "myapp.properties");
Path parent = p.getParent(); // The path /home/cay
Path file = p.getFileName(); // The last element, myapp.properties
Path root = p.getRoot(); // The initial segment / (null for a relative path)
Path first = p.getName(0); // The first element
Path dir = p.subpath(1, p.getNameCount());
// All but the first element, cay/myapp.properties
The Path interface extends the Iterable<Path> element, so you can iterate over the name components of a Path with an enhanced for loop:
for (Path component : path) {
...
}
![]() Note
Note
Occasionally, you may need to interoperate with legacy APIs that use the File class instead of the Path interface. The Path interface has a toFile method, and the File class has a toPath method.
9.2.2 Creating Files and Directories
To create a new directory, call
Files.createDirectory(path);
All but the last component in the path must already exist. To create intermediate directories as well, use
Click here to view code image
Files.createDirectories(path);
You can create an empty file with
Files.createFile(path);
The call throws an exception if the file already exists. The checks for existence and the creation are atomic. If the file doesn’t exist, it is created before anyone else has a chance to do the same.
The call Files.exists(path) checks whether the given file or directory exists. To test whether it is a directory or a “regular” file (that is, with data in it, not something like a directory or symbolic link), call the static methods isDirectory and isRegularFile of the Files class.
There are convenience methods for creating a temporary file or directory in a given or system-specific location.
Click here to view code image
Path tempFile = Files.createTempFile(dir, prefix, suffix);
Path tempFile = Files.createTempFile(prefix, suffix);
Path tempDir = Files.createTempDirectory(dir, prefix);
Path tempDir = Files.createTempDirectory(prefix);
Here, dir is a Path, and prefix/suffix are strings which may be null. For example, the call Files.createTempFile(null, ".txt") might return a path such as /tmp/1234405522364837194.txt.
9.2.3 Copying, Moving, and Deleting Files
To copy a file from one location to another, simply call
Files.copy(fromPath, toPath);
To move a file (that is, copy and delete the original), call
Files.move(fromPath, toPath);
You can also use this command to move an empty directory.
The copy or move will fail if the target exists. If you want to overwrite an existing target, use the REPLACE_EXISTING option. If you want to copy all file attributes, use the COPY_ATTRIBUTES option. You can supply both like this:
Click here to view code image
Files.copy(fromPath, toPath, StandardCopyOption.REPLACE_EXISTING,
StandardCopyOption.COPY_ATTRIBUTES);
You can specify that a move should be atomic. Then you are assured that either the move completed successfully, or the source continues to be present. Use the ATOMIC_MOVE option:
Click here to view code image
Files.move(fromPath, toPath, StandardCopyOption.ATOMIC_MOVE);
See Table 9–3 for a summary of the options that are available for file operations.
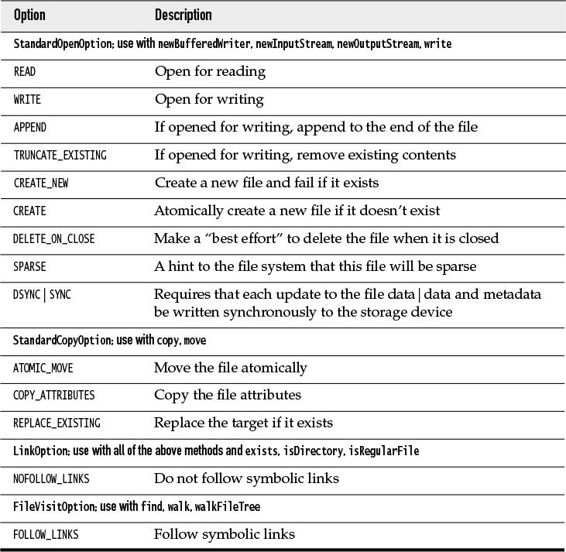
Table 9–3 Standard Options for File Operations
Finally, to delete a file, simply call
Files.delete(path);
This method throws an exception if the file doesn’t exist, so instead you may want to use
Click here to view code image
boolean deleted = Files.deleteIfExists(path);
The deletion methods can also be used to remove an empty directory.
9.2.4 Visiting Directory Entries
The static Files.list method returns a Stream<Path> that reads the entries of a directory. The directory is read lazily, making it possible to efficiently process directories with huge numbers of entries.
Since reading a directory involves a system resource that needs to be closed, you should use a try block:
Click here to view code image
try (Stream<Path> entries = Files.list(pathToDirectory)) {
...
}
The list method does not enter subdirectories. To process all descendants of a directory, use the Files.walk method instead.
Click here to view code image
try (Stream<Path> entries = Files.walk(pathToRoot)) {
// Contains all descendants, visited in depth-first order
}
Here is a sample traversal of the unzipped src.zip tree:
Click here to view code image
java
java/nio
java/nio/DirectCharBufferU.java
java/nio/ByteBufferAsShortBufferRL.java
java/nio/MappedByteBuffer.java
...
java/nio/ByteBufferAsDoubleBufferB.java
java/nio/charset
java/nio/charset/CoderMalfunctionError.java
java/nio/charset/CharsetDecoder.java
java/nio/charset/UnsupportedCharsetException.java
java/nio/charset/spi
java/nio/charset/spi/CharsetProvider.java
java/nio/charset/StandardCharsets.java
java/nio/charset/Charset.java
...
java/nio/charset/CoderResult.java
java/nio/HeapFloatBufferR.java
...
As you can see, whenever the traversal yields a directory, it is entered before continuing with its siblings.
You can limit the depth of the tree that you want to visit by calling Files.walk(pathToRoot, depth). Both walk methods have a varargs parameter of type FileVisitOption..., but there is only one option you can supply: FOLLOW_LINKS to follow symbolic links.
![]() Note
Note
If you filter the paths returned by walk and your filter criterion involves the file attributes stored with a directory, such as size, creation time, or type (file, directory, symbolic link), then use the find method instead of walk. Call that method with a predicate function that accepts a path and a BasicFileAttributes object. The only advantage is efficiency. Since the directory is being read anyway, the attributes are readily available.
This code fragment uses the Files.walk method to copy one directory to another:
Click here to view code image
Files.walk(source).forEach(p -> {
try {
Path q = target.resolve(source.relativize(p));
if (Files.isDirectory(p))
Files.createDirectory(q);
else
Files.copy(p, q);
} catch (IOException ex) {
throw new UncheckedIOException(ex);
}
});
Unfortunately, you cannot easily use the Files.walk method to delete a tree of directories since you need to first visit the children before deleting the parent. In that case, use the walkFileTree method. It requires an instance of the FileVisitor interface. Here is when the file visitor gets notified:
1. Before a directory is processed:
Click here to view code image
FileVisitResult preVisitDirectory(T dir, IOException ex)
2. When a file or directory is encountered:
Click here to view code image
FileVisitResult visitFile(T path, BasicFileAttributes attrs)
3. When an exception occurs in the visitFile method:
Click here to view code image
FileVisitResult visitFileFailed(T path, IOException ex)
4. After a directory is processed:
Click here to view code image
FileVisitResult postVisitDirectory(T dir, IOException ex)
In each case, the notification method returns one of the following results:
• Continue visiting the next file: FileVisitResult.CONTINUE
• Continue the walk, but without visiting the entries in this directory: FileVisitResult.SKIP_SUBTREE
• Continue the walk, but without visiting the siblings of this file: FileVisitResult.SKIP_SIBLINGS
• Terminate the walk: FileVisitResult.TERMINATE
If any of the methods throws an exception, the walk is also terminated, and that exception is thrown from the walkFileTree method.
The SimpleFileVisitor class implements this interface, continuing the iteration at each point and rethrowing any exceptions.
Here is how you can delete a directory tree:
Click here to view code image
Files.walkFileTree(root, new SimpleFileVisitor<Path>() {
public FileVisitResult visitFile(Path file,
BasicFileAttributes attrs) throws IOException {
Files.delete(file);
return FileVisitResult.CONTINUE;
}
public FileVisitResult postVisitDirectory(Path dir,
IOException ex) throws IOException {
if (ex != null) throw ex;
Files.delete(dir);
return FileVisitResult.CONTINUE;
}
});
9.2.5 ZIP File Systems
The Paths class looks up paths in the default file system—the files on the user’s local disk. You can have other file systems. One of the more useful ones is a ZIP file system. If zipname is the name of a ZIP file, then the call
Click here to view code image
FileSystem zipfs = FileSystems.newFileSystem(Paths.get(zipname), null);
establishes a file system that contains all files in the ZIP archive. It’s an easy matter to copy a file out of that archive if you know its name:
Click here to view code image
Files.copy(zipfs.getPath(sourceName), targetPath);
Here, zipfs.getPath is the analog of Paths.get for an arbitrary file system.
To list all files in a ZIP archive, walk the file tree:
Click here to view code image
Files.walk(zipfs.getPath("/")).forEach(p -> {
Process p
});
You have to work a bit harder to create a new ZIP file. Here is the magic incantation:
Click here to view code image
Path zipPath = Paths.get("myfile.zip");
URI uri = new URI("jar", zipPath.toUri().toString(), null);
// Constructs the URI jar:file://myfile.zip
try (FileSystem zipfs = FileSystems.newFileSystem(uri,
Collections.singletonMap("create", "true"))) {
// To add files, copy them into the ZIP file system
Files.copy(sourcePath, zipfs.getPath("/").resolve(targetPath));
}
![]() Note
Note
There is an older API for working with ZIP archives, with classes ZipInputStream and ZipOutputStream, but it’s not as easy to use as the one described in this section.
9.3 URL Connections
You can read from a URL by calling the getInputStream method on an URL object. However, if you want additional information about a web resource, or if you want to write data, use the URLConnection class. Follow these steps:
1. Get an URLConnection object:
Click here to view code image
URLConnection connection = url.openConnection();
For an HTTP URL, the returned object is actually an instance of HttpURLConnection.
2. If desired, set request properties:
Click here to view code image
connection.setRequestProperty("Accept-Charset", "UTF-8, ISO-8859-1");
If a key has multiple values, separate them by commas.
3. To send data to the server, call
Click here to view code image
connection.setDoOutput(true);
try (OutputStream out = connection.getOutputStream()) {
Write to out
}
4. If you want to read the response headers and you haven’t called getOutputStream, call
connection.connect();
Then query the header information:
Click here to view code image
Map<String, List<String>> headers = connection.getHeaderFields();
For each key, you get a list of values since there may be multiple header fields with the same key.
5. Read the response:
Click here to view code image
try (InputStream in = connection.getInputStream()) {
Read from in
}
A common use case is to post form data. The URLConnection class automatically sets the content type to application/x-www-form-urlencoded when writing data to a HTTP URL, but you need to encode the name/value pairs:
Click here to view code image
URL url = ...;
URLConnection connection = url.openConnection();
connection.setDoOutput(true);
try (Writer out = new OutputStreamWriter(
connection.getOutputStream(), StandardCharsets.UTF_8)) {
Map<String, String> postData = ...;
boolean first = true;
for (Map.Entry<String, String> entry : postData.entrySet()) {
if (first) first = false;
else out.write("&");
out.write(URLEncoder.encode(entry.getKey(), "UTF-8"));
out.write("=");
out.write(URLEncoder.encode(entry.getValue(), "UTF-8"));
}
}
try (InputStream in = connection.getInputStream()) {
...
}
9.4 Regular Expressions
Regular expressions specify string patterns. Use them whenever you need to locate strings that match a particular pattern. For example, suppose you want to find hyperlinks in an HTML file. You need to look for strings of the pattern <a href="...">. But wait—there may be extra spaces, or the URL may be enclosed in single quotes. Regular expressions give you a precise syntax for specifying what sequences of characters are legal matches.
In the following sections, you will see the regular expression syntax used by the Java API, and how to put regular expressions to work.
9.4.1 The Regular Expression Syntax
In a regular expression, a character denotes itself unless it is one of the reserved characters
. * + ? { | ( ) [ \ ^ $
For example, the regular expression Java only matches the string Java.
The symbol . matches any single character. For example, .a.a matches Java and data.
The * symbol indicates that the preceding constructs may be repeated 0 or more times; for a +, it is 1 or more times. A suffix of ? indicates that a construct is optional (0 or 1 times). For example, be+s? matches be, bee, and bees. You can specify other multiplicities with { }—see Table 9–4.
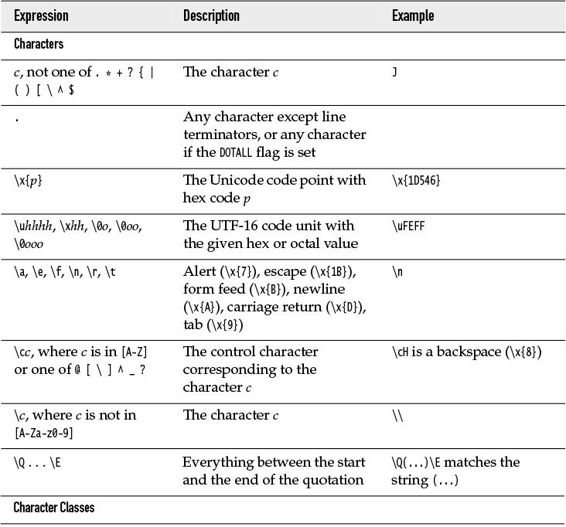
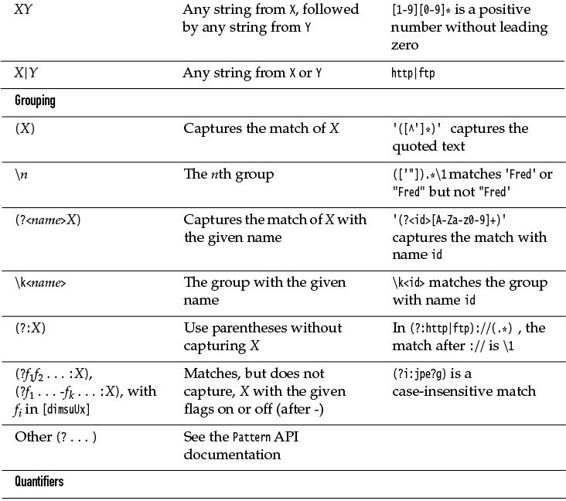
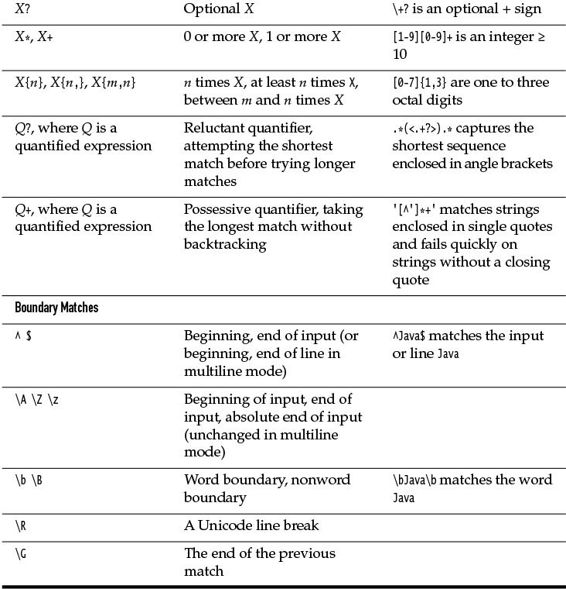
Table 9–4 Regular Expression Syntax
A | denotes an alternative: .(oo|ee)f matches beef or woof. Note the parentheses—without them, .oo|eef would be the alternative between .oo and eef. Parentheses are also used for grouping—see Section 9.4.3, “Groups,” on p. 298.
A character class is a set of character alternatives enclosed in brackets, such as [Jj], [0-9], [A-Za-z], or [^0-9]. Inside a character class, the - denotes a range (all characters whose Unicode values fall between the two bounds). However, a - that is the first or last character in a character class denotes itself. A ^ as the first character in a character class denotes the complement (all characters except those specified).
There are many predefined character classes such as \d (digits) or \p{Sc} (Unicode currency symbols). See Tables 9–4 and 9–5.
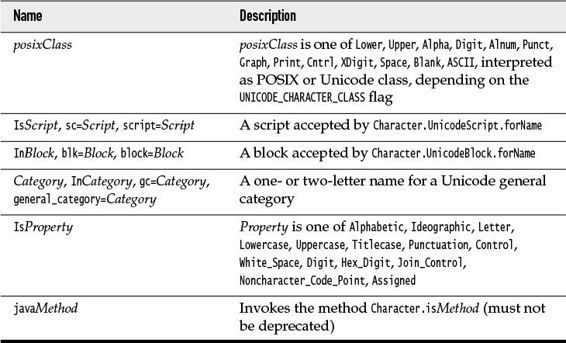
Table 9–5 Predefined Character Classes \p{...}
The characters ^ and $ match the beginning and end of input.
If you need to have a literal . * + ? { | ( ) [ \ ^ $, precede it by a backslash. Inside a character class, you only need to escape [ and \, provided you are careful about the positions of ] - ^. For example, []^-] is a class containing all three of them.
9.4.2 Finding One or All Matches
Generally, there are two ways to use a regular expression: Either you want to find out whether a string conforms to the expression, or you want to find all matches of a regular expressions in a string.
In the first case, simply use the static matches method:
Click here to view code image
String regex = "[+-]?\\d+";
CharSequence input = ...;
if (Pattern.matches(regex, input)) {
...
}
If you need to use the same regular expression many times, it is more efficient to compile it. Then, create a Matcher for each input:
Click here to view code image
Pattern pattern = Pattern.compile(regex);
Matcher matcher = pattern.matcher(input);
if (matcher.matches()) ...
If the match succeeds, you can retrieve the location of matched groups—see the following section.
If you want to match elements in a collection or stream, turn the pattern into a predicate:
Click here to view code image
Stream<String> strings = ...;
Stream<String> result = strings.filter(pattern.asPredicate());
The result contains all strings that match the regular expression.
Now consider the other use case—finding all matches of a regular expression in an input string. Use this loop:
Click here to view code image
Matcher matcher = pattern.matcher(input);
while (matcher.find()) {
String match = matcher.group();
...
}
In this way, you can process each match in turn. The next section shows how you can take care of all of the matches together.
9.4.3 Groups
It is common to use groups for extracting components of a match. For example, suppose you have a line item in the invoice with item name, quantity, and unit price such as
Blackwell Toaster USD29.95
Here is a regular expression with groups for each component:
Click here to view code image
(\p{Alnum}+(\s+\p{Alnum}+)*)\s+([A-Z]{3})([0-9.]*)
After matching, you can extract the nth group from the matcher as
Click here to view code image
String contents = matcher.group(n);
Groups are ordered by their opening parenthesis, starting at 1. (Group 0 is the entire input.) In this example, here is how to take the input apart:
Click here to view code image
Matcher matcher = pattern.matcher(input);
if (matcher.matches()) {
item = matcher.group(1);
currency = matcher.group(3);
price = matcher.group(4);
}
We aren’t interested in group 2; it only arose from the parentheses that were required for the repetition. For greater clarity, you can use a noncapturing group:
Click here to view code image
(\p{Alnum}+(?:\s+\p{Alnum}+)*)\s+([A-Z]{3})([0-9.]*)
Or, even better, capture by name:
Click here to view code image
(?<item>\p{Alnum}+(\s+\p{Alnum}+)*)\s+(?<currency>[A-Z]{3})(?<price>[0-9.]*)
Then, you can retrieve the items by name:
item = matcher.group("item");
![]() Note
Note
When you have a group inside a repetition, such as (\s+\p{Alnum}+)* in the example above, it is not possible to get all of its matches. The group method only yields the last match, which is rarely useful. You need to capture the entire expression with another group.
9.4.4 Removing or Replacing Matches
Sometimes, you want to break by matched delimiters and keep everything else. The Pattern.split method automates this task. You obtain an array of strings, with the delimiters removed:
Click here to view code image
Pattern commas = Pattern.compile("\\s*,\\s*");
String[] tokens = commas.split(input);
// "1, 2, 3" turns into ["1", "2", "3"]
If there are many tokens, you can fetch them lazily:
Click here to view code image
Stream<String> tokens = commas.splitAsStream(input);
If you don’t care about precompiling the pattern or lazy fetching, you can just use the String.split method:
Click here to view code image
String[] tokens = input.split("\\s*,\\s*");
If you want to replace all matches with a string, call replaceAll on the matcher:
Click here to view code image
Matcher matcher = commas.matcher(input);
String result = matcher.replaceAll(",");
// Normalizes the commas
Or, if you don’t care about precompiling, use the replaceAll method of the String class.
Click here to view code image
String result = input.replaceAll("\\s*,\\s*", ",");
The replacement string can contain group numbers $n or names ${name}. They are replaced with the contents of the corresponding captured group.
Click here to view code image
String result = "3:45".replaceAll(
"(\\d{1,2}):(?<minutes>\\d{2})",
"$1 hours and ${minutes} minutes");
// Sets result to "3 hours and 45 minutes"
Use \ to escape $ and \ in the replacement string.
9.4.5 Flags
Several flags change the behavior of regular expressions. You can specify them when you compile the pattern:
Click here to view code image
Pattern pattern = Pattern.compile(regex,
Pattern.CASE_INSENSITIVE | Pattern.UNICODE_CHARACTER_CLASS);
Or you can specify them inside the pattern:
Click here to view code image
String regex = "(?iU:expression)";
Here are the flags:
• Pattern.CASE_INSENSITIVE or i: Match characters independently of the letter case. By default, this flag takes only US ASCII characters into account.
• Pattern.UNICODE_CASE or u: When used in combination with CASE_INSENSITIVE, use Unicode letter case for matching.
• Pattern.UNICODE_CHARACTER_CLASS or U: Select Unicode character classes instead of POSIX. Implies UNICODE_CASE.
• Pattern.MULTILINE or m: Make ^ and $ match the beginning and end of a line, not the entire input.
• Pattern.UNIX_LINES or d: Only '\n' is a line terminator when matching ^ and $ in multiline mode.
• Pattern.DOTALL or s: Make the . symbol match all characters, including line terminators.
• Pattern.COMMENTS or x: Whitespace and comments (from # to the end of a line) are ignored.
• Pattern.LITERAL: The pattern is taking literally and must be matched exactly, except possibly for letter case.
• Pattern.CANON_EQ: Take canonical equivalence of Unicode characters into account. For example, u followed by ¨ (diaeresis) matches ü.
The last two flags cannot be specified inside a regular expression.
9.5 Serialization
In the following sections, you will learn about object serialization—a mechanism for turning an object into a bunch of bytes that can be shipped somewhere else or stored on disk, and for reconstituting the object from those bytes.
Serialization is an essential tool for distributed processing, where objects are shipped from one virtual machine to another. It is also used for fail-over and load balancing, when serialized objects can be moved to another server. If you work with server-side software, you will often need to enable serialization for classes. The following sections tell you how to do that.
9.5.1 The Serializable Interface
In order for an object to be serialized—that is, turned into a bunch of bytes—it must be an instance of a class that implements the Serializable interface. This is a marker interface with no methods, similar to the Cloneable interface that you saw in Chapter 4.
For example, to make Employee objects serializable, the class needs to be declared as
Click here to view code image
public class Employee implements Serializable {
private String name;
private double salary;
...
}
It is safe and appropriate to implement the Serializable interface if all instance variables have primitive or enum type, or refer to serializable objects. Many classes in the standard library are serializable. Arrays and the collection classes that you saw in Chapter 7 are serializable provided their elements are. More generally, all objects that you can reach from a serializable object need to be serializable.
In the case of the Employee class, and indeed with most classes, there is no problem. In the following sections, you will see what to do when a little extra help is needed.
To serialize objects, you need an ObjectOutputStream, which is constructed with another OutputStream that receives the actual bytes.
Click here to view code image
ObjectOutputStream out = new ObjectOutputStream(
Files.newOutputStream(path));
Now call the writeObject method:
Click here to view code image
Employee peter = new Employee("Peter", 90000);
Employee paul = new Manager("Paul", 180000);
out.writeObject(peter);
out.writeObject(paul);
To read the objects back in, construct an ObjectInputStream:
Click here to view code image
ObjectInputStream in = new ObjectInputStream(
Files.newInputStream(path));
Retrieve the objects in the same order in which they were written, using the readObject method.
Click here to view code image
Employee e1 = (Employee) in.readObject();
Employee e2 = (Employee) in.readObject();
When an object is written, the name of the class and the names and values of all instance variables are saved. If the value of an instance variable belongs to a primitive type, it is saved as binary data. If it is an object, it is again written with the writeObject method.
When an object is read in, the process is reversed. The class name and the names and values of the instance variables are read, and the object is reconstituted.
There is just one catch. Suppose there were two references to the same object. Let’s say each employee has a reference to their boss:
Click here to view code image
Employee peter = new Employee("Fred", 90000);
Employee paul = new Manager("Barney", 105000);
Manager mary = new Manager("Mary", 180000);
peter.setBoss(mary);
paul.setBoss(mary);
out.writeObject(peter);
out.writeObject(paul);
When reading these two objects back in, both of them need to have the same boss, not two references to identical but distinct objects.
In order to achieve this, each object gets a serial number when it is saved. When you pass an object reference to writeObject, the ObjectOutputStream checks if the object reference was previously written. In that case, it just writes out the serial number and does not duplicate the contents of the object.
In the same way, an ObjectInputStream remembers all objects it has encountered. When reading in a reference to a repeated object, it simply yields a reference to the previously read object.
9.5.2 Transient Instance Variables
Certain instance variables should not be serialized—for example, database connections that are meaningless when an object is reconstituted. Also, when an object keeps a cache of values, it might be better to drop the cache and recompute it instead of storing it.
To prevent an instance variable from being serialized, simply tag it with the transient modifier. Also, mark instance variables as transient if they belong to nonserializable classes. Transient fields are always skipped when objects are serialized.
9.5.3 The readObject and writeObject Methods
In rare cases, you need to tweak the serialization mechanism. A serializable class can add any desired action to the default read and write behavior, by defining methods with the signature
Click here to view code image
private void readObject(ObjectInputStream in)
throws IOException, ClassNotFoundException
private void writeObject(ObjectOutputStream out)
throws IOException
Then, the object headers continue to be written as usual, but the instance variables fields are no longer automatically serialized. Instead, these methods are called.
Here is a typical example. The Point2D class in the JavaFX library is not serializable. Now, suppose you want to serialize a class LabeledPoint that stores a String and a Point2D. First, you need to mark the Point2D field as transient to avoid a NotSerializableException.
Click here to view code image
public class LabeledPoint implements Serializable {
private String label;
private transient Point2D point;
...
}
In the writeObject method, first write the nontransient label variable by calling the defaultWriteObject method. This is a special method of the ObjectOutputStream class that should only be called from within a writeObject method of a serializable class. Then, write the point coordinates using the writeDouble method from the DataOutput interface.
Click here to view code image
private void writeObject(ObjectOutputStream out)
throws IOException {
out.defaultWriteObject();
out.writeDouble(point.getX());
out.writeDouble(point.getY());
}
In the readObject method, reverse the process:
Click here to view code image
private void readObject(ObjectInputStream in)
throws IOException, ClassNotFoundException {
in.defaultReadObject();
double x = in.readDouble();
double y = in.readDouble();
point = new Point2D(x, y);
}
The readObject and writeObject methods only need to read and write their own instance variables. They should not concern themselves with superclass data.
![]() Note
Note
A class can define its own serialization format by implementing the Externalizable interface and providing methods
Click here to view code image
public void readExternal(ObjectInput in)
public void writeExternal(ObjectOutput out)
When reading an externalizable object, the object stream creates an object with the no-argument constructor and then calls the readExternal method. This can give better performance, but it is very rarely used.
9.5.4 The readResolve and writeReplace Methods
We take it for granted that objects can only be constructed with the constructor. However, a deserialized object is not constructed. Its instance variables are simply restored from an object stream.
This is a problem if the constructor enforces some condition. For example, a singleton object may be implemented so that the constructor can only be called once. Before Java had the enum construct, enumerated types were simulated by classes with a private constructor that was called once for each instance. As another example, database entities could be constructed so that they always come from a pool of managed instances.
These situations are exceedingly rare. Nowadays, the serialization of enum types is automatic. And you shouldn’t implement your own mechanism for singletons. If you need a singleton, make an enumerated type with one instance that is, by convention, called INSTANCE.
Click here to view code image
public enum PersonDatabase {
INSTANCE;
public Person findById(int id) { ... }
...
}
Now let’s suppose that you are in the rare situation where you want to control the identity of each deserialized instance. As an example, suppose a Person class wants to restore its instances from a database when deserializing. Then don’t serialize the object itself but some proxy that can locate or construct the object. Provide a writeReplace method that returns the proxy object:
Click here to view code image
public class Person implements Serializable {
private int id;
// Other instance variables
...
private Object writeReplace() {
return new PersonProxy(id);
}
}
When a Person object is serialized, none of its instance variables are saved. Instead, the writeReplace method is called and its return value is serialized and written to the stream.
The proxy class needs to implement a readResolve method that yields a Person:
Click here to view code image
public class PersonProxy implements Serializable {
private int id;
public PersonProxy(int id) {
this.id = id;
}
public Object readResolve() {
return PersonDatabase.INSTANCE.findById(id);
}
}
When the readObject method finds a PersonProxy in an ObjectInputStream, it deserializes the proxy, calls its readResolve method, and returns the result.
9.5.5 Versioning
Serialization was intended for sending objects from one virtual machine to another, or for short-term persistence of state. If you use serialization for long-term persistence, or in any situation where classes can change between serialization and deserialization, you will need to consider what happens when your classes evolve. Can version 2 read the old data? Can the users who still use version 1 read the files produced by the new version?
The serialization mechanism supports a simple versioning scheme. When an object is serialized, both the name of the class and its serialVersionUID are written to the object stream. That unique identifier is assigned by the implementor, by defining an instance variable
Click here to view code image
private static final long serialVersionUID = 1L; // Version 1
When the class evolves in an incompatible way, the implementor should change the UID. Whenever a deserialized object has a nonmatching UID, the readObject method throws an InvalidClassException.
If the serialVersionUID matches, deserialization proceeds even if the implementation has changed. Each nontransient instance variable of the object to be read is set to the value in the serialized state, provided that the name and type match. All other instance variables are set to the default: null for object references, zero for numbers, and false for boolean values. Anything in the serialized state that doesn’t exist in the object to be read is ignored.
Is that process safe? Only the implementor of the class can tell. If it is, then the implementor should give the new version of the class the same serialVersionUID as the old version.
If you don’t assign a serialVersionUID, one is automatically generated by hashing a canonical description of the instance variables, methods, and supertypes. You can see the hash code with the serialver utility. The command
serialver ch09.sec05.Employee
displays
Click here to view code image
private static final long serialVersionUID = -4932578720821218323L;
When the class implementation changes, there is a very high probability that the hash code changes as well.
If you need to be able to read old version instances, and you are certain that is safe to do so, run serialver on the old version on your class and add the result to the new version.
![]() Note
Note
If you want to implement a more sophisticated versioning scheme, override the readObject method and call the readFields method instead of the defaultReadObject method. You get a description of all fields found in the stream, and you can do with them what you want.
Exercises
1. Write a utility method for copying all of an InputStream to an OutputStream, without using any temporary files. Provide another solution, without a loop, using operations from the Files class, using a temporary file.
2. Write a program that reads a text file and produces a file with the same name but extension .toc, containing an alphabetized list of all words in the input file together with a list of line numbers in which each word occurs. Assume that the file’s encoding is UTF-8.
3. Write a program that reads a file containing text and, assuming that most words are English, guesses whether the encoding is ASCII, ISO 8859-1, UTF-8, or UTF-16, and if the latter, which byte ordering is used.
4. Using a Scanner is convenient, but it is a bit slower than using a BufferedReader. Read in a long file a line at a time, counting the number of input lines, with (a) a Scanner and hasNextLine/nextLine, (b) a BufferedReader and readLine, (c) a bufferedReader and lines. Which is the fastest? The most convenient?
5. When an encoder of a Charset with partial Unicode coverage can’t encode a character, it replaces it with a default—usually, but not always, the encoding of "?". Find all replacements of all available character sets that support encoding. Use the newEncoder method to get an encoder, and call its replacement method to get the replacement. For each unique result, report the canonical names of the charsets that use it.
6. The BMP file format for uncompressed image files is well documented and simple. Using random access, write a program that reflects each row of pixels in place, without writing a new file.
7. Look up the API documentation for the MessageDigest class and write a program that computes the SHA-1 digest of a file. Feed blocks of bytes to the MessageDigest object with the update method, then display the result of calling digest. Verify that your program produces the same result as the sha1sum utility.
8. Write a utility method for producing a ZIP file containing all files from a directory and its descendants.
9. Using the URLConnection class, read data from a password-protected web page with “basic” authentication. Concatenate the user name, a colon, and the password, and compute the Base64 encoding:
Click here to view code image
String input = username + ":" + password;
String encoding = Base64.getEncoder().encodeToString(
input.getBytes(StandardCharsets.UTF_8));
Set the HTTP header Authorization to the value "Basic " + encoding. Then read and print the page contents.
10. Using a regular expression, extract all decimal integers (including negative ones) from a string into an ArrayList<Integer> (a) using find, and (b) using split. Note that a + or - that is not followed by a digit is a delimiter.
11. Using regular expressions, extract the directory path names (as an array of strings), the file name, and the file extension from an absolute or relative path such as /home/cay/myfile.txt.
12. Come up with a realistic use case for using group references in Matcher.replaceAll and implement it.
13. Implement a method that can produce a clone of any serializable object by serializing it into a byte array and deserializing it.
14. Implement a serializable class Point with instance variables for x and y. Write a program that serializes an array of Point objects to a file, and another that reads the file.
15. Continue the preceding exercise, but change the data representation of Point so that it stores the coordinates in an array. What happens when the new version tries to read a file generated by the old version? What happens when you fix up the serialVersionUID? Suppose your life depended upon making the new version compatible with the old. What could you do?
16. Which classes in the standard Java library implement Externalizable? Which of them use writeReplace/readResolve?
All materials on the site are licensed Creative Commons Attribution-Sharealike 3.0 Unported CC BY-SA 3.0 & GNU Free Documentation License (GFDL)
If you are the copyright holder of any material contained on our site and intend to remove it, please contact our site administrator for approval.
© 2016-2026 All site design rights belong to S.Y.A.