Pragmatic Unit Testing in Java 8 with JUnit (2015)
Part 4. The Bigger Unit-Testing Picture
Chapter 14. Testing on a Project
If you’re like most of us, you’re working on a project with other team members. You’ll want to be on the same page with them when it comes to unit testing. In this chapter you’ll learn about standards that you and your team must hash out if you’re to avoid wasting time on endless debates and code thrashing.
The topics covered in this chapter will provide you with the basis for understanding what you’ll want to discuss and pin down quickly.
Coming up to Speed
Learning a new practice like unit testing requires continual vigilance. Even if you enjoy writing unit tests and are good about covering the new code you write, you’re usually facing an uphill battle.
Perhaps your teammates are not as vigilant and are slamming out code at a rate that far outpaces your testing. Or, perhaps you’re close to a critical deadline, and your team insists that the only way to make the deadline is to toss all safeguards.
“Unit testing isn’t free,” says Pat, “We’re supposed to deliver in two weeks, and we’re way behind. We just need to slam out code.”
We’ve been there, however, and so has Dale, who responds to Pat, “The worst possible time to throw away unit tests is while in crunch mode. If we do, we’ll be slamming out lots of code in short order, which means it’s guaranteed to be messier. It will take longer to determine whether or not it’s working properly, and it will take longer to fix any defects in that messier code. And there will be more defects. One way or another, we’ll pay dearly for the choice to dispense with quality for short-term gains.
“Plus, slamming out code with no tests only speeds things up for a very short period of time—maybe a couple days or so. Invariably, we hit ugly defects that require long debugging sessions. And we always spend more time making changes to hastily crafted, difficult-to-understand code. Sorry Pat, tossing the unit tests won’t buy us the time we need.”
Unfortunately, not much will get us out of inevitable last-minute quandaries, no matter how good we are at development. About all we can do is negotiate. But we can hopefully diminish the number of times we are up against the wall by insisting that we develop with quality controls from day one.
Unit testing can be a part of those quality controls. Let’s discuss how to ensure that unit testing becomes a habitual part of your team’s cadence.
Getting on the Same Page with Your Team
How developers approach unit testing can vary dramatically from individual to individual. Some developers might insist on TDD. Others might resist unit testing at all costs, producing only the tests that they feel forced to write. Some developers might prefer lumping multiple cases into a single test method. Some might favor slower integration tests. Obviously, not everyone is going to agree with the recommendations you’ve read about in this book.
It’s important that your team get on the same page. Long debates—or continual back-and-forth without resolution—are rarely good uses of anyone’s time. And although you’ll never agree on everything, you can at least find out what you do agree on and start moving in the direction of increasing consensus.
Establishing Unit-Testing Standards
You’ll want to derive some standards around unit testing. Start minimally and seek to answer two questions:
· What things do developers feel are wasting the most time of everyone?
· What are simple standards that everyone can quickly agree on?
Seed a bit of discussion, run a quick meeting, and put into writing the expectations for the team. Don’t stop there: you and your team will need to keep atop adherence to the standards and also be willing to revisit and adapt them as often as needed. Most teams need to revisit and tweak their standards at least quarterly, and more often initially.
Here’s a short list of things you might want to standardize on early.
· What tests developers should run prior to check-in
· How to name test classes and test methods
· Whether to use Hamcrest or classic assertions
· Whether to use AAA or not
· Which mock tool to prefer
· Whether to disallow console output when checked-in tests execute
· How to clearly identify and discourage slow tests in the unit-test suite
Increasing Adherence to Standards with Reviews
Staying atop standards is not easy. Your team will need to exert a bit of collective peer pressure. One more standard you’ll want to agree upon is how to review code. Your team’s investment in the unit tests and the production system is too expensive to allow individuals to do whatever they want to the code, tests included.
You might initiate review sessions where unit-test producers solicit feedback from others on the team. You can formalize the review process using techniques like Fagan inspections.[37] Such after-the-fact reviews can at least act as a gate that prevents blatant standards violations.
Another mechanism some teams employ is to require pull requests—a feature most closely associated with GitHub. A developer submits a pull request for a chunk of work that he or she would like integrated into the main branch. Other team members can comment on the request and ultimately decide when the change gets pulled, or merged, into the main branch.
Some IDEs support code-review plug-ins. For example, Upsource[38] is a code-review tool for IntelliJ IDEA that provides the ability to discuss bits of code in annotations that the IDE manages.
Reviewing via Pair Programming
Few practices have drawn as much controversy in the software development world as pair programming, or pairing, where two programmers work together, side-by-side, to develop software. Done well, pairing can generate two-heads-are-better-than-one solutions, with higher-quality design than either of the pair could produce while soloing. Pairing advocates suggest that pairing is an active form of review.
After-the-fact review suffers from a few challenges. First, reviewers aren’t usually familiar with the intimate details of the code product being reviewed. The best reviews—the ones that find problems before you ship them—come from people with a deep understanding of the code. Reality in most shops prevents this sort of time investment. As a result, reviews find fewer defects than we’d like. The sorts of defects corrected are more typically surface-level. After-the-fact reviews are valuable, but probably not as much as they cost.
Further, after-the-fact reviews come too late to fix serious problems. After code is built and seemingly ready to ship, teams are usually under too much pressure to step back and significantly rework code that’s purportedly already working. Developers are pressed into moving on, by their peers, managers, and even themselves.
Pairing, on the other hand, holds the hope that a second set of eyes will help build quality in from the get-go. One way this can happen is insistence on more and better unit testing. Think of pairing as a great way to instill a habit. Your unit tests will provide more value if built by pairs.
It’s not for everyone, however. The thought of working with other developers closely throughout the day can send many of us screaming for the exits. If you’re intrigued, make sure you fully understand how to practice pairing successfully before trying to sell it to your teammates. There are many poor ways to approach pair programming that will frustrate your team.
The PragPub article “Pair Programming Benefits”[39] provides you with some selling points. Another article, “Pair Programming in a Flash”[40] lays out the ground rules for successful pair programming, as well as points out a few pitfalls to avoid.
Convergence with Continuous Integration
“It works on my machine!” cries Pat. “Must be something wrong on your machine,” he says to Dale.
Unit tests aren’t going to fix all such problems, but they are a standard of sorts: any changes to the code can’t break the collective set of tests; otherwise the standards—the tests—have been violated.
To be able to view the unit tests as a team-wide standard requires a shared repository, of course. Developers check code out from the repository (or create local branches, depending on your worldview), make changes, test locally, then check the code back into the shared repository (also known as integrating the code).
The cutting edge of old-school mentality was to run a nightly build against the shared code. If everything built okay, chances were that the integrated code was in good shape—at least, that was the theory.
Adding unit and other automated tests to such a nightly build increases its value dramatically. Knowing that the software passes all tests when run on a machine other than yours, integrated with other recent code changes, should increase your confidence about shipping it.
Nowadays, the nightly build, although a great step in the right direction, seems quaint and inadequate. A team of developers can add several hundreds of lines of code to the system in a day. The more code other developers add, the more likely your code won’t work in conjunction with it. With only nightly test runs against the integrated software, it could be nearly a full day before you find out about conflicts. And it could be another day for you to unravel how the combined code works and to find the problem. And it could be yet another day to merge the clashing code areas.
Enter the notion of continuous integration (CI). Waiting a full day seems silly. You want more-rapid feedback. CI means you integrate code much more frequently and verify the results of that integration each time. The more quickly you know that your code doesn’t work well with other changes, the better off your team is.
The practice of CI is best supported with a tool known as a continuous integration server. A CI server monitors your source repository. When new code is checked in, the CI server checks out the code from the source repository and initiates a build. If the build exhibits any problems, the CI server notifies the development team.
For the CI server to provide any value, your build must now include the running of your unit tests. Because the CI server build process works on the code of record in your source repository, it demonstrates the overall health of your system. Not “my changes work on my machine,” or “your changes work on your machine,” but “our code works on one of our golden servers.”
The CI server helps support healthy peer pressure against allowing bad code. Developers begin to habituate themselves to running their unit tests before check-in. No one wants to be recognized as the person wasting their teammates’ time by causing the CI build process to fail.
Installing and configuring a typical CI server requires perhaps a day or two. This is time well spent. We consider use of a CI server to be foundational.
|
|
A CI server is a minimum for building a modern development team. |

You’ll find numerous CI tools that work well with Java. Some CI servers are free, some are open source, some are hosted, and some are licensed. Some of the more widely used CI servers include Hudson, Jenkins (a fork of Hudson), TeamCity, AntHill, CruiseControl, Buildbot, and Bamboo.
Code Coverage
Managers love numbers. The concept of code coverage—how much code is unit-tested—is one that tickles the typical manager’s number fetish but ultimately leaves a bad taste when used for anything but educational purposes.
More specifically, code coverage is a measure of the percentage of code that your unit tests execute. You can find tools that do the dirty work of taking the measurements. Emma (which we show briefly here—it’s a free and easily installed Eclipse plugin) and Cobertura are examples of code-coverage tools.
Imagine that you have a Coverage class containing only one method, named soleMethod(), and that soleMethod() contains a single nonconditional statement. If you run a unit test that calls soleMethod(), the statement is executed. The code coverage for soleMethod(), and the class as well (since Coverage has no other methods), is 100%. If you run no unit tests that call soleMethod(), the code coverage for Coverage is 0%.
Next consider that soleMethod() contains an if statement with a single simple conditional, and the body of the if statement is a single statement. Here’s an example of this code scenario:
|
iloveyouboss/13/src/scratch/Coverage.java |
|
|
|
public class Coverage { |
|
|
int count; |
|
|
|
|
|
public void soleMethod() { |
|
|
if (count > 0) |
|
|
count++; |
|
|
} |
|
|
} |
If the conditional holds true when a test is run, the coverage against Coverage is 100%. If the conditional doesn’t hold true, the coverage is conceptually 50%: the if conditional counts as code executed, and the body of the if statement doesn’t get executed—so roughly half the code is executed.
Some tools also measure branch coverage. Each conditional represents a branch; your tests get 100% branch-coverage credit if you have one test that covers the true branch and another test that covers the false branch.
Given the test:
|
iloveyouboss/13/test/scratch/CoverageTest.java |
|
|
|
@Test |
|
|
public void noIncrementOfCount() { |
|
|
new Coverage().soleMethod(); |
|
|
} |
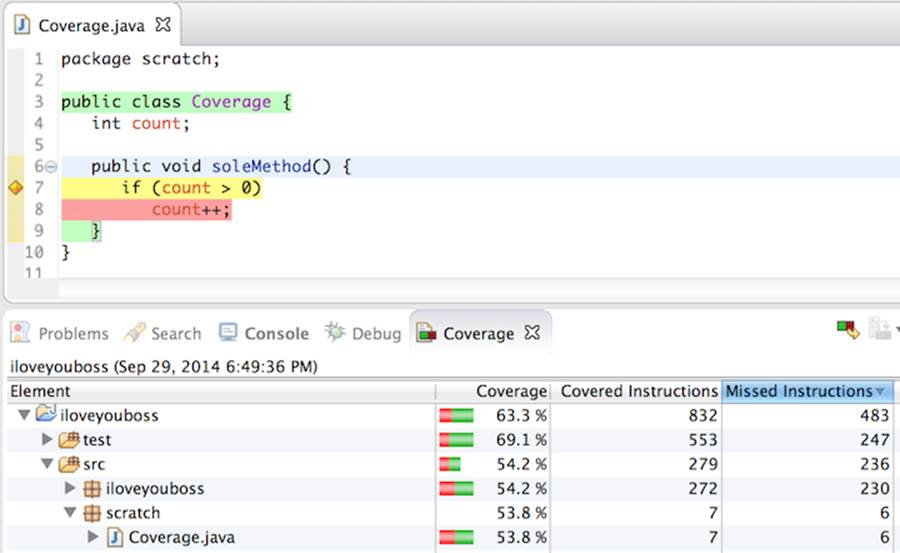
…the following figure shows coverage of 53.8% for Coverage.java, with seven covered instructions and six missed. For the code snippet immediately preceding, Emma highlights covered lines in green, uncovered lines in red, and incomplete branch coverage in yellow. The class declaration itself is colored green; the conditional if (count > 0) is yellow because no test results in the conditional evaluating to true (because the value of count never changes from 0); and count++ is red because it never gets executed.
Given a second test that alters count to have a positive value, the code coverage ends up at 100%:
|
iloveyouboss/13/test/scratch/CoverageTest.java |
|
|
|
@Test |
|
|
public void incrementOfCount() { |
|
|
Coverage c = new Coverage(); |
|
|
c.count = 1; |
|
|
c.soleMethod(); |
|
|
} |
Different tools measure things a little differently. Emma uses the concept of a basic block of code—a nonbranching chunk of bytecode—whereas Cobertura measures using lines of code. Don’t worry that the tools differ a little in how they report coverage—you’re looking for trending in the numbers, not a specific number.
How Much Coverage Is Enough?
On the surface, it would seem that higher code coverage is good and lower coverage not so good. Your manager craves a single number that says, “Yup, we’re doing well on our unit-testing practice,” or “No, we’re not writing enough unit tests.”
To satisfy your manager, you’d unfortunately need to first determine what enough means. Obviously, 0% is not enough. And 100% would be great, but is it realistic?
The concept of coverage has some built-in limitations that mean it’s only possible to reach 100% by faking things. Imagine that you’re using a framework like Hibernate that requires you to supply a no-argument constructor. Your test code and client code, on the other hand, use an overloaded constructor that takes a single argument. The no-arg constructor counts against your coverage percentage because the test code doesn’t execute it directly. Unless, of course, you cheat and write a test that simply instantiates the class. Congratulations: you’ve now unwittingly entered the temporarily lucrative and ethics-free world of metric gaming (managers: worry not, it will all come back to bite them in the end).
Most folks out there (the purveyors of Emma included) suggest that coverage under 70% is insufficient. We agree. Many developers also state that investing more time in unit testing provides diminishing returns on value. We don’t necessarily agree.
Teams that habitually write unit tests after they write code achieve coverage levels of 70% with relative ease. Much of the remaining near-third of their code remains untested because it’s difficult code and hard to test (usually due to poor dependencies). Sheer odds mean that 30% of your defects lie in this untested code, and in reality the number is probably higher—difficult code tends to hide more defects.
|
|
Jeff’s Theory of Code Coverage: the amount of bad code increases in the areas of least coverage. |
Is 100% Really As Good As It Sounds?
The better your design, the easier it is to write tests. Revisit Chapter 8, Refactoring to Cleaner Code and Chapter 9, Bigger Design Issues to understand how to better structure your code. A good design coupled with the will to increase coverage will move you in the direction of 100%, which should lead to fewer defects. You won’t reach 100%, and that’s okay.
Developers practicing TDD (see Chapter 12, Test-Driven Development) typically achieve percentages well over 90%, largely by definition: they always first write a unit test to describe the code they’re about to write. TDD makes tests a self-fulfilling prophecy.
The coverage percentage can mislead. It’s easy to write a few tests that slam through a large percentage of code yet assert little. Coverage tools don’t care whether or not you have written a single assert. You also might have written poor tests that are hard to understand and hard to maintain, and that don’t assert anything useful. We’ve seen teams waste a lot of effort on writing unit tests that had high coverage numbers but little value.
The Value in Code Coverage
Particularly as you begin your journey in unit testing, you’ll want to know where your tests cover code and where they don’t. The beautiful part of tools like Emma is that they provide visual annotations of the code that show you where you’re lacking in coverage.
When you think you’re done with writing tests, run your coverage tool. Take a look at the areas in the code that aren’t covered. If you’re concerned at all about the uncovered areas of code, write more tests. Looking at the coverage-tool results regularly will keep you honest with the tests you write.
Code-coverage numbers mean little in isolation. The trend of code coverage is important, however: your team should be increasing the percentage of coverage over time, or at least not letting it slide downward.
|
|
Use code-coverage tools only to help you understand where your code lacks coverage or where your team is trending downward. |
After
Up until this chapter, it’s been only you and us (the authors) working together to learn about and practice unit testing. We looked up from our monitors, however, and realized there’s a team around us. In reaction, we talked about some considerations for adopting unit testing in your team.
This book is a short, speedy tour of many the practices, concepts, and recommendations for unit testing. It’s enough to get you on your way to improving the quality of your software in a professional capacity. The best things you can do with the information you’ve gleaned here is to start writing tests against the code you produce and keep writing tests with an eye to making them better each time.
The next-best thing you can do is to continually to seek out more knowledge on unit testing. We’ve scratched the surface on most of the topics we’ve discussed. You’ll want to experiment with the ideas we’ve presented. You’ll also want to try other things that other unit testers (or TDD practitioners) espouse.
The world of modern unit testing is a decade-and-a-half old. That short history contains some dramatic shifts in the ways we approach unit testing. It also suggests that more changes are inevitable. Keep monitoring and reading about unit testing and TDD, and we guarantee that you’ll find even better ways to make them pay off.
Footnotes
|
[37] |
http://en.wikipedia.org/wiki/Fagan_inspection |
|
[38] |
https://www.jetbrains.com/upsource/codereview/ |
|
[39] |
https://pragprog.com/magazines/2011-07/pair-programming-benefits |
|
[40] |
https://pragprog.com/magazines/2011-06/pair-programming-in-a-flash |
All materials on the site are licensed Creative Commons Attribution-Sharealike 3.0 Unported CC BY-SA 3.0 & GNU Free Documentation License (GFDL)
If you are the copyright holder of any material contained on our site and intend to remove it, please contact our site administrator for approval.
© 2016-2026 All site design rights belong to S.Y.A.