Pragmatic Unit Testing in Java 8 with JUnit (2015)
Part 1. Unit-Testing Foundations
A couple of examples to get you started, then a foray into the various JUnit assertions, and finally a discussion about how to best organize and structure your unit tests. You’ll be slamming out unit tests before you know it!
Chapter 1. Building Your First JUnit Test
In this chapter we’ll work through a small example of writing a unit test. You’ll learn how to set up your project and how to add a test class, and you’ll see what a test method looks like. Most important, you’ll learn how to get JUnit to run your new, passing test.
Reasons to Write a Unit Test
Pat has just completed work on a small feature change, adding a couple dozen lines to the system. He’s fairly confident in his change, but it’s been a while since he’s tried things out in the deployed system. Pat runs the build script, which packages and deploys the change to the local web server. He pulls up the application in his browser, navigates to the appropriate screen, enters a bit of data, clicks submit, and…stack trace!
Pat stares at the screen for a moment, then the code. Aha! Pat notes that he forgot to initialize a field. He makes the fix, runs the build script again, cranks up the application, enters data, clicks submit, and…hmm, that’s not the right amount. Oops. This time, it takes a bit longer to decipher the problem. Pat fires up his debugger and after a few minutes discovers an off-by-one error in indexing an array. He once again repeats the cycle of fix, deploy, navigate the GUI, enter data, and verify results.
Happily, Pat’s third fix attempt has been the charm. But he spent about fifteen minutes working through the three cycles of code—manual test—fix.
Dale chooses to work differently. Each time she writes a small bit of code, she adds a unit test that verifies the small change she added to the system. She then runs all her unit tests. They run in seconds, so she’s not waiting long to find out whether or not she can move on.
If there’s a problem, Dale stops immediately and fixes it. Her problems are easier to uncover, because she’s added only a few lines of code each time instead of piling gobs of new code atop her mistakes.
Dale retains the tests permanently along with the rest of the system. They continue to pay off each time she or anyone else changes code in the same area. These unit tests support regression testing—she no longer needs to spend several minutes verifying that new changes break no existing behavior.
Dale’s tests also save Pat and everyone else on the team significant amounts of time when it comes to understanding what the system does. “How does the system handle the combination of X and Y?” asks Madhu, the business analyst. Pat’s response, more often than not, is “I don’t know, let me take a look at the code.” Sometimes Pat can answer the question in a minute or two, but frequently he ends up digging about for a half hour or more. Meanwhile, Dale looks to her unit tests for an immediate answer.
Let’s follow in Dale’s footsteps and start learning how to write small, focused unit tests. We’ll first make sure we understand basic JUnit concepts.
Learning JUnit Basics: Our First Passing Test
For our first example, we’ll write tests against a small class named ScoreCollection. Its goal is to return the mean (average) for a collection of scoreable objects (things that answer with a score).
For this first example, you’ll see Eclipse screenshots. The screenshots are here to guide you through setting up and using JUnit for the first time. After this chapter, you won’t see screenshots and you won’t need them.
If you’re not using Eclipse, good news: your JUnit tests will look the same whether you use Eclipse, IntelliJ IDEA, NetBeans, or some other development environment. How you set up your project to use JUnit will differ, and the way JUnit looks and feels will differ a bit from IDE to IDE. For that reason, we’ve provided comparable screenshots from IntelliJ IDEA and NetBeans in Appendix 1, Setting Up JUnit in IntelliJ IDEA and NetBeans.
Here’s the code we want to test:
|
iloveyouboss/1/src/iloveyouboss/Scoreable.java |
|
|
|
package iloveyouboss; |
|
|
|
|
|
@FunctionalInterface |
|
|
public interface Scoreable { |
|
|
int getScore(); |
|
|
} |
|
iloveyouboss/1/src/iloveyouboss/ScoreCollection.java |
|
|
|
package iloveyouboss; |
|
|
|
|
|
import java.util.*; |
|
|
|
|
|
public class ScoreCollection { |
|
|
private List<Scoreable> scores = new ArrayList<>(); |
|
|
|
|
|
public void add(Scoreable scoreable) { |
|
|
scores.add(scoreable); |
|
|
} |
|
|
|
|
|
public int arithmeticMean() { |
|
|
int total = scores.stream().mapToInt(Scoreable::getScore).sum(); |
|
|
return total / scores.size(); |
|
|
} |
|
|
} |
A ScoreCollection class accepts a Scoreable instance through its add() method. A Scoreable object is simply one that can return an int score value.
Feel free to enter the source directly into your development environment. You can also download the source from http://pragprog.com/book/utj2/source_code. Personally, we’re still learning to master the fun things in Java 8 such as lambdas, so we’d just as soon type the code ourselves. We’ve found that typing the code instead of simply pasting it helps us learn better.
Configuring Our Project
We’re going to put our tests in the same package (iloveyouboss—we’ll explain the package name in the next chapter) as ScoreCollection. In Eclipse, we separate the tests and production code by putting the tests in one source folder (test) and the production code in another (src).
Let’s create a source folder named test before continuing. In Eclipse, the easiest way to do this is in the Package Explorer. Select the project, right-click to bring up the context menu, and select New ▶ Source Folder. Type the name test as the Folder Name and click Finish.
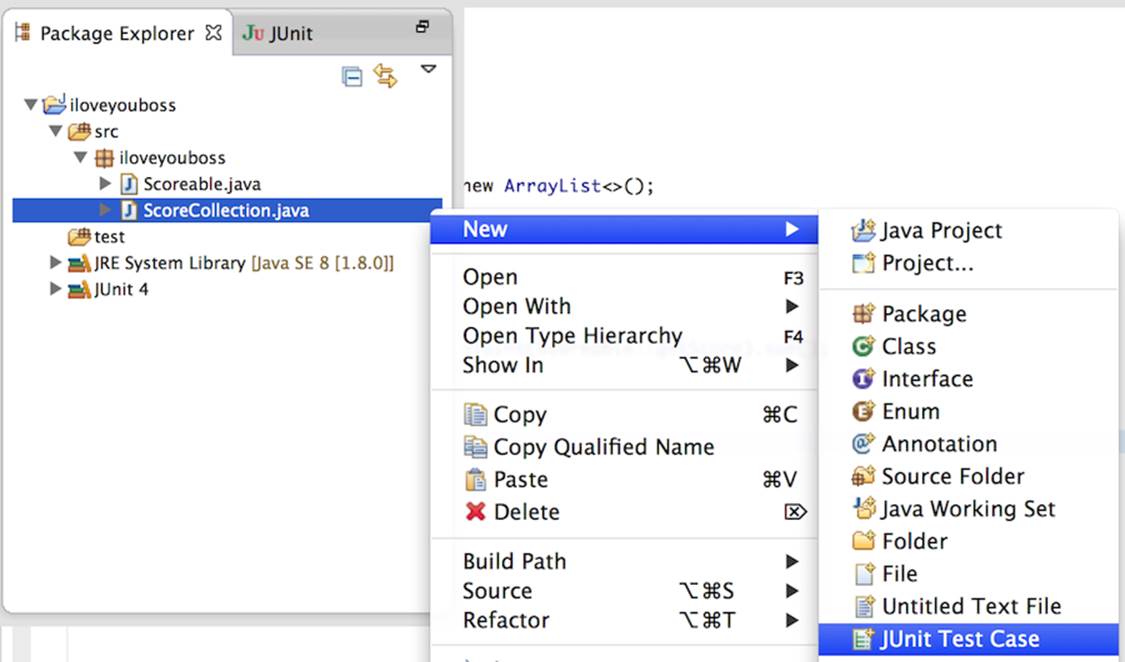
Next, we’ll create a JUnit test class for ScoreCollection. In Eclipse, here’s one way to do this:
1. Select the ScoreCollection.java entry from the Package Explorer.
2. Right-click to bring up the context menu.
3. Select New ▶ JUnit Test Case.
The following figure shows what the menu looks like in Eclipse:
Eclipse provides a busy wizard dialog, but we’ll rarely need to change much in it. We simply need to tell Eclipse that the source folder is iloveyouboss/test instead of iloveyouboss/src. The one small thing we must change is highlighted in the Figure 1, JUnit Test Case wizard in Eclipse.
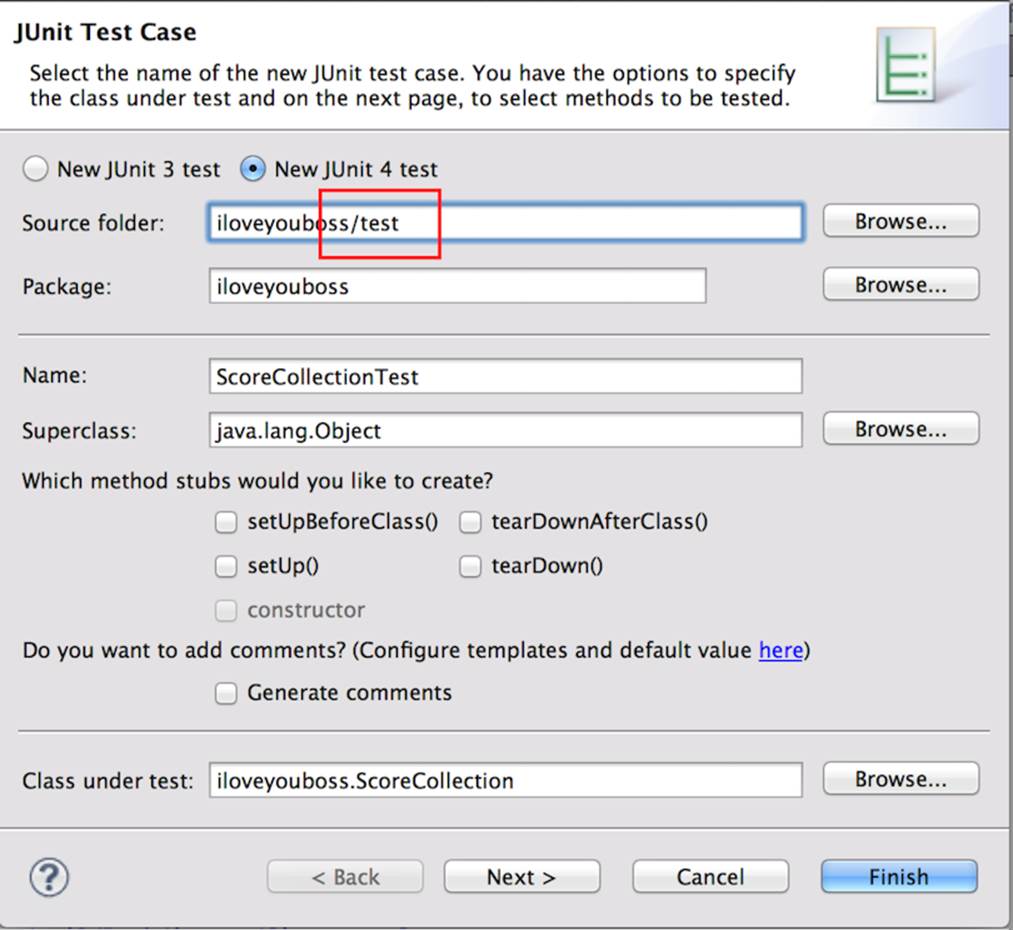
Figure 1. JUnit Test Case wizard in Eclipse
We click Finish to create the test class. Since this is the first time we’re creating a test for the iloveyouboss project, Eclipse tells us that we need to add support for JUnit 4 to the project. (In case you’re wondering, JUnit 4 has been available since 2006. You might find some older projects that use JUnit 3, which is fairly easy to figure out after you learn JUnit 4.) The following figure shows you this minor distraction:
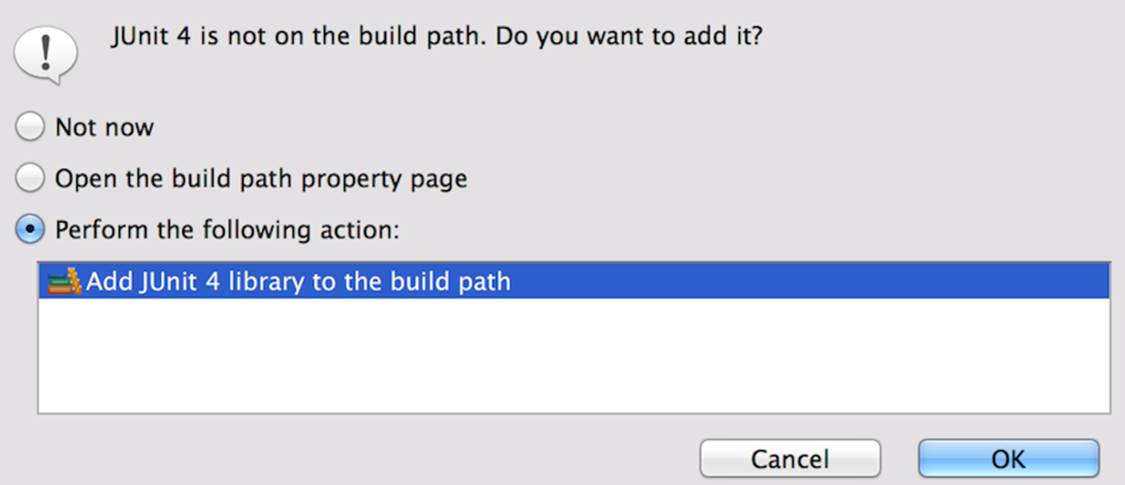
Sounds good to us—let’s click OK.
Understanding the JUnit Test Bits
Eclipse creates a nice little template test for us, all ready to run:
|
iloveyouboss/2/test/iloveyouboss/ScoreCollectionTest.java |
|
|
|
package iloveyouboss; |
|
|
|
|
① |
import static org.junit.Assert.*; |
|
② |
import org.junit.*; |
|
|
|
|
③ |
public class ScoreCollectionTest { |
|
|
|
|
④ |
@Test |
|
⑤ |
public void test() { |
|
⑥ |
fail("Not yet implemented"); |
|
|
} |
|
|
|
|
|
} |
Stepping through the important bits:
①
The fail static method comes from the org.junit.Assert class.
②
The @Test annotation comes from the org.junit package.
③
The test-class name is ScoreCollectionTest. Many teams adopt the standard of appending Test to the name of the class being tested (for now, the target class) to derive the test-class name. (You’ll see later that there are good reasons to create more than one test class for a given target.)
④
JUnit knows to execute the test method as a test because it’s marked with the @Test annotation. You can have other methods in the test class that are not tests, and JUnit doesn’t try to execute them as such.
⑤
JUnit creates a single test method (or simply, a single test) in the test class. Its name—an important piece of information—defaults to test. We’ll always want to change the test name to something meaningful.
⑥
Eclipse adds a deliberate test-failure point as the default body of the test. When JUnit executes this test, fail() causes a test failure, at which point JUnit displays the informative failure message Not yet implemented. Our job is to replace this stub failure statement with a real test.
Running JUnit
Let’s see what happens when we run JUnit against our project. From the Package Explorer, click the project (iloveyouboss) and right-click to bring up its context menu. Select Run As ▶ JUnit Test. You’ll get something that looks like Figure 2, Running a JUnit Test.
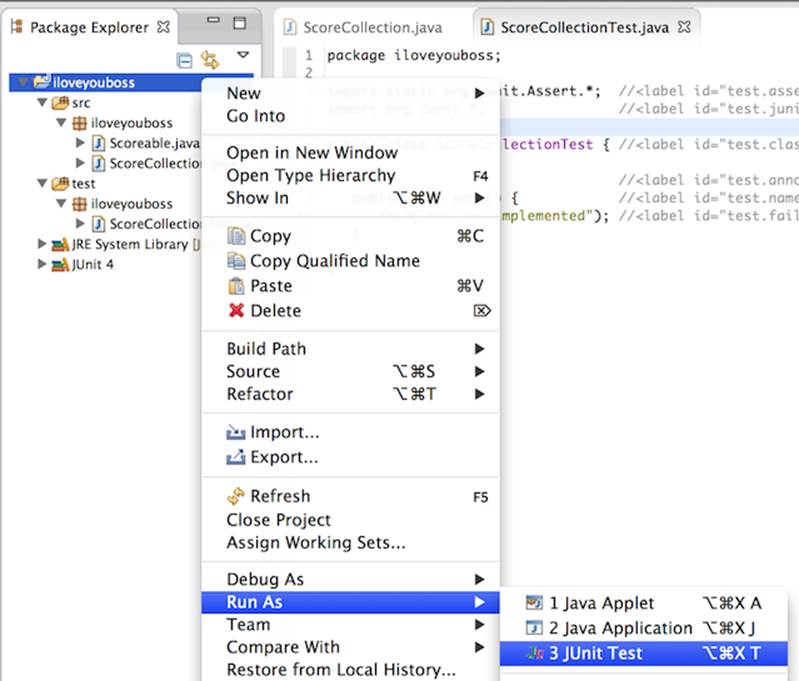
Figure 2. Running a JUnit Test
The JUnit view shows information about the tests that JUnit just ran:
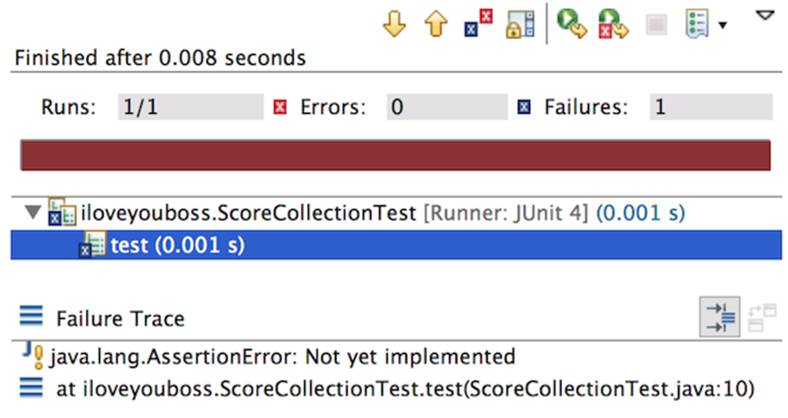
The most prominent visual feature of the JUnit view is the solid red bar, indicating that one or more tests failed. If colors aren’t your thing, you can also look at the numeric summaries immediately above the red bar. In our example, Runs shows that one test ran out of one total, we had zero errors, and one of the tests demonstrated a failure.
The two panes below the red bar provide detailed information about JUnit’s test run. The top pane provides a hierarchical view of test classes and the test methods contained within. Selecting a failed test from the top pane provides a stack trace in the bottom pane. Because Eclipse’s version of JUnit selected our sole test, we see in the bottom pane that it threw a java.lang.AssertionError at line 10 in ScoreCollectionTest. The exception carries the message Not yet implemented, which we can trace directly back to our test-class code. Cool!
At the top of the JUnit view you can see a number of tool icons (for which hover help is available). Don’t fear experimenting with them. The most useful is the Rerun Test icon, which runs once again the set of tests you currently see in the JUnit view. Try it out.
The red of JUnit is strong and mildly off-putting. We’ll try to ingrain an instinctive reaction of noting any red bars we see, calmly fixing the code or tests, then rerunning the tests until we no longer see red. Think “bull on Valium.”
To get rid of our red bar, remove the fail method call:
|
iloveyouboss/3/test/iloveyouboss/ScoreCollectionTest.java |
|
|
|
public class ScoreCollectionTest { |
|
|
@Test |
|
|
public void test() { |
|
|
} |
|
|
} |
(You’ll now see only pertinent parts of code in the book. Remember, you can download the full source from the PragProg site.)[9]
Now, rerun the tests. We wouldn’t dare deprive you of seeing the glorious, luminescent JUnit green bar on your own screen. No screenshot here; go see for yourself. We have a passing test!
The passing test clarifies an important design feature of JUnit. When JUnit calls a test method, it executes statements top-to-bottom. If JUnit runs through to the end of the test method without encountering an explicit fail (or an assertion that fails; we’ll see this very soon), the test passes.
Our test is empty, so it will always hit the end immediately and thus pass.
If you got the green bar, congratulations! Setting things up is often the hardest part. If you’re still struggling, seek help from a colleague or on the Internet, or drop a question in the forum for this book.[10]
You’ve learned most of what you need to know about how to work with JUnit in your IDE, so you’ll see code and no more screenshots from here on out. You should strive to master your IDE of choice, though. Eclipse and other IDEs provide keyboard shortcuts to kick off tests, rerun them, switch between the tests and the editors, and so on. Ingraining the shortcuts will remove one more impediment to effective coding.
Arrange, Act, and Assert Your Way to a Test
In the prior section, we ran a test that does…nothing. Now it’s time to flesh it out with code that vets the ScoreCollection class.
We want to start with a scenario—a test case—that provides an example of expected behavior of the target code. To test a ScoreCollection object, we can add the numbers 5 and 7 to it and expect that the arithmeticMean method will return 6 (because (5 + 7) / 2 is equal to 6).
Naming is important. We call this test answersArithmeticMeanOfTwoNumbers—that nicely summarizes the scenario laid out in the test method. Here’s the code:
|
iloveyouboss/4/test/iloveyouboss/ScoreCollectionTest.java |
|
|
Line 1 |
package iloveyouboss; |
|
- |
|
|
- |
import static org.junit.Assert.*; |
|
- |
import static org.hamcrest.CoreMatchers.*; |
|
5 |
import org.junit.*; |
|
- |
|
|
- |
public class ScoreCollectionTest { |
|
- |
@Test |
|
- |
public void answersArithmeticMeanOfTwoNumbers() { |
|
10 |
// Arrange |
|
- |
ScoreCollection collection = new ScoreCollection(); |
|
- |
collection.add(() -> 5); |
|
- |
collection.add(() -> 7); |
|
- |
|
|
15 |
// Act |
|
- |
int actualResult = collection.arithmeticMean(); |
|
- |
|
|
- |
// Assert |
|
- |
assertThat(actualResult, equalTo(6)); |
|
20 |
} |
|
- |
} |
To do anything in a test, we first need to arrange things with code that sets up the state in a test. For our example, we create a ScoreCollection instance, then call the add() method a couple times with Scoreable implementations.
As far as creating Scoreable instances is concerned: we could find a class in our system that implements Scoreable and create instances of it. Or we could define (perhaps in the test as a nested class) an implementation of Scoreable that allows setting a value into it to be returned by getScore, but that’d be a good amount of extra and unnecessary code. The simpler way using Java 8 is to pass a lambda expression that returns the value we want the Scoreable instance to return: () -> 5, for example.
After we arrange the test, we act on—execute—the code we’re trying to verify: the arithmeticMean method.
Finally, we assert that we get the expected result. We use the assertThat() method, which takes two arguments: the actual result and a matcher. The equalTo matcher compares the actual result to the expected value of 6. JUnit passes the test if the result of applying the matcher is true; otherwise it fails the test.
To use the equalTo matcher, make sure you use a static import for org.hamcrest.CoreMatchers (see line 4).
Let’s verify that it works. Run JUnit and drool over the lovely shade of green.
If you’re worried that the test isn’t really doing anything, change the expected value of 6 to something else (42), rerun JUnit, and watch the test fail. There’s that disturbing red again.
The failed assertion does more than report an error: it halts the test then and there (by throwing a runtime exception that JUnit itself catches). Do not pass failed assertion, do not collect $200! If you have any lines of code following an assertion that fails, they won’t be executed. It’s one hint that you’re probably best off sticking to a single assertion as the last statement in your tests.
Is the Test Really Testing Anything?
You might even want to consider building a strong discipline around ensuring that the tests fail. Consider always ensuring that the test fails. It’s possible to write a test that doesn’t really verify what you think it does, which can lead to bad, costly assumptions on your part.
In fact, programmers following the practice of test-driven development (TDD) always demonstrate test failure first, to demonstrate that the code they write is responsible for making the test pass. See Chapter 12, Test-Driven Development for more on how TDD practitioners build a cycle around this discipline.
|
|
Deliberately fail your tests to prove they’re really doing something. |

After
In this chapter you got past one of the more significant challenges: getting a first test to pass using JUnit in your IDE. Congrats! But life, and most “real” code, isn’t so simple. In the next chapter, you’ll tackle writing tests for a meatier example and learn quite a bit more about JUnit in the process.
Before moving on: we wrote one test against ScoreCollection. That might or might not be sufficient. Take a few moments and analyze ScoreCollection’s code. Ask yourself:
· Do I need to write additional tests to feel confident that the code works?
· Could I write tests that expose defects or limitations in the class?
In the next several chapters, we’ll explore how to best answer those questions for any code you’re testing.
Footnotes
|
[9] |
For your pleasure, one more time: https://pragprog.com/titles/utj2/source_code. |
|
[10] |
Click the Discuss link at https://pragprog.com/book/utj2/pragmatic-unit-testing-in-java-8-with-junit. |
All materials on the site are licensed Creative Commons Attribution-Sharealike 3.0 Unported CC BY-SA 3.0 & GNU Free Documentation License (GFDL)
If you are the copyright holder of any material contained on our site and intend to remove it, please contact our site administrator for approval.
© 2016-2026 All site design rights belong to S.Y.A.