JavaScript for Kids: A Playful Introduction to Programming (2015)
Part II. Advanced JavaScript
Chapter 11. Find the Buried Treasure!
Let’s put what we’ve learned so far to good use and make a game! The aim of this game is to find the hidden treasure. In this game, the web page will display a treasure map. Inside that map, the program will pick a single pixel location, which represents where the hidden treasure is buried. Every time the player clicks the map, the web page will tell them how close to the treasure they are. When they click the location of the treasure (or very close to it), the game congratulates them on finding the treasure and says how many clicks it took to find it. Figure 11-1 shows what the game will look like after a player clicks the map.
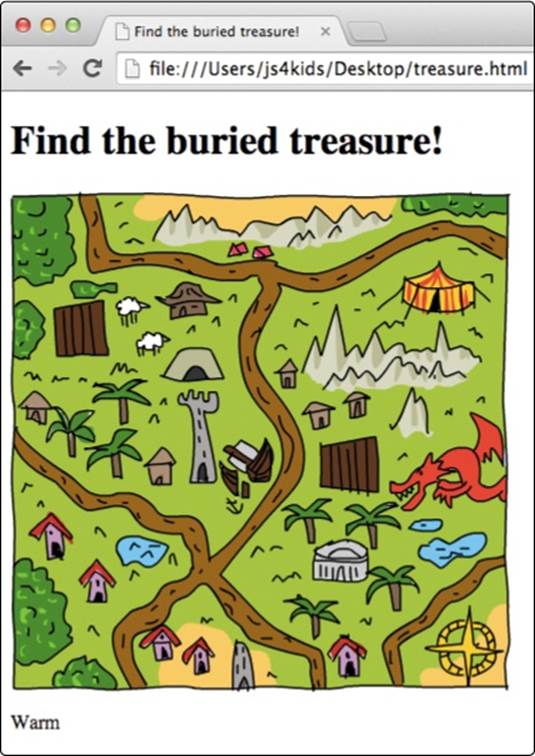
Figure 11-1. The buried treasure game
Designing the Game
Before we start writing the code, let’s break down the overall structure of this game. Here is a list of steps we need to take to set up the game so it can respond accordingly when a player clicks the treasure map.
1. Create a web page with an image (the treasure map) and a place to display messages to the player.
2. Pick a random spot on the map picture to hide the treasure.
3. Create a click handler. Each time the player clicks the map, the click handler will do the following:
a. Add 1 to a click counter.
b. Calculate how far the click location is from the treasure location.
c. Display a message on the web page to tell the player whether they’re hot or cold.
d. Congratulate the player if they click on the treasure or very close to it, and say how many clicks it took to find the treasure.
I’ll show you how to implement each of these features in the game, and then we’ll go through the full code.
Creating the Web Page with HTML
Let’s look at the HTML for the game. We’ll use a new element called img for the treasure map and add a p element where we can display messages to the player. Enter the following code into a new file called treasure.html.
<!DOCTYPE html>
<html>
<head>
<title>Find the buried treasure!</title>
</head>
<body>
<h1 id="heading">Find the buried treasure!</h1>
➊ <img id="map" width=400 height=400 ![]()
➋ src="http://nostarch.com/images/treasuremap.png">
➌ <p id="distance"></p>
<script src="https://code.jquery.com/jquery-2.1.0.js"></script>
<script>
// Game code goes here
</script>
</body>
</html>
The img element is used to include images in HTML documents. Unlike the other HTML elements we’ve looked at, img doesn’t use a closing tag. All you need is an opening tag, which, like other HTML tags, can contain various attributes. At ➊ we’ve added an img element with an id of"map". We set the width and height of this element using the width and height attributes, which are both set to 400. This means our image will be 400 pixels tall and 400 pixels wide.
To tell the document which image we want to display, we use the src attribute to include the web address of the image at ➋. In this case, we’re linking to an image called treasuremap.png on the No Starch Press website.
Following the img element is an empty p element at ➌, which we give an id of "distance". We’ll add text to this element by using JavaScript to tell the player how close they are to the treasure.
Picking a Random Treasure Location
Now let’s build the JavaScript for our game. First we need to pick a random location for the hidden treasure inside the treasure map image. Since the dimensions of the map are 400 by 400 pixels, the coordinates of the top-left pixel will be { x: 0, y: 0 }, and the bottom-right pixel will be { x: 399, y: 399 }.
Picking Random Numbers
To set a random coordinate point within the treasure map, we pick a random number between 0 and 399 for the x value and a random number between 0 and 399 for the y value. To generate these random values, we’ll write a function that takes a size argument as input and picks a random number from 0 up to (but not including) size:
var getRandomNumber = function (size) {
return Math.floor(Math.random() * size);
};
This code is similar to the code we’ve used to pick random words in earlier chapters. We generate a random number between 0 and 1 using Math.random, multiply that by the size argument, and then use Math.floor to round that number down to a whole number. Then we output the result as the return value of the function. Calling getRandomNumber(400) will return a random number from 0 to 399, which is just what we need!
Setting the Treasure Coordinates
Now let’s use the getRandomNumber function to set the treasure coordinates:
➊ var width = 400;
var height = 400;
➋ var target = {
x: getRandomNumber(width),
y: getRandomNumber(height)
};
The section of code at ➊ sets the width and height variables, which represent the width and height of the img element that we’re using as a treasure map. At ➋ we create an object called target, which has two properties, x and y, that represent the coordinates of the buried treasure. Thex and y properties are both set by getRandomNumber. Each time we run this code, we get a new random location on the map, and the chosen coordinates will be saved in the x and y properties of the target variable.
The Click Handler
The click handler is the function that will be called when the player clicks the treasure map. Start building this function with this code:
$("#map").click(function (event) {
// Click handler code goes here
});
First we use $("#map") to select the treasure map area (because the img element has an id of "map"), and then we go into the click handler function. Each time the player clicks the map, the function body between the curly brackets will be executed. Information about the click is passed into that function body as an object through the event argument.
This click handler function needs to do quite a bit of work: it has to increment the click counter, calculate how far each click is from the treasure, and display messages. Before we fill in the code for the click handler function, we’ll define some variables and create some other functions that will help execute all these steps.
Counting Clicks
The first thing our click handler needs to do is track the total number of clicks. To set this up, we create a variable called clicks at the beginning of the program (outside the click handler) and initialize it to zero:
var clicks = 0;
Inside the click handler, we’ll include clicks++ so that we increment clicks by 1 each time the player clicks the map.
Calculating the Distance Between the Click and the Treasure
To figure out whether the player is hot or cold (close to the treasure or far away), we need to measure the distance between where the player clicked and the location of the hidden treasure. To do this, we’ll write a function called getDistance, like so:
var getDistance = function (event, target) {
var diffX = event.offsetX - target.x;
var diffY = event.offsetY - target.y;
return Math.sqrt((diffX * diffX) + (diffY * diffY));
};
The getDistance function takes two objects as arguments: event and target. The event object is the object passed to the click handler, and it comes with lots of built-in information about the player’s click. In particular, it contains two properties called offsetX and offsetY, which tell us the x- and y-coordinates of the click, and that’s exactly the information we need.
Inside the function, the variable diffX stores the horizontal distance between the clicked location and the target, which we calculate by subtracting target.x (the x-coordinate of the treasure) from event.offsetX (the x-coordinate of the click). We calculate the vertical distance between the points in the same way, and store the result as diffY. Figure 11-2 shows how we would calculate diffX and diffY for two points.
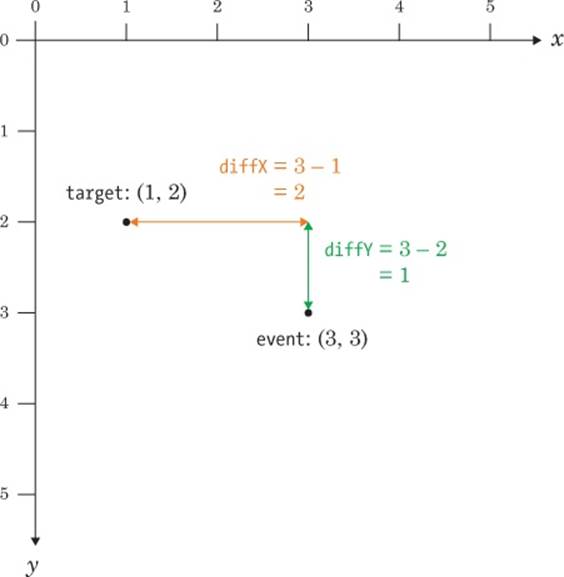
Figure 11-2. Calculating the horizontal and vertical distances between event and target
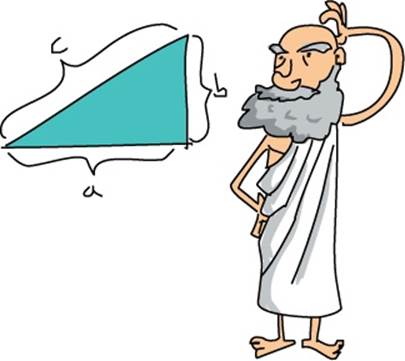
Using the Pythagorean Theorem
Next, the getDistance function uses the Pythagorean theorem to calculate the distance between two points. The Pythagorean theorem says that for a right triangle, where a and b represent the lengths of the two sides bordering the right angle and c represents the length of the diagonal side (the hypotenuse), a2 + b2 = c2. Given the lengths of a and b, we can calculate the length of the hypotenuse by calculating the square root of a2 + b2.
To calculate the distance between the event and the target, we treat the two points as if they’re part of a right triangle, as shown in Figure 11-3. In the getDistance function, diffX is the length of the horizontal edge of the triangle, and diffY is the length of the vertical edge.
To calculate the distance between the click and the treasure, we need to calculate the length of the hypotenuse, based on the lengths diffX and diffY. A sample calculation is shown in Figure 11-3.
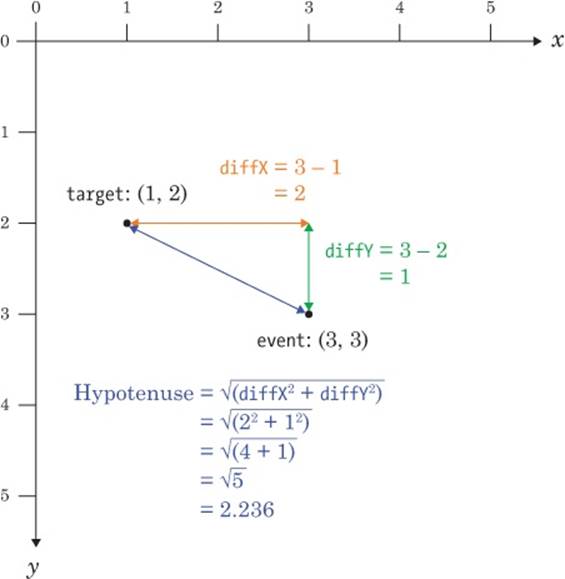
Figure 11-3. Calculating the hypotenuse to find out the distance between event and target
To get the length of the hypotenuse, we first have to square diffX and diffY. We then add these squared values together, and get the square root using the JavaScript function Math.sqrt. So our complete formula for calculating the distance between the click and the target looks like this:
Math.sqrt((diffX * diffX) + (diffY * diffY))
The getDistance function calculates this and returns the result.
Telling the Player How Close They Are
Once we know the distance between the player’s click and the treasure, we want to display a hint telling the player how close they are to the treasure, without telling them exactly how far away the treasure is. For this, we use the getDistanceHint function shown here:
var getDistanceHint = function (distance) {
if (distance < 10) {
return "Boiling hot!";
} else if (distance < 20) {
return "Really hot";
} else if (distance < 40) {
return "Hot";
} else if (distance < 80) {
return "Warm";
} else if (distance < 160) {
return "Cold";
} else if (distance < 320) {
return "Really cold";
} else {
return "Freezing!";
}
};
This function returns different strings depending on the calculated distance from the treasure. If the distance is less than 10, the function returns the string "Boiling hot!". If the distance is between 10 and 20, the function returns "Really hot". The strings get colder as the distance increases, up to the point where we return "Freezing!" if the distance is greater than 320 pixels.
We display the message to the player by adding it as text in the p element of the web page. The following code will go inside our click handler to calculate the distance, pick the appropriate string, and display that string to the player:
var distance = getDistance(event, target);
var distanceHint = getDistanceHint(distance);
$("#distance").text(distanceHint);
As you can see, we first call getDistance and then save the result as the variable distance. Next we pass that distance to the getDistanceHint function to pick the appropriate string and save it as distanceHint.
The code $("#distance").text(distanceHint); selects the element with the id of "distance" (in this case the p element) and sets its text to distanceHint so that each time the player clicks the map, our web page tells them how close they are to the target.
Checking If the Player Won
Finally, our click handler needs to check whether the player has won. Because pixels are so small, instead of making the player click the exact location of the treasure, we’ll let them win if they click within 8 pixels.
This code checks the distance to the treasure and displays a message telling the player that they’ve won:
if (distance < 8) {
alert("Found the treasure in " + clicks + " clicks!");
}
If the distance is less than 8 pixels, this code uses alert to tell the player they found the treasure and how many clicks it took them to do so.
Putting It All Together
Now that we have all the pieces, let’s combine them to make one script.
// Get a random number from 0 to size
var getRandomNumber = function (size) {
return Math.floor(Math.random() * size);
};
// Calculate distance between click event and target
var getDistance = function (event, target) {
var diffX = event.offsetX - target.x;
var diffY = event.offsetY - target.y;
return Math.sqrt((diffX * diffX) + (diffY * diffY));
};
// Get a string representing the distance
var getDistanceHint = function (distance) {
if (distance < 10) {
return "Boiling hot!";
} else if (distance < 20) {
return "Really hot";
} else if (distance < 40) {
return "Hot";
} else if (distance < 80) {
return "Warm";
} else if (distance < 160) {
return "Cold";
} else if (distance < 320) {
return "Really cold";
} else {
return "Freezing!";
}
};
// Set up our variables
➊ var width = 400;
var height = 400;
var clicks = 0;
// Create a random target location
➋ var target = {
x: getRandomNumber(width),
y: getRandomNumber(height)
};
// Add a click handler to the img element
➌ $("#map").click(function (event) {
clicks++;
// Get distance between click event and target
➍ var distance = getDistance(event, target);
// Convert distance to a hint
➎ var distanceHint = getDistanceHint(distance);
// Update the #distance element with the new hint
➏ $("#distance").text(distanceHint);
// If the click was close enough, tell them they won
➐ if (distance < 8) {
alert("Found the treasure in " + clicks + " clicks!");
}
});
First, we have the three functions getRandomNumber, getDistance, and getDistanceHint, which we’ve already looked at. Then, at ➊, we set up the variables we’ll need: width, height, and clicks. After that, at ➋, we create the random location for the treasure.
At ➌ we create a click handler on the map element. The first thing this does is increment the clicks variable by 1. Then, at ➍, it works out the distance between event (the click location) and target (the treasure location). At ➎ we use the function getDistanceHint to convert this distance into a string representing the distance ("Cold", "Warm", and so on). We update the display at ➏ so the user can see how far they are. Finally, at ➐, we check to see whether the distance is under 8, and if so, we tell the player they’ve won and in how many clicks.
This is the entire JavaScript for our game. If you add this to the second <script> tag in treasure.html, you should be able to play it in your browser! How many clicks does it take you to find the treasure?
What You Learned
In this chapter, you used your new event-handling skills to create a game. You also learned about the img element, which can be used to add images to a web page. Finally, you learned how to measure the distance between two points using JavaScript.
In the next chapter, we’ll learn about object-oriented programming, which will give us more tools for organizing our code.
Programming Challenges
Here are a few ways you could change the game and add more features.
#1: INCREASING THE PLAYING AREA
You could make the game harder by increasing the size of the playing area. How would you make it 800 pixels wide by 800 pixels tall?
#2: ADDING MORE MESSAGES
Try adding some extra messages to display to the player (like "Really really cold!"), and modify the distances to make the game your own.
#3: ADDING A CLICK LIMIT
Add a limit to the number of clicks and show the message "GAME OVER" if the player exceeds this limit.
#4: DISPLAYING THE NUMBER OF REMAINING CLICKS
Show the number of remaining clicks as an extra piece of text after the distance display so the player knows if they’re about to lose.