JavaScript for Kids: A Playful Introduction to Programming (2015)
Part II. Advanced JavaScript
Chapter 12. Object-Oriented Programming
Chapter 4 discussed JavaScript objects—collections of keys paired with values. In this chapter, we’ll look at ways to create and use objects as we explore object-oriented programming. Object-oriented programming is a way to design and write programs so that all of the program’s important parts are represented by objects. For example, when building a racing game, you could use object-oriented programming techniques to represent each car as an object and then create multiple car objects that share the same properties and functionality.
A Simple Object
In Chapter 4, you learned that objects are made up of properties, which are simply pairs of keys and values. For example, in the following code the object dog represents a dog with the properties name, legs, and isAwesome:
var dog = {
name: "Pancake",
legs: 4,
isAwesome: true
};
Once we create an object, we can access its properties using dot notation (discussed in Accessing Values in Objects). For example, here’s how we could access the name property of our dog object:
dog.name;
"Pancake"
We can also use dot notation to add properties to a JavaScript object, like this:
dog.age = 6;
This adds a new key-value pair (age: 6) to the object, as you can see below:
dog;
Object {name: "Pancake", legs: 4, isAwesome: true, age: 6}
Adding Methods to Objects
In the preceding example, we created several properties with different kinds of values saved to them: a string ("Pancake"), numbers (4 and 6), and a Boolean (true). In addition to strings, numbers, and Booleans, you can save a function as a property inside an object. When you save a function as a property in an object, that property is called a method. In fact, we’ve already used several built-in JavaScript methods, like the join method on arrays and the toUpperCase method on strings.
Now let’s see how to create our own methods. One way to add a method to an object is with dot notation. For example, we could add a method called bark to the dog object like this:
➊ dog.bark = function () {
➋ console.log("Woof woof! My name is " + this.name + "!");
};
➌ dog.bark();
Woof woof! My name is Pancake!
At ➊ we add a property to the dog object called bark and assign a function to it. At ➋, inside this new function, we use console.log to log Woof woof! My name is Pancake!. Notice that the function uses this.name, which retrieves the value saved in the object’s name property. Let’s take a closer look at how the this keyword works.
Using the this Keyword
You can use the this keyword inside a method to refer to the object on which the method is currently being called. For example, when you call the bark method on the dog object, this refers to the dog object, so this.name refers to dog.name. The this keyword makes methods more versatile, allowing you to add the same method to multiple objects and have it access the properties of whatever object it’s currently being called on.
Sharing a Method Between Multiple Objects
Let’s create a new function called speak that we can use as a method in multiple objects that represent different animals. When speak is called on an object, it will use the object’s name (this.name) and the sound the animal makes (this.sound) to log a message.
var speak = function () {
console.log(this.sound + "! My name is " + this.name + "!");
};
Now let’s create another object so we can add speak to it as a method:
var cat = {
sound: "Miaow",
name: "Mittens",
➊ speak: speak
};
Here we create a new object called cat, with sound, name, and speak properties. We set the speak property at ➊ and assign it the speak function we created earlier. Now cat.speak is a method that we can call by entering cat.speak(). Since we used the this keyword in the method, when we call it on cat, it will access the cat object’s properties. Let’s see that now:
cat.speak();
Miaow! My name is Mittens!
When we call the cat.speak method, it retrieves two properties from the cat object: this.sound (which is "Miaow") and this.name (which is "Mittens").
We can use the same speak function as a method in other objects too:

var pig = {
sound: "Oink",
name: "Charlie",
speak: speak
};
var horse = {
sound: "Neigh",
name: "Marie",
speak: speak
};
pig.speak();
Oink! My name is Charlie!
horse.speak();
Neigh! My name is Marie!
Again, each time this appears inside a method, it refers to the object on which the method is called. In other words, when you call horse.speak(), this will refer to horse, and when you call pig.speak(), this refers to pig.
To share methods between multiple objects, you can simply add them to each object, as we just did with speak. But if you have lots of methods or objects, adding the same methods to each object individually can become annoying, and it can make your code messier, too. Just imagine if you needed a whole zoo full of 100 animal objects and you wanted each to share a set of 10 methods and properties.
JavaScript object constructors offer a better way to share methods and properties between objects, as we’ll see next.

Creating Objects Using Constructors
A JavaScript constructor is a function that creates objects and gives them a set of built-in properties and methods. Think of it as a specialized machine for creating objects, kind of like a factory that can churn out tons of copies of the same item. Once you’ve set up a constructor, you can use it to make as many of the same object as you want. To try it out, we’ll build the beginnings of a racing game, using a Car constructor to create a fleet of cars with similar basic properties and methods for steering and acceleration.
Anatomy of the Constructor
Each time you call a constructor, it creates an object and gives the new object built-in properties. To call a normal function, you enter the function name followed by a pair of parentheses. To call a constructor, you enter the keyword new (which tells JavaScript that you want to use your function as a constructor), followed by the constructor name and parentheses. Figure 12-1 shows the syntax for calling a constructor.
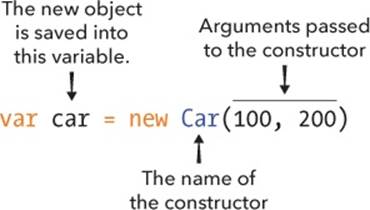
Figure 12-1. The syntax for calling a constructor named Car with two arguments
NOTE
Most JavaScript programmers start constructor names with a capital letter so it’s easy to see at a glance that they’re different from other functions.
Creating a Car Constructor
Now let’s create a Car constructor that will add an x and y property to each new object it creates. These properties will be used to set each car’s onscreen position when we draw it.
Creating the HTML Document
Before we can build our constructor, we need to create a new HTML document. Make a new file called cars.html and enter this HTML into it:
<!DOCTYPE html>
<html>
<head>
<title>Cars</title>
</head>
<body>
<script src="https://code.jquery.com/jquery-2.1.0.js"></script>
<script>
// Code goes here
</script>
</body>
</html>
The Car Constructor function
Now add this code to the empty <script> tags in cars.html (replacing the comment // Code goes here) to create the Car constructor that gives each car a set of coordinates.
<script>
var Car = function (x, y) {
this.x = x;
this.y = y;
};
</script>
Our new constructor Car takes the arguments x and y. We’ve added the properties this.x and this.y to store the x and y values passed to Car in our new object. This way, each time we call Car as a constructor, a new object is created with its x and y properties set to the arguments we specify.
Calling the Car Constructor
As I mentioned earlier, the keyword new tells JavaScript that we’re calling a constructor to create a new object. For example, to create a car object named tesla, open cars.html in a web browser and then enter this code in the Chrome JavaScript console:
var tesla = new Car(10, 20);
tesla;
Car {x: 10, y: 20}
The code new Car(10, 20) tells JavaScript to create an object using Car as a constructor, pass in the arguments 10 and 20 for its x and y properties, and return that object. We assign the returned object to the tesla variable with var tesla.
Then when we enter tesla, the Chrome console returns the name of the constructor and its x and y values: Car {x: 10, y: 20}.
Drawing the Cars
To show the objects created by the Car constructor, we’ll create a function called drawCar to place an image of a car at each car object’s (x, y) position in a browser window. Once we’ve seen how this function works, we’ll rewrite it in a more object-oriented way in Adding a draw Method to the Car Prototype. Add this code between the <script> tags in cars.html:
<script>
var Car = function (x, y) {
this.x = x;
this.y = y;
};
var drawCar = function (car) {
➊ var carHtml = '<img src="http://nostarch.com/images/car.png">';
➋ var carElement = $(carHtml);
➌ carElement.css({
position: "absolute",
left: car.x,
top: car.y
});
➍ $("body").append(carElement);
};
</script>
At ➊ we create a string containing HTML that points to an image of a car. (Using single quotes to create this string lets us use double quotes in the HTML.) At ➋ we pass carHTML to the $ function, which converts it from a string to a jQuery element. That means the carElement variable now holds a jQuery element with the information for our <img> tag, and we can tweak this element before adding it to the page.
At ➌ we use the css method on carElement to set the position of the car image. This code sets the left position of the image to the car object’s x value and its top position to the y value. In other words, the left edge of the image will be x pixels from the left edge of the browser window, and the top edge of the image will be y pixels down from the top edge of the window.
NOTE
In this example, the css method works like the offset method we used in Chapter 10 to move elements around the page. Unfortunately, offset doesn’t work as well with multiple elements, and since we want to draw multiple cars, we’re using css here instead.

Finally, at ➍ we use jQuery to append the carElement to the body element of the web page. This final step makes the carElement appear on the page. (For a reminder on how append works, see Creating New Elements with jQuery.)
Testing the drawCar Function
Let’s test the drawCar function to make sure it works. Add this code to your cars.html file (after the other JavaScript code) to create two cars.
$("body").append(carElement);
};
var tesla = new Car(20, 20);
var nissan = new Car(100, 200);
drawCar(tesla);
drawCar(nissan);
</script>
Here, we use the Car constructor to create two car objects, one at the coordinates (20, 20) and the other at (100, 200), and then we use drawCar to draw each of them in the browser. Now when you open cars.html, you should see two car images in your browser window, as shown inFigure 12-2.
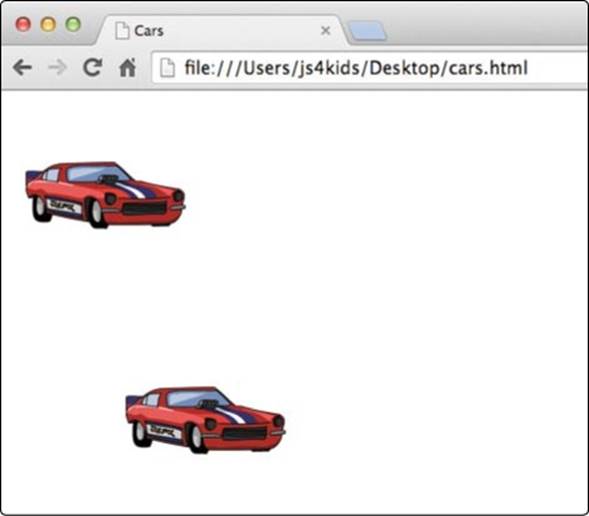
Figure 12-2. Drawing cars using drawCar
Customizing Objects with Prototypes
A more object-oriented way to draw our cars would be to give each car object a draw method. Then, instead of writing drawCar(tesla), you’d write tesla.draw(). In object-oriented programming, we want objects to have their own functionality built in as methods. In this case, thedrawCar function is always meant to be used on car objects, so instead of saving drawCar as a separate function, we should include it as part of each car object.
JavaScript prototypes make it easy to share functionality (as methods) between different objects. All constructors have a prototype property, and we can add methods to it. Any method that we add to a constructor’s prototype property will be available as a method to all objects created by that constructor.
Figure 12-3 shows the syntax for adding a method to a prototype property.
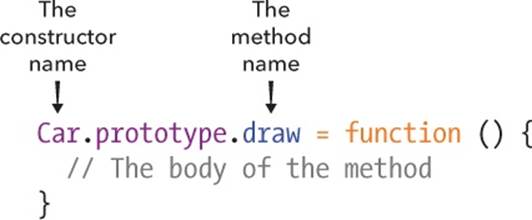
Figure 12-3. The syntax for adding a method to a prototype property
Adding a draw Method to the Car Prototype
Let’s add a draw method to Car.prototype so that all objects we create using Car will have the draw method. Using File ▸ Save As, save your cars.html file as cars2.html. Then replace all of the JavaScript in your second set of <script> tags in cars2.html with this code:
➊ var Car = function (x, y) {
this.x = x;
this.y = y;
};
➋ Car.prototype.draw = function () {
var carHtml = '<img src="http://nostarch.com/images/car.png">';
➌ this.carElement = $(carHtml);
this.carElement.css({
position: "absolute",
➍ left: this.x,
top: this.y
});
$("body").append(this.carElement);
};
var tesla = new Car(20, 20);
var nissan = new Car(100, 200);
tesla.draw();
nissan.draw();
After creating our Car constructor at ➊, we add a new method called draw to Car.prototype at ➋. This makes the draw method part of all of the objects created by the Car constructor.
The contents of the draw method are a modified version of our drawCar function. First, we create an HTML string and save it as carHTML. At ➌ we create a jQuery element representing this HTML, but this time we save it as a property of the object by assigning it to this.carElement. Then at ➍, we use this.x and this.y to set the coordinates of the top-left corner of the current car image. (Inside a constructor, this refers to the new object currently being created.)
When you run this code, the result should look like Figure 12-2. We haven’t changed the code’s functionality, only its organization. The advantage to this approach is that the code for drawing the car is part of the car, instead of a separate function.
Adding a moveRight Method
Now let’s add some methods to move the cars around, beginning with a moveRight method to move the car 5 pixels to the right of its current position. Add the following code after your definition of Car.prototype.draw:
this.carElement.css({
position: "absolute",
left: this.x,
top: this.y
});
$("body").append(this.carElement);
};
Car.prototype.moveRight = function () {
this.x += 5;
this.carElement.css({
left: this.x,
top: this.y
});
};
We save the moveRight method in Car.prototype to share it with all objects created by the Car constructor. With this.x += 5 we add 5 to the car’s x value, which moves the car 5 pixels to the right. Then we use the css method on this.carElement to update the car’s position in the browser.
Try the moveRight method in the browser console. First, refresh cars2.html, and then open the console and enter these lines:
tesla.moveRight();
tesla.moveRight();
tesla.moveRight();
Each time you enter tesla.moveRight, the top car should move 5 pixels to the right. You could use this method in a racing game to show the car moving down the racetrack.
Try moving nissan to the right. How many times do you need to call moveRight on nissan to make it line up with tesla?
Use setInterval and moveRight to animate nissan so that it drives across the browser window.
Adding the Left, Up, and Down move Methods
Now we’ll add the remaining directions to our code so that we can move our cars around the screen in any direction. These methods are basically the same as moveRight, so we’ll write them all at once.
Add the following methods to cars2.html just after the code for moveRight:
Car.prototype.moveRight = function () {
this.x += 5;
this.carElement.css({
left: this.x,
top: this.y
});
};
Car.prototype.moveLeft = function () {
this.x -= 5;
this.carElement.css({
left: this.x,
top: this.y
});
};
Car.prototype.moveUp = function () {
this.y -= 5;
this.carElement.css({
left: this.x,
top: this.y
});
};
Car.prototype.moveDown = function () {
this.y += 5;
this.carElement.css({
left: this.x,
top: this.y
});
};
Each of these methods moves the car by 5 pixels in the specified direction by adding or subtracting 5 from each car’s x or y value.

What You Learned
In this chapter, you learned the basics of object-oriented programming in JavaScript, including how to create constructors to build new objects and how to modify the prototype property of those constructors to share methods between objects.
In object-oriented programs, most functions are written as methods. For example, to draw the car, we call the draw method on the car, and to move the car to the right, we call the moveRight method. Constructors and prototypes are JavaScript’s built-in way of letting you create objects that share the same set of methods, but there are many ways to write object-oriented JavaScript. (For more on object-oriented JavaScript, see Nicholas C. Zakas’s The Principles of Object-Oriented JavaScript [No Starch Press, 2014].)
Writing JavaScript in an object-oriented way can help you structure your code. Having well-structured code means that when you come back to it later to make changes, it should be easier to figure out how your program works if you don’t remember (this is particularly important with bigger programs or when you start to work with other programmers who may need to access your code). For example, in the final project in this book, we’ll build a Snake game that requires quite a bit of code, and we’ll use objects and methods to organize our game and handle a lot of the important functionality.
In the next chapter, we’ll go over how to draw and animate lines and shapes on a web page using the canvas element.
Programming Challenges
Try these challenges to practice working with objects and prototypes.
#1: DRAWING IN THE CAR CONSTRUCTOR
Add a call to the draw method from inside the Car constructor so that car objects automatically appear in the browser as soon as you create them.
#2: ADDING A SPEED PROPERTY
Modify the Car constructor to add a new speed property with a value of 5 to the constructed objects. Then use this property instead of the value 5 inside the movement methods.
Now try out different values for speed to make the cars move faster or slower.
#3: RACING CARS
Modify the moveLeft, moveRight, moveUp, and moveDown methods so they take a single distance argument, the number of pixels to move, instead of always moving 5 pixels. For example, to move the nissan car 10 pixels to the right, you would call nissan.moveRight(10).
Now, use setInterval to move the two cars (nissan and tesla) to the right every 30 milliseconds by a different random distance between 0 and 5. You should see the two cars animate across the screen, jumping along at varying speeds. Can you guess which car will make it to the edge of the window first?