JavaScript for Kids: A Playful Introduction to Programming (2015)
Part I. Fundamentals
Chapter 6. Conditionals and Loops
Conditionals and loops are two of the most important concepts in JavaScript. A conditional says, “If something is true, do this. Otherwise, do that.” For example, if you do your homework, you can have ice cream, but if you don’t do your homework, you don’t get the ice cream. A loopsays, “As long as something is true, keep doing this.” For example, as long as you are thirsty, keep drinking water.
Conditionals and loops are powerful concepts that are key to any sophisticated program. They are called control structures because they allow you to control which parts of your code are executed when and how often they’re executed, based on certain conditions you define.
We first need to go over how to embed JavaScript in our HTML file so we can start creating longer programs than we’ve looked at so far.
Embedding JavaScript in HTML
Here is the HTML file we created in Chapter 5, with additions in color and the existing text in gray. (To make this example a little simpler, I’ve also deleted the link to xkcd.)
<!DOCTYPE html>
<html>
<head>
<title>My first proper HTML page</title>
</head>
<body>
<h1>Hello world!</h1>
<p>My first web page.</p>
<script>
var message = "Hello world!";
console.log(message);
</script>
</body>
</html>
Here we’ve added a new element, called script. This is a special element in HTML. With most HTML elements, the content between the opening and closing tags is displayed on the page. With script, on the other hand, everything between the tags is treated as JavaScript and run by the JavaScript interpreter.
Now let’s look at the code inside the script element:
var message = "Hello world!";
➊ console.log(message);
Running JavaScript in an HTML file is quite different from running it in the console. When you’re using the JavaScript console, each line you type is run as soon as you press ENTER, and the value of that line is printed out to the console. In a web page, the JavaScript is all run from top to bottom at one time, and nothing is automatically printed to the console, unless we tell the browser otherwise. We can use console.log to print things out, which will make it easier to see what’s going on as we run our programs. The console.log method takes any value and prints out, orlogs, that value to the console. For example, if you load the HTML file from the beginning of this section with the JavaScript console open, you’ll see this:
Hello world!
Calling console.log(message) at ➊ caused the string "Hello world!" to be printed to the console.
Now that you know how to write longer programs with JavaScript, you can start learning about conditionals.
Conditionals
There are two forms of conditional statements in JavaScript: if statements and if...else statements. An if statement is used to execute a piece of code if something is true. For example, if you’ve been good, you get a treat. An if...else statement executes one piece of code if something is true and another if not. For example, if you’ve been good, you get a treat; else, you get grounded.
if Statements
The if statement is the simplest of JavaScript’s control structures. It’s used to run code only if a condition is true. Return to your HTML file and replace the two lines inside the script element with this:
➊ var name = "Nicholas";
➋ console.log("Hello " + name);
➌ if (name.length > 7) {
➍ console.log("Wow, you have a REALLY long name!");
}
First, at ➊ we create a variable called name and set its value to the string "Nicholas". Then we use console.log to log the string "Hello Nicholas" at ➋.
At ➌ we use an if statement to check whether the length of name is greater than 7. If it is, the console will display "Wow, you have a REALLY long name!", using console.log at ➍.
As Figure 6-1 shows, an if statement has two main parts: the condition and the body. The condition should be a Boolean value. The body is one or more lines of JavaScript code, which are executed if the condition is true.
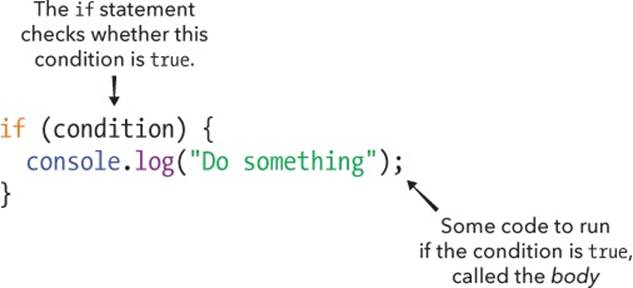
Figure 6-1. The general structure of an if statement
When you load your HTML page with this JavaScript in it, you should see the following in the console:
Hello Nicholas
Wow, you have a REALLY long name!
Because the name Nicholas has eight characters, name.length returns 8. Therefore, the condition name.length > 7 is true, which causes the body of the if statement to be run, resulting in this somewhat startling message being logged. To avoid triggering the if condition, change the name Nicholas to Nick (leaving the rest of the code as is):
var name = "Nick";
Now save the file and reload the page. This time, the condition name.length > 7 is not true, because name.length is 4. That means that the body of the if statement is not run and all that gets printed to the console is this:
Hello Nick
The body of an if statement is executed only if the condition is true. When the condition is false, the interpreter simply skips over the if statement and moves on to the next line.
if...else Statements
As I said before, an if statement will execute its body only if the condition is true. If you want something else to happen when the condition is false, you need to use an if...else statement.
Let’s extend the example from earlier:
var name = "Nicholas";
console.log("Hello " + name);
if (name.length > 7) {
console.log("Wow, you have a REALLY long name!"); }
else {
console.log("Your name isn't very long.");
}
This does the same thing as before, except that if the name isn’t longer than seven characters, it prints out an alternative message.

As Figure 6-2 shows, if...else statements look like if statements, but with two bodies. The keyword else is placed between the two bodies. In an if...else statement, the first body is run if the condition is true; otherwise, the second body is run.

Figure 6-2. The general structure of an if...else statement
Chaining if...else Statements
Often we need to check a sequence of conditions and do something when one of them is true. For example, say you’re ordering Chinese food and you’re choosing what to eat. Your favorite Chinese dish is lemon chicken, so you’ll have that if it’s on the menu. If it’s not, you’ll have beef with black bean sauce. If that’s not on the menu, you’ll have sweet and sour pork. In the rare case that none of those options is available, you’ll have egg fried rice, because you know all the Chinese restaurants you go to will have that.
var lemonChicken = false;
var beefWithBlackBean = true;
var sweetAndSourPork = true;
if (lemonChicken) {
console.log("Great! I'm having lemon chicken!");
} else if (beefWithBlackBean) {
console.log("I'm having the beef.");
} else if (sweetAndSourPork) {
console.log("OK, I'll have the pork.");
} else {
console.log("Well, I guess I'll have rice then.");
}
To create a chain of if...else statements, start with a normal if statement and, after the closing brace of its body, enter the keywords else if, followed by another condition and another body. You can keep doing this until you run out of conditions; there’s no limit to the number of conditions. The final else section will run if none of the conditions is true. Figure 6-3 shows a generic chain of if...else statements.
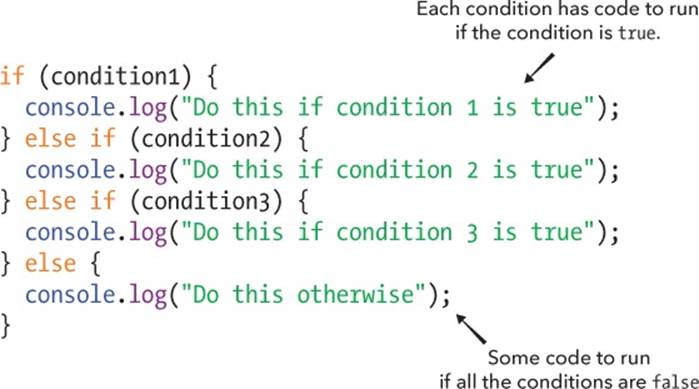
Figure 6-3. Chaining multiple if...else statements
You can read this as follows:
1. If the first condition is true, execute the first body.
2. Otherwise, if the second condition is true, execute the second body.
3. Otherwise, if the third condition is true, execute the third body.
4. Otherwise, execute the else body.
When you have a chain of if...else statements like this with a final else section, you can be sure that one (and only one) of the bodies will be run. As soon as a true condition is found, its associated body is run, and none of the other conditions is checked. If we run the code in the previous example, I'm having the beef will be printed to the console, because beefWithBlackBean is the first condition that’s found to be true in the if...else chain. If none of the conditions is true, the else body is run.

There’s one other thing to note: you don’t necessarily have to include the final else. If you don’t, though, and none of the conditions is true, then nothing inside the if...else chain will be executed.
var lemonChicken = false;
var beefWithBlackBean = false;
var sweetAndSourPork = false;
if (lemonChicken) {
console.log("Great! I'm having lemon chicken!");
} else if (beefWithBlackBean) {
console.log("I'm having the beef.");
} else if (sweetAndSourPork) {
console.log("OK, I'll have the pork.");
}
In this example, we’ve left out the final else section. Because none of your favorite foods is available, nothing gets printed out (and it looks like you’re not going to have anything to eat!).
Write a program with a name variable. If name is your name, print out Hello me!; otherwise, print Hello stranger!. (Hint: Use === to compare name to your name.)
Next, rewrite the program so it’ll say hi to your dad if name is set to your dad’s name or hi to your mom if name is your mom’s name. If it’s neither of them, say Hello stranger! as before.
Loops
As we’ve seen, conditionals allow you to run a piece of code once if a condition is true. Loops, on the other hand, allow you to run a piece of code multiple times, depending on whether a condition remains true. For example, while there’s food on your plate, you should keep eating; or, while you still have dirt on your face, you should keep washing.

while Loops
The simplest kind of loop is a while loop. A while loop repeatedly executes its body until a particular condition stops being true. By writing a while loop, you are saying, “Keep doing this while this condition is true. Stop when the condition becomes false.”
As Figure 6-4 shows, while loops start with the while keyword, followed by a condition in parentheses and then a body in braces.
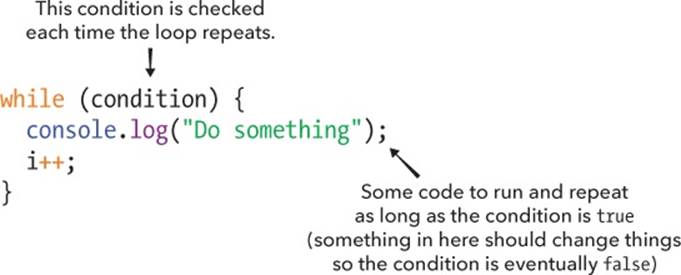
Figure 6-4. The general structure of a while loop
Like an if statement, the body of a while loop is executed if the condition is true. Unlike an if statement, after the body is executed, the condition is checked again, and if it’s still true, the body runs again. This cycle goes on until the condition is false.
Counting Sheep with a while loop
Say you’re having trouble sleeping and you want to count sheep. But you’re a programmer, so why not write a program to count sheep for you?
var sheepCounted = 0;
➊ while (sheepCounted < 10) {
➋ console.log("I have counted " + sheepCounted + " sheep!");
sheepCounted++;
}
console.log("Zzzzzzzzzzz");

We create a variable called sheepCounted and set its value to 0. When we reach the while loop ➊, we check to see whether sheepCounted is less than 10. Because 0 is less than 10, the code inside the braces (the body of the loop) ➋ runs, and "I have counted " + sheepCounted + " sheep!" is logged as “I have counted 0 sheep!” Next, sheepCounted++ adds 1 to the value of sheepCounted, and we go back to the start of the loop, over and over:
I have counted 0 sheep!
I have counted 1 sheep!
I have counted 2 sheep!
I have counted 3 sheep!
I have counted 4 sheep!
I have counted 5 sheep!
I have counted 6 sheep!
I have counted 7 sheep!
I have counted 8 sheep!
I have counted 9 sheep!
Zzzzzzzzzzz
This repeats until sheepCounted becomes 10, at which point the condition becomes false (10 is not less than 10), and the program moves on to whatever comes after the loop. In this case, it prints Zzzzzzzzzzz.
Preventing Infinite Loops
Keep this in mind when you’re using loops: if the condition you set never becomes false, your loop will loop forever (or at least until you quit your browser). For example, if you left out the line sheepCounted++;, then sheepCounted would remain 0, and the output would look like this:
I have counted 0 sheep!
I have counted 0 sheep!
I have counted 0 sheep!
I have counted 0 sheep!
...
Because there’s nothing to stop it, the program would keep doing this forever! This is called an infinite loop.
for Loops
for loops make it easier to write loops that create a variable, loop until a condition is true, and update the variable at the end of each turn around the loop. When setting up a for loop, you create a variable, specify the condition, and say how the variable should change after each cycle—all before you reach the body of the loop. For example, here’s how we could use a for loop to count sheep:
for (var sheepCounted = 0; sheepCounted < 10; sheepCounted++) {
console.log("I have counted " + sheepCounted + " sheep!");
}
console.log("Zzzzzzzzzzz");
As Figure 6-5 shows, there are three parts to this for loop, separated by semicolons: the setup, condition, and increment.
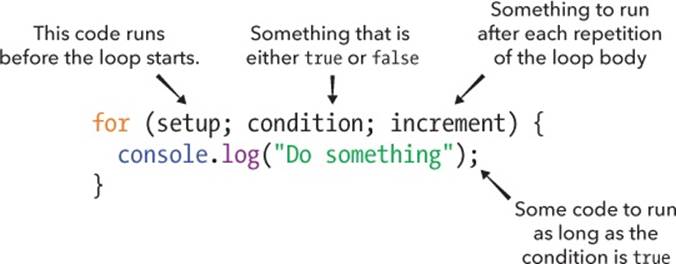
Figure 6-5. The general structure of a for loop
The setup (var sheepCounted = 0) is run before the loop starts. It’s generally used to create a variable to track the number of times the loop has run. Here we create the variable sheepCounted with an initial value of 0.
The condition (sheepCounted < 10) is checked before each run of the loop body. If the condition is true, the body is executed; if it’s false, the loop stops. In this case, the loop will stop once sheepCounted is no longer less than 10.
The increment (sheepCounted++) is run after every execution of the loop body. It’s generally used to update the looping variable. Here, we use it to add 1 to sheepCounted each time the loop runs.
for loops are often used to do something a set number of times. For example, this program will say Hello! three times.
var timesToSayHello = 3;
for (var i = 0; i < timesToSayHello; i++) {
console.log("Hello!");
}
Here is the output:
Hello!
Hello!
Hello!
If we were the JavaScript interpreter running this code, we would first create a variable called timesToSayHello and set it to 3. When we reach the for loop, we run the setup, which creates a variable i and sets it to 0. Next, we check the condition. Because i is equal to 0 andtimesToSayHello is 3, the condition is true, so we enter the loop body, which simply outputs the string "Hello!". We then run the increment, which increases i to 1.
Now we check the condition again. It’s still true, so we run the body and increment again. This happens repeatedly until i is equal to 3. At this point, the condition is false (3 is not less than 3), so we exit the loop.
Using for Loops with Arrays and Strings
One very common use of for loops is to do something with every element in an array or every character in a string. For example, here is a for loop that prints out the animals in a zoo:
var animals = ["Lion", "Flamingo", "Polar Bear", "Boa Constrictor"];
for (var i = 0; i < animals.length; i++) {
console.log("This zoo contains a " + animals[i] + ".");
}
In this loop, i starts at 0 and goes up to one less than animals.length, which in this case is 3. The numbers 0, 1, 2, and 3 are the indexes of the animals in the animals array. This means that every time around the loop, i is a different index, and animals[i] is another animal from theanimals array. When i is 0, animals[i] is "Lion". When i is 1, animals[i] is "Flamingo", and so on.
Running this would output:
This zoo contains a Lion.
This zoo contains a Flamingo.
This zoo contains a Polar Bear.
This zoo contains a Boa Constrictor.

As you saw in Chapter 2, you can access individual characters in a string in the same way you can access individual elements in an array, using square brackets. This next example uses a for loop to print out the characters in a name:
var name = "Nick";
for (var i = 0; i < name.length; i++) {
console.log("My name contains the letter " + name[i] + ".");
}
This would output:
My name contains the letter N.
My name contains the letter i.
My name contains the letter c.
My name contains the letter k.
Other Ways to use for Loops
As you might imagine, you don’t always have to start the looping variable at 0 and increment it by 1. For example, here’s a way to print all the powers of 2 below the number 10,000:
for (var x = 2; x < 10000; x = x * 2) {
console.log(x);
}
We set x to 2 and increment the value of x using x = x * 2;, which will double the value of x each time the loop runs. The result gets big very quickly, as you can see:
2
4
8
16
32
64
128
256
512
1024
2048
4096
8192
And voilà! This short for loop prints out all the powers of 2 below 10,000.
Write a loop to print the powers of 3 under 10,000 (it should print 3, 9, 27, etc.).
Rewrite this loop with a while loop. (Hint: Provide the setup before the loop.)
What You Learned
In this chapter, you learned about conditionals and loops. Conditionals are used to run code only when a certain condition is true. Loops are used to run code multiple times and to keep running that code as long as a certain condition is true. You can use conditionals to make sure that the right code is run at the right time, and you can use loops to keep your program running as long as necessary. Having the ability to do these two things opens up a whole new world of programming possibilities.
In the next chapter, we’ll use the power of conditionals and loops to make our first real game!
Programming Challenges
Try out these challenges to practice working with conditionals and loops.
#1: AWESOME ANIMALS
Write a for loop that modifies an array of animals, making them awesome! For example, if your starting array is . . .

var animals = ["Cat", "Fish", ![]()
"Lemur", "Komodo Dragon"];
then after you run your loop, it should look like this:
["Awesome Cat", "Awesome Fish", "Awesome Lemur", "Awesome ![]()
Komodo Dragon"]
Hint: You’ll need to reassign values to the array at each index. This just means assigning a new value at an existing position in the array. For example, to make the first animal awesome, you could say:
animals[0] = "Awesome " + animals[0];
#2: RANDOM STRING GENERATOR
Make a random string generator. You’ll need to start with a string containing all the letters in the alphabet:
var alphabet = "abcdefghijklmnopqrstuvwxyz";
To pick a random letter from this string, you can update the code we used for the random insult generator in Chapter 3: Math.floor(Math.random() * alphabet.length). This will create a random index into the string. You can then use square brackets to get the character at that index.
To create the random string, start with an empty string (var randomString = ""). Then, create a while loop that will continually add new random letters to this string, as long as the string length is less than 6 (or any length you choose). You could use the += operator to add a new letter to the end of the string. After the loop has finished, log it to the console to see your creation!
#3: H4CK3R SP34K
Turn text into h4ck3r sp34k! A lot of people on the Internet like to replace certain letters with numbers that look like those letters. Some numbers that look like letters are 4 for A, 3 for E, 1 for I, and 0 for O. Even though the numbers look more like capital letters, we’ll be replacing the lowercase versions of those letters. To change normal text to h4ck3r sp34k, we’ll need an input string and a new empty string:
var input = "javascript is awesome";
var output = "";
You’ll then need to use a for loop to go through all the letters of the input string. If the letter is "a", add a "4" to the output string. If it’s "e", add a "3". If it’s "i", add a "1", and if it’s "o", add a "0". Otherwise, just add the original letter to the new string. As before, you can use += to add each new letter to the output string.
After the loop, log the output string to the console. If it works correctly, you should see it log "j4v4scr1pt 1s 4w3s0m3".
All materials on the site are licensed Creative Commons Attribution-Sharealike 3.0 Unported CC BY-SA 3.0 & GNU Free Documentation License (GFDL)
If you are the copyright holder of any material contained on our site and intend to remove it, please contact our site administrator for approval.
© 2016-2026 All site design rights belong to S.Y.A.