MEAN Machine - A beginner's practical guide to the JavaScript stack (2015)
Node Authentication
In this chapter, we will implement a good basis of authentication for our application. It is important to note that there are multiple ways of implementing authentication and that will all be based on a case-by-case basis of what type of application you are building, who will be accessing your data, and many other factors.
However, even though there can be many ways to implement authentication, there will be a foundation that is widely used and that is token based authentication. Using this type of authentication for our application from the start ensures that it will be protected no matter how large it grows.
The main benefits of tokens are:
· Stateless and scalable servers
· Mobile application ready
· Pass authentication to other applications (think OAuth through Facebook third-party applications)
· Extra security as compared to other authentication methods
Let’s talk a bit on authentication and why we should use token based authentication.
Why Token Based Authentication Came to Be?
Token based authentication has been used across the web for many services that we use on a daily basis. When a service provides us with an API to access their data, it is usually authenticated using tokens. Take Facebook’s API for example. We need to authenticate with Facebook (the first time with username and password) and then we are given a token for future authentication. Every request after that for a given time will only need the token and not our username and password. We’ll talk more on the logistics of this, but keep in mind that many other services including GitHub, Google+, and Twitter (among many more) use tokens for authentication.
Server Based Authentication (Traditional Method)
Before we can talk about why tokens came about for authentication, let’s look at how the norm for authentication used to work.
Since the HTTP protocol is stateless, if we authenticate a user with a username and password, then on the next request, our application won’t know who we are. We would have to authenticate again.
The traditional way of having our applications remember who we are is to store the user logged in information on the server. This can be done in a few different ways on the session, usually in memory or stored on the disk.
Here is a graph of how a server based authentication workflow would look:
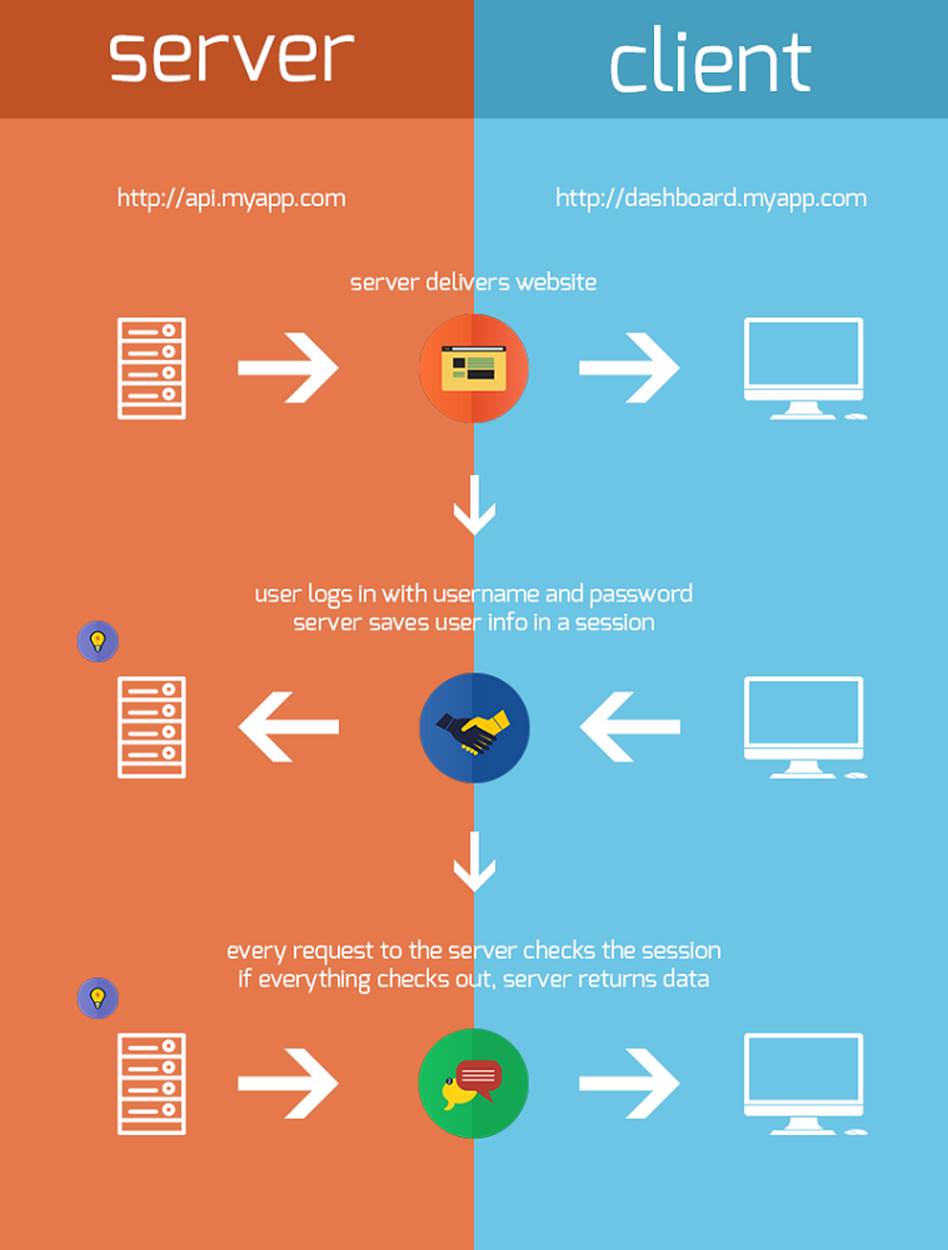
Server Based Authentication
As the web, applications, and the rise of the mobile applications have come about, this method of authentication has shown problems, especially in scalability.
The Problems with Server Based Authentication
A few major problems arose with this method of authentication.
Sessions: Every time a user is authenticated, the server will need to create a record somewhere on our server. This is usually done in memory and when there are many users authenticating, the overhead on your server increases.
Scalability: Since sessions are stored in memory, this provides problems with scalability. As our cloud providers start replicating servers to handle application load, having vital information in session memory will limit our ability to scale.
CORS: As we want to expand our application to let our data be used across multiple mobile devices, we have to worry about cross-origin resource sharing (CORS). When using AJAX calls to grab resources from another domain (mobile to our API server), we could run into problems with forbidden requests.
CSRF: We will also have protection against cross-site request forgery (CSRF). Users are susceptible to CSRF attacks since they can already be authenticated with say a banking site and this could be taken advantage of when visiting other sites.
With these problems, scalability being the main one, it made sense to try a different approach.
How Token Based Authentication Works
Token based authentication is stateless. We are not storing any information about our user on the server or in a session.
This concept alone takes care of many of the problems with having to store information on the server.
No session information means your application can scale and add more machines as necessary without worrying about where a user is logged in.
Although this implementation can vary, the gist of it is as follows:
1. User Requests Access with Username / Password
2. Application validates credentials
3. Application provides a signed token to the client
4. Client stores that token and sends it along with every request
5. Server verifies token and responds with data
Every single request after the first will require the token. This token should be sent in the HTTP header so that we keep with the idea of stateless HTTP requests. We will also need to set our server to accept requests from all domains using Access-Control-Allow-Origin: *. What’s interesting about designating * in the ACAO header is that it does not allow requests to supply credentials like HTTP authentication, client-side SSL certificates, or cookies.
Here’s an infographic to explain the process:
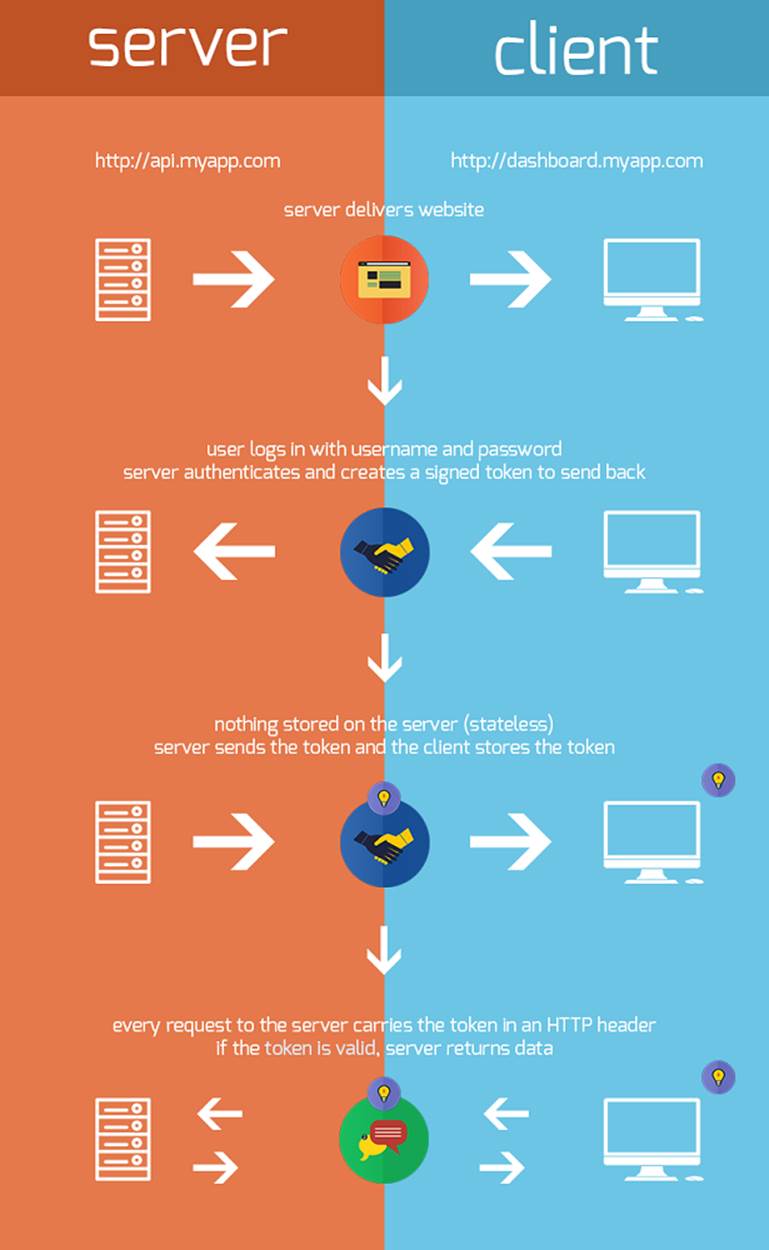
Token Based Authentication
Once we have authenticated with our information and we have our token, we are able to do several things with this token.
We could even create a permission based token and pass this along to a third-party application (say a new mobile app we want to use), and they will be able to have access to our data — but only the information that we allowed with that specific token.
The Benefits of Tokens
Stateless and Scalable
Tokens are stored on client side. Completely stateless, and ready to be scaled. Our load balancers are able to pass a user along to any of our servers since there is no state or session information anywhere.
If we were to keep session information for a user that was logged in, this would require us to keep sending that user to the same server that they logged in at (called session affinity).
This brings problems since, some users would be forced to the same server and this could bring about a spot of heavy traffic.
Not to worry though! Those problems are gone with tokens since the token itself holds the data for that user.
Security
The token, not a cookie, is sent on every request and since there is no cookie being sent, this helps to prevent CSRF attacks. Even if your specific implementation stores the token within a cookie on the client side, the cookie is merely a storage mechanism instead of an authentication one. There is no session based information to manipulate since we don’t have a session!
The token also expires after a set amount of time, so you will be required to login once again. This helps us stay secure.
Extensibility (Friend of A Friend and Permissions)
Tokens will allow us to build applications that share permissions with another. For example, we have linked random social accounts to our major ones like Facebook or Twitter.
When we login to Twitter through a service (let’s say Buffer), we are allowing Buffer to post to our Twitter stream.
By using tokens, this is how we provide selective permissions to third-party applications. We could even build our own API and hand out special permission tokens if our users wanted to give access to their data to another application.
Multiple Platforms and Domains
We talked a bit about CORS earlier. When our application and service expands, we will need to be providing access to all sorts of devices and applications (since our app will most definitely become popular!).
Having our API just serve data, we can also make the design choice to serve assets from a CDN. This eliminates the issues that CORS brings up. Our data and resources are available as long as a user has a valid token.
Standards Based
When creating the token, we will be using standards-based JSON Web Tokens. This handy debugger and library chart created by Auth0 shows the support for JSON Web Tokens. You can see that it has a great amount of support across a variety of languages. This means you could actually switch out your authentication mechanism if you choose to change backend programming languages in the future!
Now that we’ve gotten a good foundation of token based authentication, let’s get closer to implementing it by examining the method of implementation.
JSON Web Tokens
JSON Web Tokens (JWT), pronounced “jot”, are a standard since the information they carry is transmitted via JSON. We can read more about the draft here, but that explanation isn’t the most pretty to look at.
JSON Web Tokens work across different programming languages: JWTs work in .NET, Python, Node.js, Java, PHP, Ruby, Go, JavaScript, and Haskell. So you can see that these can be used in many different scenarios.
JWTs are self-contained: They will carry all the information necessary within itself. This means that a JWT will be able to transmit basic information about itself, a payload (usually user information), and a signature.
JWTs can be passed around easily: Since JWTs are self-contained, they are perfectly used inside an HTTP header when authenticating an API. You can also pass it through the URL.
What does a JWT look like?
A JWT is easy to identify. It is three strings separated by .
For example:
1 aaaaaaaaaa.bbbbbbbbbbb.cccccccccccc
Let’s break down the 3 parts and see what each contains.
Breaking Down a JSON Web Token
Since there are 3 parts separated by a ., each section is created differently. We have the 3 parts which are:
· header
· payload
· signature

JSON Web Token Overview
Header
The header carries 2 parts:
· declaring the type, which is JWT
· the hashing algorithm to use (HMAC SHA256 in this case)
Here’s an example:
1 {
2 "typ": "JWT",
3 "alg": "HS256"
4 }
Now once this is base64encode, we have the first part of our JSON web token!
1 eyJhbGciOiJIUzI1NiIsInR5cCI6IkpXVCJ9
Payload
The payload will carry the bulk of our JWT, also called the JWT Claims. This is where we will put the information that we want to transmit as well as other information about our token.
There are multiple claims that we can provide. This includes registered claim names, public claim names, and private claim names.
Registered Claims
Claims that are not mandatory whose names are reserved for us. These include:
· iss: The issuer of the token
· sub: The subject of the token
· aud: The audience of the token
· exp: This will probably be the registered claim most often used. This will define the expiration in NumericDate value. The expiration MUST be before the current date/time.
· nbf: Defines the time before which the JWT MUST NOT be accepted for processing
· iat: The time the JWT was issued. Can be used to determine the age of the JWT
· jti: Unique identifier for the JWT. Can be used to prevent the JWT from being replayed. This is helpful for a one time use token.
Public Claims
These are the claims that we create ourselves like user name, information, and other important information.
Private Claims
A producer and consumer may agree to use claim names that are private. These are subject to collision, so use them with caution.
Example Payload
Our example payload has two registered claims (iss, and exp) and two public claims (name, admin).
1 {
2 "iss": "scotch.io",
3 "exp": 1300819380,
4 "name": "Chris Sevilleja",
5 "admin": true
6 }
This will encode to:
1 eyJpc3MiOiJzY290Y2guaW8iLCJleHAiOjEzMDA4MTkzODAsIm5hbWUiOiJDaHJpcyBTZXZpbGxlamEi\
2 LCJhZG1pbiI6dHJ1ZX0
That will be the second part of our JSON Web Token.
Signature
The third and final part of our JSON Web Token is going to be the signature. This signature is made up of a hash of the following components:
· the header
· the payload
· secret
· The token is sent on every request so there are no CSRF attacks. There is no session based information to manipulate since, well, we don’t have a session!
This is how we get the third part of the JWT:
1 var encodedString = base64UrlEncode(header) + "." + base64UrlEncode(payload);
2
3 HMACSHA256(encodedString, 'secret');
The secret is the signature held by the server. This is the way that our server will be able to verify existing tokens and sign new ones. This is the only thing that our server holds in order to verify the user.
This gives us the final part of our JWT.
1 03f329983b86f7d9a9f5fef85305880101d5e302afafa20154d094b229f75773
Now we have our full JSON Web Token:
1 eyJhbGciOiJIUzI1NiIsInR5cCI6IkpXVCJ9.eyJpc3MiOiJzY290Y2guaW8iLCJleHAiOjEzMDA4MTk\
2 zODAsIm5hbWUiOiJDaHJpcyBTZXZpbGxlamEiLCJhZG1pbiI6dHJ1ZX0.03f329983b86f7d9a9f5fef\
3 85305880101d5e302afafa20154d094b229f75773
Auth0 has created a great site to go through and test out how JWTs are made. You can see as you change the content on the fly, you are able to see the JWT get updated immediately. Auth0 provides great tools and they also maintain the jsonwebtoken Node package to handle creating and verifying JWTs in Node.
With an understanding of both token based authentication and the mechanism to handle authentication, JSON Web Tokens, let’s see how we can implement both of these into our Node API that we just built.
Authenticating Our Node.js API
Here is a quick overview of what we will want for our API. Keep in mind that this sort of layout could be used for many types of applications. We can have websites where the unauthenticated routes are the front facing routes of the site and the authenticated are the backend admin sections.
For this next part, we will want:
· A basic route (home page), which will be (unauthenticated)
· Only API routes are authenticated
· Route used to authenticate a user (login)
· Pass in the token to have working auth
Setting Up
We’ll be using the application we created in Chapter 9. It has everything we need since it is an API and we want to use tokens to implement authentication into an API.
The main things we will want to do are:
· Set up an authentication route to check a user and make sure they have the correct password
· Give a user a token if they authenticate with the right username and password
· Authenticate the API routes (but not the basic home page route)
Let’s get started with the authentication. Get the app you created from Chapter 9. We will need to install the Node jsonwebtoken package so that we will be able to create and verify tokens.
1 npm install jsonwebtoken --save
Since we already have a package.json file from Chapter 9, this command will keep the packages we already have and add jsonwebtoken to the list of dependencies.
Grab the JSON Web Token Package
Let’s go ahead and grab the jsonwebtoken package in our server.js file like so:
1 var jwt = require('jsonwebtoken');
Create a Secret to Create Tokens With
As we learned, part of our JWT is made using a secret. We will create a variable so that we can use this string as the secret.
1 var superSecret = 'ilovescotchscotchyscotchscotch';
With the package that we need and secret ready to go, let’s move onto authenticating a user.
Create a Sample User
First, we need to make sure that we even have a user to authenticate since towards the end of last chapter, we deleted everyone. Let’s create the user using the POST http://localhost:8080/api/users route we created in our API to add a user to our database.
We will send a POST request with the following information:
Name Chris Username chris Password supersecret
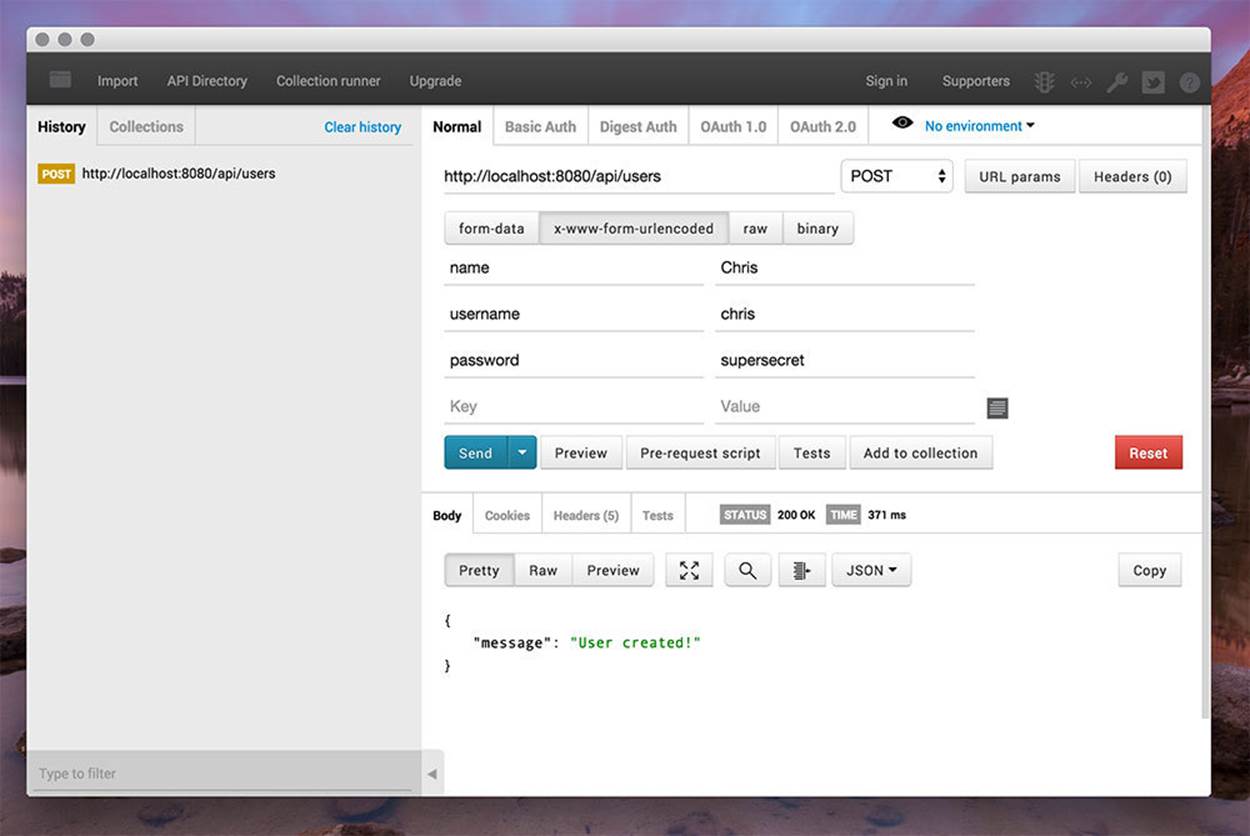
Create Sample User
Since there is no authentication yet, the user will be created just fine. Now that we have our user, let’s create the authentication mechanism for him to sign in and get a token.
Authenticating A User and Giving a Token
We will create a new route inside of our API routes called POST http://localhost/api/authenticate. This is where a user will send POST request with username and password. If both of those check out, they will receive a token so that they can have access the information from our API.
The order of how we create our routes is important here. We don’t want this authenticate route to be protected by our authentication middleware, so it will be placed before the middleware that we created in Chapter 9. Here is a look at its placement:
1 // basic route for the home page
2 app.get('/', ...
3
4 // get an instance of the express router
5 var apiRouter = express.Router();
6
7 // route for authenticating users
8 apiRouter.post('/authenticate', ...
9
10 // middleware to use for all requests
11 apiRouter.use(function(req, res, next) ...
12
13 // other api routes. the authenticated routes
14 apiRouter.get('/', ...
Inside of the apiRouter.post('/authenticate', ... route is where we will be creating the JSON Web Token and returning it to our user.
Let’s create the route to authenticate our user. We will:
· Check to make sure a user with that username exists
· Check to make sure that the user has the correct password (by comparing their password to the hashed one saved in the database)
· Create a token if all is well
1 // route to authenticate a user (POST http://localhost:8080/api/authenticate)
2 apiRouter.post('/authenticate', function(req, res) {
3
4 // find the user
5 // select the name username and password explicitly
6 User.findOne({
7 username: req.body.username
8 }).select('name username password').exec(function(err, user) {
9
10 if (err) throw err;
11
12 // no user with that username was found
13 if (!user) {
14 res.json({
15 success: false,
16 message: 'Authentication failed. User not found.'
17 });
18 } else if (user) {
19
20 // check if password matches
21 var validPassword = user.comparePassword(req.body.password);
22 if (!validPassword) {
23 res.json({
24 success: false,
25 message: 'Authentication failed. Wrong password.'
26 });
27 } else {
28
29 // if user is found and password is right
30 // create a token
31 var token = jwt.sign({
32 name: user.name,
33 username: user.username
34 }, superSecret, {
35 expiresInMinutes: 1440 // expires in 24 hours
36 });
37
38 // return the information including token as JSON
39 res.json({
40 success: true,
41 message: 'Enjoy your token!',
42 token: token
43 });
44 }
45
46 }
47
48 });
49 });
This route does the main things that we need it to do: check if the user with that username exists, make sure that the password is correct using the comparePassword method we created in Chapter 9 on our User model, and create a token.
We are using the jwt (jsonwebtoken) package to sign the token. This package will automatically generate the header and the signature of our JWT when we pass in the payload, which in this case is our user.
Now, when we try to authenticate a user using the credentials we used earlier with a POST request to http://localhost:8080/api/authenticate along with the information we used to create a user (chris/supersecret), we will be given the token back!

Authenticate User and Get a Token
We can also test our authentication route with the wrong username:
Authenticate Wrong Username
And here it is with the wrong password:
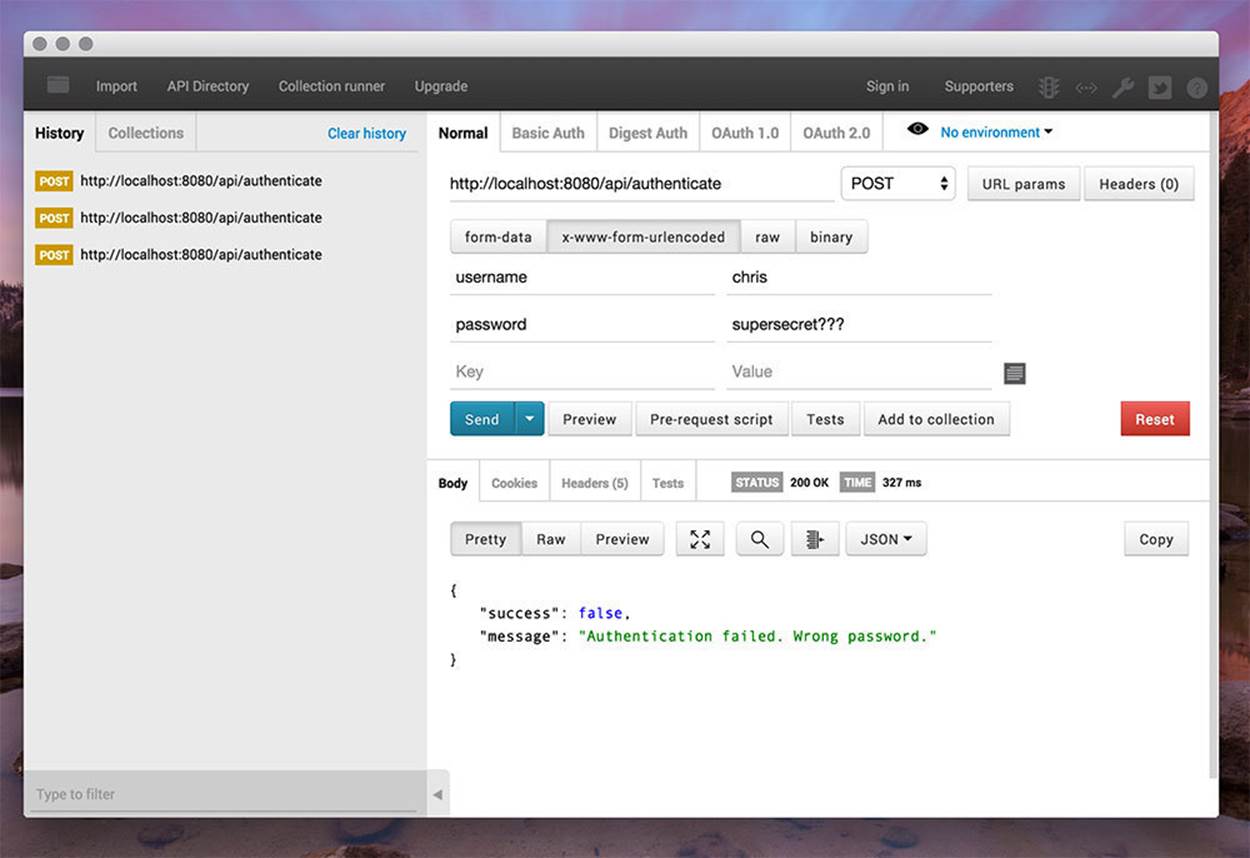
Authenticate Wrong Password
Now that we have given our user the token, it will be up to them to hold the token on the client side (probably in a cookie). They will then send that token to us on every request where they would like to get information. Let’s look at how we can check that token on every request to make sure that it is a valid token.
Route Middleware to Protect API Routes
We will use the middleware that we already put in place (apiRoutes.use(function())) to check the token on every request for our authenticated routes.
We will create a flexible API by allowing a user to pass the token via POST parameters, the URL parameters, or as an HTTP header. We will verify the token and if the token is good, we will pass the user along to their original destination and give them the information they requested.
Here is that middleware for verifying the token:
1 // route middleware to verify a token
2 apiRouter.use(function(req, res, next) {
3
4 // check header or url parameters or post parameters for token
5 var token = req.body.token || req.param('token') || req.headers['x-access-toke\
6 n'];
7
8 // decode token
9 if (token) {
10
11 // verifies secret and checks exp
12 jwt.verify(token, superSecret, function(err, decoded) {
13 if (err) {
14 return res.status(403).send({
15 success: false,
16 message: 'Failed to authenticate token.'
17 });
18 } else {
19 // if everything is good, save to request for use in other routes
20 req.decoded = decoded;
21
22 next();
23
24 }
25 });
26
27 } else {
28
29 // if there is no token
30 // return an HTTP response of 403 (access forbidden) and an error message
31 return res.status(403).send({
32 success: false,
33 message: 'No token provided.'
34 });
35
36 }
37
38 // next() used to be here
39 });
We are using the jsonwebtoken package again, but this time we are going to verify the token that was passed in. It is important that our secret used here matches the secret that was used to create the token.
If everything looks good and the token was able to be verified, we’ll take the information that came out of the token and pass it to the other routes in the req object.
If there is no token, we will want to send an HTTP status of 403 which means access forbidden. We will also send the message that the token was not provided.
We have moved the next() to be in the if/else statement so that our user will only continue forward if they have a token and it verified correctly.
Testing Our Route Middleware
Now that we have built out the middleware that is responsible for protecting all the routes that follow it, let’s test what we’ve just made to make sure that it works properly.
Here is an attempt at trying to reach the main API route without passing in any authentication:
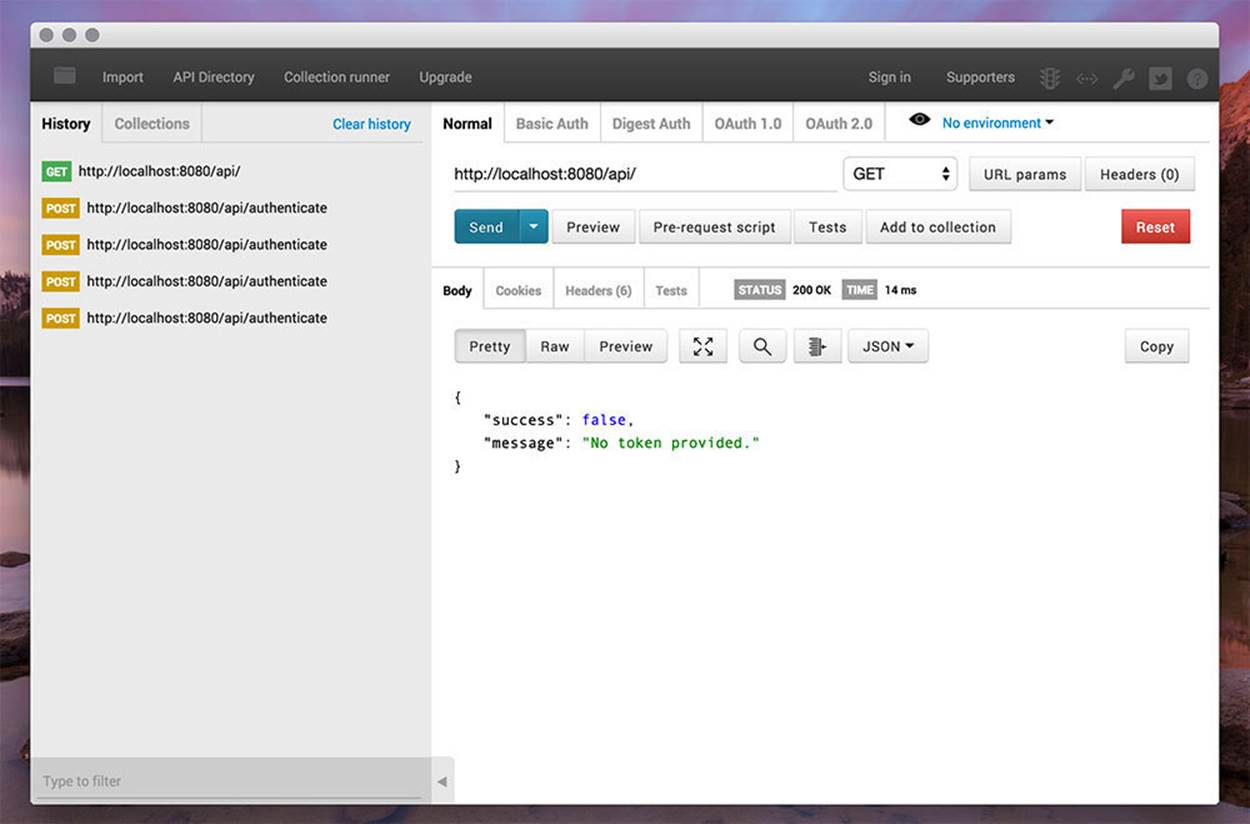
No Token Provided
Now let’s pass in a token through the HTTP Headers as x-access-token:
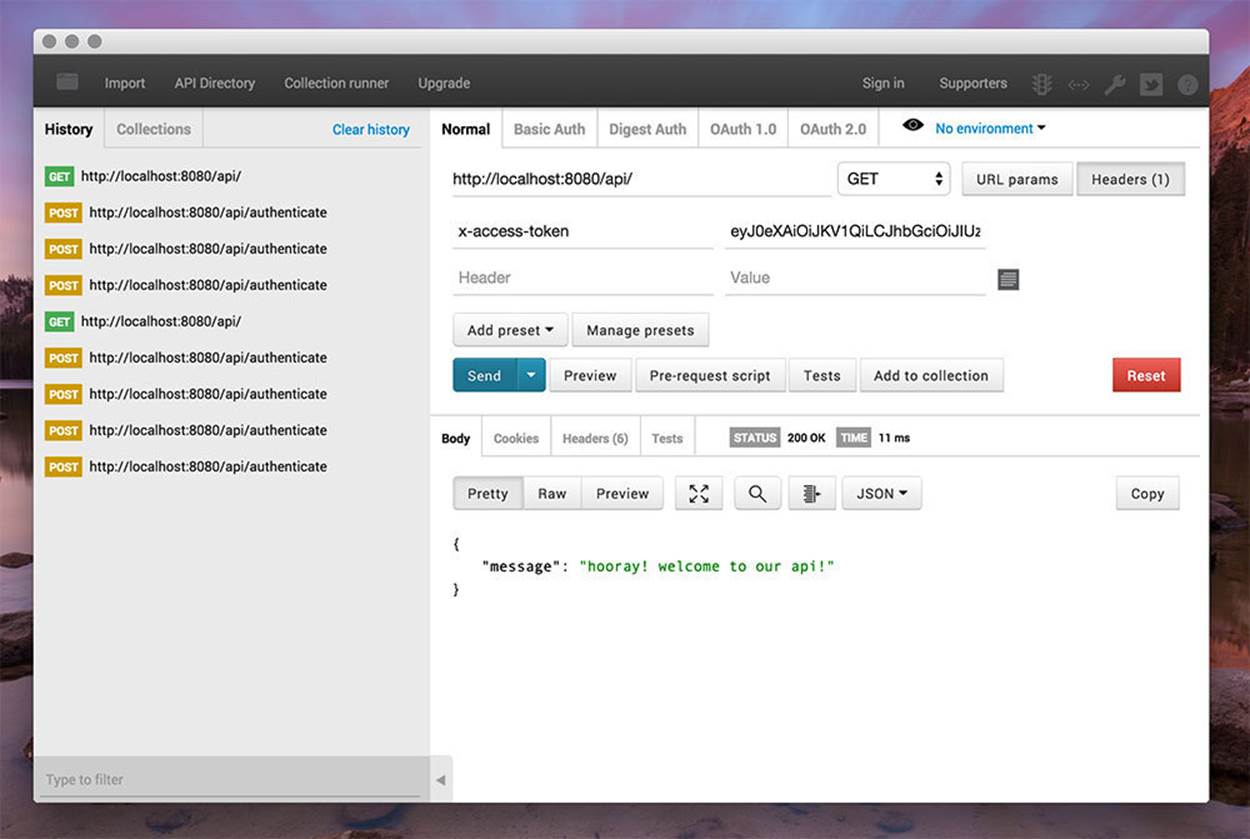
Token Passed Through HTTP Header
We can also pass the token in as a URL parameter like so: http://localhost:8080/api/users?token=eyJ0eXAiOiJKV1QiLCJhbGciOiJIUzI1NiJ9.eyJwYXNzd29yZCI6IiQyYSQxMCRyZ3JhdXB6c0RaSGJZNzdDUVNJbkh1WjkwUld2cS9OV3NpMGtPdWVlUGV0cVVCdmoyLmpLYSIsInVzZXJuYW1lIjoiY2hyaXMiLCJuYW1lIjoiQ2hyaXMiLCJfaWQiOiI1NDgxZTI2ZTkzYjliYmE3MTcxYmZkNWUiLCJfX3YiOjB9.fKBuDM0J1jpiAKfkPpr_b_NS6io8U4srLGuvEAfRhJg
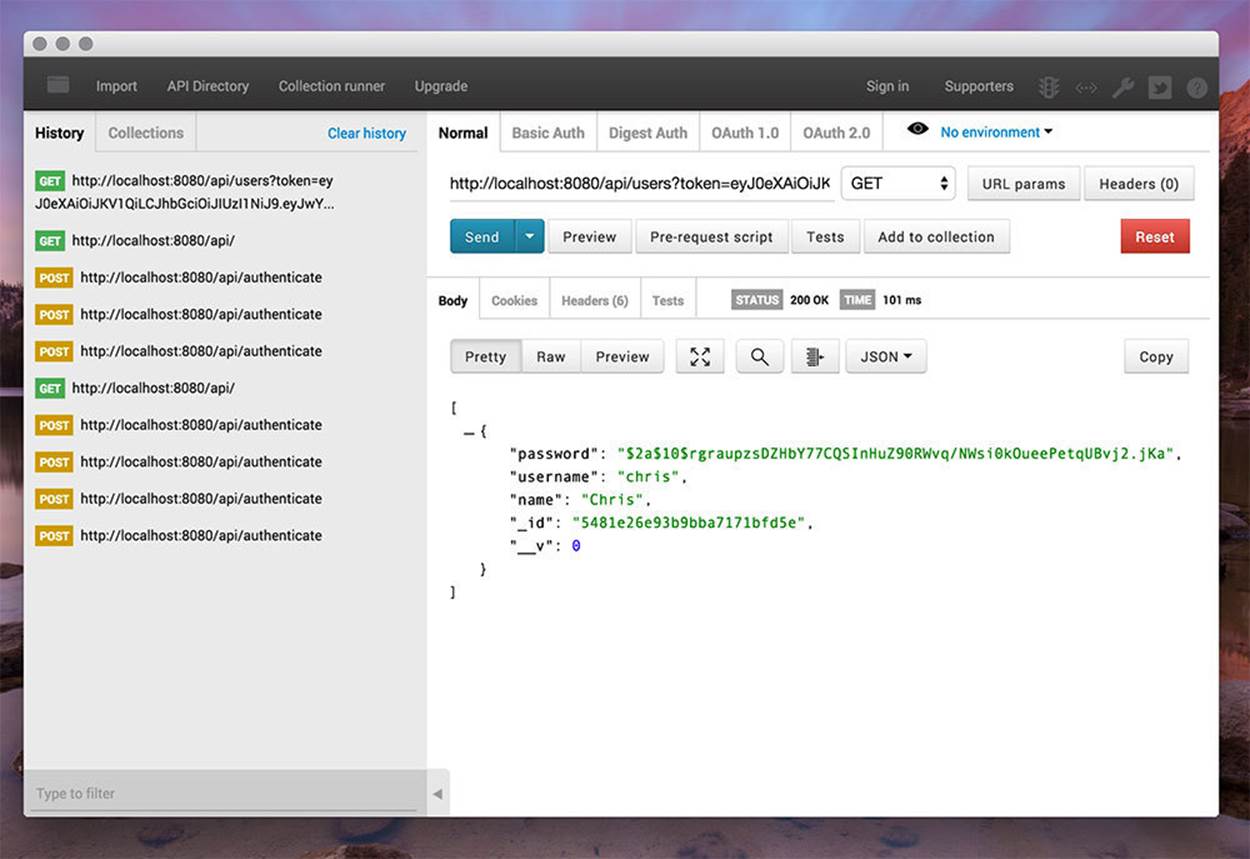
Token Passed Through URL Parameter
Route to Get User Information
Let’s quickly add one more route to our API so that we can return a user’s information.
We will call this endpoint (GET http://localhost:8080/api/me) and this will allow us to get information about the logged in user.
After all our other apiRouter routes, let’s define the following:
1 // api endpoint to get user information
2 apiRouter.get('/me', function(req, res) {
3 res.send(req.decoded);
4 });
Remember in our middleware, we stored the logged in user in req.decoded for use in the other routes. Now we’ll just grab that information and return it. We’ll see how this is useful in the future Angular chapters when we want to display a logged in user’s name in a message (something likeHello Chris!).
Modules to Help with Authentication
Now that we have built all of this from scratch ourselves, it’s important to note that there are Node modules out there to help handle authentication for us. It is good to understand the basics by building security ourselves, but it also can help to have modules that are built by teams of people and make sure that security is solid.
For handling authentication in Node, you won’t find a better package than PassportJS. This allows us to integrate authentication on our server with session based security, social based authentication, and what we’ve done in this chapter, JWT security.
There is even a package to handle checking the JWT and protecting routes called express-jwt. This package creates a middleware for us so that we don’t have to. It will allow us to set protected and unprotected routes.
Conclusion
Now we have an API with token authentication! Just like the big companies like Facebook, Google, Twitter, and GitHub! Well not exactly like them since they implement more features like user specific permissions, group permissions, and many more advanced features, but this is the foundation of it.
Remember that security is a very important part of our applications and protecting our users’ information should be top priority. Keep in mind that this is only just the beginning of security and that security is always evolving to guard from new and old attacks.
This API will be used to hand data to our frontend AngularJS application. By doing so, we are once again adhering to the notion that our backend and frontend are both separate, yet work together to create amazing experiences.
All materials on the site are licensed Creative Commons Attribution-Sharealike 3.0 Unported CC BY-SA 3.0 & GNU Free Documentation License (GFDL)
If you are the copyright holder of any material contained on our site and intend to remove it, please contact our site administrator for approval.
© 2016-2026 All site design rights belong to S.Y.A.